Close
0%
0%

8051 tuner

A 3-octave tone generator using an 8051 MCU

Similar projects worth following
A project to learn the 8051, SDCC, and I2C.

So moving on from my 8048 adventures, I'm going to do something with my 8051 MCU chips.

For these there is an abundance of information on this family of MCUs as it's still in production but mainly as derivatives in many variants. It's probably the most long-lived MCU family and is still beloved. It's not hard to see why. Intel took the lessons it learnt from the 8048 MCU family and added more useful features. One of the most prominent is the set of bit manipulation instructions that work on single bits in special function registers (SFRs) or low memory, very useful for device control. It's estimated that these contribute to about 30% improvement in code density. These MCUs can support a high level language like C making them easier to program.

In this project I'm also going to learn to use Small Device C Compiler and the I2C protocol, the latter because it's used for communication with a 16 character x 2 line LCD panel. I hope that's not too much new tech for me to bite off in one project.

I will be summarising major accomplishments in these details, but the running story will be in the logs.

Goals

The tuner itself isn't very practical. It really should be called an equal tempered 3 octave tone generator (but that's a mouthful) using the timers of the 8051. The name is from the tuning forks used to calibrate musical instruments. Tuner apps on smartphones e.g. for guitars, do far more, even tell you how much you are off and which direction to tune the string. In fact instead of requiring the human to compare the square wave output of this tuner with the instrument's sound, why not analyse the frequency of the instrument and tell the user what to do to tune it?

It really is an excuse for me to learn several things:

About the last item, there are two main varieties of displays sold on the Internet, those that are driven with a parallel interface, and those driven with serial interface. In the latter case there is a piggyback board at the back of the display carrying a chip that accepts I2C/TWI input and presents the bytes to the LCD driver chip which implements the old Hitachi HD44780 controller protocol. In software the drivers are layered, the display library presents a display interface which at the lowest level sends out commands and data using the I2C protocol.

I prefer the serial displays as these use less pins than parallel displays. The extra cost of the piggyback board is only a dollar or two.

The MCU board

I got the MCU circuit working on my breadboard after some adventures, recounted in the project logs. Here is a photo taken of it driving the TM1637 display from my previous 8042 clock project which has a simpler interface and whose protocol I'm familiar with.
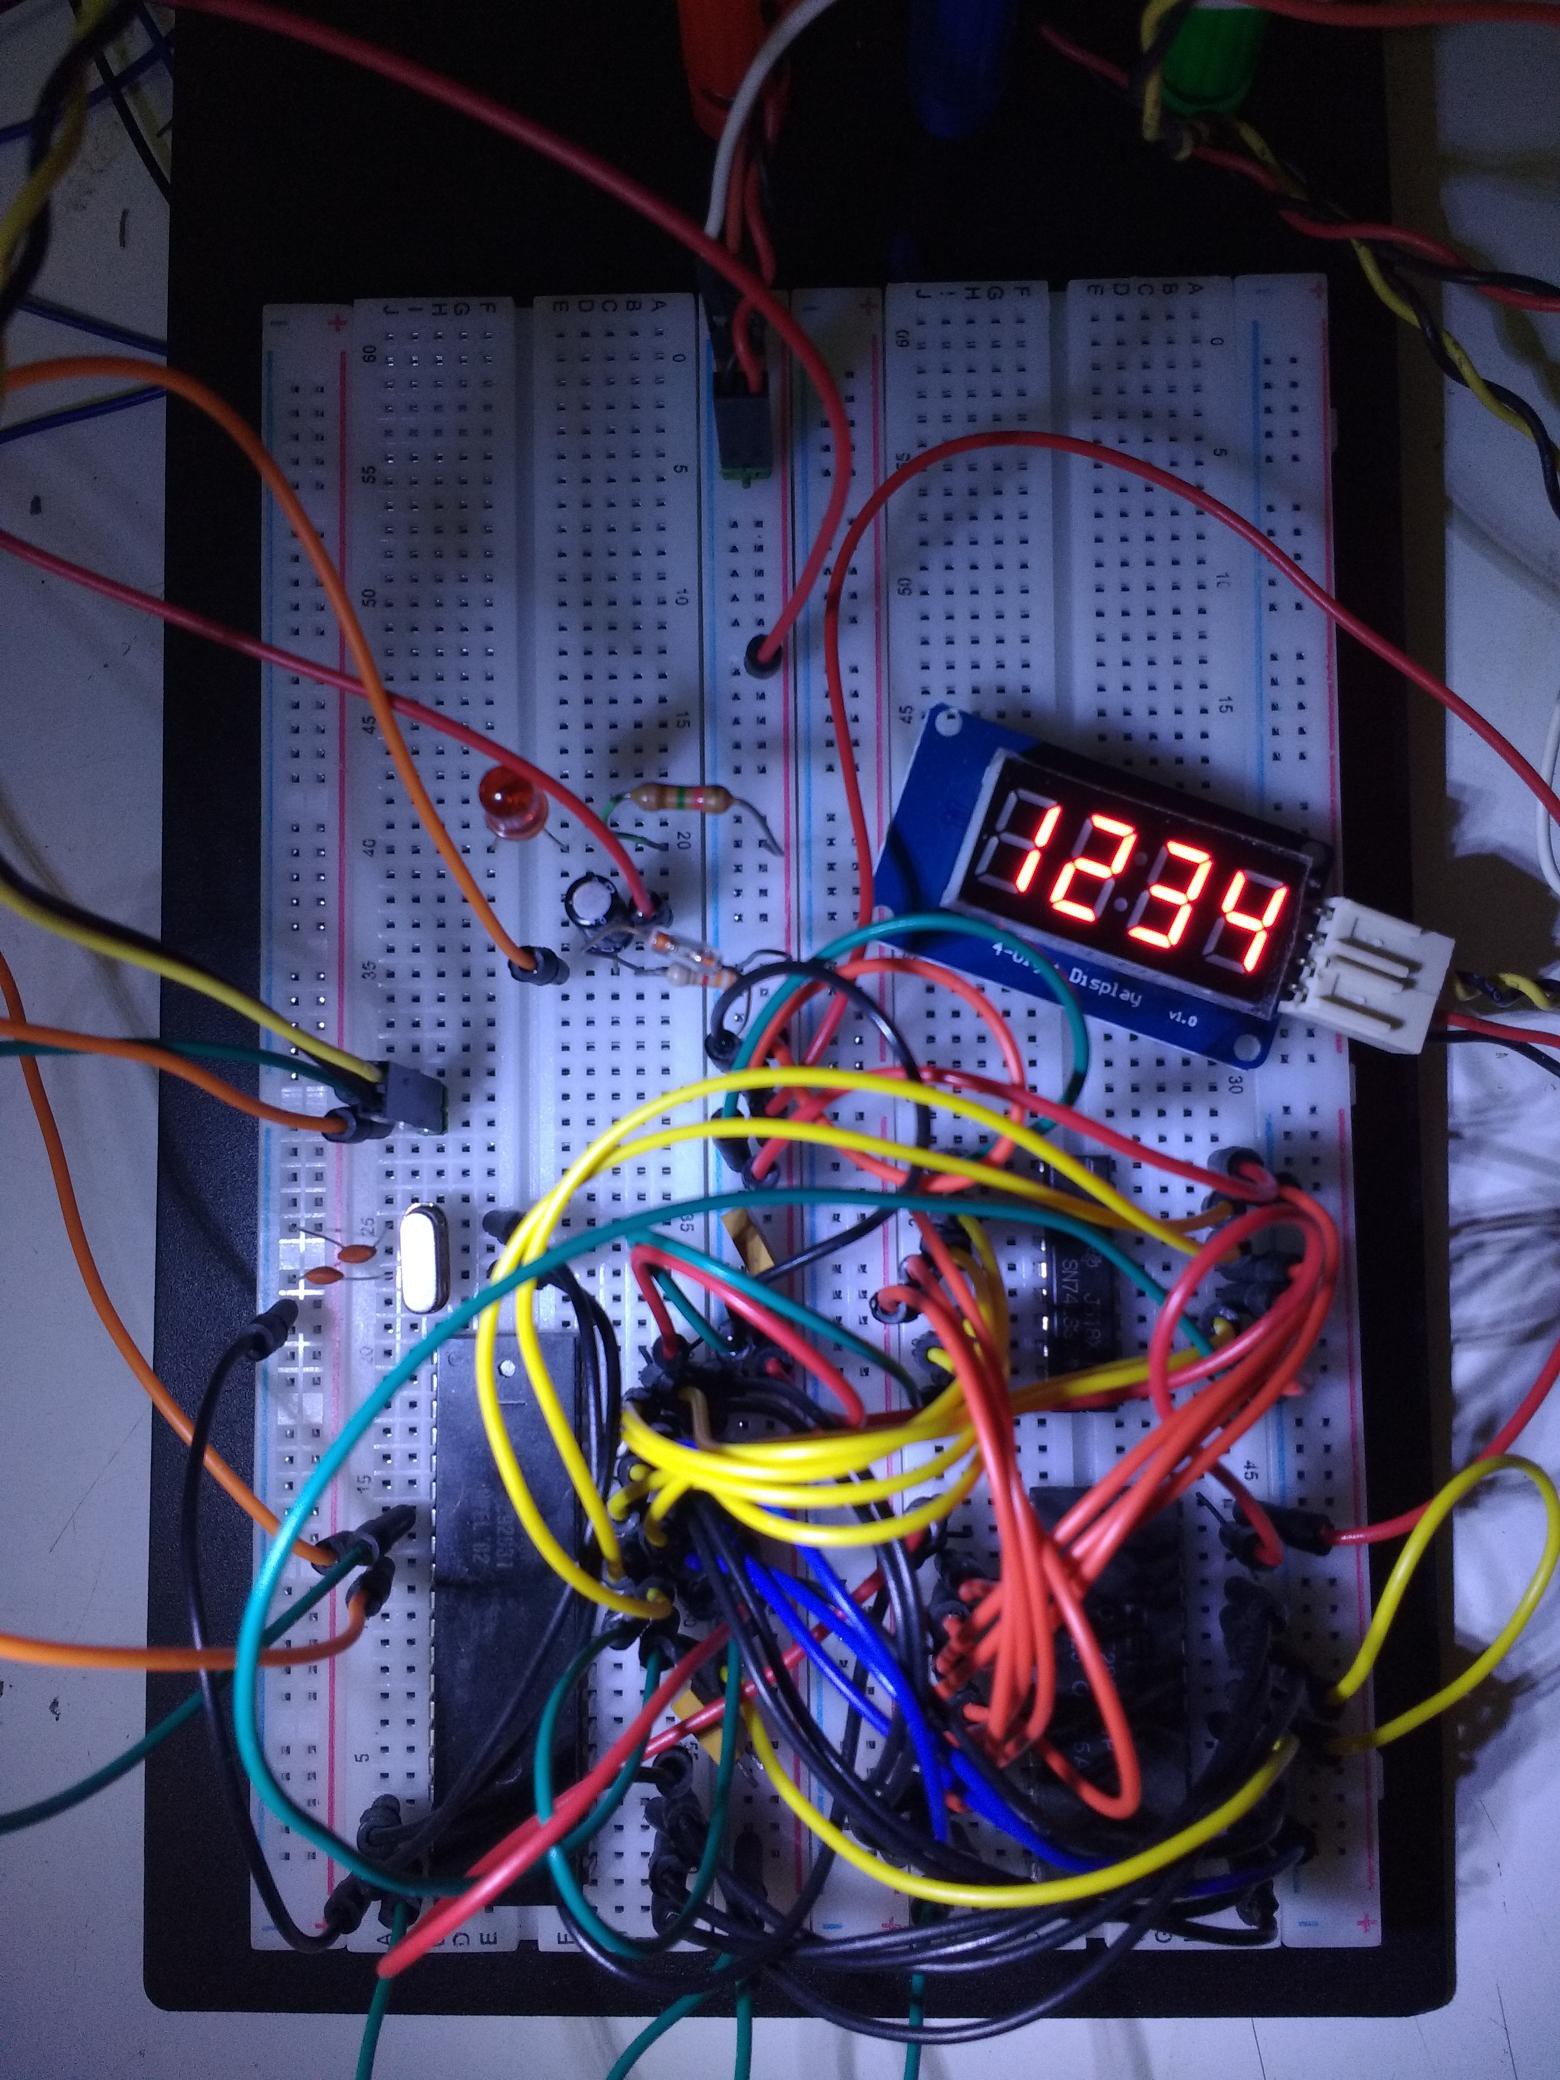
It's a bit harder to see the chips as the off-the-shelf jumper wires take up more room than the homemade ones in the last project but there is an 8031 MCU (8051 with no internal ROM), 28256 EEPROM, and 74LS373 8-bit latch, plus some small components like the crystal clock source and reset circuitry. The LED and resistor were used to get the blink program working.

Tone generator and switch handling working

The tone generator is probably the simplest part of the project. I just program timer 1 to flip the speaker port bit every half cycle. The frequency is determined by the clock divisor programmed into timer 1. The divisor table in the C code is pregenerated using a Python script.

I also got the note increment and decrement buttons working, using a Protothread handler, as described in a log entry.

What remains is the code for displaying information...

Read more »

chromatic-descent.mp4

Running down the scale chromatically. The display shows the sound as a frequency and as a note name.

MPEG-4 Video - 1.70 MB - 01/08/2019 at 01:43

Download

chromatic-ascent.aac

Running up the scale chromatically. First a couple of single button depressions, then holding down for autorepeat.

Advanced Audio Coding (AAC) - 191.71 kB - 01/02/2019 at 23:47

Download

  • Final remarks

    Ken Yap01/08/2019 at 05:28 0 comments

    So I've finally implemented the specifications set out in the beginning. I've learnt about the 8051 architecture, the Small Device C Compiler (SDCC), the HD44780 LCD controller instruction set, and the I2C protocol.

    I'll bear in mind the modern 8051 derivatives for future MCU projects as they are readily available and cheap. The couple of ancient ones I have will be returned to my old artefacts collection. 😊

    SDCC is eminently suitable for 8051 MCU projects. I could do everything I wanted in C.

    The HD44780 based 16x2 LCD display has limitations but I understand better where it can be used.

    I've tangled with the I2C protocol and learnt through mistakes.

    I won't be making a production board as this is not a practical gadget; see my remarks in the Details section. It was always a self-assigned learning project.

    Now I can reuse that breadboard for the next project!

  • Some remarks about delays

    Ken Yap01/08/2019 at 05:19 0 comments

    The LCD display is a relatively slow device to update. Visible blinking can be seen when there are changes. So it's not suitable for situations where the display changes rapidly.

    This slowness means that some operations require relatively long delays, e.g. reset. Fortunately most are before the tick loop is entered. However a couple of functions like clear and home require a 2 ms delay. I moved the clear to the initialisation. I replaced the home in the main loop with a setcursor. However it is necessary to clear the line when the text changes, or previous text that is longer than the current text will still be displayed. I solved this by always sending 16 characters by sending the right number of padding blanks.

    However this is not a general solution for long delays. If they are blocking, they will stop the MCU from other tasks. One solution would be to use Protothreads also to handle the display, by implementing a busy flag. So say when a clear is issued, the thread should set a busy flag and then wait for the timer to go off before clearing the flag. Other parts of the program would look at the flag and refrain from using the display when it's busy. For example, changing the note sets the texchanged flag, but it wouldn't be acted on in the tick loop to update the display until the busy flag indicates that the display is ready for another command.

    As can be seen, even the Arduino driver suffers from the use of blocking delays, some of which are quite long, which make it unsuitable for applications where the MCU must be available for other tasks. I daresay the LCD library isn't the only one that has blocking delays internally. There is no good way to fix this short of adding some multithreading features to Arduino libraries and sketches.

  • Display and buttons both working

    Ken Yap01/08/2019 at 01:55 0 comments

    Strangely when it came to trying out the display with the buttons, the latter failed to work. It's so dispiriting when something that worked before doesn't now. The behaviour was really bizarre, it was as if something was cancelling my button depressions. This puzzled me greatly. How could the addition of the display change the behaviour of the buttons? The outputs are driven by port 1, while the buttons are read by port 3.

    Eventually it occurred to me to grep for all instances of P3 in my C code. Lo and behold, I had forgotten that a while back, in anticipation of debugging with a simulator, I had added a line to set P3 to the data being sent to the LCD display so that I could see the data by watching P3. I had forgotten that P3 is an input port, so not as benign as I thought. The reason it didn't happen before was I had tested the buttons without the LCD display.

    I fixed the code and now everything works according to specification.

    You can watch a video here showing the tuner running down the scale chromatically and the display showing the note being played.

    I have something else to say about delay routines in drivers in the next log, then I can mark the project completed.

  • Display almost working

    Ken Yap01/07/2019 at 07:06 0 comments

    Got a test program on Arduino displaying the text lines I want on the LCD, this with the Wire library which uses the builtin I2C pins on the AVR. Wrote the equivalent program in the 8051 code and program the EEPROM. No joy, display doesn't even initialise.

    Ok, need to backtrack a bit. Tried using my bit-banging routines on the Arduino. No joy either.

    Some searching found the SoftwareWire library which works on any two pins instead of just A0 and A1, the normal I2C pins. I modified my test program to use this, but got garbage printed out. At the right intervals though. At least the initialisation seems to be working.

    Oh well, have retrace my steps and break this down to smaller steps until I find the missing piece. I hate it when hardware decides to be picky like this.

    Ok, I found the problem. The 1602 is fussy about letting it complete certain actions, like clear and home, by waiting the period specified in the datasheet. When sufficient delay was added, I could get the correct text later. But there is a potential issue with insertng delays, which I will discuss in a later log.

    Now, moving back to using my bit-banging routines, this still failed, until I noticed by reading the code for SoftwareWire that where the specification specifies the slave address, say ADDR, what actually is sent over the wire is ADDR*2 for writes and ADDR*2+1 for reads. That explains why some slave addresses were odd, and of course why they only go up to 127. I was under the mistaken impression that the write and read addresses were ADDR and ADDR+1 respectively. So I won't forget this detail of the protocol.

    Fixed the code and programmed the EEPROM for the 8051. That works too.

    Now to get the increment and decrement buttons working in conjunction with the display.

  • Using protothreads on MCUs

    Ken Yap01/03/2019 at 00:02 0 comments

    In my previous projects there are places where periods of a fraction of a second are required between actions, for example, debouncing a switch, or waiting for an autorepeat threshold. These periods are much longer than the tick period. The MCU must do work every tick, such as refreshing the display or scanning the switches, so a blocking wait is not acceptable.

    In larger systems this is often handled using threads. But threads are relatively heavyweight constructs, requiring stack space and thread switching code. These are hard or impossible to provide on simple MCUs.

    Usually the programmer resorts to writing a state machine, where variables remember where the subtask is up to. Sometimes the state machine uses an explicit state variable, sometimes the state is encoded in the values of variables. You can see this in my 8042 switch handling code where counters store the state.

    But state machine code is hard to comprehend. So I thought there should be a solution with very lightweight threads. A search found Protothreads by Adam Dunkels which has been available since 2005. This is designed for low resource MCUs, only requiring one integer location to store the thread state. It is implemented in standard C, not requiring any assembler assist, so is portable to any MCU with a suitable C compiler. In fact the C code consists of preprocessor macros.

    Let's look at an example. This is a simulated version of the switch handling code in the tuner. The specifications are these:

    1. When a button is pressed the thread waits until the debounce period has passed. If the button is released before this, the thread restarts.
    2. On expiry of the debounce period, the action is taken. The thread then waits until the autorepeat threshold is reached. If the button is released before this, the thread restarts.
    3. On expiry of the autorepeat threshold, the action is taken. The thread then repeatedly waits for the repeat period to elapse, taking the action every time this happens. If the button is released at any time, the thread restarts.

    To make things concrete, this design uses a debounce period of 100ms, an autorepeat threshold of 400ms more, and a repeat period of 250ms (4 times a second).

    Now look at the thread handler and main program:

        33  static
        34  PT_THREAD(switchhandler(struct pt *pt))
        35  {
        36          PT_BEGIN(pt);
        37          PT_WAIT_UNTIL(pt, swstate != swtent);
        38          swtent = swstate;
        39          PT_WAIT_UNTIL(pt, --swmin <= 0 || swstate != swtent);
        40          if (swstate != swtent) {                // changed, restart
        41                  reinitstate();
        42                  PT_RESTART(pt);
        43          }
        44          switchaction("single");
        45          PT_WAIT_UNTIL(pt, --swrepeat <= 0 || swstate != swtent);
        46          if (swstate != swtent) {                // changed, restart
        47                  reinitstate();
        48                  PT_RESTART(pt);
        49          }
        50          switchaction("repeat start");
        51          for (;;) {
        52                  swrepeat = RPTPERIOD;
        53                  PT_WAIT_UNTIL(pt, --swrepeat <= 0 || swstate == SWMASK);
        54                  if (swstate == SWMASK) {        // released, restart
        55                          reinitstate();
        56                          PT_RESTART(pt);
        57                  }
        58                  switchaction("repeat");
        59          }
        60          PT_END(pt);
        61  }
        62
        63  void main()
        64  {
        65          for (int i = 0; i < 64; i++) {
        66                  port = SWMASK;
        67                  if (i == 1)
        68                          port &= ~INCBUTTON;     // transient, should ignore
        69                  else if (10 <= i && i < 12)
        70                          port &= ~INCBUTTON;     // single action
        71                  else if (16 <= i && i < 24)
        72                          port &= ~INCBUTTON;     // single, repeat doesn't kick in
        73                  else if (30 <= i && i < 50)
        74                          port &= ~INCBUTTON;     // single, repeat twice
        75                  if (port != SWMASK)
        76                          printf("%d down\n", i);
        77                  swstate = port;
        78                  PT_SCHEDULE(switchhandler(&pt));
        79          }
        80  }

    You can see that it is programmed as a sequential routine. The structure of the handler mirrors the specification above. You have to imagine that the thread has a life of its own and waits at the PT_WAIT_UNTIL macro until the condition is satisfied. In reality, the MCU exits the routine and uses a local continuation to know where to restart when the thread is called again. But you are not supposed to know this unless you have read...

    Read more »

  • SDCC MCU oriented features worth noting

    Ken Yap12/21/2018 at 00:23 0 comments

    1. On the MCS-51 Harvard architecture, SDCC implements __code space, which is where constants and constant strings should be stored. The declarations:

    __code unsigned const short divisors[] = {
        ...
    };
    __code const char *const descriptions[] = {
        ...
    };

    and the correct use of const ensures that these constant data are stored in code memory (ROM). The appropriate MOVC instructions are generated when copying from these areas.

    But also read the SDCC manual about different types of pointers. When pointing to __code data the use of a __code pointer will generate better code and take less bytes than a generic pointer.

    AVR C/C++, e.g. Arduino, has a similar feature for constant data in code memory: PROGMEM.

    2. SDCC supports __naked functions which are good for short pieces of code that don't use any registers, e.g. operate on ports, so you can avoid register save and restore.

    3. SDCC supports interrupt service routines (ISRs). It will generate a reti instead of the normal ret for returns. It will do the appropriate register save and restore. With the __using() pragma, you can direct it to use an alternate register set.

    4. The idiom:

    P1_4 ^= 1;      // flip LED

    is the shortest way to flip a port or low memory bit. It generates one instruction, i.e.:

    cpl P1_4

     5. SDCC is smart enough to do tail call optimisation. For example, one of the I2C routines ends thus:

    delay5us();

    Instead of generating a lcall _delay5us followed by a ret, it generates a ljmp _delay5us, which then returns directly to the caller, saving a few bytes and a bit of time. But it has to know that delay5us() has certain properties.

    6. Not specific to SDCC but inline generates code at the point of use instead of a function call (and a function body elsewhere) where the trade-off, e.g. for small functions, is worthwhile

  • No, don't use the GPL for this

    Ken Yap12/07/2018 at 23:05 0 comments

    While looking around the Internet for examples of I2C driver code for the 8051, I found a couple released under the GPL.

    Now first let me say I'm entirely supportive of GPLed projects. After all I depend on a lot of them.

    However the GPL is unsuitable for libraries that will be incorporated into firmware. If I distribute my MCU widgets containing this firmware I will have to offer access to the GPLed code and any code linked to it. LGPL or another license like MIT would be more suitable. I suspect the authors of those GPLed library routines had good intentions of contributing to the open software ecosystem, but failed to understand that this actually hinders adoption of their code.

    Fortunately, in the case of the I2C routines, it's not rocket science and easy to write replacements after having studied various tutorials and examples.

  • A frustrating bug crushed

    Ken Yap12/03/2018 at 22:38 0 comments

    Tried a preliminary version of my tuner code which handles the buttons and blinks a LED, before getting into the display handling code. Very frustrated that the LED flashed irregularly and seemingly random. What's more some of the other port 1 pins were also going low some of the time when I tested them with the LED line. Tried all sorts of things, inserting delays, checking for volatile variables, looking at the interrupt handler.

    Finally after a night's sleep it occured to me to double check the breadboard jumpers between the MCU and the EEPROM. What do you know, I forgot to hook up one of the high address lines, A13. Which meant that the MCU was being presented with 0xFFs for code bytes some of the time. It was probably resetting every now and then.

    Now the MCU reliably executes code. I was probably lucky with the first short blink program that the bug didn't surface then. Lesson: double check all your connections according to the schematic. If I had noticed that address pin from the MCU went nowhere I would have avoided all this.

    That's another win for MCUs with integrated flash memory, less to wire up and go wrong.

  • Looking for a good free 8051 GUI simulator

    Ken Yap11/29/2018 at 23:26 1 comment

    One of the things that helped a lot in 8048 development was the s48 simulator which allowed me to watch the effect of instructions on memory and ports.

    SDCC comes with s51 but this is a CLI simulator. It may be useful in some cases. It also seems to be possible to invoke the simulator through ddd, the GNU GUI debugger frontend, which invokes sdcdb, which invokes s51. The docs say it may not be as smooth as expected.

    Lookiing at other free simulators for Linux, mcu8051ide seems to emulate lots of 8051 variants, provide a fairly complete display, but unfortunately I can find no way to load just a hex or binary file, you have to develop using the compiler and assembler that it uses. I'm the kind of person who likes to use a text editor on a C file*. Since it's GPLed open source, I suppose one could add this capability.

    Edsim51 is also quite complete, even simulates peripherals, and is written in Java, so cross-platform. But unfortunately again you have to develop using its IDE, I see no way to load a hex or binary file.

    I am willing to consider jsim-51 which will run under my WIndows XP in a VM. It can even read both the .ihx and .map files generated by asxxxx, the assembler used by SDCC, to provide a labelled disassembly. However I can't find a way to display registers and memory continuously while simulating, one has to pause, then issue an update display command. Maybe I have to look harder. It's strange as the timers can be monitored continuously. One disadvantage is as it was written ages ago, it only caters for the 8031/8051, not any of the recent variants with more peripherals.

    But one good thing about developing in C is that you are one level above assembly instructions and don't have to worry as much about the state of the registers and flags but think in terms of program variables. Subroutines also encourage compartmentalising functionality. But when it comes to low-level operations on ports, it's good to be able to watch.

    Oh well, I'll see how I do writing a structured program in C from the start and maybe I won't need to simulate much.

    * But I recognise the benefits of and do use the facilities of the Arduino IDE, especially the facts that it handles the variations in AVR CPUs behind the scenes, and brings together many tools, including such things as SPI programming, under its umbrella. One can always edit the .ino file outside of the IDE and then reload in the IDE.

  • I got the board working

    Ken Yap11/28/2018 at 07:28 0 comments

    I fixed the code and the schematic.

    I took the TM1637 4 digit display module I used for my 8042 clock and a test program written in C instead of assembler. After a bit of adjustment of the code (again I missed a bit transition in the protocol) I got it to display the desired numbers.

    So now I can release the board design on Github and the rest of the project will be getting the software working.

View all 11 project logs

Enjoy this project?

Share

Discussions

HummusPrince wrote 12/28/2019 at 22:39 point

Very nice stuff you got going there. Bitbanging I2C sure sounds like a fun excercise :)

One thing bothers me though - why using the I2C version of the display? It would be the sensible choice for every other microcontroller probably, but given that you're already using a full 8031 chip from external ROM with all it's bells and whistles, why won't you use the parallel port?

The HD44780's parallel interface was designed in such a way that you can connect the display as if it was external RAM. Using very little glue logic one can connect it in parallel to real XRAM so it takes a distinct place in the address space.

Reads and writes become simple MOVX operations - this seems very elegant and attractive to me as it leaves out a lot of mess communicating with the display.

  Are you sure? yes | no

Ken Yap wrote 12/28/2019 at 22:48 point

1. I don't like lots of wires. 2. I wanted to learn I2C. 3. Since I would be dismantling the project once finished, I wanted a display I could reuse elsewhere without lots of wires (sort of related to 1).

  Are you sure? yes | no

HummusPrince wrote 12/28/2019 at 23:36 point

AFAIK these I2C to parallel modules are usually detachable, and considering the huge mass of wires which are mandatory in that design, wiring the display doesn't seem to add relatively much.

But the educational purpose does win, I guess.

  Are you sure? yes | no

Ken Yap wrote 12/29/2019 at 00:10 point

The I2C to parallel converter was just piggybacked on the existing pins so if I want to I could detach that and it would be a parallel interface display. But you then also need more port lines, which is covered by "wires", to drive it.

  Are you sure? yes | no

Similar Projects

Does this project spark your interest?

Become a member to follow this project and never miss any updates