-
1MQTT Library
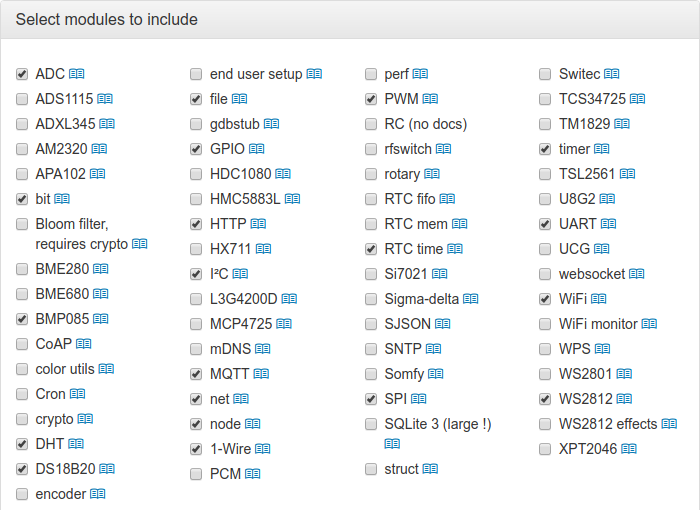
NodeMCU comes fully equipped with an MQTT library, assuming you followed the build instructions in Part 1 of this series. However, this example also uses the DHT and DS18B20 libraries, so go back to the NodeMCU custom firmware build website and build a new firmware with these options:
![]()
Or, you can download a pre-built version from the Files section. Flash it to your connected Feather or other module using:
#!/bin/bash
esptool.py --port /dev/feather0 erase_flash
esptool.py --port /dev/feather0 write_flash -fm=dio -fs=32m 0x00000 nodemcu-master-19-modules-2019-01-12-20-51-40-float.bin
Remember to change the port name if you don't have udev rules for your boards (they will show us as /dev/ttyUSBx normally). Also, change the name of the nodemcu binary if you built your own version. The above snippet can be saved to a file named flash_lua.sh and run when needed. This can make it very quick to flash fresh firmware if something goes wrong.
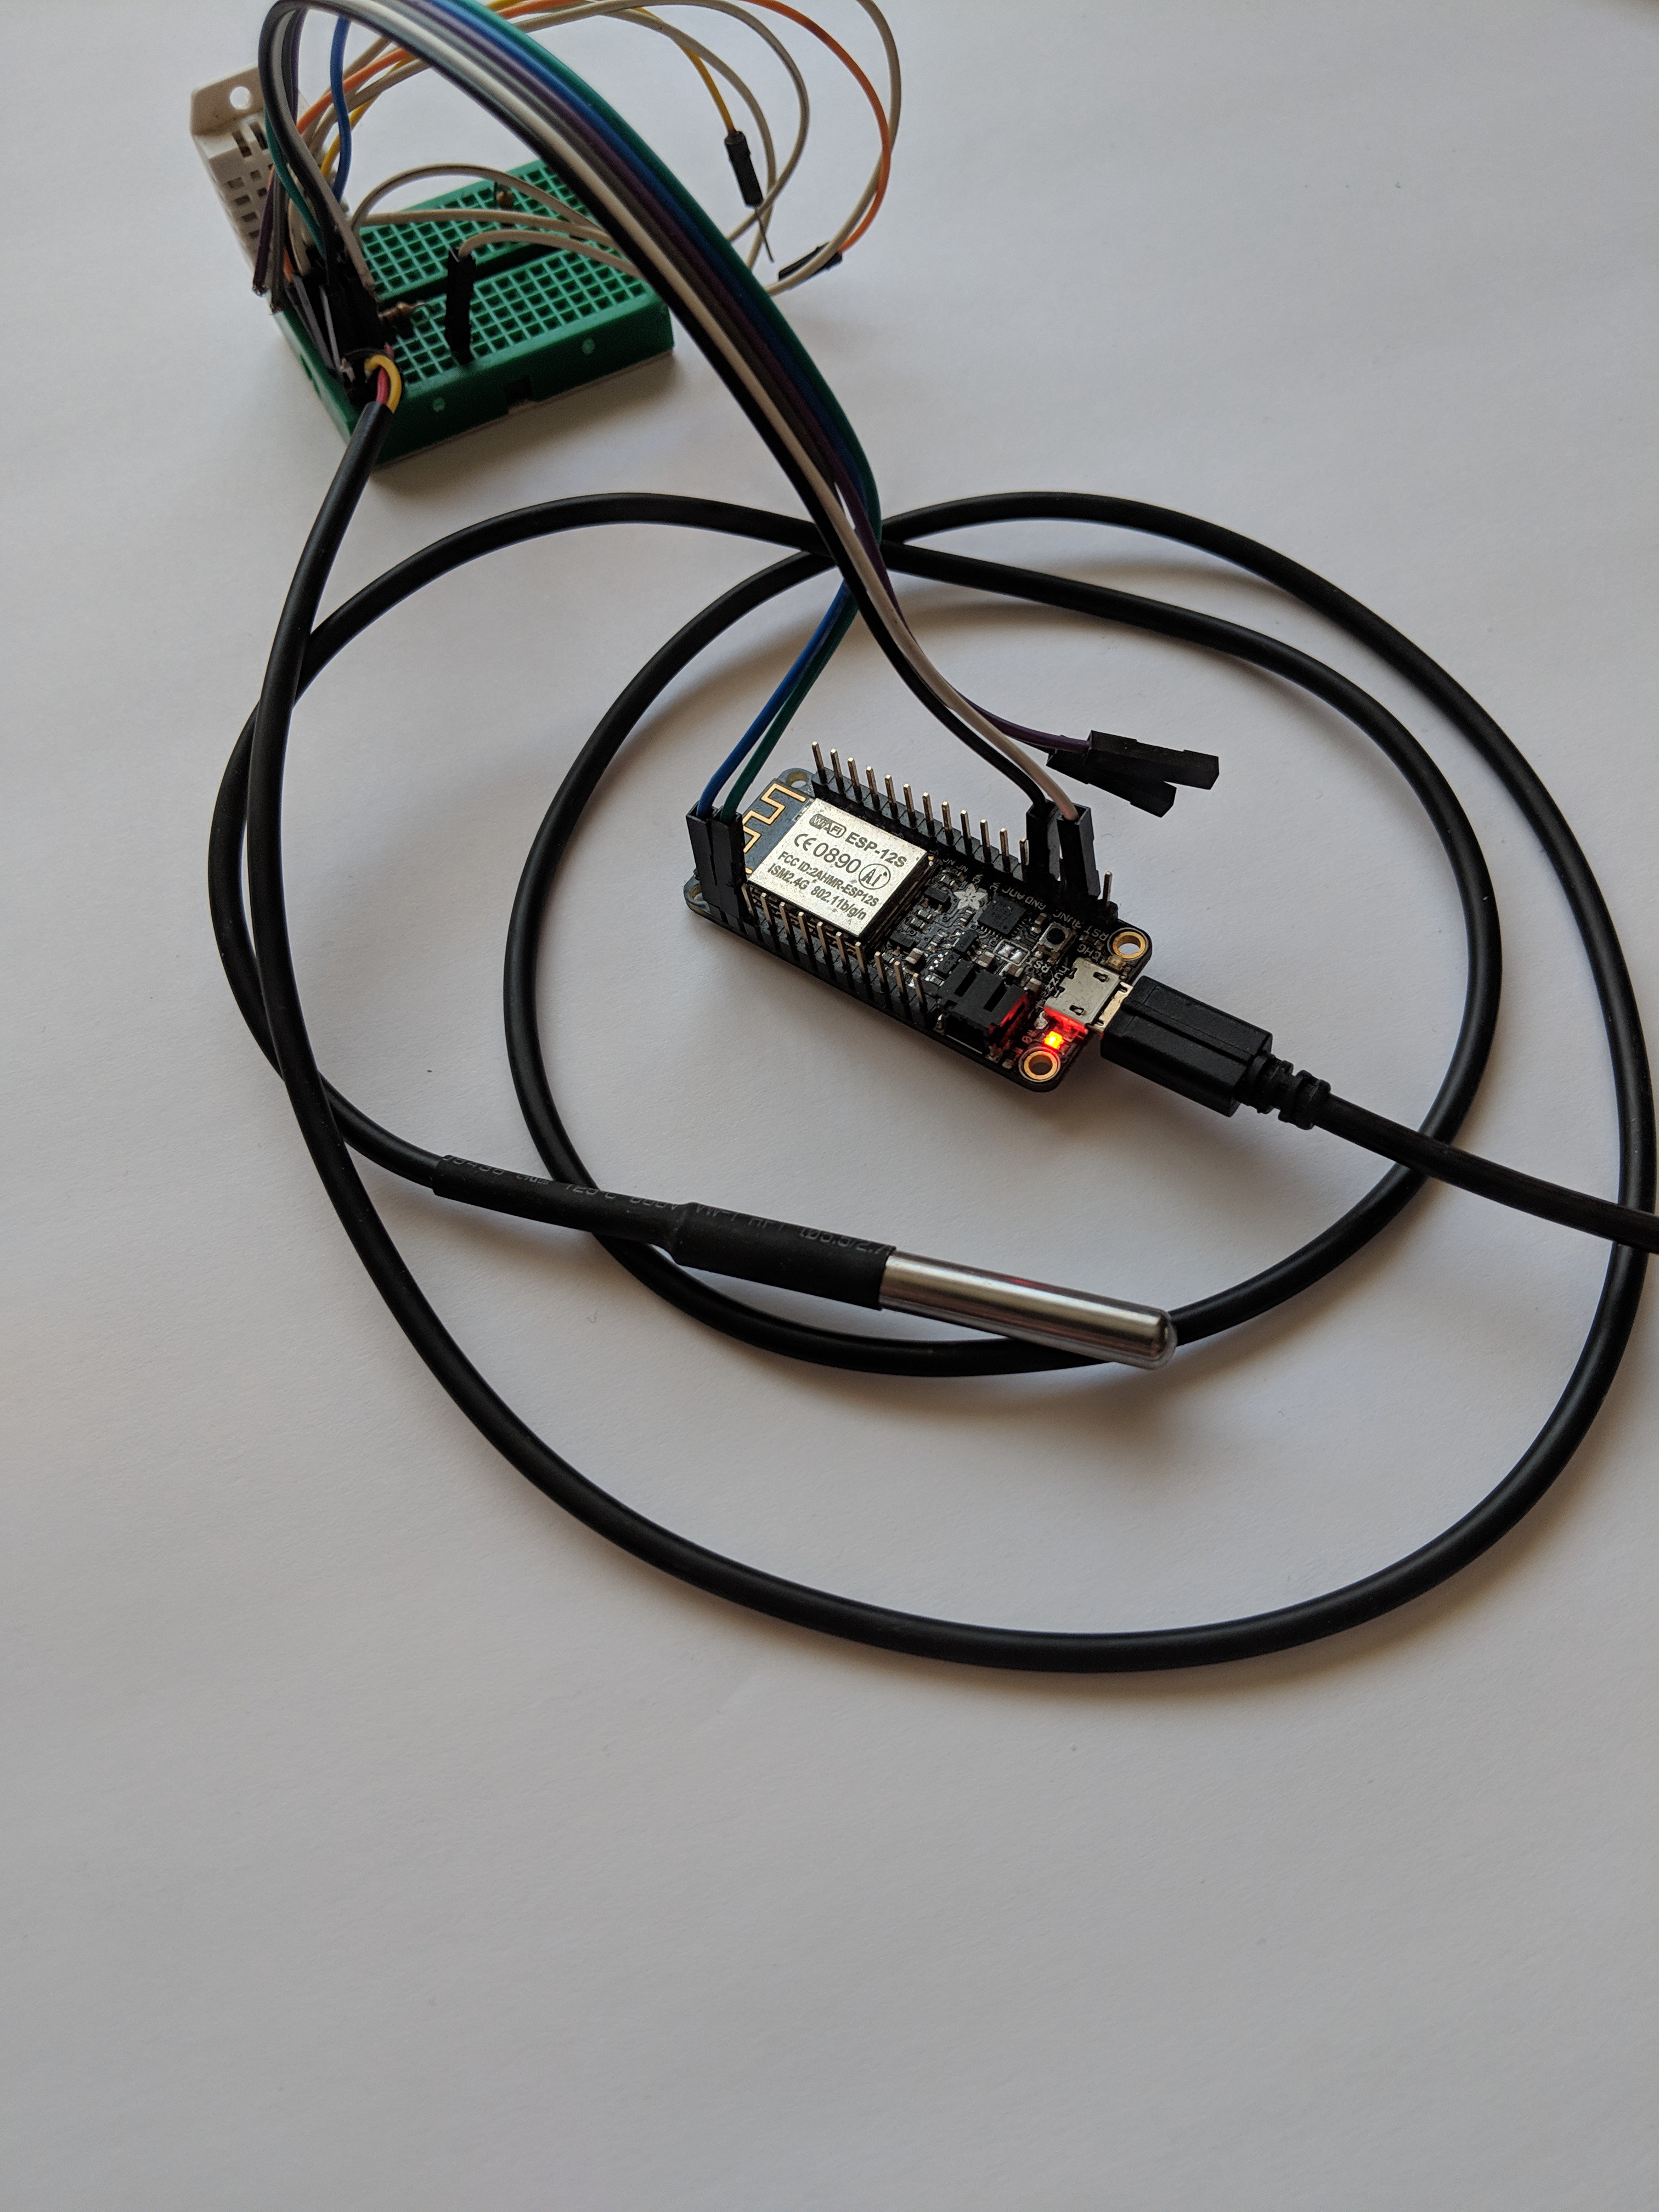
For this example, we will be reading from a DS18B20 temperature sensor and a DHT22 Humidity Sensor. The code can easily be modified to use other sensors if you don't have these available. If you need help, check the Getting Help section in Details!
![]()
The DS18B20 uses 1-Wire, while the DHT22 uses a proprietary single wire serial protocol. Luckily, both of these sensors already have modules as part of the NodeMCU firmware. Just make sure you choose the DS18B20, DHT, and 1-Wire modules when building your firmware.
Our code will first connect to Wi-Fi, and establish an MQTT connection to Adafruit IO. We will create functions to get the humidity value from the DHT22 and to get the temperature from the DS18B20. These will in turn call functions which use the MQTT connection to log the most recent values.
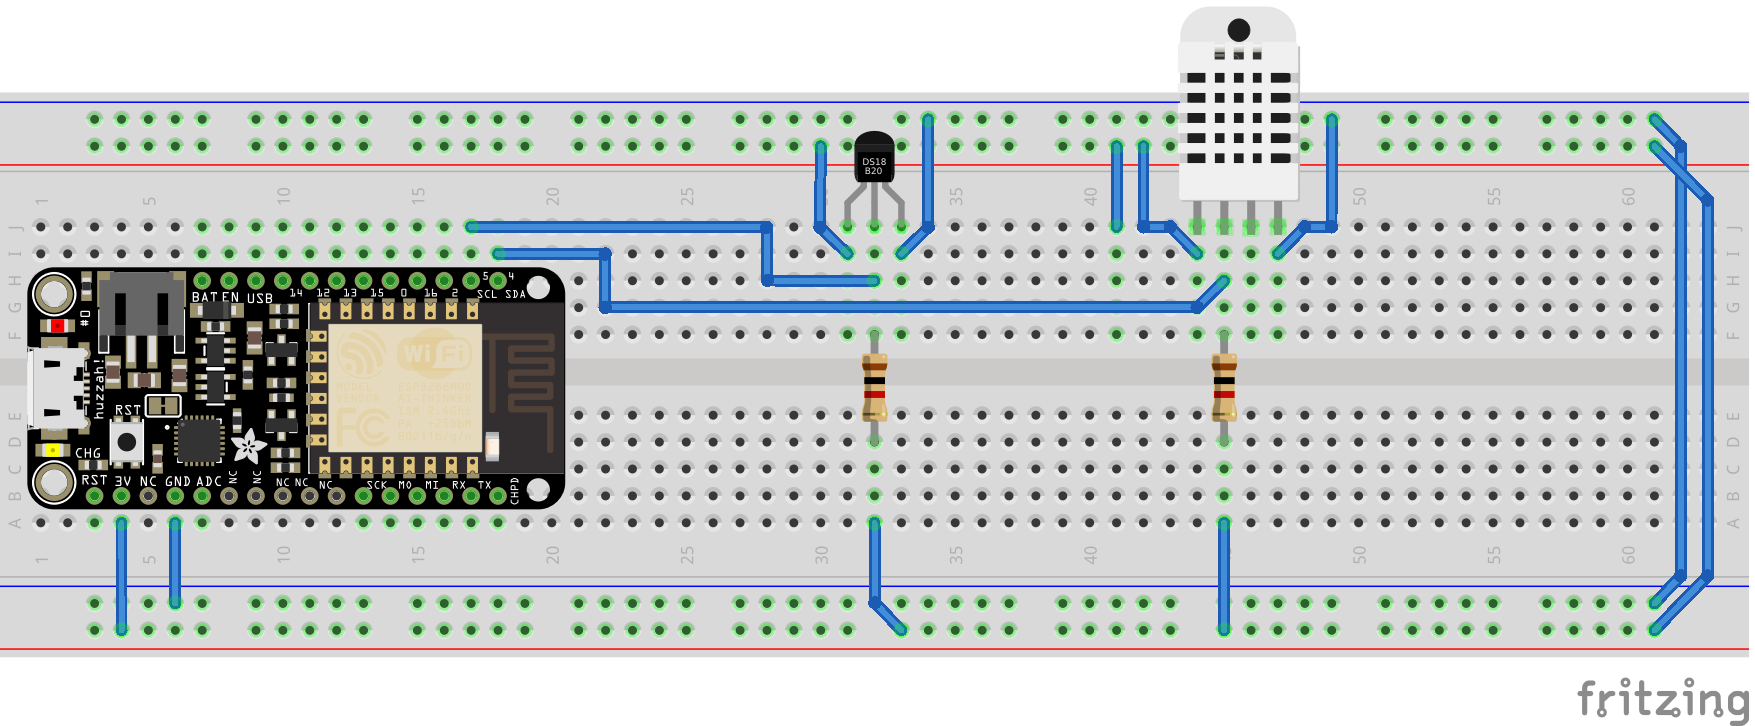
Here's a quick look at the circuit layout:
![]()
The full init.lua file can be downloaded here. We'll go through it in later steps.
-
2Sign up for Adafruit IO
We will need an Adafruit IO account for this to work. If you use a different datalogging service that supports MQTT, feel free to use that instead, but I've found Adafruit IO to be very reliable and easy to use. They support the MQTT standard fully which makes IO widely compatible with MQTT libraries for many different devices.
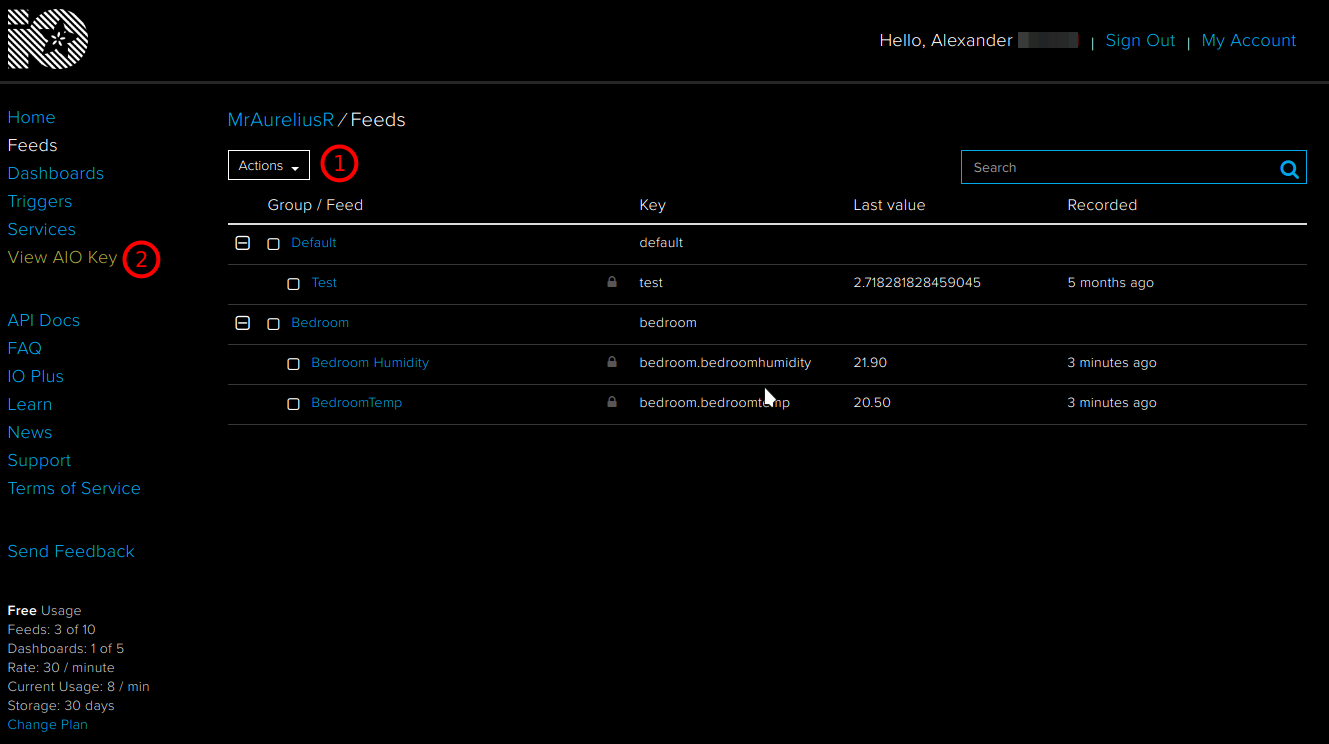
Signing up is a breeze. Head over to https://io.adafruit.com/ and sign up. If you already have an Adafruit account, you can use the same credentials to log into IO. Once logged in, we need to create feeds to send data to. Navigate to Feeds in the left hand toolbar. Click on Actions, and create a feed. You can optionally put them into a group, but it's easier to just leave them in the default group. After creating two feeds, click on View AIO Key and copy this value.
![]()
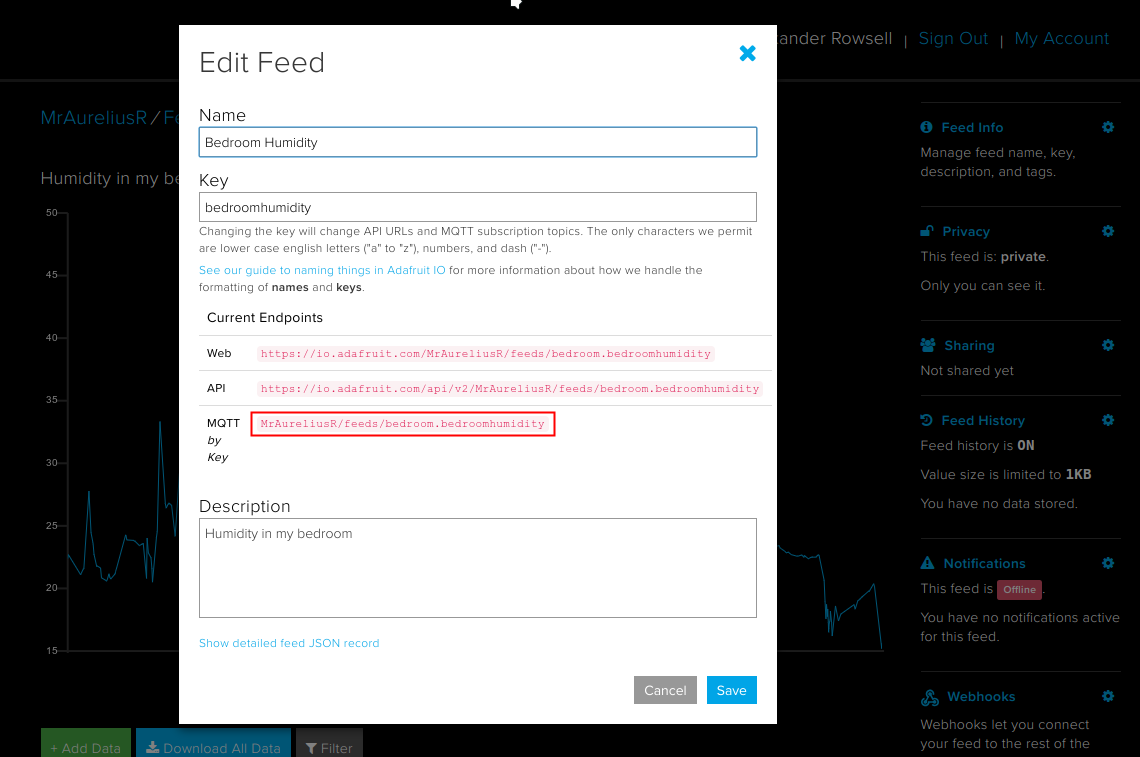
After creating the feed, we can view it by clicking on its name. Click Feed Info on the right hand toolbar, and copy the MQTT topic name.
![]()
Copy the MQTT topic name You can paste these values into a text file for now, or you can download the init.lua file from the downloads section above and paste these values directly into the code.
-
3Establishing Connection
The official documentation is located in the NodeMCU ReadTheDocs. The simplicity of the library reflects how elegantly simple MQTT itself is. All we need to do is create an MQTT Client object, connect, and then publish as needed.
Creating the MQTT Client object is as simple as calling mqtt.Client() with the correct parameters. It requires a client ID, which can be any alphanumeric string you want; a timeout value for keeping the TCP connection open; and the username and password. In our case the password will be our Adafruit IO key. The call will look something like this:
mClient = mqtt.Client("esp8266", 120, IO_USER, IO_KEY)Once the object is created, we use the functions built into that object to do everything else. The next thing to do is establish the connection to Adafruit IO. We use the :connect method of our object to do so:
mClient:connect(IO_HOST, IO_PORT, IO_SSL, 0,
    function(client)
        print("Connected")
    end,
    function(client, reason)
        print("Connection failed for " .. reason)
    end
)
One of the neat features of the Lua language is the ability to define anonymous (nameless) functions in the arguments to a function. In the :connect method, the callbacks for successful connection and failed connection are defined right in the call. This makes the code more compact and efficient, one of the hallmarks of Lua in general. The arguments to :connect are host (IP address), port (typically 1883), whether or not we are using SSL, a deprecated option which must be 0, and then callbacks for successful and failed connections.
Now that we are connected, we can call any of the methods in the MQTT object. For the purpose of this project, we're just going to use our tried-and-tested timers to control everything. We create four functions: two to get the data from the humidity and temperature sensors respectively, and two to publish those pieces of data to the MQTT broker. We use timers to call the functions to get the data (named getHumid() and getTemp()) which in turn call the publish functions (logHumid() and logTemp()).
function logTemp(ftemp)
   mClient:publish(IO_TEMP_TOPIC, ftemp, 0, 0, function(client) print("Temperature sent!\n") end)
end

function logHumid(fhumid)
   mClient:publish(IO_HUMIDITY_TOPIC, fhumid, 0, 0, function(client) print("Humidity sent!\n") end)
end

function getHumid()
   local fHumid = 0
   gpio.write(led2Pin, gpio.LOW)
   _, _, fHumid = dht.read(humidSensorPin)
   logHumid(fHumid)
   gpio.write(led2Pin, gpio.HIGH)
end

function getTemp()
   gpio.write(ledPin, gpio.LOW)
   ds18b20.read(
    function(ind,rom,res,temp,tdec,par)
       print(temp)
       logTemp(temp)
    end,{});
   gpio.write(ledPin, gpio.HIGH)
end
Most of the code is very self-explanatory. One little trick in Lua is that a function can return multiple values. For example, dht.read() returns up to five variables. We only need the third variable, so we can use the underscore to tell Lua that we don't want the first two return variables. Also, as mentioned previously, we can give a very simple function to ds18b20.read() instead of creating another named function. We only need the temp variable, so we send this off to logTemp(). Notice that the second argument to this function is an empty Lua table {}. By passing an empty table for the ROM address, the library will instead use the skip ROM command and simply talk to the first device on the bus. This will only work if there is only one device on the bus! In our case this is fine.
![]()
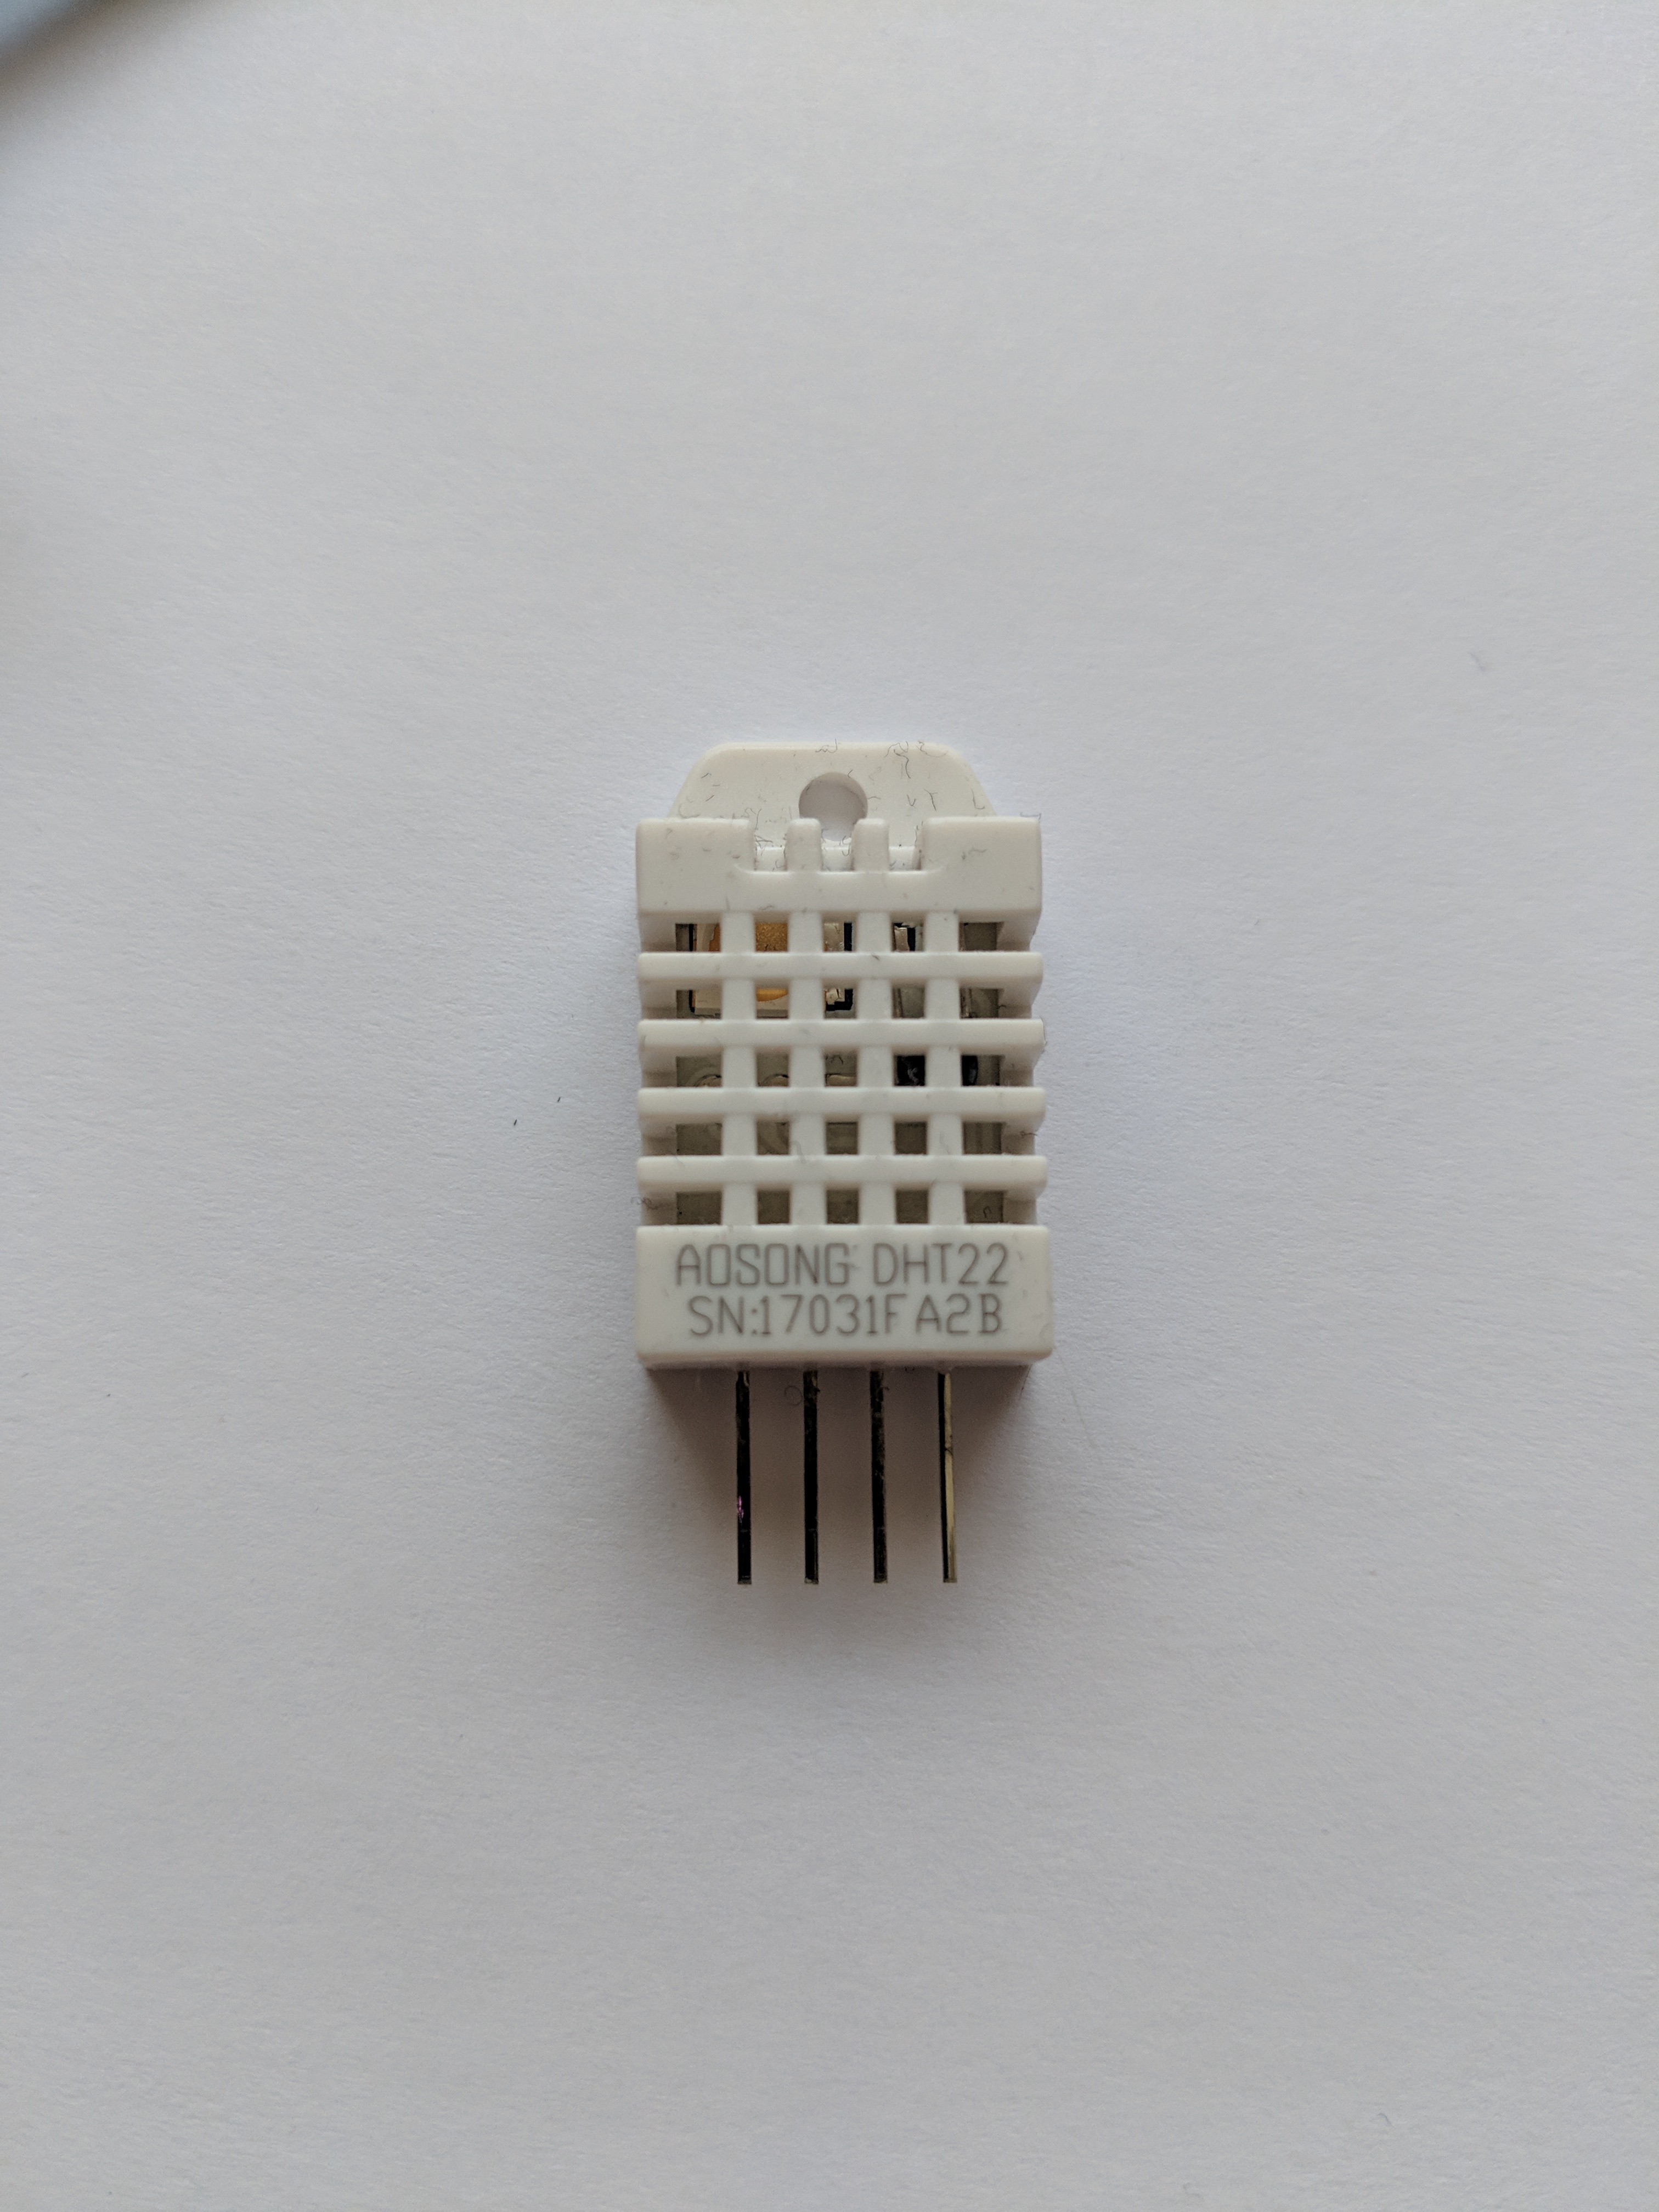
The DHT22 Humidity Sensor In the log functions, we simply call mClient:publish(). :publish is another method of the MQTT object. Its arguments are the name of the topic to publish to, the data to publish, the QoS level to use (we will always be using 0 in our projects), whether this is a retained message (a special type of MQTT message that we won't worry about now), and a function to call once we receive confirmation from the server that it has received our data. In this example, I create an anonymous function which simply prints out a confirmation that the data was sent.
-
4Putting it all together
I will be using GPIO5 and GPIO4 to communicate with the DS18B20 and the DHT22. These are NodeMCU pins 1 and 2 respectively. I will also be using the on-board LEDs on GPIO0 and GPIO2, which are NodeMCU pins 3 and 4. We also need to declare variables to hold the user credentials and server info for Adafruit IO.
As usual, we will be using timers to control our project. In this example I use three timers: one each for getTemp() and getHumid() which run on a period of 60 seconds, and a single-shot timer 200ms after startup which prints the Wi-Fi info to the console.
Simply replace the important values with your own credentials, insert your Wi-Fi SSID and password, and make sure to edit the IP settings to match those of your Wi-Fi network.
tempSensorPin = 1 --this is GPIO5
humidSensorPin = 2 --GPIO4
ledPin = 3
led2Pin = 4
IO_USER = 'your_username'
IO_TEMP_TOPIC = 'your_feed1'
IO_HUMIDITY_TOPIC = 'your_feed2'
IO_KEY = 'your_io_key'
IO_HOST = 'io.adafruit.com'
IO_PORT = 1883 -- you can use the SSL port if you built the nodemcu firmware with TLS support
IO_SSL = 0 -- change to 1 if using SSL

function logTemp(ftemp)
   mClient:publish(IO_TEMP_TOPIC, ftemp, 0, 0, function(client) print("Temperature sent!\n") end)
end

function logHumid(fhumid)
   mClient:publish(IO_HUMIDITY_TOPIC, fhumid, 0, 0, function(client) print("Humidity sent!\n") end)
end

function getHumid()
   local fHumid = 0
   gpio.write(led2Pin, gpio.LOW)
   _, _, fHumid = dht.read(humidSensorPin)
   logHumid(fHumid)
   gpio.write(led2Pin, gpio.HIGH)
end

function getTemp()
   gpio.write(ledPin, gpio.LOW)
   ds18b20.read(
    function(ind,rom,res,temp,tdec,par)
       print(temp)
       logTemp(temp)
    end,{});
   gpio.write(ledPin, gpio.HIGH)
end

wifiConfigT = {ssid = "yourssid", pwd = "yourpass", auto = true}
wifi.setmode(wifi.STATION)
wifi.setphymode(wifi.PHYMODE_G) -- use 802.11g
wifi.sta.setip({ip = "192.168.0.85", netmask = "255.255.255.0", gateway = "192.168.0.1"}) -- configure this to an un-used static IP on your network, and also add your gateway
if wifi.sta.config(wifiConfigT) == true then -- connect to AP
   gpio.mode(ledPin, gpio.OUTPUT)
   gpio.mode(led2Pin, gpio.OUTPUT)
   mClient = mqtt.Client("esp8266", 120, IO_USER, IO_KEY)
   mClient:connect(IO_HOST, IO_PORT, IO_SSL, 0,
           function(client)
              print("Connected")
           end,
           function(client, reason)
              print("Connection failed for " .. reason)
   end)
   ds18b20.setup(tempSensorPin)
   ds18b20.setting({}, 12) --set all attached sensors to 12-bit
   tmr.alarm(0, 60000, tmr.ALARM_AUTO, getTemp)
   tmr.alarm(1, 60000, tmr.ALARM_AUTO, getHumid)
   tmr.alarm(2, 200, tmr.ALARM_SINGLE, function() print(wifi.sta.status()); print(wifi.sta.getip()) end)

else
   print("Connection failed")
end
To program it, we use luatool.py as before. I usually have the luatool.py file in the directory above my project, so I run it like this:
python2 ../luatool.py --port [port] --src init.lua --dest init.lua --verboseMake sure you choose the correct port for your board! As I mentioned back in Part 1, luatool can be a bit finnicky and you often need to run it a few times, possibly resetting your board in between. This is because it is actually sending the file over the serial interface via the Lua console. If the board is outputting any data from a running Lua program, this will cause luatool to error and quit. As long as it manages to complete the first few lines (file.open(), file.close(), file.remove()) then it should work on the following attempt as the program has been deleted from flash. If you have trouble with this, check Getting Help in the details section of this project.
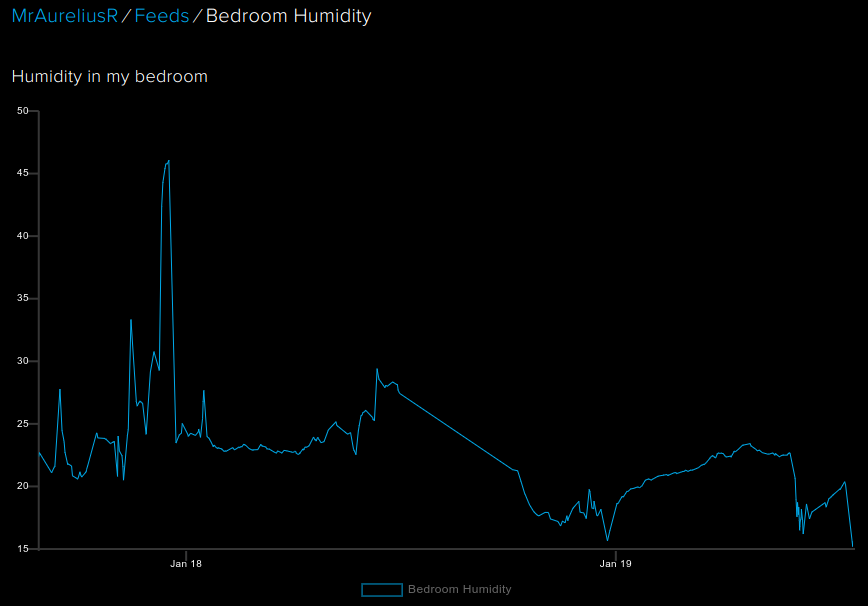
For a fairly complex task, we can see that Lua and the NodeMCU libraries make it quite a simple bit of coding! This will run forever, grabbing the humidity and temperature every 60 seconds and logging it. I had this code running for about 2 weeks straight in my bedroom. It was very interesting to see the trends during the winter here; you can see when the furnace comes on in the morning, as well as when I would occasionally open my window to cool down. Even more interesting was the low humidity! I have since picked up a humidifier and it really made a big difference to the comfort in my bedroom.
![]()
Stay tuned for part 4, where we will build on what we learned in this project to build an even more ambitious IoT project!
ESP8266 Lua Tutorial, Part 3
We use NodeMCU's implementation of MQTT to create our first IoT device!
 Alexander
Discussions
Become a Hackaday.io Member
Create an account to leave a comment. Already have an account? Log In.