Close
0%
0%

Xplained Yourself

Xplained-like mEDBG debugger for almost all former Aymel's AVR and ARM microcontrollers

Similar projects worth following
mEDBG debuggers are able to program and debug SPI/dWire, UPDI, SWD, TP interfaces. They also include build-in clock and UART. Pretty neat! It's heart is ATmega32U4!
This clone is based on schematics and software provided by Microchip. Original mEDBG is tight to only one type of MCU, but I hacked it's memory. Xplained Yourself isn't tied to one MCU type. It can program and debug all MCUs with corresponding interface. When changing from one interface to another eg. from ISP/dW to SWD, you'll have to change firmware. Fortunately it is very simple, just boot into bootloader: press RST and HWB, than release RST and wait till your PC sees 32U4, then release HWB. In atmel studio go to programming, select appropriate firmware files, program and reset Xplained Yourself board, and you're ready to debugging.

Please consider some donation for the time and effort I used to develop his project. I included PayPal link in the links area-under gallery and team on the left

It is Microchip/Atmel Xplained mini/nano mEDBG debugger with some additional features:

  • level translation,
  • USB 5V VBUS Schottky diode protection,
  • build in 3.3V LDO,
  • target voltage jumper selector: 5V (4.7V actually), 3.3V, external/other,
  • power, programming and target power sensing LEDs,
  • hacked code responsible for MCU selection: it is possible to program and debug all MCUs with compatible interface : ISP/dWire (most megaAVR and tinyAVR), SWD (all Atmel's ARMs), UPDI (new megaAVR and tinyAVR: called "0" and "1" series), TPI (some small tinyAVR)

(a little bit outdated) table showing interfaces in AVR / SAM families:

With Xplained Yourself you are able to program all tinyAVR, megaAVR and SAM ARMs and debug most of them. It is not possible to program/debug XMEGA and UC families with Xplained Yourself.

Xplained_Yourself_fw_AS7.2542.zip

newer, updated pack tested with AS7.2542 firmware pack for Xplained Yourself it should be compatible with Xplained boards (and unlock ability to program every MCU which can be hooked up to board)

x-zip-compressed - 79.90 kB - 01/11/2021 at 21:52

Download

XYS_1.1.1c_all.zip

board, schematic in graphic and Eagle formats, gerbers Xplained Yourseld rev.1.1.1c for SPI/dW/UPDI/SWD/TPI minor changes compared to the previous version - final version

application/x-zip-compressed - 835.51 kB - 12/02/2018 at 15:49

Download

XYS_1.1.1c_gerber.zip

gerbers Xplained Yourseld rev.1.1.1c for SPI/dW/UPDI/SWD/TPI

application/x-zip-compressed - 317.03 kB - 12/02/2018 at 15:49

Download

XYS_1.1.1b.zip

board and schematic in graphic and Eagle formats Xplained Yourseld rev.1.1.1b for SPI/dW/UPDI/SWD/TPI semifinal version (with minor mistakes)

x-zip-compressed - 316.43 kB - 11/19/2018 at 17:11

Download

XplainedYourself_1.0.zip

Board and schematic picture and Eagle Xplained Yourseld rev.1.0 for SPI/dW/UPDI/SWD only

x-zip-compressed - 136.65 kB - 11/18/2018 at 20:42

Download

View all 7 files

  • 1 × ATmega32U4 Microprocessors, Microcontrollers, DSPs / ARM, RISC-Based Microcontrollers
  • 2 × Resistor 100k 0805 footprint
  • 3 × Resistor 330 0805 footprint
  • 2 × Resistor 22R 0805 footprint
  • 1 × ISP 3x2 Header

View all 22 components

  • Tindie store for Xplained Yourself PCBs

    vidmo04/11/2019 at 19:09 0 comments

    Hi, I decided to open Tindie store for selling some spare boards I have. They aren't populated, but I can make a few to order, just contact me. I don't have to solder them, I might as well sell them as DIY kit...

  • rev. 1.1.1b review and rev. 1.1.1c

    vidmo12/02/2018 at 16:07 0 comments

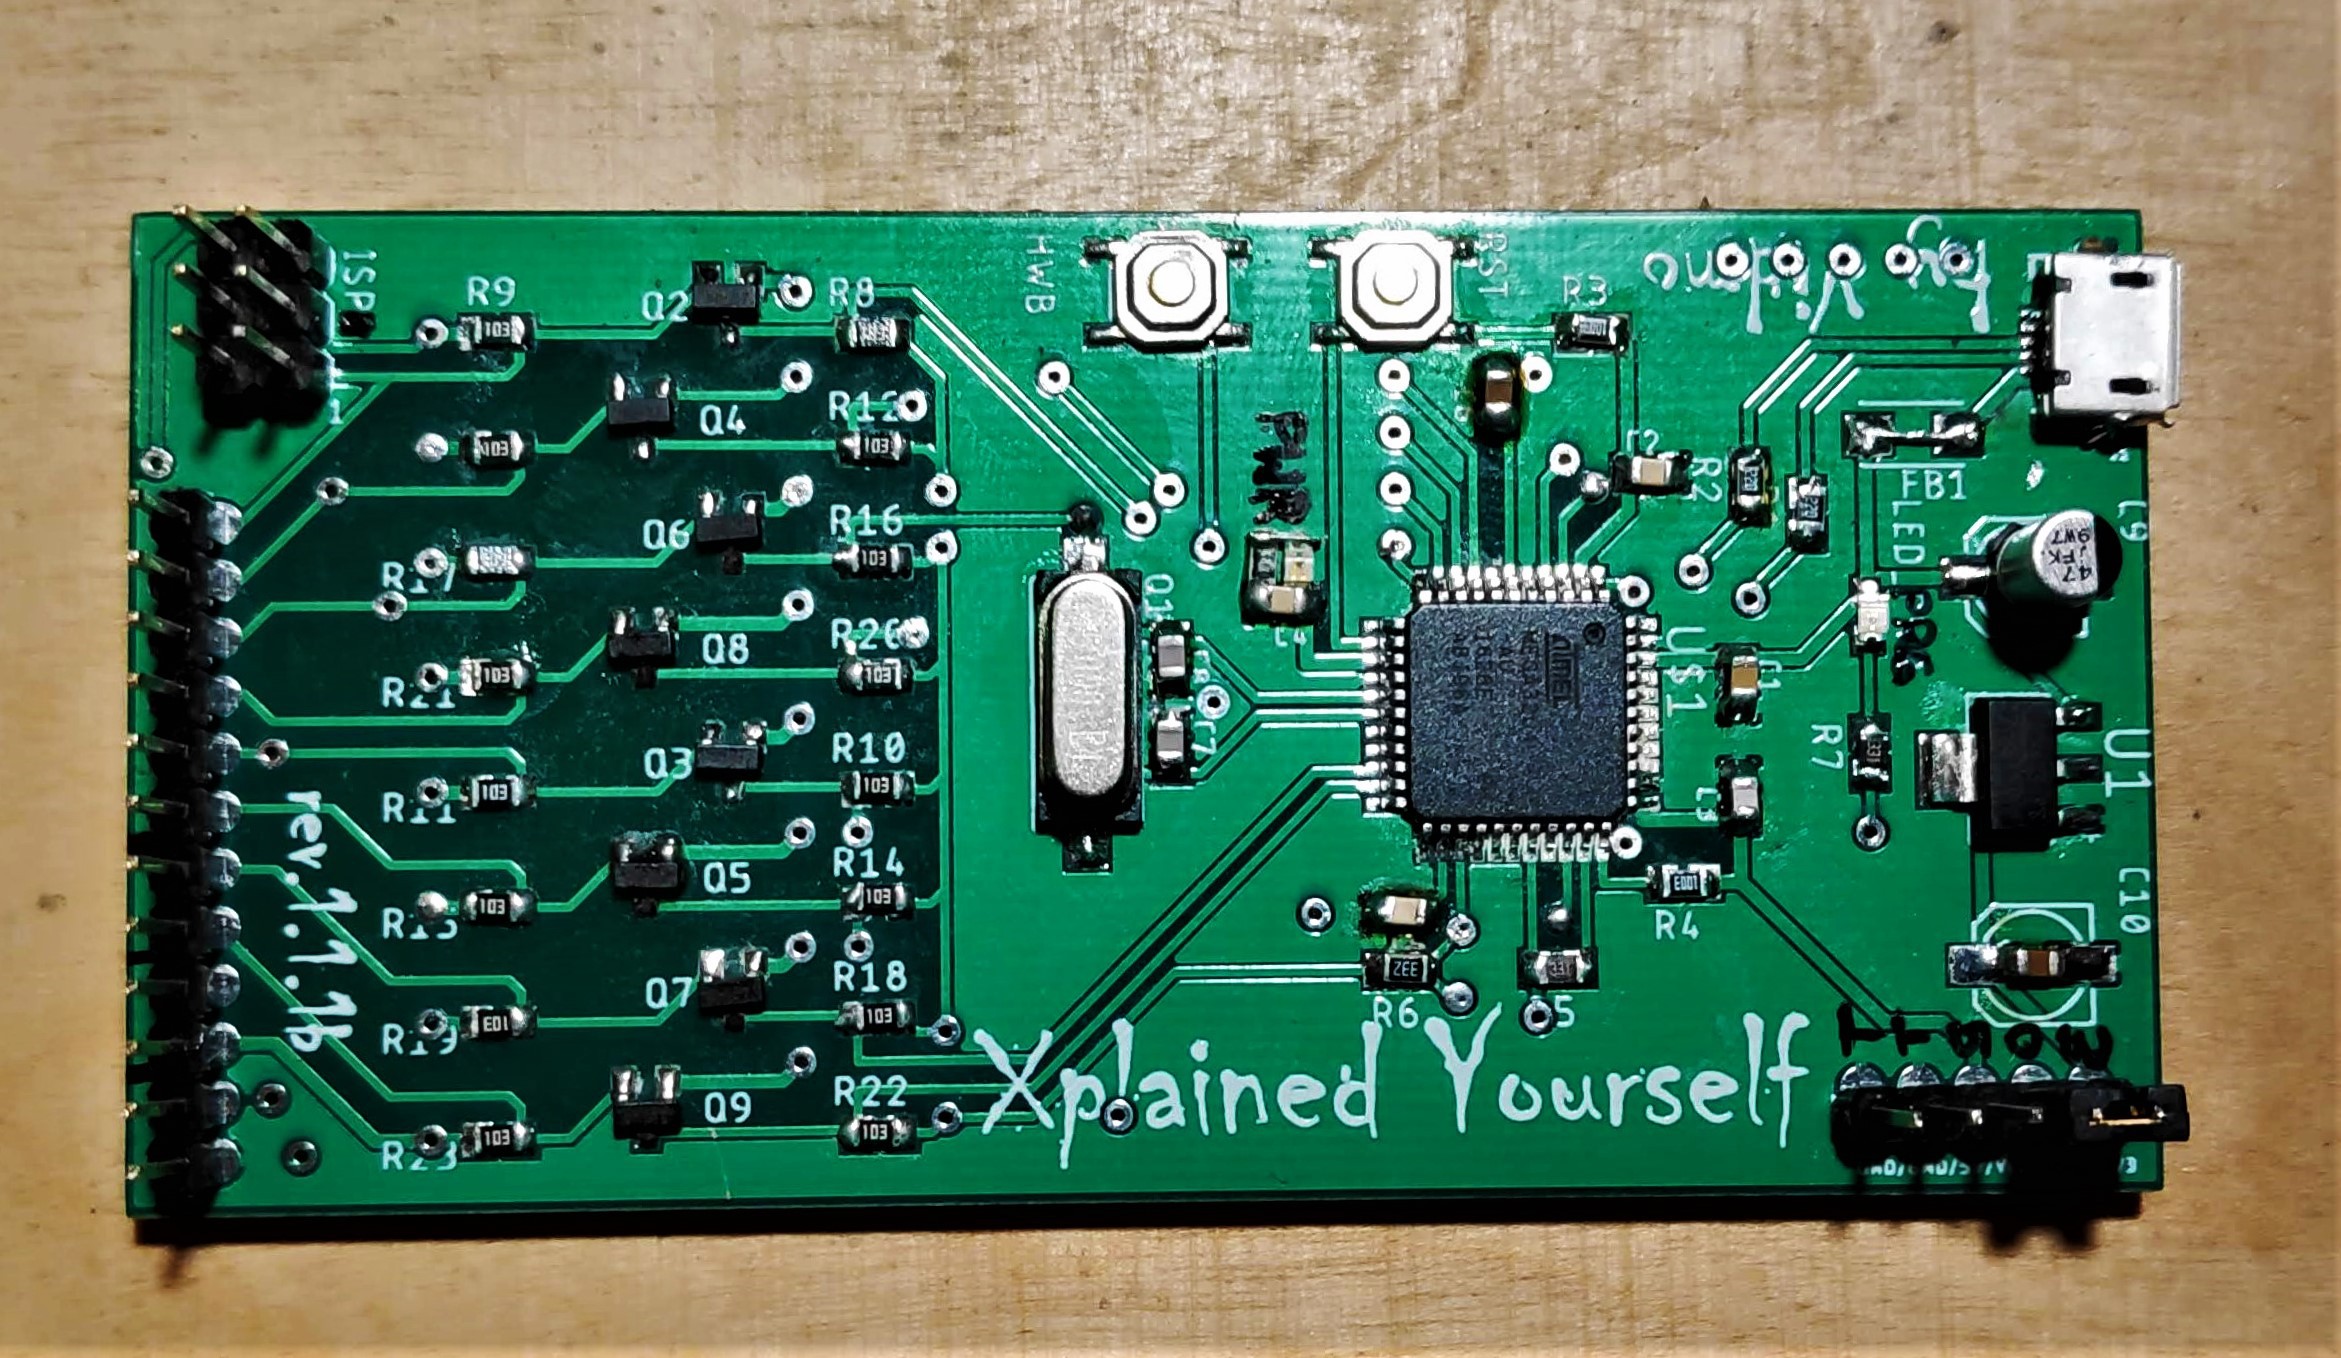
    This is how ready Xplained Yourself rev. 1.1.1b looks like:
    It works great. I tested it with ATmega328P and ATtiny1616 as far. It can program and debug, no surprise here :)
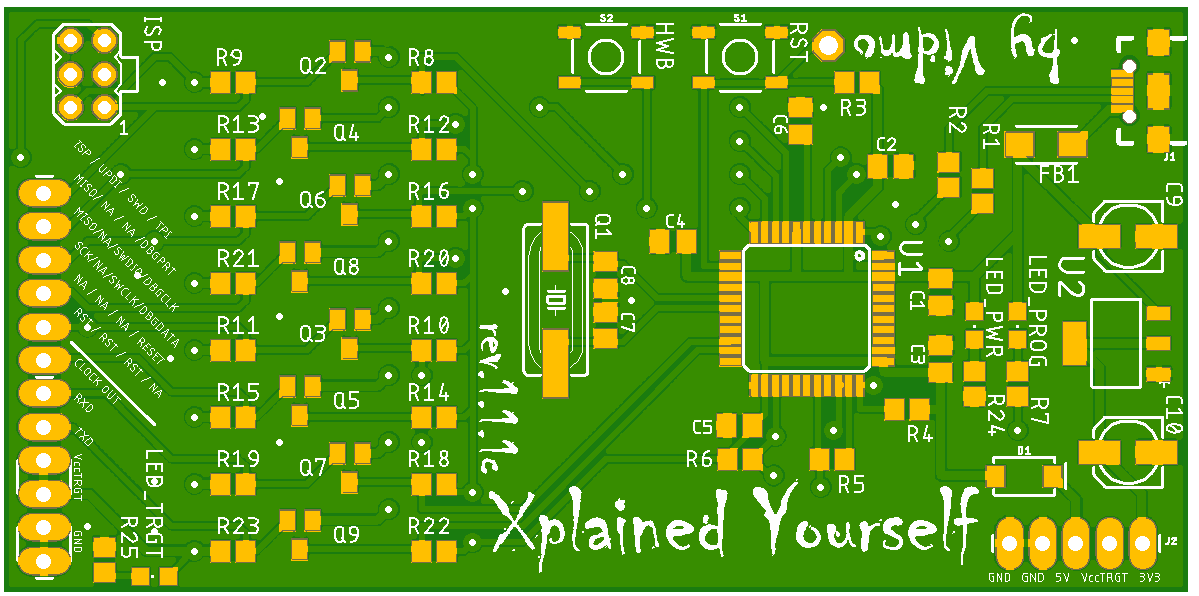
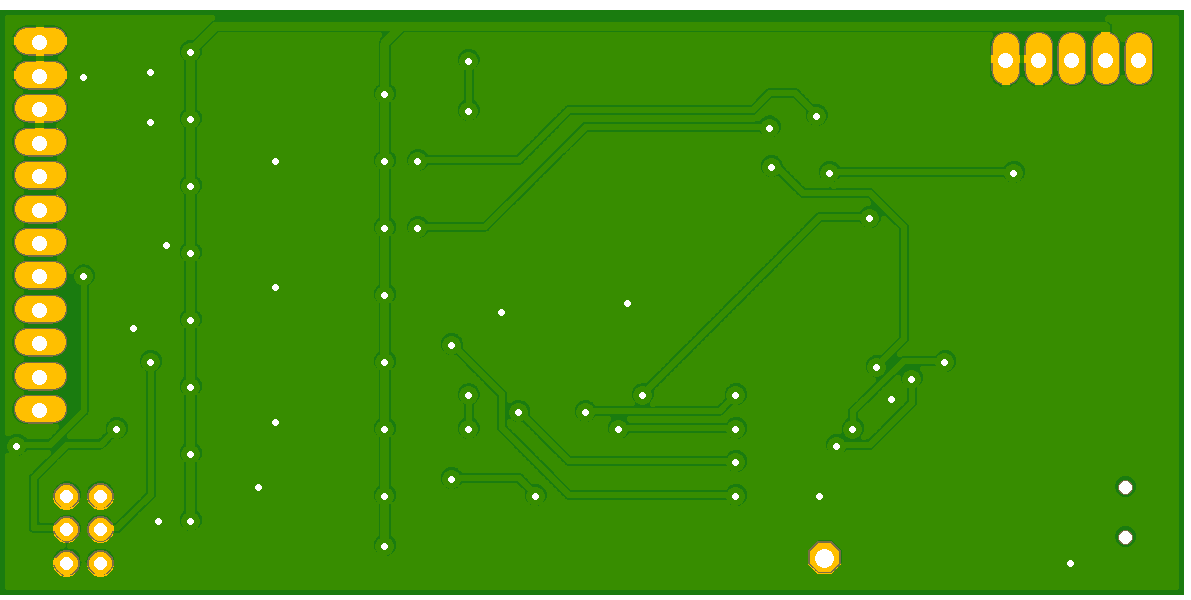
    I didn't have ferrite bead so I replaced it with piece of wire, also I didn;t have one 47u capacitor, so I replaced 1117's output cap with 1u ceramic one. I'll order them when I'll have more parts to buy.

    I made few minor mistakes:

    • LED name - is programming indicator not power. (I added power LED with it's resistor across C4)
    • Few ground vias are not connected.
    • No via is tinted.
    • Few names are hidden beneath footprints.

    I changed that in 1.1.1c. I also added some improvements:

    • More ground fields for better screening signals.
    • Power LED.
    • Target voltage sensing LED.
    • Test point for ATmega's reset (external programmer is needed to set clock out fuse, which is necessary for routing clock signal to CLKO pin).
    • 5V protection Schottky diode. Schottky diodes have low drop - 0.3V. That means, output voltage is 4.7V, which is safe for 16MHZ and 20MHz AVRs, and should be enough. 
    • Signal names on silkscreen.
    • I moved few traces I was afraid could touch others.
      Here are pictures of new board:

  • Rev. 1.1.1b

    vidmo11/19/2018 at 17:32 0 comments

    I made semifinal version. It includes MOSFET level translators. (It might become final after successful tests)

    I wanted to include integrated level translator, but they are expensive (MAX3002) or hard to find (GTL2003) or reported faulty (74245 with AVRISP mkII). There might be some conspiracy: none of the above have pinout compatible with another!

    I chose BSS138 MOSFETs because I inspired myself with Sparkfun's level converter tutorial. I believe, that generic level converters, I have, have the same transistors (or something with worse parameters) and they work properly, so it's worth a shoot.

    New board is bigger than 1.0, but still pretty small ~45x90mm (something like ~1.8"x3.6").

    I ordered few PCBs from Chinese manufacturer. They should arrive this week, I'll test them ASAP.

    Oh! The "b" in reversion means, that there was 1.1.1 in the process. In 1.1.1 I used autorouter, which did the job I wasn't satisfied with. Then I saved it with different name, rip up that mess and routed it manually.

View all 3 project logs

  • 1
    Components and board

    Rev. 1.0 was designed for ISP/dW only (mostly as a proof of concept). By coincidence it can be used with UPDI and SWD also. It lacks level converter, so be careful. 
    Rev. 1.1.0 was designed to program and debug all 4 interfaces: SPI/dW / SWD / UPDI / TPI. I also want to include level converter in debugger itself for simplicity and safety. 
    Rev. 1.1.1b is 1.1.0 with MOSFET level converters included into schematic. I chose MOSFETS, because i tested those generic Chinese converters with SWD, and they worked good. Second reason was problems with IC converter: it's hard to get GTL2003, MAX3002 is more expensive, than 32U4, 74245 was reported faulty with AVRISP mkII.

    Rev. 1.0 can be build around Arduino Micro (or others with suitable pins exposed)
    Rev. 1.1.0 could use Arduino, but TPI needs pin connected to RxD LED (it would involve some hardware hacking).
    Arduinos with 32U4 have different bootloader, than stock 32U4s. You should be able to program them with avrdude or reprogram bootloader with different programmer. DFU bootloader is avaliable at the very bottom of 32U4's page

    Bom of Rev. 1.0:

    C1,2,4,5 100n 0805
    C3,6 1u 0805
    C7,8 12p 0805
    ISP1 6 pin AVR ISP 3x2 HEADER
    J1 USB_MICRO-B_FEMALE-SMT
    J2 4x1 HEADER
    Q1 CRYSTALSM49 SM49 16MHz
    R1,2 22 0805
    R3,4 100k 0805
    R5 330 0805
    R6 3k3 0805
    S1,2 MOMENTARY-SWITCH-SPST-2-SMD-5.2MM
    U$1 ATMEGA32U4-AU TQFP44 

    Rev. 1.1.0 uses all above and additionally:

    1x 1117 3V3 LDO
    2x 4u7 polarized capacitor
    2x generic Chinese lever converter (will be replaced with something integrated)
    2x 6x1 header
    1x 3x1 header with jumper
    1x LED 0805
    1x 330 0805 resistor

    Rev. 1.1.1b uses all 1.0 components and additionally:

    1x 1117 3V3 LDO
    2x 4u7 polarized capacitor
    2x 6x1 header
    1x 5x1 header with jumper
    1x LED 0805
    1x 330 0805 resistor
    16x 10k 0805 resistor
    8x SSB138 MOSFET

    There's BOM generated by Eagle in Rev. 1.1.1b package (use it for orders, I might skipped something).

    You can etch or get PCBs done by some fab. It's your choice. I made Rev. 1.0 with few jumpers on bottom side, so it can be made as one sided. It's fairly easy to solder 0805s and ATmega with iron.

  • 2
    (re)programming ATmega 32U4

    You'll need Atmel Studio.
    For new board goto 1a, and for reprogramming goto 1b.
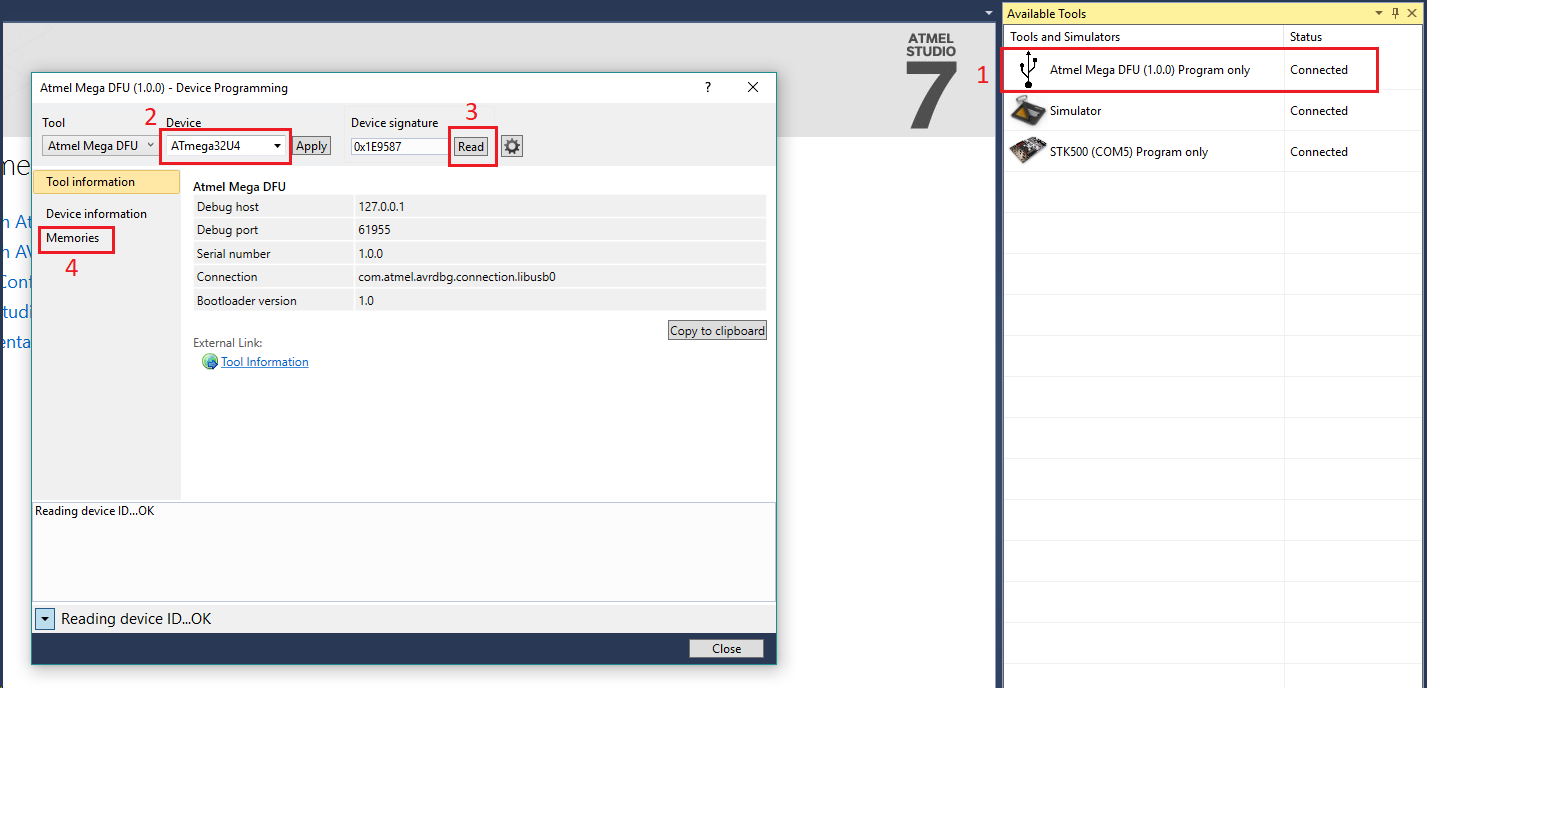
    1a. Connect Xplained Yourself board to USB, Atmel Studio should show new tool (View>Available Atmel Tools): Atmel Mega DFU.  (if not goto 1b and check continuity in your board).
    1b. Turn bootloader on by: press HWB button, press RST button, release RST, wait few seconds, release HWB.
    2. Go into programming mode (RMB click on DFU), Select ATmega 32U4, and read signature.
    3. Program Flash and EEPROM (in Memories tab) with the same protocol.
    4. Reset board with RST button.
    5. Here's your fresh, new debugger!

View all instructions

Enjoy this project?

Share

Discussions

pw1 wrote 09/06/2024 at 02:34 point

I explained to myself. AVR32DD14 debugging not working. Reading the signature and FUSEs works. Writing to program memory and EEPROM is impossible.

Attempting to write FLASH:
Error code 0x00 received from the debugger. Debugger command Memory write failed.
Severity:        ERROR
ComponentId:    20100
StatusCode:    1
ModuleName:    TCF command: Modules:writeToMemory failed.
Error code 0x00 received from the debugger. Debugger command Memory write failed.
  (Microchip Studio 7 Version: 7.0.2594)

  Are you sure? yes | no

wanggaoteng wrote 12/20/2022 at 02:53 point

Hi, I reproduce this project, but it does not work (ISP/debugWire). In the instructions above, I can't find fuse settings. Does it need to use stk500 or something else to set the fuse of atmega32u4 before the first step "1a" ? Most arduino uno users are not avr expert, can you give the people a more detailed instructions as an example? Best regards.

  Are you sure? yes | no

pw1 wrote 12/05/2022 at 13:50 point

Does this work with new AVR DD microcontrollers?

  Are you sure? yes | no

Mara Sophie Grosch wrote 04/22/2021 at 20:40 point

Hi, amazing project!


Do I see it correctly there is no PDI support, so no chance to use this with my atxmega128a4u?

  Are you sure? yes | no

cameronrsbh wrote 10/31/2020 at 23:20 point

Hi! I have reproduced this project, and it works with ISP debugging, however it never manages to connect to a SAMD21 over SWD...

I have confirmed that the SMAD21 works with a proper EDBG, so I am not sure if I am missing something... does the XYS need more than just SWDCLK, SWDIO, and GND to debug?

  Are you sure? yes | no

djana2 wrote 10/12/2020 at 13:39 point

Cześć. na PCB nie masz połączenia na ścieżce CLK_OUT.

  Are you sure? yes | no

Martin Blaha wrote 07/11/2020 at 20:29 point

Hello,

please how value is set fuses in atmega32u4 ?

lfuse= 

hfuse= 

efuse=

Thank you very much for reply

  Are you sure? yes | no

Steven Hancock wrote 10/23/2020 at 08:23 point

On a Pro Micro 32u4 running mEDBG firmware, these fuse settings work for me, they should also work with this board.

lfuse = 0x1e

hfuse = 0x91

efuse = 0xf6

If I recall correctly, I got those fuse settings from a post on the avrfreaks forum.

  Are you sure? yes | no

rbruno96 wrote 08/31/2019 at 18:13 point

Hi! Been looking for AVRICE, dragon, etc. clones for a long time without any success. Finally I came across this great hack! I developed an entire project prototype without any proper debugging, just UART-read variables and LEDs as ok/not ok and trust me it took much longer because of lack of a debugger (dWire in my case, for ATmega328). I will try to bulid your debugger from a hacked Arduino Pro Micro (cannot get Arduino Micro where I live), which has not one necessary pin exposed and I will have to work it out.
Maybe I'll make a breakout board and try it in breadboard, if I cannot get it to work at first attempts.

Thank you!

  Are you sure? yes | no

André Neves wrote 03/12/2019 at 19:04 point

Hello Vidmo.

Thank you for your great job.

I am trying to use avrdude and arduino IDE to program my atmega4809, but I can not program it.

Is it possible using atmega32u4? 

Thank you!

  Are you sure? yes | no

Steven Hancock wrote 10/23/2020 at 08:37 point

Yes, the 4809 is programmed via UPDI, it's possible to program it with this project or any other 32u4 with the appropriate firmware and circuit. The Arduino UNO Wifi uses a 32u4 with the same mEDBG firmware to program its MCU. With a resistor, a capacitor and the jtag2updi firmware you can also turn an Arduino Nano or UNO into a UPDI programmer pretty easily, but I don't think that comes with the same debugging features as mEDBG.

  Are you sure? yes | no

Dimitrios Chr. Ioannidis wrote 02/10/2019 at 10:57 point

Hi,

  first let me thank you again for this project. I implement it on breadboard and it works great.

  FYI, I think I found a limitation. I tried to use debugwire on a atmega328p board running at 20MHz and I couldn't get it to work. It works if I change the fuses on the board to use external clock but this beat the purpose in my case ( timing bugs ).

  Anyway thx again.

  Are you sure? yes | no

vidmo wrote 02/21/2019 at 16:05 point

Thanks for that info. I will check that out. You could try to overclock 32U4 to 20 MHz. I'll try that as soon as I get 20MHz crystals.

  Are you sure? yes | no

Lloyd Blythen wrote 02/09/2019 at 08:27 point

Just found this but I'll certainly study it. Looks like a great job on a project that's potentially very useful. There's been plenty of discussion elsewhere about turning an Xplained Mini's on-board target into an STK500 programmer for standalone chips; it's generally considered interesting but uneconomic. This project is the first I've seen that addresses the board's greater potential as a debugger. Thanks for all your work, vidmo, and especially for publishing it :-)

One question: is your hacked code proprietary? Can't see it among the files or anywhere else here.

  Are you sure? yes | no

Kieran Paulger wrote 12/11/2018 at 12:10 point

I just wanted to thank you for your work, I have a attiny416 xplained board, flashed your code on, and now it works perfectly as a generic UPDI programmer for the ATTINY816

  Are you sure? yes | no

Dimitrios Chr. Ioannidis wrote 11/21/2018 at 09:41 point

Hi I'm very interested in this. 

EDIT : Deleted my RTFM question. 

PS: ( If it works I'm planning to implement the mEDBG protocol for the Lazarus IDE using the Free Pascal AVR compiler. )

  Are you sure? yes | no

Similar Projects

Does this project spark your interest?

Become a member to follow this project and never miss any updates