 vidmo
vidmo-
1Components and board
Rev. 1.0 was designed for ISP/dW only (mostly as a proof of concept). By coincidence it can be used with UPDI and SWD also. It lacks level converter, so be careful.
Rev. 1.1.0 was designed to program and debug all 4 interfaces: SPI/dW / SWD / UPDI / TPI. I also want to include level converter in debugger itself for simplicity and safety.
Rev. 1.1.1b is 1.1.0 with MOSFET level converters included into schematic. I chose MOSFETS, because i tested those generic Chinese converters with SWD, and they worked good. Second reason was problems with IC converter: it's hard to get GTL2003, MAX3002 is more expensive, than 32U4, 74245 was reported faulty with AVRISP mkII.Rev. 1.0 can be build around Arduino Micro (or others with suitable pins exposed)
Rev. 1.1.0 could use Arduino, but TPI needs pin connected to RxD LED (it would involve some hardware hacking).
Arduinos with 32U4 have different bootloader, than stock 32U4s. You should be able to program them with avrdude or reprogram bootloader with different programmer. DFU bootloader is avaliable at the very bottom of 32U4's pageBom of Rev. 1.0:
C1,2,4,5 100n 0805
C3,6 1u 0805
C7,8 12p 0805
ISP1 6 pin AVR ISP 3x2 HEADER
J1 USB_MICRO-B_FEMALE-SMT
J2 4x1 HEADER
Q1 CRYSTALSM49 SM49 16MHz
R1,2 22 0805
R3,4 100k 0805
R5 330 0805
R6 3k3 0805
S1,2 MOMENTARY-SWITCH-SPST-2-SMD-5.2MM
U$1 ATMEGA32U4-AU TQFP44Rev. 1.1.0 uses all above and additionally:
1x 1117 3V3 LDO
2x 4u7 polarized capacitor
2x generic Chinese lever converter (will be replaced with something integrated)
2x 6x1 header
1x 3x1 header with jumper
1x LED 0805
1x 330 0805 resistorRev. 1.1.1b uses all 1.0 components and additionally:
1x 1117 3V3 LDO
2x 4u7 polarized capacitor
2x 6x1 header
1x 5x1 header with jumper
1x LED 0805
1x 330 0805 resistor
16x 10k 0805 resistor
8x SSB138 MOSFETThere's BOM generated by Eagle in Rev. 1.1.1b package (use it for orders, I might skipped something).
You can etch or get PCBs done by some fab. It's your choice. I made Rev. 1.0 with few jumpers on bottom side, so it can be made as one sided. It's fairly easy to solder 0805s and ATmega with iron.
-
2(re)programming ATmega 32U4
You'll need Atmel Studio.
For new board goto 1a, and for reprogramming goto 1b.
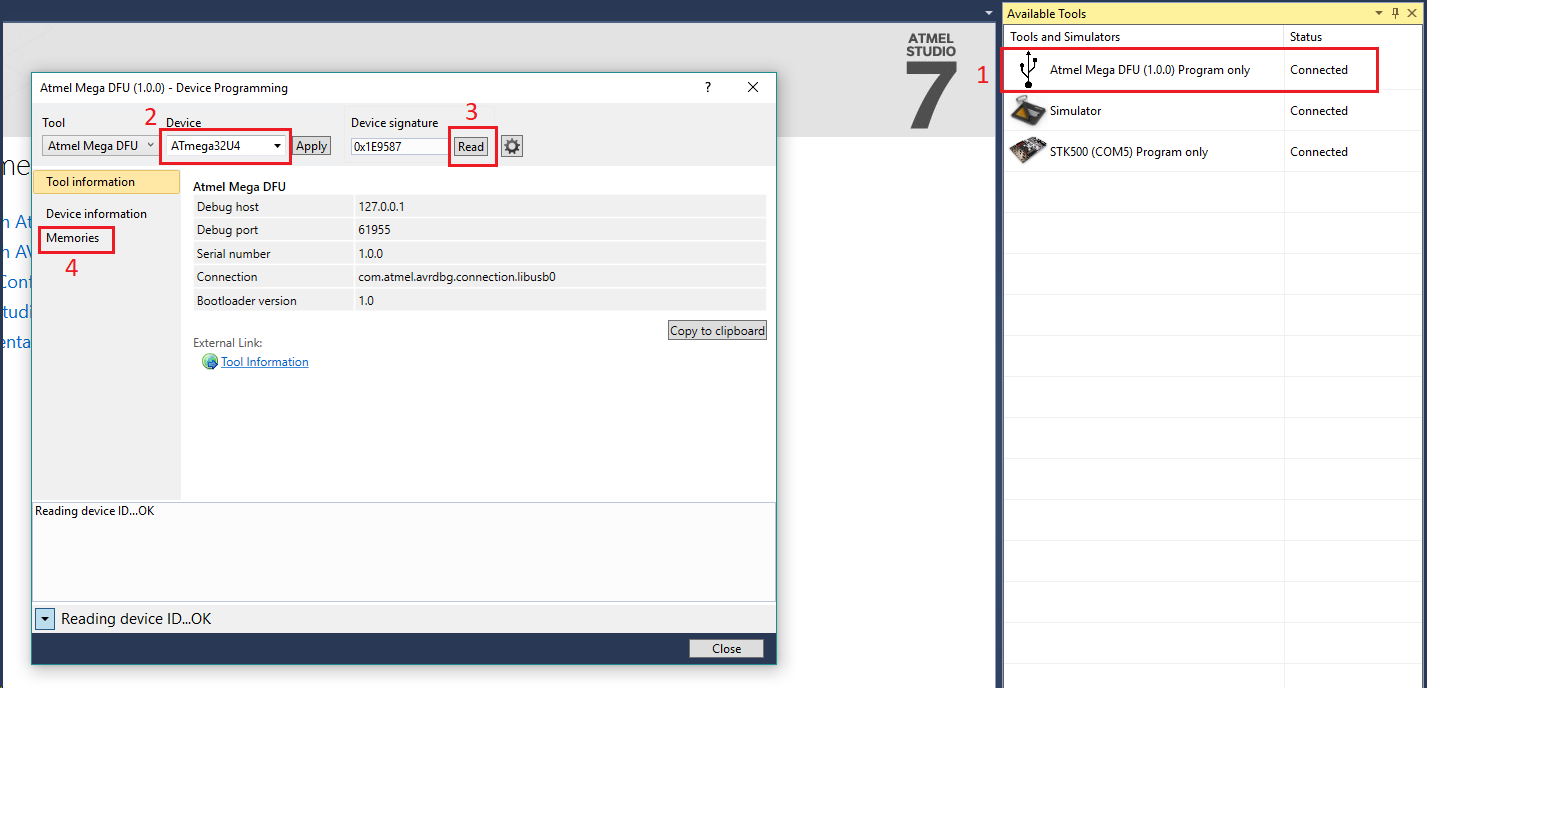
1a. Connect Xplained Yourself board to USB, Atmel Studio should show new tool (View>Available Atmel Tools): Atmel Mega DFU. (if not goto 1b and check continuity in your board).
1b. Turn bootloader on by: press HWB button, press RST button, release RST, wait few seconds, release HWB.
2. Go into programming mode (RMB click on DFU), Select ATmega 32U4, and read signature.
3. Program Flash and EEPROM (in Memories tab) with the same protocol.
4. Reset board with RST button.
5. Here's your fresh, new debugger!![]()
![]()
Xplained Yourself
Xplained-like mEDBG debugger for almost all former Aymel's AVR and ARM microcontrollers

Discussions
Become a Hackaday.io Member
Create an account to leave a comment. Already have an account? Log In.
Hello.
Thank you for your great job.
I am trying to use avrdude and arduino IDE to program my atmega4809, but I can not program it.
Is it possible using atmega32u4?
Thank you!
Are you sure? yes | no