Capt. Flatus O'Flaherty ☠
-
Making Data Available for Transmission in Python
12/07/2018 at 22:33 • 0 commentsI've not programmed in Python before, but compared to C++ it already seems much easier and a lot more intuitive.
I worked out that the Lora beacon was the probably right place to start tinkering and that it needed a 'list' of numbers that represent ANSII characters and that these can be decimal or hex values. The actual phrase in the beacon program that transmits the data is on line 65:
self.write_payload(j)where j is the payload list, which would normally look something like this for 'Hello World':
([72, 101, 108, 108, 111, 32, 87, 111, 114, 108, 100])To get 'Hello World' into this list format the following code is used:
import array as arr import numpy as np c= 'Hello World' g = arr.array('i',[]) n=-1for x in c: g.extend([0]) n = n+1 y = ord(x) g[n] = y
j = np.array(g).tolist()
print(g)The code converts each of the characters in the string to an integer in an integer array, denoted by the letter 'i', of length c, corresponding to the number of characters and spaces in the string. The extend command extends the array to accept more integers. Next, for each of the characters in the string the 'ord' command does the actual character to integer transformation and 'g[n] = y' dumps it into the right place in the array. Last is the array to list command that turns the whole array into the list format. Simples!
The new LoRa beacon file is called Tegwyns_LoRa_Beacon in the files section of this blog and, assuming it's located in the same place as the original beacon file, it would be run from the command line with:
cd /home/pi/Desktop/dragonino_python_fix/pySX127x-master/ && python3 Tegwyns_LoRa_Beacon.py -f 869 -s 7 -
Port the Code Over to Python
12/07/2018 at 13:03 • 0 commentsSince the neural network module using Python 3 i thought it would be a good idea to get the LoRa transmiiter hat on the Raspberry Pi, the Dragonino, to also be controlled using this version of Python. Fortunately, people have already done this and it's well documented here: https://github.com/mayeranalytics/pySX127x/issues/21
However, there are a couple of extra steps that are skipped, so I'll write out the whole procedure here:
1. Remove the SD card from the RPi and insert it into a suitable PC.
2. Copy and paste the config.txt file from the /boot folder to your desktop folder.
3. Change the permissions using chmod 777 in command line, or whatever is convenient, and edit the file by adding:
dtoverlay=spi0-cs,cs0_pin=25
to the very top.
4. Save, and paste back onto the SD card into boot again. This is the only way to quickly and easily edit this file!
5. Download the Python files from here: https://github.com/mayeranalytics/pySX127x , extract, and open up the 'board_config.py' in a text editor.
6. Use the following values in board_config:
    DIO0 = 4
    DIO1 = 23
    DIO2 = 24
    DIO3 = 21
    LED = 18
    SWITCH = 7
...... Oh, I nearly forgot, if you're in Europe, we use 868 (ish) Mhz so where it says: 'low_band = true' in board_config, this needs to be changed to 'false'. It's pretty self explanatory if you read the comments next to it.
7. Find the 'constants.py' file and edit it by adding the following, being careful to use exactly 4 spaces to be compatible with Python formatting:
    @add_lookup
    class SPI_BAUD_RATE:
        MAX_SPEED_HZ = 5000
    @add_lookup
    class SPI_MODE:
        SPI_MODE = 0b01
8. Find the LoRa.py file and find the line:
spi = BOARD.SpiDev()
insert these lines right underneath it:
spi.max_speed_hz = SPI_BAUD_RATE.MAX_SPEED_HZ
spi.mode = SPI_MODE.SPI_MODE
9. Open a terminal and CD to the directory that contains the 'tx_beacon.py' file eg
cd /home/pi/Desktop/dragonino/psySX127x-master/10. Where '869' is the frequency in MHz and '7' is the spreading factor, run the beacon program using:
python tx_beacon.py -f 869 -s 711. Tune the Arduino to 8690E5 and you should see something like this in the serial console:
Received packet ' ' with RSSI -33
Received packet ' ' with RSSI -23
Received packet ' ' with RSSI -33
Received packet ' ' with RSSI -26
Received packet ' ' with RSSI -25
It's working!
12. If you want to see something a bit more meaningful, open 'tx_beacon.py' with text editor and, near line 65, find:
self.write_payload([0x0f])
Change this to:
self.write_payload([0x57,0x68,0x61,0x74,0x20,0x74,0x68,0x65,0x20,0x66,0x75,0x63,0x6B,0x21])WARNING: This will transmit obscene language over the airways so don't let your granny see it!
-
Getting LoRa Peer to Peer Working
12/05/2018 at 17:16 • 0 comments![]()
![]()
![]()
Most info on the interweb about LORA seems to point to the 'Things Network' in which we are all assimilated into some kind of cyber - Borg Utopian style collective in we all cooperate without conflict.. but what if we just want basic data transfer between 2 devices and dont need the whole world to witness our data? Peer to peer is quite possibly the answer.
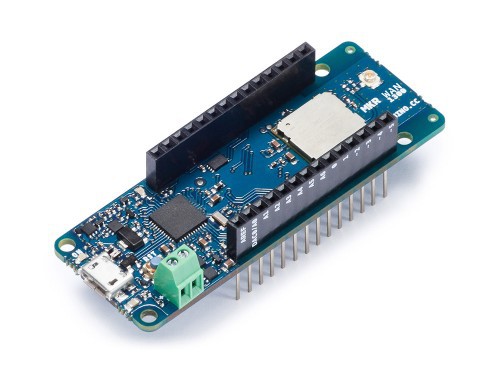
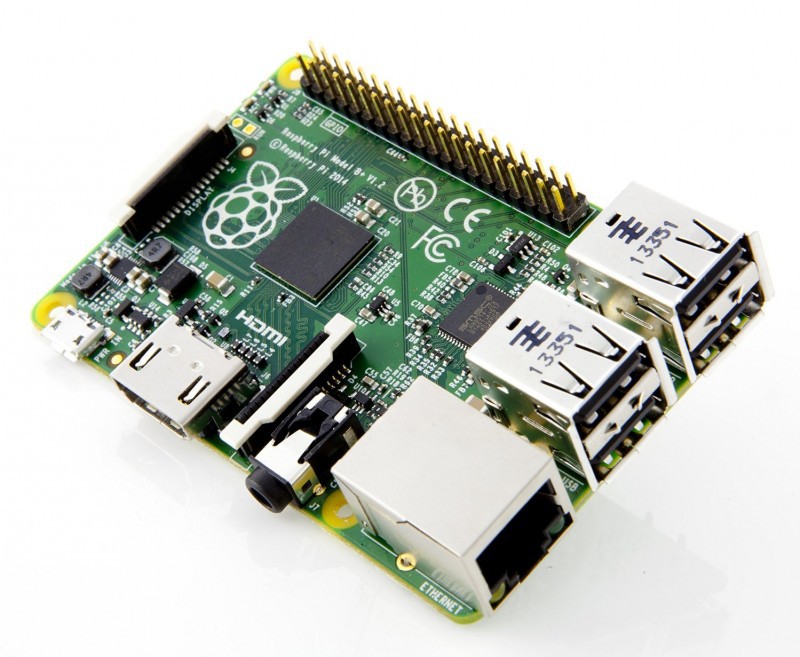
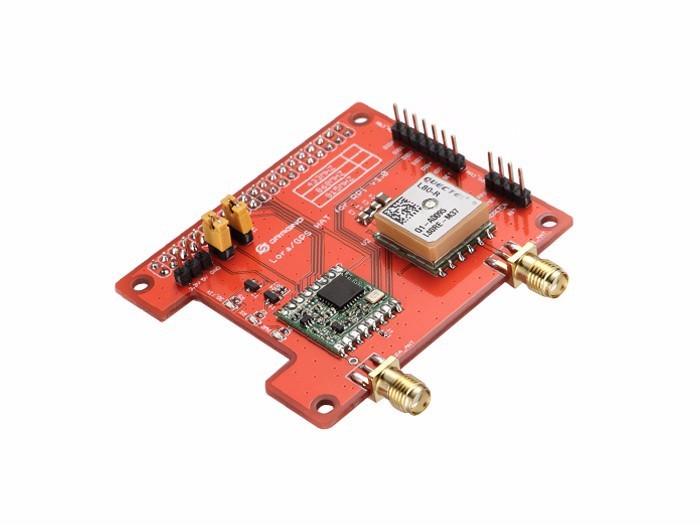
In this case, a Raspberry Pi with a Draganino LoRa/GPS hat will send data about the security state of a remote location (eg farm gate) to tell us if people are coming in or if someone has stolen one of our cows. The receiver is an Arduino MKRWAN 1300 which has a dedicated LoRa chip soldered onto it.
BE WARNED: This Arduino is a 3.3V device and will be destroyed by applying 5v to any (or most of) of the pins. Also, never operate either the Dragino hat or the Arduino device without an antenna attached!
As far as code is concerned, both instances are really simple, although it took me a while to work out that I had to flash the Arduino with a firmware upgrade to get it to work properly. The Raspberry Pi was processed as follows:
$ wget https://codeload.github.com/dragino/rpi-lora-tranceiver/zip/master
$ unzip master
$ cd rpi-lora-tranceiver-master/dragino_lora_app
$ make
$ cd rpi-lora-tranceiver-master/dragino_lora_app &&./dragino_lora_app
$ ./dragino_lora_app sender
I've no idea how secure this is, but we can look at that later on.
NB. The RPi MUST have a proper power supply and SPI needs to be activated in the settings. OS used is Raspian stretch.
Setting up the Arduino is just as easy. There's just a cuple of things to watch out for:
Firstly, the Rpi, in my case attempted to transmit 'HELLO' every 3 seconds on 868.1 MHz, so the Arduino needs to be configured accordingly ...... 868.1 MHz = 8681 x 105 = 8681E5. Other regions eg USA will use different sets of frequencies.
Download Arduino lora libraries here: (both are required)
https://github.com/sandeepmistry/arduino-LoRa
https://github.com/arduino-libraries/MKRWAN
After installing the libraries in the normal way, open the MKWAN example set and up load 'MKRWANFWUpdate_standalone' to the Arduino and open serial console. You should see the update as it progresses. Next, find the 'LoRa' example set and select 'LoRaReceiver' and upload. Dont forget to edit the frequency as mentioned before! Open the serial console and you should see the HELLO sent from RPI.
![]()
A cheapo SDR USB dongle such as RTL-SDR can be very useful for checking that there is a signal being transmitted on the correct frequency. The software used is Zadig + Cubic SDR.
That's it for now. Later on we'll have to edit the main.cpp file in the Rpi to get object detection data, .... but that's another story!
LoRa + Neural Network Security System
Spot trespassers with a neural network and transmit basic results via LoRa