agp.cooper
-
Final Version?
01/28/2019 at 12:20 • 0 commentsFinal Version, Perhaps!
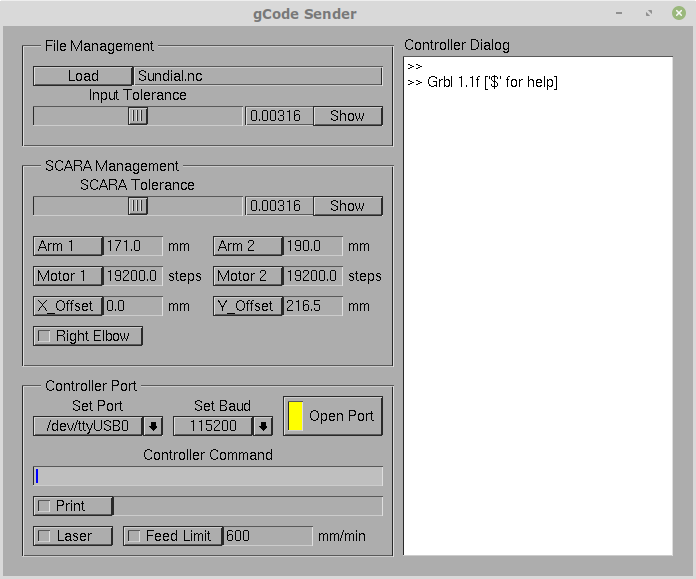
Spent the day reworking the interface (adding SCARA hardware support).
![]()
Added the option for right or left handed (default) elbows.
Here is the test input file:
![]()
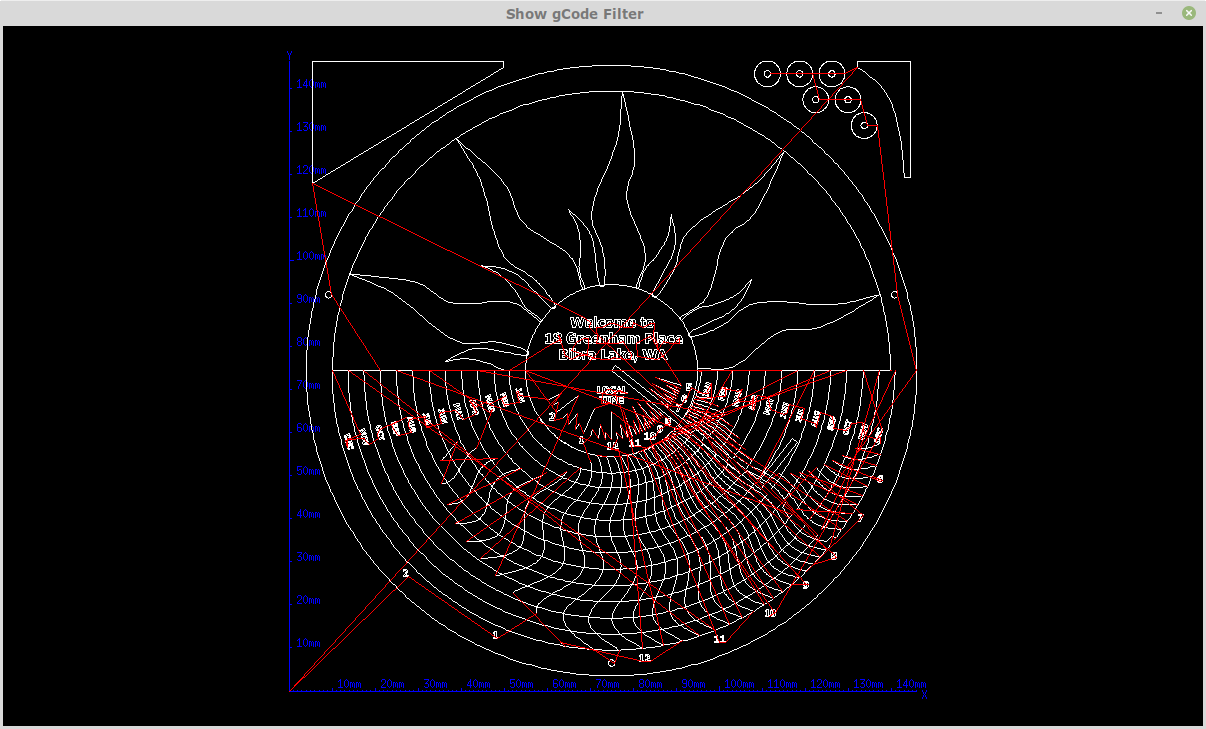
An here is the SCARA output:
![]()
Notice how the image is trimmed to the maximum SCARA reach.
Hardware
Bought a 500mw laser head, power supply and a new controller.
So I can start thinking about a prototype SCARA machine.
Termux
Termux is an Android app that run Linux. It runs without access to the root directory of the device (this make things a bit tricky). Initially it is just a terminal but X11 can be installed. With a vnc server and viewer, graphical programs can be run. Add CLANG which pretends to be GCC), programs and library can be compiled and run. Yes, you guessed it, I compiled xForms to run under Termux on my tablet. It works but without a real mouse or real keyboard it is rather clumsy.
IUP
IUP (supports X11) is another small C GUI library that is better suited to Android. Like a web-page, it moves around the buttons etc, to suit the device.
libui
Another small X11 C GUI, I looked at.
Nuklear
Initially I looked at this one before finding xForms. But without documentation it looked too hard to start with. Looking back it looks like a nice one to use with CLANG. It has no dependencies and is contained in a single header file.
As an added bonus it works in "immediate mode", that is there is no event loop, just post your form as required.
AlanX
-
Grbl 0.7d
01/07/2019 at 13:57 • 0 commentsGrbl 0.7d
My old laser plotter uses D12 for the laser control while Grbl 0.8 and higher use D11.
D11 makes sense as it has PWM, but unless I hack the Controller hardware I have to stay with Grbl 0.7d.
The old Laser plotter was never built to last. All the Perspex has cracked and broken (must be very cheap Perspex) and the ribbon cable glue has let go.
Anyway I set the defaults for my laser plotter and yes it works. But recovery from an error or a state I had not thought of, needs a look at as the flags are not always properly set.
The other problem is checking if the image will fit inside the plotting limits and setting plotting defaults. A popup configuration window may be helpful.
---
Watching Grbl 0.7d burn its way through the code it is clear why my laser plotter was not used much and why I wrote the gCode Filter. Still it struggles to burn evenly even after filtering.
Grbl 1.1f has made an effort to resolve this so it may be best to retire my old laser plotter and get a new one. Or at least rebuild the old one.
AlanX
-
The Real Grbl 1.1f
01/05/2019 at 14:08 • 0 commentsGrbl 1.1f
Grbl has made some changes to the serial protocol. The "V" in front of version is gone and the speed is now 115200 baud.
So a minor rework. Introduced a bug that cost a lot of time to find.
Grbl has inhibited the reset on connection and prints a \r\n before the "Grbl " signature. You need to hit the reset button to get Grbl to respond.
Line terminations are \r\n (Windows) rather than \n (Linux) but Grbl tolerates \n.
Still not working as I like, something for tomorrow.
Uploading Grbl to a spare Nano
First down load Grbl v1.1f from: https://github.com/gnea/grbl/releases
I renamed the file to shorten it, to "grbl_v1_1f.hex".
Although I have Arduino installed, I put it in /opt rather than among the system files.
So I installed avrdude using:
- sudo apt install avrdude
To upload Grbl, open a terminal where the "hex" file is and type:
- /usr/bin/avrdude -v -patmega328p -Uflash:w:grbl_v1_1f.hex:i -carduino -b 57600 -P /dev/ttyUSB0
Obviously, my serial port is /dev/ttyUSB0 (yours may be something else).
Strange Behaviour
I was having problems communicating with Grbl.
First problem with GUI programming is that different parts of the program can talk to the serial port. Make sure you are debugging the right place!
Second, the end of line termination "\r\n" (i.e. Windows) did not work, even though Grbl is a "\r\n" device. The code has to use "\n". The "System" must be changing this on the way out?!
Grbl uses a ^x as a soft-boot, I will have to add this to the initialisation code.
Working
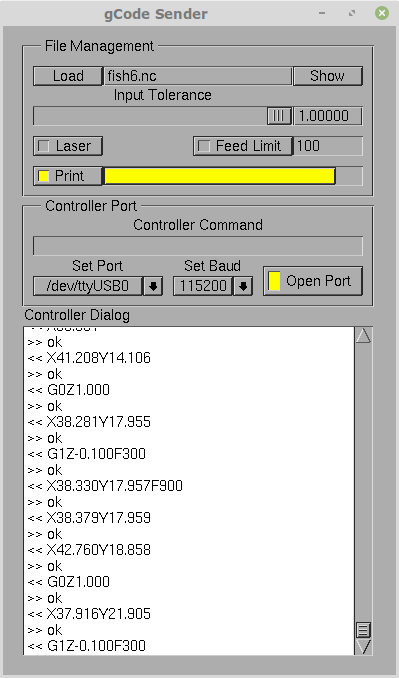
Okay, it's taking to Grbl and although the Nano is not hooked up to the Laser machine, it is working is way though the file at its own pace:
![]()
And:![]() Note, the first "<< ", that was because there is a duplicate command, and the second "<< " was a blank line at the end of the file. So all good.
Note, the first "<< ", that was because there is a duplicate command, and the second "<< " was a blank line at the end of the file. So all good.Need to look at initiation codes to make sure my units match.
It Happens
It was working! The image above proves it, but this afternoon it stopped.
Any way I swapped out Serial code for the "Terminal" code as that was working.
Turned off the Command Dialog while the print is active (could be messy).
AlanX
-
Ready for Testing
01/05/2019 at 04:14 • 0 commentsReady for Testing
Pulled a couple of long days, but now the code appears to be working, just need to do some real testing.
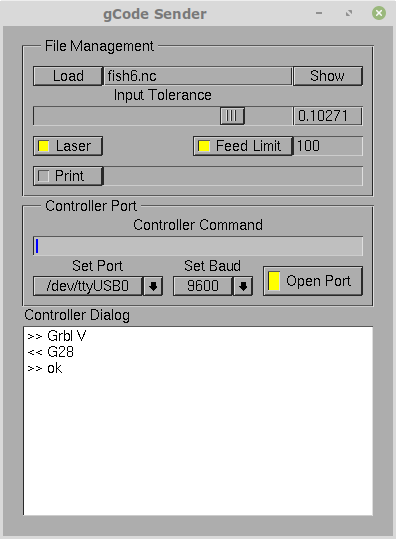
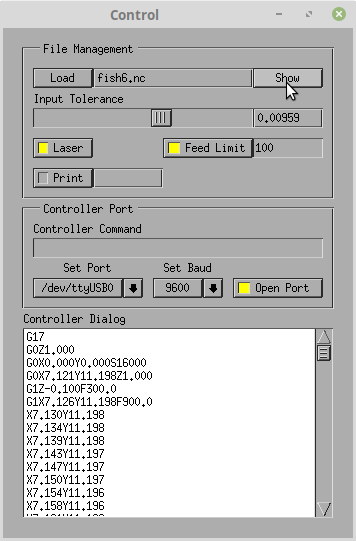
Here is the Control Panel:
![]()
I have loaded a 49k lines gCode file (fish6.nc) and reduced it to 1k lines using the Input Tolerance slider (tolerance=0.1).
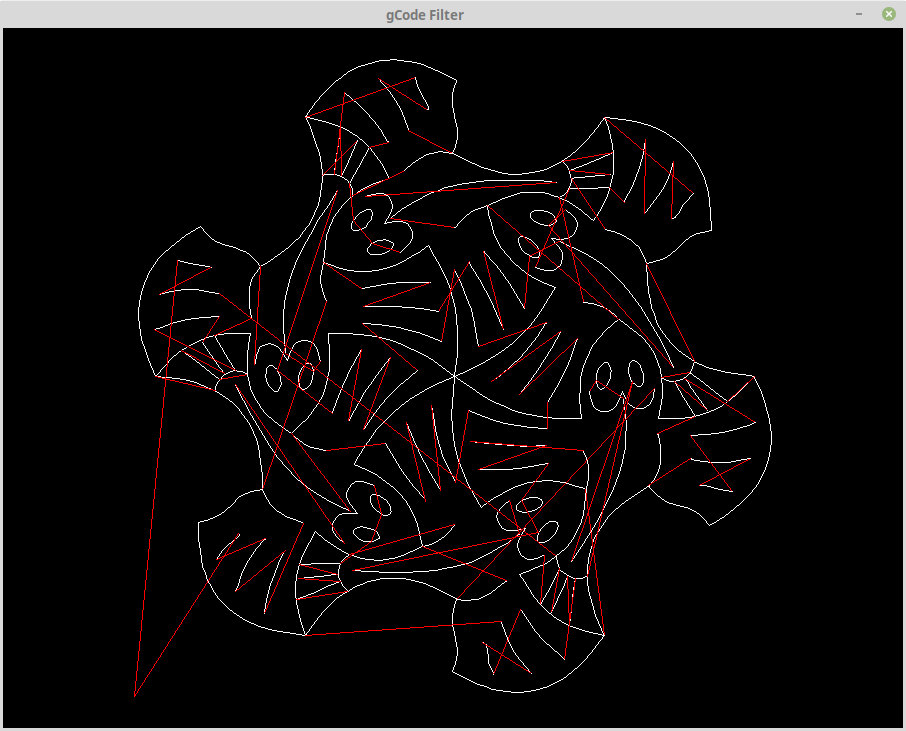
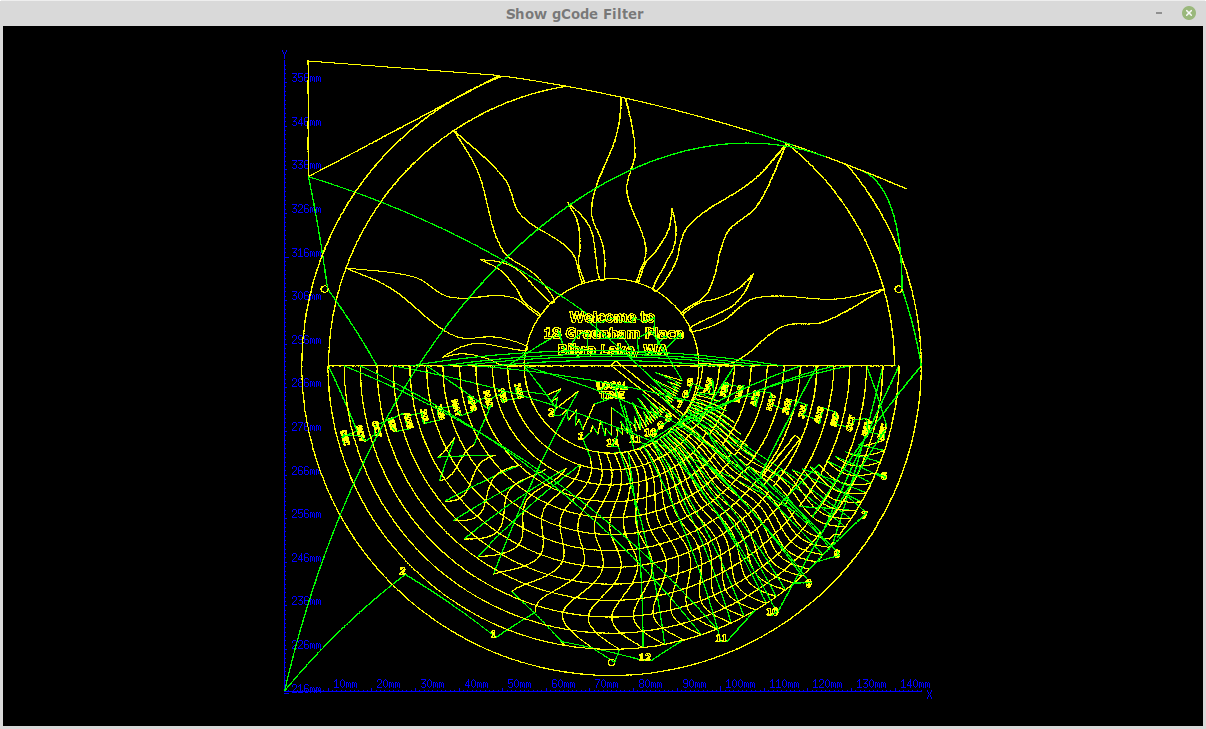
If you "Show" the file you get:
![]()
Next I turned on "Laser", which adds M3/M5 (Laser On/Off) codes depending on the Z value (on if less than zero otherwise off).Next I limited the feed speed to 100 units (mm/sec?).
Then I Opened the Serial Port (/dev/ttyUSB0). You cannot print unless the port is open. When you open the port the controller (i.e. Arduino) is reset, and then you get the initialisation mesage "Grbl V".
I then sent "G28", the Homing function to the controller via the Controller Command input box (as per the Control Panel image above). The file has G17 (metric) and G90 (absolute coordinates) is assumed.
After that you can "Print" the file. The progress bar will grow and when done resets.
You can pause printing by turning off the "Print" button.
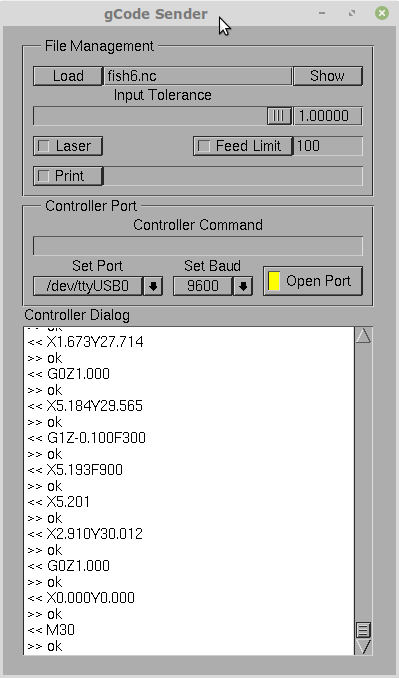
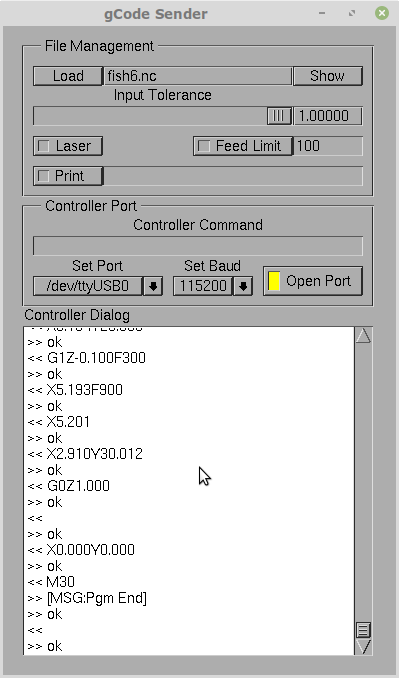
If you close the serial port the print will be cancelled.Here is the Control Panel after printing has been completed:
![]()
You can see the M3/M4 Laser codes and the Feed Limit (=100) in action in he Controller Dialog window.
There is probably some tweaking to be done with regard to how the buttons interact.
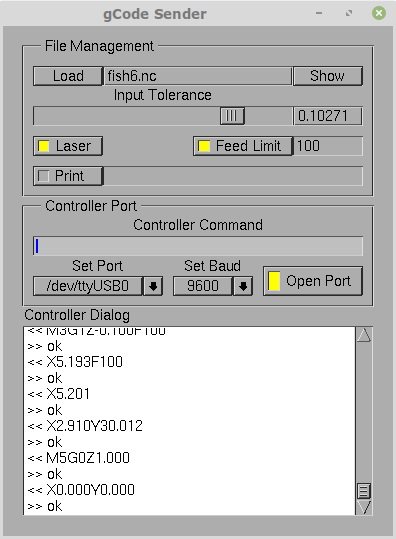
For the Laser flag I block any M3/M5 codes in the file and insert M3/M5 for laser on/off.
I also block any Z output if the Laser flag is set. This results in code like "M5G0", which seems strange but is legal (it changes mode from G1 to G0 which out moving):
![]()
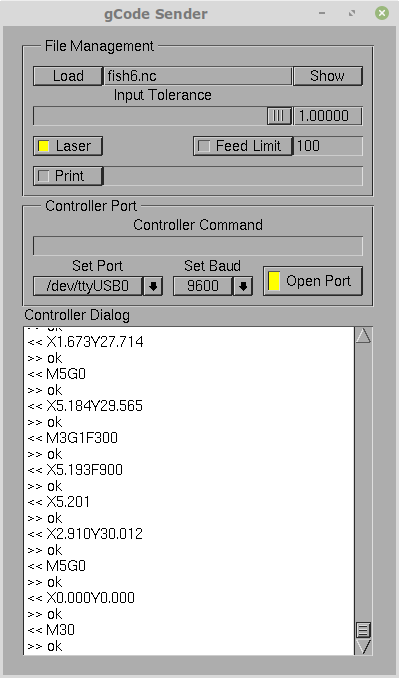
The same code without the Laser flag looks like this:
![]()
One important issue with my gCode parser is that it only accepts the first code type (i.e. M, T, G, X, Y, Z, F and S) found on a line, any other of the same type is ignored. So if your code has something like "M3G1X10.0M5", then the "M5" will not be recognised (burn baby burn!). I think only hand written code will be like this!
The Code is about 700-800 lines and needs a tidy up.
If you have some horrible gCode (xyz) that you think will break my code, email me.
AlanX
-
XForms' Form Designer
12/29/2018 at 05:29 • 0 commentsGUI Programming
I generally prefer to code directly but why not try the Form Designer (fdesign).
Where to Start? Perhaps page 93 of the documentation ("Part II - The Form Designer").
Okay after two days it is pretty straight forward and easy to use.
Here is my gCodeSender clone:
![]()
Fonts
That is changing the font type, size etc, does not seem to work. Te demo "fonts.c" does not work. It does not help that I Mint does not have the default font (i.e. helvetic-*-?, courier-*-?, times-*-?, charter-*-? and Symbol).
Even then, if I try to install my own, they register but same result (i.e. font).
After Another Two Days
The serial port opens and closes pretty reliably. An unplug while the port is open hangs the port but the next port is provided upon "Reflesh" (i.e. "/dev/ttyUSB0" is lost but "/dev/ttyUSB1" pops up). The Arduino serial controller has the same problem.
After lots of research I find the "hang" problem is not fixable. It is an issue with how the drivers work or coded.
I added locks to the serial ports just in case of two program instances inter-react.
Still need to write the background serial port communications code. Looking to use the "idle callback procedure" for this. My stand alone serial test programs seem to be working properly.
Wrote some code to sort out the line ending options (it pretends to be a Grbl controller). Yes, I get everything:
- \n (linux)
- \r (arduino!?)
- \r\n (Windows)
- \n\r (not so far!)
- \0 (zero terminated string - not tested)
The code looks like this:
void setup() {
  // start serial port at 9600 bps and wait for port to open
  Serial.begin(9600);
  while (!Serial);

  // send a byte to establish contact until receiver responds
  establishContact();
}

void loop() {
  static char inByte='\0';         // incoming serial byte
  static char lastByte='\0';       // last incoming serial byte

  if (Serial.available()>0) {
    // get incoming byte:
    lastByte=inByte;
    inByte=Serial.read();

    if ((lastByte=='\r')&&(inByte=='\n')) {
       // Block on second byte of \r\n series
       inByte='\0';
    } else if ((lastByte=='\n')&&(inByte=='\r')) {
       // Block on second byte of \n\r series
       inByte='\0';
    } else if ((inByte=='\n')||(inByte=='\r')||(inByte=='\0')) {
       // Print if /r, /n, /r/n, /n/r or /0
       Serial.println("ok");
    }
  }
}

void establishContact() {
  while (Serial.available()<=0) {
    Serial.println("Grbl V");   // send the initialisation string
    delay(1000);
  }
}
Form Designer
The "Show" button calls "gCodeFilter" that pops up a display of the loaded file after filtering (i.e. Input Tolerance):
![]()
A Terminal Program
I found this Serial Terminal program (source: https://en.wikibooks.org/wiki/Serial_Programming/termios):
#include <stdlib.h>
#include <stdio.h>
#include <unistd.h>
#include <fcntl.h>
#include <termios.h>
#include <string.h> // needed for memset

int main(int argc,char **argv) {
  struct termios tio;
  struct termios stdio;
  int tty_fd;
  char c='D';

  printf("Please start with %s /dev/ttyUSB0 (for example)\n",argv[0]);

  memset(&stdio,0,sizeof(stdio));
  stdio.c_iflag=0;
  stdio.c_oflag=0;
  stdio.c_cflag=0;
  stdio.c_lflag=0;
  stdio.c_cc[VMIN]=1;
  stdio.c_cc[VTIME]=0;
  tcsetattr(STDOUT_FILENO,TCSANOW,&stdio);
  tcsetattr(STDOUT_FILENO,TCSAFLUSH,&stdio);
  fcntl(STDIN_FILENO,F_SETFL,O_NONBLOCK);  // make the reads non-blocking

  memset(&tio,0,sizeof(tio));
  tio.c_iflag=0;
  tio.c_oflag=0;
  tio.c_cflag=CS8|CREAD|CLOCAL; // 8n1, see termios.h for more information
  tio.c_lflag=0;
  tio.c_cc[VMIN]=1;
  tio.c_cc[VTIME]=5;

  tty_fd=open(argv[1],O_RDWR|O_NONBLOCK);  // O_NONBLOCK might override VMIN and VTIME, so read() may return immediately.
  cfsetospeed(&tio,B9600);                 // 9600 baud
  cfsetispeed(&tio,B9600);                 // 9600 baud
  tcsetattr(tty_fd,TCSANOW,&tio);

  while (c!='q') {
    if (read(tty_fd,&c,1)>0) write(STDOUT_FILENO,&c,1); // if new data is available on the serial port, print it out
    if (read(STDIN_FILENO,&c,1)>0) write(tty_fd,&c,1);  // if new data is available on the console, send it to the serial port
  }

  close(tty_fd);

  return(0;
}
Here is my version:
// Serial Port Code
#include <stdio.h>
#include <fcntl.h>                 // File Control Definitions
#include <termios.h>               // POSIX Terminal Control Definitions
#include <unistd.h>                // UNIX Standard Definitions
#include <sys/file.h>              // flock()
// The Serial Port Structure
struct termios SerialPortSettings; // Serial Port Stucture
int fd=-1;                         // Serial Port File Descripter
char portstr[13]="/dev/ttyUSB0";   // Serial Port Name
bool PortFlag=false;
bool OpenPortFlag=false;
int BaudSpeed=9600;
int BaudCode=B9600;                // Baud Constant (9600).
.
.

void Open_Port_cb(FL_OBJECT *ob,long data FL_UNUSED_ARG) {
  OpenPortFlag=fl_get_button(ob);
  fprintf(stderr,"Open Port Flag %d\n",OpenPortFlag);

  if (OpenPortFlag) {
    // Get selected port name
    strcpy(portstr,fl_get_choice_text(fd_Control->Set_Port));

    // Set the Port
    fd=open(portstr,O_RDWR|O_NOCTTY|O_SYNC);
    if (fd!=-1) {
      // Lock access so that another process can not also use the port
      if (flock(fd,LOCK_EX|LOCK_NB)==0) {
        // Get the current attributes of the serial port - Should fail if no hardware
        if (tcgetattr(fd,&SerialPortSettings)==0) {
          tcgetattr(fd,&SerialPortSettings);                     // Get the current attributes of the serial port

          cfsetispeed(&SerialPortSettings,BaudCode);             // Set Read Speed as 9600
          cfsetospeed(&SerialPortSettings,BaudCode);             // Set Write Speed as 9600

          SerialPortSettings.c_cflag&=~PARENB;                   // Disables the Parity Enable bit (PARENB), So No Parity
          SerialPortSettings.c_cflag&=~CSTOPB;                   // CSTOPB = 2 Stop bits, here it is cleared so 1 Stop bit
          SerialPortSettings.c_cflag&=~CSIZE;                    // Clears the mask for setting the data size
          SerialPortSettings.c_cflag|=CS8;                       // Set the data bits = 8

          SerialPortSettings.c_cflag&=~CRTSCTS;                  // No Hardware flow Control
          SerialPortSettings.c_cflag|=CREAD|CLOCAL;              // Enable receiver, ignore Modem Control lines

          SerialPortSettings.c_iflag&=~(IXON|IXOFF|IXANY);       // Disable XON/XOFF flow control both i/p and o/p
          SerialPortSettings.c_iflag&=~(ICANON|ECHO|ECHOE|ISIG); // Non Cannonical mode

          SerialPortSettings.c_oflag&=~OPOST;                    // No Output Processing

          // Setting Time outs (set for: do not wait - return immediately)
          SerialPortSettings.c_cc[VMIN]=0;                       // Block until at least n characters read
          SerialPortSettings.c_cc[VTIME]=0;                      // Block until at least n * 100ms increments

          if ((tcsetattr(fd,TCSANOW,&SerialPortSettings))==0) {  // Set the attributes to the termios structure
            PortFlag=true;
            fprintf(stderr,"\nSerial Port %s Baud %d Mode %s\n",portstr,BaudSpeed,"8N1");
          } else {
            PortFlag=false;
          }
        } else {
          PortFlag=false;
        }
      } else {
        PortFlag=false;
      }
    } else {
       PortFlag=false;
    }
    if (PortFlag) {
       // Discards old data in the rx buffer
       tcflush(fd,TCIFLUSH);
    } else {
       if (fd!=-1) {
         // Close the Port (if open)
         close(fd);
         // Free the port so that others can use it
         flock(fd,LOCK_UN);
         fd=-1;
       }
       fl_clear_choice(fd_Control->Set_Port);
       fl_addto_choice(fd_Control->Set_Port,"Refresh!");
       fl_set_button(fd_Control->Open_Port,false);
       fprintf(stderr,"\nSerial Port not found!\n");
    }
  } else {
     if (fd!=-1) {
       // Close the Port (if open)
       close(fd);
       // Free the port so that others can use it
       flock(fd,LOCK_UN);
       fd=-1;
     }
  }
}
Both work but there are some differences in the set up that needs to be checked, "O_NONBLOCK" for example.
Still more code to write.
Font Issue Solved
Finally, I found an XForms-Tookkit log that said to install "xfont-100dpi".
I found the font in "Software Manager", "installed it", "restarted" and now it works.
Also you can use "xlsfonts" to enumerate the "installed fonts".
Still I have not been able to install my own fonts.
"xfont-75dpi" also works but is better suited to small screens.
Serial Success
The code is talking to the "Fake Grbl" (i.e. the Arduino) nicely now:
![]()
Here Fake Grbl sends the initialisation code "Grbl V" (the ">> " is added by gCodeSender).
I responded with "Hello" and then Grbl responds with "ok".
Closing the port close the link. Reopening the port, re-initialises the Arduino.
All working good.
File Processing
What remains is to load and process the gCode file.
AlanX
-
X11 GUI Programming Research
12/25/2018 at 01:57 • 1 commentProgramming Directly in X11
Okay I tried out the X11 demo programs.
You certainly can write a procedure here if you need something special.
Played around with loading some file images to screen.
Yes they work but it is clear most people don't code GUIs down here!
XCB
Same here, was not much easier that X11.
Xlib
"Xlib" reminds me of GLUT (yeah I have done some coding here).
Pretty easy to use but then I realised that all those procedures for text input, text windows, radio buttons etc. are missing. I never realised what a "Widget" was, and now I know! So I need an add-on library for the Widgets.
Code:Blocks
Code:Blocks has some GUI options so I thought I would have a look at them. Okay, there is wxSmith (a graphical Widget designer), and there is GTK+ and GLFLW, and no doubt others. I use Code:Blocks for programming in C but have no idea how the rest of it works.
Time to have a bit of a look.
GTK+
It took quite a bit of work to compile my first demo program. I think the library was installed but the trick was to use the following options:
- Other compiler options: `pkg-config --cflags gtk+-2.0`
- Other linker options: `pkg-config --libs gtk+-2.0`
or
- Other compiler options: `pkg-config --cflags gtk+-3.0`
- Other linker options: `pkg-config --libs gtk+-3.0`
Depending on the library version you are using.
It did not give me a warm fuzzy feeling, looking back I think it was the "documentation".
No doubt there is a form designer but I did not find it.
GLFLW
Could not get it to compile, so I moved on.
Time for some research
I was wasting a lot of time now and not getting very far. The issue is that these libraries have steep learning curves and they not feel right for me (more power than what I need).
The Wikipedia for X11 did not help much, but on the Wikipedia for Xlib I found the basic "widget" libraries:
![]()
So okay, I found Xlib and XCB, the client libraries.
Found GTK+, so my options are Qt, FLTK and XForms (ignoring Xaw, Motif and OpenLook for the time being).
A quick look at Qt said no for me (it is a monster) but I fell in love with XForms. Why, the easy to read and follow documentation, the (relatively readable code) and the simple form designer (fdesign).
So (for the time being) my GUI library will be XForms.
To compile an XForm GUI usually all you need is: "-lxforms" and occasionally "-lX11" (for low level functions).
AlanX
GUI Programming for a Console Hacker
After 30 years of procedural language programming (i.e. console programming), time to look at event driven programming.
 Note, the first "<< ", that was because there is a duplicate command, and the second "<< " was a blank line at the end of the file. So all good.