Ross Bamford
-
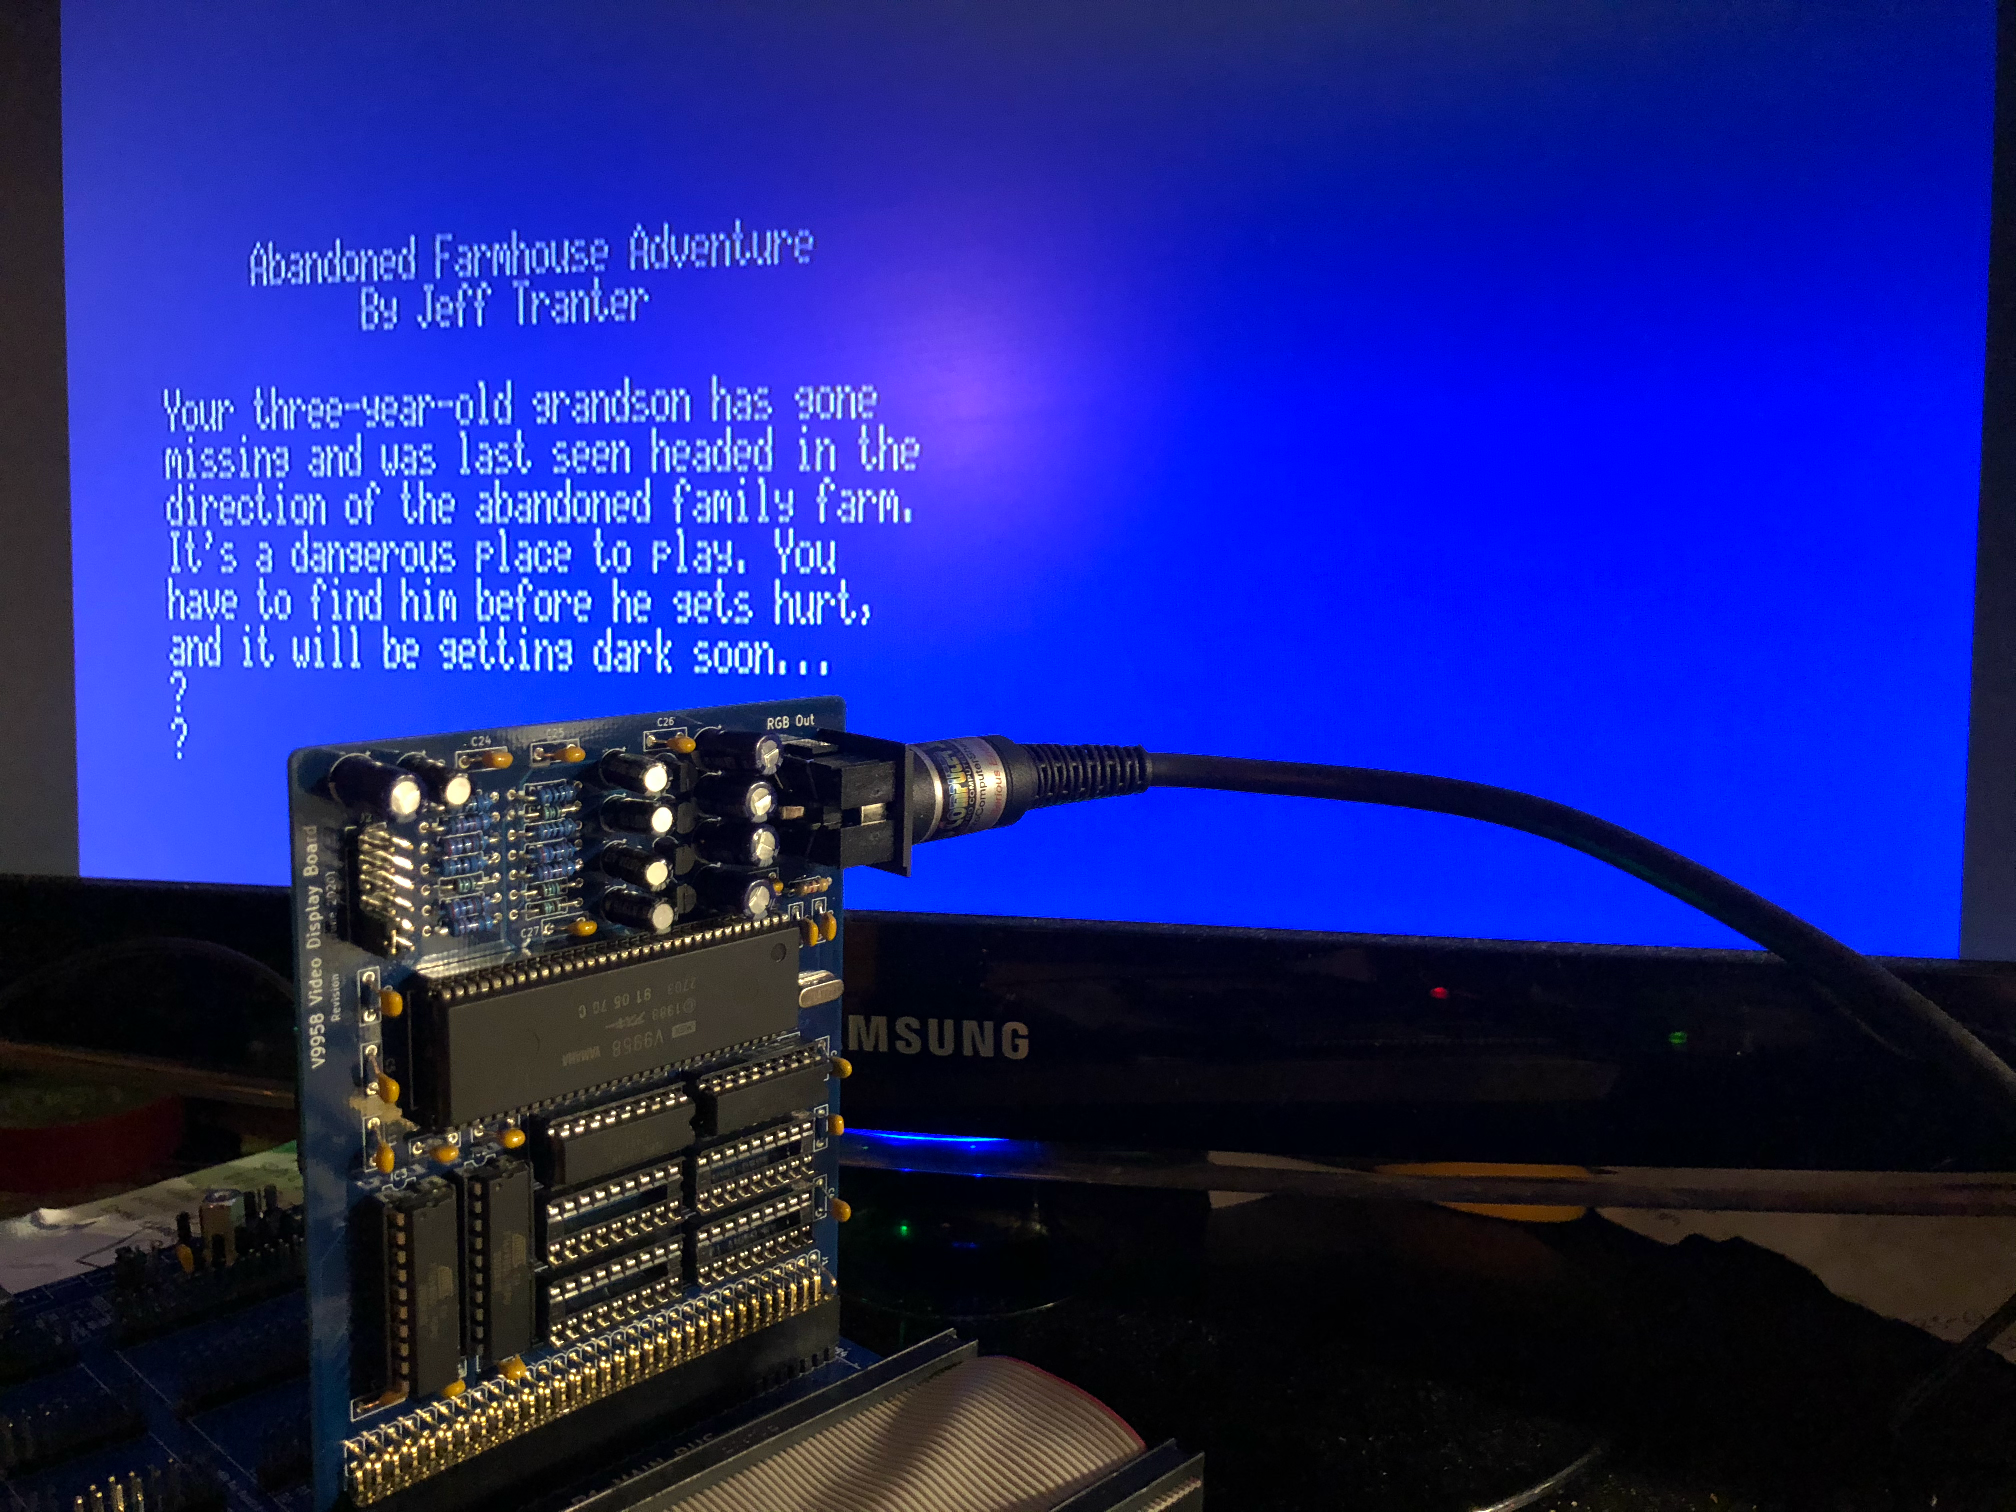
V9958 80x24 Console
07/08/2020 at 21:56 • 4 commentsNow that the V9958 video board is shipping on Tindie, and I've gotten fresh stock of all the options for the base board, I've been working on getting a basic text mode console supported by the standard firmware. It took me a while to get used to the way the V9958 works, but thanks to the pretty great Yamaha documentation that's still available online (link for V9938, the V9958 documentation just lists the changes) it wasn't too difficult to make something work.
Here's a shot of it running Jeff Tranter's adventure, with the unmodified code that runs on the board without video connected.
(Sadly I don't currently have a CRT to run it on, but I'm working on that!)
Getting this working in the firmware in a way that was compatible with the current revision 1 board presented two challenges - firstly, I had to write the code for the console, including taking care of scrolling and tracking cursor position etc, and secondly I had to somehow find a way to get the code to fit in the severely-limited 16KB of ROM (a good chunk of which is taken up by the Kermit routines already).
---------- more ----------The first challenge was writing the code. I'd already done some examples and proof-of-concept / demo code for the V9958, including a naive text-mode console demo that basically redrew the whole screen during the vertical blanking interval.
While this worked, it made the VBLANK take so long that there wasn't time for the computer to do anything else! Obviously it was fine as a demo (and let me figure out the basics of the V9958's TEXT2 mode) but for something general purpose that would go into the firmware a better way was needed.
The result of this work was the second text-mode console demo, which is much more efficient, and has a VBLANK that runs in a timely fashion. The general approach here is:
- Have an in-RAM circular buffer with the current screen contents
- Have two pages in video RAM, one of which is always current
- When printing a character, it goes directly to the active VRAM page for display, as well as the RAM buffer
With this scheme, the VBLANK handler usually does nothing much (except handle the blinking cursor). When the time comes to scroll the screen, non-interrupt code does the following:
- Increments the RAM buffer start pointer by a line length, and clears the last line
- Copies the RAM buffer to the non-active VRAM page
- Sets a dirty flag
With that done, next time there's a VBLANK, the handler just flips the pages (by setting the appropriate V9958 register with the new active page start), which again takes very little time.
Obviously it's slightly more involved (handling backspace characters and so on) but that's the basic gist of it, and I have to say I'm pretty happy with it. It works really well, scrolls nicely with no visual tearing or other artefacts, and means that there's never a long-running interrupt handler starving the rest of the system. The use of two VRAM pages means you never see a half-scrolled screen.
I did play around with using the V9958s blitter commands (which are available in text modes, unlike on the 9938) but the timing was a nightmare, and the fact that the commands haven't really been updated (and so one has to translate coordinates to their graphics mode equivalents, for example) made it not worth the effort. I may yet revisit this in the future, but as I say, it works and I'm happy with how it turned out.
The next challenge was making it fit in the ROMs. The 16KB ROMs I (short-sightedly) used for the revision one boards were already pretty full, and I definitely didn't want to lose any of the existing functionality - the idea here is to make a new minor revision of the firmware that is a drop in replacement, but also detects and uses the V9958 if fitted.
I played around with a few different ideas, and eventually settled on splitting the firmware into two stages - stage one would handle the basic machine initialisation (including the V9958) and provide the resident ROM code and TRAP handlers (both TRAP 14 which is rosco_m68k basic IO and TRAP 15 which provides Easy68k compatibility). Stage two would take care of loading user programs (via Kermit at the moment, though with this split it can be easily replaced with code to load via SD card, for example, which we're already working towards).
How does this save any ROM space? That's the clever bit - stage 2 is compressed (with a simple Zip-based algorithm). Once the basic machine is initialised, stage one unzips stage two into RAM, and runs it from there.
The Zip algorithm doesn't give super high compression ratios, and is optimised for size in the decompression code (otherwise the advantage of using compression would be lost), but it's good enough to fit everything that was previously in the firmware, plus the V9958 code and a text-mode font (which currently isn't, but could easily be, compressed too - at the moment it just lives alongside the V9958 code itself, which has to be in stage one so it's always available in ROM).
There's still some scope for saving a few bytes (which I'm hoping to use to provide a similar "pluggable" interface for the UART, to allow it to auto-detect the coming-soon MC68681 expansion board) but overall it works quite nicely, and is available in the current development branch for the new firmware (I'll try to remember to update here once it's actually released!)
-
Benchmarks!
06/13/2020 at 19:41 • 1 commentOver on Discord, @Xark recently did some work on porting some old dhrystones to the rosco_m68k, which gave a feel for the performance of the board for the first time, and the results are encouraging! In Xark's words, we "blew the doors off an outdated Dhrystone text file found somewhere on the Internet" :D
Obviously these are to be taken with a hefty grain of salt as they're hardly "fair" - we're using a much more modern compiler than was likely available for any of the other machines on the list, and we also don't have an OS to get in the way. To try and make it a more even fight we did limit the GCC optimisation to -O1, which feels like it should be roughly on-par with the optimisations that would have been done by the compilers in use at the the time the other machines were benchmarked.
To see how the rosco_m68k stacked up against other machines of the same era, we ran the benchmarks with both 8MHz and 10MHz system clock. The results were thus (further down the list is better):
Last updated 06/06/2020 by Xark
*----------------DHRYSTONE VERSION 1.1 RESULTS BEGIN--------------------------
 *
 * MACHINE      MICROPROCESSOR  OPERATING       COMPILER        DHRYSTONES/SEC.
 * TYPE                         SYSTEM                          NO REG  REGS
 * --------------------------   ------------    -----------     ---------------
 * Apple IIe    65C02-1.02Mhz   DOS 3.3         Aztec CII v1.05i  37      37
 * -            Z80-2.5Mhz      CPM-80 v2.2     Aztec CII v1.05g  91      91
 * -            8086-8Mhz       RMX86 V6        Intel C-86 V2.0  197     203LM??
 * IBM PC/XT    8088-4.77Mhz    COHERENT 2.3.43 Mark Wiiliams    259     275
 * -            8086-8Mhz       RMX86 V6        Intel C-86 V2.0  287     304 ??
 * Fortune 32:16 68000-6Mhz     V7+sys3+4.1BSD  cc               360     346
 * PDP-11/34A   w/FP-11C        UNIX V7m        cc               406     449
 * Macintosh512 68000-7.7Mhz    Mac ROM O/S     DeSmet(C ware)   625     625
 * VAX-11/750   w/FPA           UNIX 4.2BSD     cc               831     852
 * rosco_m68k   68010-8.0Mhz    ROM             gcc-7.5.0        -       862 (-O1)
 * DataMedia 932 68000-10Mhz    UNIX sysV       cc               837     888
 * Plexus P35   68000-12.5Mhz   UNIX sysIII     cc               835     894
 * ATT PC7300   68010-10Mhz     UNIX 5.0.3      cc               973    1034
 * rosco_m68k   68010-10Mhz     ROM             gcc-7.5.0        -      1086 (-O1)
 * Compaq II    80286-8Mhz      MSDOS 3.1       MS C 3.0        1086    1140 LM
 * IBM PC/AT    80286-7.5Mhz    Venix/286 SVR2  cc              1159    1254 *15
 * Compaq II    80286-8Mhz      MSDOS 3.1       MS C 3.0        1190    1282 MM
 * MicroVAX II  -               Mach/4.3        cc              1361    1385
 * DEC uVAX II  -               Ultrix-32m v1.1 cc              1385    1399
 * Compaq II    80286-8Mhz      MSDOS 3.1       MS C 3.0        1351    1428
 * VAX 11/780   -               UNIX 4.2BSD     cc              1417    1441
 * VAX-780/MA780                Mach/4.3        cc              1428    1470
 * VAX 11/780   -               UNIX 5.0.1      cc 4.1.1.31     1650    1640
 * Ridge 32C V1 -               ROS 3.3         Ridge C (older) 1628    1695
 * Gould PN6005 -               UTX 1.1c+ (4.2) cc              1732    1884
 * Gould PN9080 custom ECL      UTX-32 1.1C     cc              4745    4992
 * VAX-784      -               Mach/4.3        cc              5263    5555 &4
 * VAX 8600     -               4.3 BSD         cc              6329    6423
 * Amdahl 5860  -               UTS sysV        cc 1.22        28735   28846
 * IBM3090/200  -               ?               ?              31250   31250
 *
It was really exciting to see these results - the rosco_m68k is the fastest 68000 in both the 8MHz and 10MHz categories :)
I will say again that the lack of an OS at the moment is probably a distinct advantage here, although these results were captured with the system timer tick running which does some memory access a couple hundred times a second and toggles a GPIO periodically, so it's not like there was nothing else going on - I like to think the results are in some way representative.
You can find the code along with the results in a text file here.
-
(Dramatically) Improving Comms Speed
06/07/2020 at 18:56 • 0 commentsOne of the things that's become an increasing problem on this project is the MC68901 Multi Function Peripheral. Way back when I started this project (actually when I ordered the very first MC68010 for it!) I ordered a 68901, almost on a whim, as it seemed like a very capable chip that would take care of a lot of problems for me. To an extent that turned out to be true, but the venerable MFP brings with it more than its fair-share of problems too.
---------- more ----------The MFP was introduced sometime around 1983/84 and was one of the earlier 68000-specific peripherals, replacing a bunch of earlier 6800 legacy peripherals. On paper, it's a great chip - it sports a vectored interrupt controller, programmable timers, interrupt-capable GPIO with various trigger modes, and a USART. The fact that it packs so much into a small (48 pin DIL) package was one of the things that attracted me to it.
Unfortunately, although it does a lot of different stuff, it's very much a "Jack of all trades, master of none" - it doesn't really excel at any of the various tasks. As an interrupt controller it's okay, and the programmable timers are quite useful (especially if you have need to use the advanced event counting and PWM modes). The GPIOs are okay for certain tasks, but not fast enough for, for example, bit-banging SPI (I think we measured them flat-out under software control at around 133KHz). And that's fine, because that's not what they're designed for. For interfacing legacy (read 6800) peripherals into the vectored interrupt scheme they're pretty great.
The UART (well, USART) is what really lets the 68901 down. Specifically, it's slow. This is largely due to the fact that it is totally useless unless used with the divide-by-16 baud rate clock, and when that clock is generated by the MFP itself (the recommended configuration from a Motorola application note) there's an additional divide-by-four pre-scaler. Coupled with the (necessary) divide by 16 this limits the baud rate that's usable to 9600 (if one cares about using POSIX rates, 28800 is possible otherwise but not supported by some of the support software).
As an aside, you could in theory drive the BRG from an external clock, and avoid the divide-by-16 counter, but of course this ups the component count and requires another clock (rather than just a crystal). The maximum one can use is 4MHz so a standard 3.6864MHz clock could be supplied and who knows, it might work well at higher speeds. Speed isn't quite the whole story though.
Programming the UART on the MFP in an interrupt-driven scheme is also fraught with problems. It boils down to the fact that, because of the way the registers are designed, there's no good way (that I've found at least) to safely implement a transmit ring buffer without risking deadlock. Because of the way pending interrupts are handled, you cannot be assured that a pending "buffer empty" interrupt that occurs while the interrupt is disabled will actually be raised once they are re-enabled. This leads to an awkward two-step dance of fully disabling the transmitter while trying to work out if the character to be sent should be buffered or just sent directly to the transmit buffer.
To make things worse, the buffer on both transmit and receive are only a single byte in size, and the slow GPIO (coupled with the pretty lax interpretation of CTS by the FTDI chips) means that "hardware" flow control (under software control - the MFP doesn't provide any help with this) is pretty much useless.
So to cut a long story short(er), I've been getting pretty frustrated with this, both from the UART perspective and also from the point of view of wanting to get SD cards and other SPI devices working. With this in mind, I started looking into the MC68681 DUART.
The 68681 is a slightly newer chip than the 68901 (arriving in late 1985), and was likely designed by some of the same people. In fact, when reading the data sheet and working with the chip, it definitely appears that some of the design choices came about as a direct result of lessons learned from the 68901. As you'd expect, it fully supports the 68k asynchronous bus architecture, and can do vectored interrupts.
It's a very capable chip: two completely separate UARTs, parallel input and output ports (6 and 8 bits, respectively) and full hardware flow control. I received a bunch of 'em last week and got straight to work on the integration. And of course, it works perfectly. I've now got a (proof of concept, at this point) working Kermit upload at 115,200 BPS (quite a jump from 9600!)
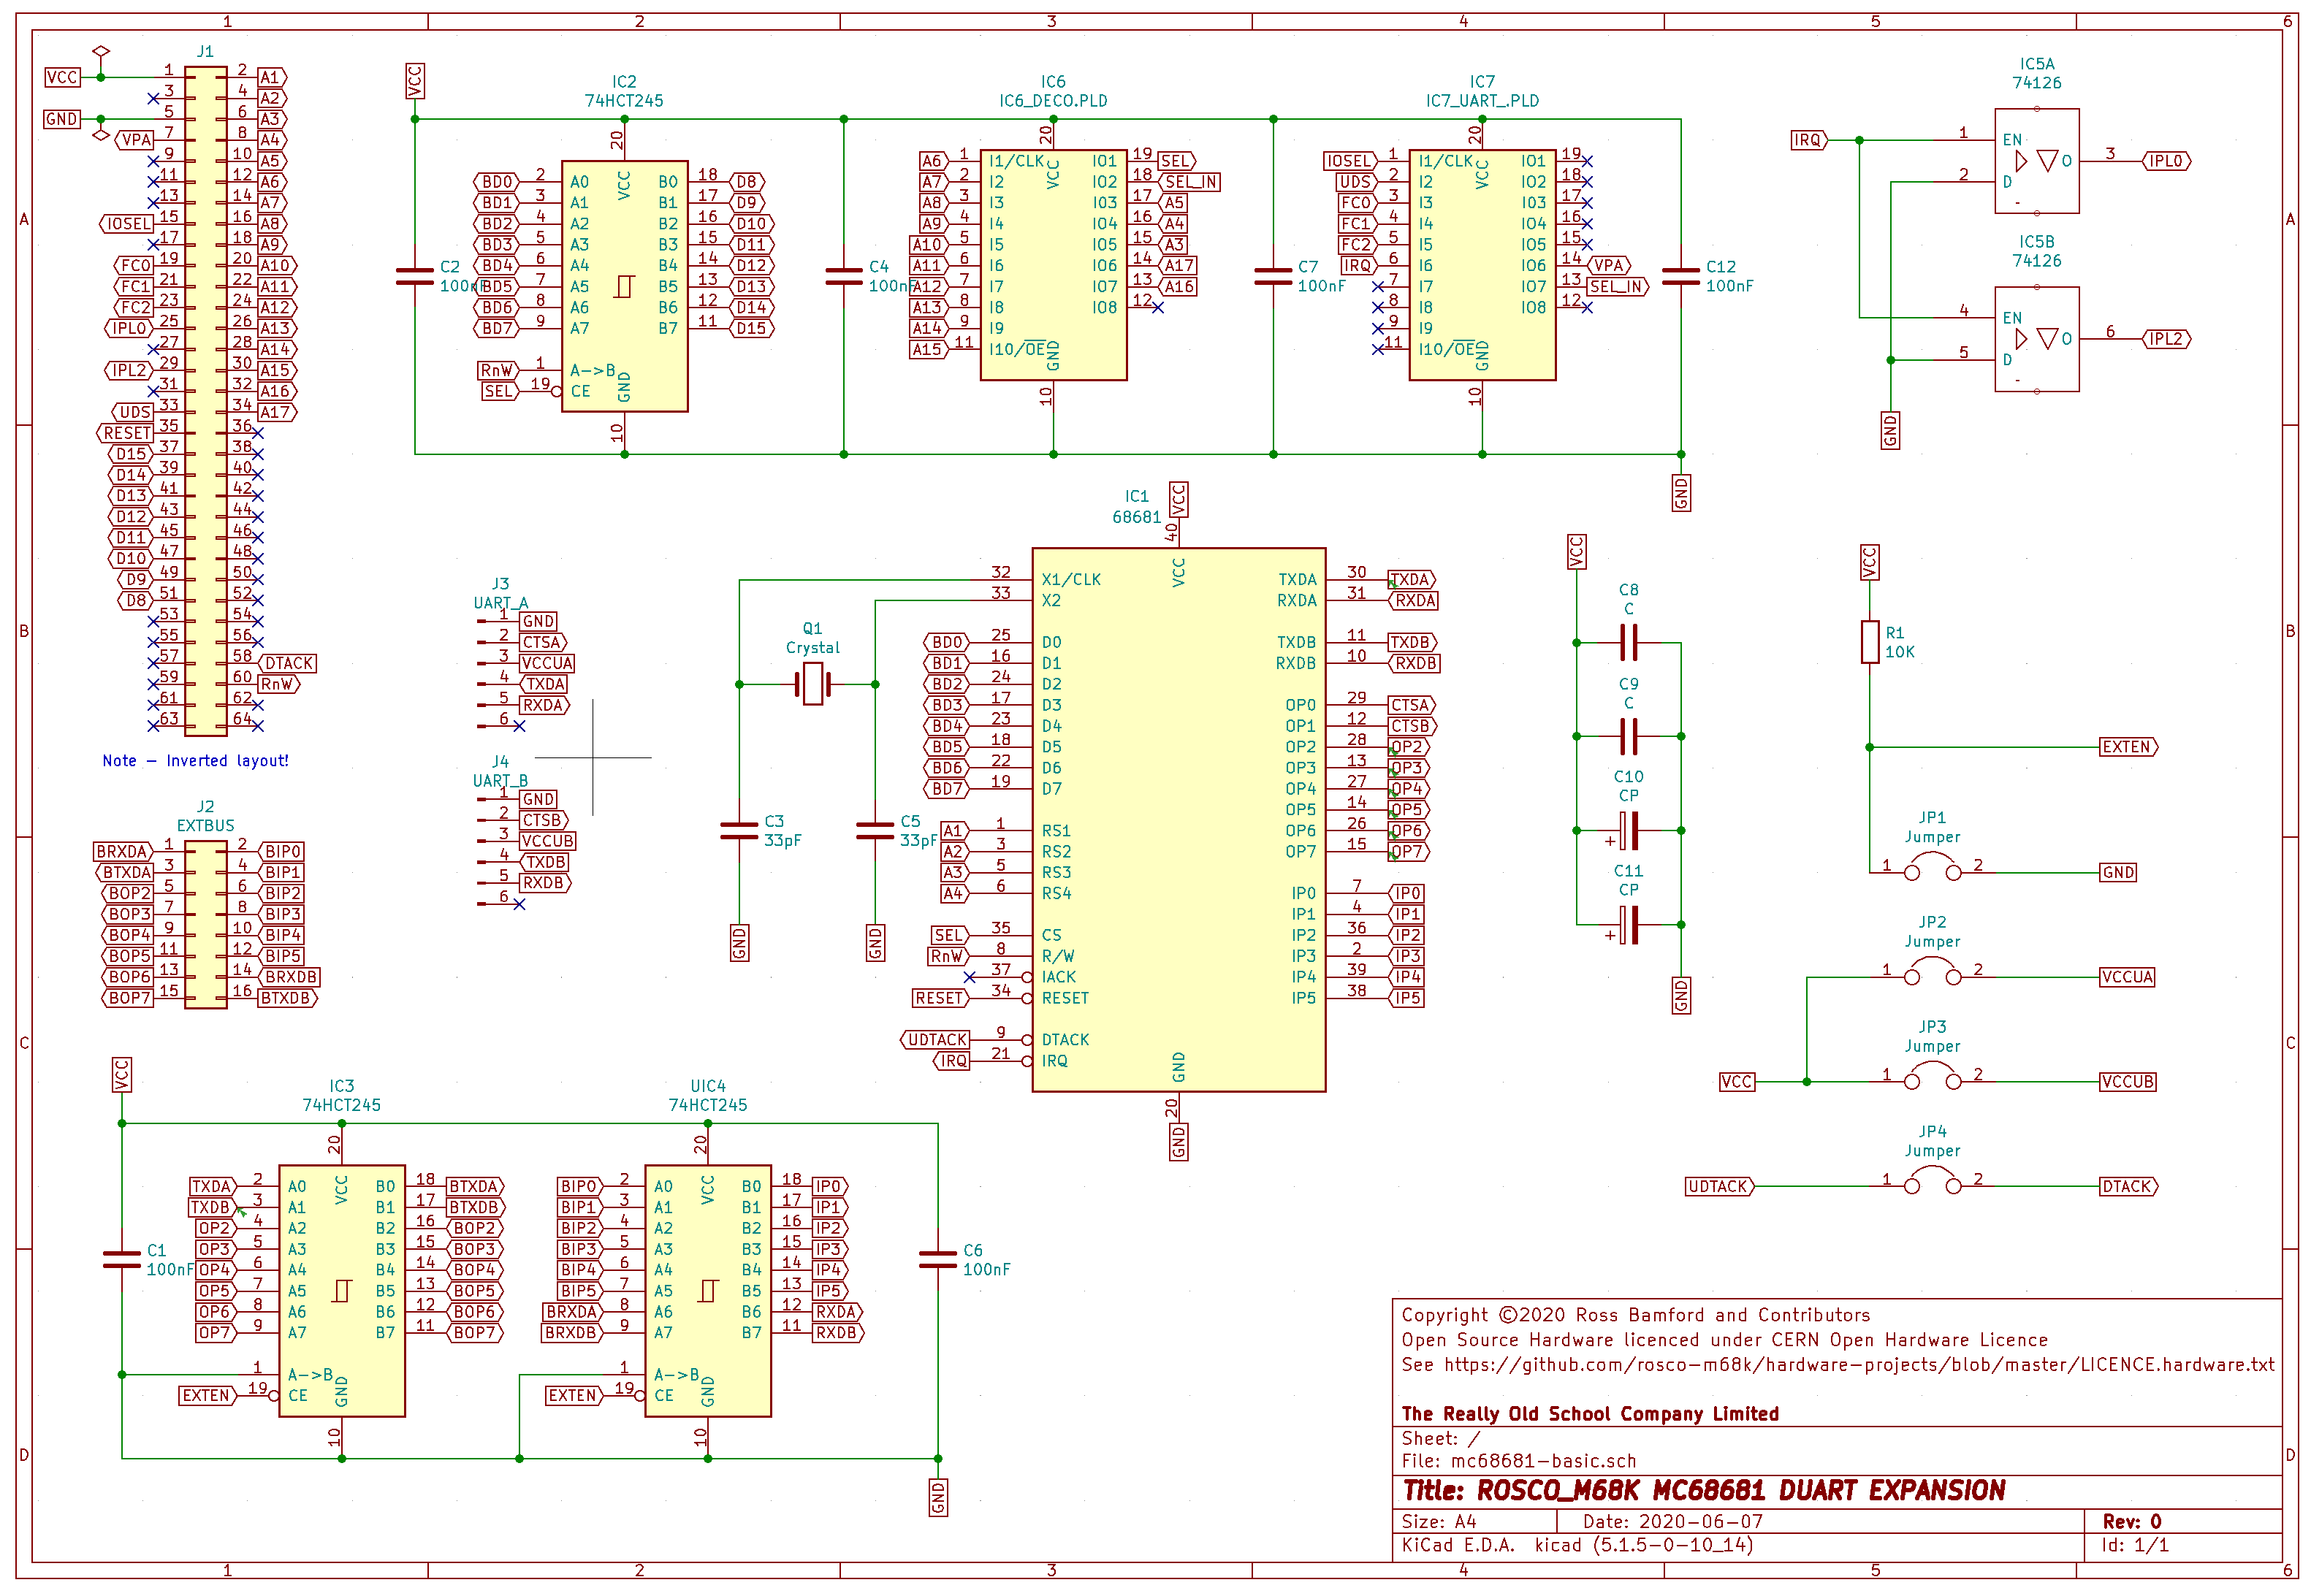
The current design looks like this (initially this is going be an expansion for the rosco):
![]()
Unfortunately, the shadow of the 68901 is long, and this is still hampered by some of the decisions I made when initially integrating the MFP. This can't use vectored interrupts at the moment, because the MFP greedily takes all of odd IO space. Vectored interrupts require a vector on the low-order data lines, and that's just not possible yet. So for now this will use auto vectoring (one of the GALs takes care of the VPA line for this). DTACK is another area where the MFP over-steps it's boundaries (due to my design though, not the chip itself), hence the jumper on the DTACK line - the point of that is to make sure this expansion is compatible with both current and future iterations of the main system design.
In terms of code, the initial testing for this has been great. Once I'd spent a little while with the data sheet getting to know the chip getting it to 57K6 was fairly easy using its ability to directly use it's own built-in timers to generate a baud clock from an external 3.6864MHz crystal. The final step to 115K2 was a little less obvious, but googling around I found the answer - one simply has to enable "test" features of the IC, but reading from a register the data sheet explicitly says not to read from! This appears to be a common thing, and seems to work fine. I'm keeping the option of dropping back to 57K6 in my pocket though, just in case...
This is the basic initialisation code, plus polled send and receive. Interrupt driven is next on the list to implement.
INIT_SERIAL_HANDLERS:: move.b #$0,DUART_IMR ; Mask all interrupts move.b #$93,DUART_MR1A ; (Rx RTS, RxRDY, Char, No parity, 8 bits) move.b #$07,DUART_MR2A ; (Normal, No TX CTS/RTS, 1 stop bit) move.b #$60,DUART_ACR ; Set 0, Counter, X1/X2, /16 move.b DUART_CRA,D0 ; Enable undocumented rates move.b #$66,DUART_CSRA ; 1200 per spec, uses counter instead move.b #0,DUART_CUR ; Counter high: 0 move.b #2,DUART_CLR ; Counter low: 2 (115.2KHz) move.b R_STARTCNTCMD,D0 ; Start count ; Debug - output clocks on OP2 for scope ; move.b #%00000011,DUART_OPCR ; RxCA (1x) on OP2 move.b #%00000101,DUART_CRA ; Enable TX/RX ; TODO CTS/RTS Not yet working - figure out how to lower RTS! move.b #$ff,W_OPR_RESETCMD ; Clear all OP bits (lower RTS) move.b #0,W_OPR_SETCMD rts RECVCHAR:: btst.b #0,DUART_SRA beq.s RECVCHAR move.b DUART_RBA,D0 rts SENDCHAR:: btst.b #3,DUART_SRA beq.s SENDCHAR move.b 7(A7),D0 move.b D0,DUART_TBA rts -
V9958 - Beyond Hello World
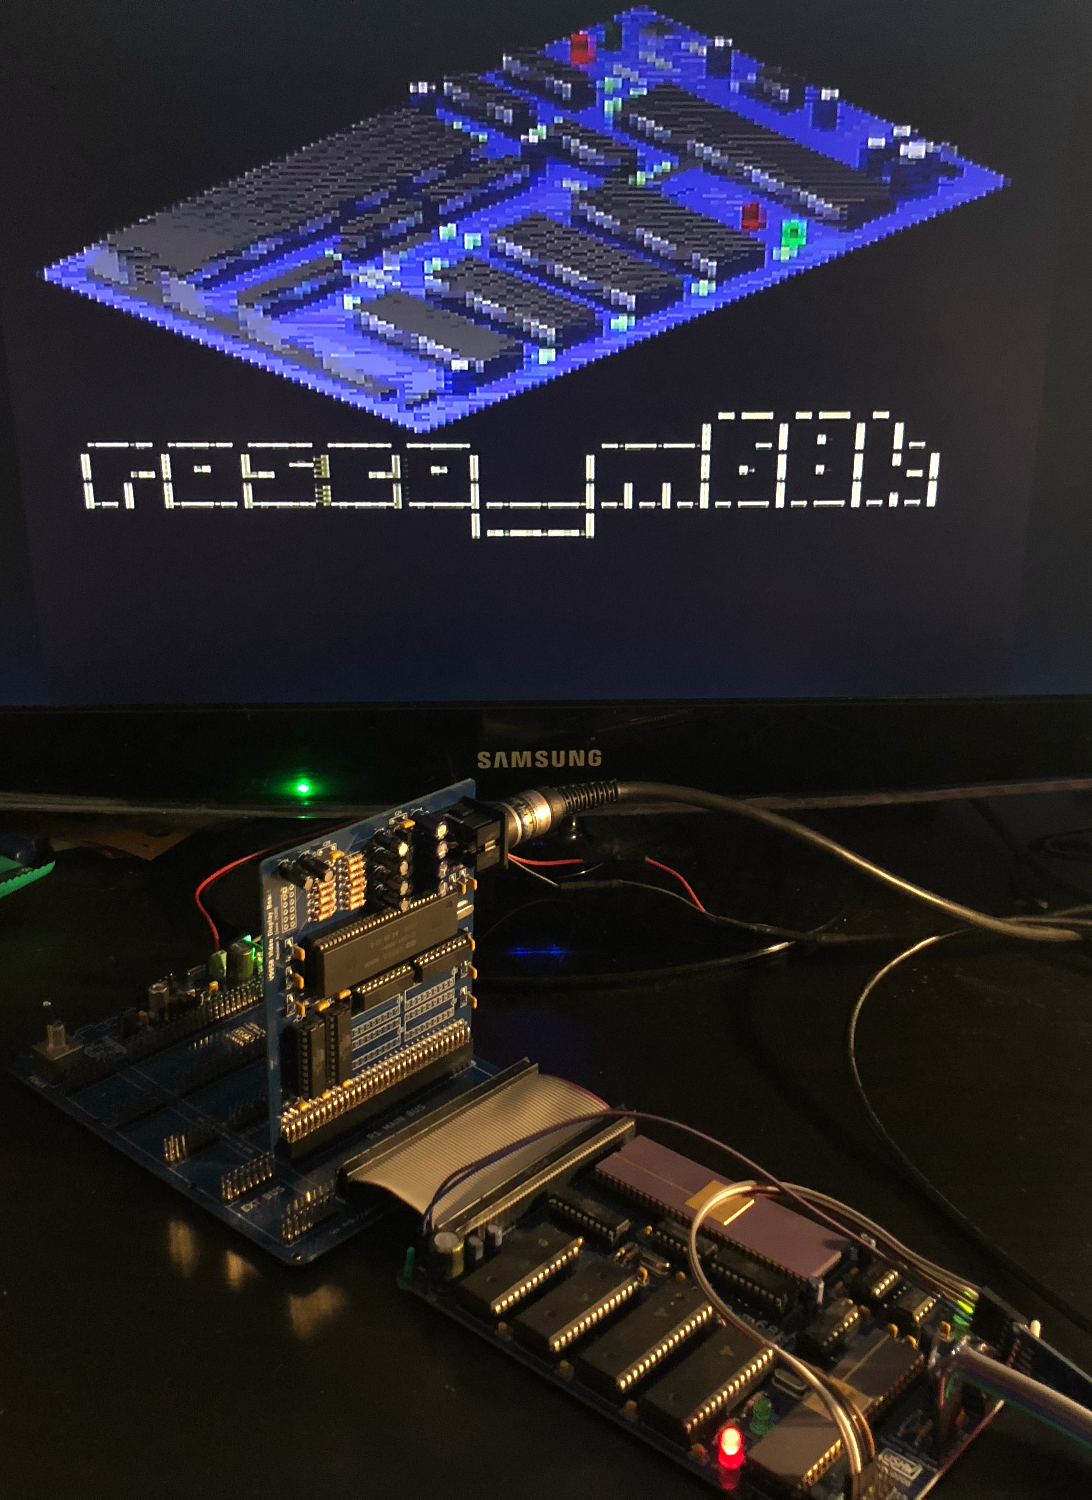
06/04/2020 at 22:45 • 0 commentsDevelopment on the V9958 board continues apace, and after a false start due to a silly mistake in the first revision things are back on-track with a revision 1 prototype. The design is now validated and working really well. So far it's baby-steps in terms of software, with just enough to show an image.
That's the board image from the website, scaled to a suitable size for the V9958 and reduced to 256 colours. It's bundled in with the code that sets up the VDP and copies the data into video RAM (64KB populated in this image, just enough for testing). Output is RGB via SCART, using a six-pin DIN connector which is compatible with readily-available cables designed for BBC Micro and Acorn computers :)
(Aside: There's also a header on-board with RGB and sync signals that will be compatible with things like http://www.jrok.com/hardware/RGB.html for those in non-SCART countries, and I plan to do a small daughterboard based on some CXA1645s I have lying around that will fit that header too).
Address decoding and selects for the VDP are handled by a couple of 16V8s, and the decoding is specific to the address range needed by the four ports the VDP exposes. I was keen not to repeat the short-sighted mistakes made earlier (with the MC68901 for example, which greedily takes all of odd IO space), and going forward will be doing the same with all the expansions. The next main board revision will also fix the underlying issue with the MFP decoding too.
Programming the V9958 is actually quite a nice experience. I've not done any real "in-anger" work with it yet, but what I have done has been pleasant. Its register set-up isn't especially arduous, and it has some nice features like auto-increment for both VRAM address and register number that make things nice and manageable. The documentation is pretty great too, though it's a bit unfortunate that one has to consult the original 9938 documentation in conjunction with the changes listed for the 9958 in a separate document. I suppose when these documents were current they would have been actually printed on real-life paper, so it makes sense that there wasn't a completely new document for the (relatively few) changes between the 9938 and the 9958.
I did run into a slightly odd issue that took a little bit of debugging (here, MAME once again proved worth it's weight in gold) - it turns out that the V9958 is a little bit picky about the order of things during initialisation, and this isn't totally obvious from the manual. Being able to single-step things and view memory in MAME was invaluable.
In the end, the code to display the image above is quite compact. This is the meat of it, including complete set-up of the VDP, switching to G7 mode, and copying the data to video RAM (the 'SLOWDOWN' subroutine referenced below is simply three NOPs and an RTS):
    ; Set mode G7, disable interrupts and enable output
    move.b  #%00001110,PORT_WREG_SETUP   ; Write DG=0,IE2=0,IE1=0,M5=1,M4=1,M3=1
    move.b  #$80,PORT_WREG_SETUP         ; To register 0
    move.b  #%01000000,PORT_WREG_SETUP   ; Write BL=1,IE0=0,M1=0,M2=0,SI=0,MAG=0
    move.b  #$81,PORT_WREG_SETUP         ; To register 1

    ; Set PAL mode
    move.b  #%10000010,PORT_WREG_SETUP   ; Set 212-line, PAL mode...
    move.b  #$89,PORT_WREG_SETUP         ; .. to register 9

    move.b  #%00000000,PORT_WREG_SETUP   ; Select BG: GGGRRRBB
    move.b  #$87,PORT_WREG_SETUP         ; .. In VDP register 7

    move.b  #%00001010,PORT_WREG_SETUP   ; Select 64K DRAM, disable sprites
    move.b  #$88,PORT_WREG_SETUP         ; .. In VDP register 8

    ; Set pattern layout table to 0x0
    move.b  #%00011111,PORT_WREG_SETUP   ; bit 16 of 0x0, constant 11111
    move.b  #$82,PORT_WREG_SETUP         ; .. to register 2

    ; Set up to write VRAM at 0x0
    move.b  #0,PORT_WREG_SETUP           ; VRAM Base at 0
    move.b  #$8E,PORT_WREG_SETUP         ; > register 14
    move.b  #0,PORT_WREG_SETUP           ; Set VRAM A0-A7
    move.b  #$40,PORT_WREG_SETUP         ; Set VRAM A8-A13, and write enable

    move.l  #_image_start,A0
    move.l  #_image_size,D0
    bra.s   .COPYSTART
.COPYLOOP:
    move.b  (A0)+,PORT_RWDATA
    bsr.s   SLOWDOWN
.COPYSTART
    dbra.w  D0,.COPYLOOP

    move.l  #$10000,D0
    subi.w  #_image_size,D0
    bra.s   .CLEARSTART
.CLEARLOOP:
    move.b  #0,PORT_RWDATA
    bsr.s   SLOWDOWN
.CLEARSTART:
    dbra.w  D0,.CLEARLOOP
I'm really looking forward to doing more with this, and can't wait to actually get some redrawing going on in the vertical retrace.
There's a couple of tweaks to make to the board for added buildability and stability, and then it'll go off for manufacturing. I'm hoping to launch it on Tindie in a few weeks time.
In the meantime, as well as video software, I'm also making a start on fixing the slow UART that has been a problem for a while. The 68901 was a great chip to get started with, and still has its uses, but we've outgrown its UART. I have a bunch of MC68681s, and the time has come to use them! More about that in a future log :)
-
Exciting new things!
05/30/2020 at 19:13 • 0 commentsThere's so much going on with the rosco_m68k at the moment, it's hard to keep up! Not just the stuff that I'm planning (of which there is lots!) - it's really exciting to see what the growing community are doing too. There's always a ton of conversation going on over on the discord server, with new and cool projects (both software and hardware) being worked on.
In no particular order, we've got a floppy-drive controller @henk.gooijen is planning (to go alongside the absolutely awesome monitor software / firmware he's created - screenshot below), a real-time-clock integration thanks to @RTS4E75 (and an IDE interface in the works). Some people are even working on some amazing FPGA stuff that's totally beyond me at this point - @Claude is working on interfacing the M68k bus to an ice40up5k (on a upduino 2.0) and @Xark has made some amazing progress on his VGA video card. I'm not going to talk too much about that as I don't want to spoil the surprise, Xark tells me he's planning to write up a Hackaday project about it, so keep an eye out for that - it's exciting stuff (we've already seen some amazing output from it on a VGA monitor!).
As I've said before it's pretty humbling that people are finding so many cool things to do with this little project that started out on breadboard as a "I wonder if I can do that" thing about 18 months ago. I love that people are picking this up and running with it, and having so much fun :)
Of course, the community is great for finding things that could be improved, and there's a whole bunch of things that have already been earmarked for a future board revision. Everything from better bus connectors to tighter IO Space decoding and bigger ROM is in the works, and as well as the V9958 video I talked about in the last log I'm also working on sound (YM2149F) and some firmware/software improvements.
I've also ordered a bunch of ICs today for various expansions I'm planning - including some much-needed MC68681 DUARTs and *lots* of 7400 series bus transceivers, some 22V8 GALs and various other support chips. Things have taken off so quickly that I've not had as much time as usual for hardware lately - I'm really looking forward to diving back in!
If you want to get involved, or even if you just want one to play with (we now have a bunch of precompiled example programs, including a BASIC interpreter!) I've just received fresh stocks, so grab yours on Tindie.
As promised, here's a screenshot of Henk's frankly awesome monitor. Keep your eyes peeled for an upcoming post from Xark in which he tells me he'll be showing some really cool pics too :)
![]()
-
V9958 - First tests successful!
05/16/2020 at 22:21 • 0 commentsIt's been another dizzying couple of weeks on the rosco_m68k project, with lots of community activity going on, Tindie orders to ship and more stock to source, but I've still had time for some good old-fashioned hacking. I've been focusing on the video card mainly, and it's now at a point where prototype boards are ordered and have been shipped by JLCPCB.
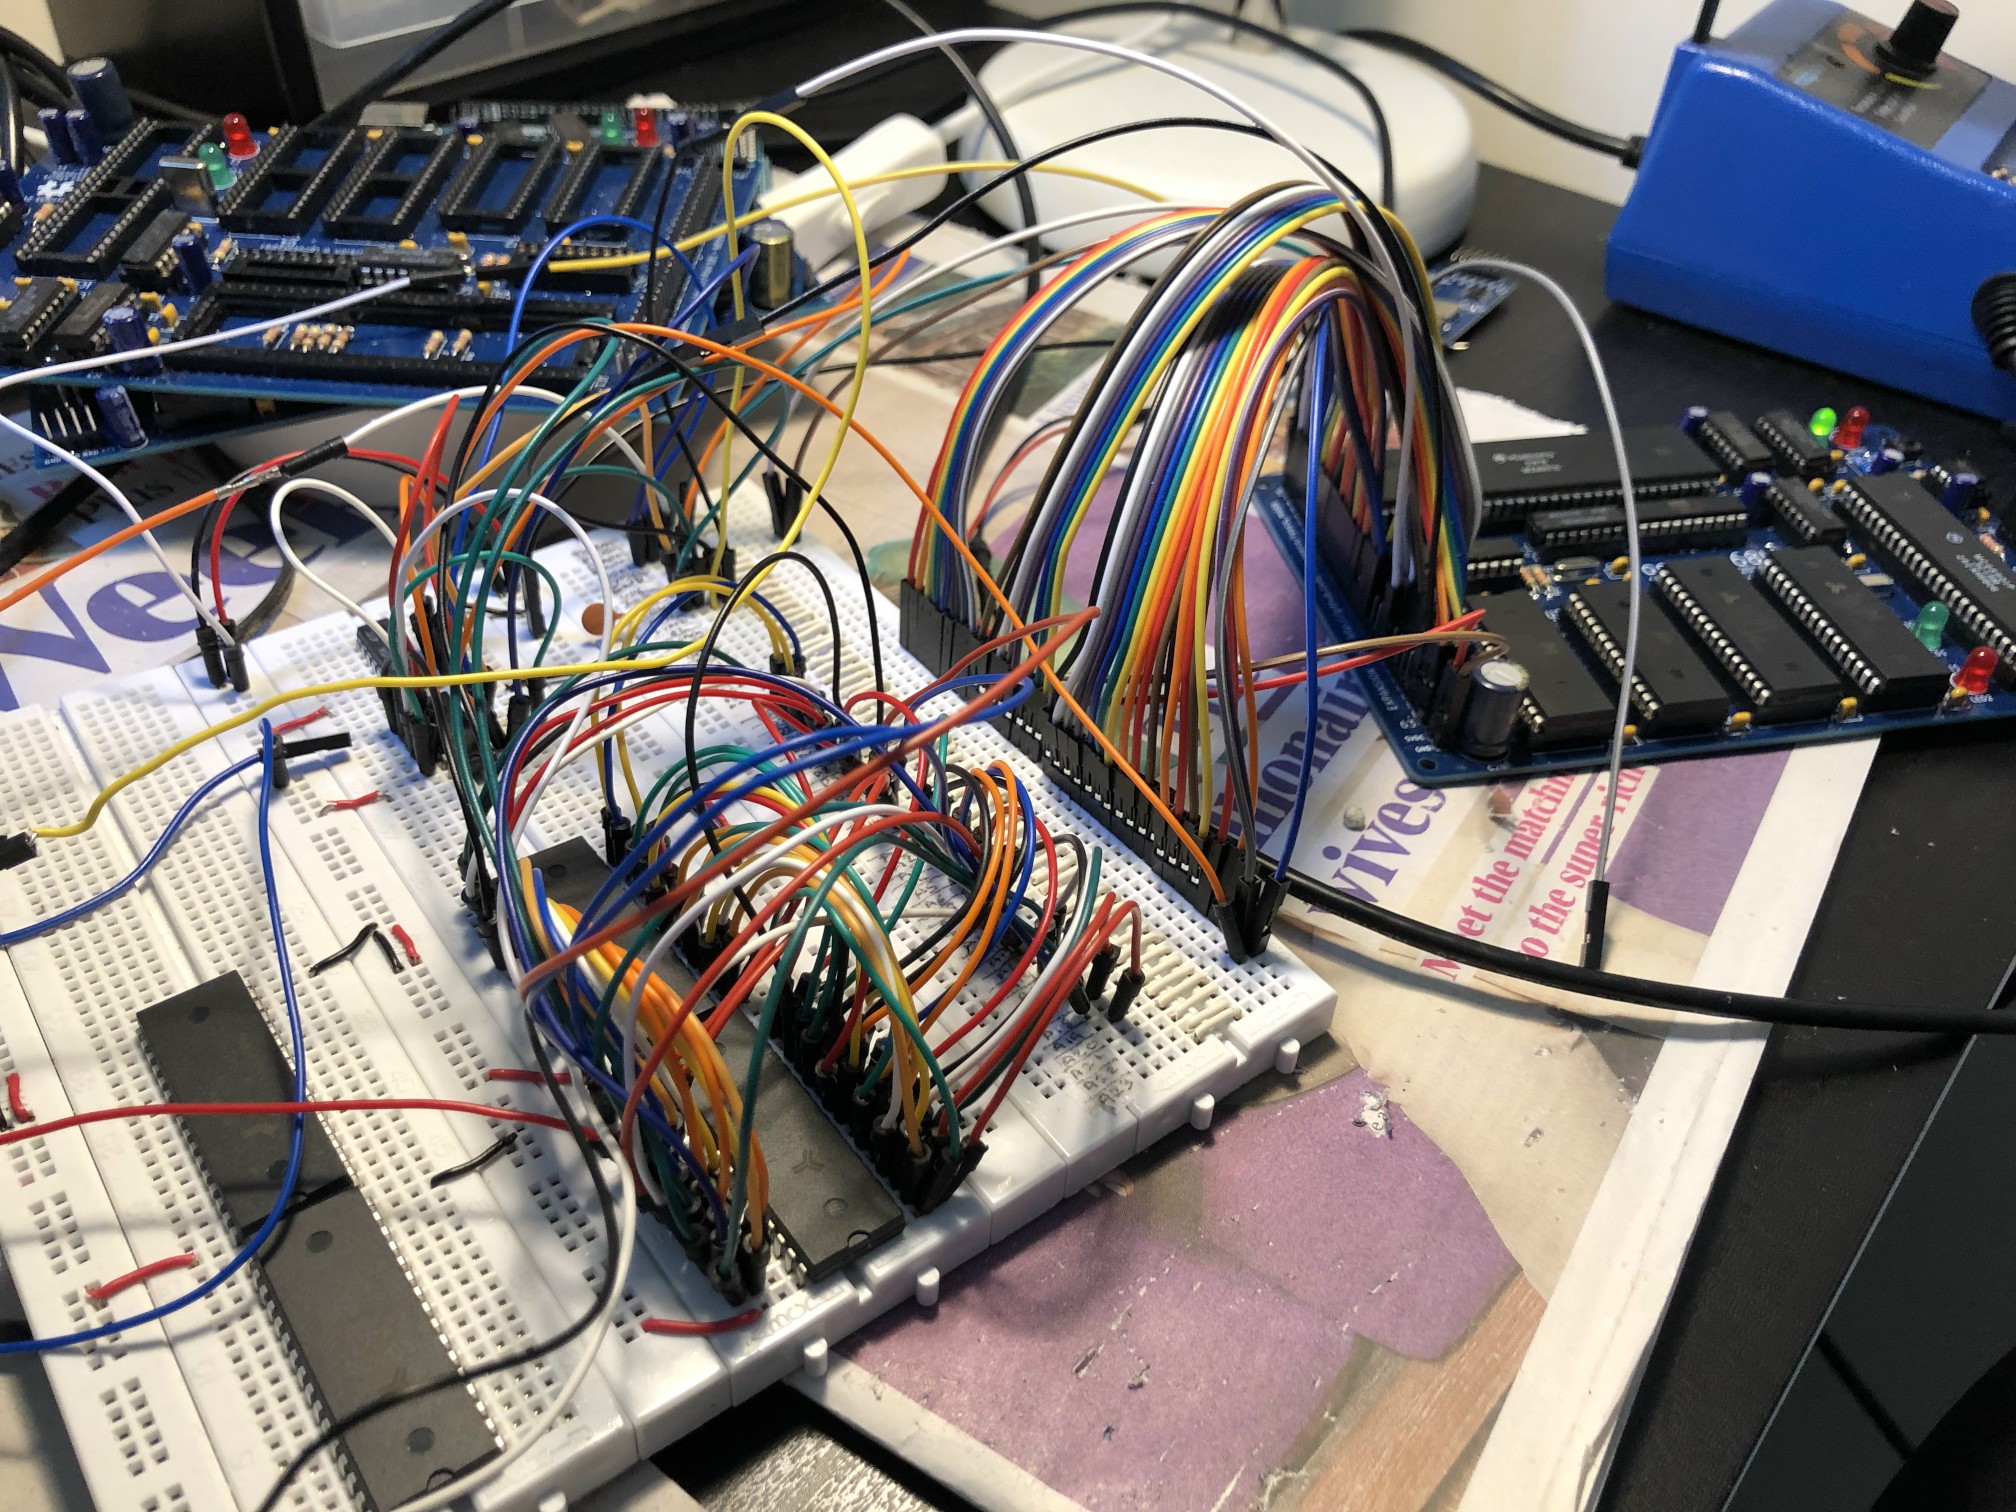
In it's current state, the board looks like this:
![]() (Well, it's changed a bit since that photo as the video RAM at bottom right understandably didn't work in this configuration :D)
(Well, it's changed a bit since that photo as the video RAM at bottom right understandably didn't work in this configuration :D) The centrepiece here is the V9958 (on it's SDIP->Breadboard adapter centre right), supported by a couple of 16V8 GALs for decoding and glue, all hooked into a prototype bus board (top left). The main board is top-right. I was pretty impressed it worked at all, and it took a little tinkering to get it going, not because of issues with the design so much as issues with breadboard in general.
To begin with, I didn't have any suitable DRAMs, so while I waited on their arrival I decided to try hooking up an old (battery-damaged) Amiga trapdoor expansion PCB to see if it would work. Results were encouraging:
![]() Obviously it's not quite there, but there *is* some output, so I knew I was heading in the right direction. Again, the ability to prove this out in MAME was a massive help, this is what the screen above looked like in the emulator:
Obviously it's not quite there, but there *is* some output, so I knew I was heading in the right direction. Again, the ability to prove this out in MAME was a massive help, this is what the screen above looked like in the emulator:![]() Eventually the DRAMs arrived, which is when I took the shot of the board you saw in the first picture. This improved things somewhat, but also made other things weirder:
Eventually the DRAMs arrived, which is when I took the shot of the board you saw in the first picture. This improved things somewhat, but also made other things weirder:![]() (all the H's are deliberate, I changed the character I was clearing the screen with to check I was actually writing the DRAM - MAME couldn't help here as it was all about cycle times and refresh).
(all the H's are deliberate, I changed the character I was clearing the screen with to check I was actually writing the DRAM - MAME couldn't help here as it was all about cycle times and refresh).This is the point where I took the first picture in this post, where the DRAM was tacked on to yet another breadboard and jumper wired in. Of course I suspected this to be the problem, and sure enough, after moving the DRAMs onto the same board as the V9958 itself and making sure the wiring was sound, I was finally able to get a decent "Hello World" out of the VDP!
![]()
With this success, I finalised the schematics for the prototype board with some input from everyone over on Discord, and drew up a quick board design to send off for manufacture. It's on it's way, and I'm really looking forward to building it and proving the design before moving onto the final design of the board.
![]()
![]() The PCB is quite compact (it's a prototype, and I'm working hard to keep prototype costs to a minimum after spending far too much on prototype RAM and bus boards):
The PCB is quite compact (it's a prototype, and I'm working hard to keep prototype costs to a minimum after spending far too much on prototype RAM and bus boards):![]() The final design is going to incorporate some great community suggestions (like the amplified RGB and sync signals going to the header as well as the DIN, and the colour bus being on a header too), but for now I just want to make sure the basic thing works, and this will do just that.
The final design is going to incorporate some great community suggestions (like the amplified RGB and sync signals going to the header as well as the DIN, and the colour bus being on a header too), but for now I just want to make sure the basic thing works, and this will do just that. -
Lots going on!
05/07/2020 at 18:29 • 0 commentsWhew, it's been a busy couple of weeks here on the project, with lots going on and lots to update, so I'm going to give a quick rundown here of the main developments that have been happening.
Tindie launch - response has been amazing!
It's almost a month since the rosco_m68k launched on Tindie, and I've been amazed by the response! I honestly wouldn't have believed back when I started this project that anyone else would be particularly interested in it, but it seems like it's going to be a modest hit, and I'm super grateful to everyone who's ordered one, or added them to their wish lists - thank you all so much!
Rest assured that the money from sales will be put to good use designing new expansions for the rosco_m68k, expanding the software, and generally making it better all the time. A V9958 video board is already in the works (more on that later!), a RAM expansion has launched today and there's a new local-bus / backplane board coming real soon (just needs one more spin through manufacturing to correct some minor issues).
Once again, huge thanks to everyone who's already built their very own brand new, really-old computer, and if you haven't got yours yet but would like one, you can find it available now on Tindie.
Community is growing!
Now the rosco_m68k is "out there" and people have jumped on board, it's been great to see a bit of a community growing around it. It's truly awesome getting together with people and hearing their plans and ideas for the computer, things they want to try and new stuff they want to make.
We're using Discord as a place to meet, and it's great to see people there who have been long-time friends of the project since the breadboard days here on Hackaday as well as new faces. If you'd like to get involved we'd love to say hi - find our server at https://discord.gg/zGUB7R8 .
The computer has an emulator!
Speaking of community, @Micko_mame joined Discord after building his rosco_m68k kit, and hasn't stopped amazing me since with the things he's doing with software. As a developer of the MAME emulator, Micko knows his way around the source of that project, as he demonstrated with a real mic-drop moment when he posted a picture of the rosco_m68k firmware and examples running in the emulator.
![]() I cannot understate how awesome this is, debugging on a single-board computer with no kernel and only serial IO can be a challenge at times. Micko's MAME fork will really speed up the software development, both by reducing the compile-run loop time and allow single step debugging in a nice window, as seen in the shot above.
I cannot understate how awesome this is, debugging on a single-board computer with no kernel and only serial IO can be a challenge at times. Micko's MAME fork will really speed up the software development, both by reducing the compile-run loop time and allow single step debugging in a nice window, as seen in the shot above.This really came into it's own recently when I was writing the initial bootstrap test code for the V9958 - writing to registers and especially to VRAM can be a bit challenging on that chip and it's hard to know if the code actually does what you think it does. Of course MAME supports the V9958, and Micko did the necessary wiring to expose it to the rosco_m68k target, and we were off to the races. Just being able to peek at VRAM and the V9958's registers saved a ton of debug time.
You can find Micko's MAME work in his fork on GitHub and trust me, it's well worth checking out - it supports RC2014 too if Z80 is more your thing than m68k :)
We are running MicroPython(!)
Another of Micko's mic-drop moments was when he announced (pretty much on day one!) that he'd gotten MicroPython running on the rosco_m68k! This is awesome on so many levels - I mean, it's a 68k running Python for one thing, but it also could open the door to a really nice machine monitor, written in python (with some assembly/C glue of course) and driven from the Python REPL. I'm super excited to start playing with it (I've sadly been head-down packing orders for shipping, frantically sourcing components and designing the V9958 expansion, but I'm going to be getting back to some software this weekend).
To get this running, Micko also had to do a minimal port of Newlib, no small feat when there's no OS, no memory management, and only serial IO.
![]() Check out the code here: https://github.com/mmicko/micropython (on the mc68000 branch).
Check out the code here: https://github.com/mmicko/micropython (on the mc68000 branch).Larger Roms & V9958
@RTS4E75 (geddit?) also joined in on Discord, and though he's been waiting a while for components and free time to build his computer, he's already got a lot of great ideas.
For a start, he immediately noticed I'd done something a bit silly when designing the revision 1 PCB, and failed to connect some address lines that would have let the rosco_m68k easily support larger ROMs that have the same footprint as the 16K that's fitted as standard. My bad, but once he's fully up and running with his board he's going to prove out the idea, and if it works I'll be fixing the problem in a future board revision. The current thinking is that 64KB total should be doable without any real design changes, and maybe even larger with a jumper or two to change how some of the lines are connected.
Along with long-time friend of the project @henk.gooijen, RTS4E75 has also been involved in a lot of the conversations about the next hardware steps, especially the design of the V9958 and how it'll interface to external displays. I'm really looking forward to getting the V9958 on a board and really playing with it - right now I have a breadboard(!) circuit with barely working video RAM (an old Amiga expansion hacked in as the DRAMs I ordered haven't turned up yet :( ) but there's still the MAME emulation I talked about earlier so it won't stop the work on the software side.
It's a known fact that stuff designed with input from people is always better than stuff designed in isolation, so I'm really lucky to have everyone involved :)
Conclusion
So, as I said, it's a busy time on the project, but I'm loving every minute of it, and I can't wait to build the next thing. There are so many ideas being floated at the moment (including floppy/HDD storage, ROM monitors / debuggers, and all kinds of other things) that I'm more excited than ever about the future of the project.
And, once again, thanks to all who've already built their rosco_m68k, as well as anyone who is thinking about getting one - you're all totally awesome!
(Both images posted in this log came from and remain property of Micko)
-
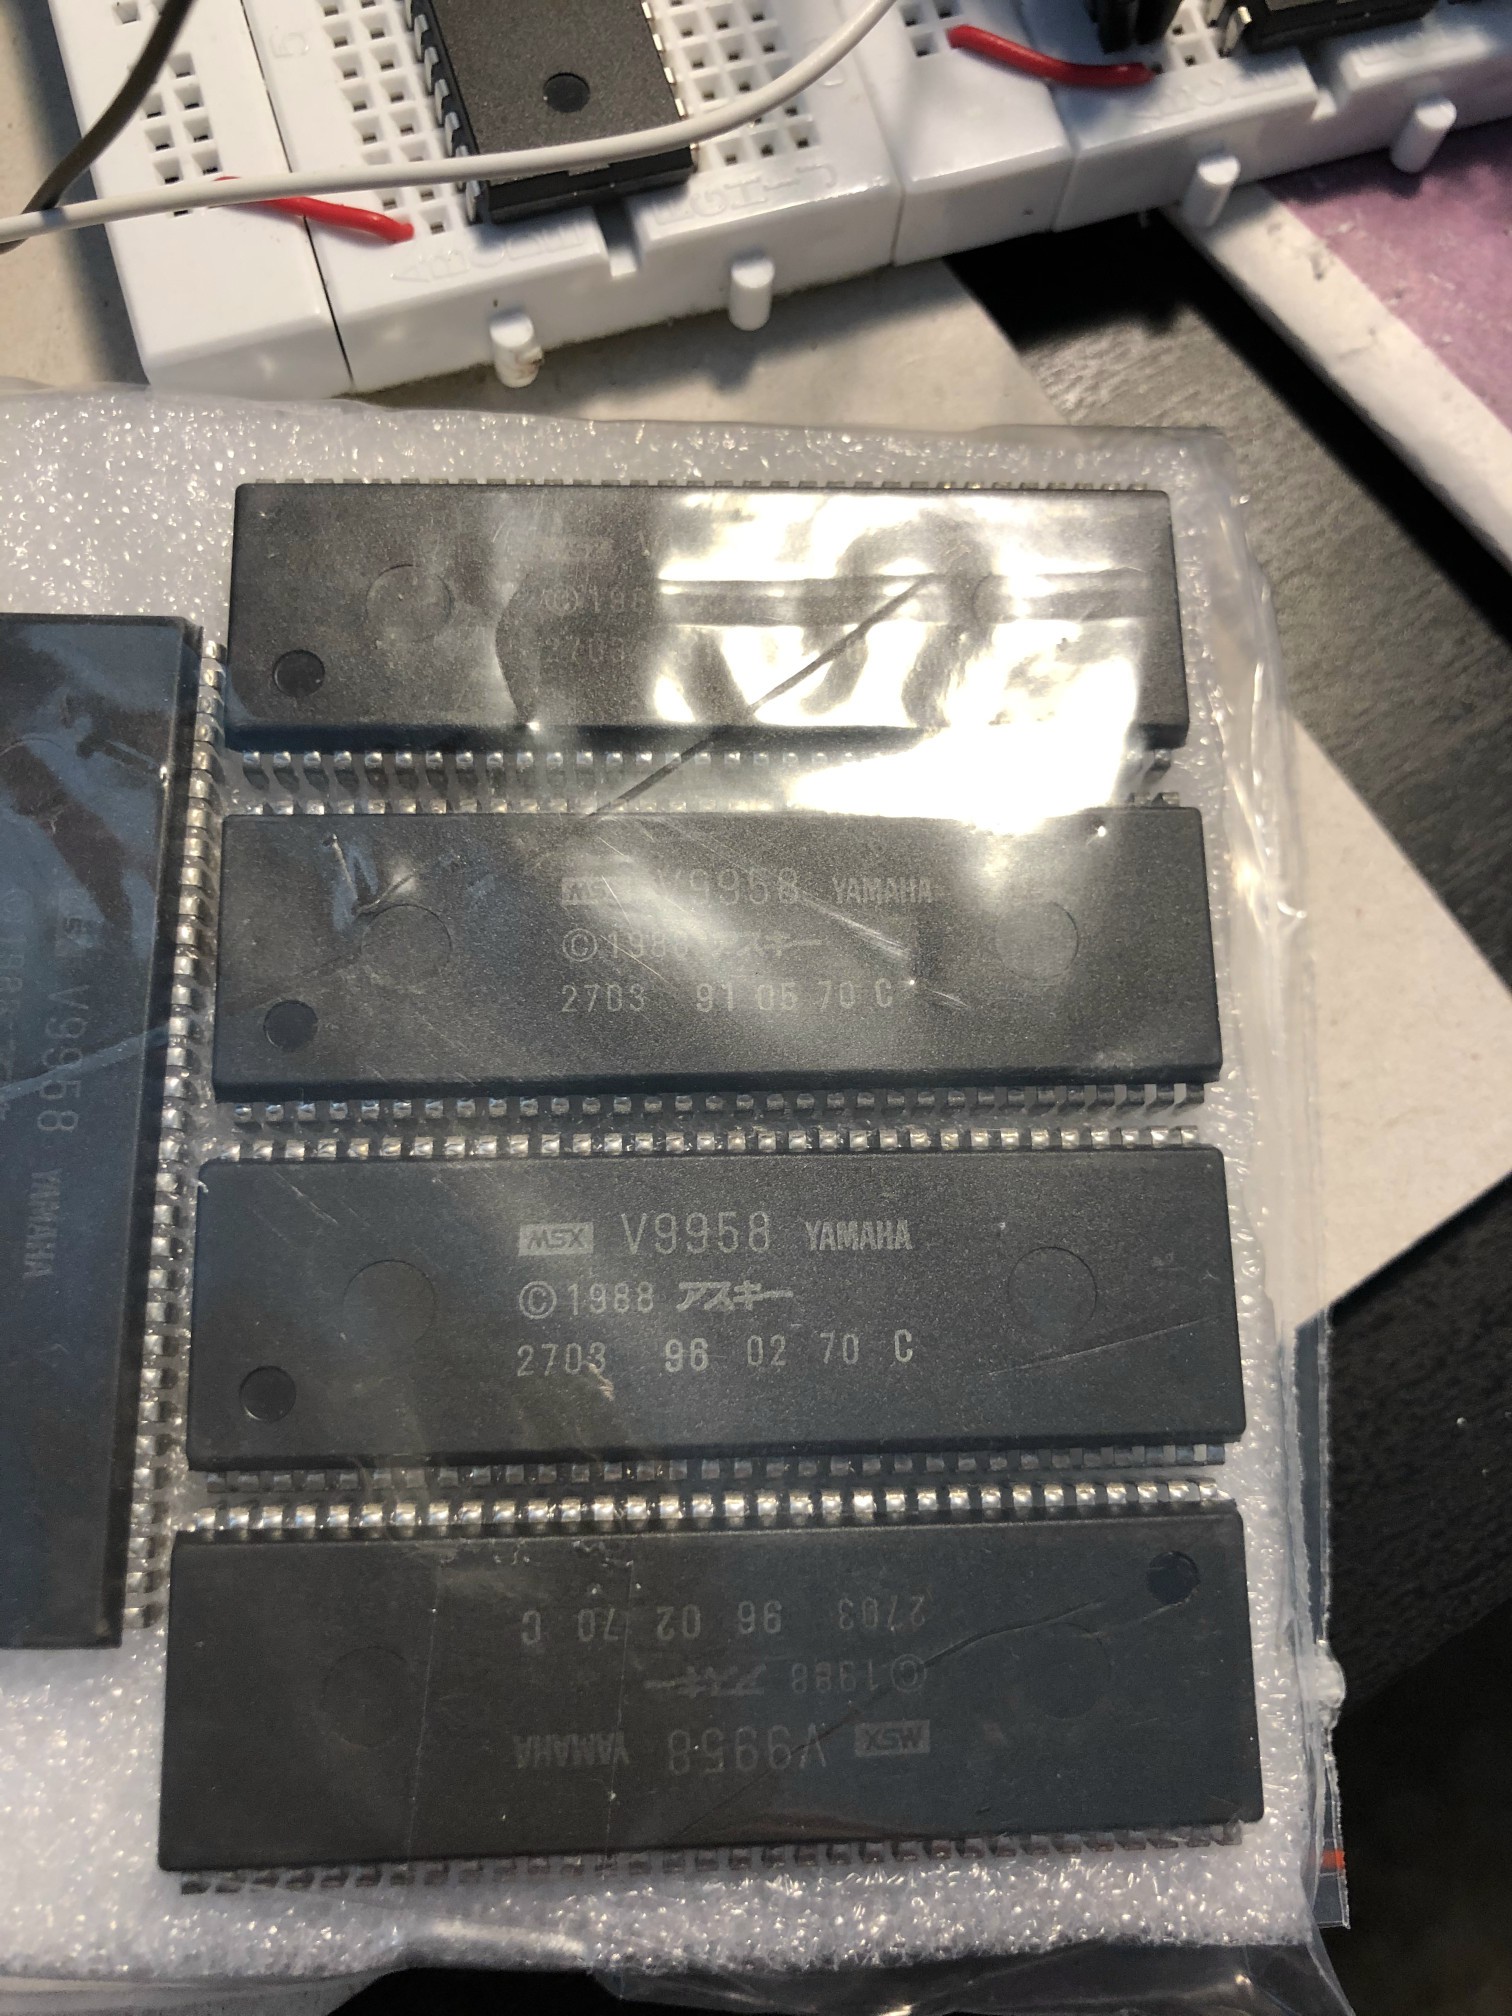
V9958 - Getting Started
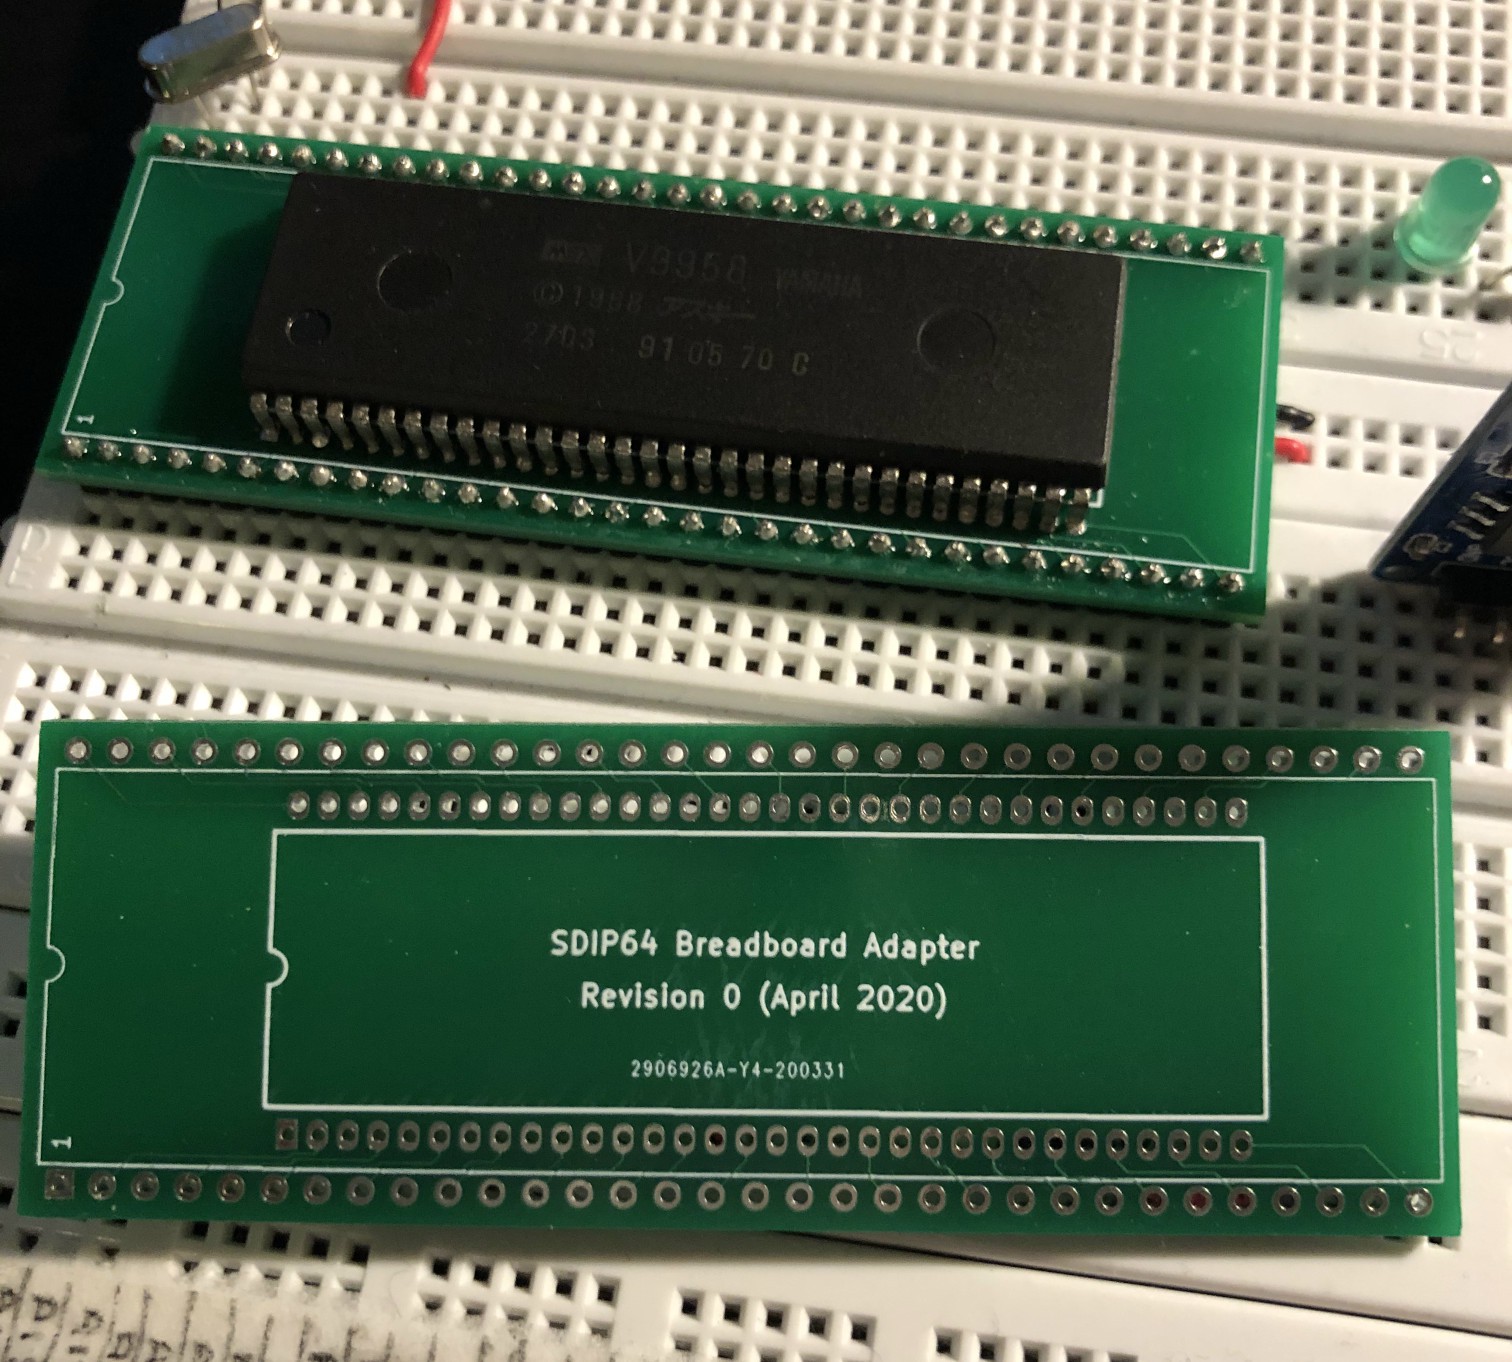
04/27/2020 at 02:02 • 0 commentsI had a little time this weekend, so I finally made a start with the V9958s I received a couple of weeks ago. I've not gotten all that far, but I have sanity checked that I can power the chips and hook them up to the bus on the rosco_m68k. As is tradition on this project, I want to develop the thing on breadboard before committing to a design (especially given the 9958 is completely new to me) but there's a hiccup - the V9958 comes in a 1.77mm pitch "Shrink DIP" package, which obviously isn't breadboard friendly.
I looked around on the nets for an adapter, and while I did find one (that was oddly enough designed for the V9958 and included the crystal and caps) it didn't ship outside the US. I also found a generic SDIP64 to breadboard converter on Amazon, but that one was out of stock. No matter, I fired up KiCAD and ran off a simple adapter in PCBnew:
![]()
I did this about ten days ago, and JLC had it back to me in a few days (I guess because it's such a simple board, in green and quite small, they were able to panel it more quickly than my usual oddball-sized-and-shaped-boards-in-blue) and of course it works great. In the pic above I've attached power and the clock - later I hooked up the bus and was able to get the chip talking to the computer in a rudimentary fashion. Because of the width of the adapter it doesn't fit 'normally' into the breadboard, and has to straddle the power rail of two side-by-side boards, but that's no problem.
I have a bunch of these little adapters, so if anyone is doing anything breadboard-based and needs to work with a wide SDIP of up-to 64-pin, let me know and I'll list them on Tindie for around $5 including shipping.
-
RAM Expansion arrived, and CPUs on the way
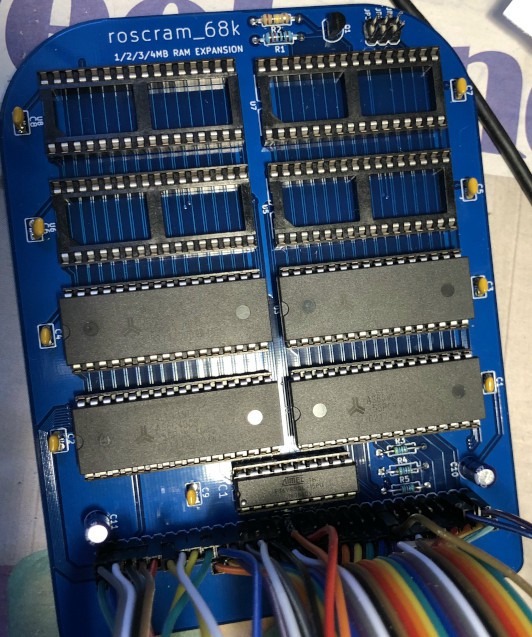
04/20/2020 at 22:00 • 0 commentsWith their usual speed, JLC got the RAM boards manufactured and shipped to me before I'd had chance to gather all the components (I'm still waiting on some right-angle pin-header sockets), so I quickly soldered one up to test it out and happy to say it works perfectly. Here it is hooked up, in the 2MB configuration:
![]()
I'll be offering this on Tindie soon in case anyone else wants to expand their RAM. Do you need a RAM expansion for the rosco_m68k? I mean, this thing supports 4MB (and you can technically have more than one connected, though I haven't finished the bus board design yet) - no-one could ever need that much RAM, right? :D
In other news, I'm finally seeing some movement on the 68010's I ordered a few weeks ago. After quite a bit of back and forth, I'm reasonably sure that these are the real-deal (not like the fakes I unfortunately picked up a month or so ago). Pictures have been sent, date-codes have been checked and assurances have been given, so all that's left is to actually receive them and test them. Needless to say, if they aren't genuine I'll unfortunately have to keep holding out for CPU stock for Tindie orders. That said, I have a good feeling this time around (and I have some backups on order too, just in case ;) ).
-
A busy weekend!
04/11/2020 at 22:20 • 0 commentsSo, I'm having a busy weekend here, having just launched the rosco_m68k on Tindie I've spent some time putting together my first few orders (thanks all who've ordered so far!) but luckily I've still found plenty of time for hardware hacking.
I've been busy working on the first expansion board for the computer, which is going to be a RAM expansion. I'm thinking of making it configurable for either one or two MB of expansion RAM, and where it maps into RAM will be configured by jumpers. The prototype is mostly working great:
![]()
In this picture it's still using a couple of 7400-series ICs for address decoding, but I'm replacing them with an ATF16V8BQL which will make it easier to support the jumper configuration and such and will save space when this thing becomes a PCB. I'm probably also going to make a simple bus-board to break the expansion bus out to multiple connectors. I feel like doing that now, and making the first expansion compatible with it will save frustration later.
Speaking of the 16V8 I've finally bitten the bullet and converted the WinCUPL code for the address decoder and IO glue to GALasm (not the original link, but the one I used). I've been meaning to do this for a while, because WinCUPL just deeply and severely sucks, and it only runs on Windows (as you might have guessed from the name) but because I've not really done anything with the CUPL since I first wrote it, I've just kept putting it off - it's good that I've finally had need to make some changes and do some new GAL code as it's spurred me on to finally do the conversion.
I've not added GALasm to the Home-brew tap I created to house to m68k GCC toolchain, because I figure that most people will want to recompile the GAL code (I include the Jedec files in Git anyway) so it would just add bloat...
While I was busy working on the RAM expansion, these turned up:
![]()
So it looks like I'm going to be ever busier than I expected I would be this weekend. I can't wait to get started with these but I don't have the breadboard adapters back from JLC yet (these are shrink DIP packages), and in any event I want to finish off the RAM expansion so these will have to wait a day or two :)
rosco_m68k
A full-featured Motorola 68k retro computer, starring a 68010 running at 10MHz

 (Well, it's changed a bit since that photo as the video RAM at bottom right understandably didn't work in this configuration :D)
  Obviously it's not quite there, but there *is* some output, so I knew I was heading in the right direction. Again, the ability to prove this out in MAME was a massive help, this is what the screen above looked like in the emulator:
 Eventually the DRAMs arrived, which is when I took the shot of the board you saw in the first picture. This improved things somewhat, but also made other things weirder:
 (all the H's are deliberate, I changed the character I was clearing the screen with to check I was actually writing the DRAM - MAME couldn't help here as it was all about cycle times and refresh).

 The PCB is quite compact (it's a prototype, and I'm working hard to keep prototype costs to a minimum after spending far too much on prototype RAM and bus boards):
 The final design is going to incorporate some great community suggestions (like the amplified RGB and sync signals going to the header as well as the DIN, and the colour bus being on a header too), but for now I just want to make sure the basic thing works, and this will do just that.
 I cannot understate how awesome this is, debugging on a single-board computer with no kernel and only serial IO can be a challenge at times. Micko's MAME fork will really speed up the software development, both by reducing the compile-run loop time and allow single step debugging in a nice window, as seen in the shot above.
 Check out the code here: