Close
0%
0%

Happy Clap Switch

Clap-clap, light goes on. Clap-clap, light goes off. This makes me happy.

Similar projects worth following
This is clap-switch. You clap twice to turn it on, and twice more to turn it off again. It is built with components I had on hand. Since this is a one-off, I used a prototype BlueBoard#01 rather than have a PCB made.

I use it in the bedroom to save me multiple trips between the bed (where I sleep) and the doorway (where the light switch is). It has knobs to adjust brightness and hue, which is genuinely nice, and a push-button in case I'm close to it and don't feel like clapping.

This project is partly "scratching an itch" and partly to show off BlueBoard#01.

This project uses BlueBoard#01, and other components I had in cupboard. I'm pretty pleased with the result - it works, it's useful and it's acceptably tidy.

This was the final prototype of BlueBoard#01 before it went into production. The differences are:

  1. It uses HASL (solder) instead of ENIG (gold) plating.
  2. The placement and size of the mounting holes changed.

This project serves as an example of how to use BlueBoard#01 for one off projects.

  • 1 × BlueBoard#01 SMD/TH Prototoyping board
  • 1 × ATTiny3217 Atmel's biggest ATTiny MCU
  • 1 × SPU0410LR5H-QB7 MEMS microphone
  • 1 × NifteeCircuits 5050 8-piece LED Stick 8 WS2812S's on a convenient board
  • 2 × Rotary Encoder

View all 8 components

  • Programming Tool Chain

    Alan Green06/07/2019 at 21:34 0 comments

    I'm working on getting the source published on github. In the meantime, here's a short write up about the tool chain.

    Happy Clap's toolchain is all Atmel, all the time. I have been using the standard Atmel Windows toolchain for quite a few years now. It uses the GCC compiler, and other open source tools, to build and run code. Over the top of this, it uses a Microsoft Visual Studio based IDE, Atmel Studio. 

    Atmel Studio

    Atmel Studio provides a convenient way to edit, compile, load and debug. It also is adequate at autocomplete suggestions, cross referencing source and highlighting the line that has a compiler error. It's... fine.

    That said, Atmel Studio feels a little old and creaky. It seems to be in the process of being deprecated in favor of MPLAB X IDE. However, MPLAB's AVR features are marked "preliminary, beta support, not production tested so I am using Atmel Studio. It's fine.

    Atmel START

    Atmel START has a website (start.atmel.com) where you configure your part using a point-click-and-occasionally-type interface.  Mostly it's about selecting which peripherals you're going to use and how they are configured. START then generates boilerplate code to initialize peripherals as well as libraries and example code to use, all in a form that can be used by one of several IDEs.

    Because START provides the source for libraries and configuration code, it's possible to rewrite just about anything you'd prefer to do differently.

    I like START. It's not perfect, but it sure beats figuring out every little detail from scratch.

    Atmel ICE

    Finally, I use Atmel's standard programming tool, the Atmel ICE. It was expensive, but I've had many years' of use out of it, and, with Atmel Studio, it Just Works.

    By Just Works I mean, when ICE says the voltages are wrong, I know that the voltages are wrong. When ICE says it programmed a chip, I know that the chip is programmed. And it's reasonably fast, too.

    I'm keen to give the new MPLAB Snap a go, to see if it measures up in terms of features and reliability.

  • Software Part 1: Buttons, Lights and Configuration

    Alan Green06/07/2019 at 20:40 2 comments

    The clap-switch source is a single file C program, written using the Atmel START framework. This post discusses the main loop, how each of the peripherals are handled. A follow up post will discuss handling of the sound input and the actual clap detection.

    If you'd like to see or use the source, it's available at github.com/alanvgreen/clap-switch

    All of the interesting code is in main.c.

    Main Loop and Top Level 

    At the core of the software is tick_millis, a 32 bit millisecond counter. tick_millis is updated every millisecond by an interrupt from the PIT (programmable interrupt timer). 

    ISR(RTC_PIT_vect)
    {
        tick_millis++;
    
        // Clear interrupt flag to indicate that interrupt has been handled.
        RTC.PITINTFLAGS = RTC_PI_bm;
    }

    The timing is generated by the 3217's internal 32kHz timer, so it will only be correct with a few percent, but that's close enough.

    The main loop begins by waiting for tick_millis to be different from the last time it saw tick_millis. It sleeps while waiting, and will wake when an interrupt occurs.

    uint32_t last_awake = tick_millis;
    while (1) {
        while (last_awake == tick_millis) {
            __builtin_avr_sleep();
        }
        last_awake = tick_millis;
    
        // ... rest of loop here ...
    }

    So long as the rest of the main loop takes less than a millisecond, then the loop will execute every millisecond.

    Output: WS2812 LEDs

    WS2812 LEDs are stateful: you only need to tell them what to do when you want them to change what they're doing. The code keeps track of whether the led status is up-to-date with the leds_updated variable. When that variable is true, the LEDs don't need updating. 

    Sending Data to WS2812s

    Following the advice from Josh Levine, clap-switch simply bit-bangs data out to the LEDs, paying more attention to the length of the high part of the cycle than the low part of the cycle. If you haven't read his article, and you think you might one day program a WS2812/NeoPixel, reading this article will pay back your time investment many-fold.

    Here's the code to send one byte. We use cycle delays, knowing our CPU speed to within 20MHz, and keeping in mind that the on-off transition adds a smidgen of delay too.

    void sendByte(uint8_t v) {
        // Working with PB0
        register uint8_t on = VPORTB_OUT | 1;
        register uint8_t off = VPORTB_OUT & 254;
        for (uint8_t i = 0; i < 8; i++) {
            if (v & 0x80) {
                VPORTB_OUT = on;
                __builtin_avr_delay_cycles(13); // 0.65uS
                VPORTB_OUT = off;
                __builtin_avr_delay_cycles(8); // 0.4uS
            } else {
                VPORTB_OUT = on;
                __builtin_avr_delay_cycles(6); // 0.3uS
                VPORTB_OUT = off;
                __builtin_avr_delay_cycles(15); // 0.75uS
                
            }
            v <<= 1;
        }
    }
    

     We call this code three times per WS2812 - once each for Green, Red and Blue (yes, in that order). And we do that 8 times - once per WS2812, for a total of 24 calls to update all of the LEDs.

    We calcuate the values of R, G and B to send using an HSL to RGB conversion algorithm. H (hue) and L (luminance) are set using the rotary encoders. We assume S (saturation) is 1, meaning fully saturated. In the context of a bedroom light, the result is a pleasingly useful subset of the full range of the WS2812s color output.

    // v is L (because lowercase l looks like 1 and is confusing). 
    // v range 0-255 instead of 0-1. 
    uint16_t v = (config.brightness * config.brightness) / 16;
    v = min(v, 255); // in case config.brightness == 64
    
    // S is assumed to be 1 (range 0-1)
    
    // Calculate chroma - 0 to 255.
    uint16_t c = (255 - abs((2 * (int16_t) v) - 255)); 
    
    // config.hue is in range 0-191
    uint8_t hue_region = config.hue >> 5; // top 3 bits of region are hue range (0-5)
    int8_t hue_val = config.hue & 0x1f; // bottom 5 bits are val
    uint16_t xt = 8 * (hue_region & 1 ? hue_val : 32-hue_val);
    uint16_t x = (c * (256 - xt)) >> 8; // scale x down to range 0 to 255
    uint8_t r = 0, g = 0, b = 0;
    switch (hue_region) {
    case 0: r = c; g = x; break;
    case 1: r = x; g = c; break;
    case 2: g = c; b = x; break;
    case 3: g = x; b = c; break;
    case...
    Read more »

  • Construction

    Alan Green05/21/2019 at 12:00 0 comments

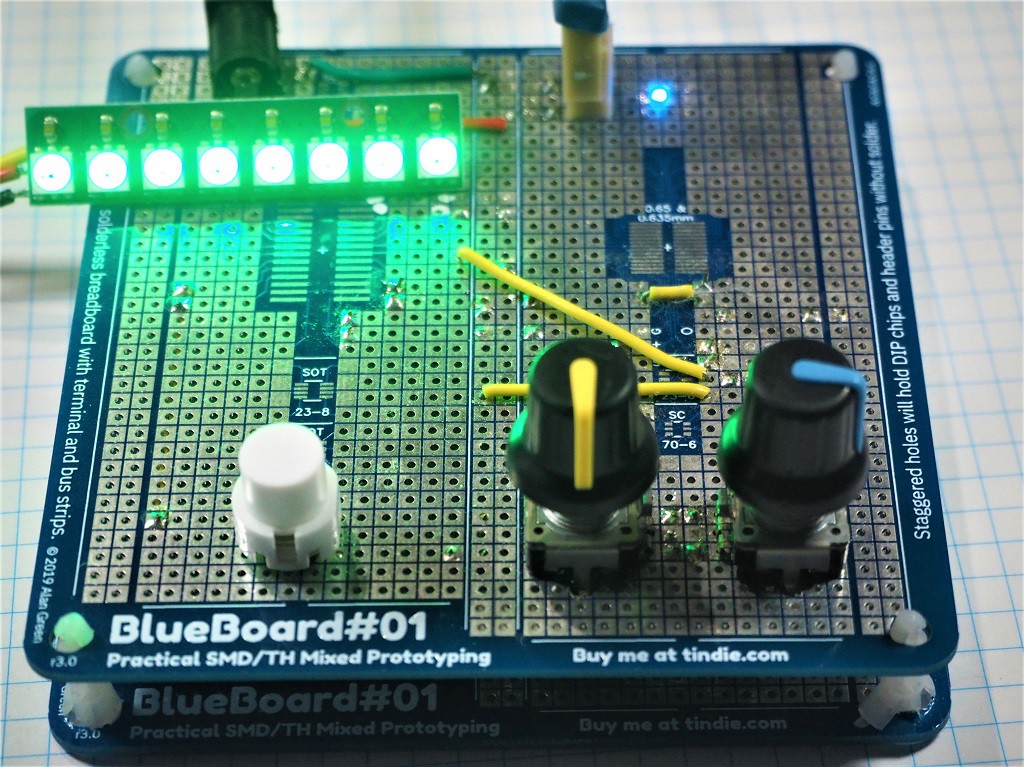
    It's green!
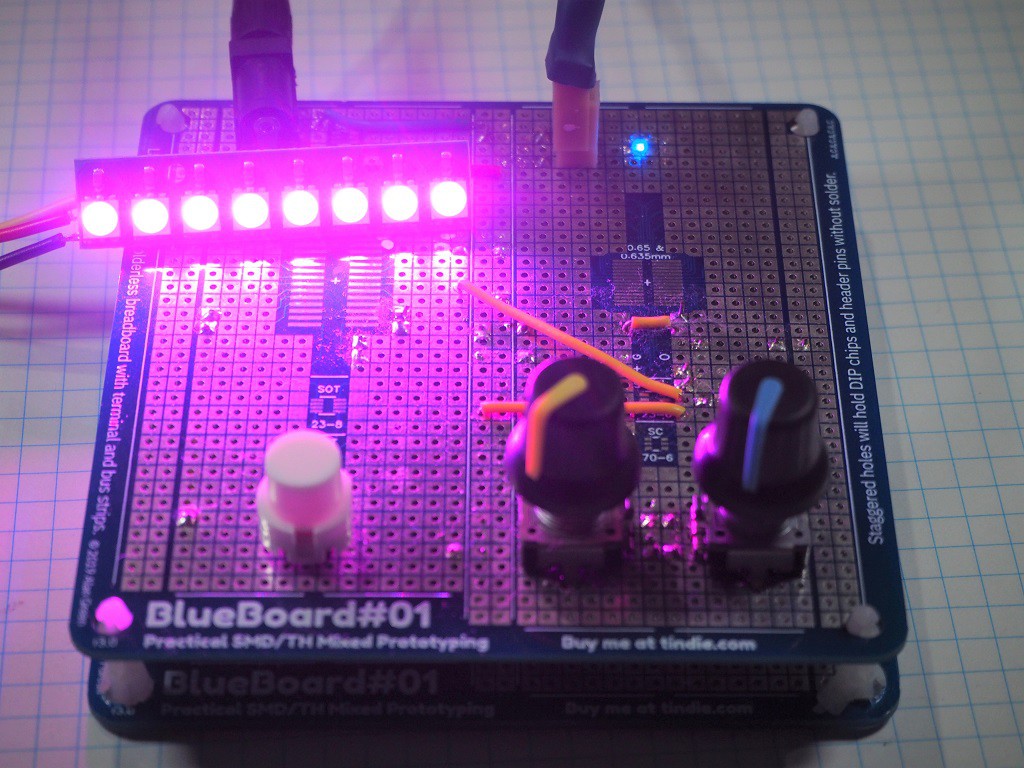
    It's purple!

    I began by drawing the component layout onto planning sheets

    Sadly, I lost these sheets. It was super-helpful to have them to work from, but I did change my mind, mid-construction on a few items.

    Soldering Components

    I have done quite a bit of prototyping with BlueBoard#01 and its predecessors. Soldering components is about as quick as soldering to a PCB. Wires are extra, but I minimized wire runs by using through hole component leads to jump between ICs, particularly around the microphone and op-amp,

    This came out nicely
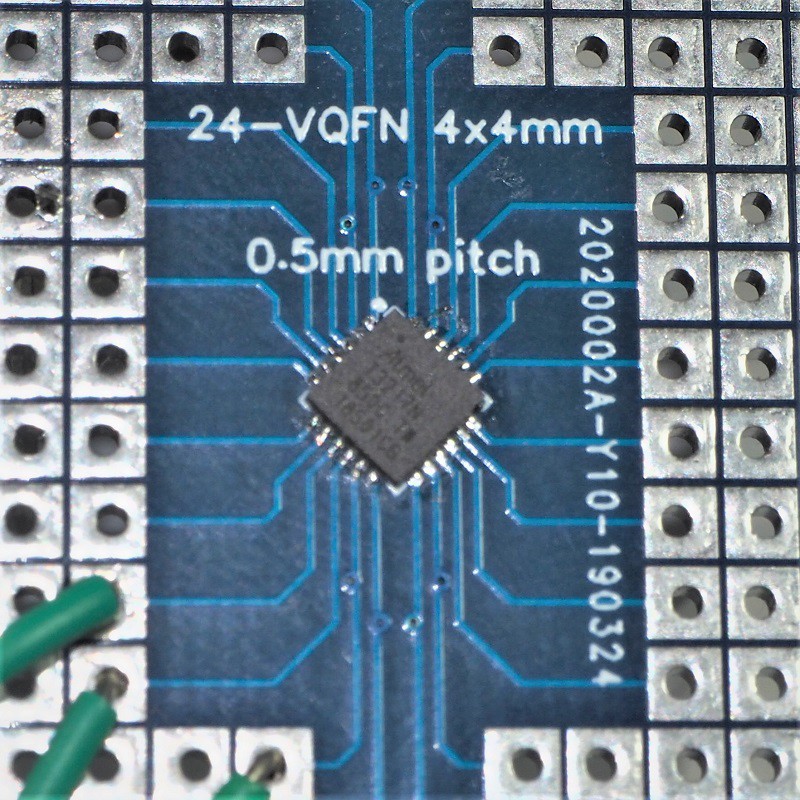
    ATTiny3217
    • The ATTiny3217 comes in QFN package. I used a hot air gun to solder it. I was a little heavy on the solder paste, and there was one bridged pin, which I was able to touch up with the soldering iron in a few seconds.
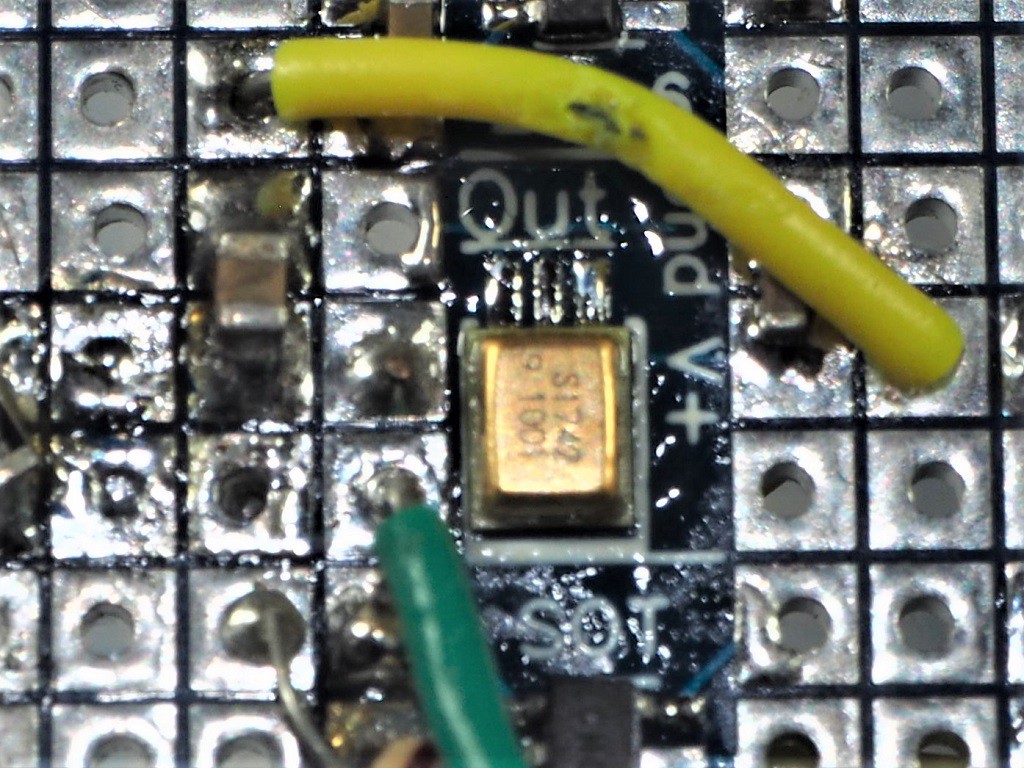
    Not so pretty
    Hand soldered SPU0410 MEMS microphone
    • The SPU0410 I hand-soldered and got it third try. Fortunately, these things are cheap. Now that I've had practice, I reckon I'll get it first time, next time. The end result looks a bit messy in close up, but its fine from a distance, and anyway, the microphone is on the bottom side of the board.

    Encoders

    Encoder with drilled out hole for peg

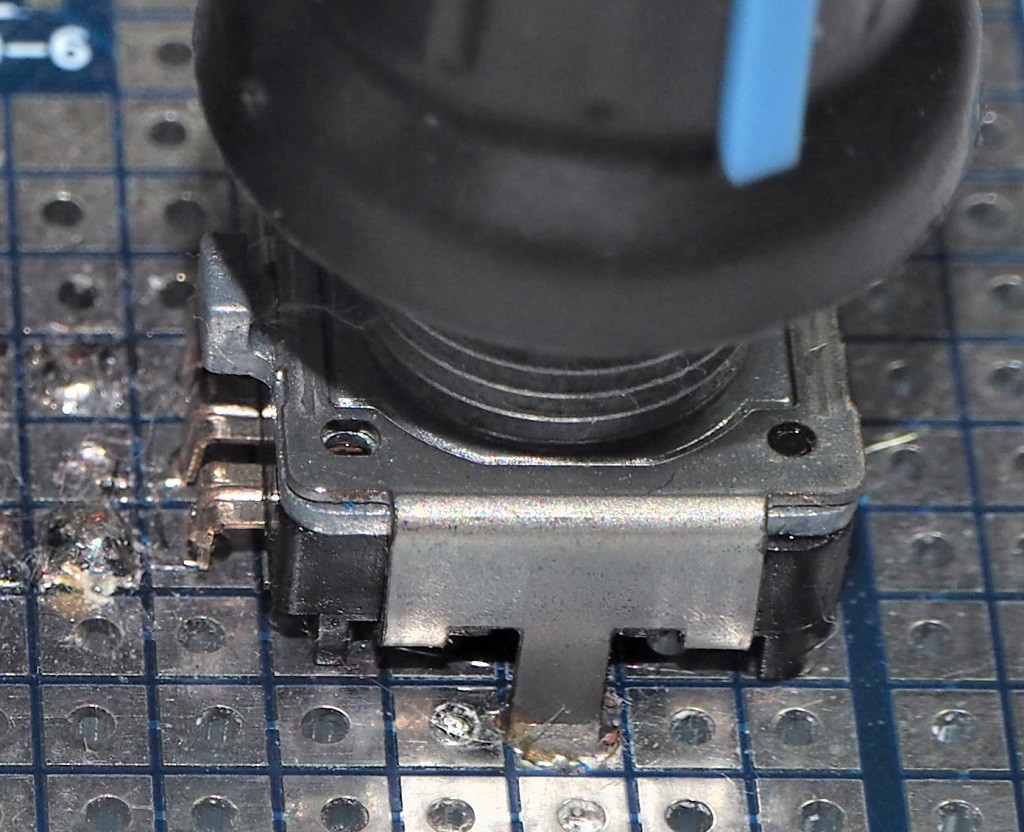
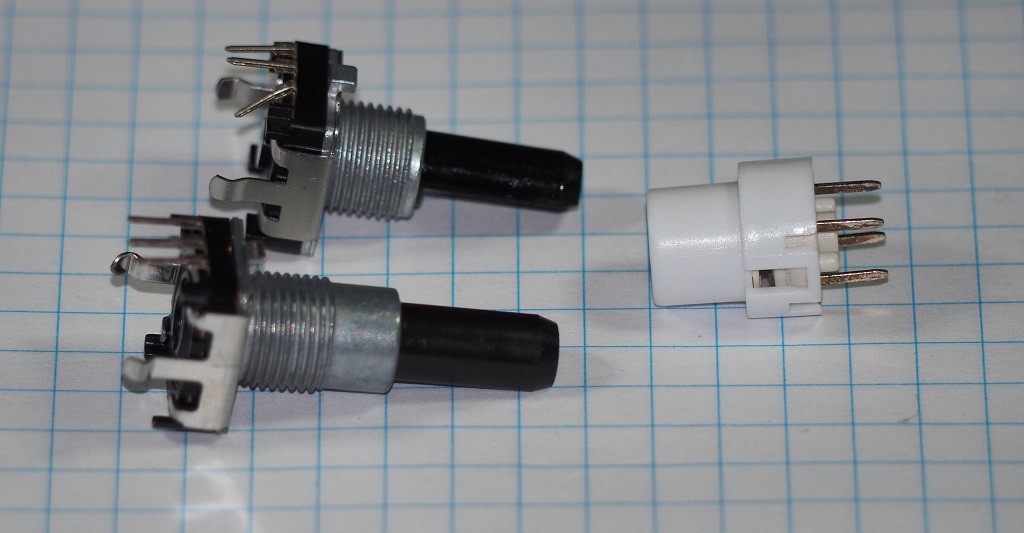
    The encoders each have three leads at 0.1" centers, as well as two additional metal pegs to help secure it to the board. I was able to drill out 2mm holes in the PCB, which fit the pegs perfectly.

    WS2812s

    The WS2812s are connected with 3 wires - 5V, Gnd and Data, which I braided together for strength and neatness. I used a 3 pin header and plug because I happened to have them - otherwise I would have soldered the wires directly to the prototype board.

    A Case

    Initially, I had the idea of laser cutting a case for the switch, but I found some PCB standoffs, and it occurred to me that I had something that already had holes drilled in exactly the right location - another BlueBoard#01, so I used that. I think it looks fine.

    The encoders, buttons, connectors and a couple of wires are on the top side of the board, while the rest of the components are on the bottom side, out of view. This is acceptably neat.

  • Schematic and Notes

    Alan Green05/21/2019 at 10:04 0 comments

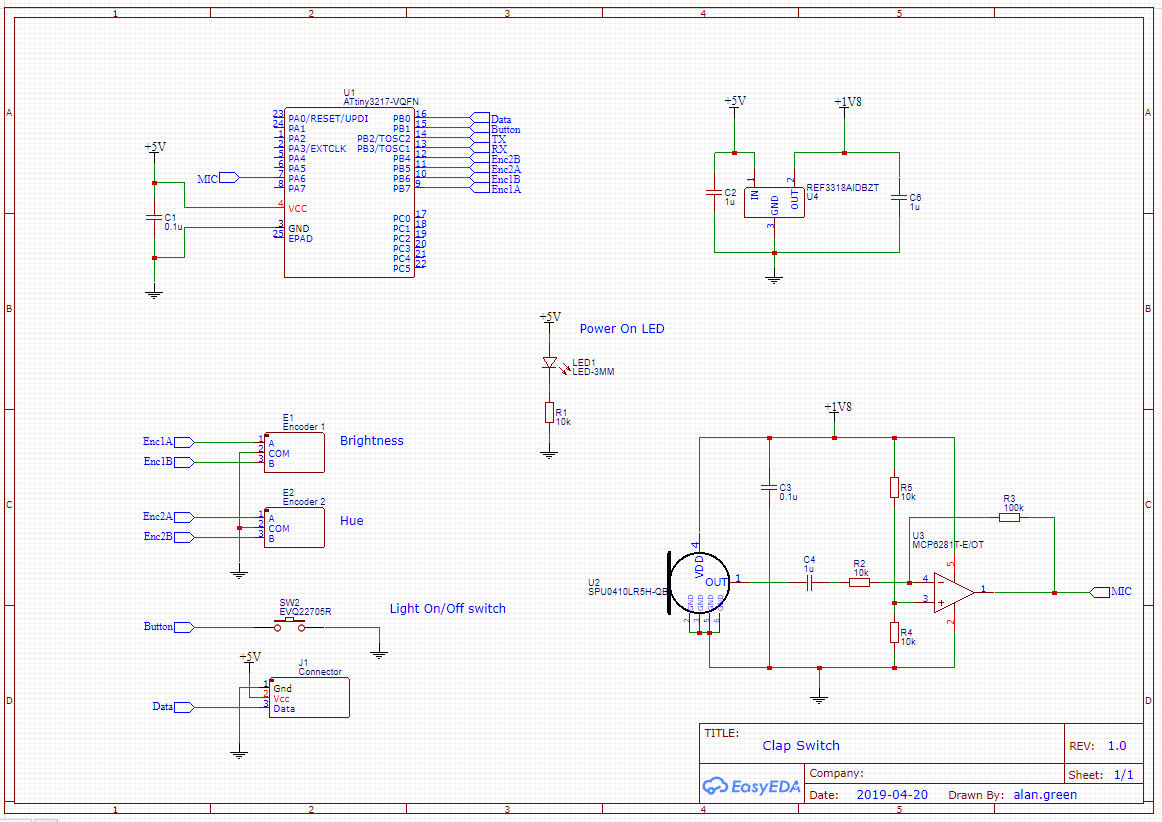
    Here is my schematic, captured in EasyEDA.

    Notes

    • Most of these components I chose simply because I had them. They're not necessarily the best for the job, but they're close enough.
    • Microcontroller: I chose the ATTiny3217. It is over powered for this application, which is fine.
    • Power on LED: I wanted a power indicator to help when I was troubleshooting. 
    • Microphone: I used the SPU0410LR5H. I'm familiar with it, and it Just Works.
    • Op AmpMCP6281 is a solid low-voltage raill-to-rail amp. It has a 5MHz Gain-Bandwidth Product, which is 500 times what it needs in this application. The trade off for this performance is that it consumes a whole half milliamp of quiescent current, but that is not a problem in this application since it is connected to mains power.
    • 1.8 V supply. The WS2812s require a 5V data signal, which means it is convenient to run the microcontroller at 5V. However, the microphone is rated at a maximum of 3.6V. I would have powered it at 3.3V, but I happened to have a large number of Texas Instruments REF3318, and no 3v3 regulators. The REF3318 is a reference rather than a voltage regulator, but it is rated for 5mA output - plenty for the microphone and amplifier.
    • Switch: A generic button I found in my cupboard. Ignore the model number in the schematic.
    • Encoder: I used a couple of fairly standard rotary encoders that I found in my box. I don't have the exact part number, but they all work pretty much the same.

  • Second Ideas

    Alan Green05/12/2019 at 20:28 0 comments

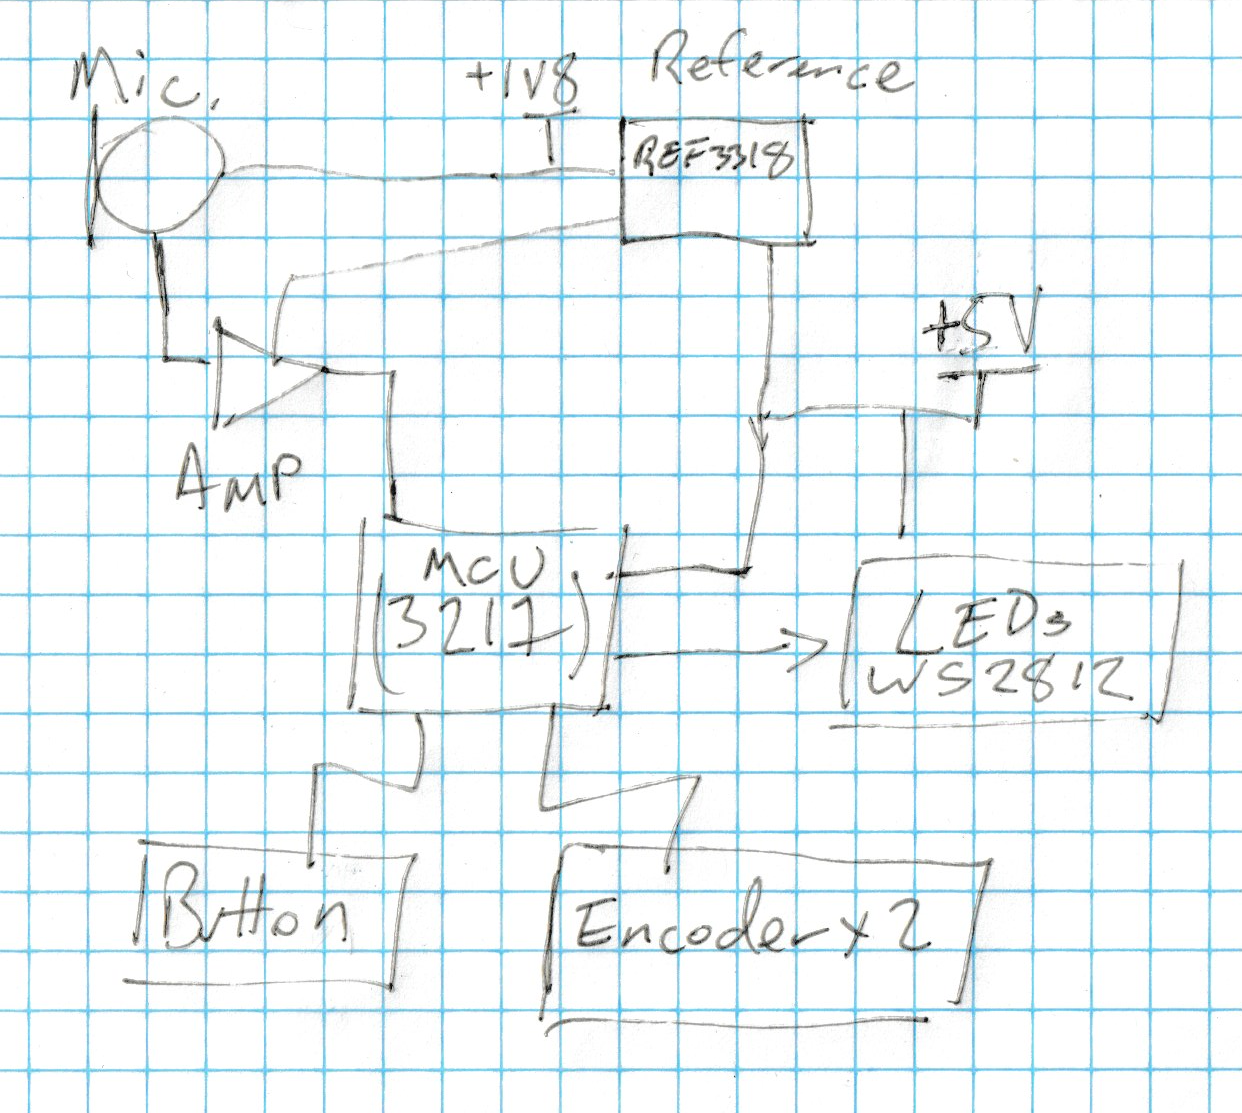
    My next plan was bit more involved:

    Design Sketch

    As you can see, there are a few changes:

    WS2812 LEDs from NifteeCircuits

    Light: The LED lamp and MOSFET are gone, replaced with an 8-element WS2812S stick from NifteeCircuits. It's definitely not a reading lamp, but it will make enough light to be useful.

    Convenient, but a bad idea.
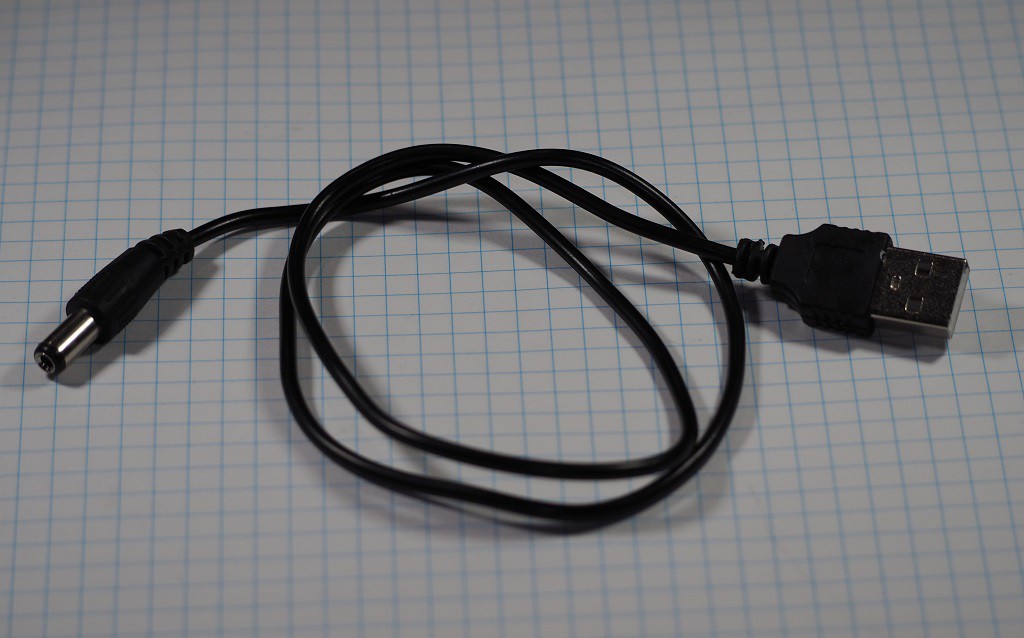
    USB-A to 5V Barrel Jack

    Power: I found a USB-A to barrel jack cable in my parts cabinet. I also had a compatible barrel jack too. I can't help but feel that this cable is a bad idea because it makes it tempting to plug arbitrary stuff in a a computer's USB port. However it avoids the need for a 7805 regulator, so I'm choosing to use it.

    You can tell they're old by the bent pins.
    Old encoders and a button

    Input: It would also be nice to be able to turn the light on and off without clapping, so I added a button. Also, since we are now using fancy WS2812s, I thought it might be nice to be able to dim the lights and control their color, so I added a couple of  rotary encoders.

  • How Bad Can an Old LED Lamp Be?

    Alan Green05/12/2019 at 02:06 0 comments

    My first ideas were great, but didn't work in practice. 

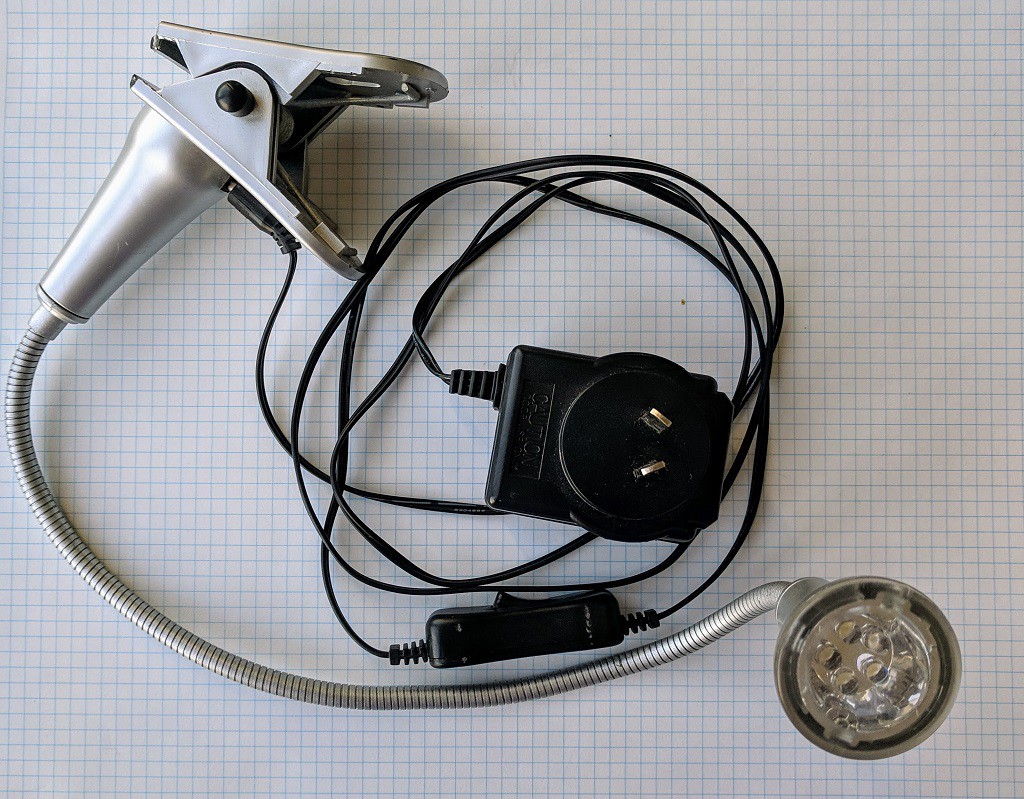
    This was the lamp. It has a 240V to 12V transformer, a clamp, a goose neck

    This was the lamp
    An LED lamp, unplugged

    I say "this was the lamp" because this lamp went down the garbage chute to be with its friends, the other pieces of garbage.

    20V from a 12V supply

    The first issue was with the power supply. It was rated at 12V, but I measured 20-and-a-bit volts with the lamp off. This was discouraging because the DMN2004 MOSFET I was planning to use to switch the lamp on and off is rated for a maximum of 20V. 

    500mA lamp consumes 40mA

    The next problem was that the lamp was only consuming 40mA. 12V * 40mA = 600mW, which is far below its rating of 6W. I suppose this is the reason that it was such a terrible reading lamp. This was the final straw. 

    I wasn't happy working with something so broken, so it went down the garbage chute and I made a new plan.

    On Reflection

    As I'm writing this up, I can see that perhaps the lamp was fine, but only the power supply was broken. I regret not being more patient. On the other hand, I did like my new design (see next post) and it's not like these things are expensive.

  • First Ideas

    Alan Green05/11/2019 at 23:02 0 comments

    I wanted a clap switch to make my life easier. My bedroom light switch is at the doorway, but bedlamp switch is at the bed. A clap switch  saves me from choosing between fumbling for the bedlamp switch after turning off the room lights, or having to walk to the bed and turn on the lamp before going back to the door to turn off the room lights.

    An inspiration here was DIYODE magazine's Three Stage Clap Switch project. I built that project on a breadboard, using a BoldPort Cuttle instead of an Arduino. It worked mostly OK. However, I had bigger plans.

    First Plan

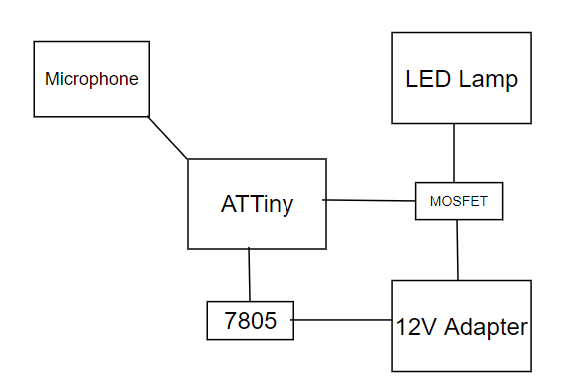
    My first plan was pretty simple: take my existing bedlamp, use its power supply to power an ATTiny microcontroller. When the ATTiny detected a clap, it would switch a MOSFET to turn the lamp on and off.

    I was keen to use parts I had in my cupboard, without buying more. I tend to buy components in fives or tens, and this has led to me having, well, a cupboard full. This leads to choices such as:

    • ATTiny3217: way overpowered for this project, but I have plenty
    • 7805 because I have a tube full.
    • Knowles SPU0410LR5H-QB-7 MEMS microphone, because, again, I have many spare.

    I also wanted to use my new prototyping board, BlueBoard#01. By no coincidence at all, I have a microcontroller and microphone that fit it perfectly.

View all 7 project logs

Enjoy this project?

Share

Discussions

Similar Projects

Does this project spark your interest?

Become a member to follow this project and never miss any updates