-
1Raspberry Pi Setup
What I did to Raspberry Pi 3 B (for now)...
Do not use NOOBS (I don't think it allows analog composite video output as we need it)
- Install just RASPBIAN, use 'stretch' update only (I think?).
- perform: -update pip3
- perform: sudo apt install apt-file
- perform: sudo apt-file update , this will allow apt-file search such as : apt-file search libhdf5_serial.so.100 (one of the "not found" perhaps) then you can install the files "not found" by : sudo apt install libhdf5-100 ... do this for all missing dependencies if any exist.
- Sometimes I used 'matplot lib pyplot' for plotting data so, install by: sudo pip3 install matplotlib ; likely better ways to do this.
- Install 'Thonny' (I'm a newbie, so I use Thonny ! )
- Install Numpy pip3 install numpy (I'm somehow using Numpy 1.12.1)
- Install OpenCV contrib headless:
- sudo pip3 install opencv-contrib-python-headless
- sudo pip3 install opencv2
- You will have to work out all the dependancies of opencv install.
- 'ldd' is Unix cmd for list dynamic dependancies, so we can use ldd cv2.cpython.... | grep "not found"
Analog Composite Video Output at Fullscreen:
In Config.txt ( i think you can use sudo nano /boot/config.txt )
- rem out hdmi_safe=1 (#hdmi_safe=1) ; not sure if we must do this
- rem out hdmi_hotplug=1 (#hdmi_hotplug=1)
- add sdtv_mode=0
When running RaspPi operating system, you can open Configuration Settings and change resolution to 720x480, which is what the output must be for the Quad's VTX to transmit.
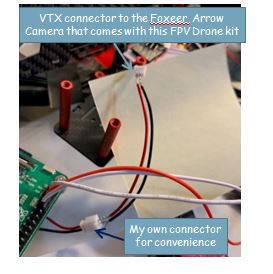
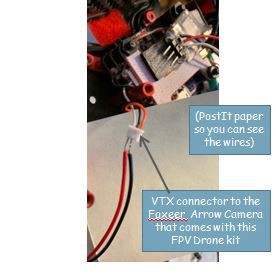
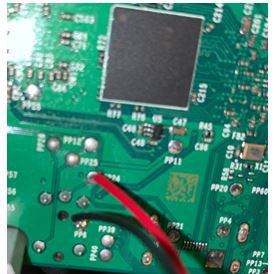
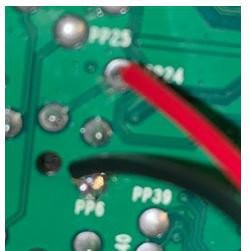
Connect the Quad's VTX connector to Rasp Pi 3 B at physical pin pp24 for composite video put and pp6 for ground.
Quad's VTX connector White wire is signal and Black wire is ground.
To get fullscreen, I currently just make the cv2 window FULLSCREEN:
cv2.namedWindow("Show", cv2.WINDOW_NORMAL)#Declare the image window
#cv2.setWindowProperty("Show",cv2.WND_PROP_FULLSCREEN,cv2.WINDOW_FULLSCREEN)#fullscreen for FPV use
#I typically rem out FULLSCREEN, since it's hard to develop the code on Pi when entire screen is the camera view.
UART for SBUS:
Open the /boot/config.txt and do following:
1. add device operlay command pi3-miniuart-bt to switch Bluetooth to the miniUART and PL011 to serial pins #8 and #10. https://www.raspberrypi.org/documentation/configuration/uart.md
It will set:
- Bluetooth to Miniuart to /dev/ttyS0 that uses VPU clock bla bla, who cares? we are not using this.
- PL011 to /dev/ttyAMA0 (this is what we use)
- UART Tx from Pi is Pin 8 or GPIO14
- UART Rx to Pi is Pin 10 or GPIO 15
2. add enable_uart=1
3. add dtoverlay=pi3-disable-bt
*Disable 'Serial Console' with raspi config or manually be removing 'serial 0' and 'serial0, 115200' baud rate setting in /boot/cmdline.txt
*Install 'pyserial', by using pip3 install pyserial pip3--update pyserialimport serial #serial port, based on pyserial install
#use this in python3 for serial port setup:

import serial #serial port

ser = serial.Serial(#init serial    port='/dev/ttyAMA0',    baudrate=100000,    bytesize=8,    parity='E',    stopbits=2,    timeout=None,    )

readin=ser.read(25)#readin 25bytes or timeout
#do stuff in here...
ser.write([sendout[0],sendout[1],sendout[2],sendout[3]....bla bla, see the code on Github https://github.com/rayzrocket/openairdefense/
Time testing showed 3ms read, <1ms buffer reset, <1ms to parse SBUS into each channel (see Github code).
8E2 UART of 25 bytes is 0.00275seconds, so 3ms is reasonable measured time.
Open Source Air Defense
Convert FPV racing drone into an interceptor using Raspberry Pi
 Ray
Ray


Discussions
Become a Hackaday.io Member
Create an account to leave a comment. Already have an account? Log In.