Summary
The output of the Si5351A is a square wave, which contains too much harmonic content. A filter is constructed.
Deets
The Si5351A puts out a square wave -- after all it is supposed to be a clock generator. However the square wave has too much harmonic content to be legal, so it is necessary to filter those out. It was my desire to make some sort of tunable filter so that the project can operate on all the bands out-of-box, but after some research I decided that would be an undertaking nearly a project in itself. So in the interest of moving the project forward I punted and decided to build the filter just for the 20 meter band (14 - 14.350 MHz). The rest of the project will work on all bands under software control, but the final output stage is tuned to a specific band, and needs to be swapped-out for other bands.
Having simplified that aspect of the project, I did a little research on filters and came across this document:
http://www.gqrp.com/harmonic_filters.pdf
harmonic_filters.pdf
Revd. George Dobbs G3RJV
which is a delightfully written, cookbook form discussion of a lowpass filter design for common ham applications like this. The design is worked-through for all the amateur bands, and is suitable for up to 10 Watts (which is plenty more than is needed here). Additionally, the author took the pains to fiddle with component values to get the desired characteristics out of standard-valued components rather than, say, 164 pF, etc. So for most practical applications you just need to get the parts and build it.
Some of the parts are toroidal inductors that you must wind yourself. I found this site to be invaluable:
http://toroids.info/
You can select your core and enter the desired inductance and find out how many turns and approximately how long of wire you will need. The same folks also sell the various toroids, and I got 100 of the T37-6 ones that I needed, figuring I would be making more filters in the future, anyway. The prices were generally quite reasonable, and the cores arrived just a few days later.
For those that don't already know, when winding a toroid, a 'turn' is considered a pass of the wire _through_the_center_ -- i.e. not counting windings on the outside. Also, consistency in winding direction can be important (not here), and it seems the convention is to wind 'clockwise'. I.e., if you hold the toroid in your left hand, you pass the first turn starting from the top most surface, on the left side, passing down through the center. Then you pull the wire up and around the outside and then and pass down through for the next turn. Each of these turns proceeds forth advancing around the toroid in a clockwise direction, so the last turn will exit on the right side from the bottom. So, start from about 7 o'clock and end up about 5 o'clock. Neatness counts a little, though generally not critically. It's worth trying to keep the wire more or less tight against the core, and it's worth spreading the windings evenly. But if you run out of toroid and have a few bunched windings to get the correct number of turns, this is not the end-of-the-world -- it will still work fine.
I needed to get capacitors, too, which were more expensive than I would have expected, but I wound up getting ceramics with a NP0/C0G dielectric for about 6-7 cents each (when you order 100). I got these from Mouser, so here are the part numbers for reference:
https://www.mouser.com/ProductDetail/810-FG18C0G1H181JNT0
https://www.mouser.com/ProductDetail/810-FG28C0G1H391JNT0
I got 100 because of the way the price breaks, and I'm going to have to pay shipping on this anyway, so why not just buy a whole bunch more for a couple bucks and amortize that shipping against future projects that might need these parts?
While waiting for toroids and capacitors, I decided to play a little with SPICE since I haven't used that in aeons, and this should be a trivially simple circuit to simulate. I initially tried an online tool:
http://www.partsim.com/simulator
and it seemed promising, but I had a devil of a time with just the schematic entry, so I thought about alternatives in the short term. (I do want to come back to this tool -- it's a cloud-based schematic capture and PCB layout solution. It's free -- their business model appears to be that they also can sell the parts in your design, fabricate prototype-scale PCBs, and even do some assembly with their standard parts.)
SPICE packages typically have no UI except for the command line, and you are meant to make an input file defining the circuit and SPICE makes an output file of the simulated electrical data at points in time for the various nodes in the netlist. You're on your own for any graphing.
I did notice that KiCad had some simulation capability. My installed KiCad was in the 4.x series, and the more recent version 5 has better integration with 'ngspice'. In fact, the KiCad 5 distribution will deploy ngspice as part of the install, so I do recommend that relative to the more manual process of installing separate packages as was done in v 4.
That being said, EDA tools being what they always seem to be, I had plenty of frustrations with KiCad as well. One of my peeves is that moving a component on the schematic breaks the nets (interconnecting wires) which I then have to reconnect. Why it would do this as opposed to just keeping the wires connected but ratty looking, and with your subsequently having to tidy them up manually is beyond me. Another is that the now-dangling wires are really hard to reconnect. At length I figured out how so select a wire and 'drag' it (really, just moving the endpoint), but I could not figure out how to select /which/ endpoint, and more often than not it was not the endpoint I needed to 'drag'. Usually I found it easier to delete the now-broken wires and just wire afresh. Fortunately this was a trivial design because that would get quite old quickly.
<<Edit: [Kiril Zyapkov] gave a wonderful tip in the comments that you can use the 'G' key whilst hovering over a component, and it seems the wires rubberband as I would consider sane. I tested that this can also move wire junctions as well. Now if I can find out how to add/delete points on a wire I'll be good.>>
Another thing you should know (and really you need to know this before you even get started), is that you need to use the parts that actually have spice models attached to them. You cannot just use any ol' inductor, capacitor, ground, etc. Definitely use the parts that are in the 'pspice' library. I don't know what would happen if you ever tried to make a PCB from those parts -- who knows what footprint is attached to them -- but I was just wanting a quick simulation, so I didn't care.
Also, you will need to place a (voltage) source on the schematic for the simulation to do anything useful. This is where your input signal comes from.
After you get all that done, you have to set all the component values, and you need to use SPICE conventions in doing so. Additionally, the signal generator component needs to it's value set to 'dc 0 ac 1' so that SPICE will know that this outputs 0 Vdc and 1 V (rms? peak?) ac. Additionally, you need to create a free text block with some SPICE commands in it:
'.ac dec 100 10meg 100meg'
to cause the AC signal to be simulated for steps over a decade, with 100 steps total, for frequencies of 10 MHz to 100 MHz. This filter is for output at 14 MHz, so this will cover a bit of the passband and bunches of the harmonics.
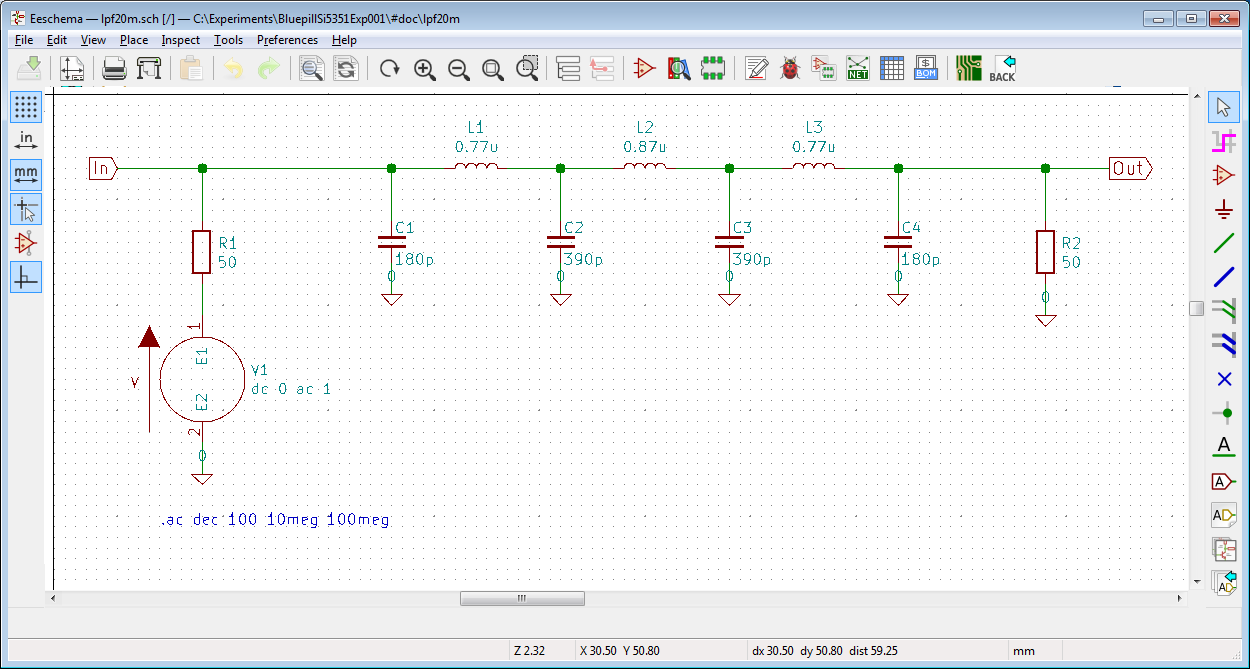
You can see I also added a series 50 ohm resistor to represent the source impedance, and another 50 ohm resistor to represent the load.
You use 'Tools, Simulator' to bring up the simulation dialog. You click 'Run/Stop Simulation' and you are presented with an empty graph. Lol! Well, the simulation was run, but now you have to indicate what node in the netlist you want to look at on the graph, and that is why it's empty. You click on 'Add Signals', and in my case I added 'V(Out)', which I guess means 'voltage, at the node in the netlist named 'Out' because that is the name of the label you attached to that node'. At any rate, adding that immediately produced the desired Bode plot of magnitude and phase. I wasn't that interested in phase, but there did not seem to be a way to remove that trace. Also, I would have liked there to be 'cursors' on the plot showing me the values of that datum, but there are not, so you are left using a ruler against the screen to try to guesstimate the value at any point on the plot.
There is a method: 'File', 'Save as image'. That produces this:
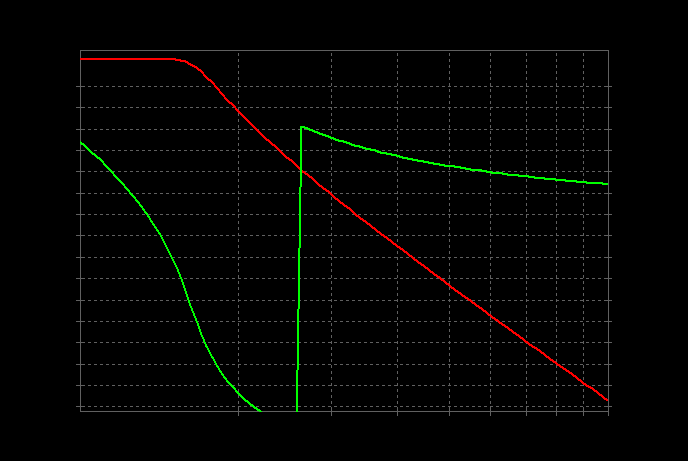
Guys, come on -- no labels on the axes?! I just wound up doing a screen capture and cropping:
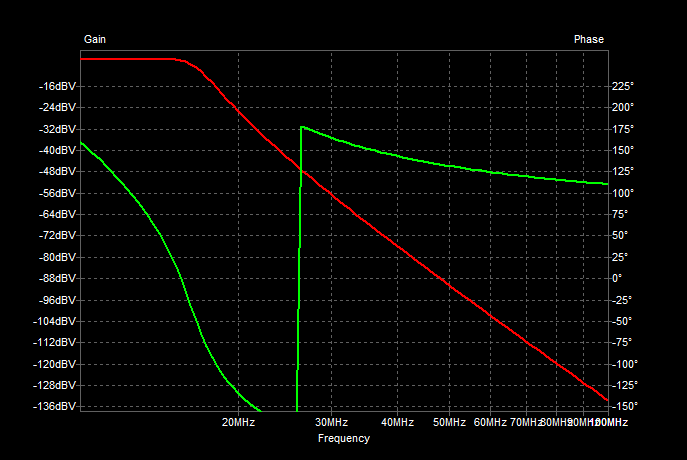
You can spew the data to a CSV so you can take it into a more sane visualization tool if you want, but this will service here (and I was a bit EDA-tooled-out at this point).
At any rate, the filter performance looks much as one would expect. To save myself some eye-strain, I did go ahead and export the data to CSV to scrutinize the numbers. The tool (ngspice? KiCad?) has a convention that I find weird in that the series data are emitted in one line, so they come out as columns (instead of rows as at least I would expect) if you view the CSV in, say, LibreOffice Calc. Also, I don't remember ever asking the data to be expressed in dB, but that winds up being convenient in this case. The output in the passband is shown as -6 dB, and this makes sense because of the two load resistors I added to the schematic because I believe these numbers are being reported as relative to the (ideal) voltage source output, so I just normalize against that.
Performance is pretty flat including the frequency of interest here, which is 14-14.35 MHz, and has a 3 dB cutoff at about 16.5 MHz. At 14 * 2 = 28 MHz, the attenuation is -52 + 6 = -46 dB, which is quite good enough for legality, though that's just the second harmonic, and since this is a square wave it's the odd harmonics that are of particular interest. At 14 * 3 = 42 MHz, the attenuation is -79 + 6 = 73 dB, which is definitely quite good enough.
When parts arrived, I wound some toroids and decided that since the project is currently in a 'breadboard' phase, that I would construct this filter as a separate unit. That way I can re-use it later in other projects when I finish this and tear it down to parts again. (If I wind up liking it, I'll make a PCB for it.) I used on off-the-shelf perfboard and some SMA connectors.
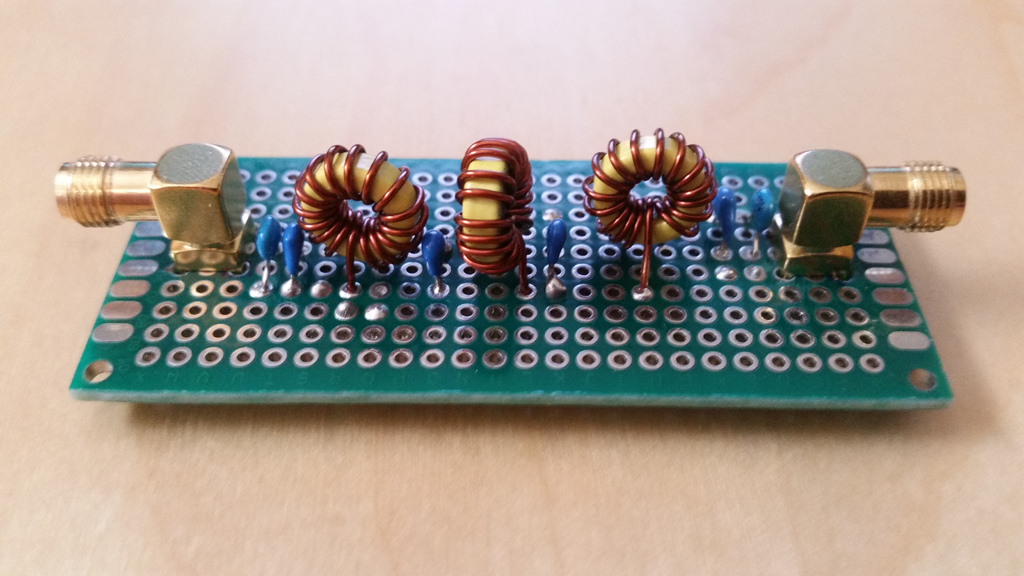
I already had some SMA pigtails and even a few 'through' connectors, so connecting it to the Si5351A breakout board output was straightforward.
I used my scope so observe various signals. First the output of the Si5351A is square, as expected:
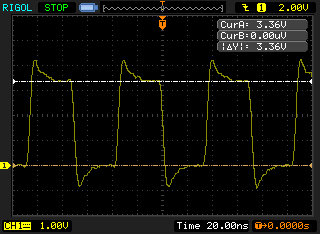
And via the filter, we go from those rags...
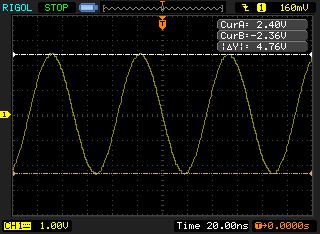
...to riches! Beautiful sine waves. That was with the output open; I put on a 50 ohm terminator:
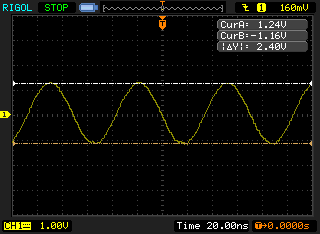
and the voltage halved from 4.76 to 2.4, which would be expected if there was a good impedance match into 50 ohms.
This measured 2.4 V peak-to-peak = 1.2 peak = 0.849 Vrms. That's 0.849 V ** 2 / 50 ohm = 14.4 mW = 11.6 dBm.
So, with no additional amplifier, I have about 11 dBm output. It's entirely conceivable that this would work by itself, however I have a rather sub-optimal antenna of my own construction. (It is an End-Fed Half-Wave Dipole for 40 m. It's operated at resonance, so it is also usable on 20, 10, and 15 as well). I didn't do a great job of tuning it, and I'm really tired of climbing in the attic, and anyways it's summer now so the attic would be a death trap. So it is what it is for the foreseeable future. Will it work?
Alas, it does not work. The only station that can hear me WSPR'ing is my own, lol, so I'm going to have to bite the bullet and provide some power amplification, too.
Next
A (hopefully simple!) power amplifier.
 ziggurat29
Discussions
Become a Hackaday.io Member
Create an account to leave a comment. Already have an account? Log In.
Also check out the Kicad forums next time you hit an issue: https://forum.kicad.info
Are you sure? yes | no
thanks for the tip; I'm a Kicad n00b, but looking to move off my old CAD product.
Are you sure? yes | no
You can "drag" components in KiCad: hover over the part, hit G, profit.
Are you sure? yes | no
news I can use! gives new meaning to 'Gee, who knew?'
Are you sure? yes | no