Victor Dedios
-
Current state of the project
08/25/2019 at 13:48 • 2 commentsThis project started on late 2017 and has gone through different states: concept, market research, design, several iterations, tests, packaging design, digital development and communication (website+social). On October 2018 it finally reached the last step, selling some units to customers and being able to test market. I could talk with some of them who gave me a lot of feedback and made me learnt which things should be fixed and which things were great about the project. I worked on improving things, sold few more and decided to stop. I needed to breath because I had been working on it for about 12 months and felt I had to reconsider some things. It was great what I had achieved and learnt but there was something missing.
![]()
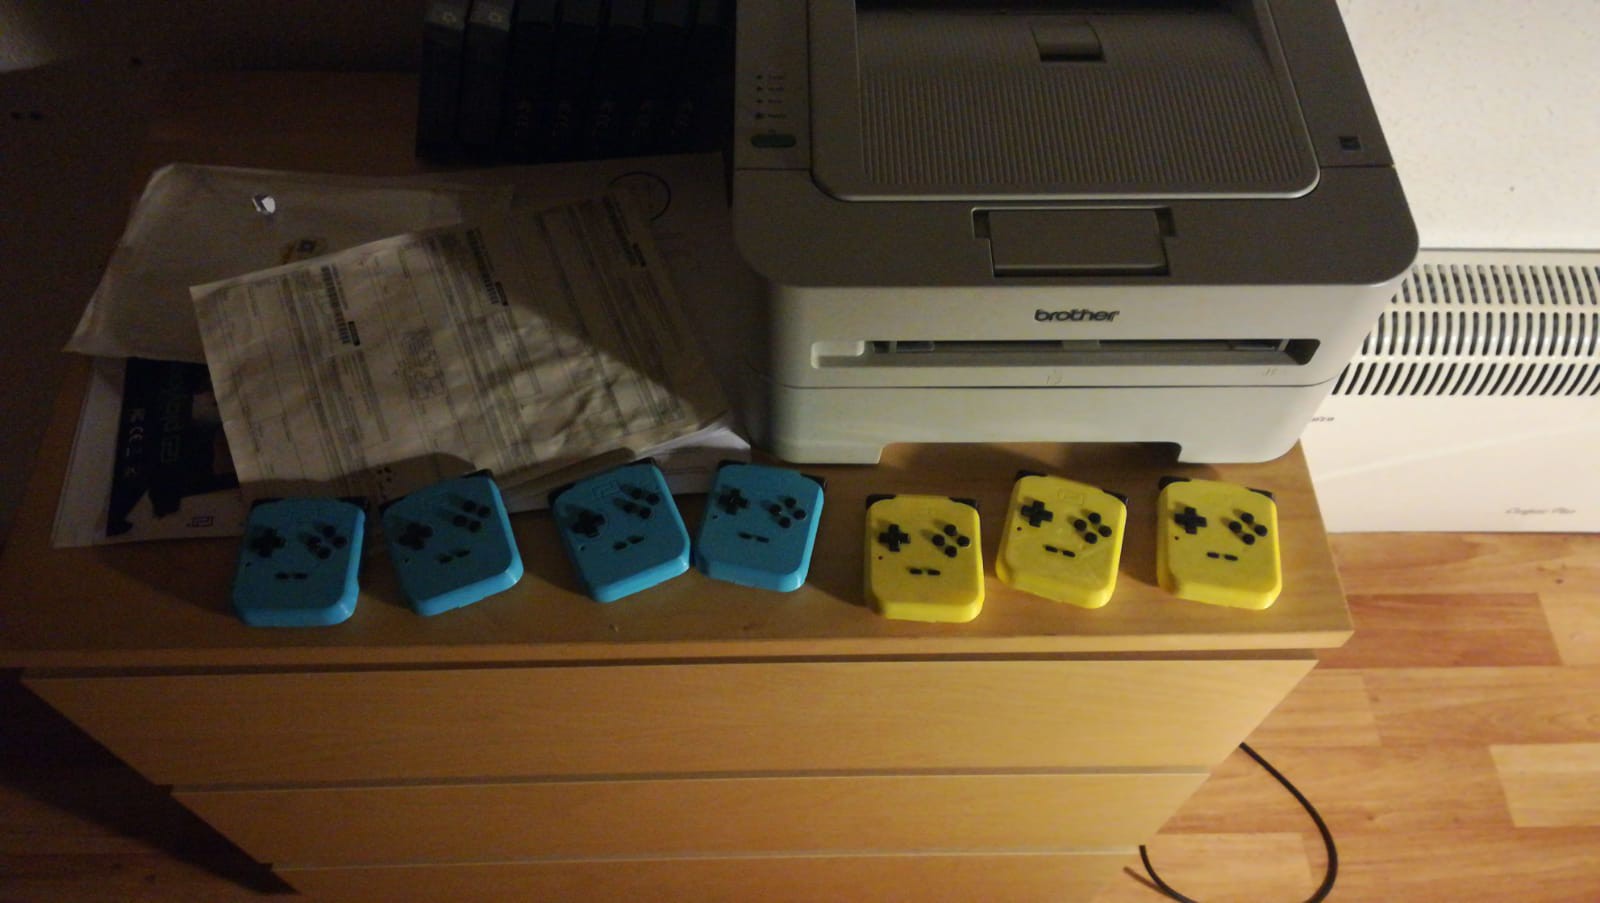
A bunch of playloops I assembled before testing them
![]()
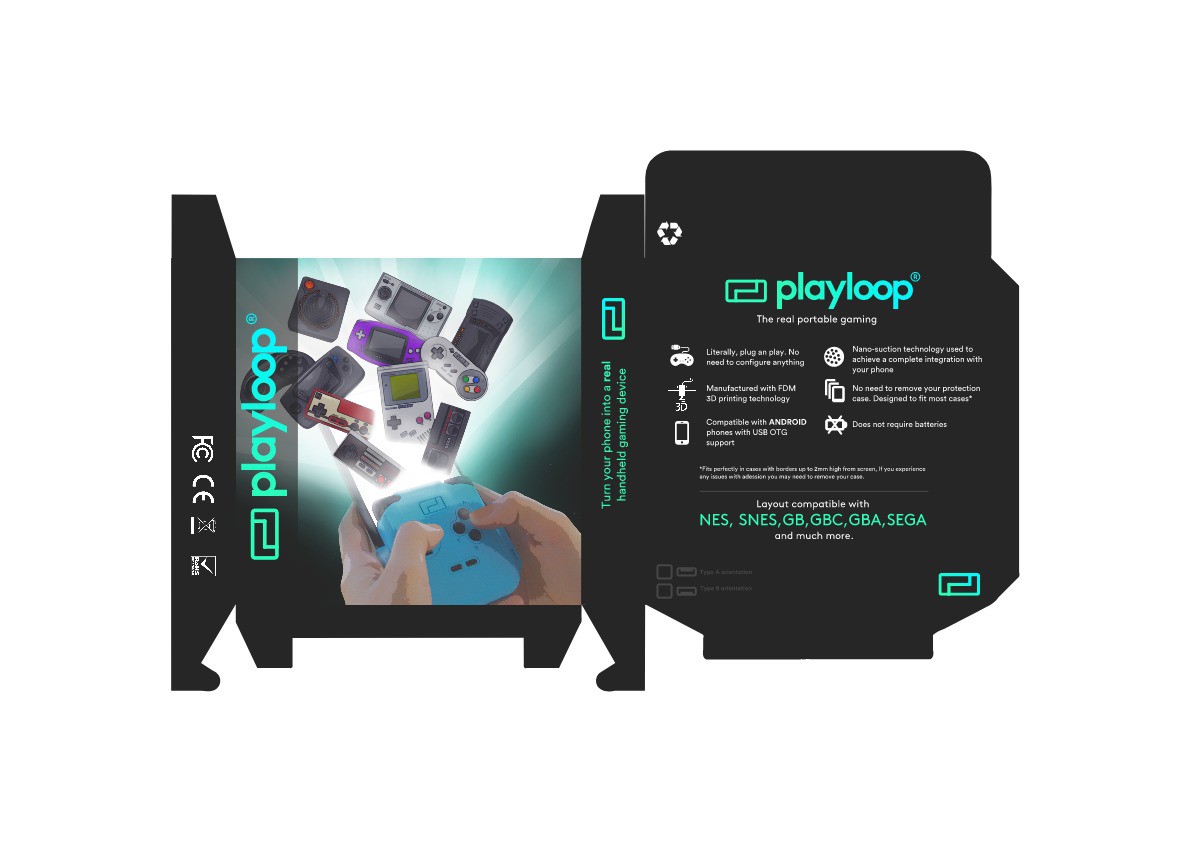
Design of the packaging
This is the last, and most important lesson, at least for me. When I started this project I had almost to zero knowledge. To get you in situation I barely know how an arduino worked (yes I had coded the basic blink led, and servo motor examples) and my skills with cad were drawing with sketch up. Every bit of information I got was thanks to this open hardware community, thank to all the open designs, lessons, schematics and courses I could find on the internet. I even got benefit from Hackaday itself where I could learn a lot of about AVR programming. This is the reason why I want to put my grain of sand and share my journey with this project and, apart from taking profit of it and keep selling it, giving back to the community what I've gotten. It will be incredible to see people learn with my experience and, of course, build Playloops.
Just to finish, you can get extra info of how the product was sold, presented to the public in the official website. Due to problems with the domain provider I had to go with a free weebly one for now.
-
Product development (II)
08/25/2019 at 13:24 • 0 commentsFinally, we got to the last part. Yes, I decided to go for a hardware solution and stood for two different options: USB or Bluetooth: both of them presented benefits and disadvantages. I finally decided to go for USB due to its simplicity on hardware and the fact that it didn't need a battery.
I also decided to update the design adding more buttons from the original design to be able to play more systems. I was increasing capabilities with this and standing for the principles I was pursuing since the beginning: creating something durable and versatile, taking most of the resources I had.
Now, let me explain you what was the final result of the designs I made:
HARDWARE
As explained, playloop connects to smartphones through USB port. It uses USB standard to communicate and, when connected presents itself as an HID device. To achieve this it mounts a AVR Atmega328p. Wait a moment, did you mention Atmega328p and USB-HID? Yes, in the software side, it runs on V-USB firmware. It is a firmware-only USB driver for AVR microcontrollers published under the terms of the GNU General Public License Version 2 (GPL). It enables a few of microcontrollers in AVR family to present themselves as HID devices. Once you plug Playloop into your smartphone, its a matter of opening a compatible emulator with gamepad recognition like, for example, RetroArch and start playing! It is compatible with Android devices, and it can run with MicroUSB or USB-C. I haven't work yet on iPhone models because Apple has restrictive policies about emulators and, since I wanted to turn this into a real product, I decided to reach a smaller goal being more focused.
![]()
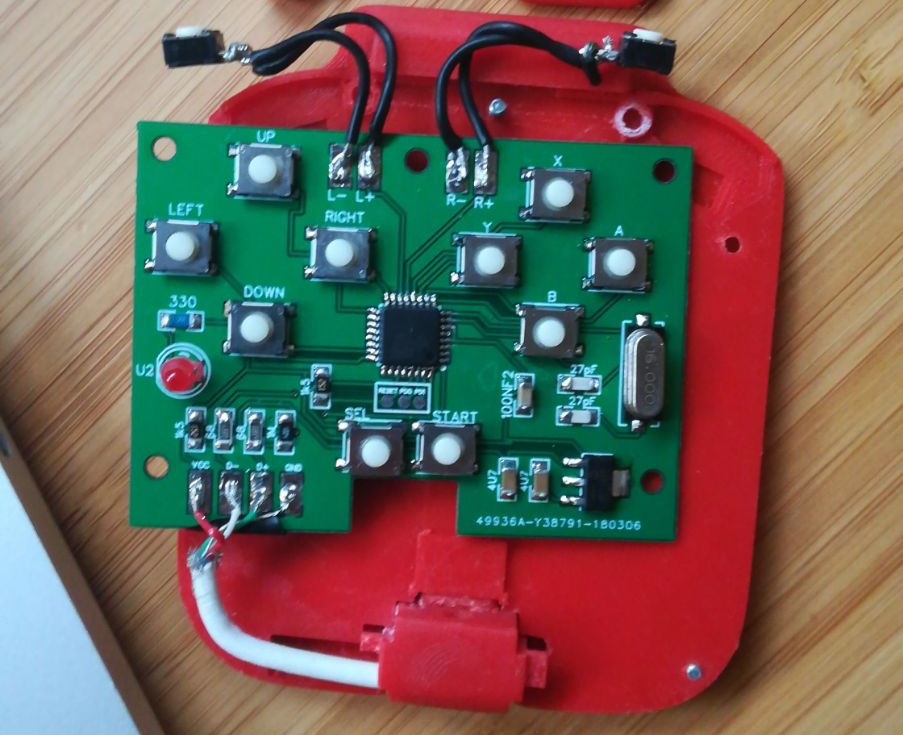
This is an earlier version o the board, it mounts tactile switches. The final version uses Nintendo ds lite rubber pads for a better performance
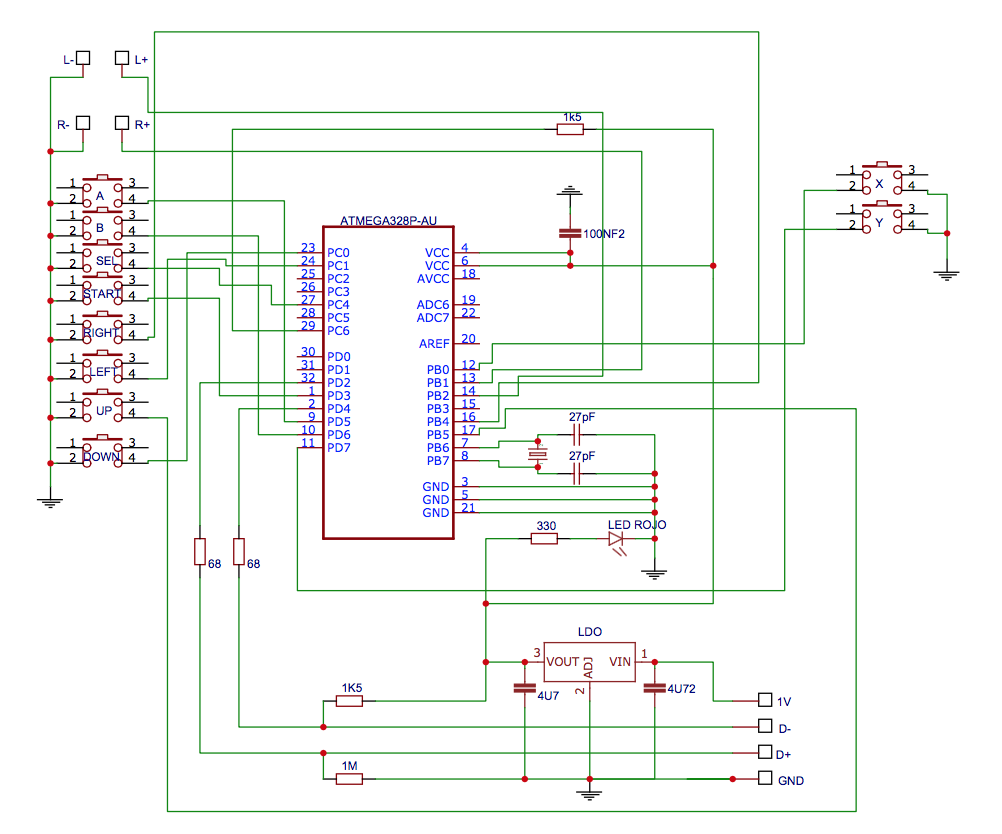
The design of the board itself is pretty straight forward. Every pad is an open switch which, once closed, connects a certain microcontroller pin to ground. The rest of components are capacitors, resistors, LDO regulator, led and cristal clock needed for the microcontroller to properly work. We could say that it is like an Arduino specially prepared for acting as a gamepad. Here you can see the schematics:
![]()
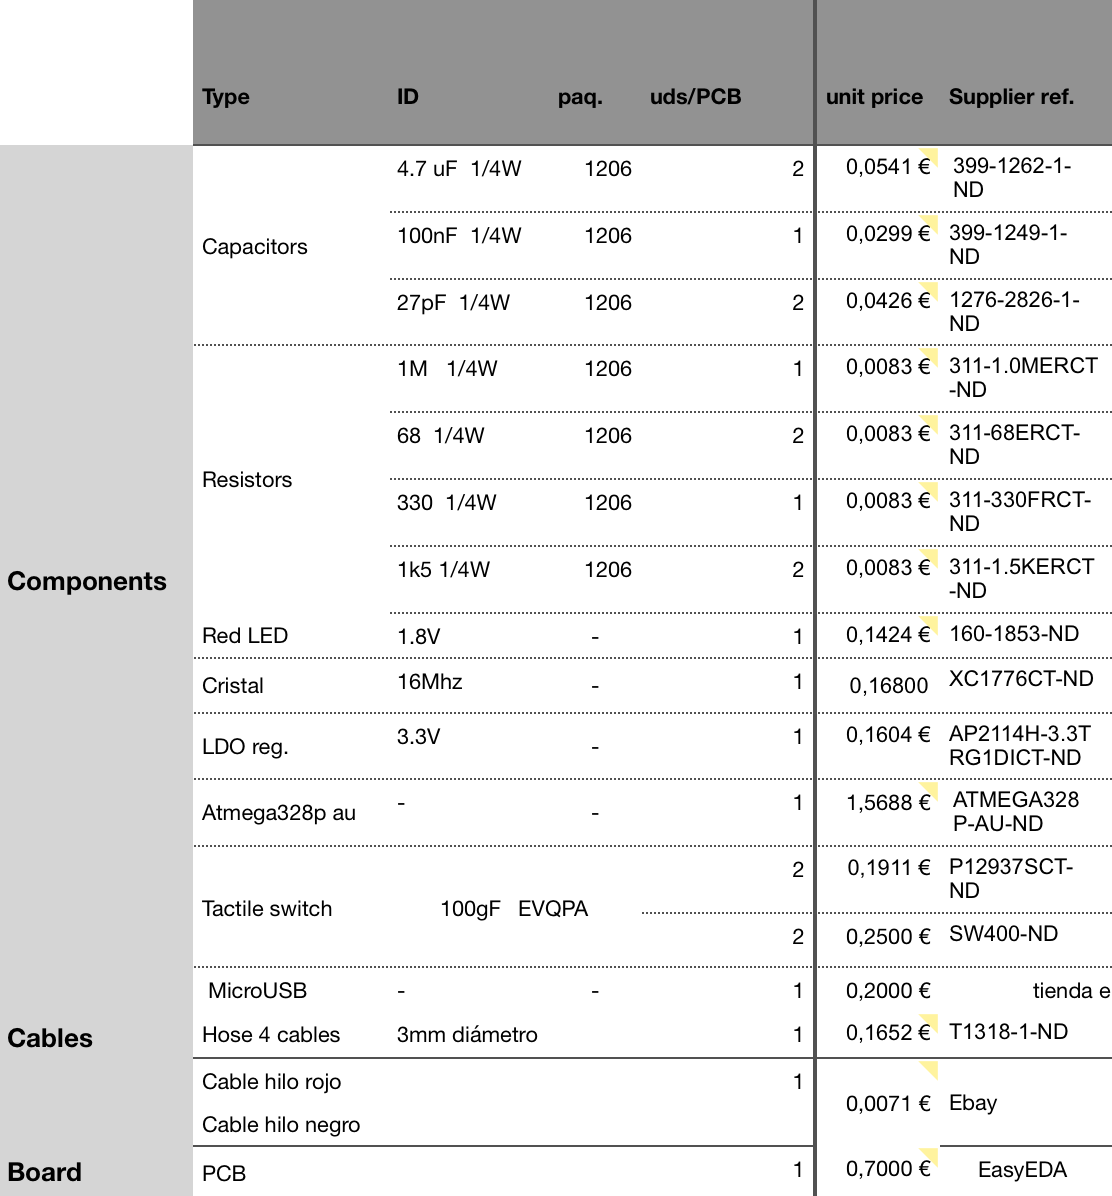
Here is a BOM for the componentes used:
![]()
SOFTWARE
On the software side the thing gets a little bit trickier. Once the signal is received (pin is been set up to GND) the microcontroller adds the pin's state to an array which, once all the USB initial communications have started, is sent as an update of required polls by the master (the smartphone). Then the smartphone, due to the HID communication standard, translates this states and makes Super Mario jump ;)
One thing I haven't said is smartphones need to be OTG to be able to use Playloop. This is a USB standard which enables smartphones to communicate in both directions, in and out the phone (in could be for example charging, out could be storing data on a external pendrive)
You can find in the files side the .hex code. I will be updating the full code in the next days.
MECHANICS
Ok, cool, but how it holds on my smartphone? Does it fit on any phone size?
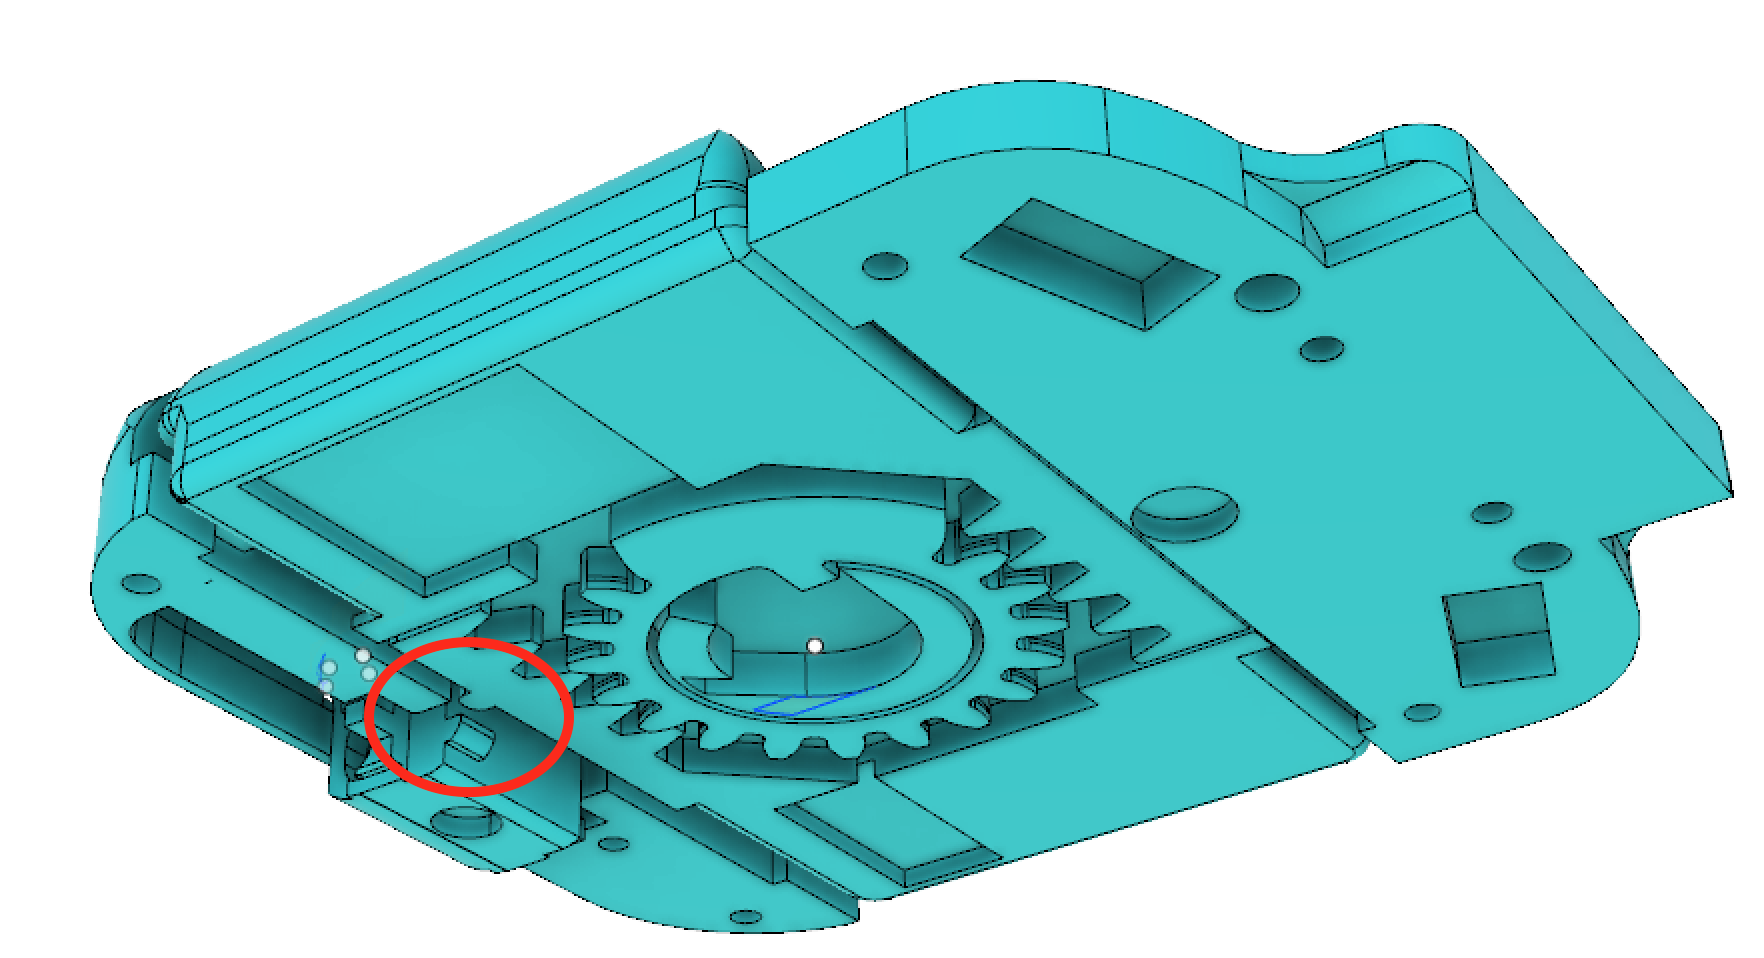
Yes, it is adaptive to almost all smartphones of the market and it holds pretty well. It is has two wings that expand up to 84mm wide. When they do so, they are driven by an internal gear and a linear rack that ensures a regular movement. This gear mounts inside a torsion spring which holds the wings on the smartphone. To ensures that Playloop is correctly attached, this two wings has a tiny rubber material called nano suction tape which prevents it to fall.
![]()
As you can observe, USB pin is initially hidden but, when sides are opened, it expands. This is due to a small mechanical lock that it has inside. This lock frees the USB pin when sides are opened, and a internal spring that it has pushes it outside its cavity.
![]()
To clarify, this is not the first version I designed, in fact it could be iteration 5-6. The first working prototype had all the back cover, the one that is in contact with the screen, covered with nano suction tape. The problem was that it held on the phone pretty well for the first 10 minutes but, after that it started to lose adhesion. So I decided to change the design and go for a lateral opening solution.
![]()
![]()
This are some physical models I printed to test how I would feel to have the wings.
MANUFACTURING
Due to financial constrains and, after thinking about it a lot, I decided to go for 3D printing when manufacturing parts. Despite the decrease on quality it will suffer from, it was the most realistic way to go for my situation. With this choice I could have a more flexible production (having in mind that I was not going to get a lot of orders at first and just wanted to test market) and, of course, it was cheaper. I wanted to gather attention from very enthusiastic customers that could forgave the fact of being 3d printed, you know: family, friends and fools.
Ok, Playloop is fully 3D printed, but this does not mean that was designed without having DFM in mind for scaling on manufacturing in the future. It is designed in such a way that most of the parts would require little adjustments to be injection molded. Its assembly is easy, excepting a few steps that have to be improved, it is just a matter of putting some parts together and tighten screws.
So the manufacturing process ended up being, briefly:
- 3d print parts
- Order PCBs to Chinese manufacturer and electronic components
- Hand solder PCBs
- Assembly parts and PCB
![]()
It was tough to build and and assembly all the units by myself and I could have gotten into debt in order to make someone else build them for me. But I believe it is important to be patient, know where you are and which resources you have. Set up some borderlines and scale when you are ready. Do not be afraid to jump into the mud.
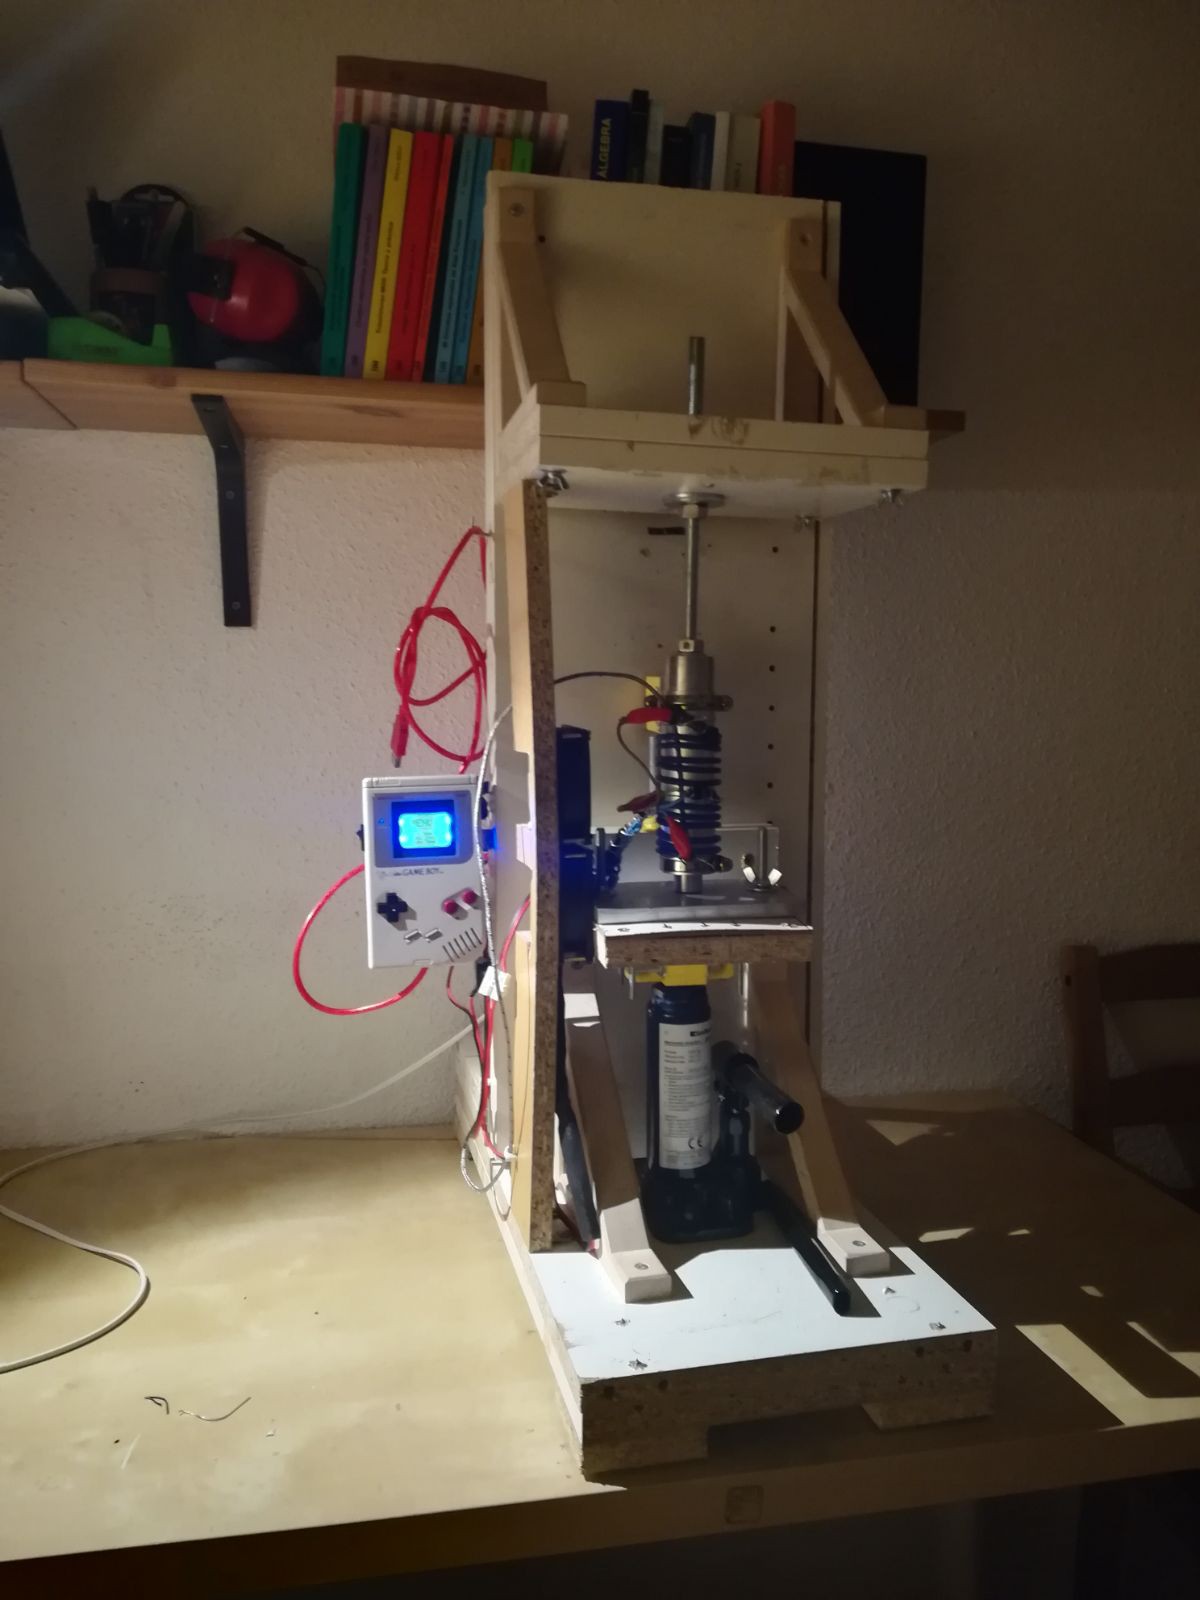
Just to finish, and as a funny story, I would like to share that I considered manufacturing some of the parts with injection molding by myself. I built kind of a "machine" with a hydraulic jack, an Arduino based PID controller, thermocouples, resistive heat thread and a solid wood structure based on IKEA furniture wastes which ended being more of a distraction than a useful tool. This may be an interesting topic for another project, but since it didn't work at all, let's pause it for now and keep it like this.
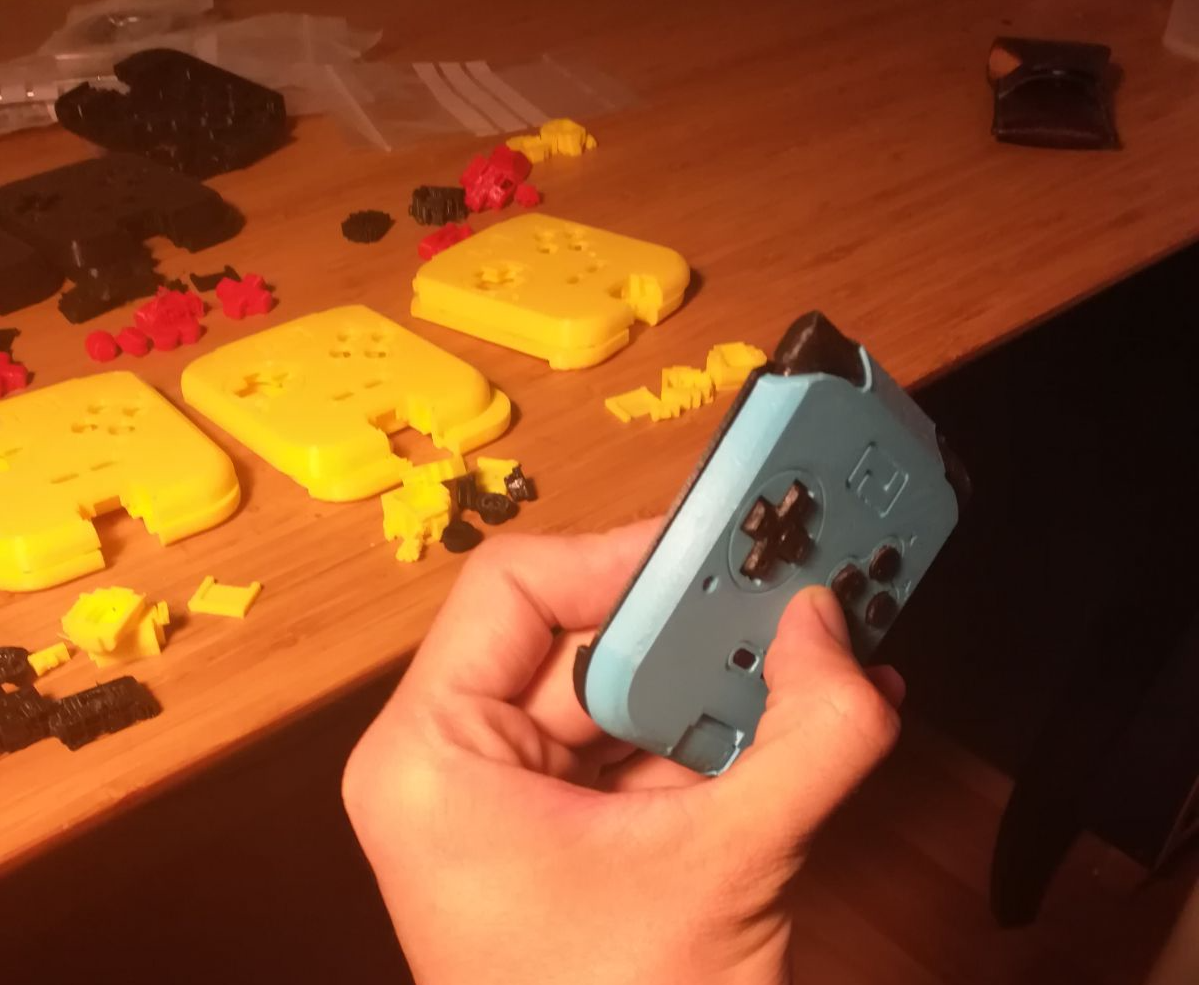
![]()
Note how cool looked the GameBoy shell as a controller. Do not worry, it was just a clone one i had laying around ;)
-
Product development (I)
08/25/2019 at 12:04 • 0 commentsI try to go for capacitive sensing
When first thinking about the design and technology I was going to use I always had in mind the design principles I had chosen. Those were going to be my mantra.
I saw an interesting option that catch my attention. It was a device that purse to turn your phone into a Gameboy, it was called SmartBoy and was developed by Hyperkin, a company that developed devices to play retro-games. I loved the concept although I did not like the design that much. It was a little bit bulky and, from reviews I read, use wasn't pretty straight forward. I decided to go for a classic Gameboy design then since it made por sense for portable game emulation and was an easier approach.
After some more research I got this idea of using something that, in contact with the screen, could activate the touchpads.
Just to clarify, nowadays most smartphone screens are capacitive. This kind of screen detects how electric fields varies in presence of different objects and, it's optimized by an internal firmware to detect human skin (which is the element i has to interact with)
This design was very smart and efficient because, if the right material was chosen, there was no need of electronics. I started doing more research about it and got this two different ways to approach design:
- Using some kind of conductive rubber that, in contact with my fingers and the screen at the same time, the phone could detect a touch. Imagine something like a rubber cup you can find on most gamepads/remotes etc but instead of closing a circuit it would put your finger in contact with the screen. This method was smart but difficult to achieve, at least for my resources. I looked for DIY solutions to build my own rubber: silicon + graphite powder/carbon fiber chop sticks/salt. No of them ended up working pretty well and this method was not very scalable. Another way was to go bigger, find a supplier that would manufacture conductive rubber, invest money and scale. But as said, I didn't had the resources and didn't want to risk that much at the very beginning.
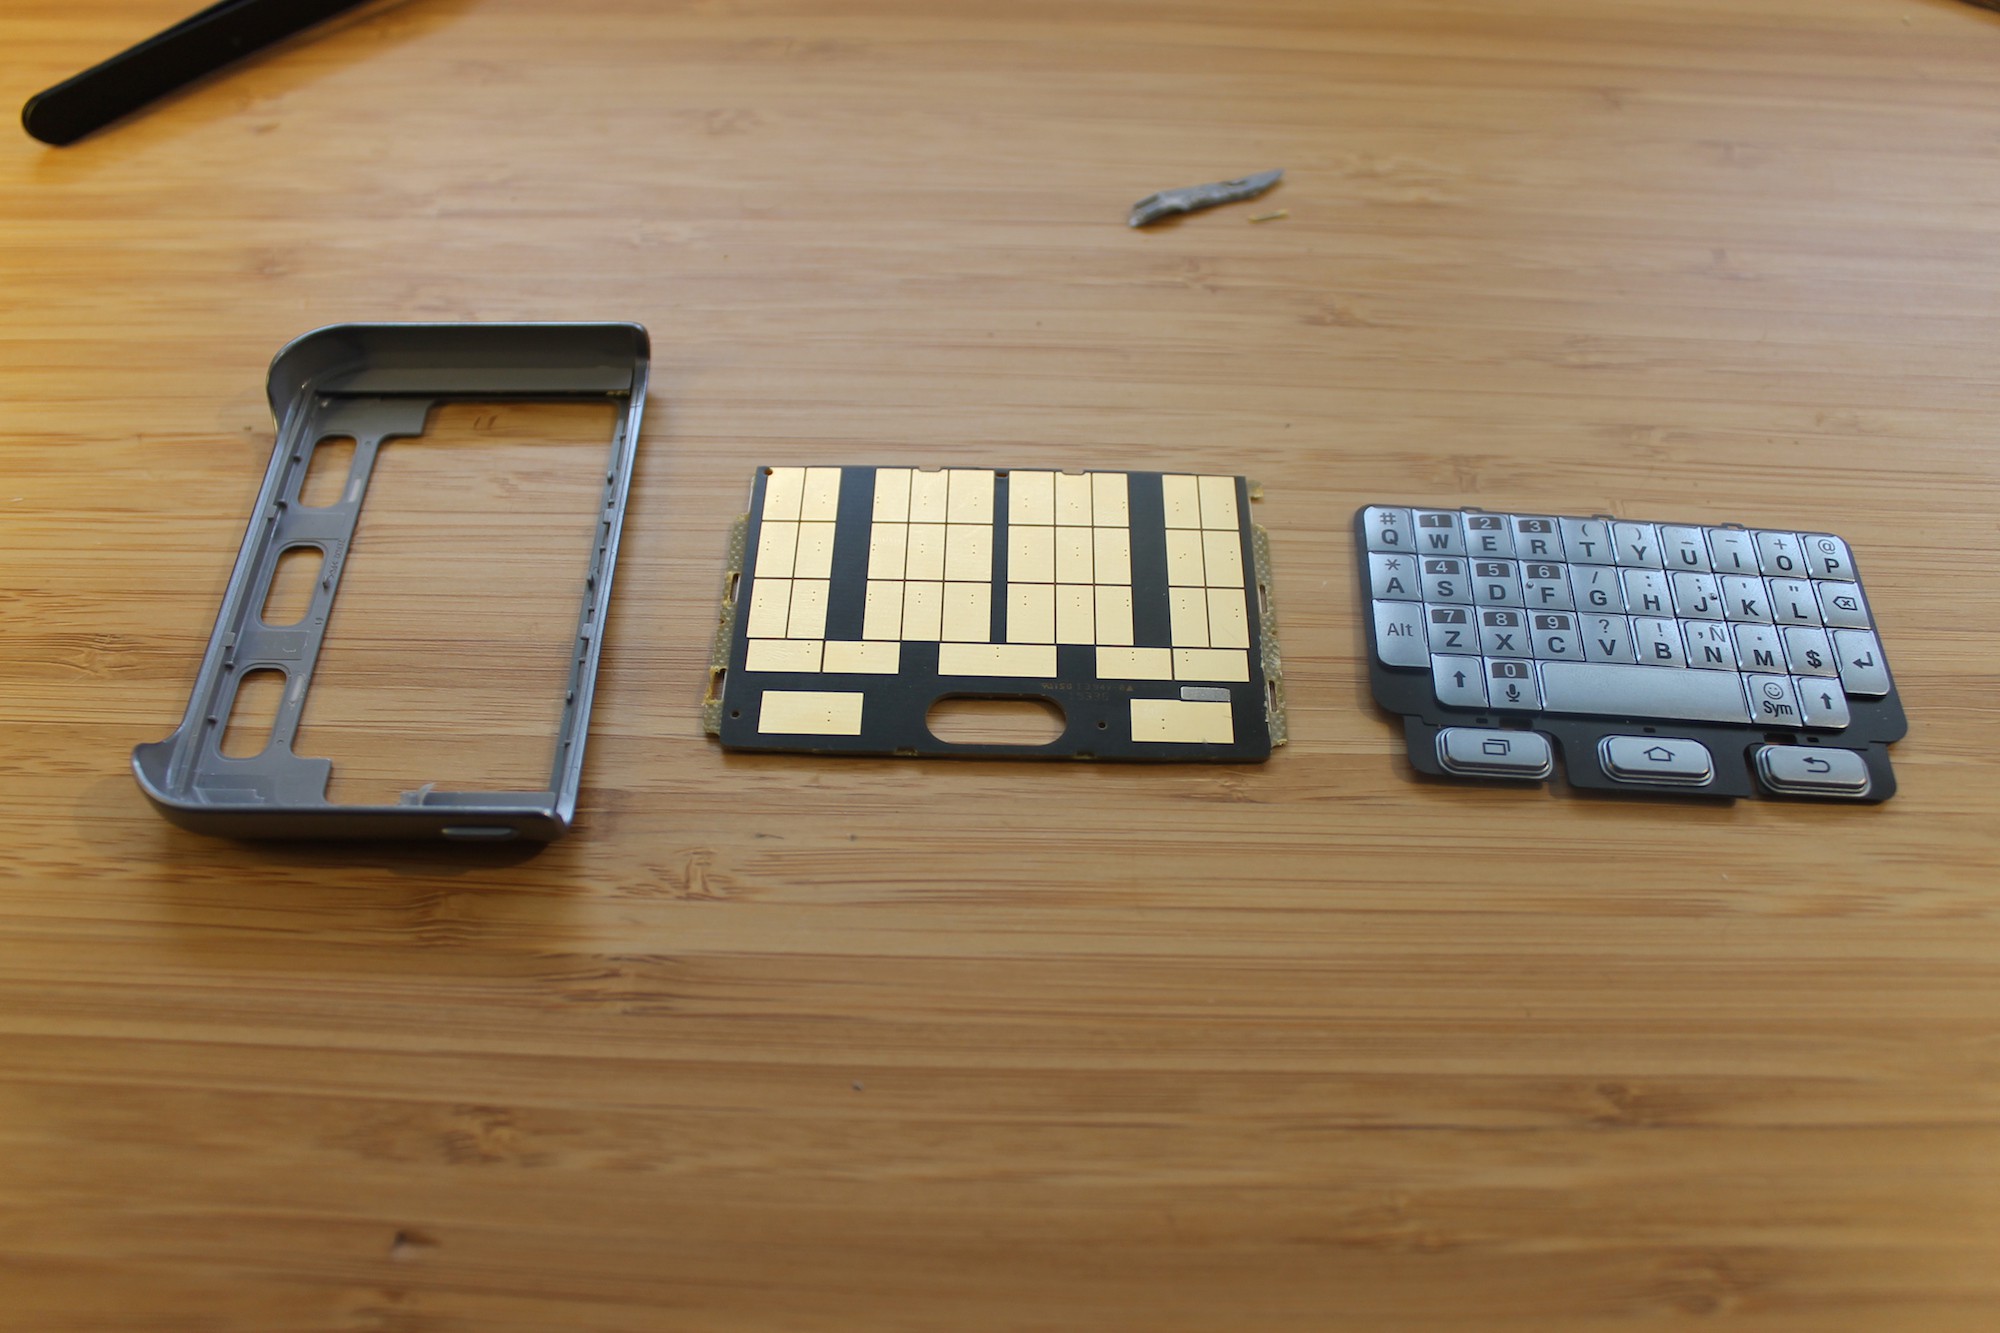
- The other option I had was quite slick. While I was exploring for more options I stumbled upon a product samsung had developed. It was a physical keyboard that attached to your smartphone. It was light and small and had no battery. I started researching about its functioning, even bought one to disassemble it and do kind of "reverse engineering":
![]()
I found a patent for this keyboard and I could confirm the conclusions I got when doing my functioning analysis. The principle was simple. It was like kind of a double sided PCB, on the upper side it had switches which connected a mass of copper to the pad in the other side through a via. This pad was always in contact with a certain part of the screen and, when the switch was closed, the screen detect the copper mass and registered an input.
But everything is not that magical... I made several versions of it, tried to work with different phones, changed designs and never got consistent results. I spent about a month pursuing this technique. Changing copper size areas, patterns did not work. Using different materials for the switches, changing board thickness..nothing. I tried to build the boards by myself at first and ordering them to a professional manufacturer after.
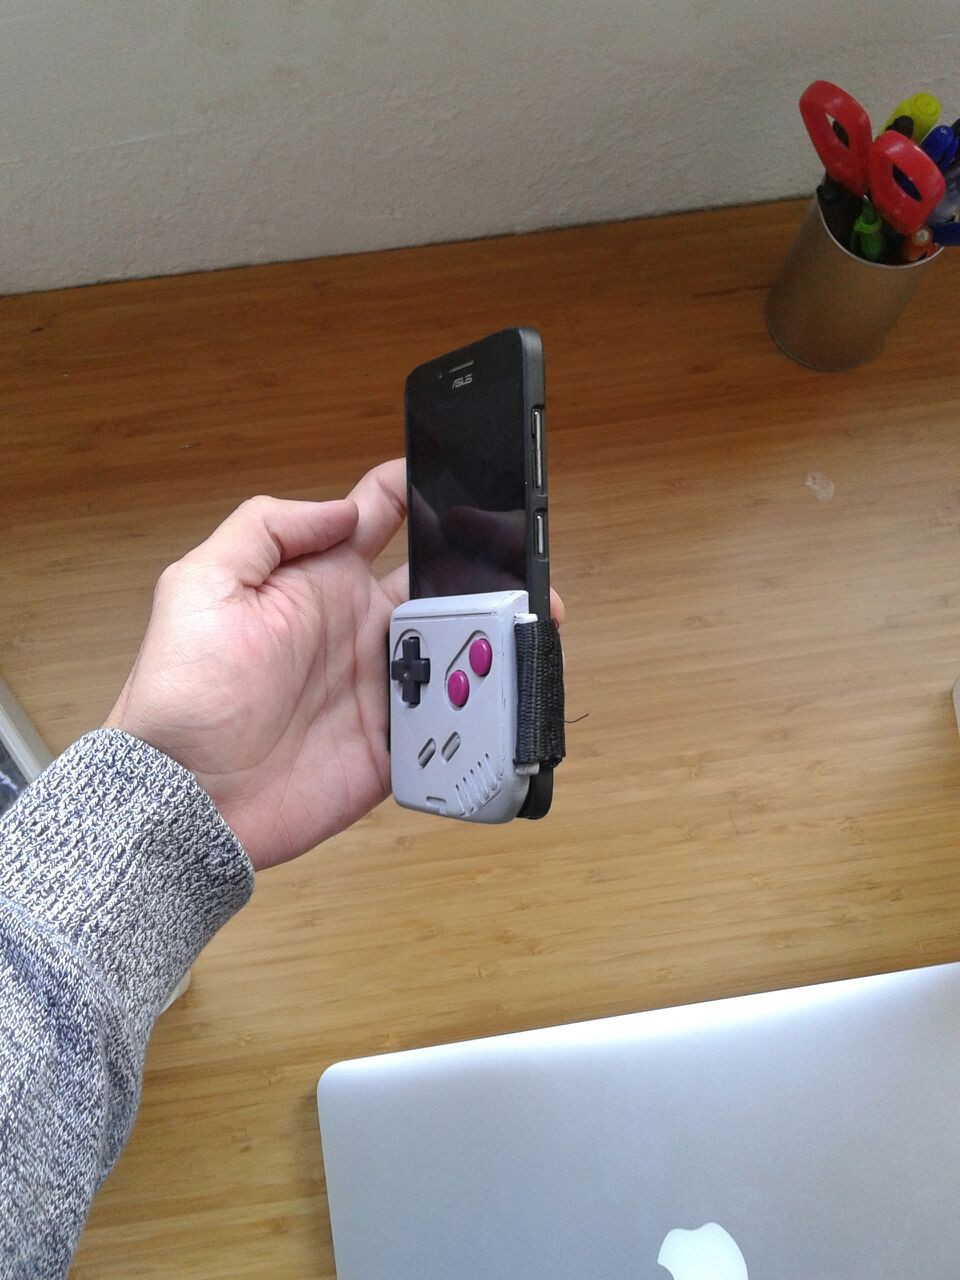
I finally got a version that more or less seemed to work. But, as said, it did not work consistently. Apart from that, I was not really convinced with the mechanical side. The bottom part of the device has to be in contact with the screen al the time. It couldn't move or you could end up registering wrong signals. This was hard to achieve if it was meant to be used in different kind of smartphones. I finally got a design which consisted in a back clip which was adjustable to different sizes. That version was held on the smartphone with nylon strips. Here are two pics of that design, looked cool though uh?
![]()
![]()
My last attempt consisted in trying to tweak android software to get more sensible to this copper "touches". I concluded that it seemed to be a chip that couldn't be accessed, unless you had a rooted phone, which registered the touches in order to send them to the SO. Modifying that chip's internal firmware seemed non scalable. I finally had to be realistic, Samsung was a huge manufacturer with decades of knowledge, tons of resources, engineers and they may had modified that firmware for de Galaxy phones.
I only had an option left, going for an electronic solution, but that is a story for the next log!
-
Design decisions
08/25/2019 at 09:04 • 0 commentsA beginning
The problem itself seems to be pretty obvious once you've got to see the solution. But believe me, at least for me, I got a lot of though and work to get a suitable solution. I knew what specs I would like it to include as said:
- Immersive experience. Once thing I noticed when playing retro-games with my smartphone was that I couldn't forget I was playing with it. This, believe or not, took away part of the original experience. I did not make sense using my smartphone due to its modern capabilities in terms of hardware (screen, battery, processor etc) and losing part of what originally gave those games that particular flavor. That shouldn't be lost.
- Portable: light and small to carry everywhere. This premise is basic and it's something I could not find with most third party gamepads I saw. A handheld console must be somehow portable. In this particular case, it didn't make sense that most gamepads where bigger and heavier than my phone. I decided it should be as much as half of my smartphone size.
- No need to charge it. This may not be obvious. But I tried to imagine which scenarios I could be using such a device. When traveling, waiting for a doctor appointment, on public transport...etc. All this situations appeared to be random and not planned. I could carry my Playloop everywhere I go because it was small and light, even forgetting it was with me. For this to happen, not worrying about charging showed up to be a must. Who wouldn't love that? I could not stand for the idea to have a chance to use it and battery got to ruin my gaming break.
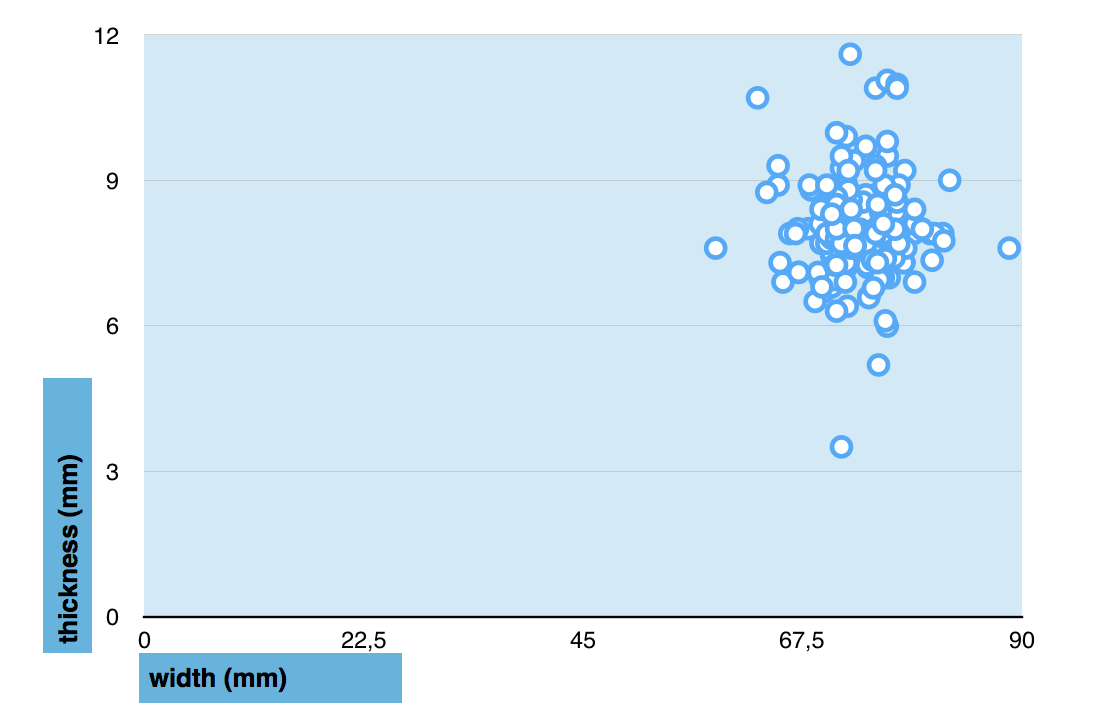
- Adaptable in case I wanted to use it in different smartphones. This last premise was essential and directly linked with what I criticize when I explained the main problems I wanted to solve. I was totally against consumerism, buying devices, using them for 2 weeks, and keeping them in a drawer. Good design is sustainable and durable, good design extends products live. Playloop should be adaptive to different smartphones because we change and it should adapt with us. According to statistics people change their smartphones every one/two years, on average. I did not have a clue which were the dimensions phones on the market had, so I made my own research. This chart shows the relation between thickness-width of the top 50 phones sold. It may be deprecated now since I made this research early 2018:
![]()
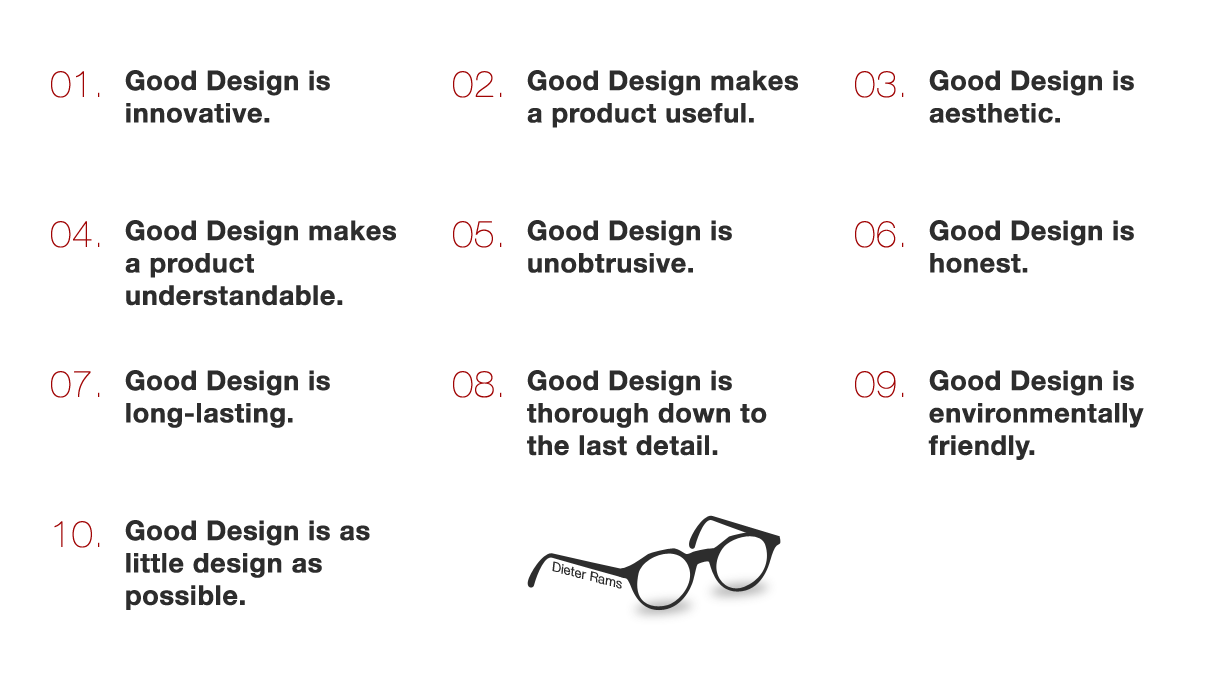
With this principles set up, I started designing the product, you can read about it on the next log. My main inspiration in this process and, from whom I learnt how ton face this problem, is one of the best designers of all times: Dieter Rams. He has 10 awesome principles when designing that I would like to share you just to end:
![]()
-
First thoughts
08/24/2019 at 09:44 • 0 comments(this is an extend essay about what is exposed on the main "details" section of the project page)
The problem
I have always loved gaming since I was a child, and I especially love what today is called "retro-games" on portable systems. I found it fascinating how engineers could design such wonderful pieces of art with so many resources, all the tricks they used to tweak every bit of hardware in order to make you feel fully immersed. This was the core concept, they hadn't vast resources, and it was really fun.
Since some years "retro-games" have became very trendy and a lot of solutions have emerged in this new retro-business. It is awesome that nowadays you can build your own system, there are tons of different designs that appear every month. I respect and love seeing people modding and building them in different shapes and sizes. Is a really fun way of learning about designing and electronics, something I've gone through with this project which I started with almost zero knowledge.
But when it comes to spending money just to play, are we getting mad? As well as people building, everyday we can find new models coming to market, some of them not even giving respect for the games. It feels more about collecting than enjoying gaming an playing. From cheap Chinese clones, more decent systems to official consoles all of it feeding this insane consumerism. We had already had those games, we had the tools to play them, there is a real need for this trend?
Ok, I am not a fool, I also love fullHD displays, HQ audio and be able to gather digitally all my games in one place bringing games to a new dimension. It also seems like a right update to give this past era a new opportunity and get younger generations to know and appreciate it. However this trend is walking away from the root core principles of early games: squeeze to the fullest the resources you have. Most of this new consoles end up being part of collections, stored in shelves catching dust and not being squeezed because they owners are trapped chasing the brand new retro-system of the moment. It may be risky to make this associations with consumerism, but it is our duty as gamers to check how we behave a sector in which you barely listen talking about being sustainable. Is important to think about how we consume resources and if there is a real need when doing it. Do I really need this brand new console to play this 30 old game that I've always enjoyed or am I trapped in this consumerism illusion? You probably are.
My approach to a solution
Let me guide you to your pocket. Your smartphone, that little gadget that travels with us most of our time. It has probably a wide HD screen, a pretty decent battery, storage and a powerful CPU. Pure specs that are perfect for playing retro-games on the go. But you only use it for browsing, FB, IG or watching videos. Have you ever tried to run a N64 game on it? It runs flawlessly. Now try it in a raspberry pi or in a cheap clone, not so good. Why not using it? It feels like a perfect candidate. You are considering buying the brand new handheld console of the moment because it comes with an IPS screen... come on.
I asked all this questions to myself and gave it a try. Soon I realized that playing retro-games with my smartphone wasn't an ideal solution, touchpad ruined the experience. Then, I looked for solutions, gamepads to attach to my phone that were portable and fully integrated but I didn't find any good tools that met my needs. Then I started thinking about what could be the right solution to face this problem, something that had/was:
- Immersive experience
- Portable: light and small to carry everywhere
- No need to charge it
- Adaptable in case I wanted to used in different smartphones
The love I felt for this idea added to the fact I wanted to learn about product development and electronics is what made me pursue this project. I was going to create Playloop: a very portable gadget that, attached to your smartphone, turned it into a great handheld gaming console, being that the only tool you will ever need to play retro-games on the go.