-
Project Log # 5: A Few Hard Lessons, But Progress In the End
10/29/2019 at 05:05 • 0 commentsHello everyone!
It has been a bit longer than I wanted between project logs, but I have managed to make some progress, while learning some important lessons. Upon trying to program the ATtiny 1614, I realized that the old ICSP programming method was not going to work. The ATtiny 1614 is a tinyAVR-1 series MCU. This means that they use a new proprietary method called UPDI. It is nice because it uses fewer pins, but I did not own a programmer for UPDI, and was not going to pay for an expensive Atmel ICE programmer.
Instead of buying a programmer, I made one using an Arduino Nano clone using jtag2UPDI, a piece of firmware that essentially turns an Arduino Uno, or any ATMega 328 MCU into a UPDI programmer. It was pretty simple to set up, both software and hardware.
![]()
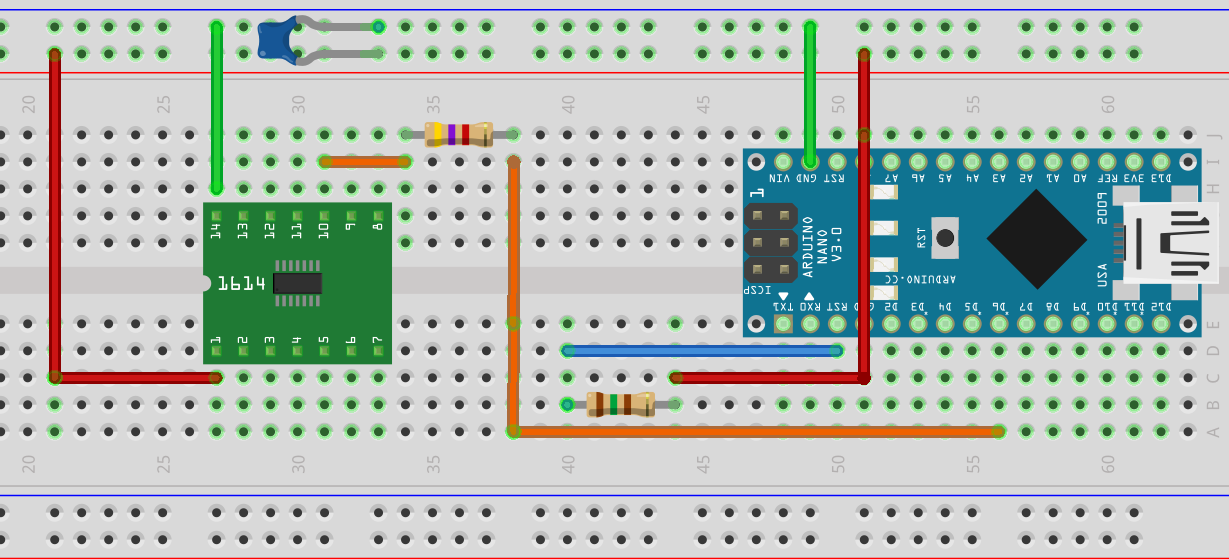
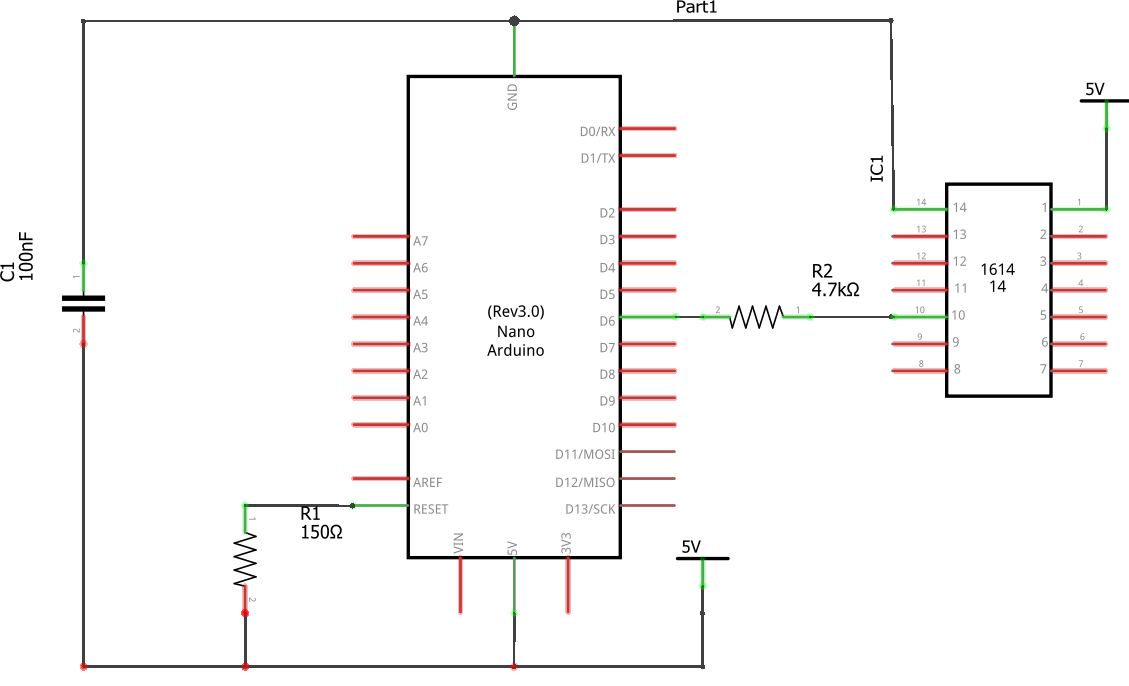
As seen above, the breadboard layout is pretty simple. I connected D6 on the Nano to Pin 10 on the ATtiny 1614 through a 4.7 KΩ resistor. Then I connected VCC and Ground on pins 1 and 14 on the ATtiny 1614 respectively to +5v and GND on the Arduino. Last, I added a decoupling capacitor (0.22uF), and a 120Ω between RST and +5v to disable the reset. I followed the setup instructions to load the jtag2UPDI firmware, and was ready to program. I might post a tutorial on this later, to take you though all of the steps in detail. There is a schematic view of this below.
![]()
For uploading code, I opted to use the megaTinyCore for speeding up development by allowing me to use Arduino code to write the programs. This greatly simplifies things, as the documentation for the ATtiny 1614 is a bit hard to understand, and most importantly, rather disorganized at the moment.
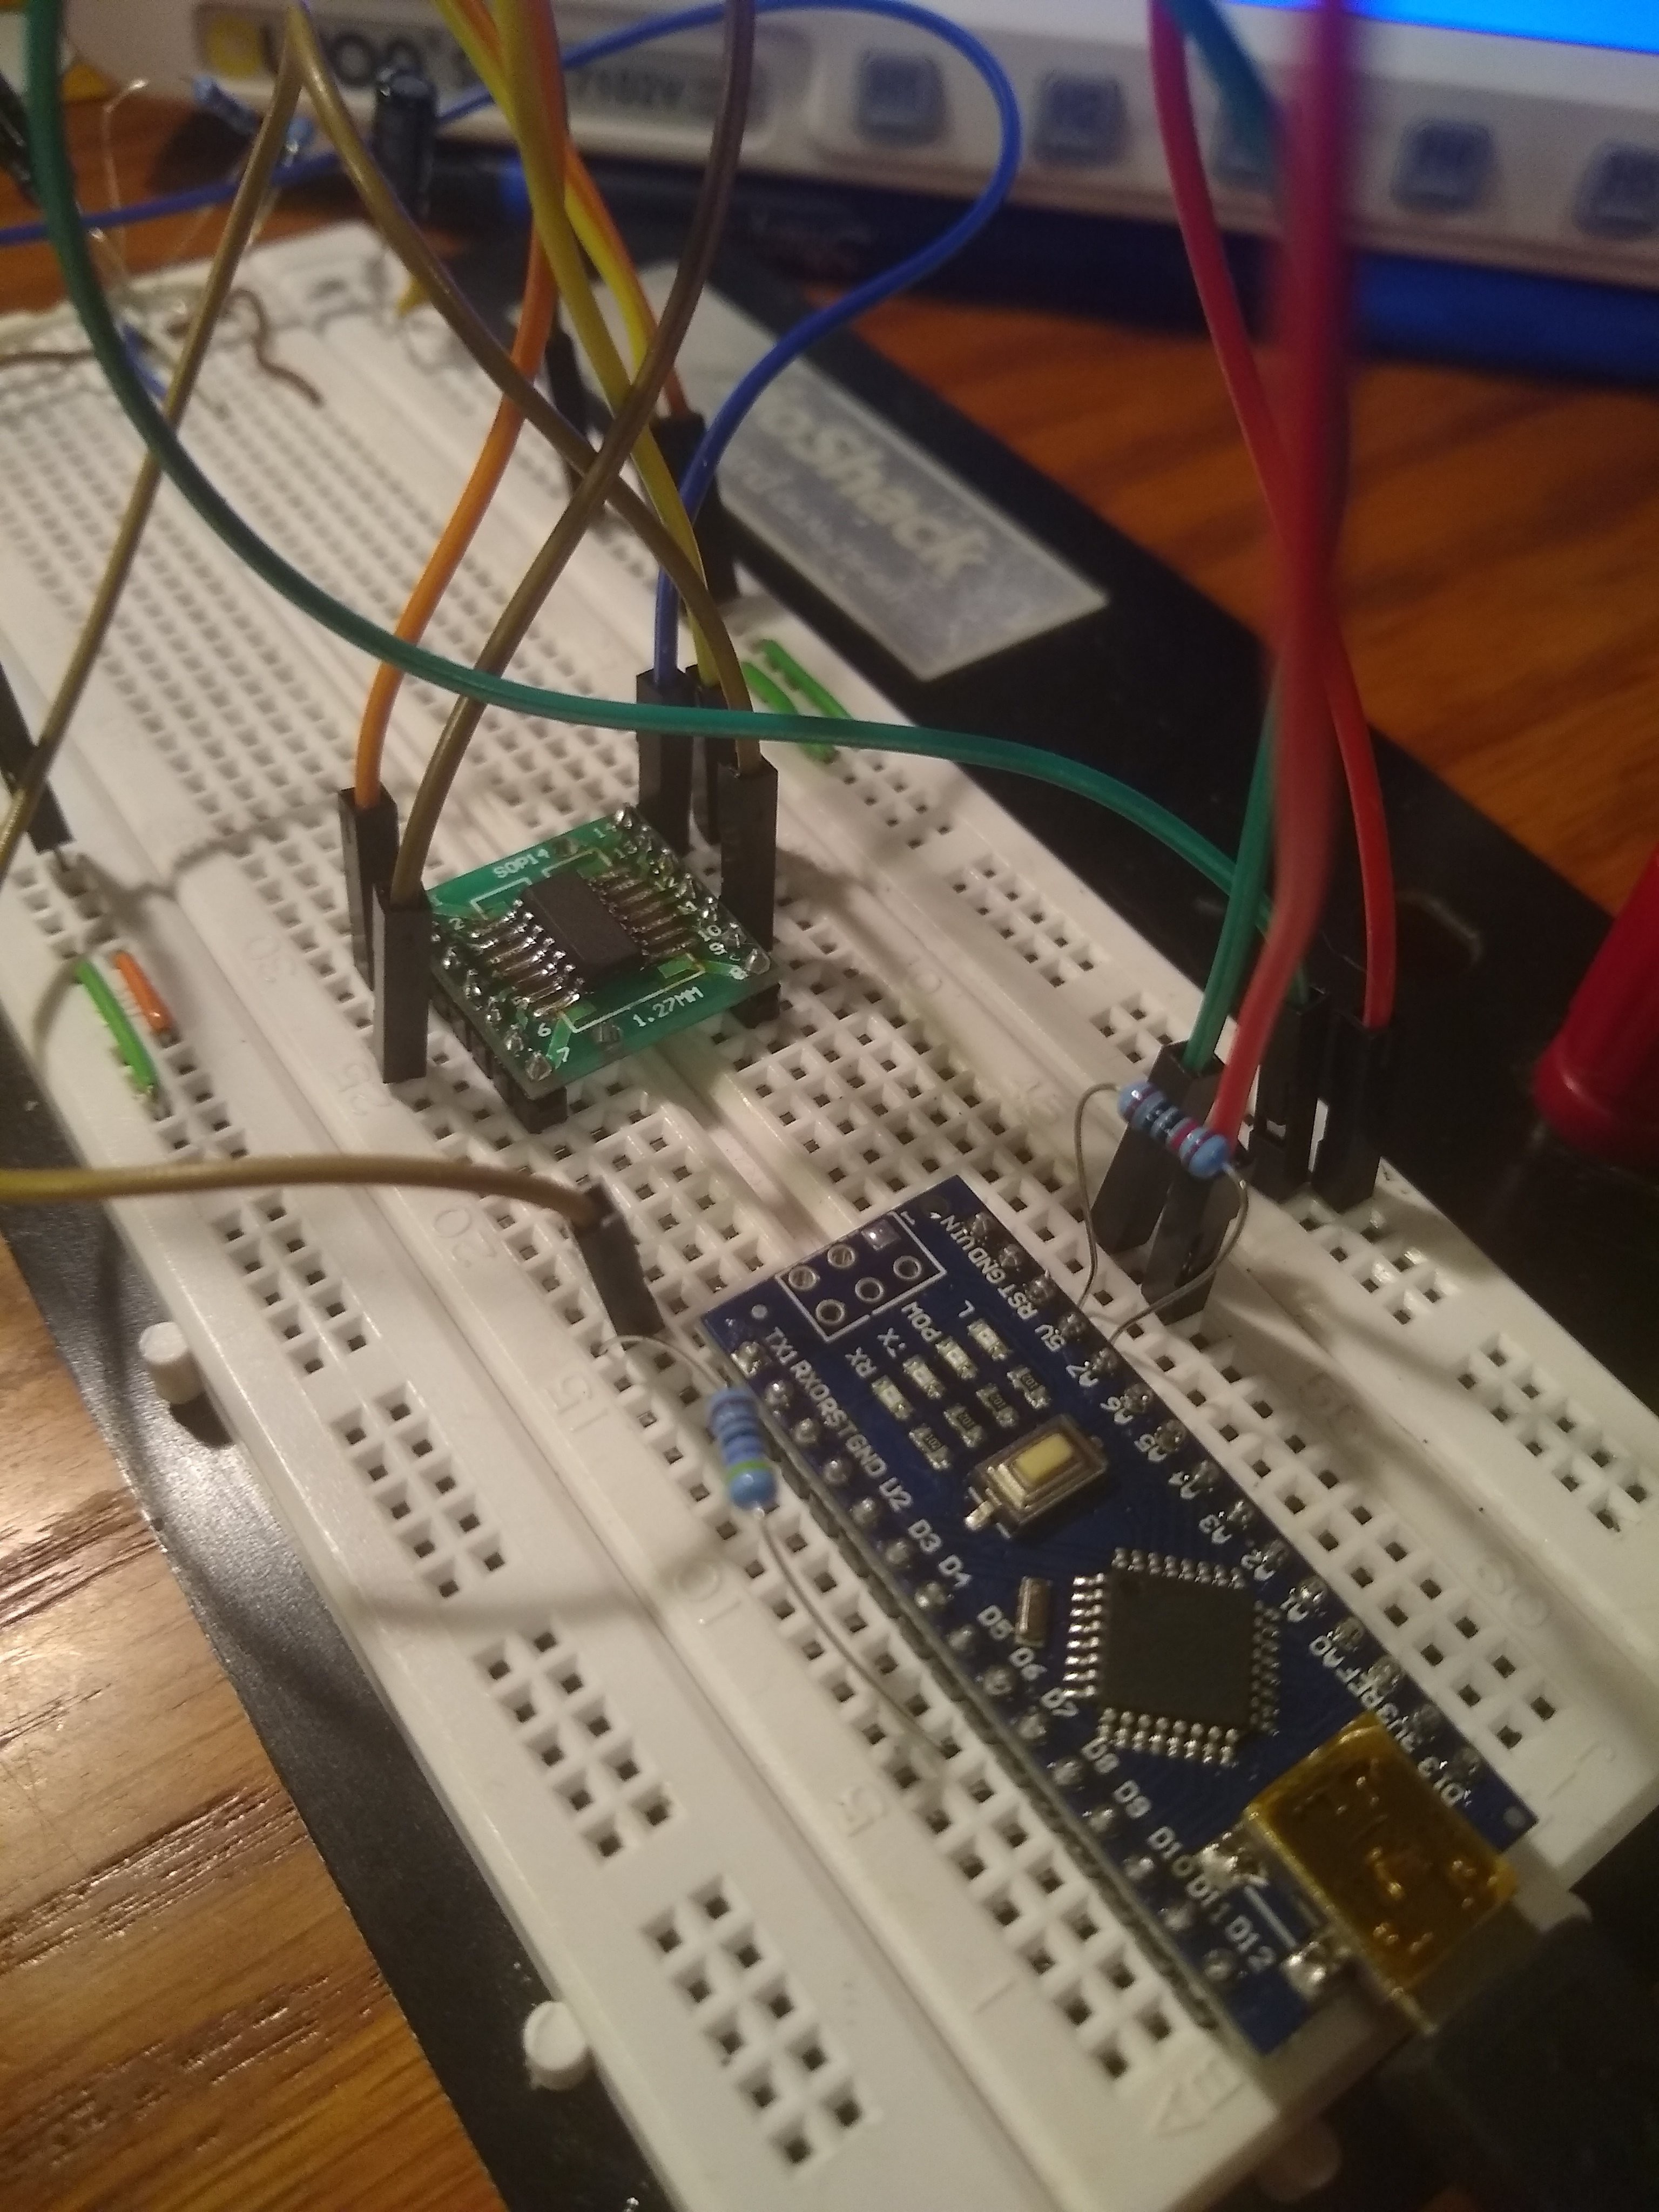
Here is the setup that I am currently using for programming. I had it soldered to perfboard initially, but messed up, and haven't had time to fix it yet, so it remains on the breadboard for now.
![]()
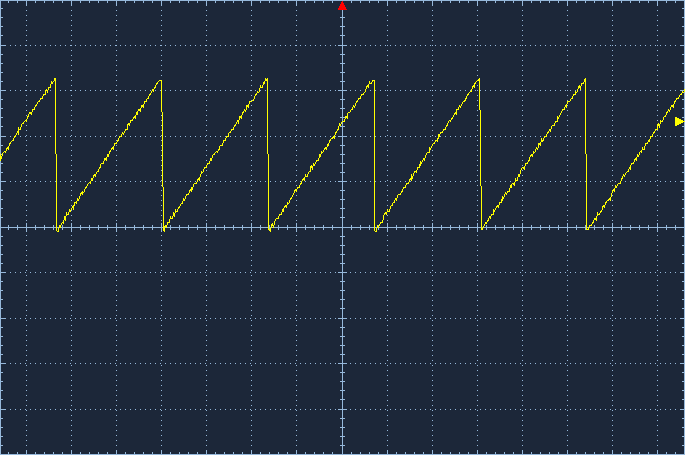
So far, I have been learning how to work with the ATtiny 1614, I have so far been able to program via Arduino, as well as Atmel Studio, and am just working on basic tasks. I have GPIO working, and with some mild frustration, have the DAC working as well. I was able to get the DAC to generate the waveform seen below. Seen here at (1V/DIV) at a frequency of about 2.13 kHz.
![]() Unfortunately, the DAC can only go up to 4.3 V, so I will have to include some sort of compensation if I want true 0-5V output.
Unfortunately, the DAC can only go up to 4.3 V, so I will have to include some sort of compensation if I want true 0-5V output.I hope this update was not too long, but it contained a lot of information. I can now focus more on the program side of things, now that I have some working hardware. As always, feel free to comment if you have any questions, comments, or suggestions.
-
Project Log #4: Major Update
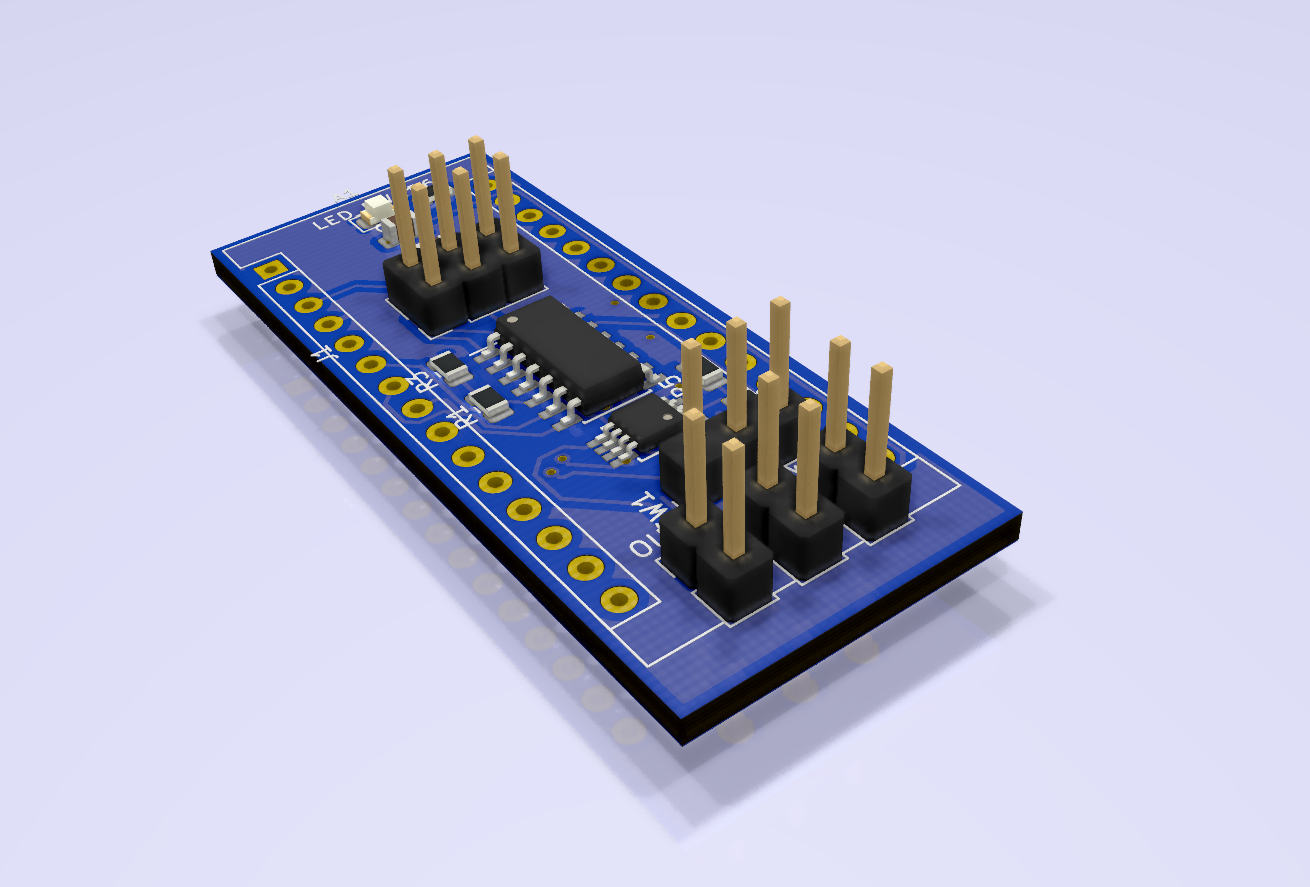
10/16/2019 at 05:11 • 0 commentsHey everyone, a lot has happened since I released my last project log. I have completely redesigned the board, and have shifted the scope of this project somewhat. The new design will be compatible with Arduino Nano, and can either be utilized as a shield, or as a standalone drop-in module. The reason, I redesigned with Arduino compatibility is to give users an easy way to interface with the module, and to allow for easier project integration.
As for software, the μPID will communicate with Arduino, or other interfaces with SPI. The microcontroller itself will be running Arduino-based software, which will be programmed using the megaTinyCore bootloader. I have also included options to switch between PWM and Analog outputs, as well as included programmable high and low alarm pins.
You will also soon be able to follow my projects, as well as tutorials, and subject guides on a new website I have been working on: setpointlabs.com. I have a couple of items published, with more soon to follow. However, my hackaday.io page will be the best way to stay up to date with my projects.
As always, feel free to comment and share your thoughts and suggestions.
-
Project Log # 3
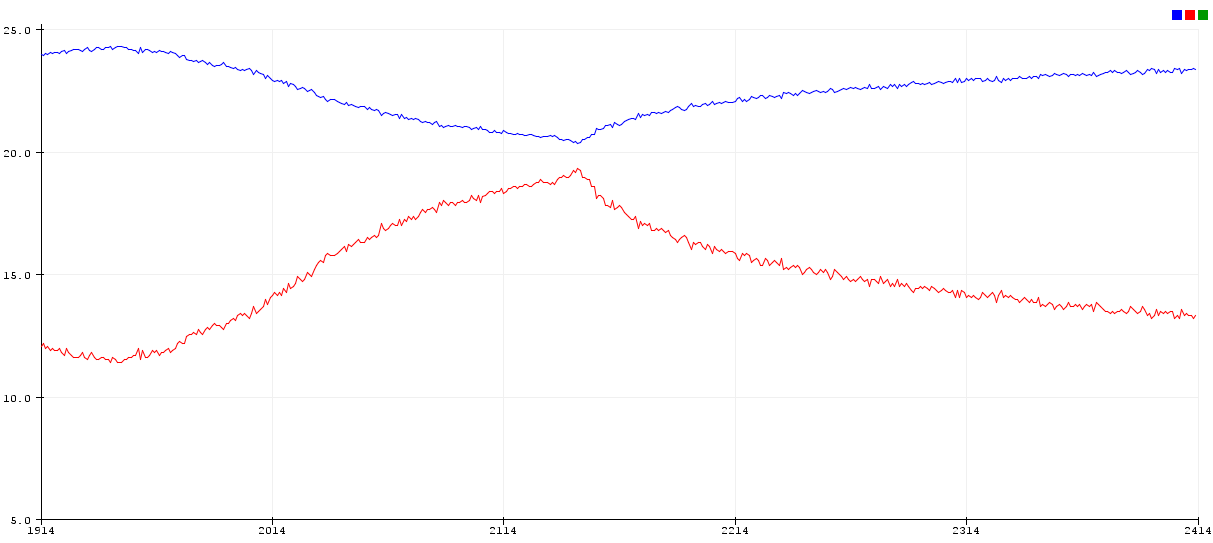
10/01/2019 at 22:55 • 0 commentsHey everyone. After a frustrating day, I have finally been able to get the ATtiny 817 Xplained to program, however, I am having problems getting the DAC to work. In the mean time, while I try to get the DAC figured out, I implemented a PID algorithim in Arduino. I am taking measurements from a GY-521 IMU/Temperature Sensor, and outputting to PWM. At the moment, I do not really have a system to control, so I have just been changing the temperature with my finger, to warm the sensor up, and blasting it with an upside-down can of electronics duster to cool it down.
I should have an actual system to control soon, and will hopefully be able to use the Xplained board.
In this image, the blue line is the measured variable (PV), and the red is the PWM value (CV). As always, if anyone has any questions, suggestions or critique, please feel free to comment.
-
Quick Update #1
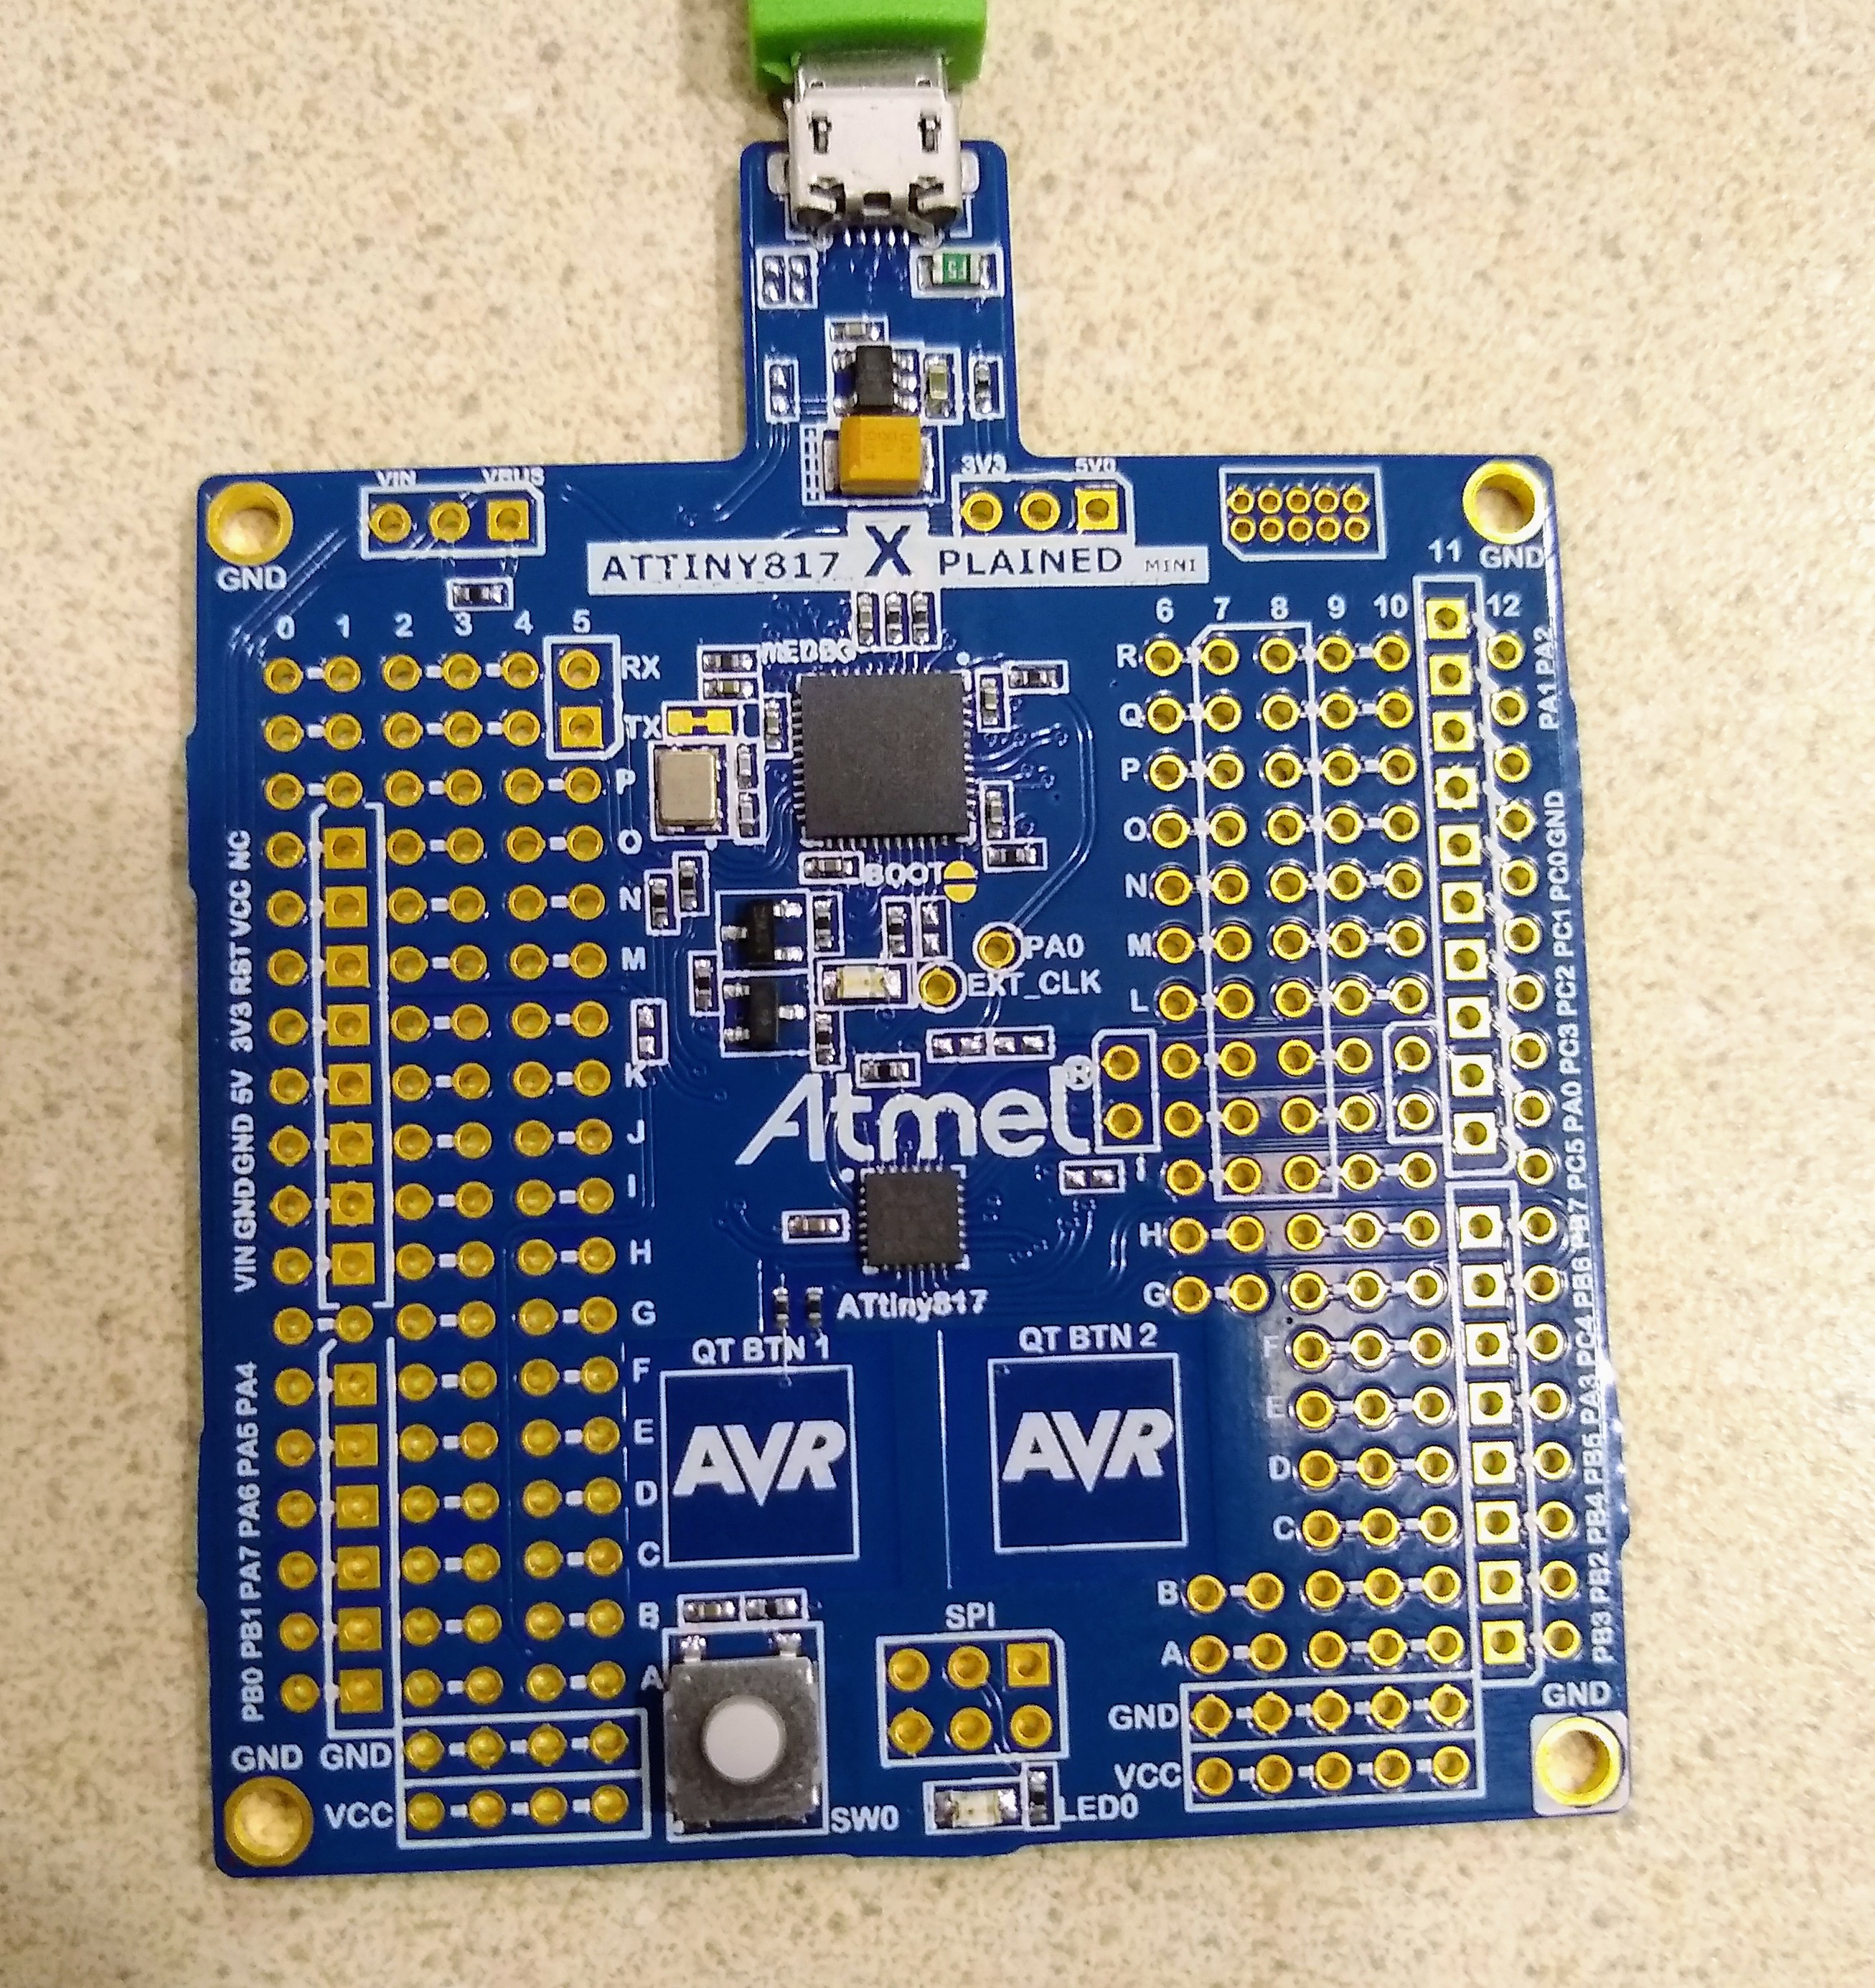
09/30/2019 at 23:57 • 0 commentsHey everyone, I finally have some hardware to start testing things on. I am using the ATtiny817 Xplained Mini evaluation board from Microchip. The ATtiny 817 has the same architecture and assembly language as the ATtiny 1617, just with 24 pins, instead of 14. This board has included programming, debugging, and a serial com port over micro USB.
![]()
I am hoping that this evaluation board will allow me to implement the system on it, before being uploaded to the Micro PID controller. You can check out the board here. As soon as I can get Atmel Studio to behave, I will try implementing a PID loop on the board.
-
Project Log #2
09/28/2019 at 15:43 • 0 commentsIn my previous project log, we discussed what a PID controller is, and the basics of how the project works. In this post, we will look at how to implement a PID controller in a microcontroller. In order to use the PID equation in a digital environment, we first must make a discrete-time model.
We will first look at the integral operator.
This is saying that the integral is equal to the sum of all previous error with respect to a sampling time.
Next, we will look at the derivative operator.
Using an approximation method known as backwards finite differences, the derivative can be approximated as the current error minus the previous error divided by the sampling time.
But how do we implement this in code? This algorithm is surprisingly simple, as can be seen below:
previous_error = 0
integral = 0
loop:
    error = setpoint – measured_value
    integral = current_error + cumulative_error*dt
    derivative = (current_error-previous_error)/dt
    output = Kp + Ki*integral + Kd*derivative
    previous_error = error
    delay(dt)
    return to loop
There will be more updates in the future. I should be getting some hardware to work on soon. As always, feel free to ask questions, and make suggestions.
-
Project Log #1
09/28/2019 at 04:07 • 0 commentsHey everyone, I have decided to give a more detailed rundown of my project, and some underlying theory.
The goal of this project is to create a PID temperature controller module for use in other projects. This board contains a sensor interface, control processor, and output interface. There are no physical user interfaces on this board, however control via serial, as well as options to interface with displays and buttons for programming will be available.
So, what exactly is a PID controller?
From Wikipedia:
A PID controller is control loop mechanism employing feedback that is widely used in industrial control systems and a variety of other applications requiring continuously modulated control.
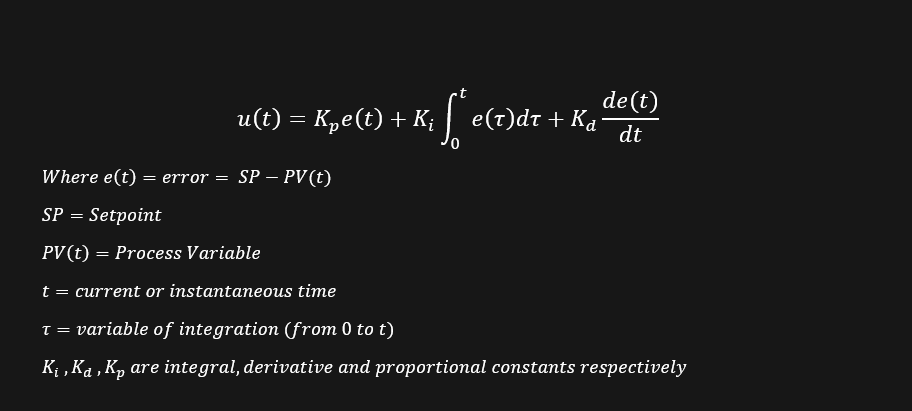
It attempts to rectify the difference between the user's desired value (the setpoint) and a measured value (the process variable) by applying a correlation based on Proportional, Integral, and Derivative values (this is where the term, PID comes from). The PID controller can be modeled by the following equation:
---------- more ----------Below is a block diagram to further explain this system.
![]()
Here, you can see that the setpoint is summed with the process variable (PV) to calculate error. This value is passed through the PID contoller, where a control variable (CV) is calculated. This value is passed through the plant (the system we are trying to control), and the output from the plant is measured to create the PV. By changing Ki, Kd, and Kp, we can control the behavior of the system. In general, we are changing these parameters to cause the plant's output to equalize at the setpoint, even if a disturbance is applied to the system. The process of adjusting these parameters is called tuning. I will include more about tuning in a later project log.
My PID controller uses a resistor divider network, one resistor being a NTC Thermistor, and an opamp to generate a voltage. This voltage is sent to the ADC on the ATtiny 1614, calculations are performed on the MCU, and then output via the built in DAC. I will include more information about my hardware and how to implement PID loops in software in future updates.
This is meant to be a very basic introduction to both my project, and the concept of PIDs in general. Many different implementations and approaches exist for characterizing PIDs and other control systems, thus this can quickly turn into a long, drawn-out discussion, however, I hope that I was not too long-winded here. If you have any questions or comments, as always, feel free to let me know.
Micro-PID Module
This is a small PID Temperature controller, designed to be a drop-in module on a parent board.
 Unfortunately, the DAC can only go up to 4.3 V, so I will have to include some sort of compensation if I want true 0-5V output.