Matthew James Bellafaire
-
Firmware V3 already?
05/23/2022 at 03:06 • 0 commentsWow, to think it’s been over a year since I last updated the logs for this project. Life got busy and I started slacking on keeping up with the logs, but that doesn’t mean a lot of cool things didn’t happen. In my last log (over a year ago) I talked about the V2 firmware and all the great changes it had over V1. Ultimately though the V2 firmware fell victim to the same issue that made me abandon V1, namely extensibility. Simply put, the V2 firmware never enforced a specific structure to adding features, had too many global variables, and generally required more time debugging than developing which became a pain and slowed down progress to a standstill. At the beginning of the year I began work on the V3 firmware with extensibility in mind to try and make the project something that was fun and interesting to work on.
There were a lot of basic features that this watch has been lacking in terms of usability, this firmware aims to address those. In the previous firmware versions much of the interaction came in the form of tap gestures alone, this limited the interactivity options. The lack of structure in the previous firmware also got in the way of creating any highly-interactive UI since every action that occurred on screen was manually written, resulting in a lot of spaghetti code that made life difficult.
Before jumping into how the new firmware works, some of the current high-level features are:
• Improvements to the reliability of Bluetooth connections
• Swipe gestures for navigating pages
• Simple structure for creating drawable objects on the screen, with improved touch handling
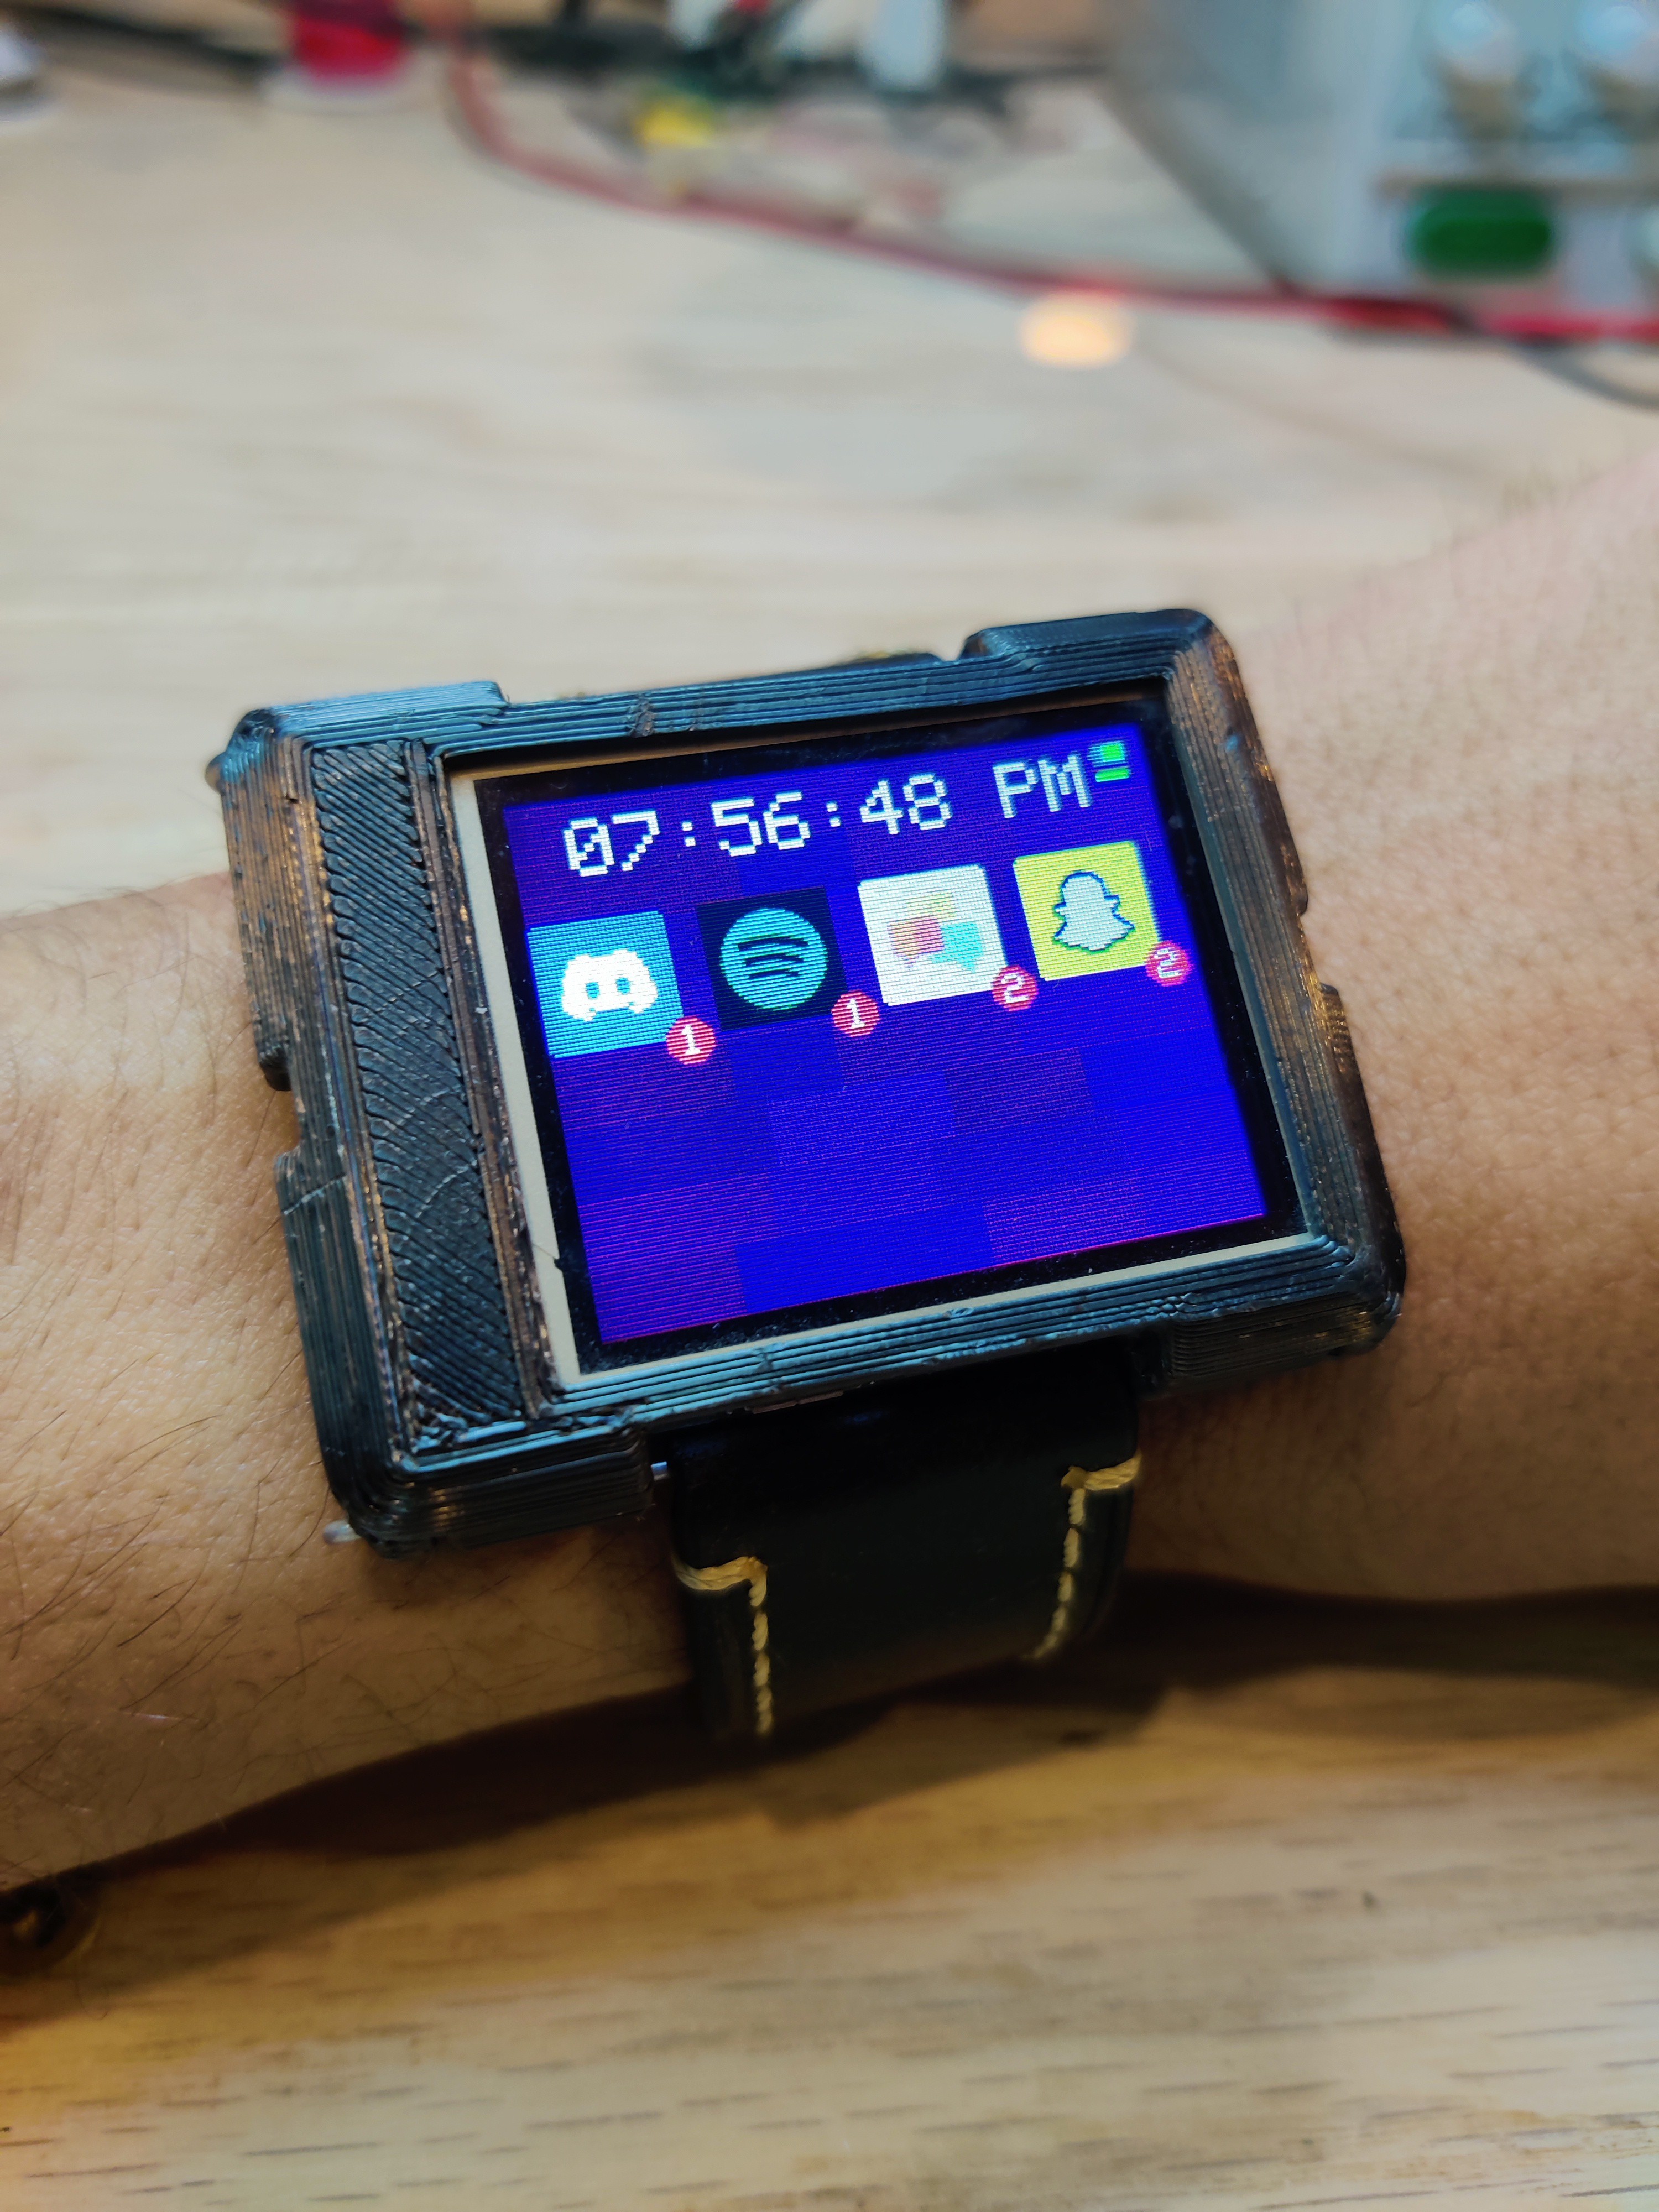
• Ability to download and display app icons to represent phone notifications
• and of course it still has a calculator (with a backspace key now!)![]()
With all the high-level stuff out of the way lets get into how this new firmware works.
Firmware Overview
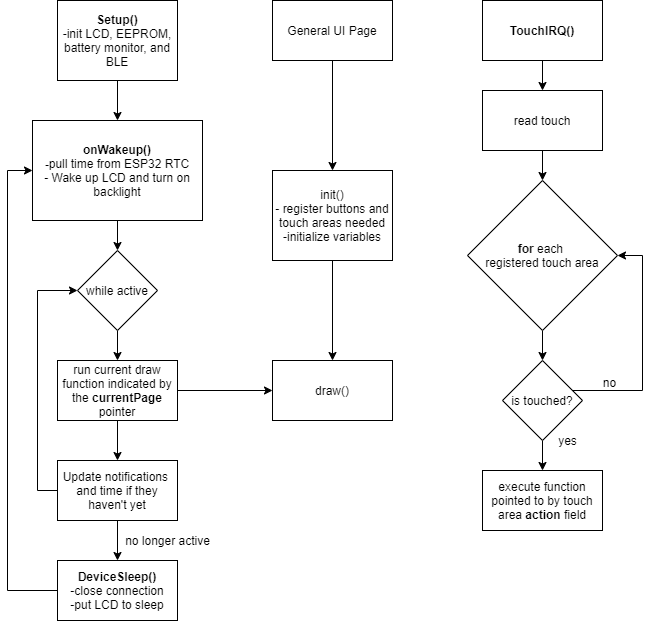
The main loop of the firmware operates in mostly the same way the previous firmware versions have. The watch initializes hardware, enters a loop and draws elements to the screen provided some wake-up conditions are met, then goes back to sleep when those conditions are no longer fulfilled. On each wake-up the watch polls the notifications and time from the companion app and stores those to memory. The fundamental change with this update is the way objects are drawn to the screen. In order to make expansion easier with the watch all screen items are encapsulated in classes which inherit from the Drawable class.
class Drawable
{
public:
    Drawable(int x, int y, int width, int height, GFXcanvas16 *buffer_ptr);
    Drawable(int x, int y, int width, int height, GFXcanvas16 *buffer_ptr, String type);
    virtual void draw();
    int getx();
    int gety();
    int getWidth();
    int getHeight();
    int setDims(int x, int y, int width, int height);
    virtual boolean isTouched(int x, int y);
    void setTouchable(boolean val);
    void registerCallback(void (*cb)());
    virtual void onTouch(int x, int y);
    String toString();

protected:
    String _type = "Drawable";
    int _x;
    int _y;
    int _width;
    int _height;
    int _ptouchx, _ptouchy;
    void (*_callback)() = nullptr;
    boolean _touchable = false;
    boolean _touched = false; //holds the value resulting from the last isTouched() call.
    GFXcanvas16 *_buffer_ptr;
};
The key functions for this class are the onTouch() and draw() functions which are both virtual, and therefore can be overridden by any child of the Drawable class. Additionally, since all classes are extensions of Drawable we can store references to the class as a Drawable pointer and know that each class will contain a draw() and a onTouch() function. These objects can be registered to the Drawable Manager which handles all the basic functions of drawing to the screen. This way, the drawFrame() function for this firmware is simplified down into:
![]()
Since all Drawables have locations and dimensions on the screen the Drawable manager can also handle the triggering of touch related functions. All a programmer has to do to add another visual element is create a simple class that extends the Drawable class and create a draw() function then register the element. Every visual element is nicely contained in its own small class that can be easily moved, reused, or included in other elements to create more complex behavior. All these benefits probably come as no surprise to anyone who knows anything about object orientation, but the amount of difficulty this has saved is massive. It also sets the ceiling higher in terms of features that can be added since difficult arrangements of visual elements can be broken down and debugged individually.
The main advantage to this structured approach is that each Drawable object can manage its own animation and redrawing itself and doesn’t require any interaction with any kind of global variables. The time, background, and application notifications all operate pretty much entirely on their own and animate whenever the draw() function is called.
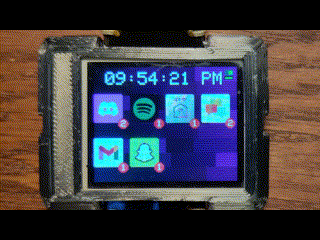
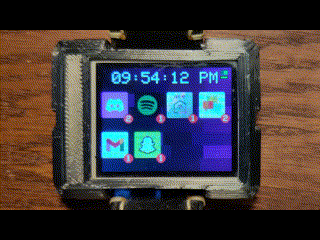
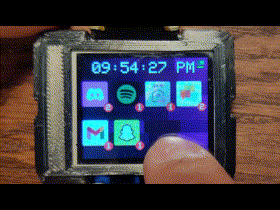
For navigation the watch now uses swipe actions. The user is able to swipe on the screen in one of 4 directions to change pages or perform any number of actions. Overall this just allows for the simplification of the interface and removal of navigation buttons that occupy precious screen real estate.Notification Icons
Adding notification icons is a feature in the watch that I’ve wanted for a very long time. On the android companion app I originally added the ability to transmit app icons around this time last year. There are a lot of steps involved between getting the image off the phone to actually displaying it on the watch and it took many attempts to get right. Transferring the notifications from the phone to the watch is done using base64, to do this I utilized the base64 library created by Densaugeo.
![]()
The app icons themselves are only a resolution of 32x32, but given that they’re transmitted over BLE it still takes a few seconds to complete even one icon transfer. This makes it impractical to read the images from the phone whenever they’re needed. In order to avoid this as much as possible the icons are saved into SPIFFS after they’re received. When an icon is requested the ESP32 first checks whether it has a local copy of the app icon before requesting it over BLE. On the home screen the notification icons themselves are used to show which apps have current notifications. Along with the theme of creating a more interactive user interface each app icon on the home screen is touchable. Touching the icon inflates a text window which shows the title of the notification. If the user wants they can then swipe left and go to the notification reader to get more information on the watch.
![]()
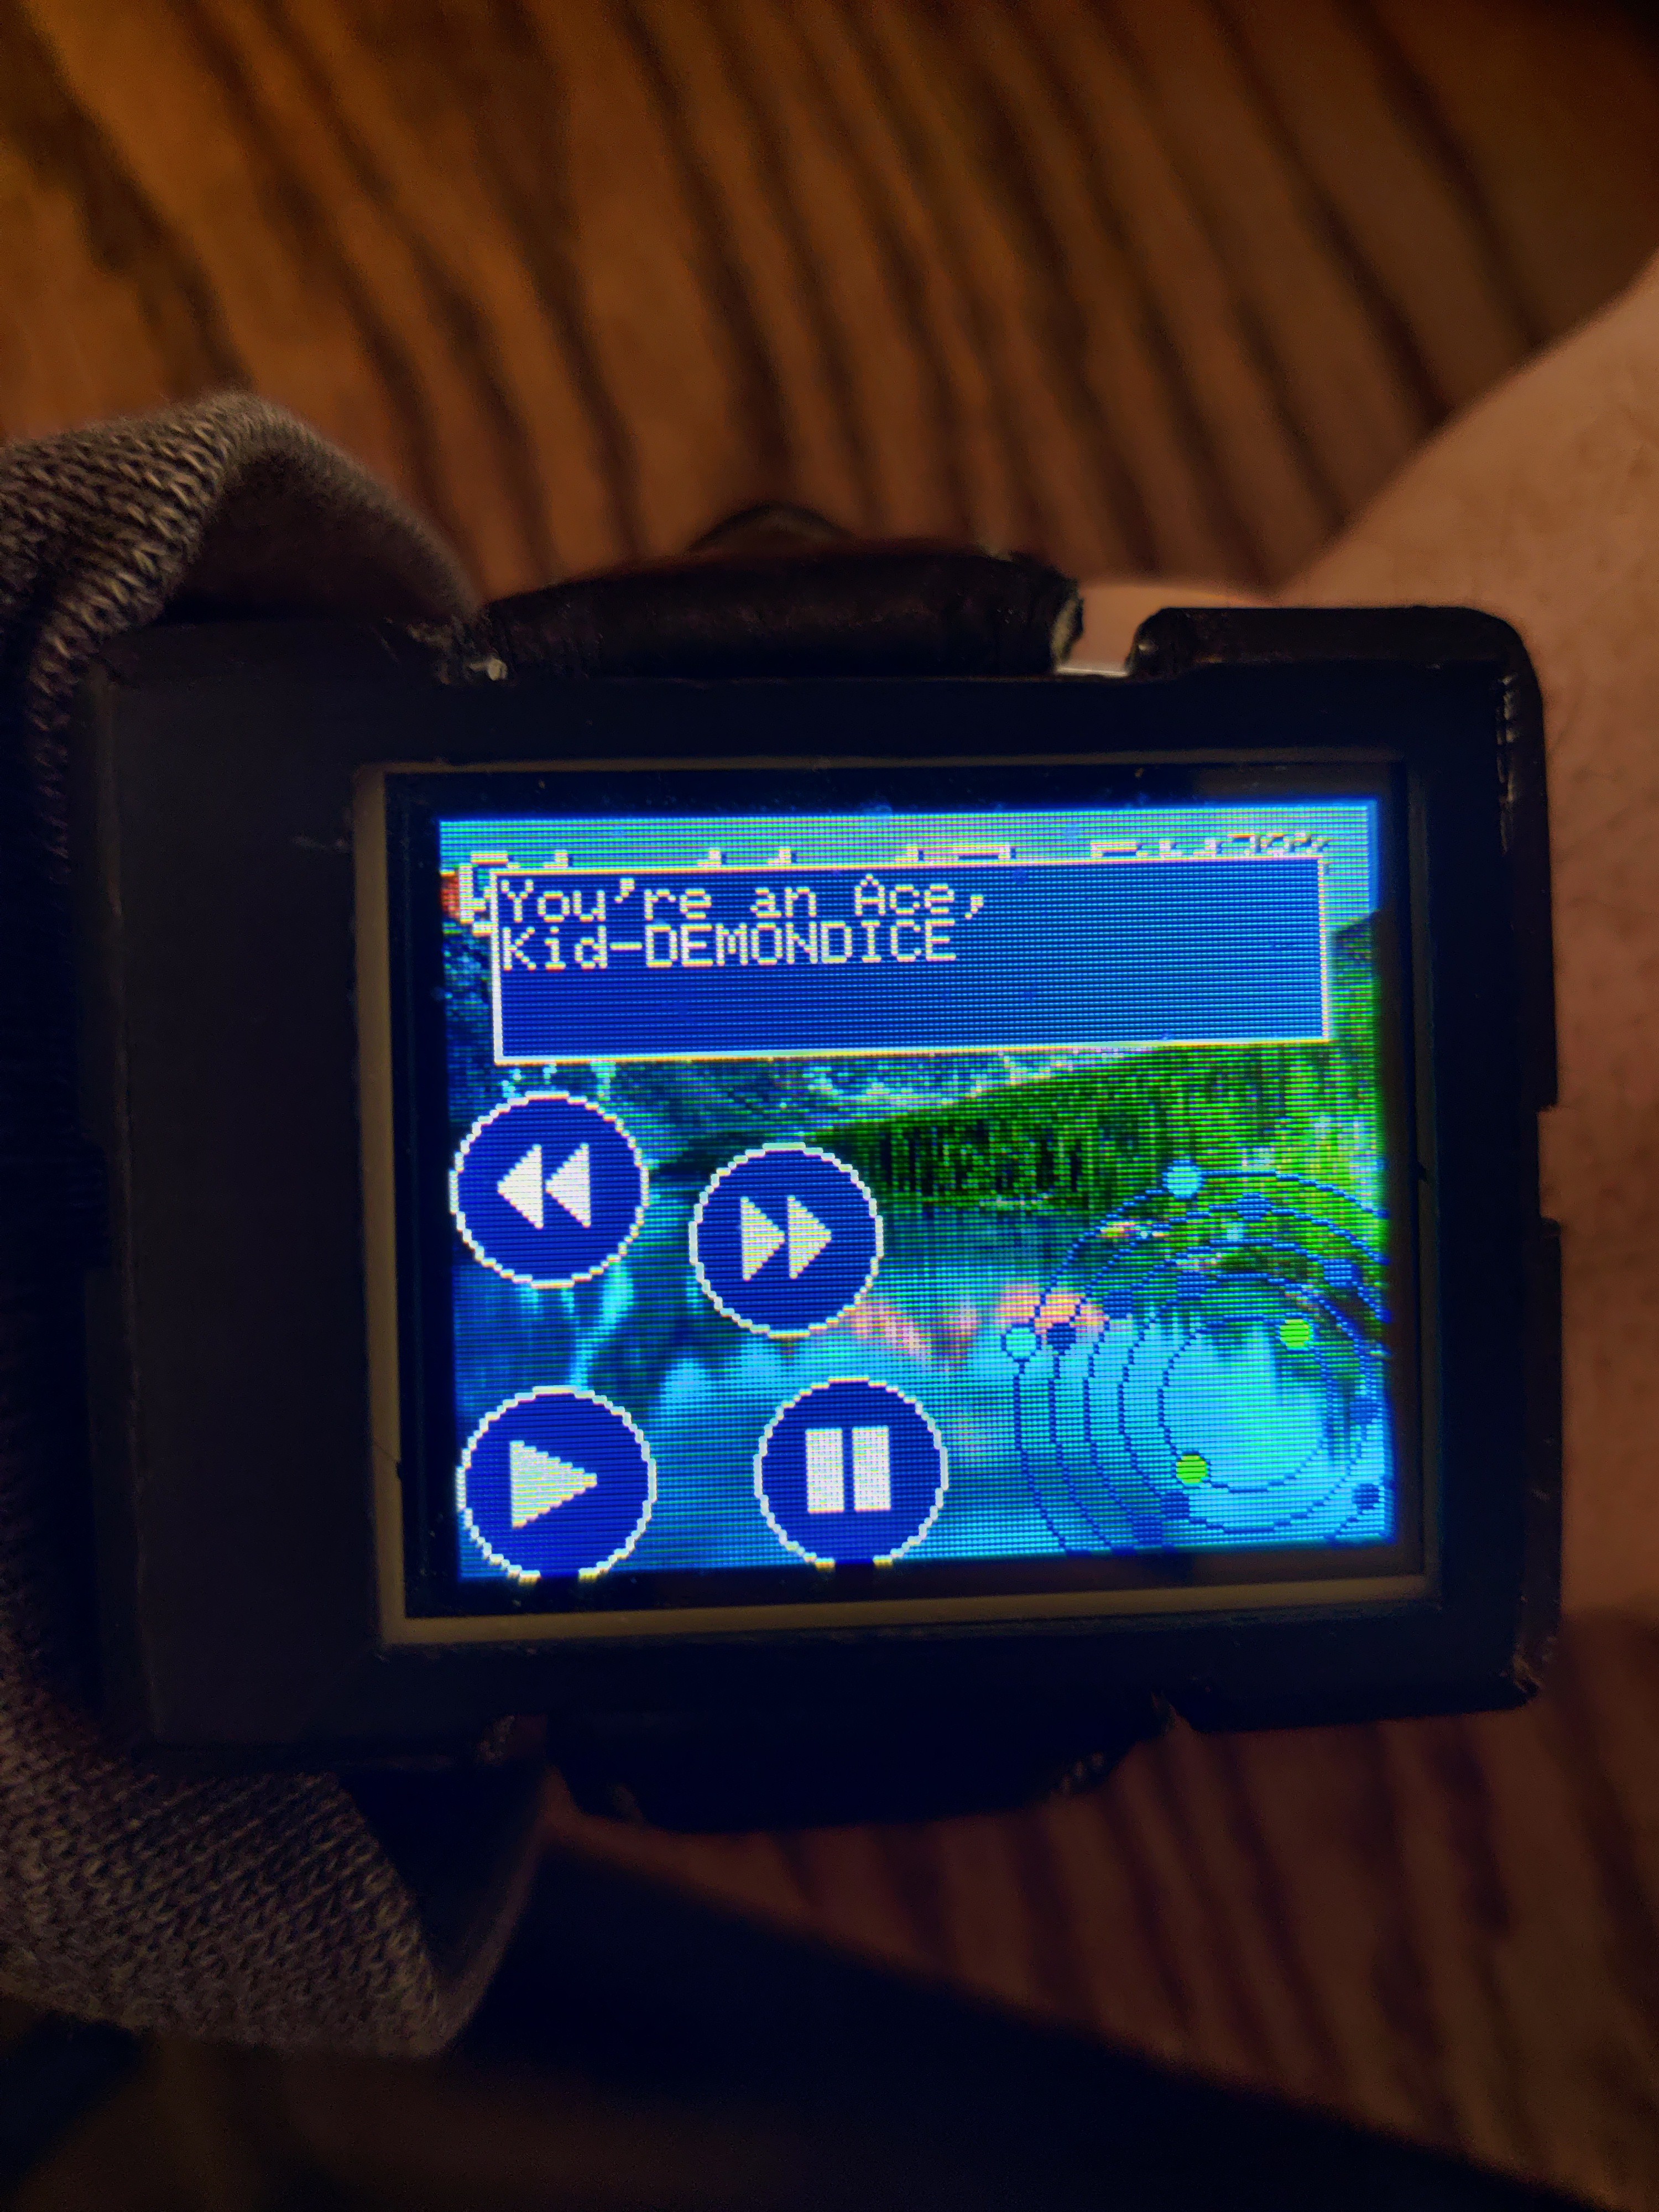
Spotify Control
When Spotify is currently playing on the device the app is sent over to the watch as a notification. Thus the Spotify app icon is present on the home screen. By tapping the Spotify icon the media control window appears, which can be used to change songs or pause/play. Mostly the same as the previous version, but a little bit more lively.
![]()
Calculator
The calculator is still a part of the firmware, there’s not much to say about it other than that it can be accessed by swiping up on the screen. It also now has a backspace button. I think of all the features on this watch, this one gets the most use.
![]()
See you in the next log!
-
The project is back! Android App Changes
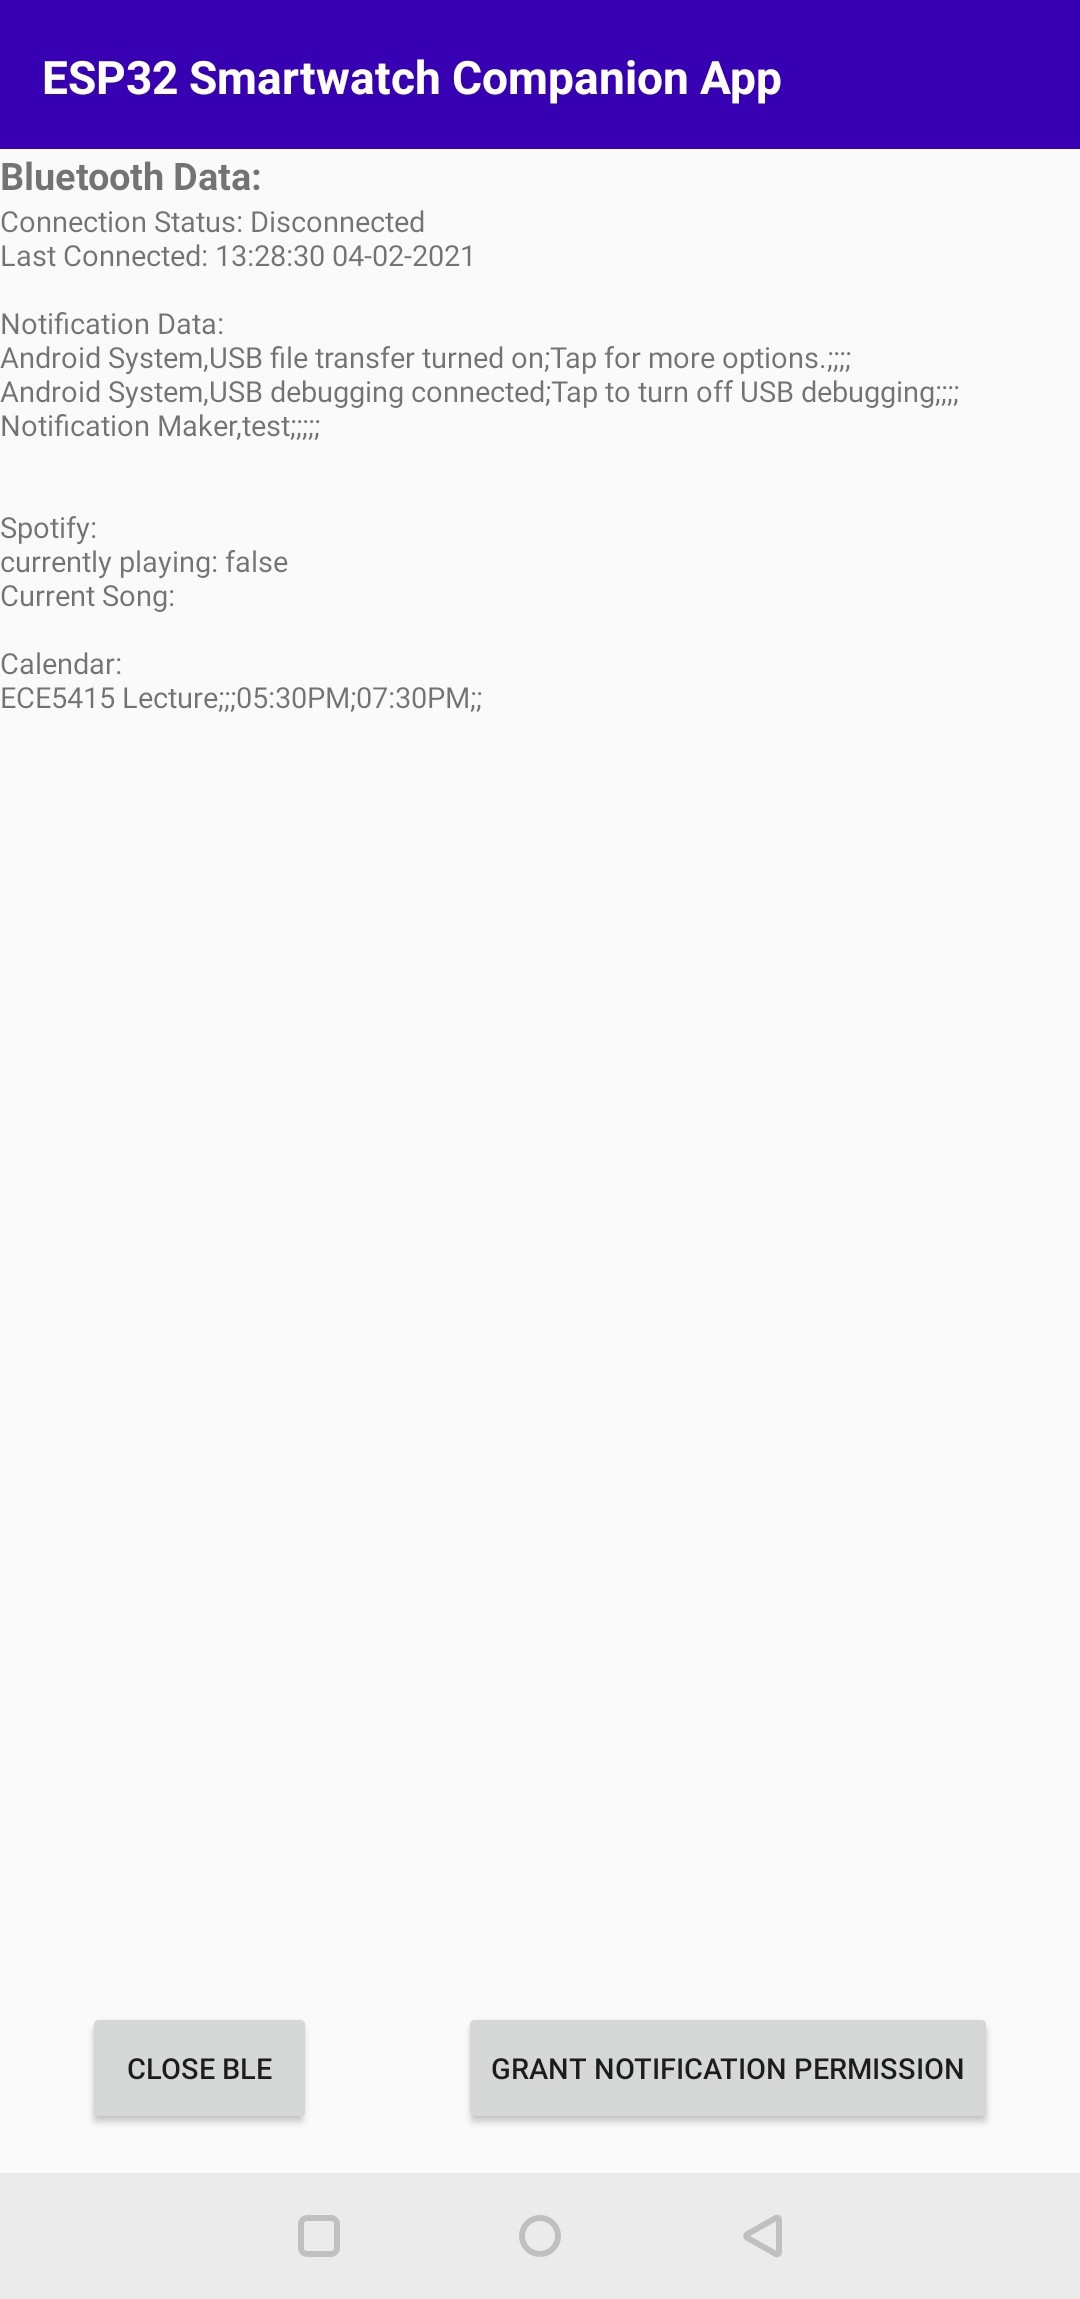
02/04/2021 at 21:00 • 1 commentIn my time using this watch I've always found the BLE connectivity to be the largest sticking point in daily use. In previous iterations there were times where the watch simply would not be able to find the android device and thus wouldn't connect. It's a minor inconvenience in most cases but it also contributed to me using the watch less than I would otherwise for the very purposes it was intended to perform. I am not, nor would I ever dream to call myself a mobile developer. For the most part I'm just learning as I go when it comes to android and so there's usually improvements to be made with any of my apps. With that said this app does handle BLE in a more graceful and reliable fashion than the previous version.
![]()
The app itself looks a lot like the previous version, the data shown at the top is all of the information that is accessible from the smartwatch over BLE. The "grant notification permission" button still makes an appearance here, since for some reason I can't find a way to request that permission at the start of the app. There's also a "close BLE" button which shuts down Bluetooth on the device, there were some cases during the development where a scan was unable to be submitted and restarting Bluetooth was the only way to resolve it. I haven't observed that issue in a while but for the time being it’s better to have the button than not.
The main advantage to this app over the previous one is in how it handles the BLE communication. Instead of taking a server role where the android app needs to constantly advertise itself it's able to instead scan for the ESP32 device then start a service. Once the initial connection is established the ESP32 will automatically reconnect to the app each time it comes out of sleep mode.
![]()
For the scanning I'm using the Nordic Semiconductor Android Scanner Compat Library which allows for intent-based background scanning. Once the device is found it starts the BLE service which handles communication with the smartwatch. This service is a foreground service which allows for the app to work better when the android device is in sleep mode, it may be possible to use a normal service, but I haven't experimented with that yet.
![]()
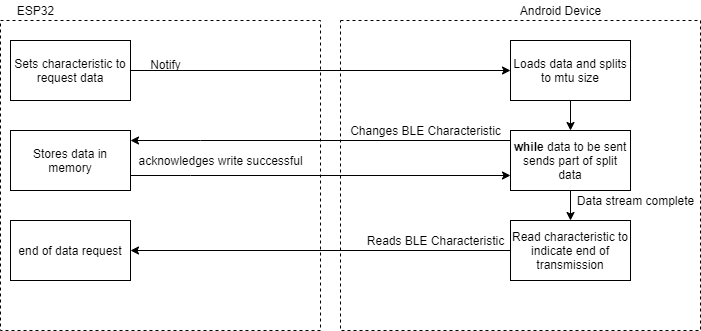
Once the foreground service is running, we can connect to the ESP32, discover its services, and get ready to begin the process of sending and receiving data. Commands are issued to the android app by the ESP32 setting its characteristic to a command string and then notifying the android device of the change. When this happens, the android device grabs the requested data (or performs the given action in the case of media controls) and replies by setting the characteristic.
![]()
The bulk of the data transmission happens in the center row of the above figure. The android device sets the data characteristic with a small portion of the requested data then waits for an acknowledgement from the ESP32. When the acknowledgement is received it writes the next portion of the data until the end is reached. At the end of the data transfer the android device reads the characteristic it was previously writing, the ESP32 interprets that read as the end of the transmission and takes the data it's received thus far as the completed message.
All the details don't necessarily matter as much as the end result though, and so far, this new app offers significantly more reliable connections than the previous app. The connection speed is also improved, but I believe that it can still be improved further. Either way this app has so far been a success and is a massive improvement over the previous one in terms of reliability, contributing to a more useable end-product.
The android app is available on my GitHub page (Here), which is also where you can find a compiled .apk file for this app under the "releases" tab of the repo. Thanks for reading and I'll see you in the next log!
-
The project is back! Firmware changes
02/04/2021 at 20:13 • 0 commentsIt’s been awhile since my last log post I’ve completed my undergraduate degree and now have moved onto graduate school. I wore this watch throughout my last semester and while working on other projects for my courses I identified a ton of improvements that could be made to make the watch more useable. The improvements were all software related and I’ve finally managed to complete the implementation. The first change is the subject of this log post, the firmware.
The original firmware created for this watch was patchwork at best, I created the original version almost a year ago on one of the early working revision 3 watches and never really improved upon it. When later updates came to the hardware that same firmware kept expanding without a firm direction or plan, as a result expanding the firmware or making changes became increasingly impossible. The newer firmware is a bit more structured lending itself better to future expansion.
Before getting into the actual structure of the firmware its important to note the newer high-level improvements that were implemented:
- -The device now goes into light sleep rather than deep sleep, allowing for almost instant wakeup.
- -The device can now be woken up by the accelerometer
- -Touch handling and page drawing are handled in the structure of the program allowing for easy expansion
- -ESP32 is now acting as a BLE server rather than a client, connections no longer require scanning on the ESP32 side of things (more on the changes that come with this in the next log)
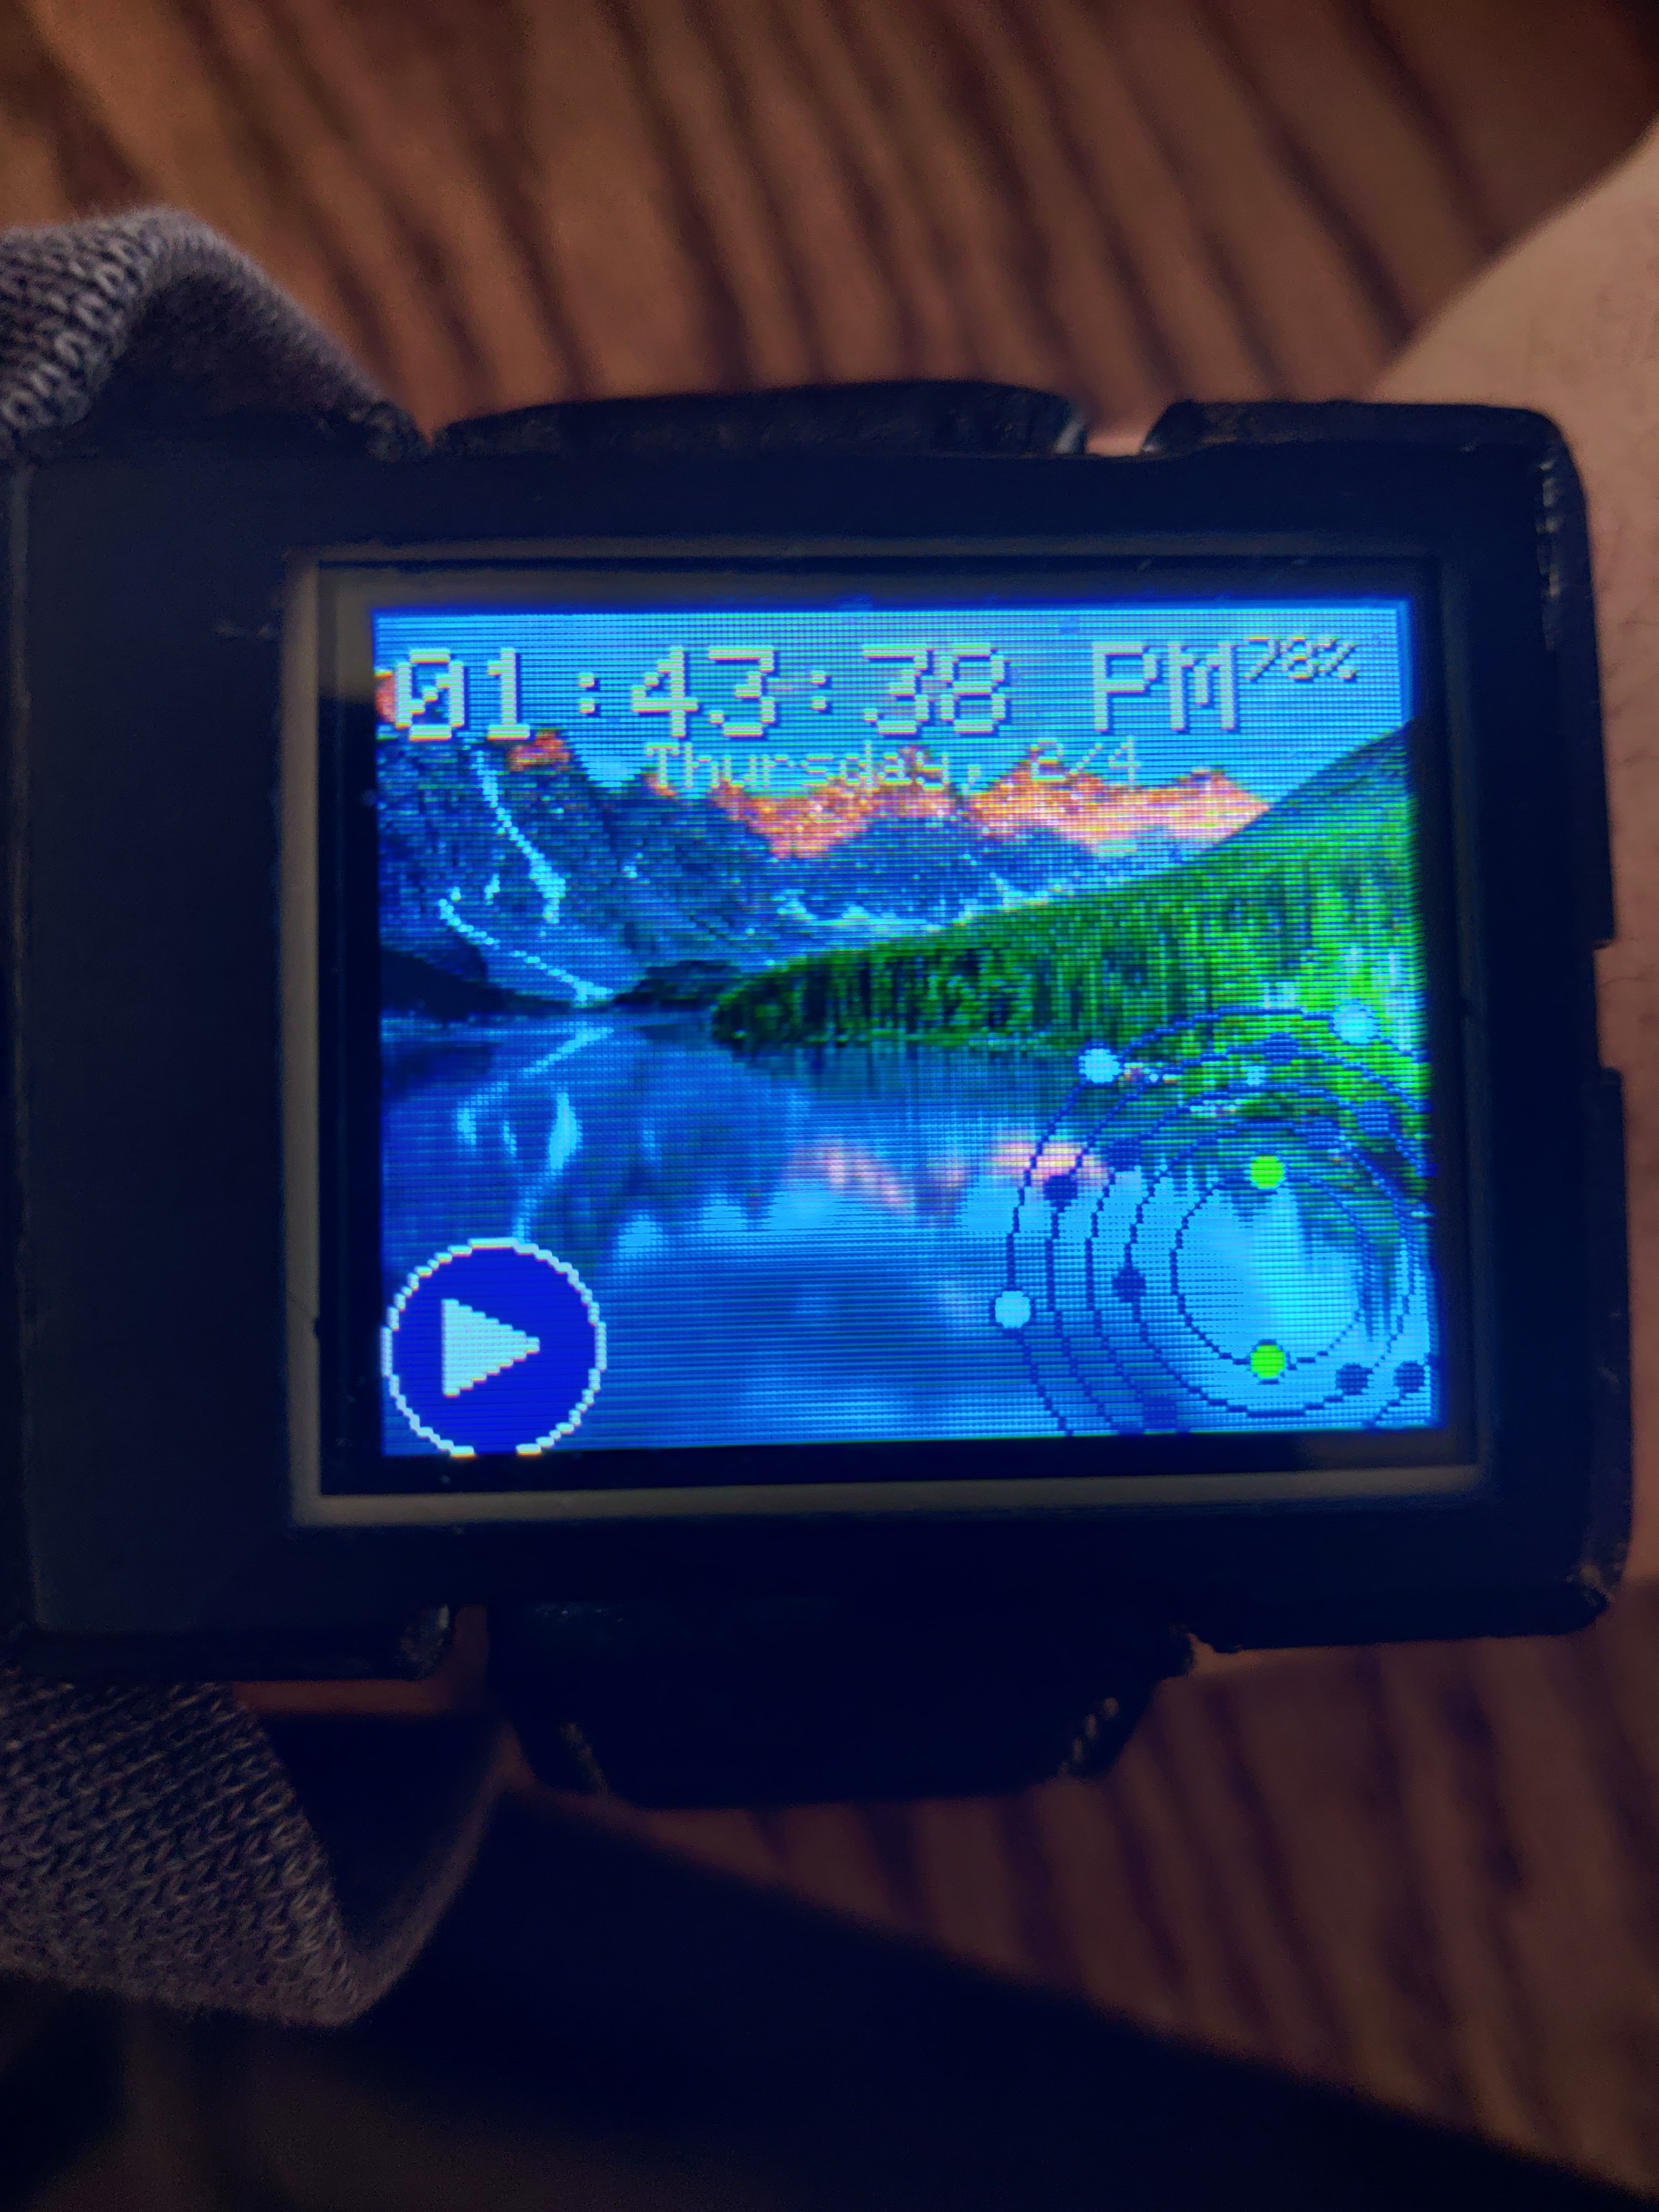
As for the UI it’s been changed significantly, instead of the old blocky aesthetic the newer version is a bit more minimal. Just the time, date, media status, and navigation circle are shown on the home screen. The circle in the bottom right is actually a button, it also animates while the home screen is active.
![]()
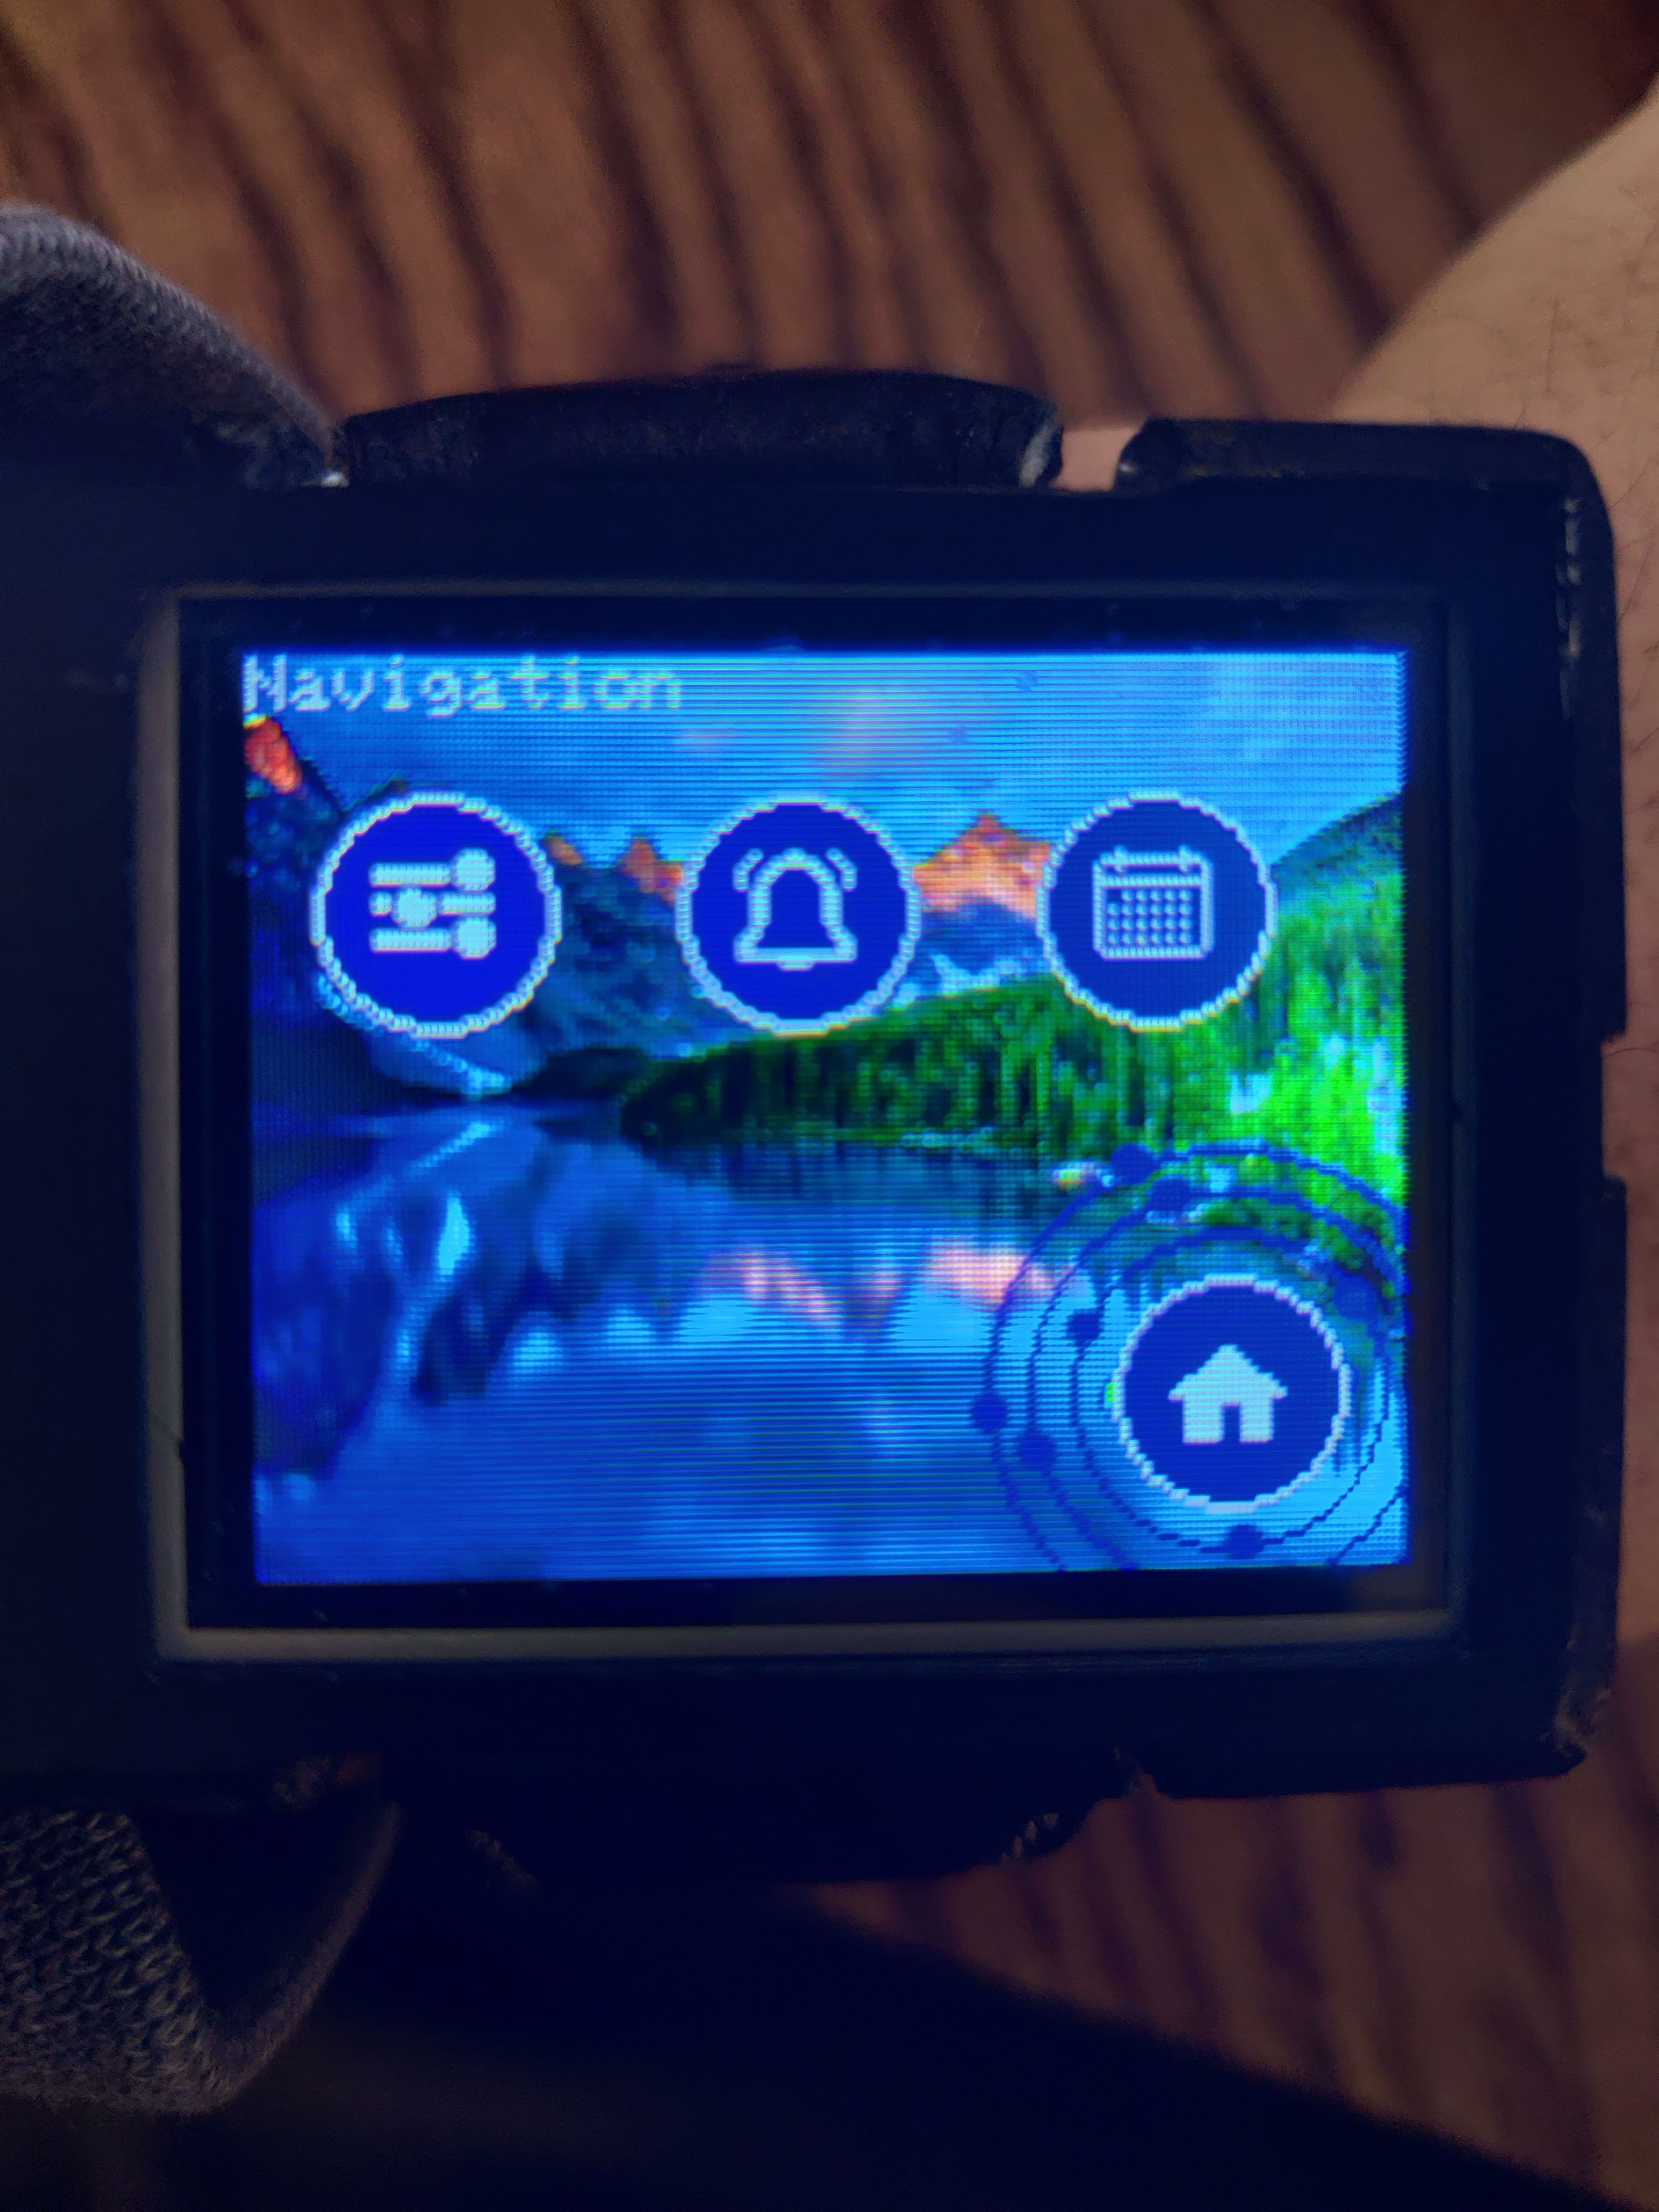
Tapping the navigation circle brings you to the navigation page.
![]()
From here you can access the settings, notifications page, and calendar reader. The home button will take you back to the home page.
![]()
The media play button on the home screen shows when there is music playing on Spotify. When tapped it brings up the current song playing and the media controls.
And finally, the calendar viewer. A bit of work went into this one, the calendar displays all the events for the day and spaces boxes on the left side corresponding to their start and end time. The scroll buttons on the right can be used to tap through the calendar events for the day. Overall, I found that the calendar app is one of the things I use the most just to see when my next event for the day is scheduled.
With all that said let’s get into the code structure.
![]()
As I said the newer code uses Light sleep instead of deep sleep. Deep sleep is significantly easier to use for this kind of application since it clears all of the variables on boot and thus the code starts from the same spot every time. However Light sleep does not clear the contents of ram, this means that when entering and exiting sleep mode the variables need to be updated to be the desired state and set before sleep. The onWakeup() and DeviceSleep() functions take care of this and prepare the device for operation/sleep. Although there is the enable MOSFET present on the LCD it is no longer used, instead the code initializes the LCDs sleep mode to push it into a low power state. In comparison to the old method of simply removing power from the LCD this is less efficient power-wise, but when the device wakes up there is no longer any need to initialize the LCD which took about (250ms) and resulted in some lag to a wakeup command.
Drawing pages is handled within the loop, there is now a void pointer that is labeled as “currentPage” which gets called every time the loop is iterated. This structure allows for any page to switch to any other page without updating a switch/case statement somewhere in the code. In general pages now use a structure where they have an ‘initialize’ and ‘run’ function. The Initialize function will register the touch areas required by the page and set the values of any variables that need to be used for that page. The ‘run’ function will do the normal drawing of the page.
Touch is also handled a bit more gracefully, there is now a touchArea structure in the code which can be registered to a specific area on the screen along with an action. When the screen is touched an interrupt is triggered which starts a task to check each touch area. This code will automatically trigger the associated function of the touch area when it is pressed, removing the need for the programmer to manually check button presses.
This new structure eases some of the pains of building newer pages and expanding the smartwatch code. A lot of work went into these improvements to the firmware and they’ve increased the general experience of using the watch. The next log will cover the changes to the android companion app which is integral to this project.
-
Some Stuff and Video Update #4
08/30/2020 at 22:58 • 2 commentsI've been working on the watch a bit here and there, but it's been rather busy lately even though I'm still at home (paradox of 2020). At the same time there just isn't much to do on the watch at this point, all the core functionality is there and I'm happy with the form factor. All that's left is adding features. So far, I've added 2 more apps to the watch a calculator and a Bluetooth serial receiver.
The calculator app is just a simple 4 function calculator, nothing special about it except it's on a watch. Since this smartwatch has a pretty large screen (compared to other watches) the calculator app is very easy to use. It's also just the convenience factor, since it's on my wrist I find myself using it often. (see video below)
The Bluetooth serial receiver is a simple app that may become useful later. The basic idea is that the watch becomes a standard Bluetooth serial device and allows other devices to connect to it. Once connected the external device can print data directly to the watch's screen. I used to work with a lot of small makers-type robots, so I like the idea of being able to read serial data from the robot while it's in action. (see video below)
On a slightly less related note I got the TTGO T-Watch 2020 a little while ago and I like what it can do. There's only a small community around it that I've been able to find but I'd really like to see the watch become more popular. I made a small port of some of this project's firmware over to the T-Watch, at the moment it only supports reading phone notifications and controlling Spotify music. Open source hardware and software were really the springboard for me when I was getting started with electronics so I'm always looking for ways to give back. The T-Watch port can be downloaded here https://github.com/Bellafaire/T-Watch-2020-Smartwatch-Port and can be uploaded through the Arduino IDE.
And finally, I've created another video log to cover some stuff up to revision 5. The video logs are still parallel to the logs posted here on Hackaday.io so really it just covers the last few logs in 2 minutes.
I think I'll consider this project complete in the coming week, but before that I want to put some polish on a few things here and there. Either way thanks for reading and I'll see you in the next log!
-
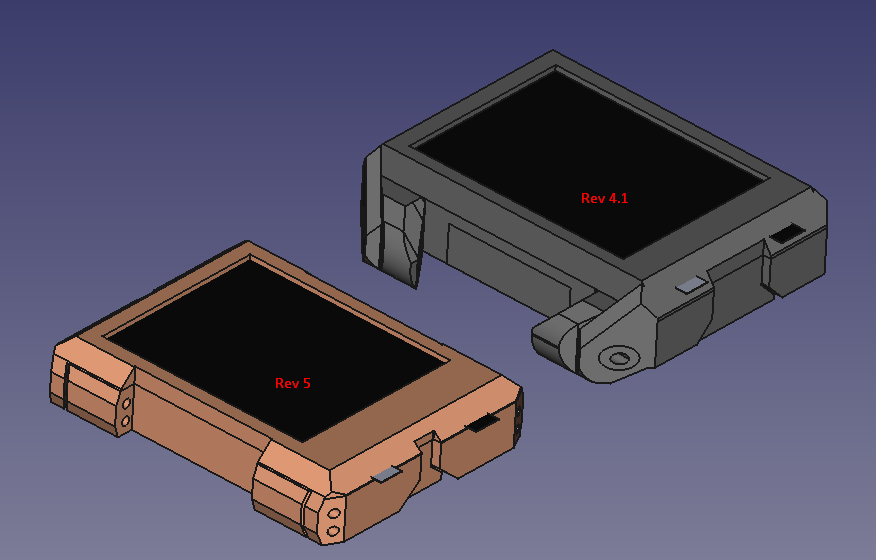
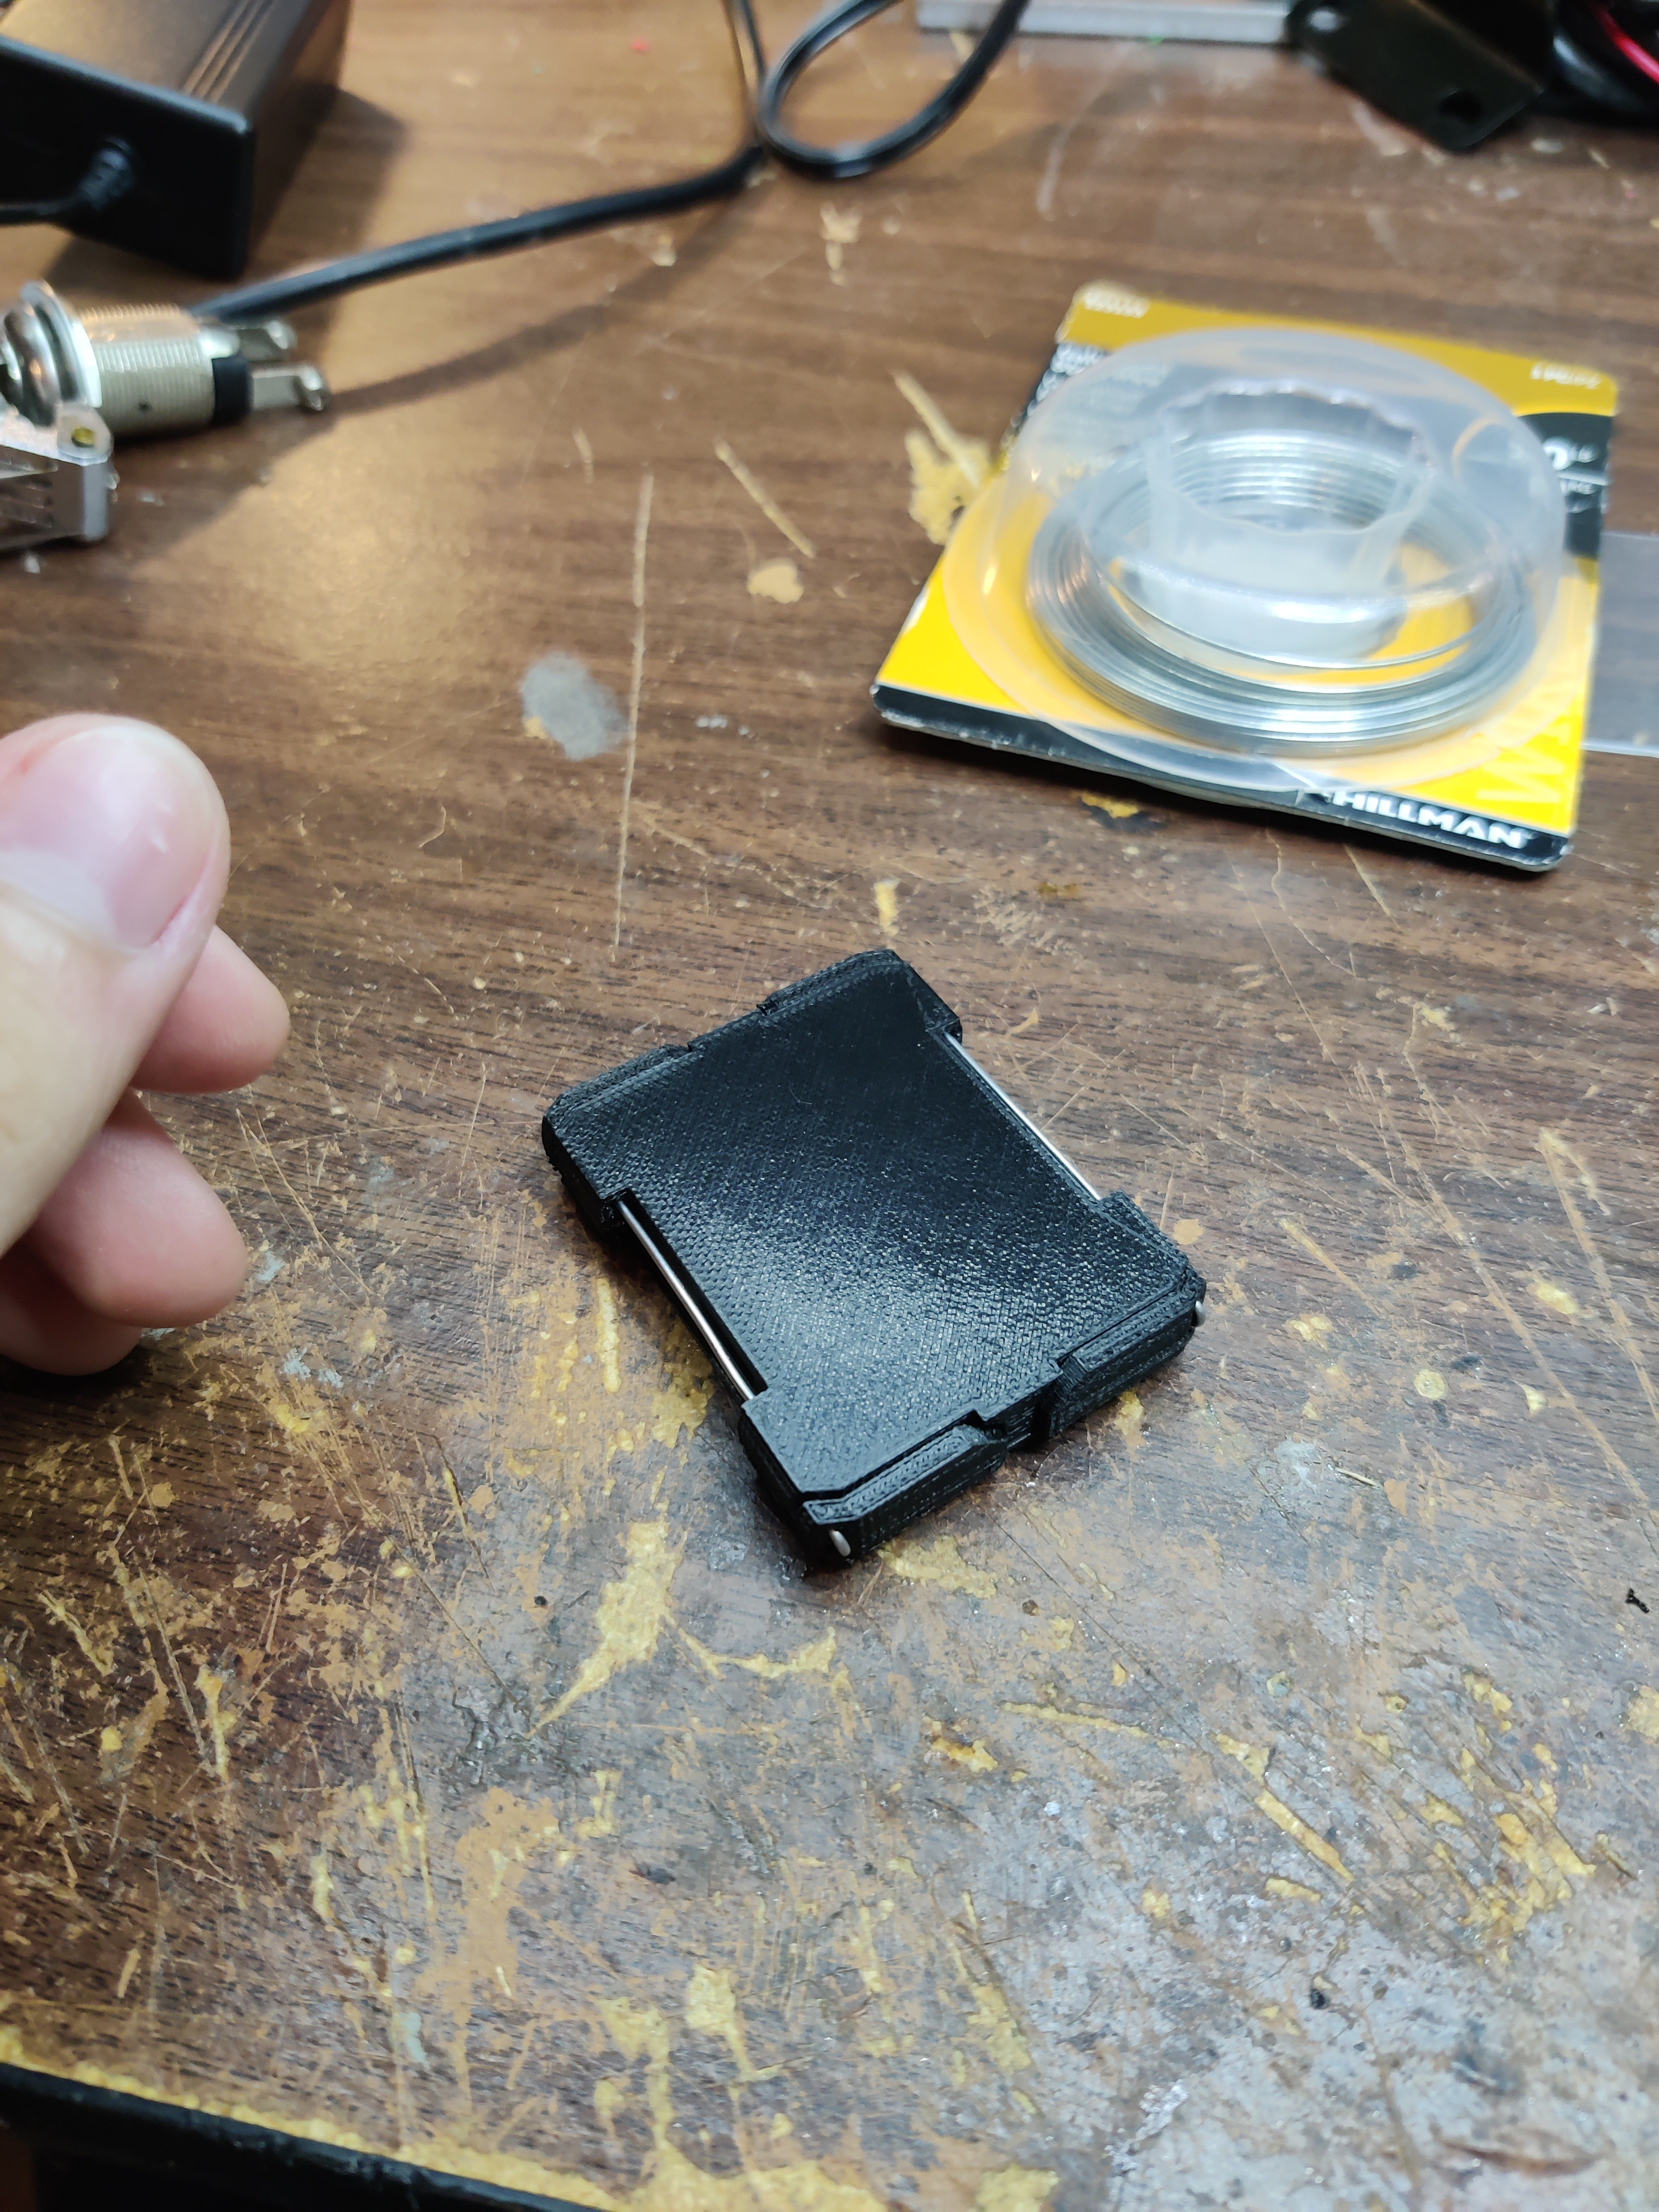
Rev 5 is finally here!
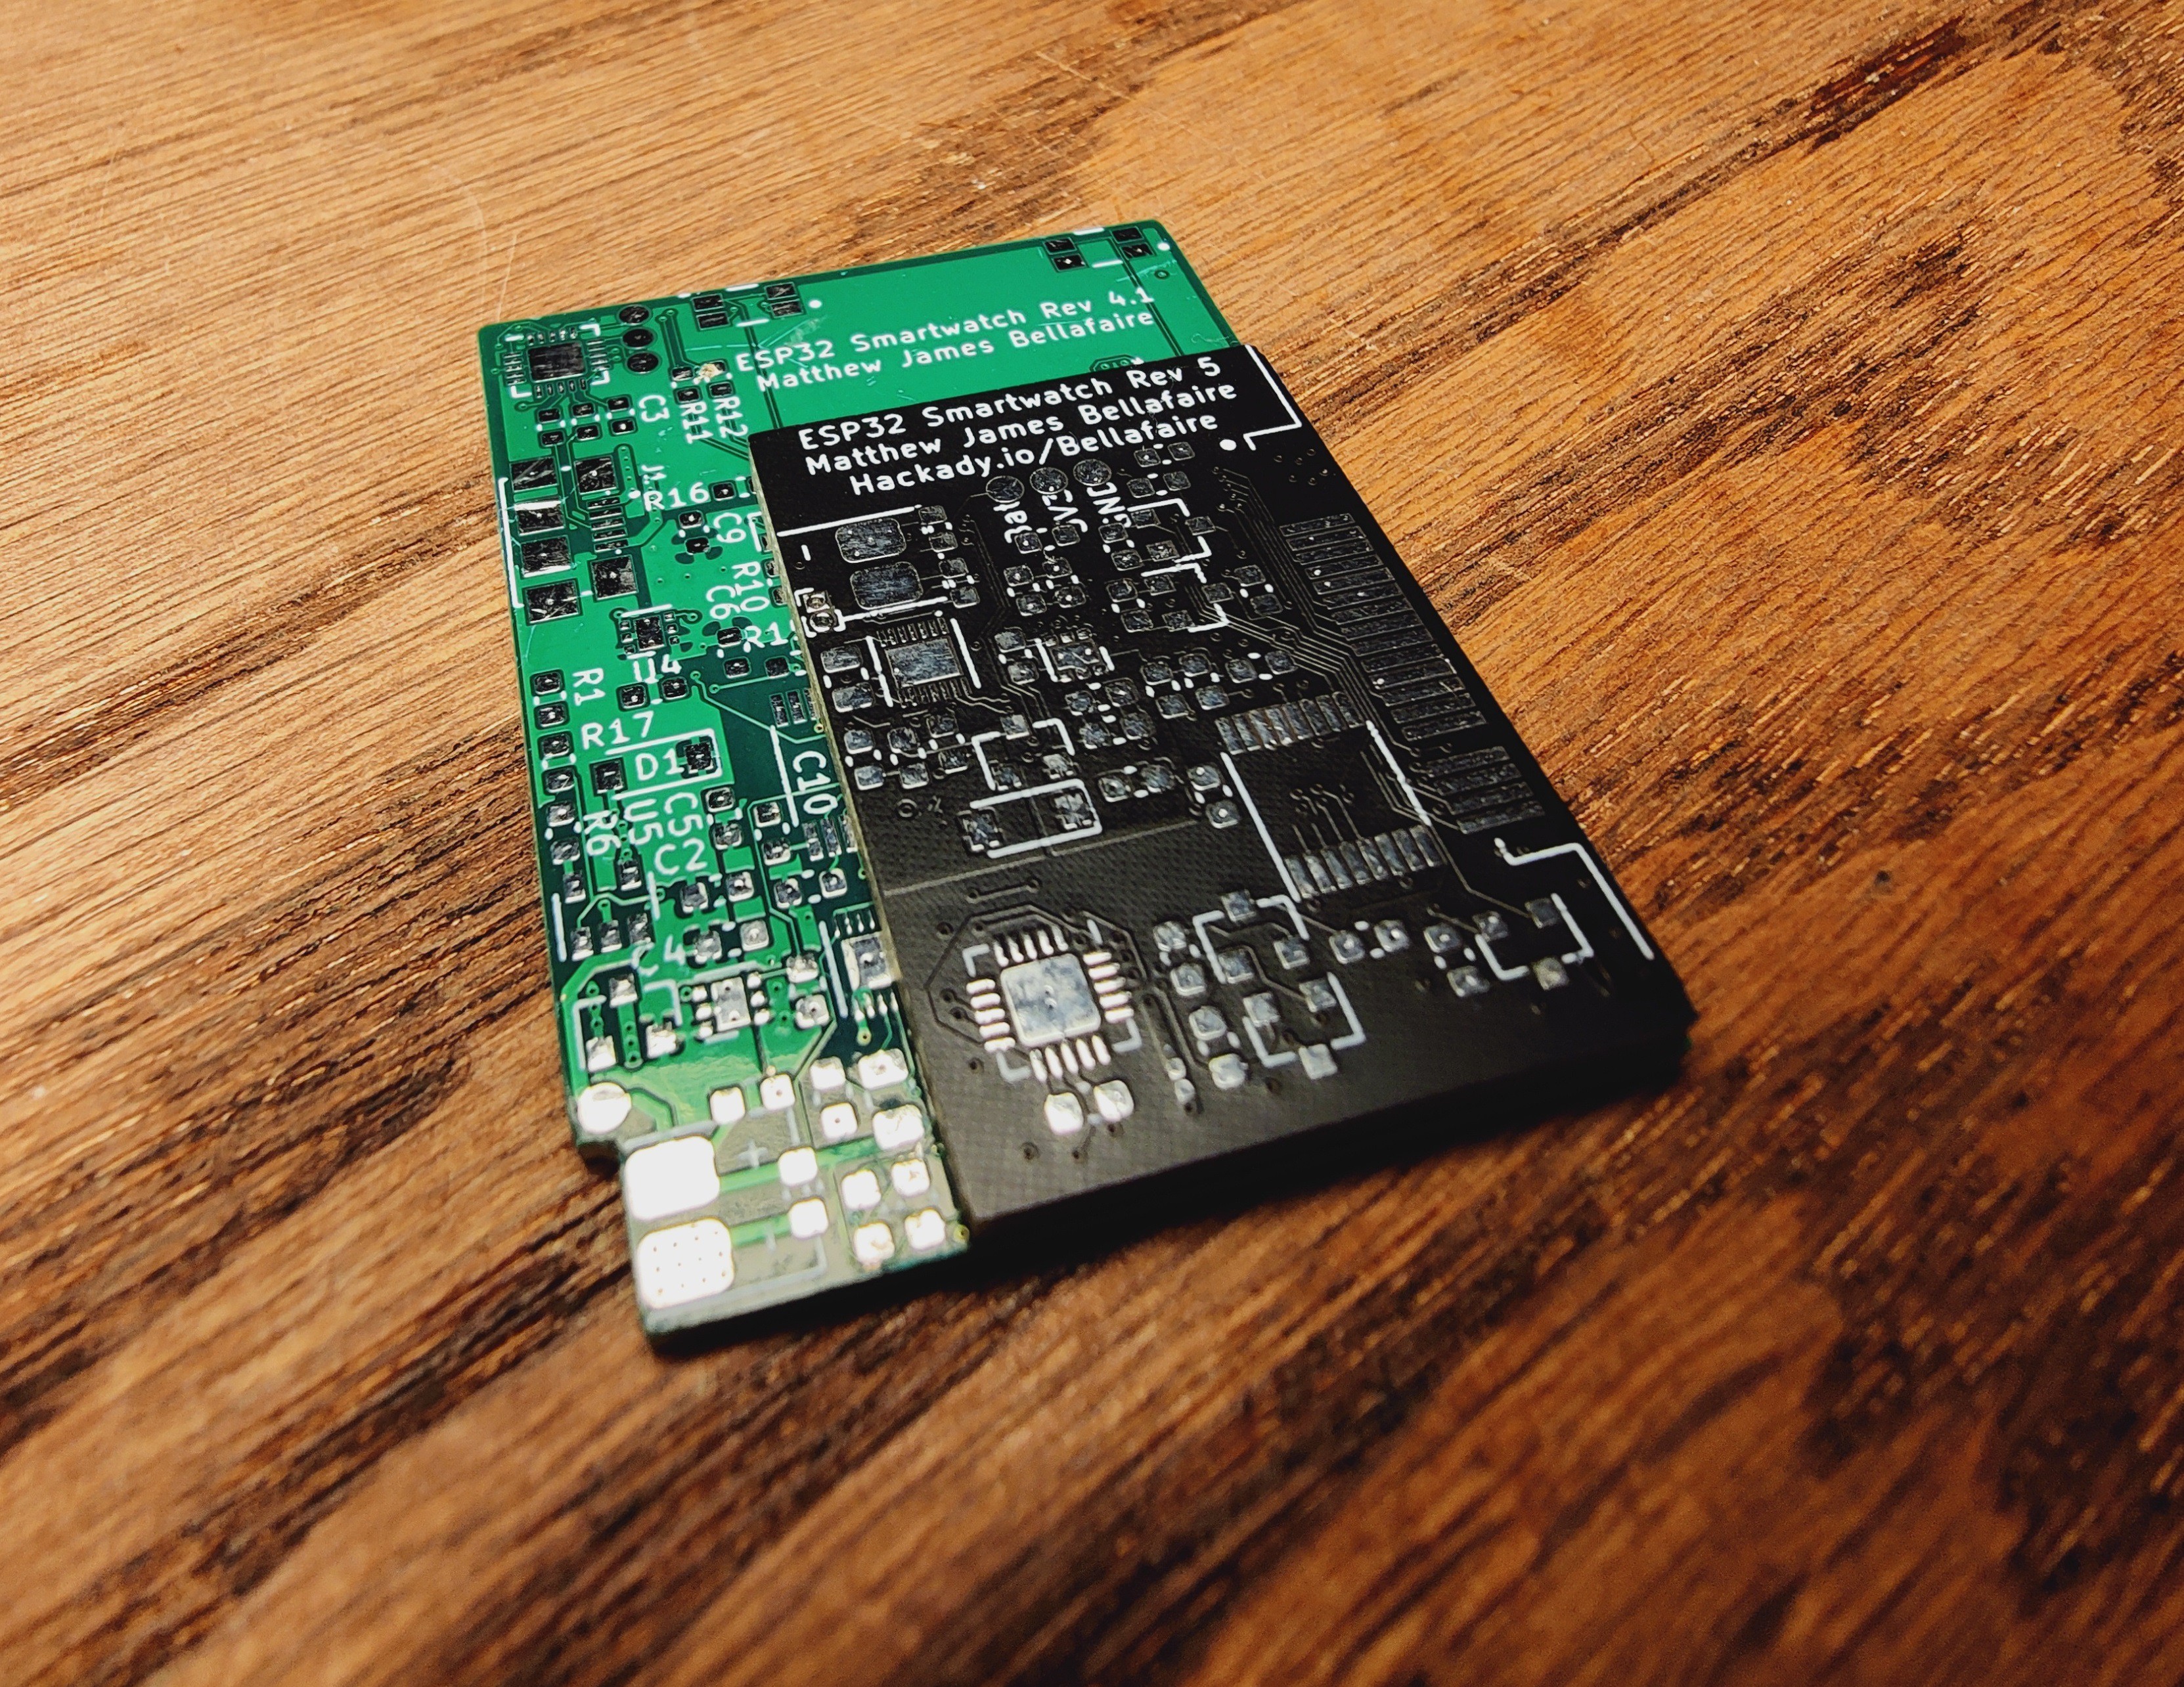
08/19/2020 at 02:03 • 0 commentsThe title really says it all here, the boards for Rev 5 arrived earlier today and I dropped everything to start putting them together. Revision 5 brings a huge reduction in overall volume of the watch while maintaining all the intended functionality. For comparison here is the revision 5 board stacked on top of the revision 4.1 board:
![]()
I've talked about the reduction in size in my previous log after the CAD files were finished up. The new size is a noticeable change jumping from the Rev 4. It's also worth noting that the current watch body can be printed entirely without support, this helps with the overall finish since there's no more marks where the supports were removed.
![]()
(the overall reduction in height was only about 3.5mm, Rev 4.1 kind of wraps around the wrist rather than sitting on top of it. The "wings" that hold the strap add a few millimeters to the height making the overall size reduction seem more extreme)
The board assembly went well, I opted to get a stencil this time around to save me some time with the current density of the underside of the board. Overall, the assembly took about 2 hours and the debugging/minor firmware changes only took about another 2. I spent more time desoldering the ESP32 module than anything else (seriously that thing takes forever to heat with hot air station) since it kept ending up with bridges between pins. Other than that, the I2C bus got pulled to ground by some extra solder and the voltage regulator didn't seat properly. As hand assembly of a board goes this watch was a breeze.
There were some minor code changes that mostly amounted to changing some pin declarations, I'm only mentioning this because it technically means the code from rev 5 and rev 4.1 are incompatible.
The hardware for this project is now complete. However, I'm not sure whether I'll ever really close this project and consider it finished since I'll continue to add features to the watch as I find a need for them. There's still a lot more to come with this project so stay tuned. Either way see you in the next log!
-
BLE Changes and Split to the Repo
08/12/2020 at 15:30 • 1 commentI'm still in the process of waiting for the new boards to arrive. In the meantime, I decided to fix some of the BLE communication issues. When I originally wrote the BLE code I didn't know much about BLE, so it was time to fix it up. I ripped everything out of the smartwatch source code relating to BLE and did it all over again from the ground up. The new implementation can now perform both the BLE scan and connect functions from within a separate FreeRTOS thread allowing for the ESP32 to connect to the android device through a background process. The connection is also more reliable and easier to use since everything now happens from the sendBLE() function rather than calling one of 4 functions.
I also finally got around to cleaning up the code in the companion app and it's at a state now where I feel like it deserves to be its own project. As a result, I've split the repos up so that people who just want the android app can find and use it. The new repo is found here: https://github.com/Bellafaire/Android-Companion-App-For-BLE-Devices
The majority of the android app is now complete, if anything gets changed now it will likely be adding features rather than changing the core functionality of the app. I also supplied an example Arduino sketch which connects to the android app and reads the phone notifications to help people hit the ground running with the app.
See you in the next log!
-
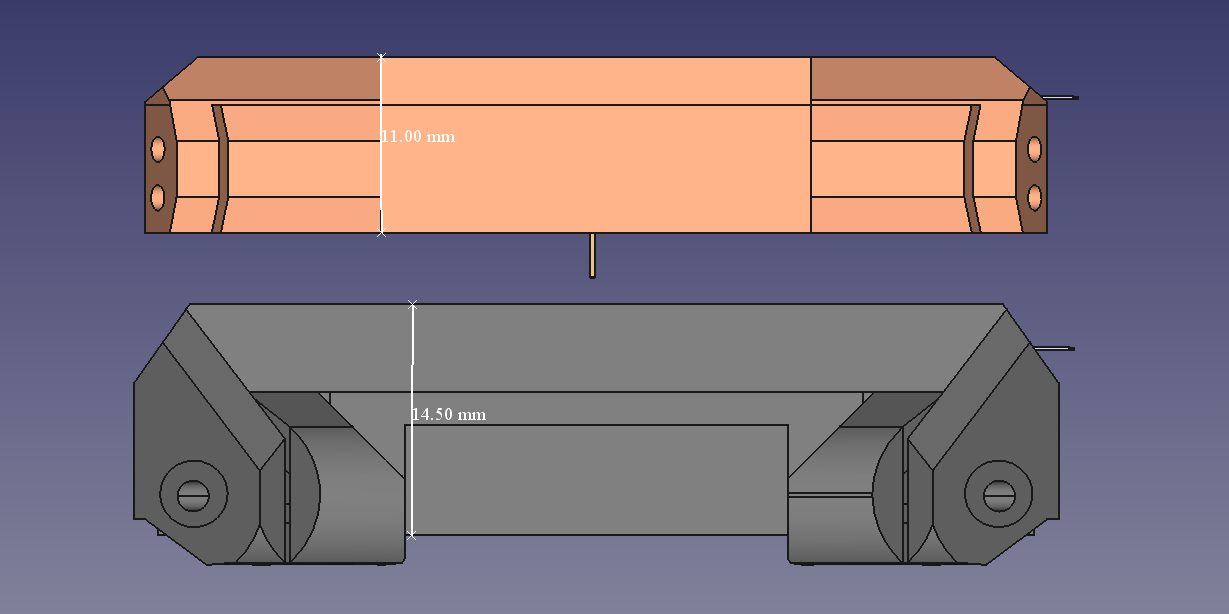
Rev 5 Case is Here and Its Tiny
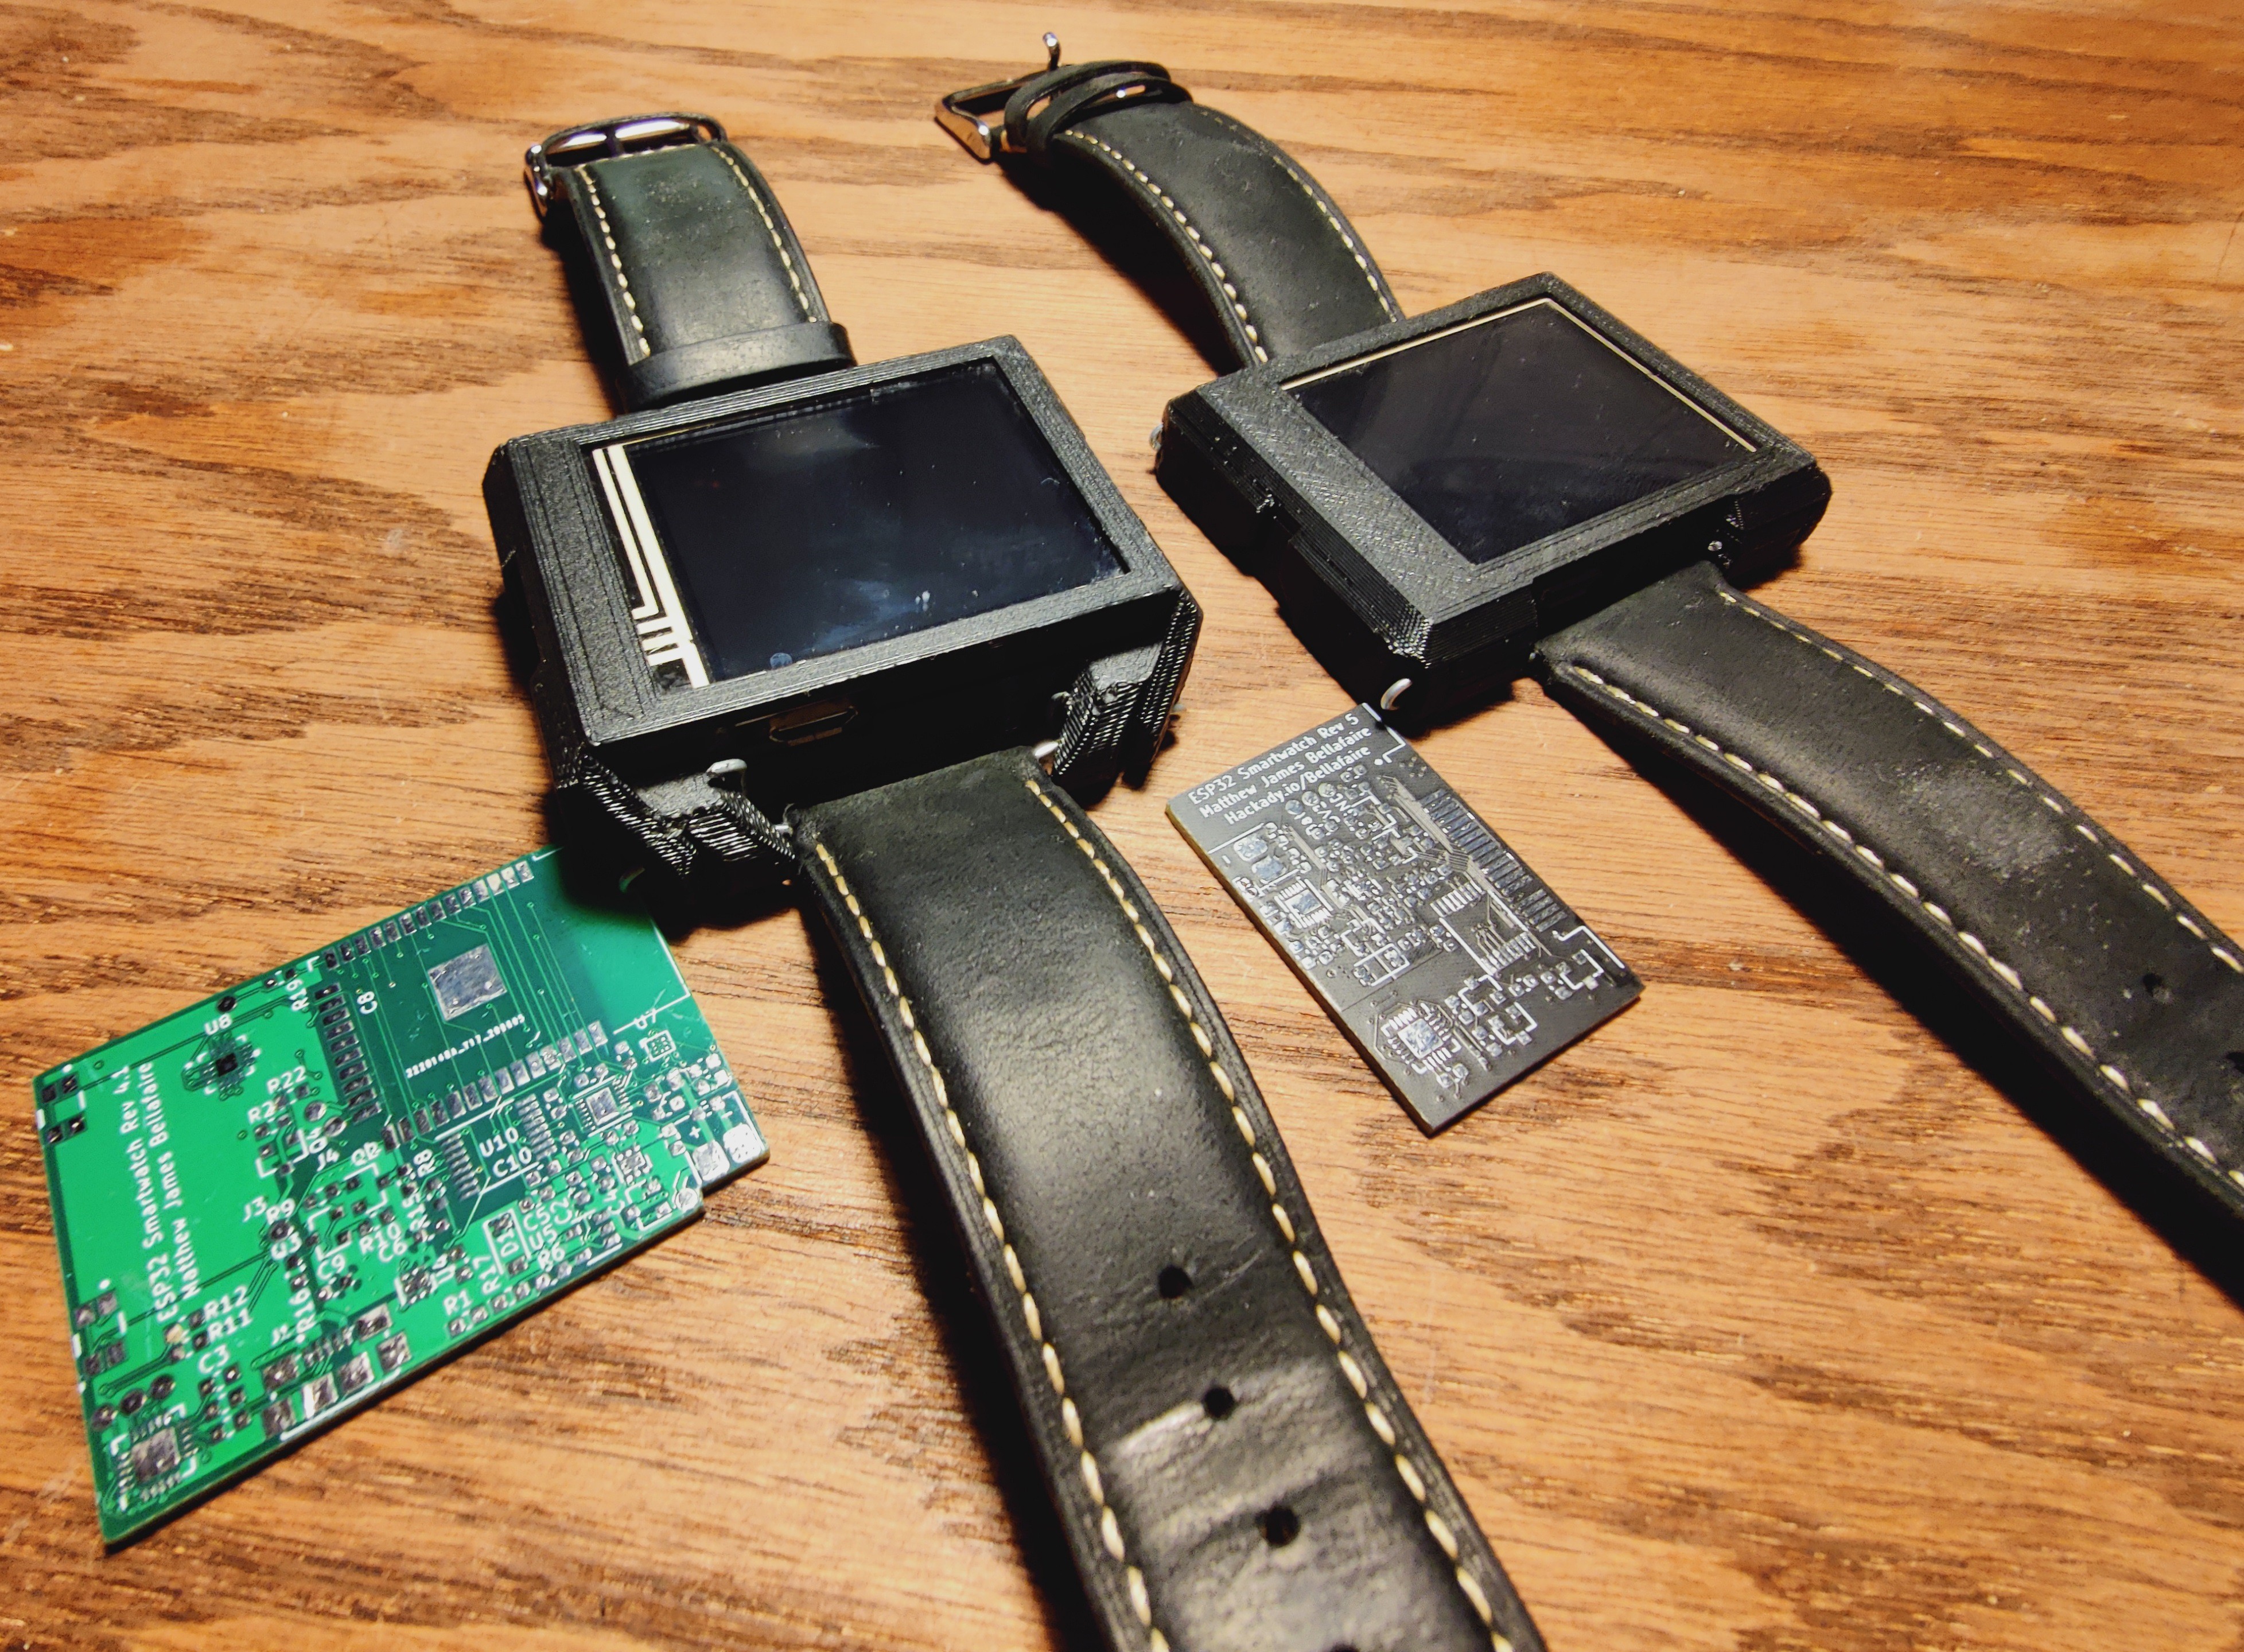
08/08/2020 at 20:17 • 0 commentsThis week has been pretty hectic so this log got delayed a bit longer than it should have. After a few designs and minor changes I've finally settled on the design for the Rev 5 case. As with all the previous cases for this project Rev 5 is designed with 3D printing in mind. I only own a cheap FDM 3D printer which has made case design a challenge due to the difficulty of printing small details. Ultimately having a design that prints well and is strong when produced on an FDM printer has been challenging. Early revisions used screws to hold everything together, but from my experience the threads would become weak over time and the screw holes were a major weak point in the design (and threaded inserts are out as an option due to space). Revision 4.1 uses some galvenized steel wire that I found at the hardware store, over the last 2 months this solution has held up well but its not very pretty. I think I've managed to come up with a design that incorporates the best parts of Rev 4.1 while also improving upon it. Without further delay here's the Revision 5 case next to Rev 4.1:
![]()
Since the battery no longer sits under the PCB the newest design is able to save considerable vertical space while maintaining the same footprint. Rev 5 cuts a whole ~3.5mm off the previous iteration which may seem like small gains but that's nearly a 25% reduction in height.
![]()
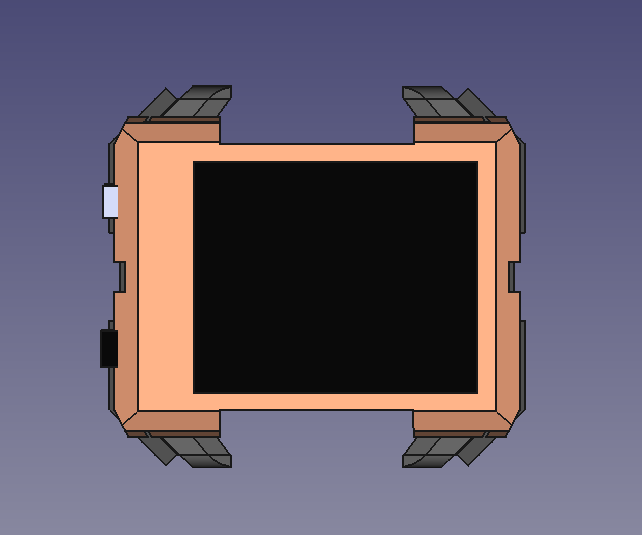
The "wings" that were present on the previous revision were also removed, they were more of a stylistic choice to start with anyway.
![]()
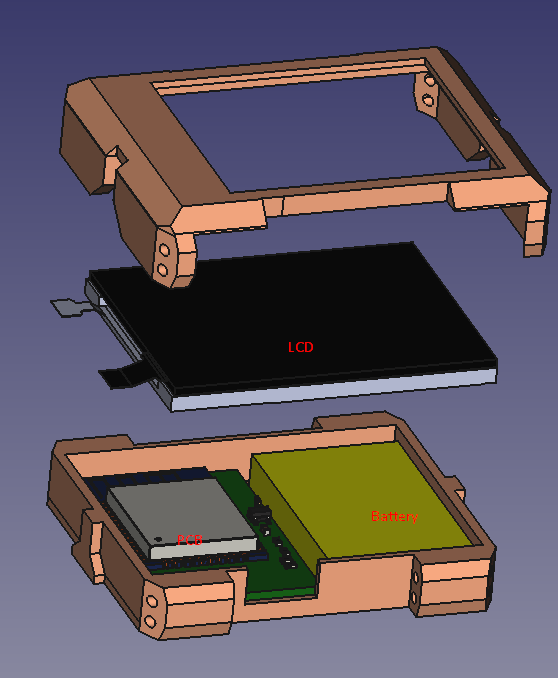
Here's a view inside the case
![]()
Assembly has changed a bit with this design. The hole pairs on the side are for feeding the wire that holds the strap on. This design can accomidate any strap with an open loop up to 26mm. For anyone curious I'm using 19 gauge Galvanized Steel Wire, I've found this to have a good stiffness for this purpose.
The bottom hole in the pair is where the wire actually runs and holds the strap on, the top is intended to hold the wire in place by bending it through that hole. When the wire is longer it's easy to pull the wire through both holes, after cutting all the excess the wire holds on well and doesn't stand out as much as Rev 4.1.
![]()
This leaves the bottom entirely wire free!
![]()
Either way that's everything for the case design. I've ordered all the components and the PCB for Rev 5 so it's back to the waiting game. I also want to say thank you to Arduino “having11” Guy for featuring this project on hackster.io (Article) in its current state, it means a lot to me to see people taking interest in this project.
-
Revision 5 Hardware!
08/06/2020 at 01:23 • 2 commentsFunny story, When I started this project back in October it was because the wrist strap on a $20 digital watch broke. While this was one of those projects I always wanted to do, the actual spark was that watch breaking. To think now, 10 months later, that a $20 digital watch would be the prompt for a project that spanned 6 board revisions and countless hours of writing firmware is kind of insane. With that said this is by far the most challenging personal project I've ever taken on and I have gained invaluable knowledge every step of the way. With all that said it's time to jump into the meat of the matter, the Rev 5 board is now complete.
Since Rev 4.1 is still going strong, now almost 2 months after I originally assembled it (and it's been my daily watch for that time), there's not a lot of changes that needed to be made for Rev 5. There were some minor improvements thrown in with this revision so let’s cover those first.
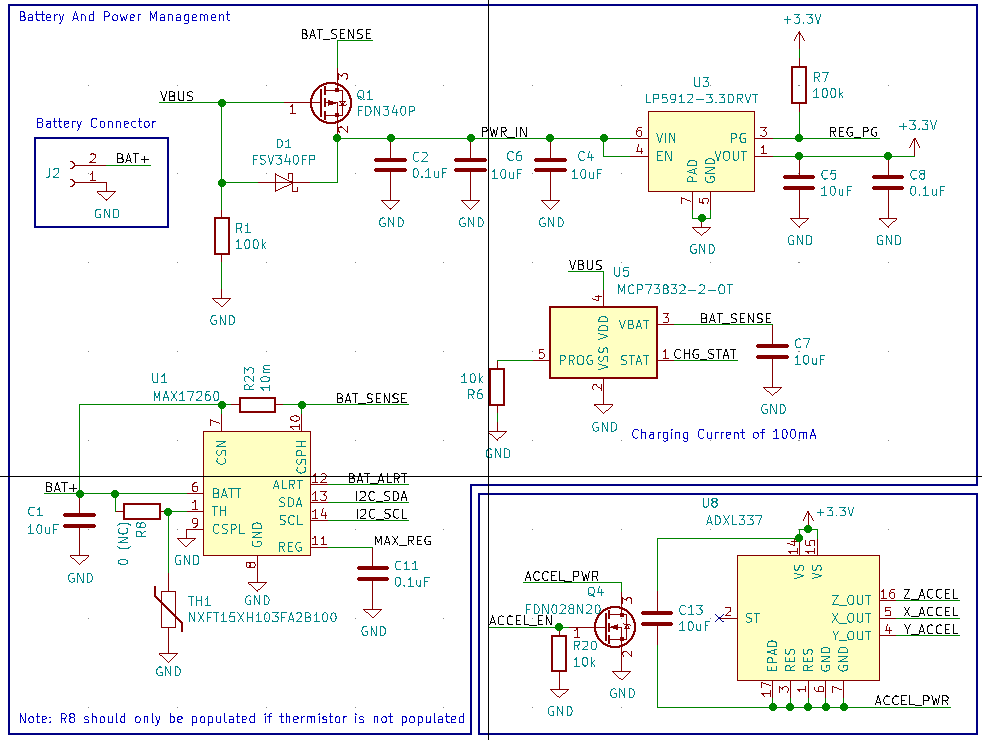
![]()
The power management circuitry has been cleaned up a bit, having two separate LDO's for the watch is entirely redundant. In Rev 5 components are enabled/disabled with MOSFETS which are each connected to pins which can be controlled by the ULP module aboard the ESP32. This way it's possible to have the RTC control whether these pins are on and off. Pulldown resistors are also present on each of the MOSFETS to ensure the default state is off. The pulldowns can be left unpopulated if I choose to use the ULP to control these functions, for the moment I don't have any plans to do so. The accelerometer, LCD Logic, and LCD Backlight each have their own enable signals for controlling the FETs.
Another minor change was the addition of a thermistor to the MAX17260. Using a 10K NTC thermistor should increase the accuracy of the battery readings. However, the datasheet also specifies that this isn't a required component of the application circuit, so I left it as optional by adding a jumper.
![]()
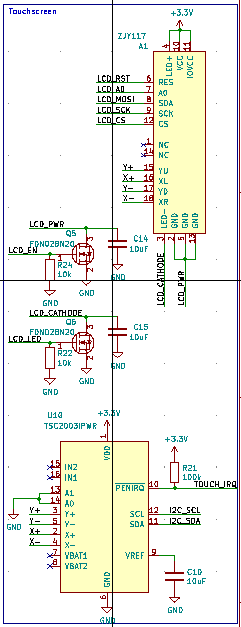
Here are the same changes applied to the LCD, I also rearranged the schematic symbol for readability since the last one was kind of a disaster.
![]()
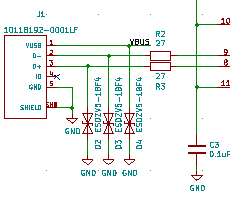
In the category of "I should have done this anyway to start with" is the addition of some ESD protection on the USB connector. For this I chose the ESDZV5-1BF4 TVS diode, which should shunt any static discharge or inductive spike from the USB cable safely.
Other than those minor changes (and some pin reassignments for the purposes of layout) the schematic is the same as the last revision. Where this revision makes a radical departure from the last is in board size.
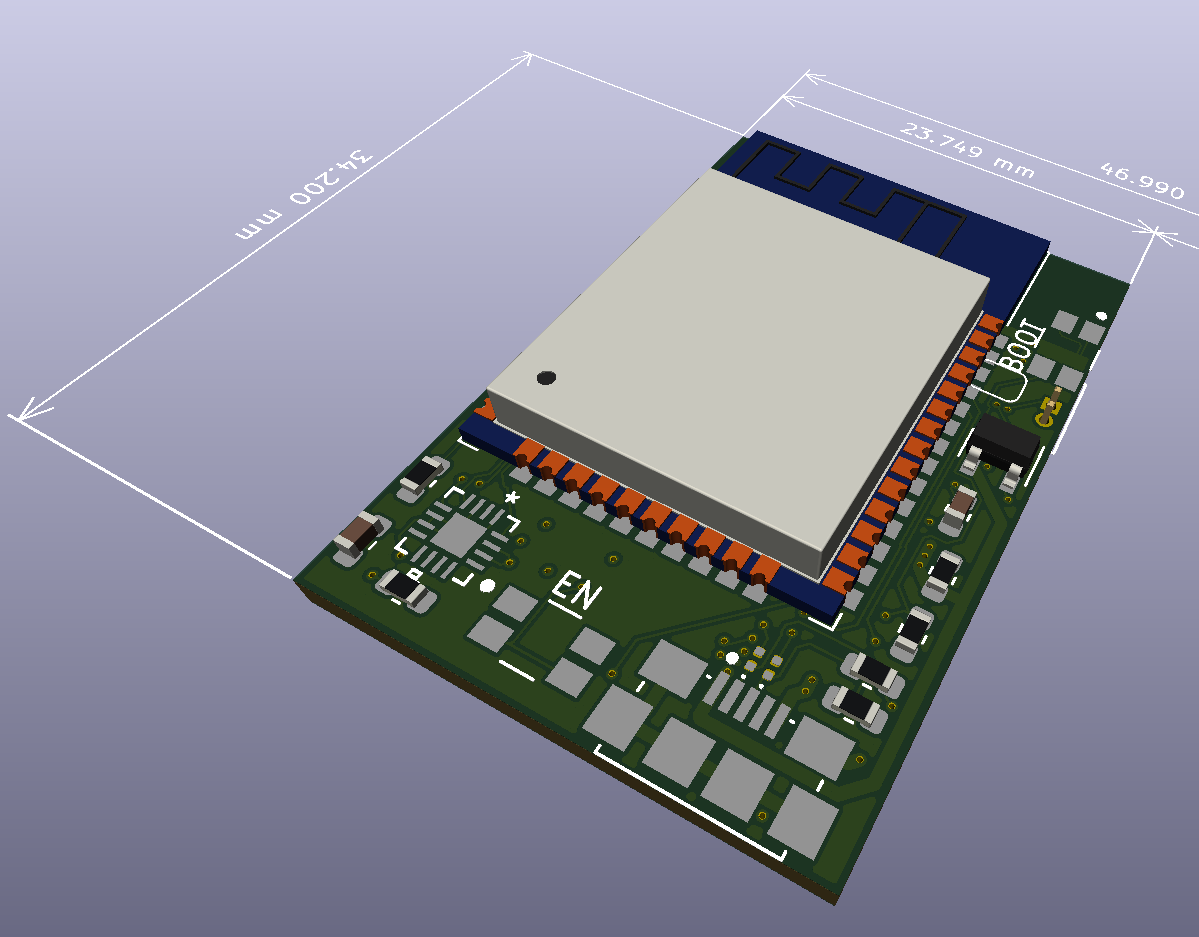
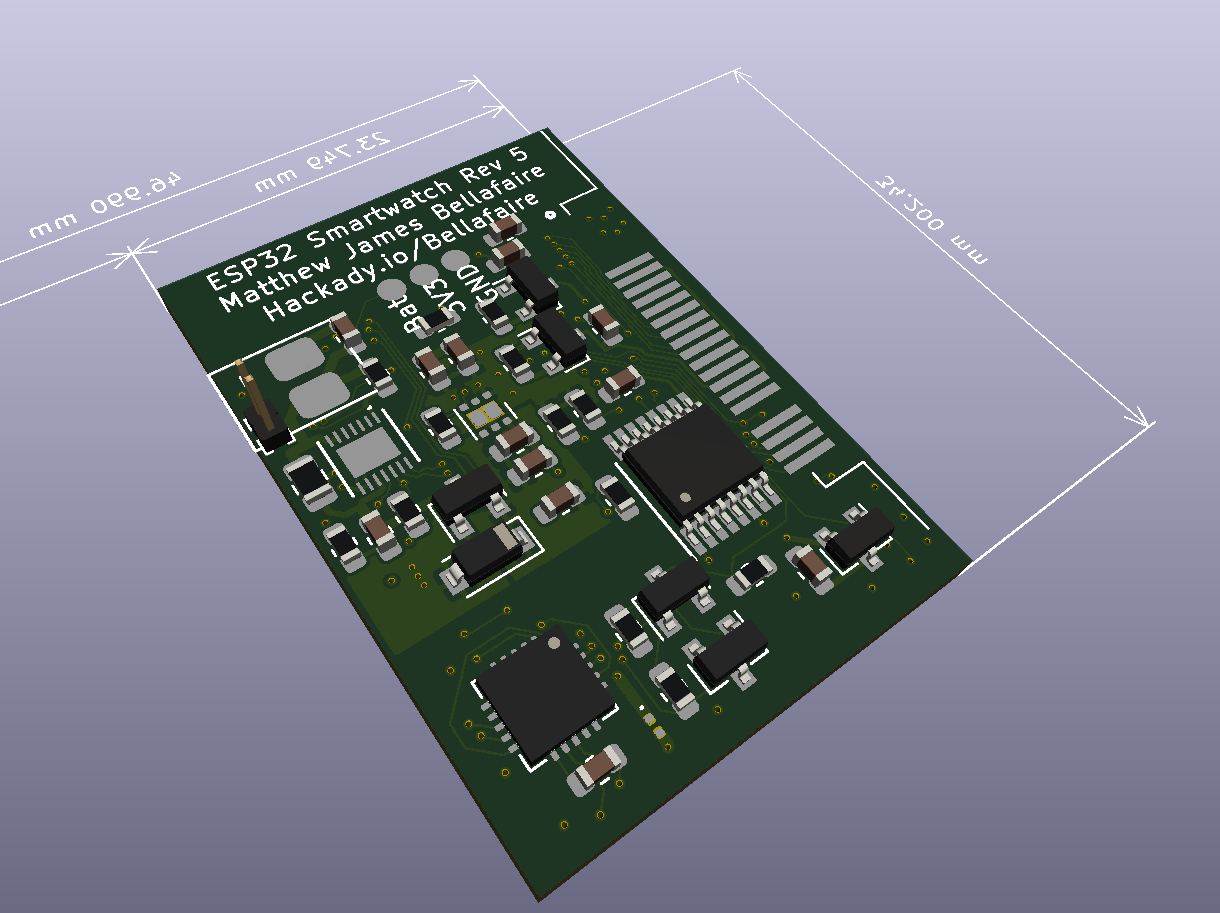
Shrinking the board down was somewhat difficult and necessitated going to a double sided load since the ESP32 is only slightly smaller than the new board itself. Before the layout got started I picked out a new battery to fit with the design (https://www.digikey.com/product-detail/en/jauch-quartz/LP502030JH-PCM-WIRES-50MM/1908-1353-ND/9560976) which mostly set the board dimensions I could get away with. The LCD is about 47mm x 34mm, meaning that both the board and this battery needs to fit within that footprint. This left me with 34mm x 24mm for laying out the board (with some of that space unusable due to the ESP32's antenna). I ended up doing the layout twice, I wasn't very happy with the first attempt, so I started from scratch. With all that said, here's the final render of the PCB:
![]()
![]()
It's worth noting also that with this reduction in overall volume the battery capacity has decreased. I haven't talked about battery life so far with the current iteration of the smartwatch since I had no intention of keeping the current 600mAh battery. For a normal day of regular use, the watch only uses about 15%-30% of its capacity, this is with the device also polling the smartphone every minute to update its notification data. Switching down to the 270mAh battery linked above should leave the watch with 30% - 60% at the end of the day which can be further improved by reducing the polling rate when in sleep mode (I'm planning some software changes that replace).
Either way that's all for the electrical updates for Rev 5, next log will go over the new form-factor and case design. See you in the next log!
-
Media Control and Video Log #3
08/03/2020 at 00:49 • 0 commentsRecently I had some time and put some more work into this project on the BLE side of things. Overall BLE communication with this project isn’t where I would like it to be and there are still a few bugs and issues with reliability, however I’m finding better ways to use BLE as this project progresses. Since the last log I’ve added some functionality to the android app allowing for specific commands to be written by the smartwatch to trigger actions on the android device.
The smartwatch itself will now attempt to connect to the android companion app whenever it comes out of sleep mode by the user tapping the screen. The connection status is indicated by a small square in the upper right-hand side of the screen (red = not connected, green = connected). With this constant connection there are a lot more options available to future functionality of the watch since the most time-consuming part of BLE was the scanning and connecting phase. When connected the communication speed between the watch and android device is fast and more than capable of streaming even long sections of text quickly.
With these improvements it’s much easier to communicate between the two devices so I decided to add my favorite feature from my old android ware smartwatches, media control. For the most part I only listen to music on Spotify these days, and unfortunately Spotify seems to enjoy doing things their own way. In order to read the current song being played by Spotify the android app uses a broadcast receiver following the documentation provided by Spotify (https://developer.spotify.com/documentation/android/guides/android-media-notifications/). Although I’d much rather read the currently playing song from the notification bar it seems Spotify doesn’t really allow for this, meaning implementation with other players will have to be implemented separately. The media controls triggered from the smartwatch are simple key-events which the companion app creates when it receives a command over BLE. I haven’t yet investigated reading media information from other android media players, so I’m not sure whether Spotify works very differently from other apps.
The media control interface itself was meant to be simple and easy to use while locating itself directly on the home screen. The media buttons will appear only when the android app detects that Spotify is currently playing. If the smartwatch is connected to the android device then the media controls will work immediately, otherwise the action will be queued until a connection is established. In general, the smartwatch can connect to the android device immediately when the android device's screen is on, otherwise it can take a few seconds or fail outright.
![]()
There have been a lot of improvements to BLE recently in this project, however there is still a lot of work to be done in this area. I've noticed that the ESP32 connects unreliably when the android device is in doze mode. By taking a look using some android BLE apps available on the play store I've been able to determine that the android device is advertising properly. Most likely the issue is on the ESP32 side of things, as a result I’m planning on redoing a lot of the BLE code to try and improve the overall reliability of the project.
I also realized recently that the last video update for the project is now nearly a month old, and a lot of work has happened in that time. I've decided to try and do regular video updates for the project, since so much of what is happening in this project at this point has to do with the user interaction it’s much easier to show rather than write about. The video logs are meant to be parallel to these project logs and represent a short overview of improvements to the project. Anyway, here's the third project video log:
Either way thanks for reading and I'll see you in the next log!
-
Android App and Timekeeping Changes
07/20/2020 at 03:27 • 0 commentsSince the last log I’ve been using this watch more and more as my daily smartwatch, in that time I’ve come across a few issues which are now resolved. A lot of these changes are minor but both the smartwatch’s firmware and the android app have undergone some changes.
Android App Changes
After the previous log I kept a close eye on the android app to make sure that everything was working properly. Android 10 tends to kill processes happening in the background when they’re not being actively used by the user. To combat this, I had to move the BLE GATT server to its own service. With this change it seems that while the android app itself may be inactive the service will continue to run without issue. The notification data is also no longer stored in the UI, this would cause some issues when the app would go to sleep, resulting in the same old notification data being sent multiple times without getting updated. The log shown on the app UI underwent similar changes, having a proper log of when exactly BLE data has been sent makes it much easier to determine when the app isn’t working properly.
There was also an issue with reading specific notifications, specifically Gmail would almost never display properly on the android app. The app can now read the body text of a received email which in turn means the body text can be read from the smart watch.
Smartwatch Firmware Changes
There’s been a lot of minor bug-fixes since the last log including a lot of fixes for random crashes. There is also now a “force put to sleep” option on the smartwatch, tapping the screen 50 times with each tap within 200ms of each other will force the watch into deep sleep. BLE notification receiving is now also an interruptible process, since notifications are generally obtained when the screen is off this prevents the watch from ignoring the wakeup tap on the screen.
One major change made to the smartwatch firmware has to do with timekeeping. This project uses the ESP32’s onboard RTC to keep time, without an external crystal this time would drift by as much as 15 minutes per day. The only way previously to update the time was to use Wi-Fi to obtain the current time, however this was a clunky solution since it had to be done manually and requires a known WIFI connection to be close. To fix time keeping the ESP32 now parses its time directly from the notification string sent from the companion app. Currently the watch updates its notification data every 60 seconds, this makes the RTC drift essentially a non-issue in most cases.
That’s pretty much everything that’s changed since the last log. The core functionality of the watch is finished, all that’s left is adding additional apps and making the watch a bit “smarter”. I’m also looking back into the hardware for potential improvements before I do a final pass on the board layout to try and make the watch thinner, but that’s all in the future. See you in the next log!