Ahron Wayne
-
So I heard you wanted programmatic stacking, stitching, and depth maps...
02/10/2021 at 20:26 • 0 commentsBy "you" I mean like three really determined fans (you know who you are) and also me!
I've always thought it was very silly for a scanner like this to rely so much on "blind" stitching, or stacking, or 3D model creation. When we have a motorized system and a specified magnification we know at the hardware level to a pretty decent degree of accuracy where we are at all times in the X, Y, and Z dimensions. And yet, we have been stitching by using a vague definition of "approximate overlap" and stacking with external software using no reference data whatsoever and the assumption that images needed to be aligned and resized. This all resulted in images that often looked quite good, but were distorted just enough to make us question whether what we were looking at on the final image mapped correctly to the original source.
And don't get me started on making 3D models by stitching images and then doing photogrammetry on them. It's frankly a miracle that any 3D models were successfully created like this at all --- it's just not what the algorithms were meant for --- and as one professional put it, the 3D aspect of the models was pretty horrible, and it's only the application of color/texture that made them look anywhere decent.
Finally, it's a pain because these are all using different programs. They're not talking to each other and sharing notes. As a result, even though a stacking program can produce a depth map, it's not going to have the same minimum and max height as a different image it makes, and stitching them together will be fruitless.
And so I set out to smush input images together using the scanner physical location and known pixel size in mm (approximately). No blending, alignment, or fixing exposure or anything like that at this point. This task intimidated me for a long time because of indexing and matrices, and as expected the first images I created were nonsense like this one:
![]()
But indexing from the top left instead of the bottom left, and other little fixes like this, ultimately results in the proper image (of a different coin):
![]()
The method here is pretty simple: Start with a ridiculously huge giant blank matrix, which I call a "yujieimage" after the person who suggested it, take your position information in XY and convert it to a pixel location using your assumed pixel size, and then index it the proper place on the blank image. This actual smushing operation is basically almost instantaneous. When you're done, just remove all the black areas (surprisingly, the slowest part in the naïve implementation). Also, I'm still not sure what to do about OpenCV's limit on array sizes --- significantly less than the whole build plate would be --- so for testing purposes I'm just doing scans in the corner of my build plate!
But it works, as you can see with this downscale image for Hackaday's file size limit, and to a surprisingly effective degree. Everything is in the right place almost, and there's no "runaway" error where stitching gets worse and worse over time.
We can also see just how much microsoft ICE has been compensating for our crazy autoexposure. See those alternating bright streaks on the edge of the coin? This is because the autoexposure triggers when hanging off the edge of the coin when the scannner is moving in one direction, and on the body of the coin when moving in the other. Controlling this exposure, dialing in the pixel size a bit more, and doing just a little bit of blending to make stitching lines less noticeable should hopefully be enough to make me abandon dedicated stitching programs altogether forever.
So that's stitching, a huge accomplishment, but we're not even done yet! Moving on to stacking. I can thank Yujie again for implementing the core of the stacking last April. Like any standard focus stacking method, it uses a focus metric to determine which pixels are in focus from a series of images and then assembles the best pixels from all the images into a new image. However, unlike those standard programs, it doesn't align and resize the images --- actually a big advantage for combining with stitching --- and it also breaks the images up into arbitrary chunks instead of doing every pixel. I'll repost this gif to show what that looks like as you make the chunks smaller and smaller:
![]()
It's not perfect (especially on speed with small pixel sizes), but it absolutely does work surprisingly well if your object doesn't have sudden Z changes that move around easily, like fur or hair.
With Autocoin in the previous post I was just mixing and matching images before stitching because focus stacking in external software is a pain. But now with stitching programmatically we might as well combine it with stacking and see immediate results around corners and overhangs:
![]()
And then last weekend Yujie finally acceded to my request to convert his stacker to also return the index of which image each pixel came from. From there, I was able to map this to the original Z coordinates, and normalize these coordinate to greyscale, resulting in...
![]()
![]()
![]()
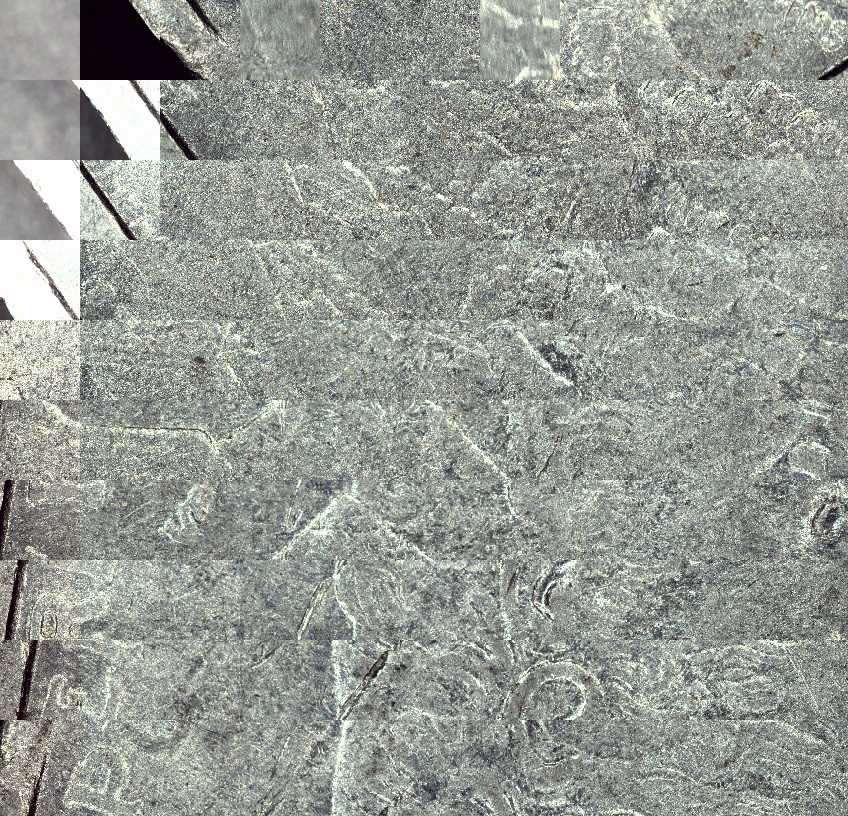
DEPTH MAPS! of various varieties and chunk sizes! Booyah! The next logical step was to stitch them together (before normalization, while the maps still corresponded to true Z heights). And so I did. I popped in a dime, held my breath, ran the scan and this resulted in:
![]()
um... well, that's disappointing. I guess you can kind of see his ear, or something? And the general outline of his head, and the edge of the coin? This was really sad. I guess the variation of depth just wasn't nearly as much as I thought of the coin.
And yet... clearly, it was, because depth maps of individual non-stitched images showed more variation than this wide field of view. And the whole point of my neededing to do these Z stacks in the first place was because of depth variation. I tried scanning an even higher-relief coin and got a similar crappy image. There must be some kind of bug...
After hours of searching, the only possible contender was the point where I was stitching the images together. And then it hit me: I had an array of Z heights that I was stitching together, and then normalizing them. Except the Z heights were floats, and the image arrays were integers, and... oh.
Instead of returning an error, it helpfully rounded them for me, and Z heights of 4.1,4.2,4.3,4.4,4.5, and 4.6 would all just become... 4. Okay, so let's just stick with floats until you've converted it to grayscale and...
![]()
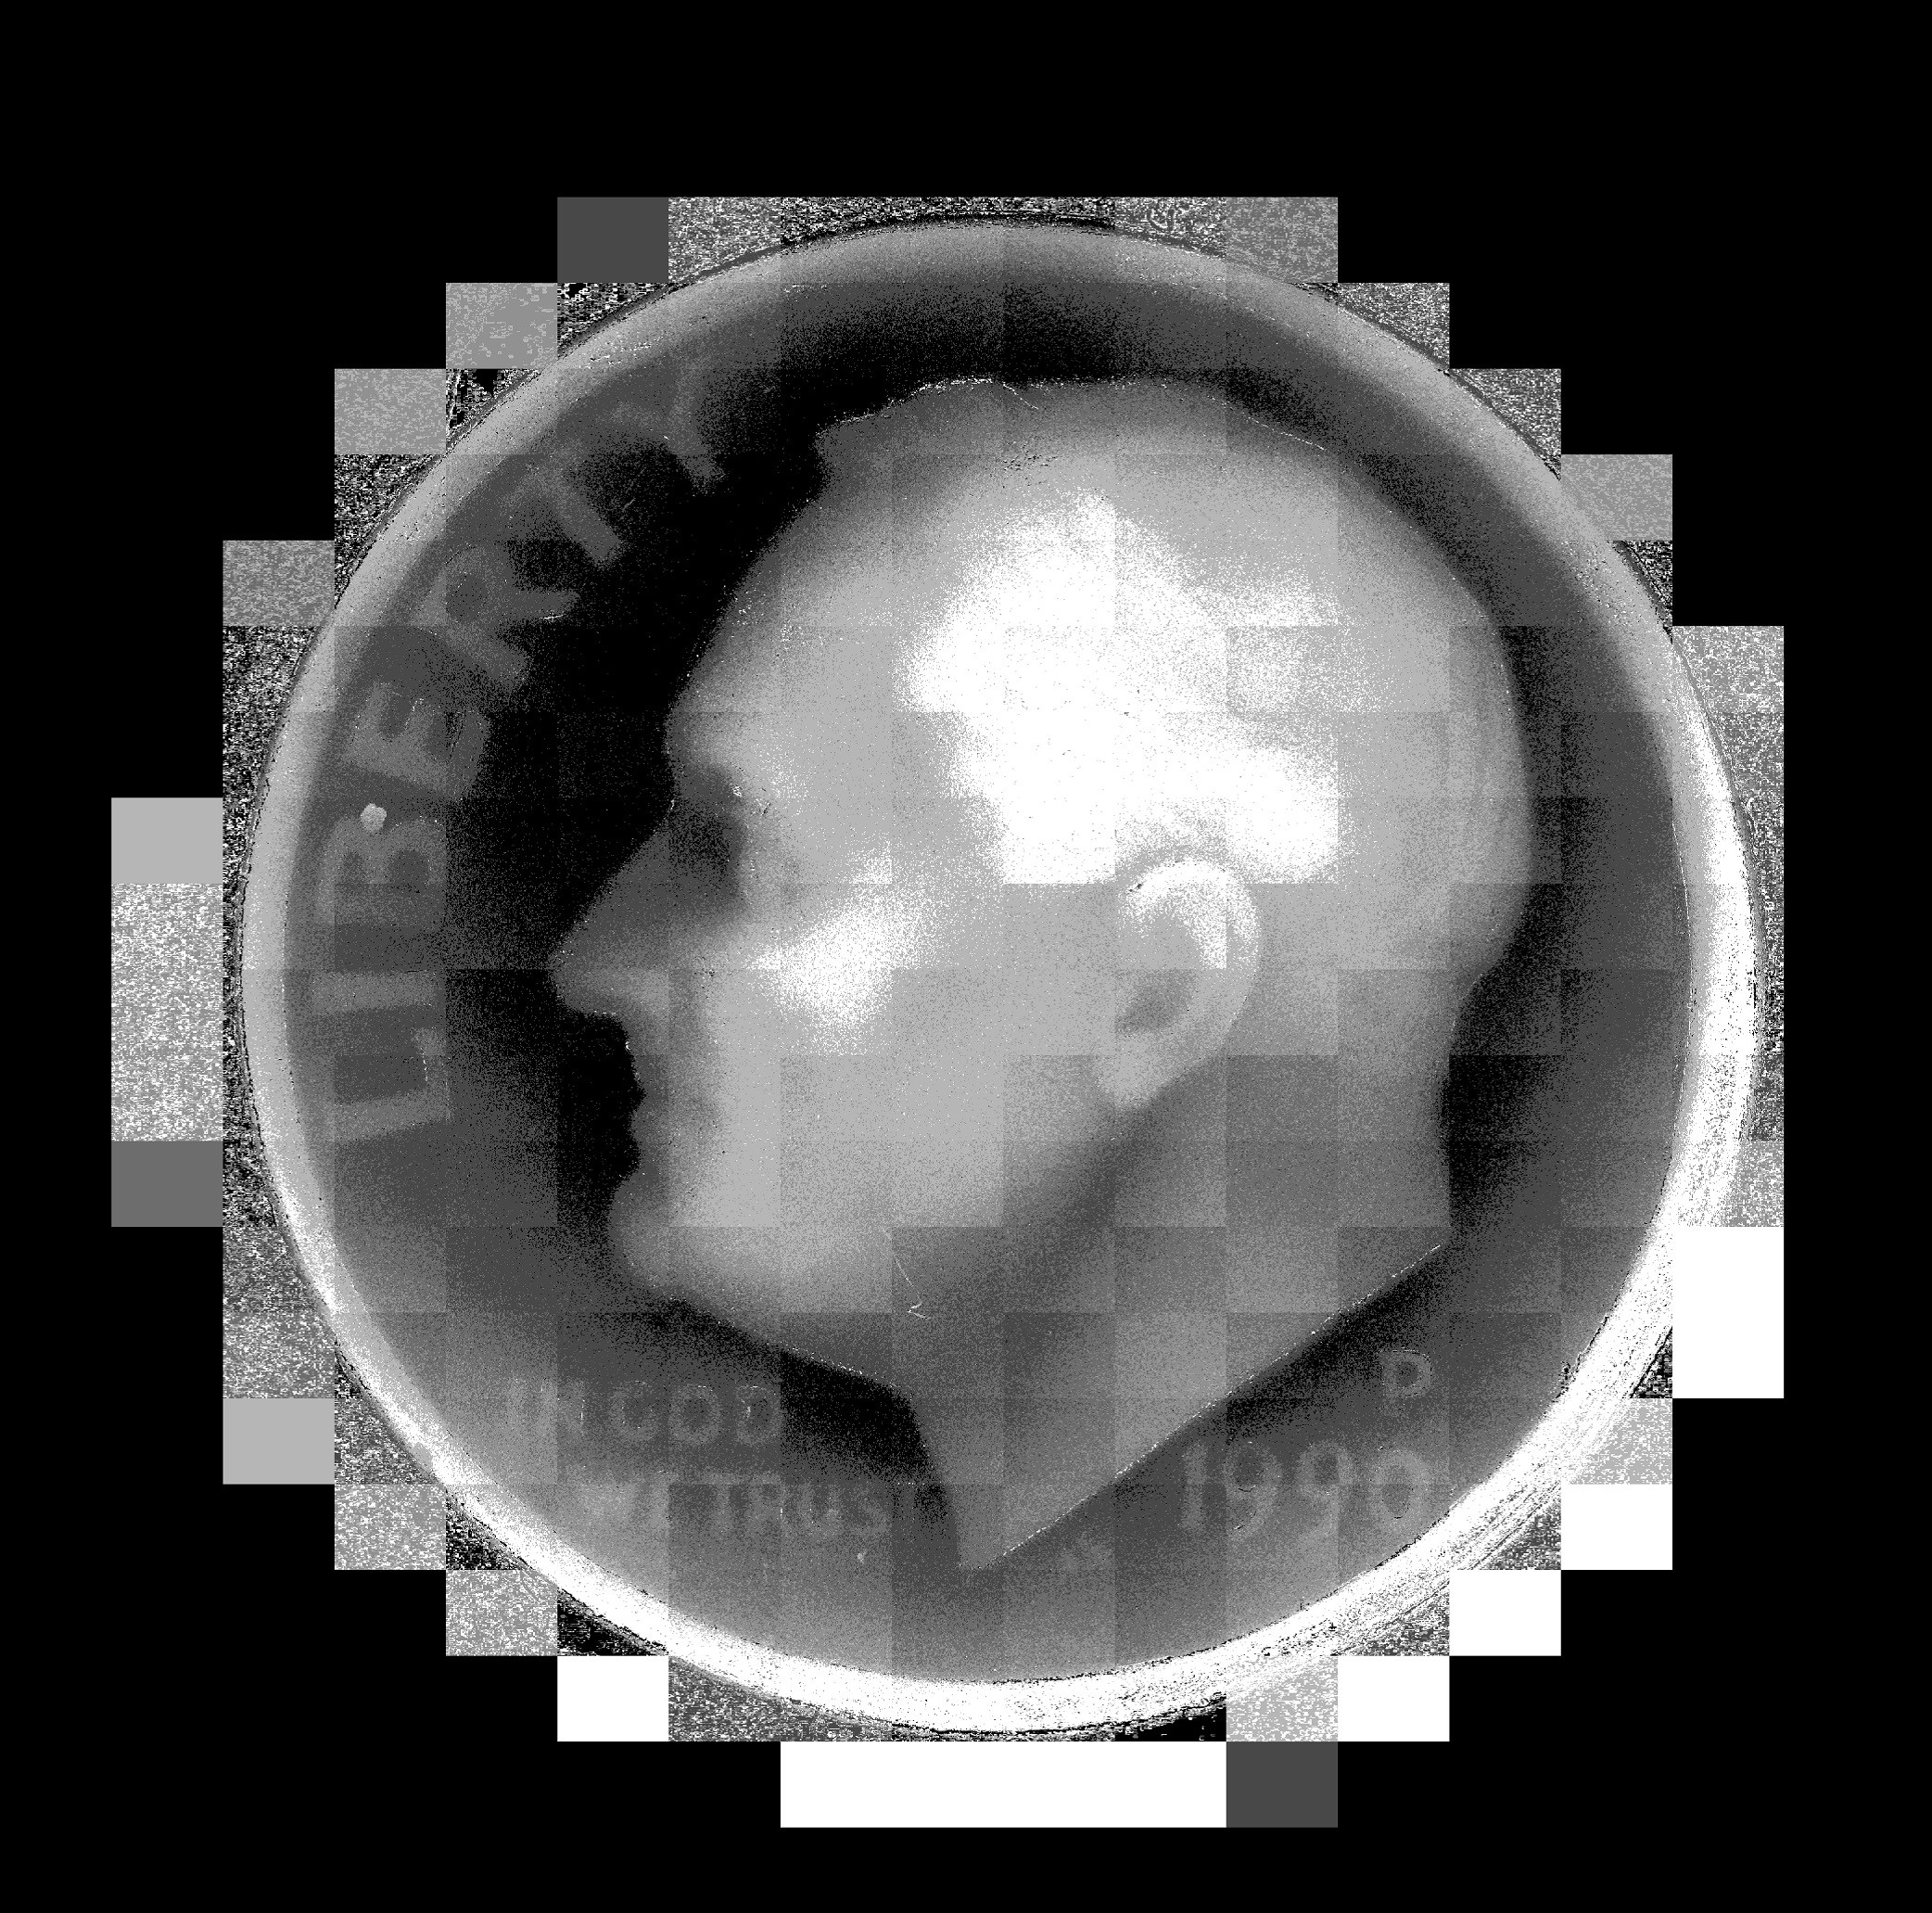
THAT LOOKS BETTER. Omg omg omg omg. It was 2 am and I couldn't sleep. I had to try running it again with even smaller chunks. AND THEN IT LOOKED EVEN BETTER!
![]()
WAGA! I dreamt that night of depth maps and 3D models combined with color, and applying this to rotating 3D scans too...
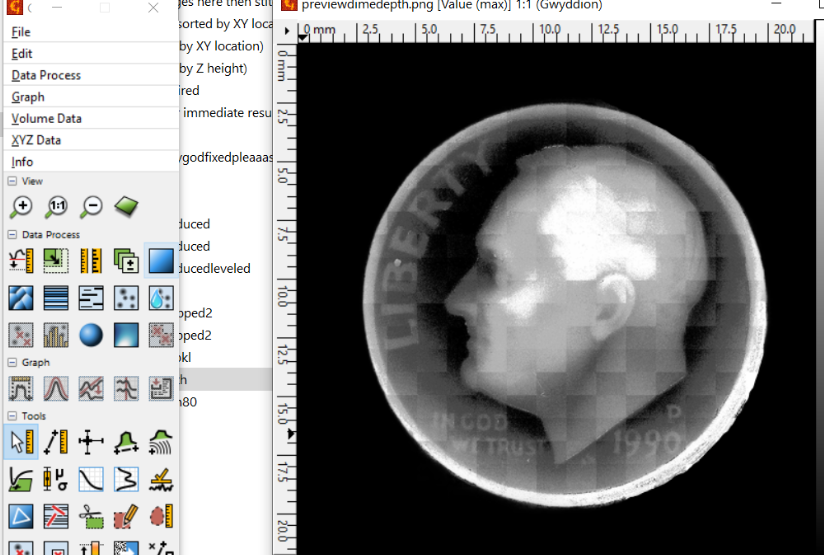
There's still a lot to do with that I'm afraid, but I'll just show you a last couple of things I've been messing around with. I used Gwyddion, meant for atomic force microscope data, and was able to visualize the data and level the plane somewhat, remove the background and stuff like that.And then it turns out, once you get to this point, getting an STL file is as simple as pretending you're trying to make a lithophane. I used LithophaneMaker.com because it has the option of cutting out circles:
And there we go. A 3D scan of a dime using a digital microscope, a 3D printer, and a few thousand lines of bad python.
Let's print it!
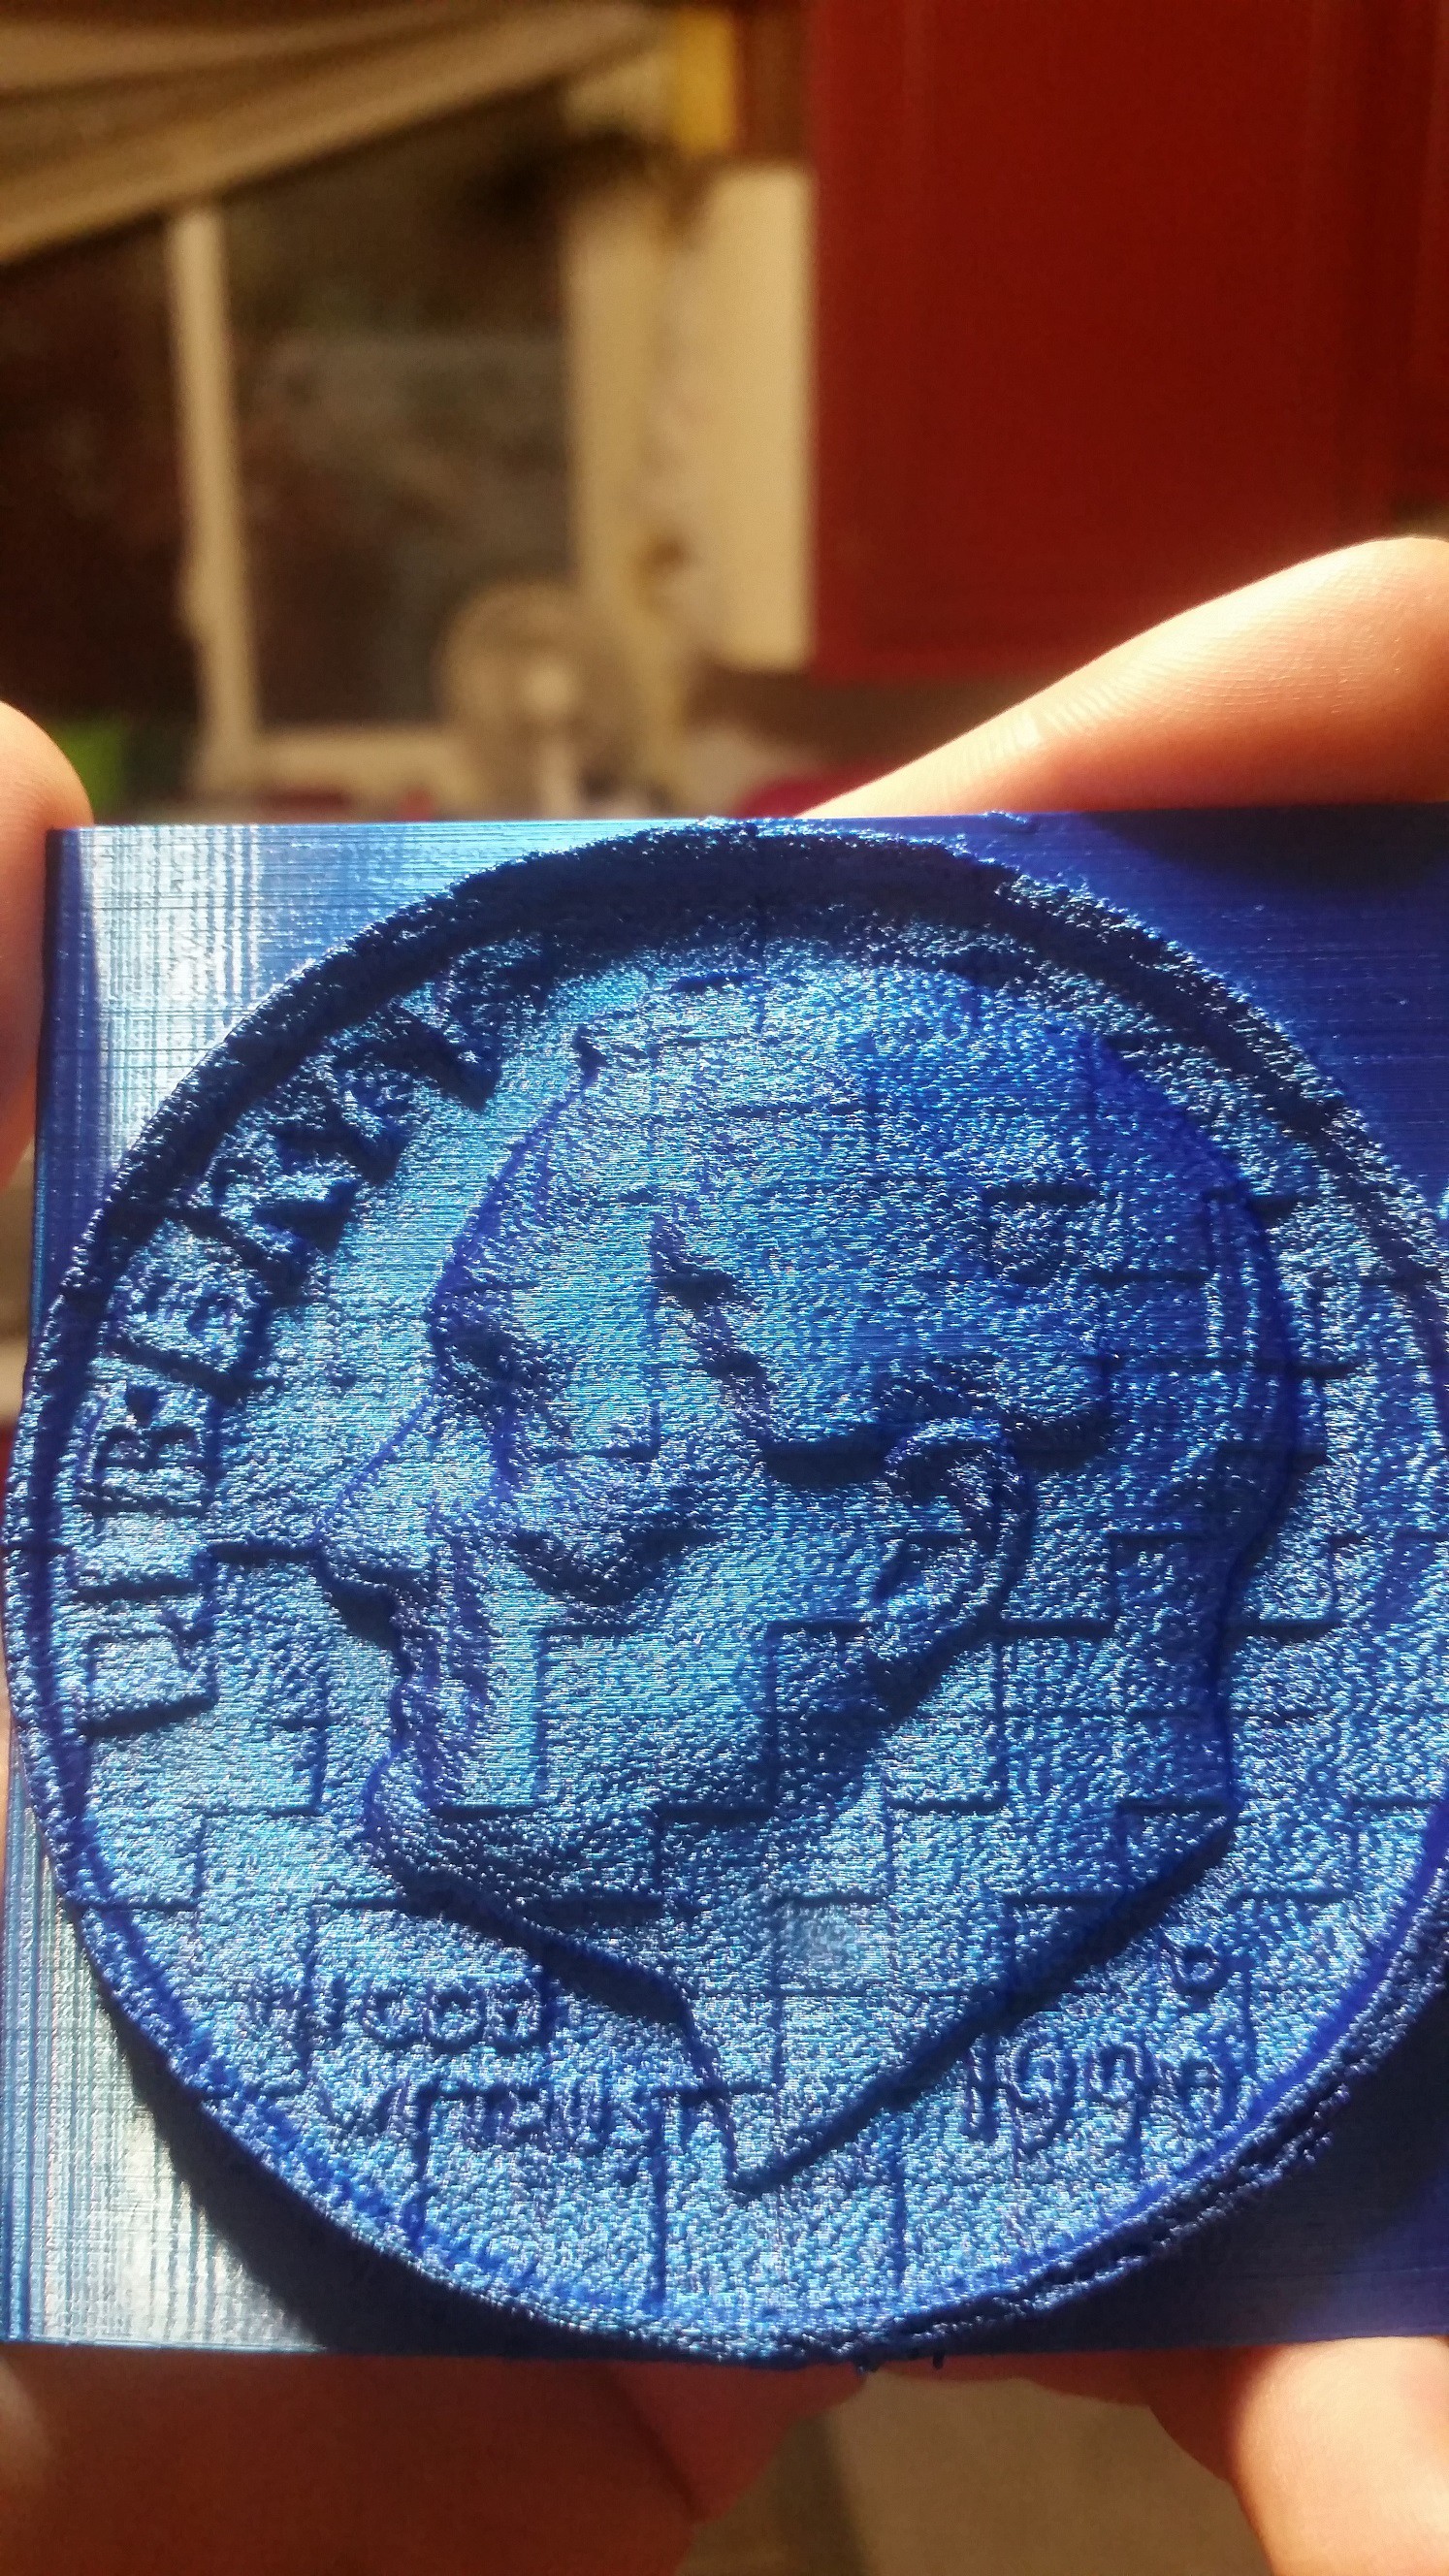
Edit: I printed it!
![]()
Needs some feathering on those mosaic lines. Other than that, though, I'm quite happy with how it turned out! It's really exciting to be able to hold it in your hand and poke roosevelt in the face.
-
"AutoCoin" or: What even is a coin, anyway?
12/31/2020 at 00:37 • 2 commentsI started this post 6 weeks ago. At that time I said "I've been working on this for the past week", wrote a bunch of stuff which is currently below my current text, and which I will proceed to delete because almost none of it is relevant anymore. You don't want to hear about all the problems I faced doing this, right? Or maybe you do, because that's hackaday. So I'll just share one thing, the thing this post is titled for, and then you can skip to the video which organizes the results in an attractive way and definitely does not misrepresent how much spaghetti it took to do this.
Ahem:
How do you determine what is, or isn't, a coin? Color? Luster? Brightness? Some specific pattern of features that you match against a database? Whatever it was, if I wanted to automatically scan coins (don't ask), I was going to have to figure out what was a coin and what was just my scanner stage.
To show you how pointless this problem is, one of these pictures is my blurry scanner stage and the other is a blurry nickel.
![]()
![]()
Oh, because they look so different. Maybe it is indeed possible with some unknown set of features to find your coins this way, and believe me, I tried. I even tried using a neural network with the extremely advanced method of replacing the label "grass" with "coin" and "dandelion" with "not coin". 52% success rate.
Until I realized that I was looking at the problem all wrong. Instead of trying to identify something distinguishing about (blurry) coins, I realized I could just focus on the build plate... and then anything I saw that was out-of-focus was a pretty good candidate for scanning.
The good news is this works for all objects, not just coins. The bad news is, I don't get to unnecessarily throw neural networks at a problem.
Anyway, there were plenty of other issues and fixes, like implementing a better autofocus, making a circle outline search routine, utilizing a circle packing library, detecting false positives, slowing the old homing procedure down, figuring out stacking (kind of), converting a grid scan into one that follows a more efficient circle shape, file sorting, and other fun stuff.
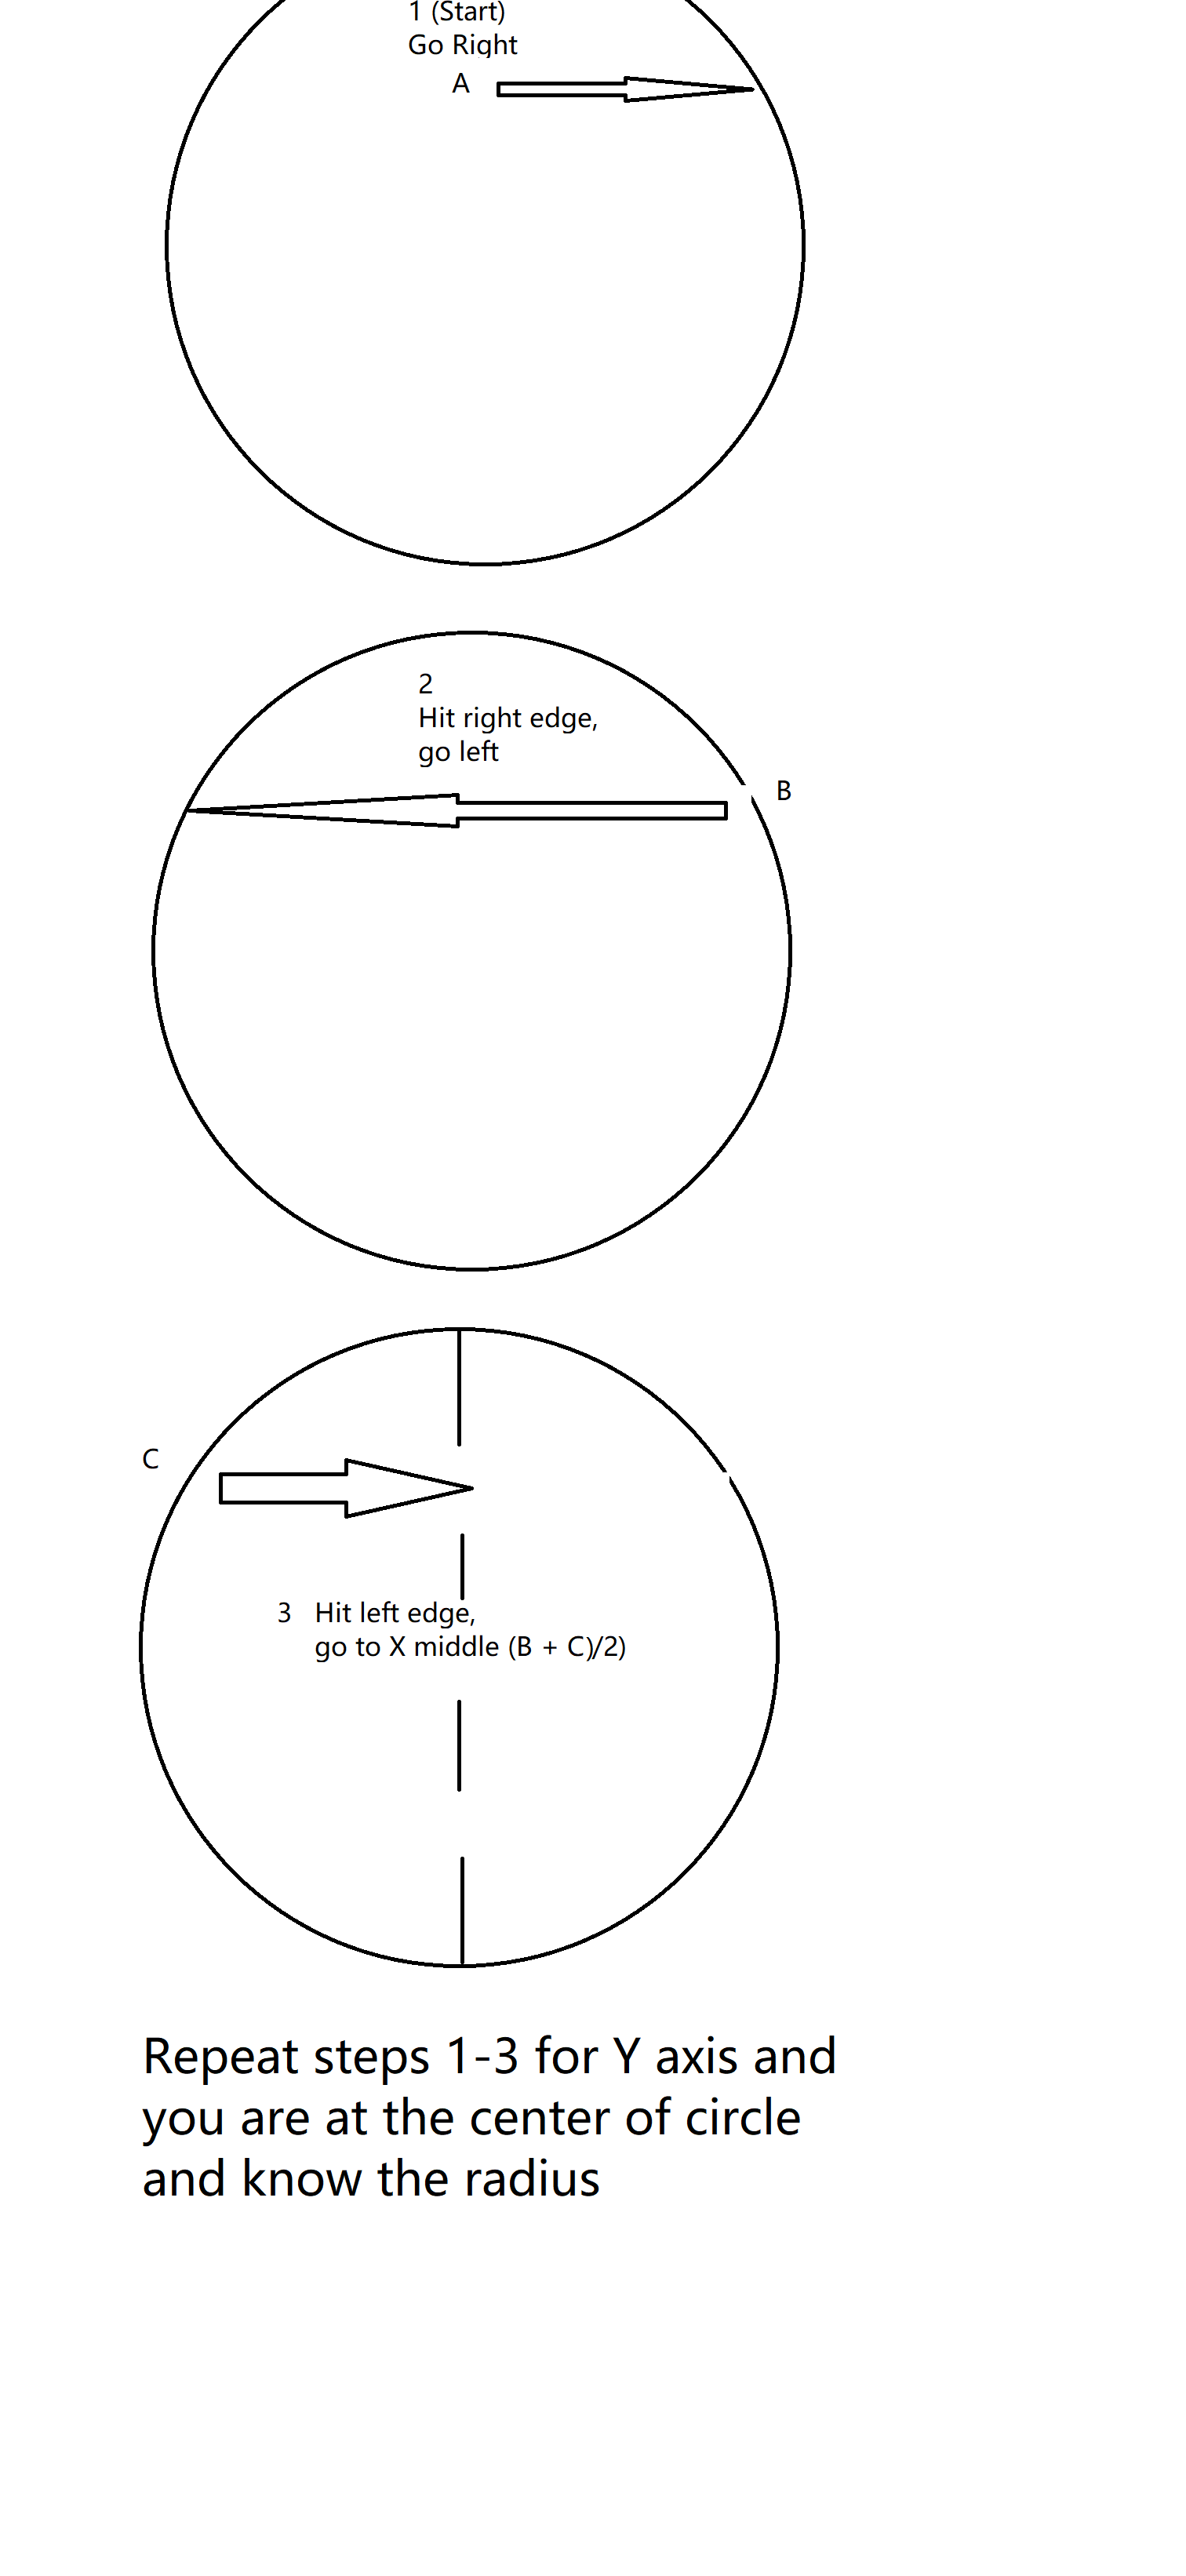
Alright. With that out of the way, here's a video.Edit: Check out this awesome photorealistic 3D animation showing how I figure out the outline of the coin!
![]()
-
Micrometeorites (part 2)
11/24/2020 at 23:32 • 2 commentsI just spent the last couple of hours on a dissecting microscope looking through grains of sand for things that were more round than usual. And I did find things. 7 or 8 candidate rough or shiny stones of size 150-500 microns, which I transferred to a tiny plastic bag using a sliver of moistened matchstick. It's not exactly the same, but right now I'm glad for my training in handling nematodes, which can be of similar size and which are also fragile and try to squirm away. Tiny rocks, in comparison, are relatively easy to pick up --- though I'm not convinced that every single one of the specks actually made it into the bag afterwards. (Edit: instead of a a plastic bag, use a sticky note or bit of conductive tape if planning on using an SEM).
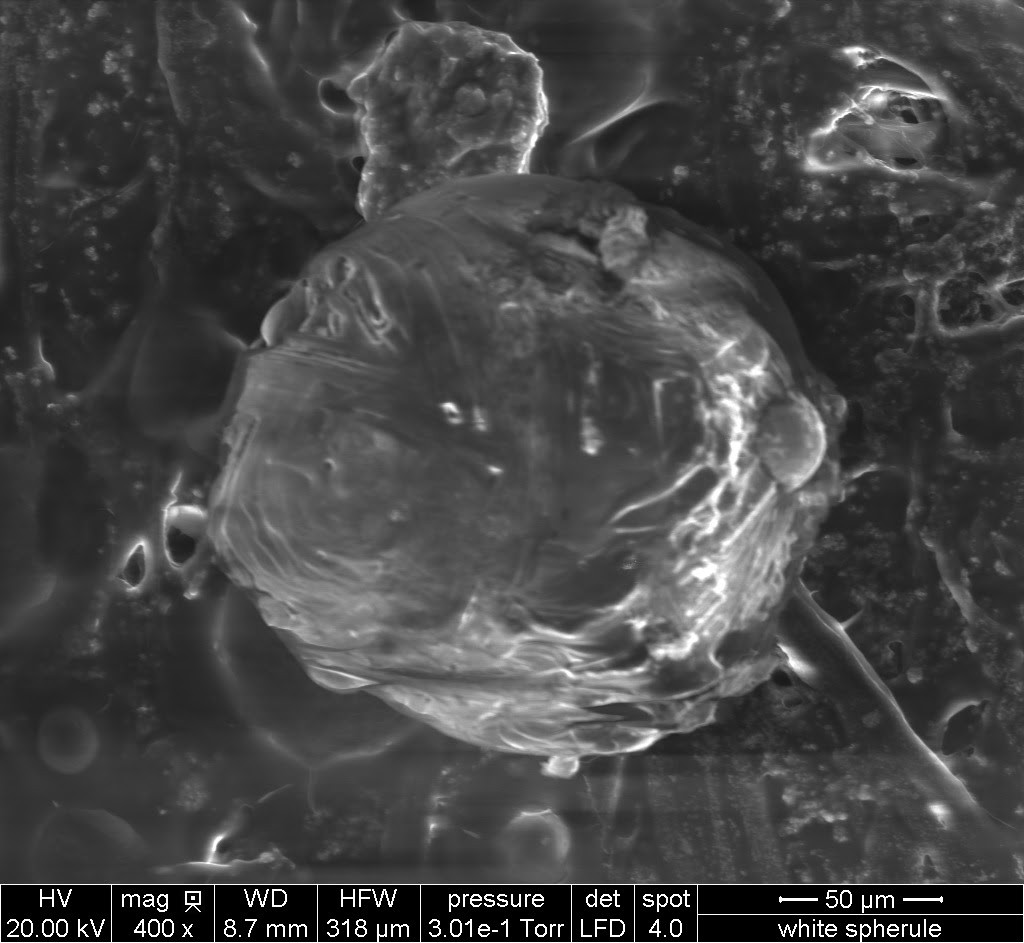
Unfortunately, while clearer when viewed directly with my eyeballs, the best pictures I could get with my phone on the eyepiece don't vastly exceed that of the USB microscope. Here's the large spherule I showed in the last post --- if it were extraterrestrial it would probably be "I type", but again, most that look like this are manmade contamination.
![]()
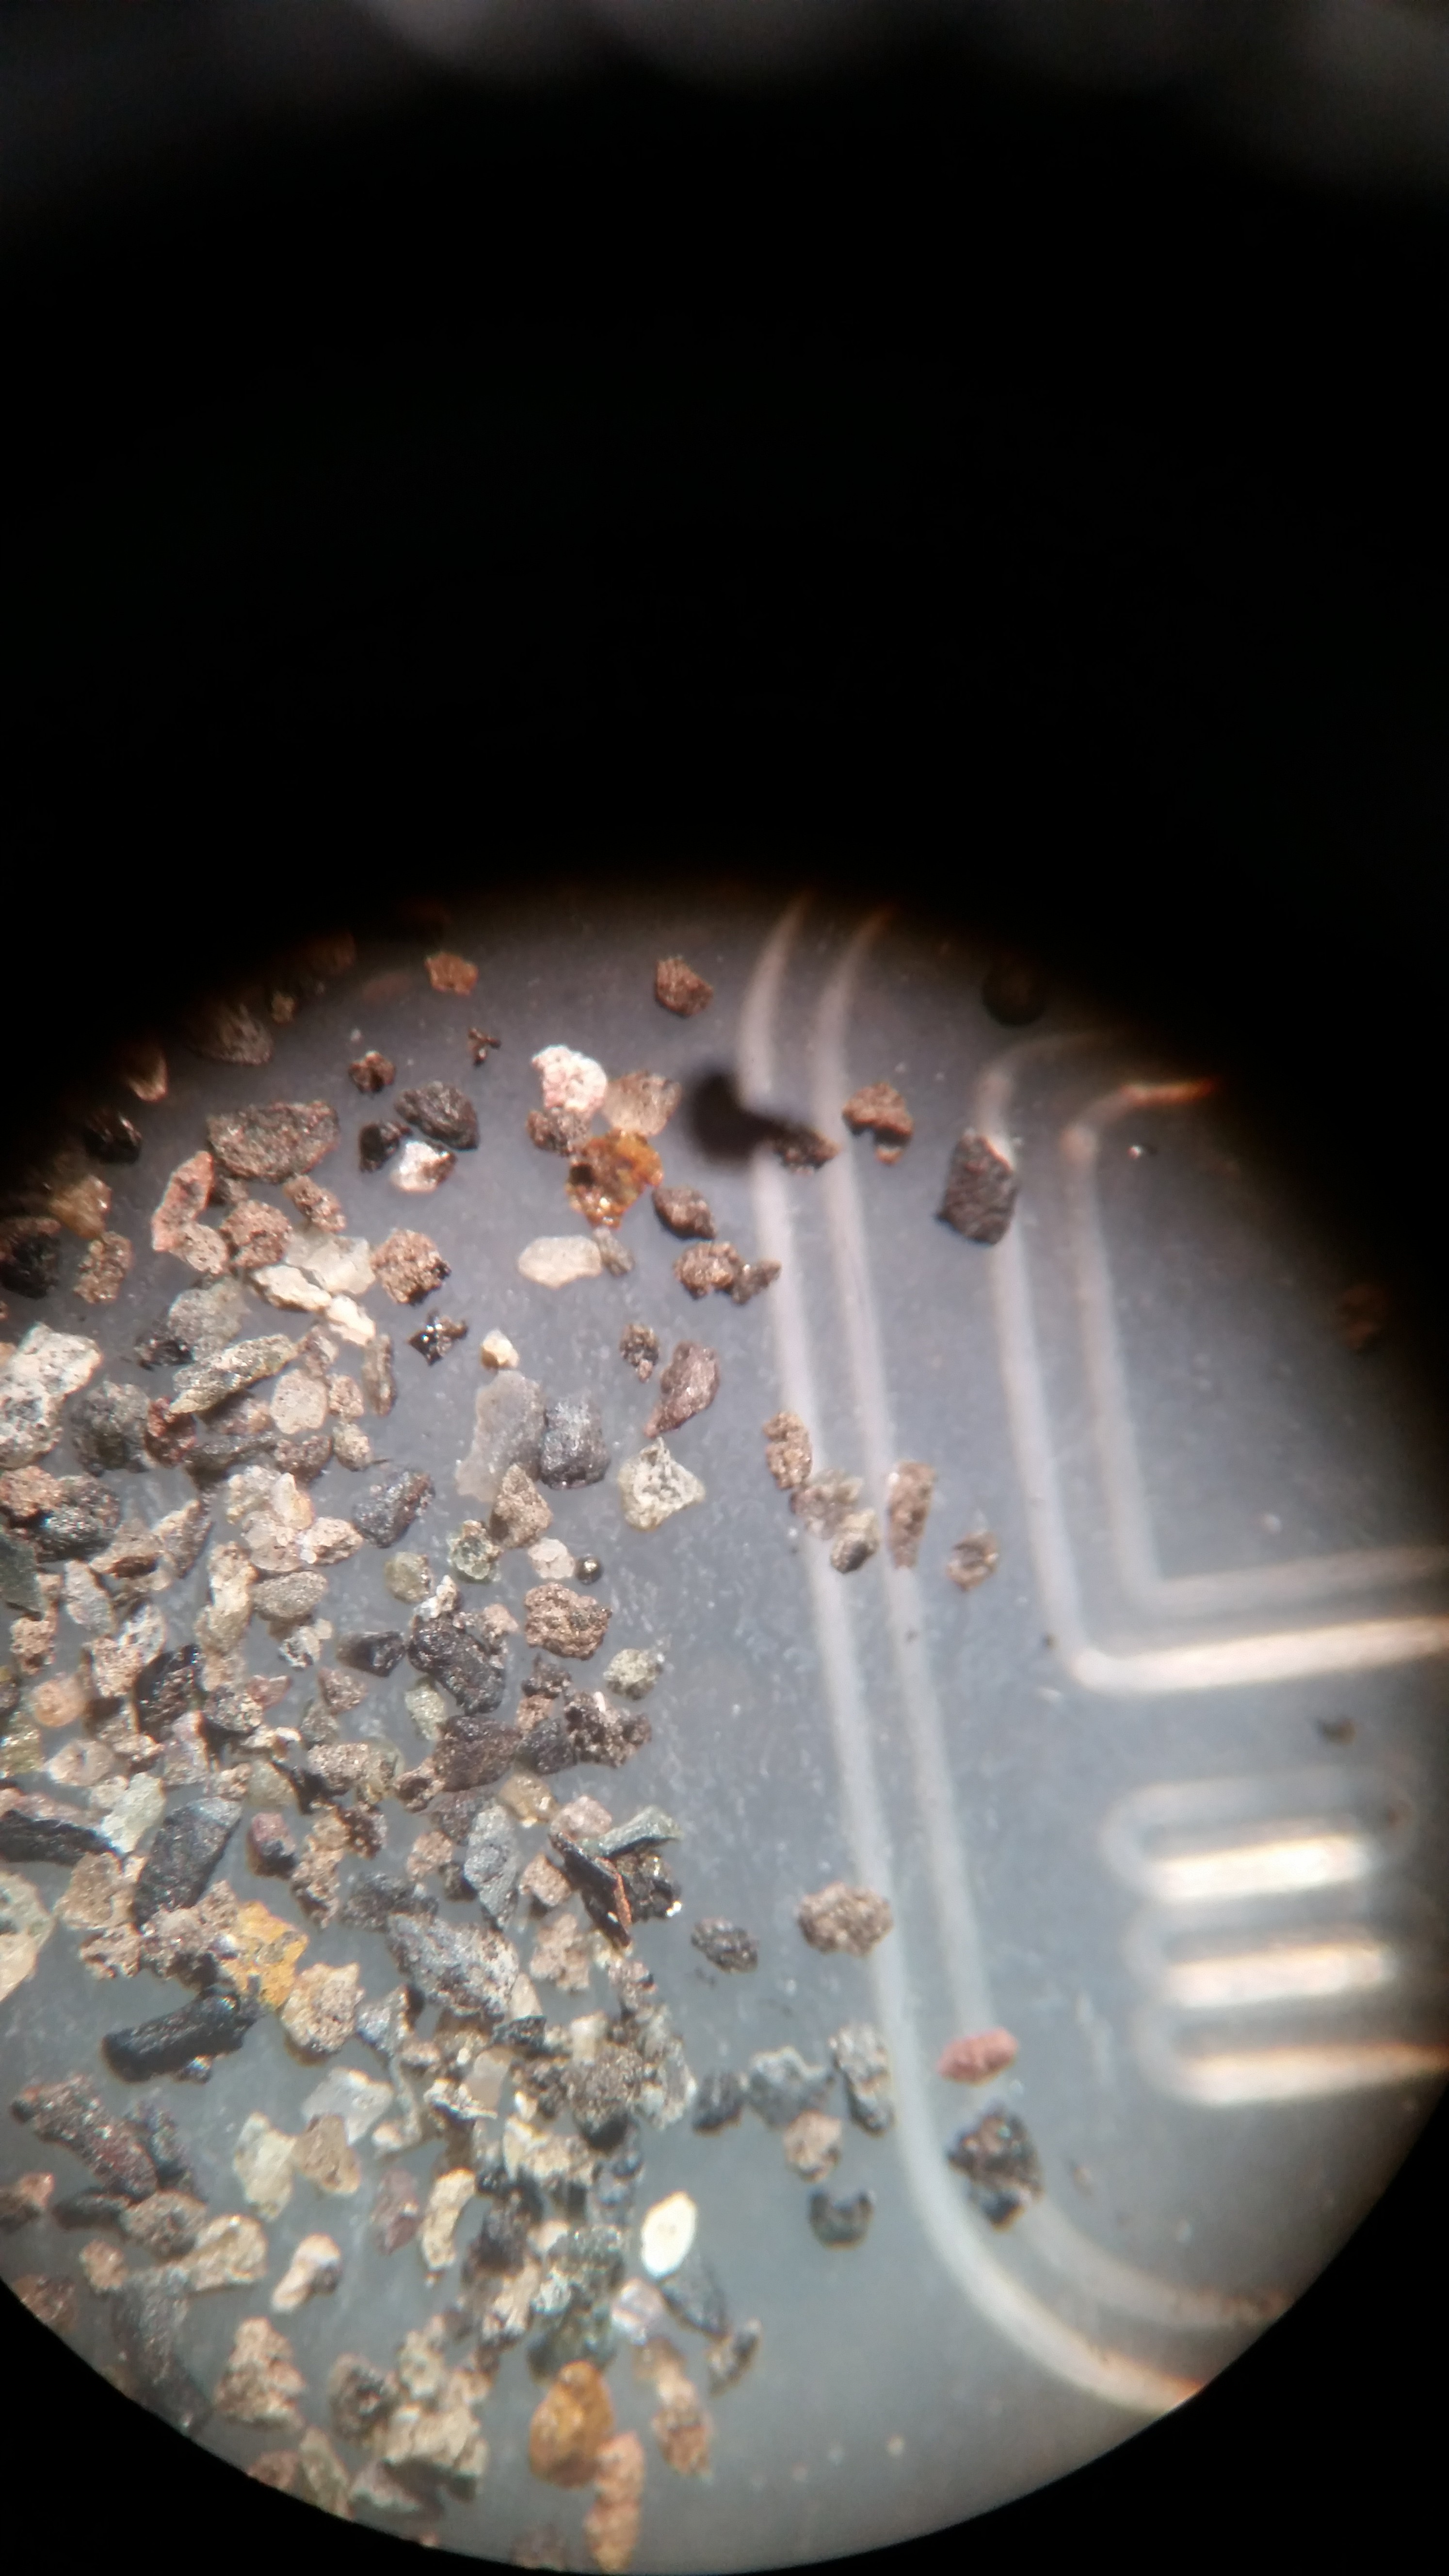
So when I get a chance they'll go right into the SEM to look in proper detail. In the meantime, let's play: Spot the blurry spherule!
![]()
![]()
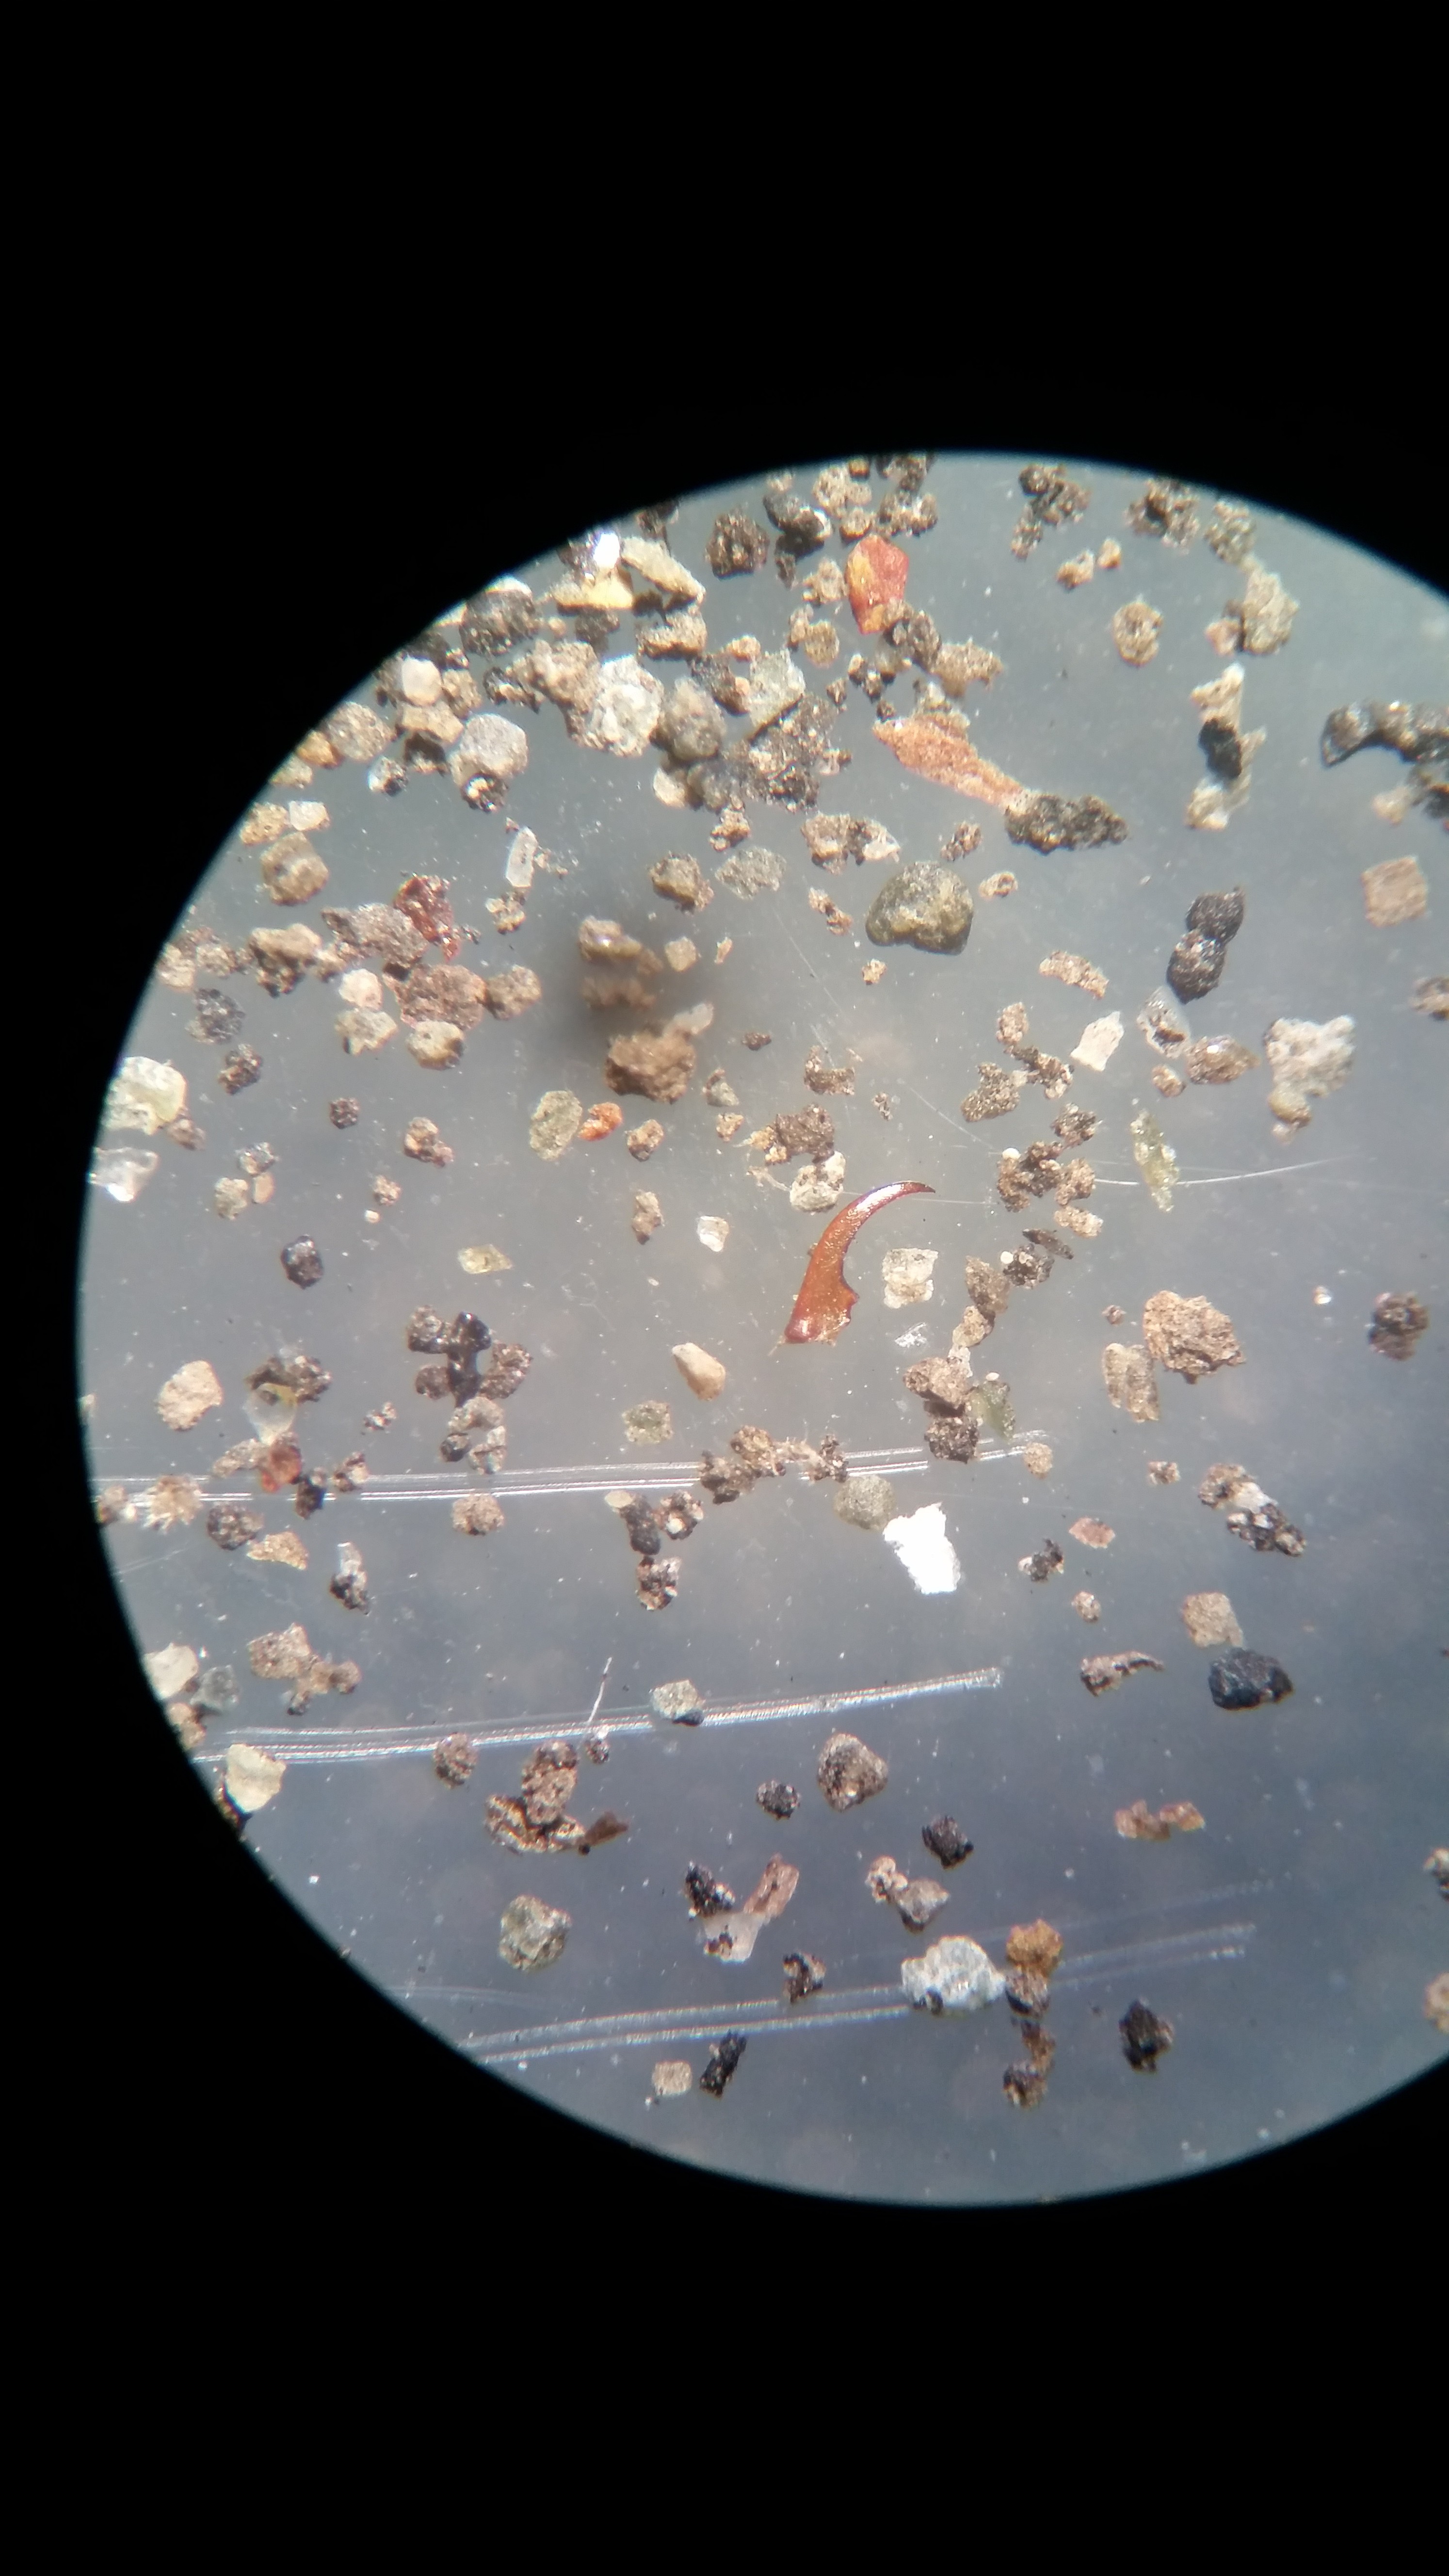
There's actually quite a bit of interesting "other" that I didn't transfer over, too:
![]()
is that an insect mandible? a thorn?
After spending this time looking through with my eyeballs, I am still convinced that some form of automation, or further enrichment of the sample, is possible. After all, we already did the latter with our washing, sieving, and magnetic sorting.First we can be even stricter: Wash more thoroughly, in order to remove all the little tiny dirt flecks which complicate the search in the small size fraction, and allow non-magnetic particles to stick to the magnetic ones. And I would sieve to an even narrower particle size --- perhaps 50 microns in variation.
With that size fraction I would like to then try a method to physically separate out jagged samples from rounded ones. My ideas are to merely shake them dry in a container until the smaller, round objects end at the bottom, to put them on a shaker with a slight slant so that rounded particles tend to roll to the bottom, or to (most complicated) use a dense liquid like saturated sucrose solution to separate them out based on drag.
I still think the automated machine vision part is possible, too, again, trying to put the particles in single file so we can use good optics and not have to make them move. But the idea of a magnetic needle picking out individual particles is pretty much absurd. I mean yes, it's possible, but it would be a pain in the butt to build.
Something like what they use to separate out seeds would be ideal:
or, actually, it turns out they have this optimized for sand-sized particles --- for sand!![]()
Apparently, the "Wesort Intelligent Full-Color CCD Quartz sand Color Sorter is specialized for the Quartz sand processing industry". What a world.
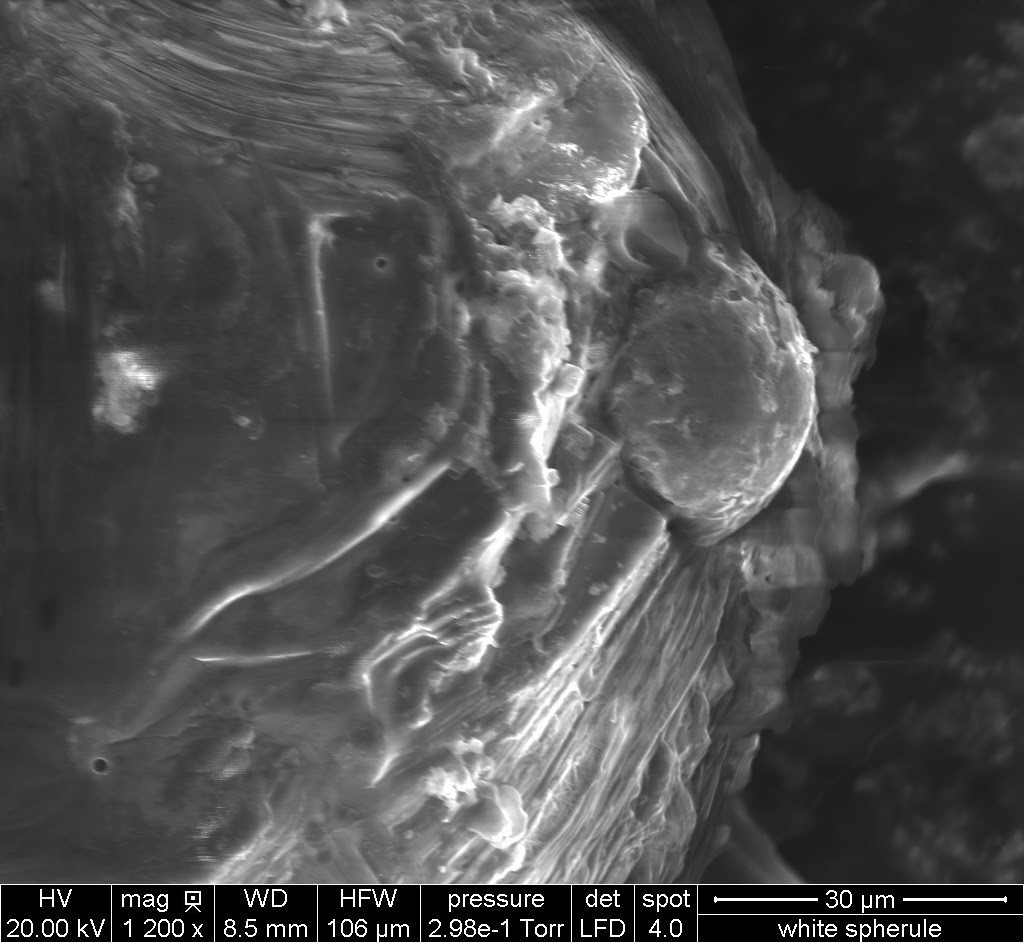
(Once again, I apologize as this is straying further and further from the path of "hacking 3d printers"! But I already started titling the posts "part 1", "part 2", soo....)Edit: No meteorites in this batch, but here's a couple SEM pictures of what was a promising candidate.
![]()
![]()
I'm also currently expecting (march 2021) some magnetic dust from a generous stranger from the river thames. My main thoughts are still along the lines of trying to find a limitless feed material that has some verified amount of meteorites, and then focus on finding better ways to automatically purify it as much as possible before handing off to humans.
-
Finding Micrometeorites: Part 1
11/23/2020 at 01:04 • 0 commentsMicrometeorites are tiny little rocks that fell from the sky, and they're actually pretty common: on average, about one falls on the earth's surface per square meter, per year. Finding them is quite easy, too, if you live in Antarctica --- just melt some drinking water and save the particles at the bottom of the hole. After all, the entire continent is covered in ice, so said particles must have come from up above.
Everywhere else in the world, though, finding micrometeorites is not easy. In fact, it was only until 2016 that a Norwegian Jazz guitarist (really) proved to the world that you could find these particles amidst the noise of urban contamination. He has since found thousands, and leads an active Facebook group where many do the same. The secret is first physically reducing the noise as much as possible, and then being patient enough to sift through large amounts of material. I've thought for a while that a project like LadyBug could be used to automate both processes to some level, with the eventual goal of being able to take a scoop of dirt from anywhere, chuck it into a machine, and have it spit out tiny meteorites at the other end.
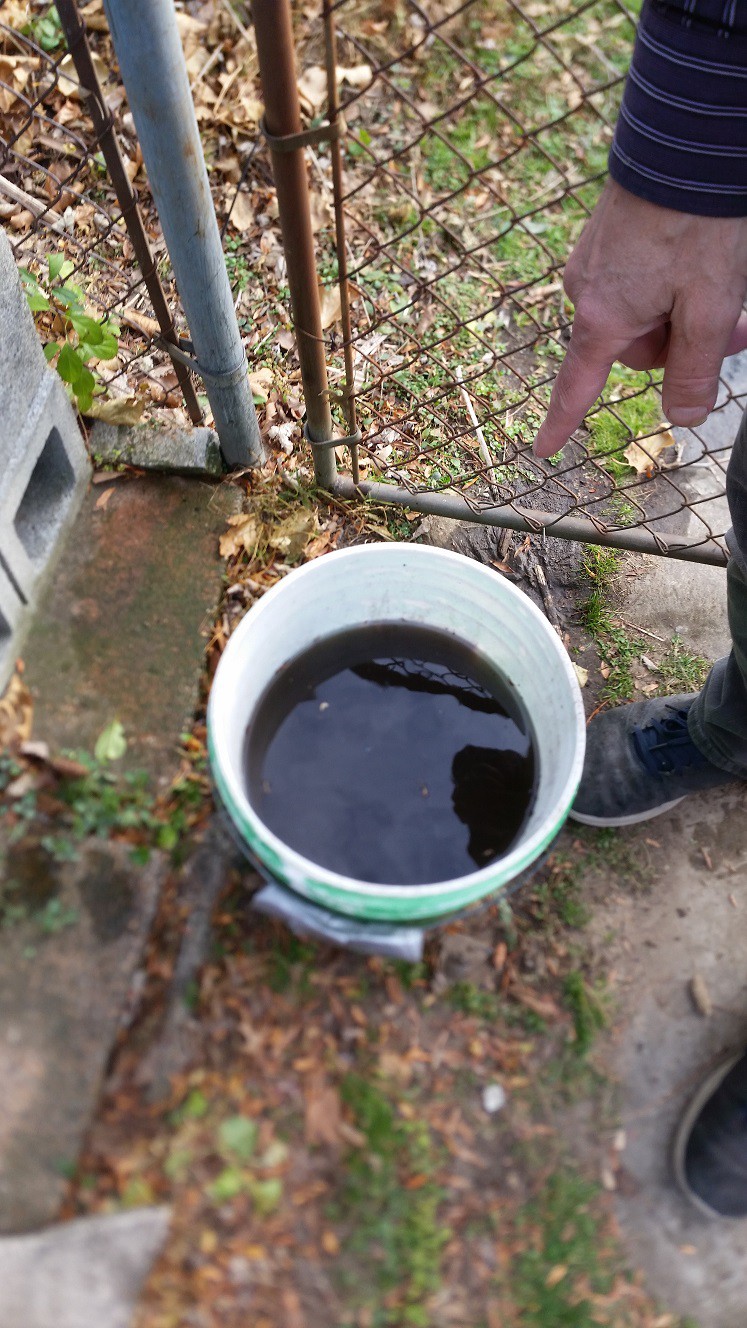
The reason I'm updating the project now is because my dad and I finally got around to emptying the rain barrel, which has been sitting under the spout for about five years now. Theoretically, any tiny rocks that landed on the roof would get flushed into the barrel, sink below the point of the spigot, and concentrate there over time.
...Maybe?
![]()
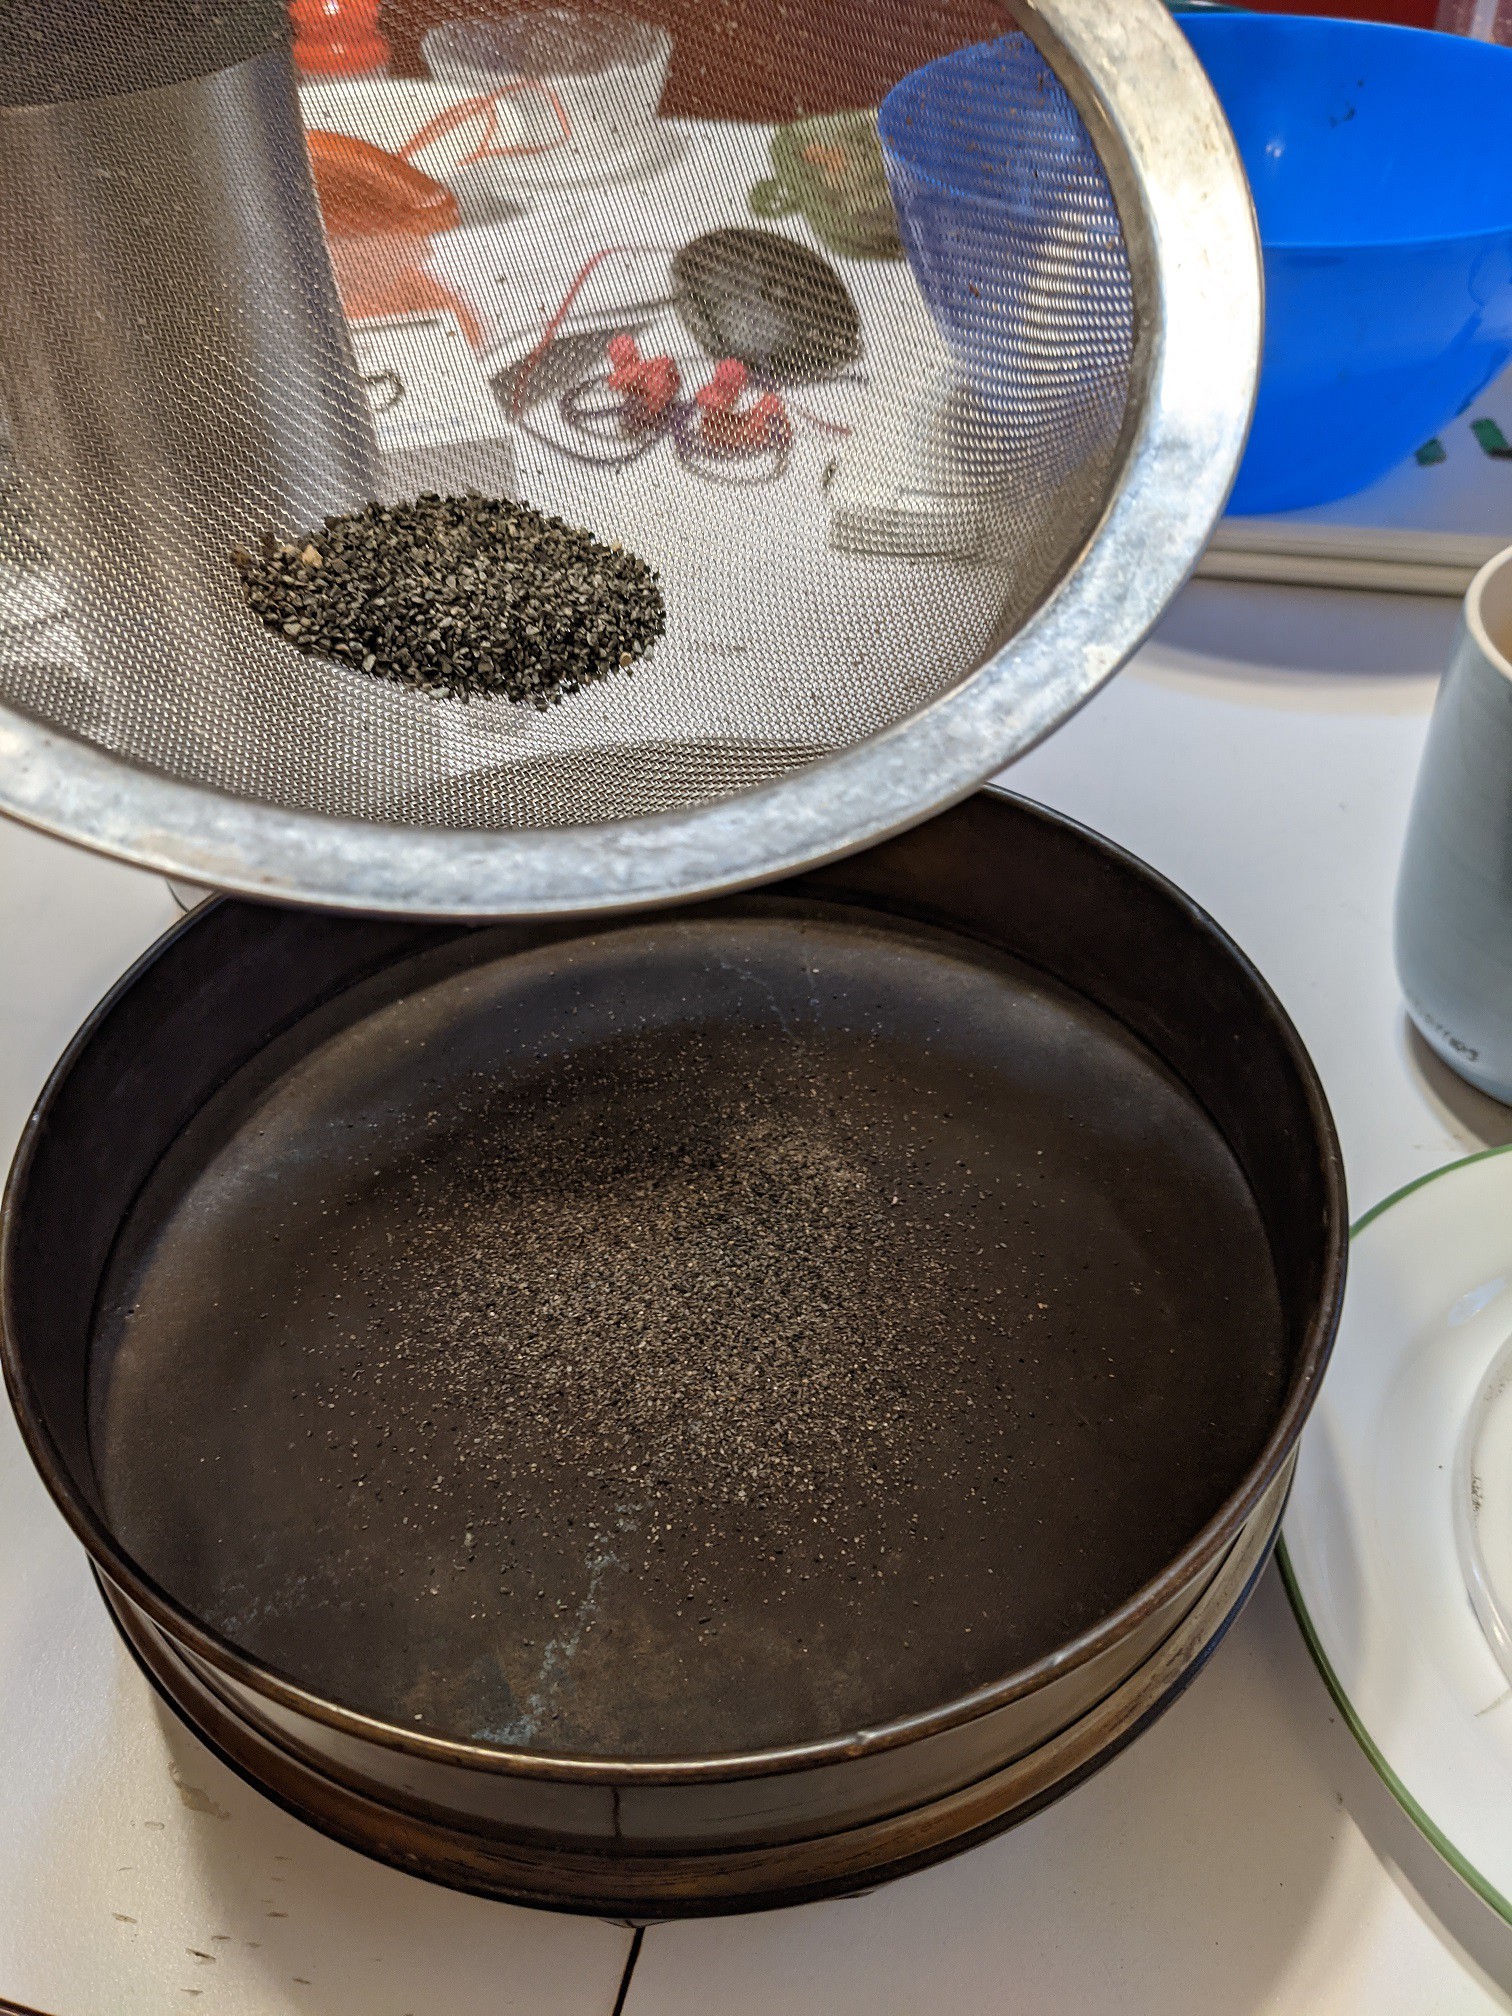
I took this nice bucket of at-the-bottom rainbarrel sludge and set to work extracting the small mineral particles, as described by "on the trail of stardust". Basically, I added water, waited a little bit of time for heavy particles to settle, then poured off the liquid. Over and over, like gold panning. Once I had done this a few times in the bucket, I transferred it over to a smaller bowl and basically just directed a stream of running water into it, so that the container was constantly overflowing. This worked much better for removing all the tiny leaves and dirt, and, when dried, I was rewarded with a couple of spoonfuls of non-dirt that could be separated into different size fractions.
![]()
Finally, I took these size fractions (>0.5mm, 0.25-0.5, and 0.15-0.25, because these are the meshes I had) and separated out the magnetic particles by using a magnet covered by a plastic bag. Not all micrometeorites are magnetic, but most are, and the extra separation is necessary to have a chance at finding one, at least for an amateur like me.
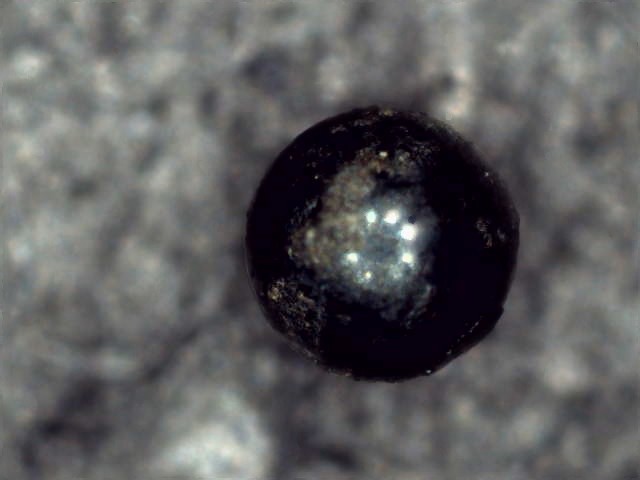
From there, I immediately noticed my first spherule with the naked eye in the larger size fraction. Woohoo!
![]()
Unfortunately, the magnification/quality I can get with my USB microscopes turns not good enough to make any kind of identification other than being able to tell that it's round. I'll have to take this and any others I find in to a proper stereoscope and then possibly an SEM to be sure. Most spherules like this are of human formation, anyway.
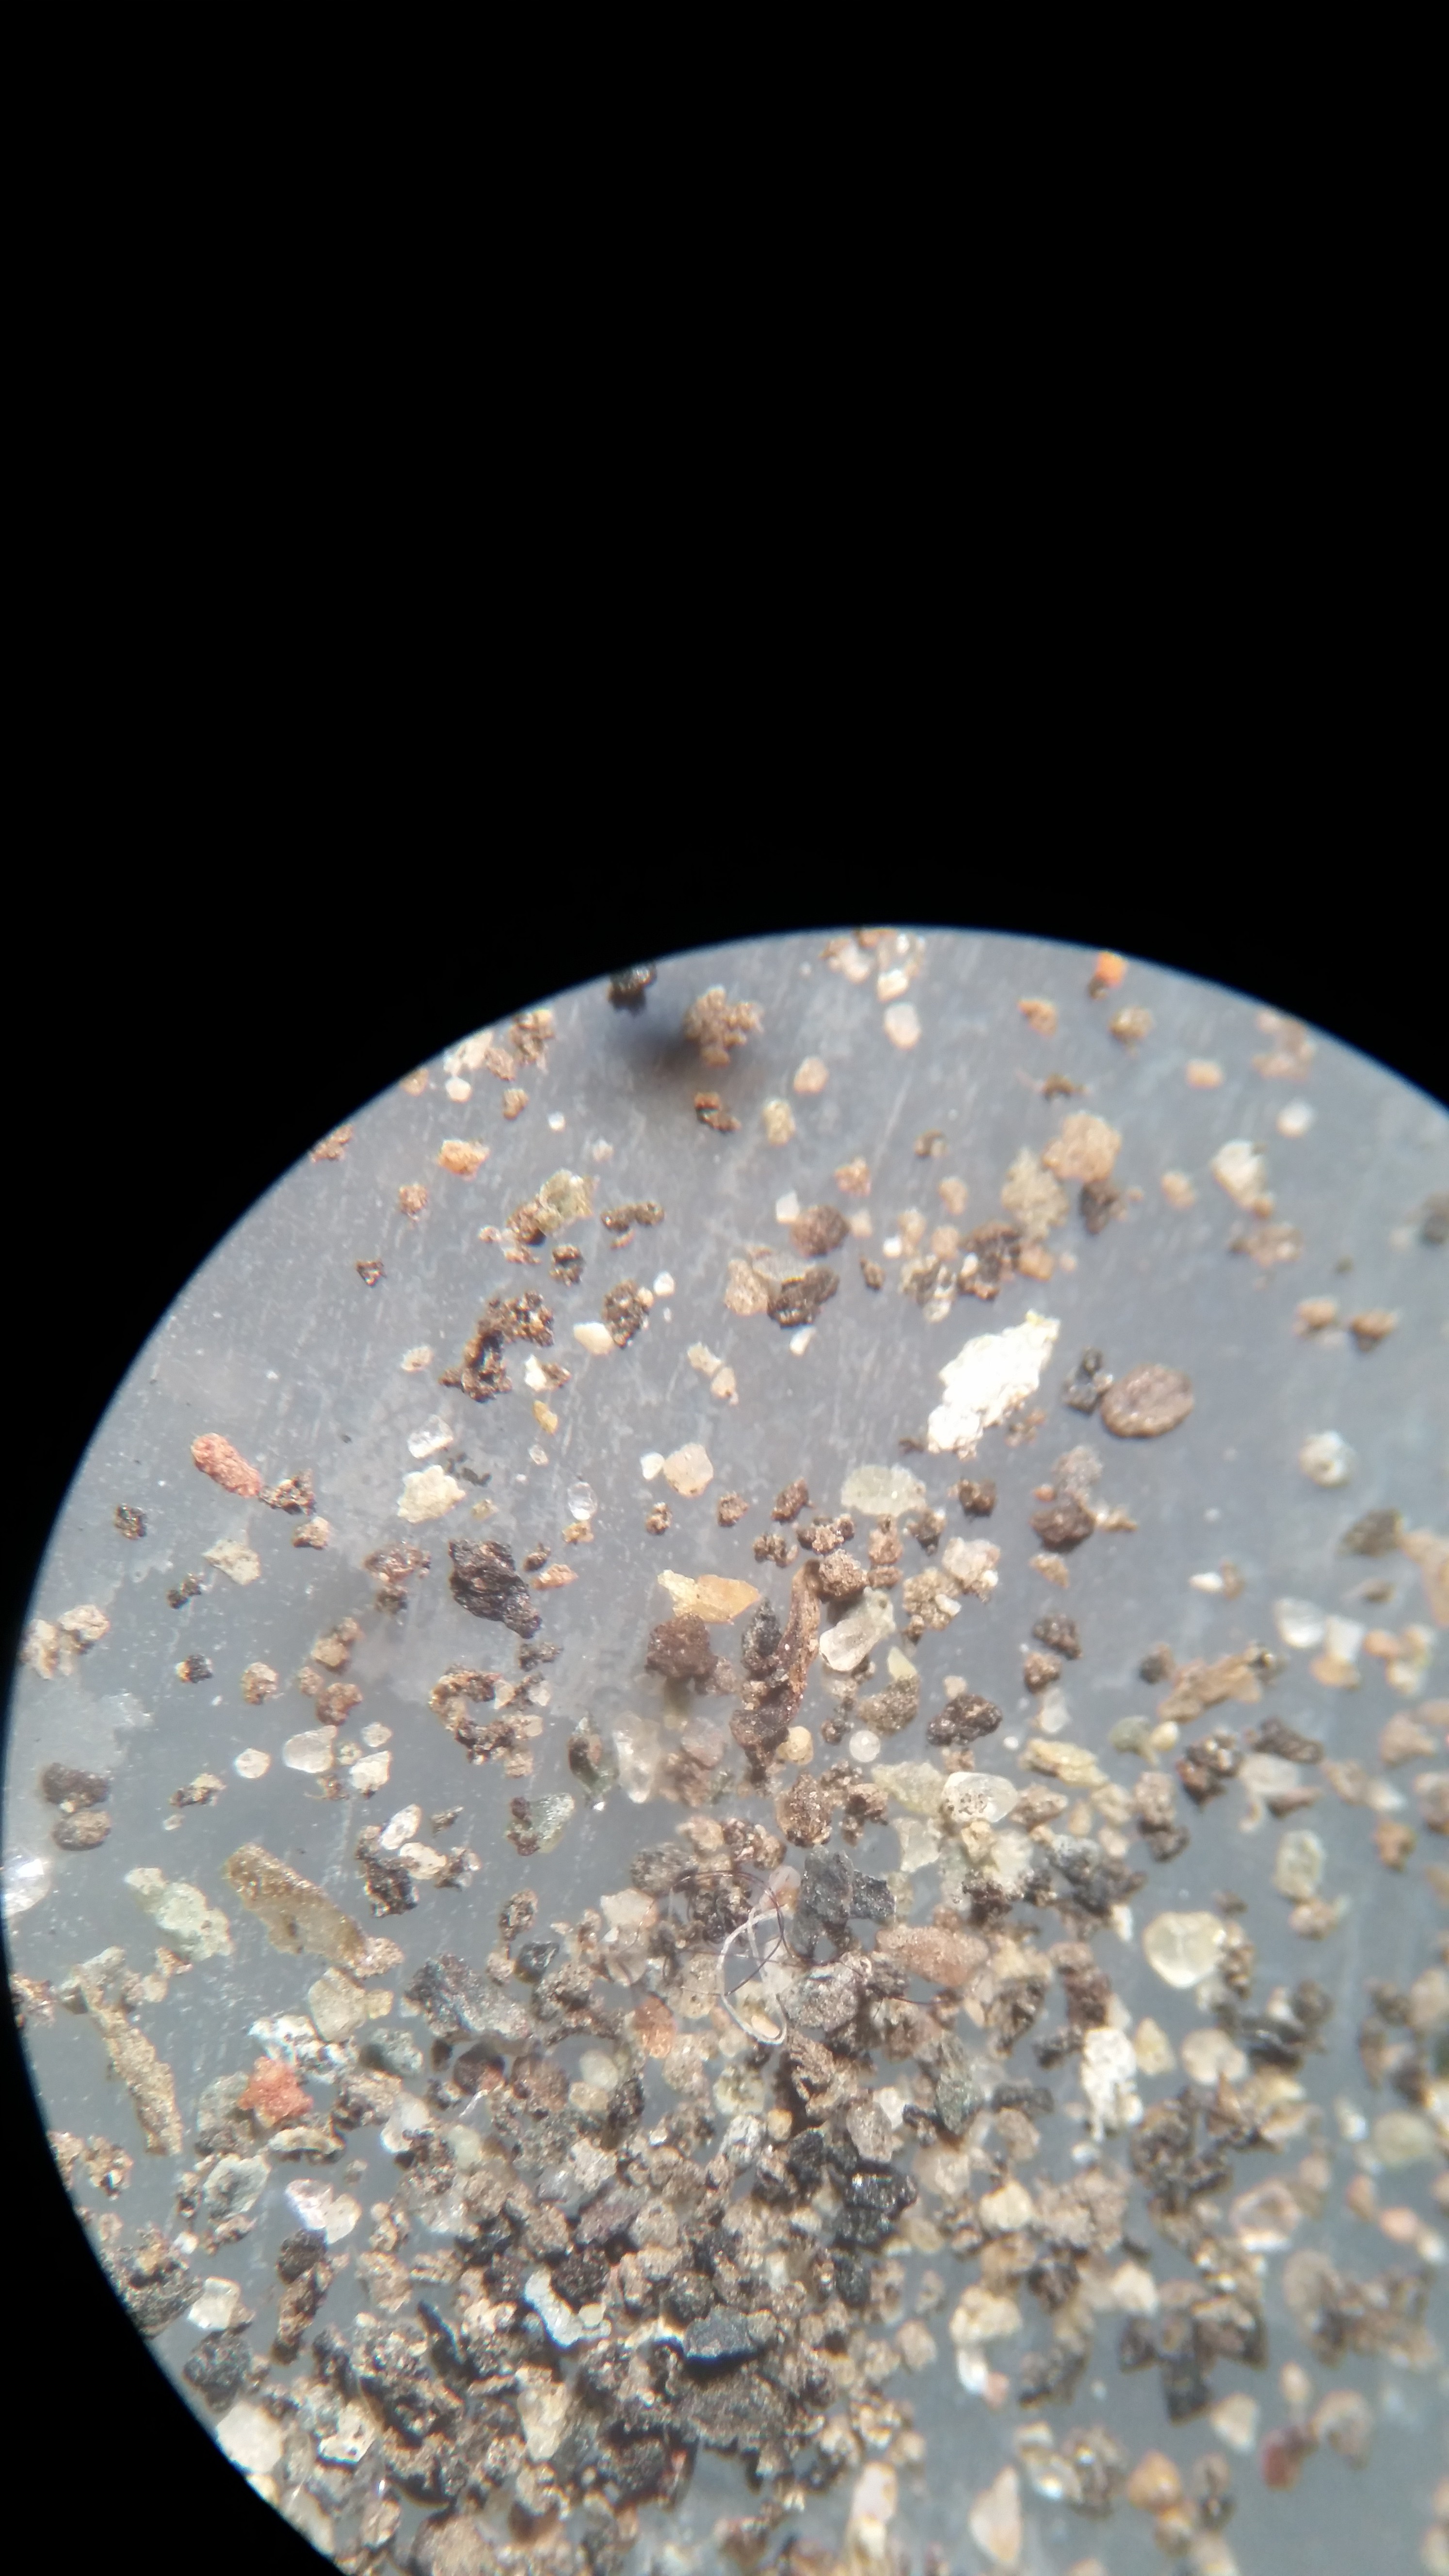
Now, I probably have about half a gram of magnetic mid-sized particles, or a few thousand to tens of thousands. Really, not that much --- certainly not too many that I can't search by eye, and I plan to. But again, let's imagine that we are truly ambitious and want to come up with something that would scale to checking through millions and millions of particles a day.Anyway, let's first start with the USB microscope sees in the magnetic 250-500 micron fraction:
![]()
(excuse the background --- it is sharpie'd cardboard. I am still trying to figure out the best thing for imaging rocks of varying but mostly blackish colors).
Note that we have quite a range of particle sizes and colors, and some things are shiny and some are not and some are blurry and some are not. The first thing we could easily do is separate to a very consistent size, which would make things easier. But let's brute force the issue with a stack+stitch:
![]()
(click for full size). Is that gold?
![]()
So now we've got a much larger field of view, and more rocks to see at once. We could feed this into some kind of image segmentatorator, but really, stitching doesn't actually help here, since the object of interest fits into a single image! And segmentor doesn't care whether it gets one big image or many small ones. Since we would presumably be keeping track of position information, stitching only adds an extra step where we now have to figure out where the rocks individually were.
Okay, but maybe your system does a scan at low magnification and then zooms in to a higher magnification to take a closer look at anything of interest.Here's one rock:
![]()
And here's the whole stitched view (non-stacked --- there was a bump).
![]()
Stitching is a bit more useful at this magnification, because you don't have to worry about your particles fitting into each frame. But this is even less of an issue for the smaller rocks, which we haven't looked at yet.
And in any case, steady-state would probably make more sense than stitching over a wide field of view. Rather than having an operator spread some particles over a plate and replacing them after the scan is done and any particles have been picked it, a serious system should use a hopper and conveyor belt to spread them out thin past a stationary (or moving in 1 axis) microscope. If you see anything worth keeping, direct the rocks into a new container. Expert mode: Use a tiny electromagnetic needle to separate each grain of sand individually.
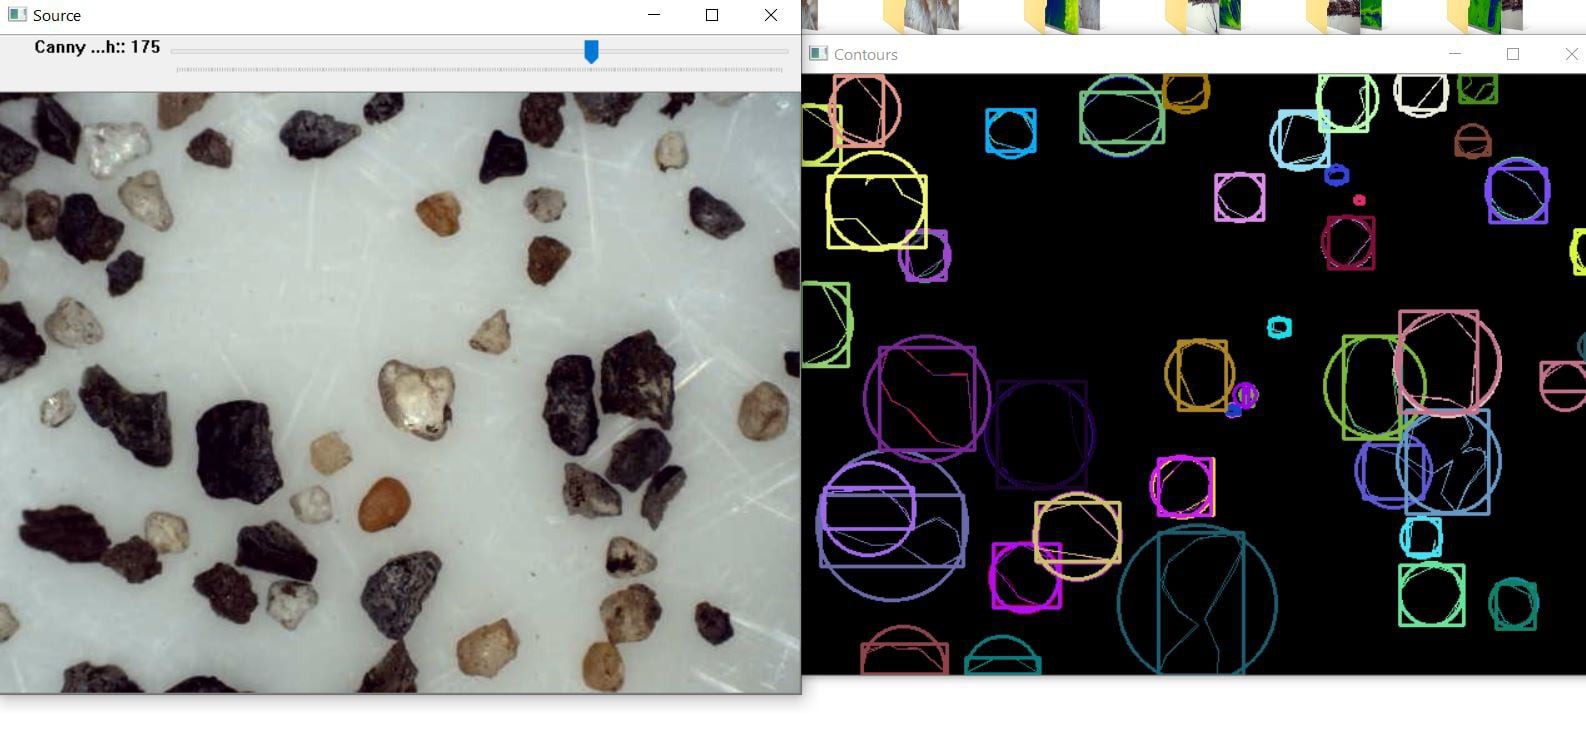
I'll leave you with an example of edge and roundness detection (on my smaller grains) using a script I found from someone who isn't me, Definitely some potential, but I think that it would also be worth trying to physically separate out by roundness rather than immediately jumping into computer vision. That is, if our goal is to solve the problem of finding micrometeorites, rather than forcing the problem to be solved using the hardware that we have.
![]()
-
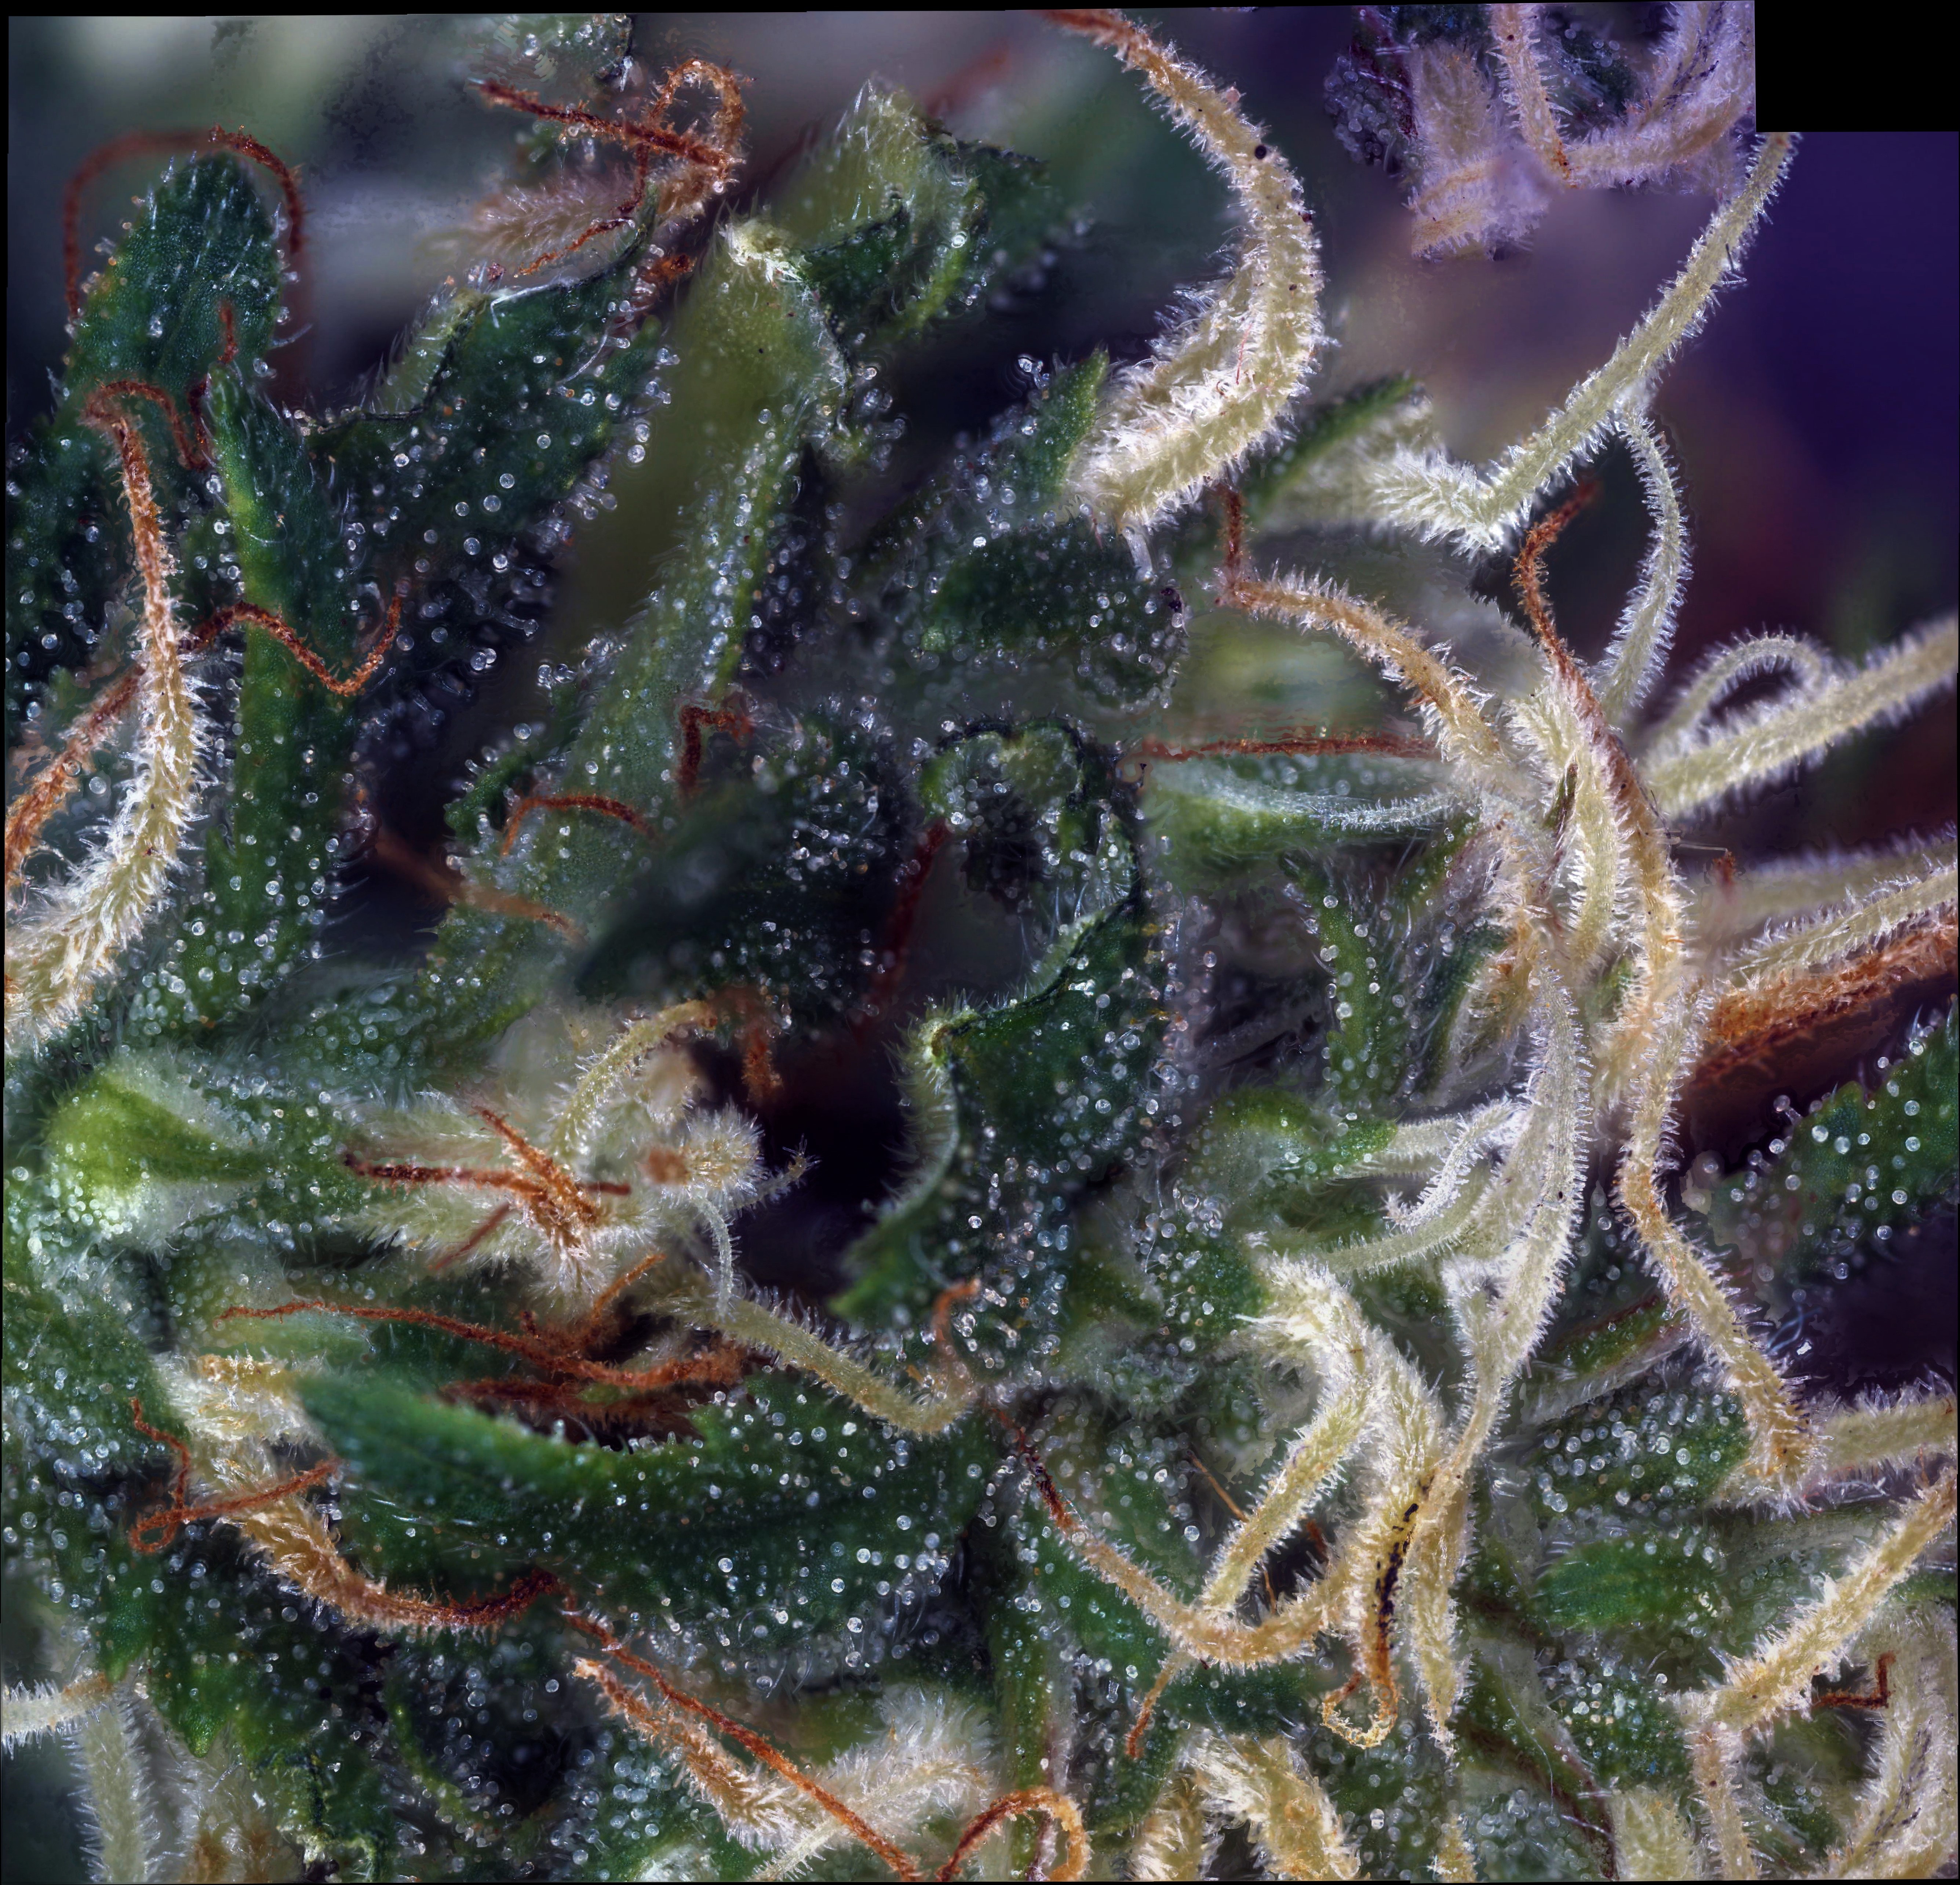
Locally Grown Caprese Salad
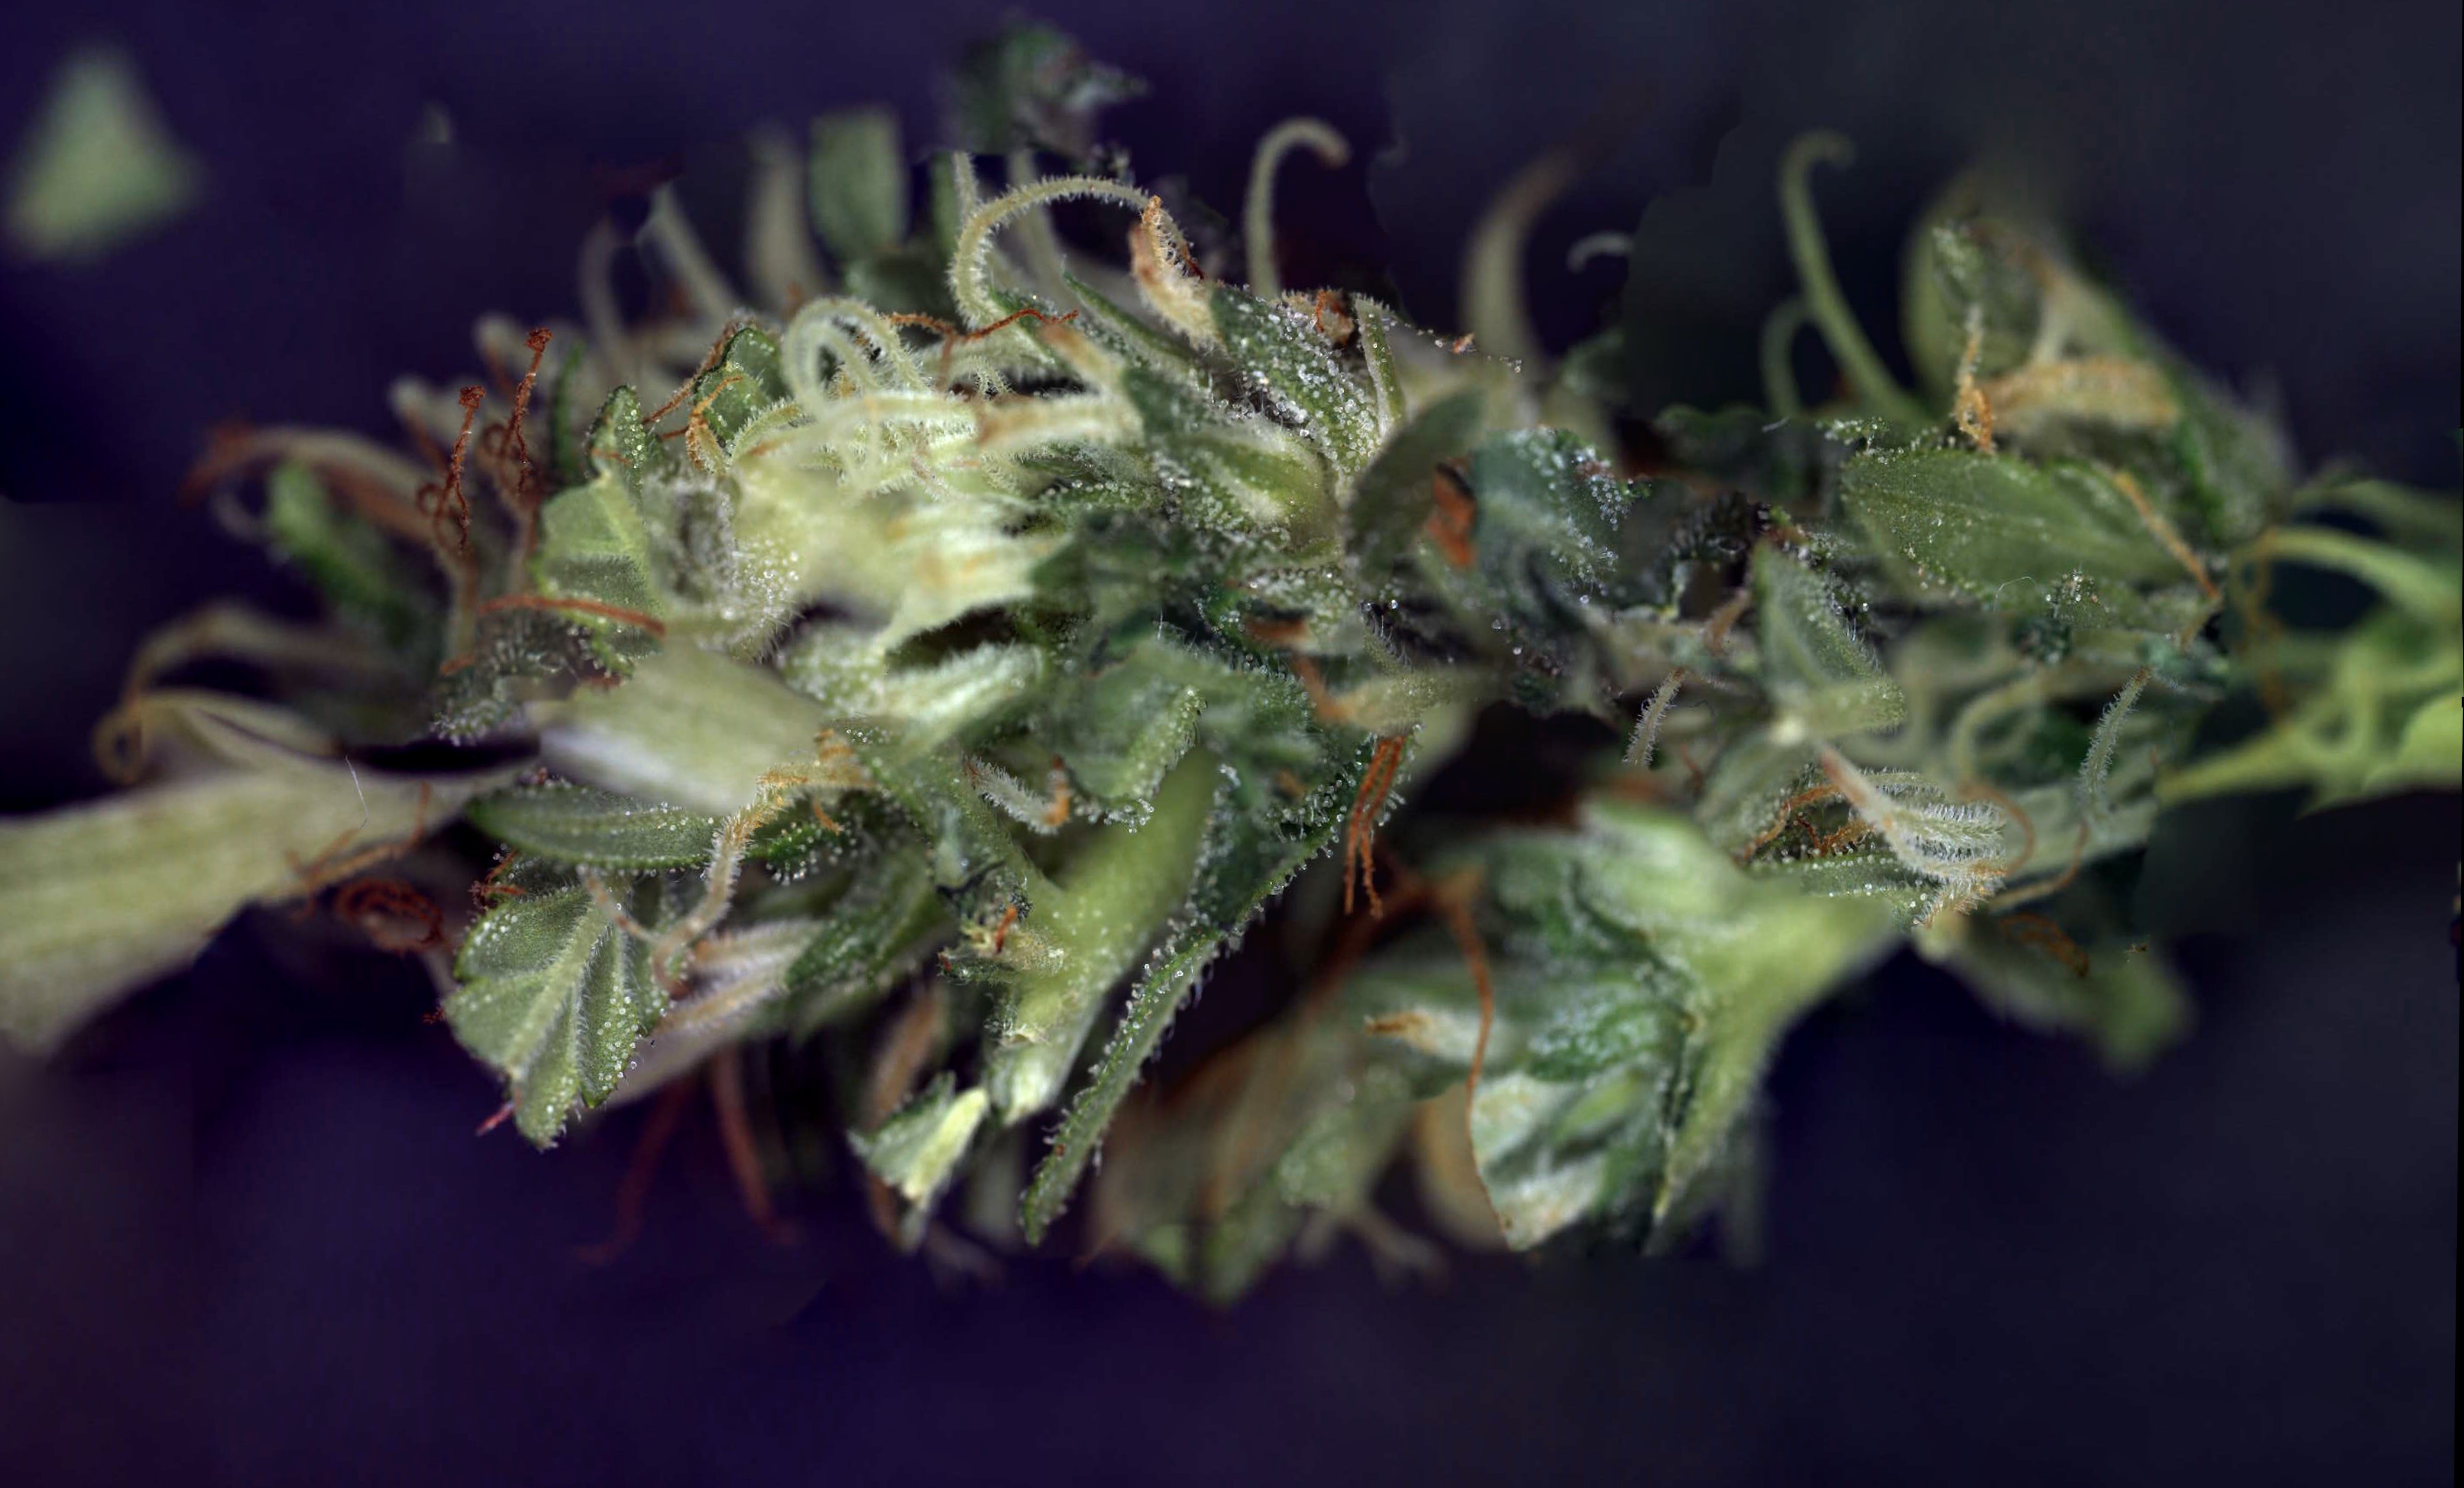
09/14/2020 at 16:12 • 0 commentsA couple of days I was asked by a... farmer... to get some pictures of his (unripe) crop. I didn't do a whole lot of preparation: No special colored background, no specially create rig, didn't even fix it to the moving buildplate. Just took a lot of pictures and tried to post-process them into something good.
Once again there's not really a substitute for good input images, meaning: They should be crisp to begin with, the colors and exposures need to be consistent and not washed out, and the positions should not move in between stacks. Also this subject is really pretty hard to capture well, since it has so many spikes and folds that you could be doing a 4 mm Z stack on an image with a 1 MM field of view.
50 images, single Z height, low magnification, stitched
![]()
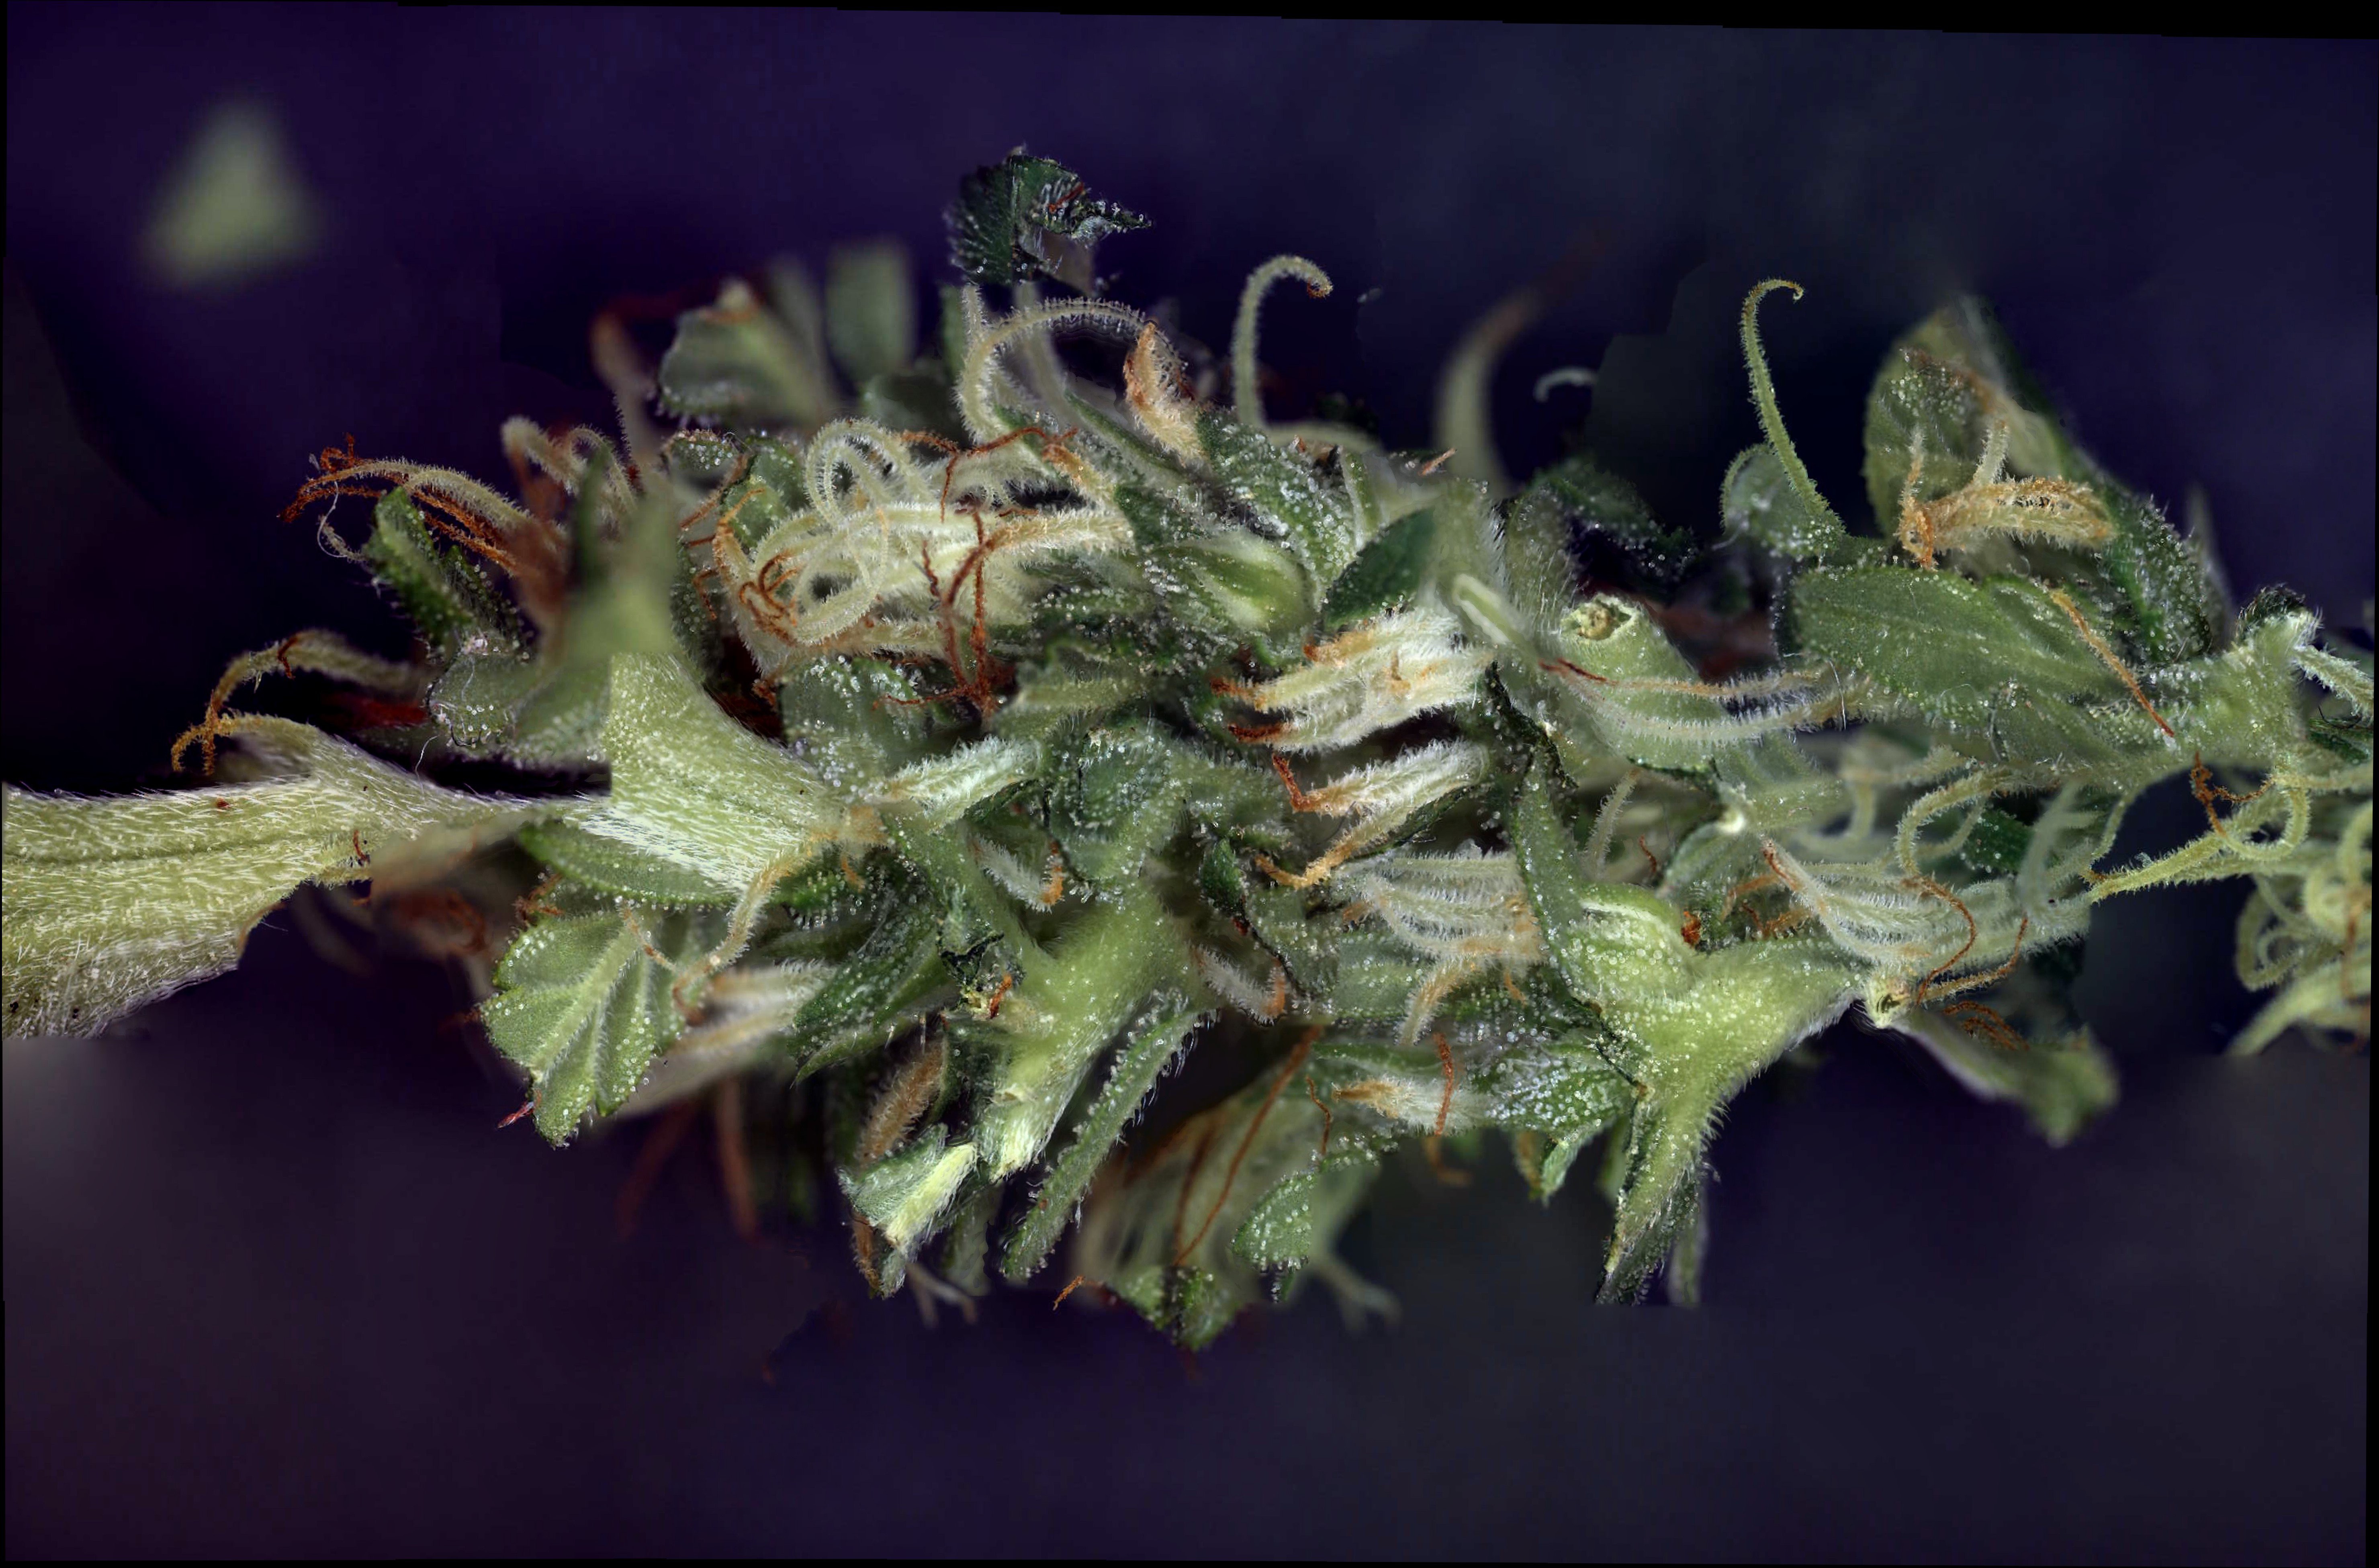
500 images over 10 Z heights / 1mm step size with ~250 thrown away for having little information, stacked in picolay and then stitched.
![]()
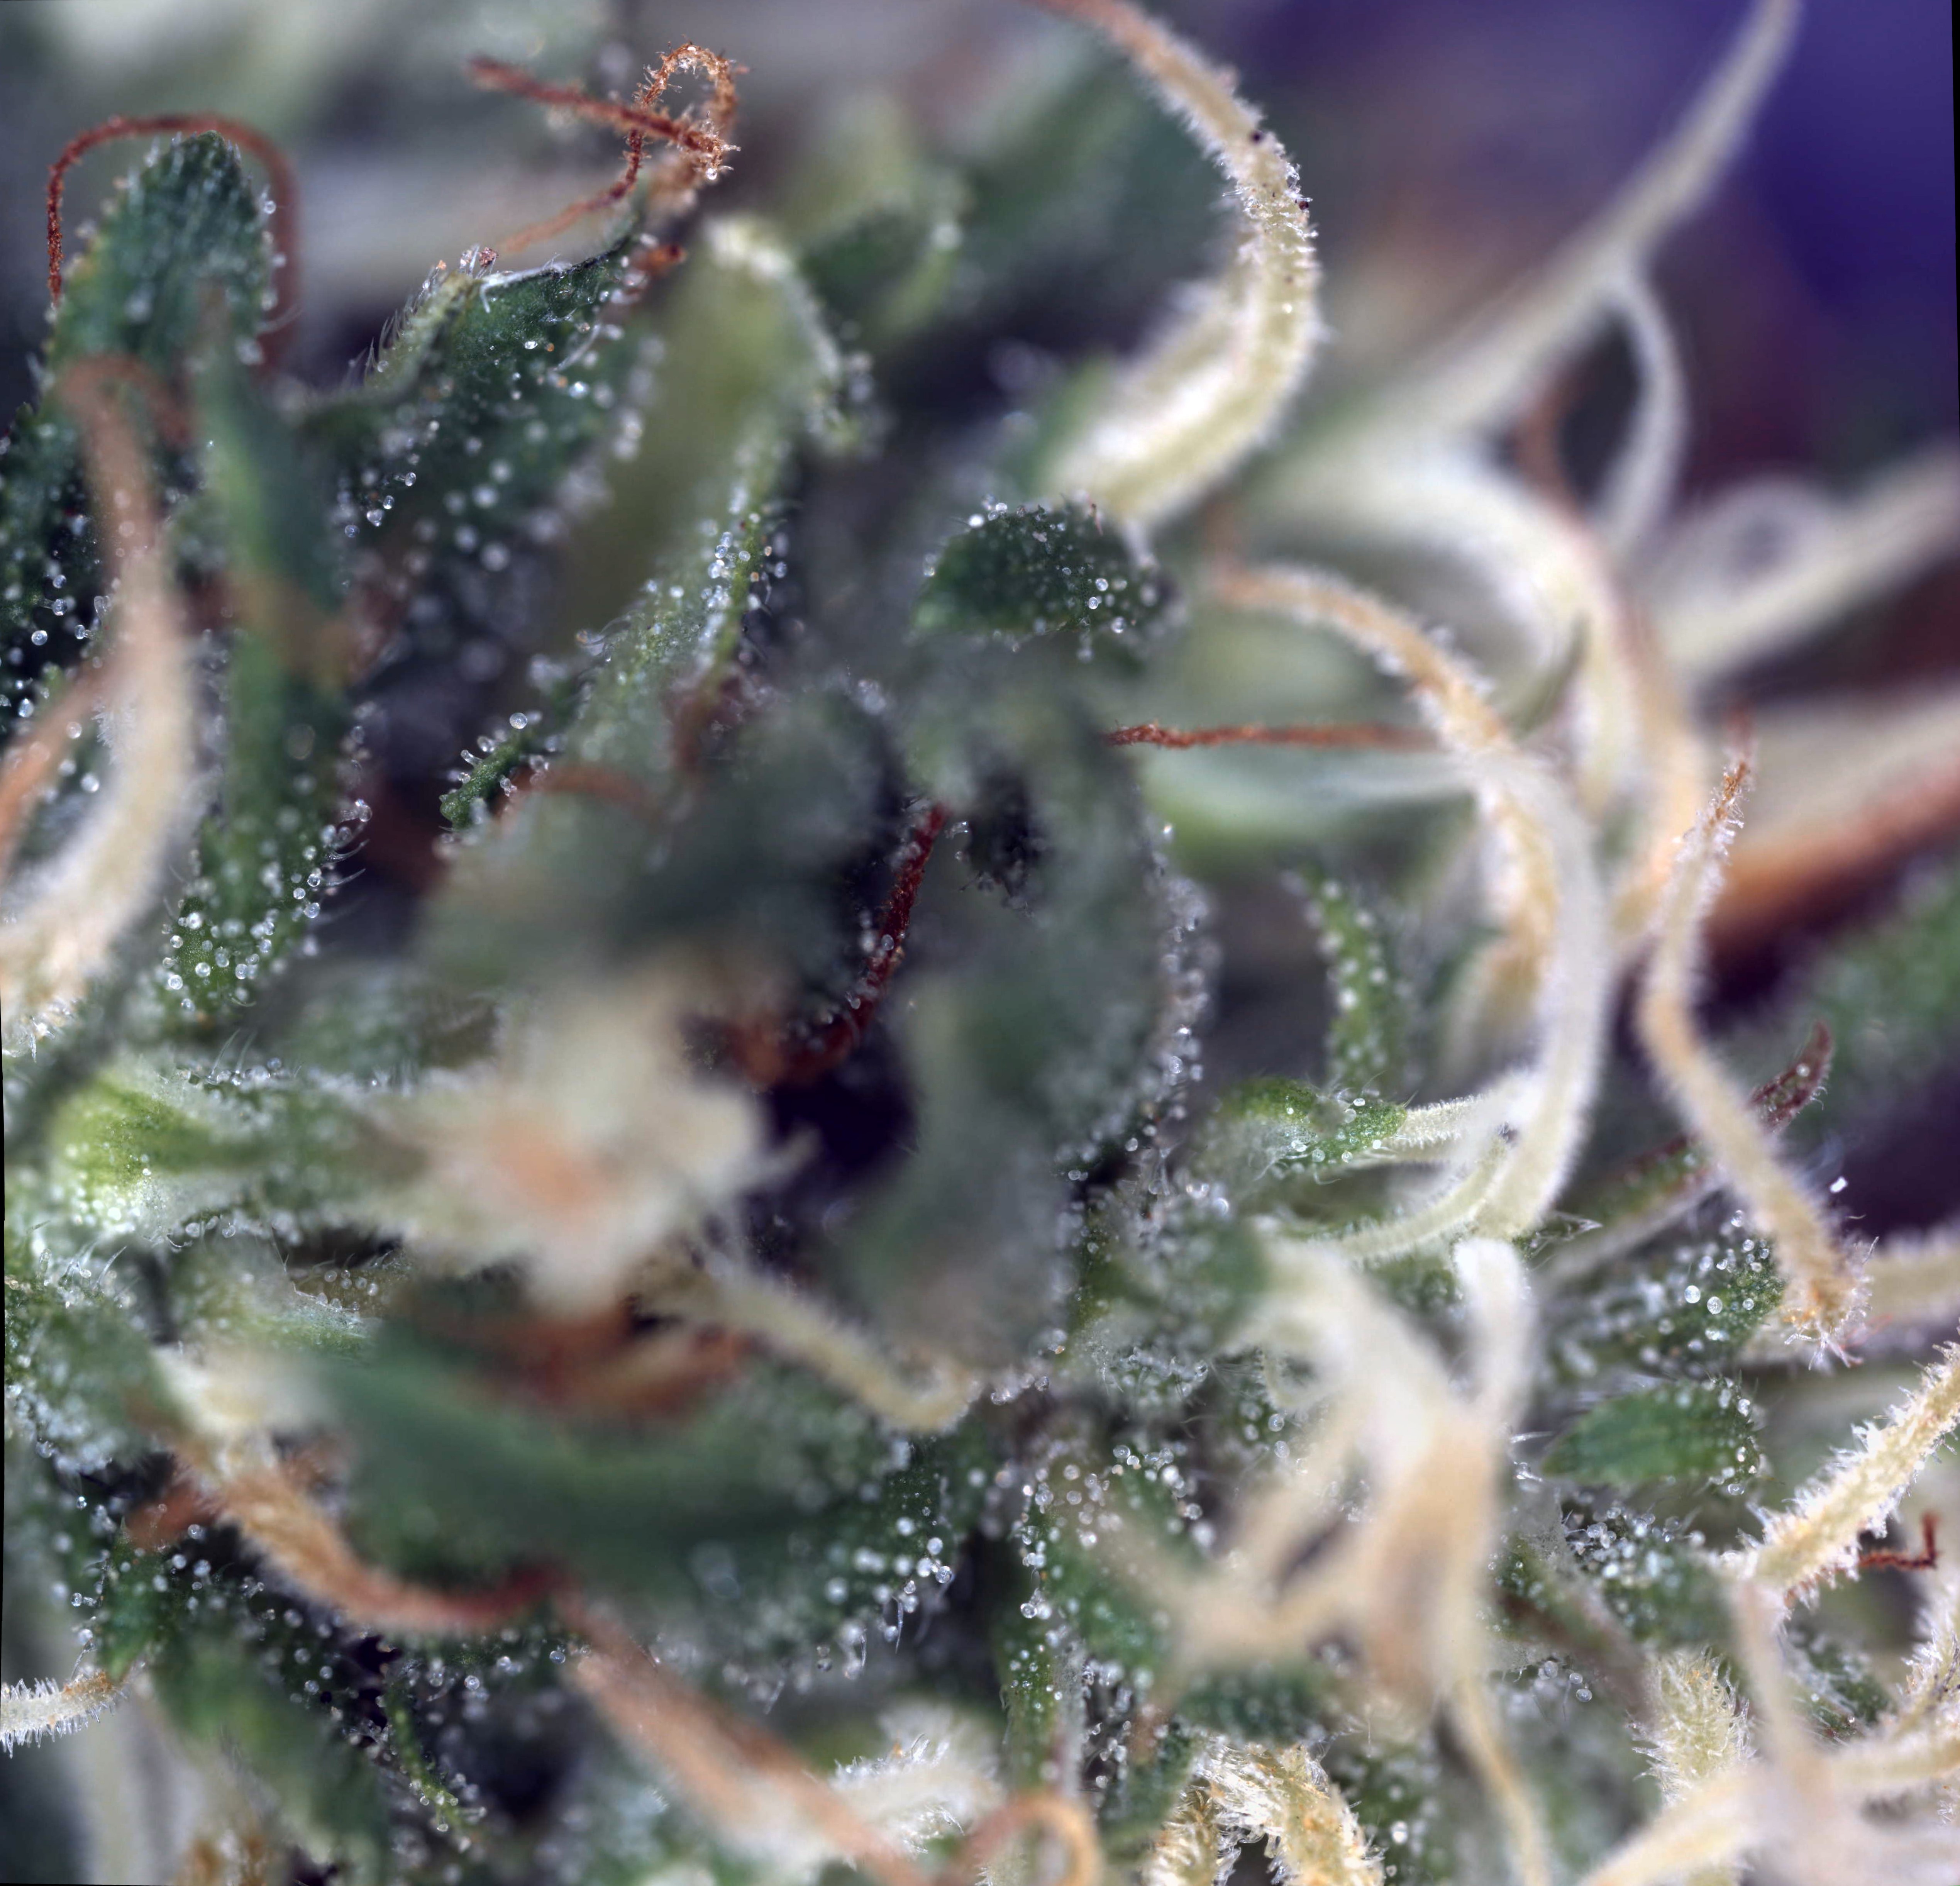
A higher magnification zoom into the right of the (FOV 10x10 mm), 117 images at one Z height. Most of the image will appear to be not in focus at this zoom. But when they are, hey, look at those little bubbles of salad dressing!
![]()
And then the same image but Z stacked --- 1900 images taken over 17 heights 0.2 mm apart, 900 or pics thrown away. I also played with the color a bit to look better and more realistic.
![]()
Finally, something presentable! And yet, the quality gain from stacking in less than ideal conditions rears its ugly head when you zoom way, way in, with huge blurring artifacts. And that kind of defeats the point of using such a zoom lens --- the image only looks good when you look at it, like, at 3 megapixels. Better than the 0.3 MP the component pictures were, but not as good as the 25 MP the picture claims to be. You can compare this image with an unblurry part of the unstacked version and you'll see what I mean.
I need to get a real camera.
-
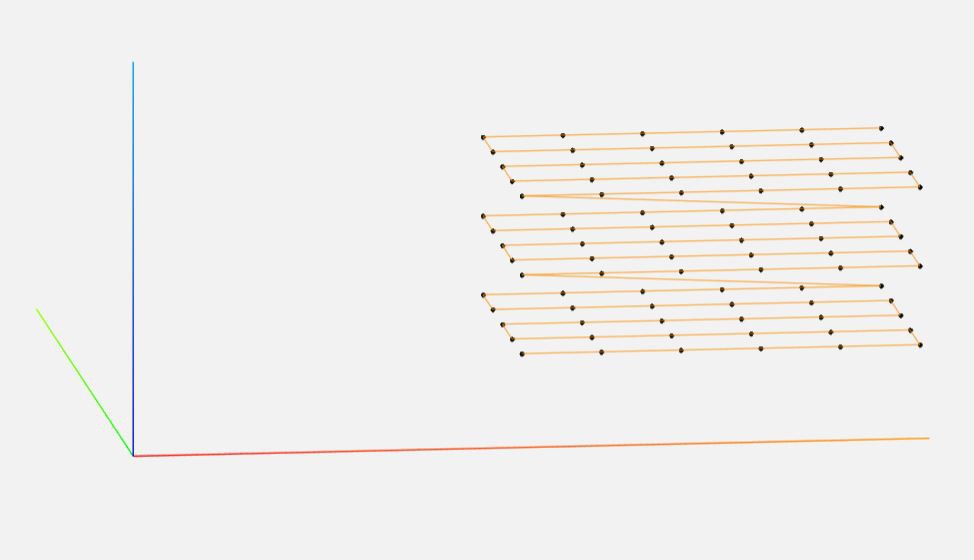
Scanning sideways
08/05/2020 at 00:44 • 0 commentsI'm just going to share this tiny misc thing because if I don't I never will:
Tired of assuming that your scan area is a flat 3D rectangle? Now you can turn it into a *tilted* 3D rectangle! These pictures should explain:
Flat:
![]()
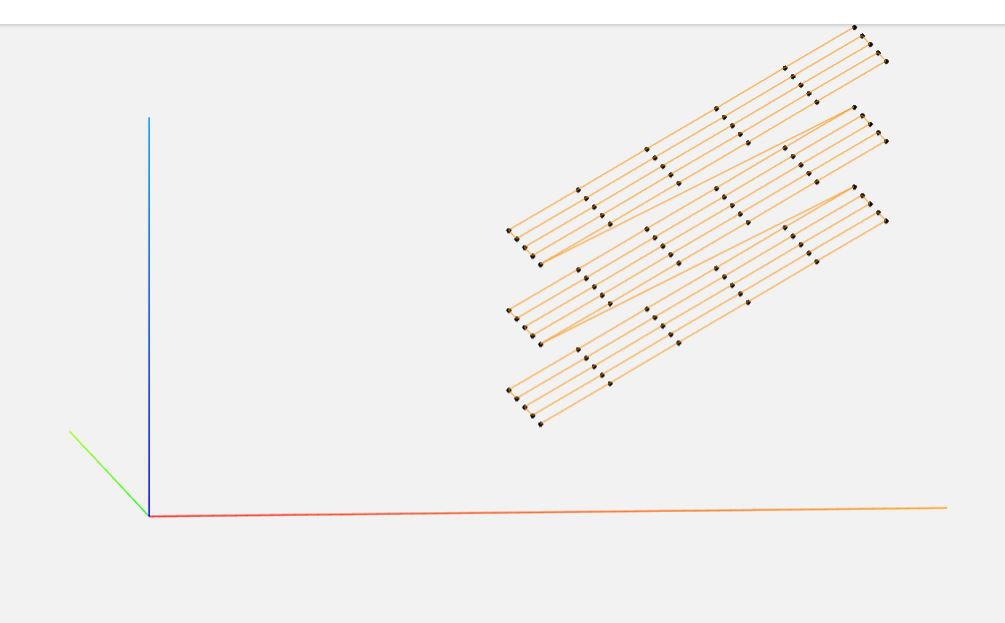
Tilted:
![]()
Note that I didn't actually generate any kind of new scan pattern... I just rotated the one I already had. It's amazing how useful sins and cosines are in real life! Thanks, statics!
This does mean that your scan pattern is a bit ridiculous.
Also pay no attention to the bottlecap propping up the thing being actively moved during the scan.
But hey, it actually works! "works" as in this is an artificial scenario with a flat object and a defined amount of tilt. But if you want to scan a shape roughly like this, it is much better than taking a giant cuboid where your object is only in focus for a thin slice, which was your previous best option.
No Tilt
![]()
30 degrees
![]()
I haven't seen enough examples of this to understand what/why might be different, but you might want to try spotting the differences by tabbing back and forth.
I would really love to see a general solution for this, probably borrowed from CNC routing, where you can scan arbitrary shapes without crashing and wasting movement. Of course it's a bit of an oxymoron to have to scan your object/know its shape before you scan it, but you could at least save a lot of time by inputting a rough shape to begin with.
-
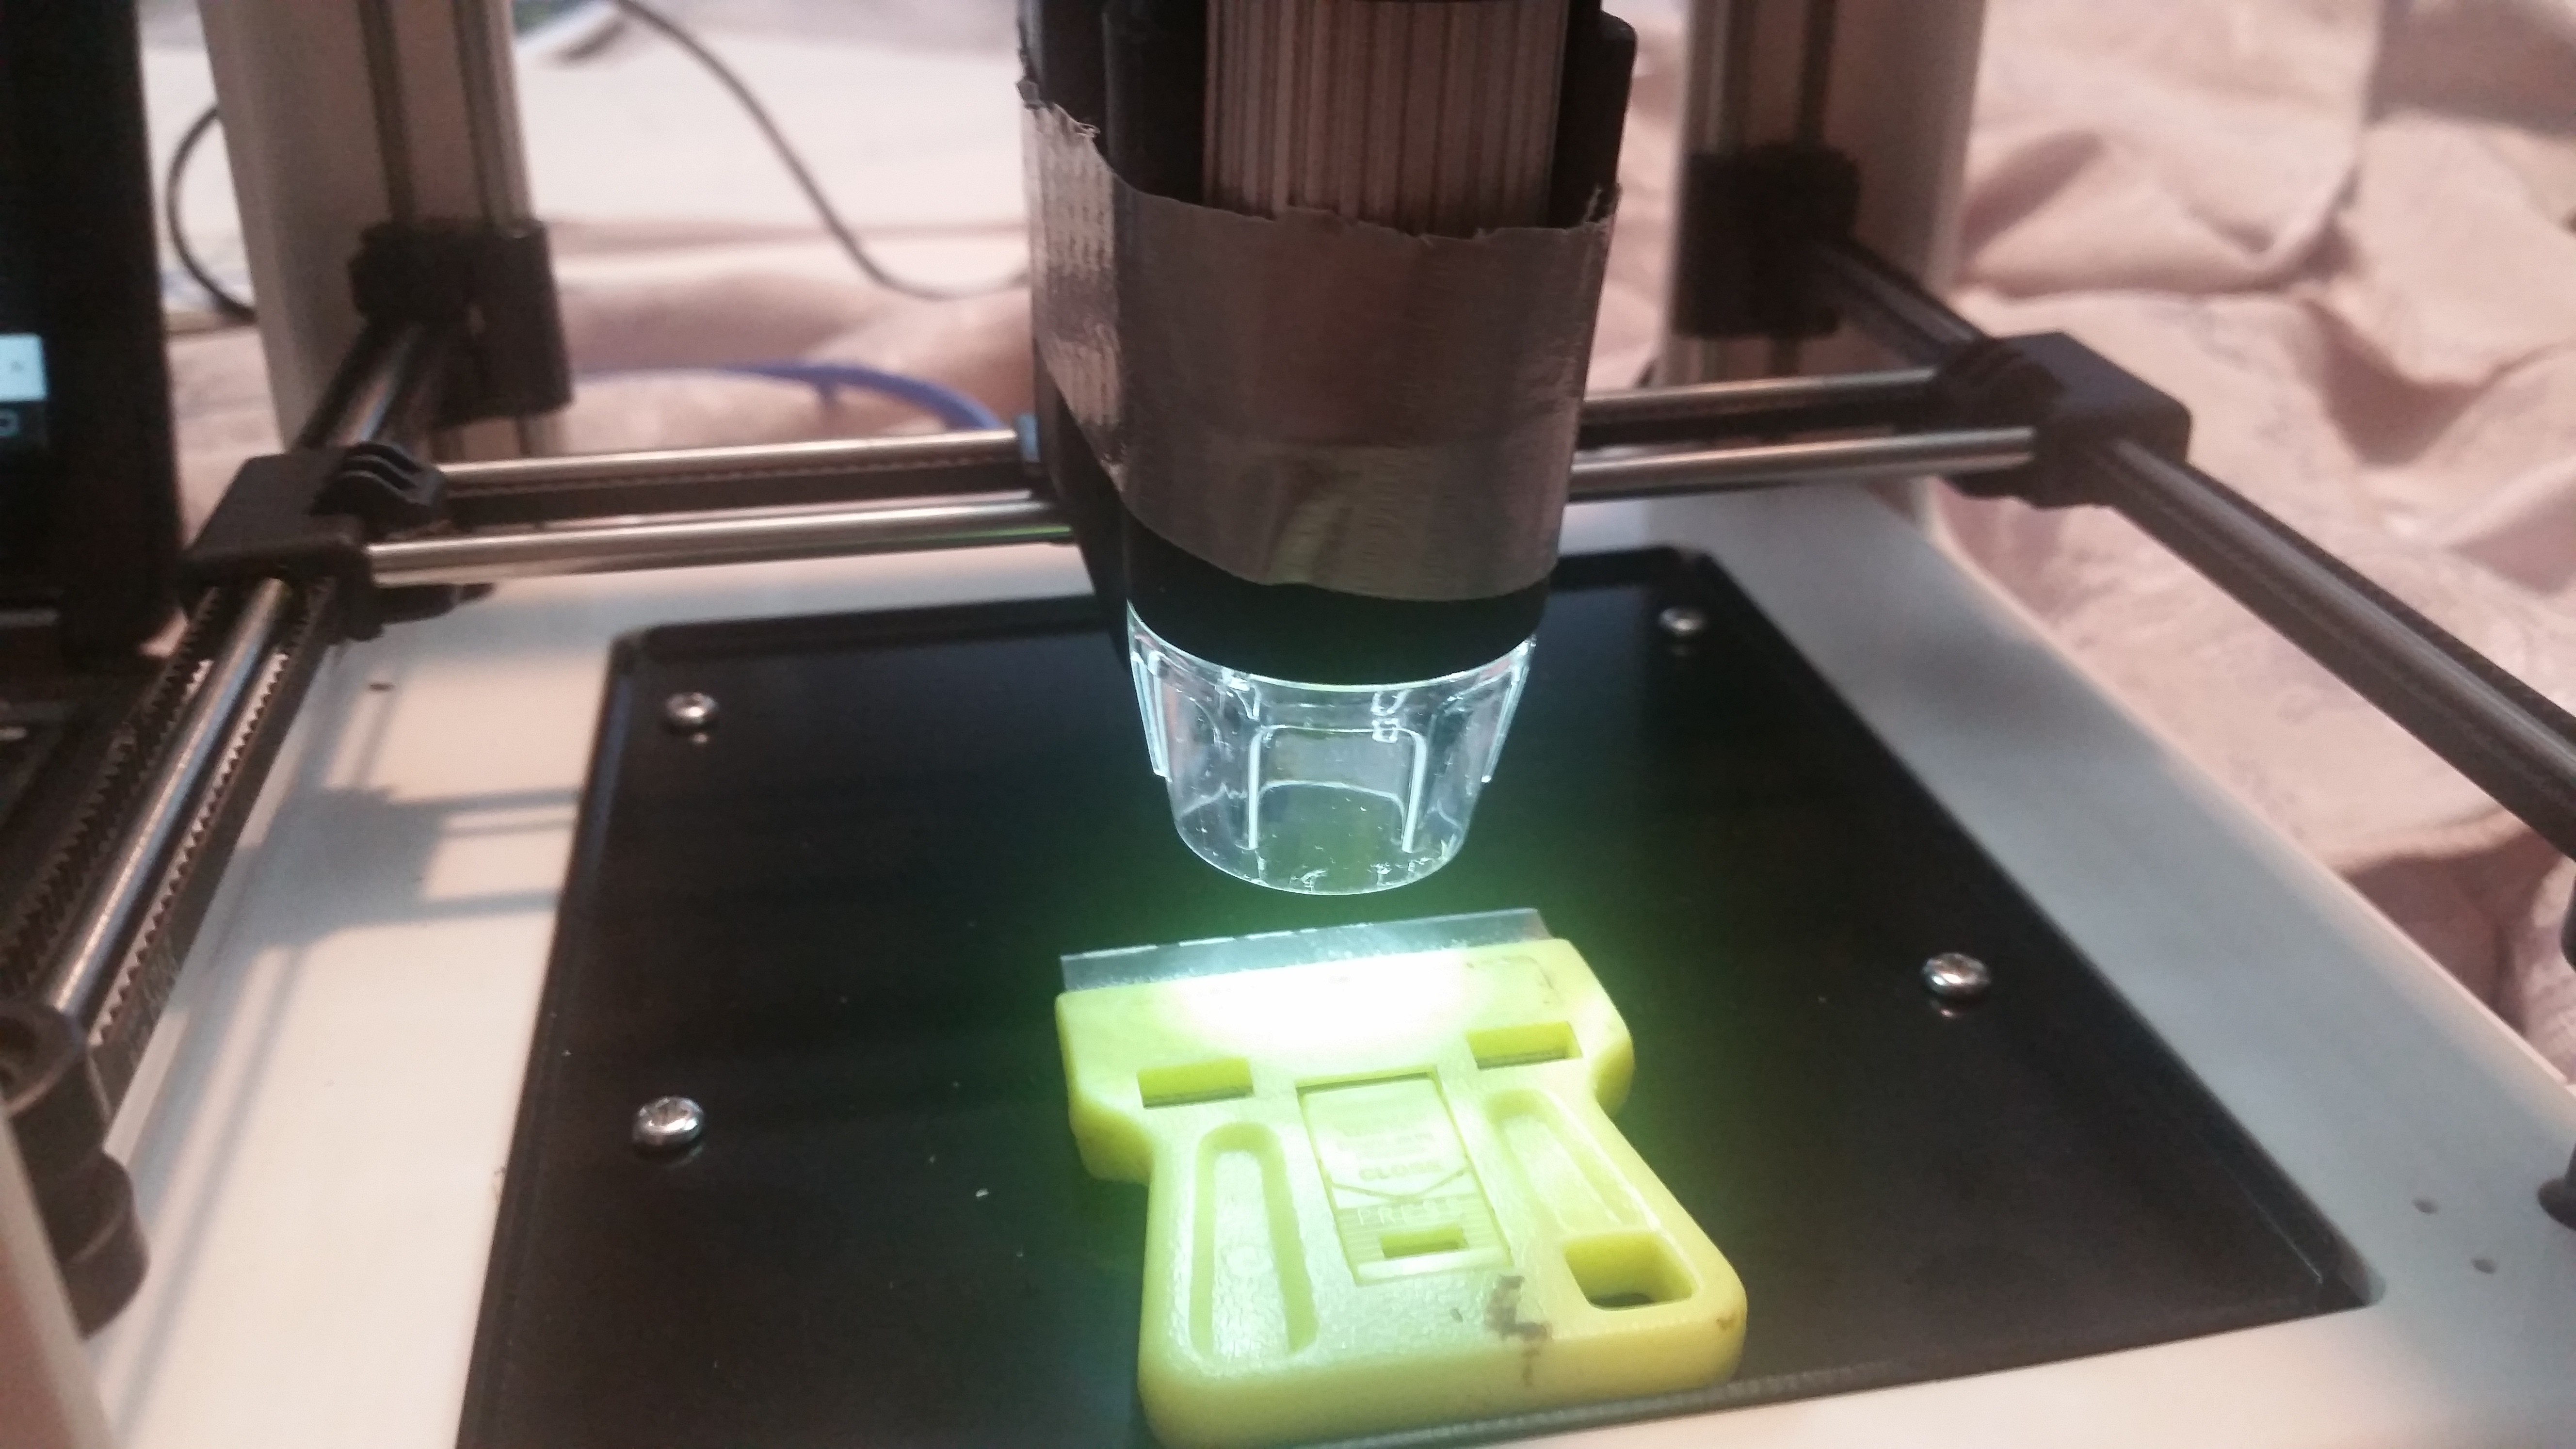
Can't you just strap a camera to a printer with some duct tape?
07/03/2020 at 02:16 • 0 commentsSomeone asked me this, kind of sarcastically, when they learned about the project. And you sure can!
![]()
What printer is this, you ask? It's an easythreed nano --- basically a clone of the M3D micro. It's an adorable little printer, ridiculously super small, and with a very simple, attractive gantry style that moves just the print head, like a delta, but with cartesian coordinates. What's the main advantage of this?
Well, you don't have to mount your object to anything. Just throw it on the build plate. Once I find a printer like this with a bit more stability (the Z axis is particularly horrible) I don't see any reason I would ever switch back to a typical style with a moving build plate.
![]()
Here's the leaf, keeping in mind this is with one of my old cheap microscopes, one I took the IR filter off (hence the washed-out green), it's just one Z height (744 X/Y), and it's strapped onto a sloppy printer with duct-tape. All included, though, should give you an idea of how easy the basic concept of this is.
The banding pattern is a combination of the slop (mostly fixed with microsoft ICE), and non-uniform pixel brightness from the cheap scope (intensified by microsoft ICE). Someday I'm going to sit down with the post on stack exchange which addressed this and apply it to all my old data, see if I can squeeze out a bit more quality from the cheap scopes.
Also, if you've been following along, today marks the official end of the Kickstarter. Didn't make the funding goal, unfortunately. Many reasons for this, but this is Hackaday, not business self reflections, so I'll just say that the project is far from dead and there are a lot of thing I still want to try. This includes improving the user interface and simplifying scan workflow, to doing stereo imaging and 3D model generation using assisted depth from focus. There's a huge amount of low-hanging fruit when it comes to this project and machine vision, and I was recently inspired by the BoofCVproject, so you might see me fumbling around there. -
Abu Moharek Meteorite Fragment
06/17/2020 at 03:17 • 0 comments0.25 grams, purchased for the princely sum of $5.00 (plus 4.98 shipping), from a man who was strangely pleasant in his Ebay ways. Trustworthy.
Unpolarized and polarized. Would love to give UV a try too. I actually took off the IR filter from one of my cheapo scopes a couple of days ago, and played around with an 850 nm flashlight, but that is a different story for a different day.
![]()
![]()
![]()
!!!!
!!!!
wowwwww!!! This came from OUTER SPACE. Of the many fragments of this meteorite, I wonder how many have been scanned like this. I sometimes worry about 'scrambling' in the stitching, but the two scans overlap perfectly, and it was done blind (without being ordered into an array), either. These kinds of images have a LOT of potential feature points, so that helps.
Hackaday subscribers are kind of misleading. I know it says 300, but I think there are maybe five of you who would get an alert for this post, and then bother to read it. It's disappointing, because I really want to see a comments thread with tons of people going "OMG WOW" because I think this one deserves it. Maybe in the meteorite forums... -
Polarized vs. Unpolarized light. Wow!
06/06/2020 at 18:15 • 0 comments![]()
I made a more complete writeup about this image over project Kickstarter page --- 25 days left!
If you're seeing the for the first time, seriously, check it out! If you want this project to succeed, I could really use your help! Take care everyone!
-
The Kickstarter is now live!
05/31/2020 at 19:09 • 0 commentsStarted from Blu-Ray players now we here. Please take a minute to stop on by, share, or even pledge --- if not for a full Beefy ($750) or LadyBug Classic ($250), for a mini Blu-Ray-hack kit ($25), which will let you do all sorts of optics and little motors projects using the components of a single Blu-Ray optical sled.
Thank you, and have a great day!
LadyBug BEEFY: 3D printer motorized microscope
Got printer? Connect to the motors with a Pi, plonk in a cheap scope, and do 2D and 3D scans!