We need a simple way to tell if the Li-Ion batter needs charging or not.
"Precision" circuit
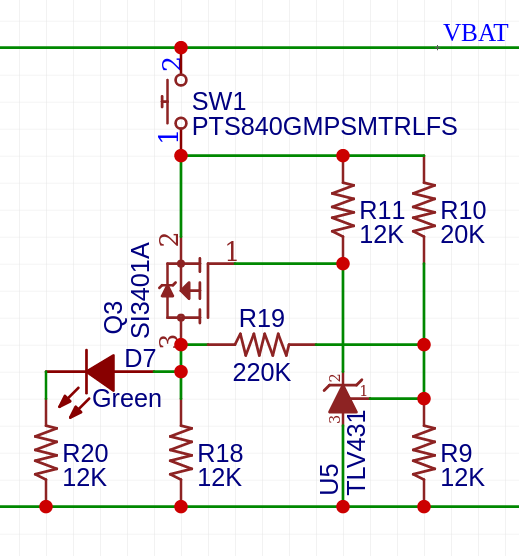
When the switch is closed, the U5 will measure the battery voltage using the voltage divider R10/R9. If the voltage on pin 1 of U5 exceeds 1.24V, then the cathode of U5 will be pulled low, causing Q3 to conduct. When Q3 conducts, the LED D7 will turn on.
R19 provides some hysteresis, preventing oscillation when the battery voltage is around 3.3V.
R18 provides a drain path for the current when Q3 if off. Otherwise, the current through R10 and R19 is enough to slightly turn D7 on.

The hysteresis voltage levels are 3.15V and 3.30V.
The circuit is relative insensitive to component tolerances. The drawback is that there's only one LED. When the green LED is off, you don't know if the circuit is broken (but the battery is full) or when the battery is empty.
Low cost circuit
I came across the following circuit on the internet. It exists in various variants, many even drawn incorrectly. So it looks like some have trouble understanding how it works.

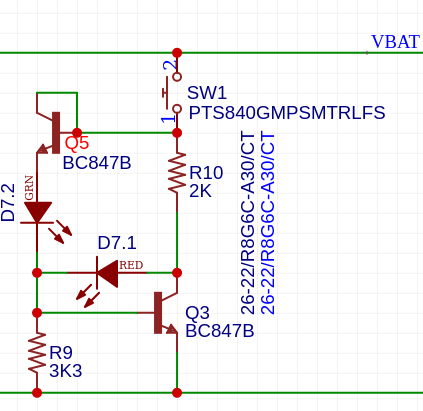
The circuit works as follows. When the battery voltage is low, the current will flow through the 1K+220ohm, the red LED and the 1K resistor across the BE-junction of the transistor. The green LED will be off because the voltage over 1K+220ohm + the red LED, minus the voltage over the 1N4007 diode will be too small to turn the green LED off.
Green LEDs typically have a higher forward voltage than red LEDs. By adding the 1N4007 in series with the green LED further increases the needed voltage to turn the green LED on.
As the battery voltage further rises, we'll reach the point where the voltage over the BE-junction will be enough to turn the transistor into conduction. As the transistor conducts, the collector will be pulled low, causing the red LED be reverse polarized. At that point, the red LED will turn off. The battery voltage will now be sufficient to turn the green LED on.
The values of the 1K+220ohm resistor is not critical because when the transistor is not conducting, the voltage at its collector will be the sum of the diode drop of the forward voltage of its BE-junction and the forward voltage of the red LED. Both of which are relatively current independent. Using a single 3K3-resistor works fine as well if that is what you happen to have laying around.
I've built this circuit with a random green and red LED, two resistors (1K and 1K2), a 1N4148 diode and a BC847 transistor.
- VIN > 3.0V ➭ green LED = ON
- 1.6V < VIN < 3.7V ➭ red LED = ON
The circuit has the advantage of having two LEDs. The case where both are on at the same time also gives an idea of how much charge remains in the battery.

Improvements:
- Reordering of LEDs allows for the use of bicolor-LEDs with common cathode. I used a 1206-bicolor LED with two independent LEDs.
- 1N4007 replaced by BC847B because it's already in the BoM.
- R9 tuned to have the red/green transition at 3.3V. You could place a 2K resistor here as well to shorten the BoM even more.
 Christoph Tack
Discussions
Become a Hackaday.io Member
Create an account to leave a comment. Already have an account? Log In.