Close
0%
0%

ESP Thermal Camera Streamer

ESP8266 streams the thermal data captured with GY-MCU90640 module to web clients

Similar projects worth following
The idea behind the project is to transmit a sequence of thermal frames obtained by the MLX90640 sensor to HTTP clients for further processing and display in the user interface.
The server is based on ESP8266 NodeMCU (lua), so it can only serve up to 3 web clients at a time. It receives thermal data from the GY-MCU90640 through a serial port and sends a stream of thermal frames to HTTP clients, typically located on more powerful hardware, capable of much more complex processing (eg, interpolate frames, convert interpolated data to color images, etc.).

Features

  • The 32x24 thermal frames, taken with the MLX90640 sensor, are streamed by ESP8266 to HTML5 capable web clients, where the frames are interpolated and shown on web UI;
  • The frame sequence, accumulated in web browser memory, can be saved as a file for later playing back and analyzing;
  • Web UI allows setting of up to 10 points for monitoring the temperature of any of the existing 768 points of the thermal picture, those points are persisted in file along with the thermal frames;
  • Wi-Fi connection (e.g. AP configuring, or connecting to the existing Wi-Fi network) can be configured through the Web interface;
  • Everything needed for streaming thermal data and showing it on browser is hosted on ESP8266 HTTP server locally, so no Internet required;
  • There is a built-in IDE for editing the software through Web interface (useful if there is a plenty of space left on ESP flash file system);
  • Up to 3 simultanious web sessions are allowed to receive a stream of thermal frames. If fourth client connects, the server removes the oldest web client recepient. The maximum amount of simultanious client sessions may be later increased if the code is executed on more powerful NodeMCU hardware, e.g. ESP32 (not checked yet).

Follow the following link to play back pre-recorded thermal data.

  • 1 × GY-MCU90640 module The module consists of MLX90640 thermal sensor array, and STM32 microcontroller that allows communication through serial port.
  • 1 × ESP8266 module any board shall fit ok here, but if you are going to hack the software using built-in IDE, the board with more than 512Kb of FLASH is preferable

  • Software improved

    dev-lab05/16/2021 at 16:29 0 comments

    • Thermal frames timestamps improved. Now the frame timestamp is taken when the frame is created on ESP.
    • Bug fix: previously, Web UI might show thermal frames with some delay that could accumulate with time. Now frames are shown closer to real time.
    • The ESP8266 processor frequency is increased to 160 MHz, which seems to help when multiple web clients are connected.
    • The previous version could not work on the latest NodeMCU. Now it should work fine on 1.5.4.1 - 3.0.0.
    • Web UI is now responsive, so it is more usable on mobile phones.
    • Code size is slightly smaller, which is useful on ESP modules with small EEPROM (512k).

View project log

  • 1
    Schema

    The schematic diagram can’t be simpler:

    • connect TX of the GY-MCU90640 to RX of the ESP8266;
    • connect RX of the GY-MCU90640 to TX of the ESP8266;
    • supply the power for both modules (note, that GY-MCU90640 accepts any voltage between 3V and 5V, while ESP module usually requires 3.3V).
      If you use a simpler ESP module (like ESP-01), rather than ESP Dev Board (NodeMCU module), you may have to wire more ESP pins (usually CH_PD and RST must be connected to +3.3v).

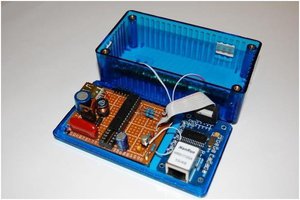
    Here is a prototype I used for debugging:

  • 2
    Setup

    Setup (on github):

    1. Flash the ESP8266 module with the NodeMCU firmware. If you use older ESP module with small onboard flash (512Kb), you have to configure the NodeMCU firmware to be less than 400Kb. That is required to leave enough space (about 70Kb) on flash file system for Thermal Streamer project files. The easiest way to build smaller firmware is to use NodeMCU custom builds service. When building the firmware, select 1.5.4.1-final (frozen, for 512KB flash) branch and the following modules: CJSONencoderfilenetnodetimerUARTWiFi. When the service finish building the firware, it will email you with the two links to download your custom firmware (one for integer version, another for float version). Just download the integer version of custom firmware, check its size (395300 bytes in my case) and flash the ESP module (I used esptool for it).
    2. Upload Thermal Streamer project files to ESP flash file system (SPIFFS) using your favorite tool. For example, I used esp-nodemcu-lua-uploader that allows to load all the files in batch mode.
    3. Restart the ESP8266 module (turn it off and turn back on). After restarting you will see a new Wi-Fi access point with the name: esp-devlab-setup. You will be able to connect to the module with the default password: We1c0me!. The default Wi-Fi AP name and password are specified in file: connect.lua.
    4. On successful connection to the esp-devlab-setup Access Point you will be able to reach the Web UI through the browser by typing anything looking like domain name as an URL, e.g.: any.site.my. You can do that because the software starts a DNS liar server (it responds with the ESP8266 IP to any DNS request) in AP mode.
    5. The thermal sensor module has to be initialized. For doing that, you have to navigate to Configure tab of Web UI, and press Setup button in Setup the thermal sensor section. After a couple of seconds, on successful initialization, you will see the message: Turn-off and then turn-on the power to complete setup. That means that the thermal module was initialized and setting are stored in CY-MCU90640 EEPROM. After that, turn-off power supply for both modules, and then turn-on for normal use. That procedure shall be done only once, here is short video: Setup the thermal sensor.
    6. Web UI shall be quite self-explaining to use. You only have to remember that the best way to brick the software is to use Web IDE without checking twice what you are uploading to the file system. The changes are taken into account immediately. A bricked NodeMCU can be cured only with connecting of ESP module to computer through UART, formatting of NodeMCU file system, and rewriting the Lua software. In some cases you even have to re-flash the NodeMCU (e.g. if you did the mistake and removed the delay in init.lua.

View all instructions

Enjoy this project?

Share

Discussions

dirk1273 wrote 02/08/2022 at 18:35 point

i have a camera module MLX90640 only with scl connection. how can you connect it?

dirk

  Are you sure? yes | no

insidecircuits wrote 12/31/2020 at 13:45 point

Very good project and comes in handy in these times. It would have been great though if you could connect the sensor standalone using I2C and not through UART using the breakout board.

  Are you sure? yes | no

dev-lab wrote 01/08/2021 at 08:25 point

This makes sense, especially now, given the completely insane prices for GY-MCU90640 modules. I bought it for about $ 75 almost two years ago, but now the cheapest I can find is $ 167.20.
So, maybe, if I have some spare time and inspiration, I'll try to write something for I2C.

  Are you sure? yes | no

Alvaro wrote 11/10/2020 at 18:29 point

How many FPS did the video have? or what was the refresh frequency of the browser?

  Are you sure? yes | no

dev-lab wrote 11/19/2020 at 22:29 point

4 when recording (showing data in real time), up to 60 when playing back the recorded data.

  Are you sure? yes | no

Tomasinjo wrote 10/04/2020 at 17:36 point

Very good project. I want to use this setup for light automation. In your opinion, what is the effective range to recognize human in meters/feet using this sensor?

  Are you sure? yes | no

dev-lab wrote 10/09/2020 at 06:24 point

I think it would be possible to distinguish human for up to about 6 meters, while I never tested it. Also, take into account, that there are 2 modifications of this thermal sensor, with different viewing angles.

But don't you think that applying thermal camera for light automation would be too expensive? If you don't like simpler solutions with old good PIR or microwave detectors, I think night vision cameras can be applied there, and it will be still cheaper than MLX90640.

  Are you sure? yes | no

Albar Muzaqi wrote 08/11/2020 at 15:09 point

hallo, how to upload lua to usp8266 without uploader?

  Are you sure? yes | no

supersidor wrote 01/29/2020 at 09:41 point

das ist bimba!

  Are you sure? yes | no

Dan Maloney wrote 01/14/2020 at 17:50 point

I watched the videos and it looks like you're getting maybe 5 frames a second or so? Is that typical performance? Because it looks pretty good, I must say. Nice work! 

  Are you sure? yes | no

dev-lab wrote 01/15/2020 at 12:03 point

Thank you :-)

CY-MCU90640 produces 4 frames per second, so that is the maximal FPS you can get on HTTP client side. With three web clients, the FPS is slower. But when you are playing the previously recorded frame sequence on web UI in fast-forward mode, you can get up to 60fps on a good hardware.

  Are you sure? yes | no

Similar Projects

Does this project spark your interest?

Become a member to follow this project and never miss any updates