-
1Introduction
A water-level marker is an electronic circuit device that transfers data back to control board to show whether a waterway has a high or low water level. Some water level markers utilize a mix of test sensors or changes to detect water levels. The reason for a water level pointer is to measure and oversee water levels in a water tank. The control board can likewise be customized to consequently turn on the water once levels get excessively low and top off the water back to the sufficient level.
-
2Get PCBs for Your Project Manufactured
You must check out PCBGOGO for ordering PCBs online for cheap!
You get 10 good quality PCBs manufactured and shipped to your doorstep for 5$ and some shipping. You will also get a discount on shipping on your first order.
PCBGOGO has the capability of PCB assembly and stencil manufacture as well as keeping good quality standards.
Do check them out If you need to get PCBs manufactured or assembled.
-
3Principle
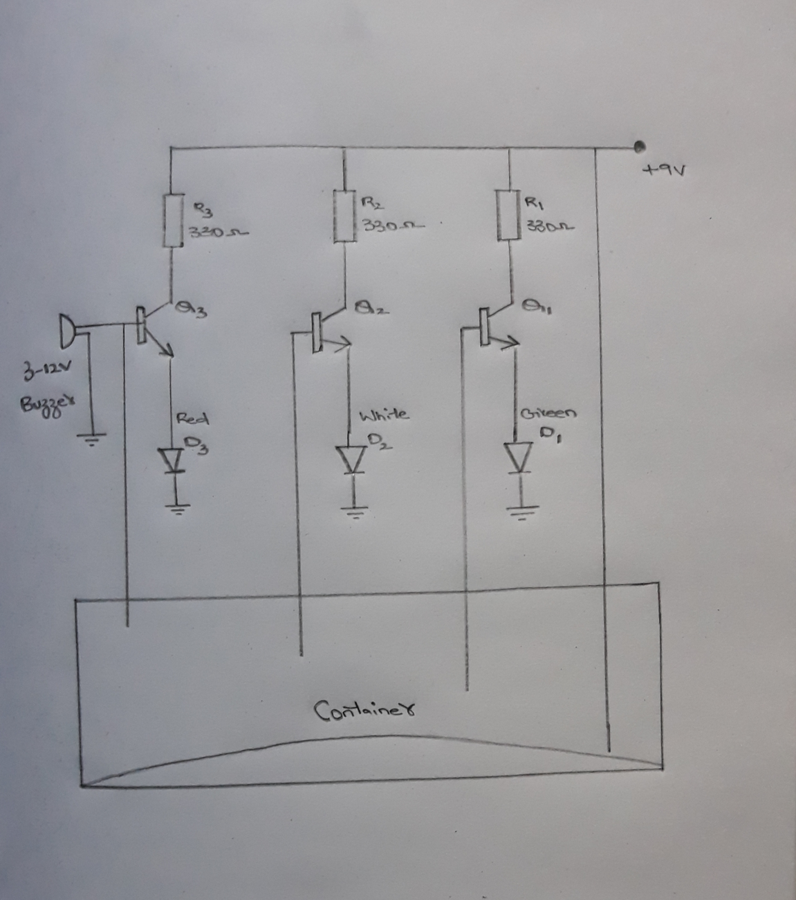
The water level indicator circuit consists of a transistor element and a buzzer which indicates the overflow of water or excessive water in the container. When the water reaches to maximum limit it shows and blinks the LED with buzzer sound to stop pouring or filling water. Let’s make our indicator to save water with automated technology.
![]()
NOTE: The positive terminal of the buzzer has to be connected to the emitter of the transistor and not the base.
-
4Step 4
1. Insert BC547 transistor on the breadboard. The left one is collector, the middle one is base and the last one is the emitter.
2. Insert the other two transistors as well on the breadboard
3. Connect 330 ohms resistors to al the collector terminals of the transistor of the breadboard.
4. Now insert the green Led with its anode to the emitter of first transistor and cathode to the negative rail of the breadboard and do the same for white and red LEDs.
5. Now connect the buzzer on the breadboard. Connect the negative wire of the buzzer to the negative rail of the breadboard and positive wire to the emitter of the third transistor.
6. Connect one wire each to the base of the transistors. Dip the other end of the wire in the container with water, it is important to dip the wires in the water level-wise and not keep the bare ends of the wire on the same level.
7. Connect the power to the circuit and start adding water to the bowl and see the LED's light up sequentially and the buzzer buzzing at the end.
-
5Conclusion
The water level indicator is the best electronic starter device indicating the water level and saves water correspondingly. The led blinks according to their level of water reaches to them and indicates the buzzing sound to stop pouring when it reaches its final limit. What are you waiting for let’s save water in a playful and knowledgeable way.
Water Level Indicator | Transistor basic UTSource
The water level indicator is the best electronic starter device indicating the water level and saves water at the time.


Discussions
Become a Hackaday.io Member
Create an account to leave a comment. Already have an account? Log In.