-
1
-
2Check your hardware against requirements
-
3Select/Download/Checksum
https://www.pfsense.org/download/
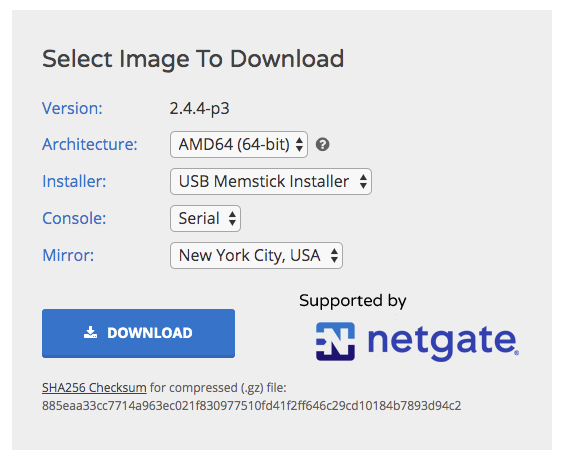
My image options are as pictured below:- Version: 2.4.4-p3
- Architecture: AMD64 (64-bit)
- Installer: USB Memstick Installer
- Console: Serial
- Mirror: New York City, USA
Even though I chose a serial install, I'm still able to access the console out of the box via VGA/kvm. I chose serial because the boot gives a few more options and I would like to eventually experiment with connecting via serial/null modem/etc.
Note the checksum, provided when you select all image options. Alternately, you can view all checksums here: https://files.pfsense.org/hashes/
Check your file integrity using sha256. I'm on OSX but pfSense's documentation is quite good for Windows/NIX/BSD/OSX: https://docs.netgate.com/pfsense/en/latest/install/verify-downloaded-files.html
-
4Prepare the disks and write the image to media
I'm going to be using two USB sticks for the install process: the first is the pfSense installer and the second is the boot drive onto which pfSense will be installed.
But before that, you'll need to decompress the image you downloaded.
The following links point to official documentation. Also worth noting is that the USB link below covers decompressing files, while optical does not:
https://docs.netgate.com/pfsense/en/latest/book/install/prepare-installer-media.html
Using USB media: https://docs.netgate.com/reference/create-flash-media.html
Using optical media: https://docs.netgate.com/pfsense/en/latest/book/install/install-iso.html
Select your media/OS/image writer as described above and buckle up for awhile - this process can take some time. Your process may vary so use the above to guide you and I'll outline my process below.
I'm writing an image to one disk and installing from it to the other. In both cases, it's not a bad idea to also zero out the drives in question. I like doing as a measure to prevent latent partition/file pointers/data from ever becoming an issue. Probably paranoid overkill, but who knows.
Security style 7-pass or even writing random data is overkill here. The point is a simple wipe to break up any contiguous file- or pointer-like structures.
I prefer to do most of my systems prep on *nix systems, and my tool of choice for wiping and writing USB disks is dd. It's almost universal, fast, simple, and reliable. If I had an up-to-date Win10 system I would use cygwin or equivalent to use dd there as well. And just to reiterate, I wouldn't consider dd a security-grade option - again, that's not the goal here.
Despite the following tome, wiping and writing the disks is simple:
- First, find the disk(s) you want to prepare and take note of the identifier(s).
!!!IMPORTANT!!!Getting this wrong could result in overwriting your current operating system! Make sure you have the correct identifier before moving beyond this step. If you have questions, ask and I'll try tohelp you out.
Many *Nix systems mount devices to /dev and append the device identifier like so:
# On OSX:
/dev/disk0
/dev/disk1

# OSX show partitions as

/dev/disk0s1
/dev/disk0s2
/dev/disk1s1
/dev/disk1s2
#etc.

# On Linux:

/dev/sda
/dev/sdb

# And Linux partitions as

/dev/sda1
/dev/sda2
/dev/sdb1
/dev/sdb2
#etc.
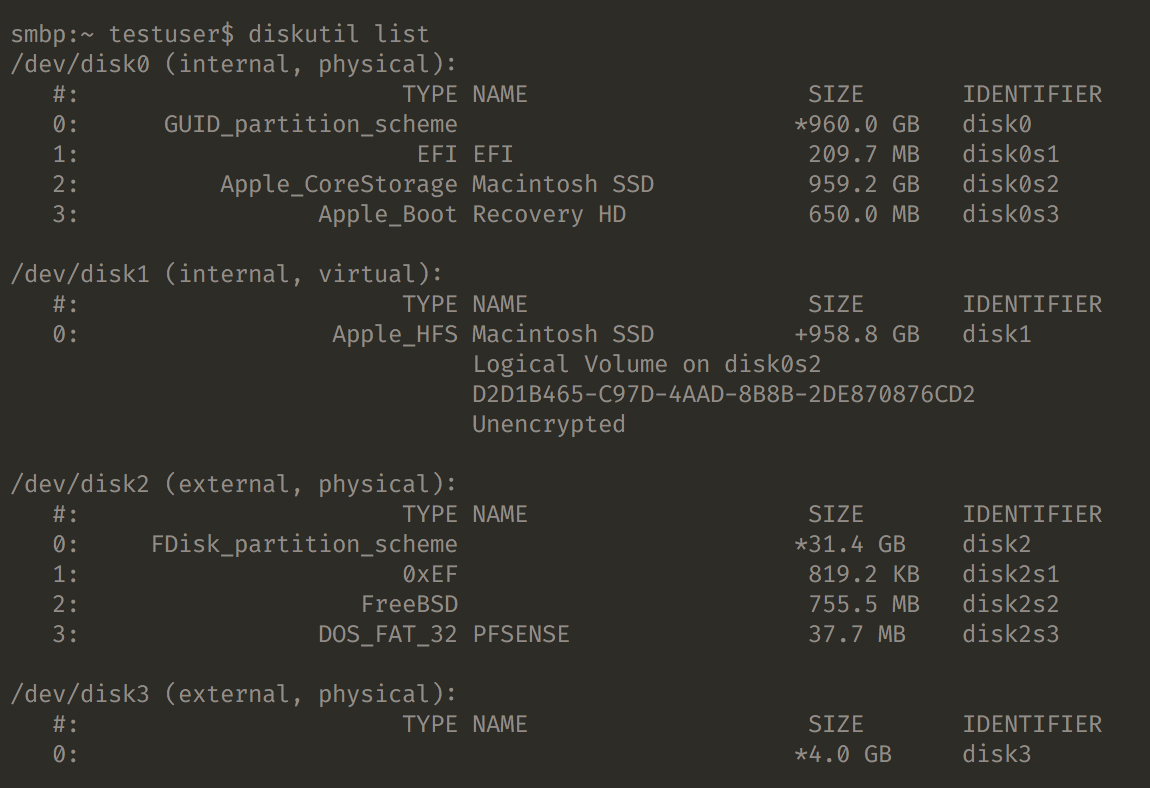
I'm presently on OSX, so I plug in my USB sticks and run the following command from the terminal to see all my devices:diskutil listwhich yields:
Here's how this is commonly done on Linux :sudo fdisk -l Once you have the identifier, you can move forward. Examining the image above, you can see I have an already written pfSense installer on the device at /dev/disk2. It has multiple partitions and is ready for use. The device at /dev/disk3 is my target drive, and is completely empty. How did I do this?
First, you have to unmount the drive:diskutil unmountDisk /dev/disk3 # prepend sudo if necessary # Linux is similar - and I think this also works on OSX: sudo umount -l /dev/sdb # Note: umount not unmount # -l will wait for the filesystem to become available; if this doesn't execute, ctrl+c/z/x to break out, you can kill that process if you want, and exit any filesystem gui windows or any associated processes before trying umount again.Then, overwrite it with zeroes:
sudo dd if=/dev/zero of=/dev/disk3 bs=4m count=1You can run man dd for details, but here's an explanation of the above:
- sudo is shorthand for superuser do - this grants you root privileges to basically do whatever you want.
- dd is the tool we'll use to do the over/writing. It's unclear if it stands for anything but there are a few colloquialisms.
- if is the input file. In this case we're using a virtual device to generate zeroes
- of is the output file, our target drive's identifier
- bs is the block size in MB, in other words, the size of the data chunk that is being written. A lower number means a slower write.
- count is the number of blocks that are simultaneously allowed to be stored in memory during this process.
You want to do this for both your installer drive and your target drive, changing to the respective disk identifier for each.
Once both disks are filled with zeroes, you can write your image to your installer disk by unmounting as above, then altering the dd if path like so:
diskutil unmountDisk /dev/rdisk3 # prepending r to identifier makes this a bit faster
sudo dd if=/path/to/image.img of=/dev/rdisk3 bs=4m
diskutil eject /dev/rdisk3
If you subsequently plug this device into a running OS, the system will either inform you the drive isn't accessible or the system won't give a gui notification at all, though the failed mount may appear in logs.
- First, find the disk(s) you want to prepare and take note of the identifier(s).
-
5Run the installer on your target hardware
-
6Configure, Test, Debug, Repeat
-
7Refine your configuration
I have two use cases:
- Install pfSense as a router behind existing router/AP - get to know the OS/features while existing network is in place
- Swap existing router/AP with pfSense, turn router/AP into bridge mode AP
-
8Export config and Backup
Discussions
Become a Hackaday.io Member
Create an account to leave a comment. Already have an account? Log In.