-
1Overview/ Acquire your parts
In this tutorial you will be:
- Enabling Apple's dictation software, and setting it up to be used offline. Also, you will be configuring it to work with the python program.
- Downloading/installing a Python IDE and getting the necessary packages.
- Downloading/ copy and pasting the necessary code to your Python IDE to take advantage of Apple's dictation software and to perform tasks based on preset keywords.
- Setting up your Arduino and walking through a "PhysicalPixel Tutorial" to give the reader a better understanding of how the system for starting the car will actually work.
- Altering the PhysicalPixel program to meet our needs.
- Wiring the Arduino to a transistor and a relay.
- Wiring the system to a Jeep.
- Starting the Jeep.
-
2Enable Dictation on your Macintosh computer
Turn on your MacBook and Log in. Once you are on the main desktop click the apple icon in the top left hand corner of the screen.

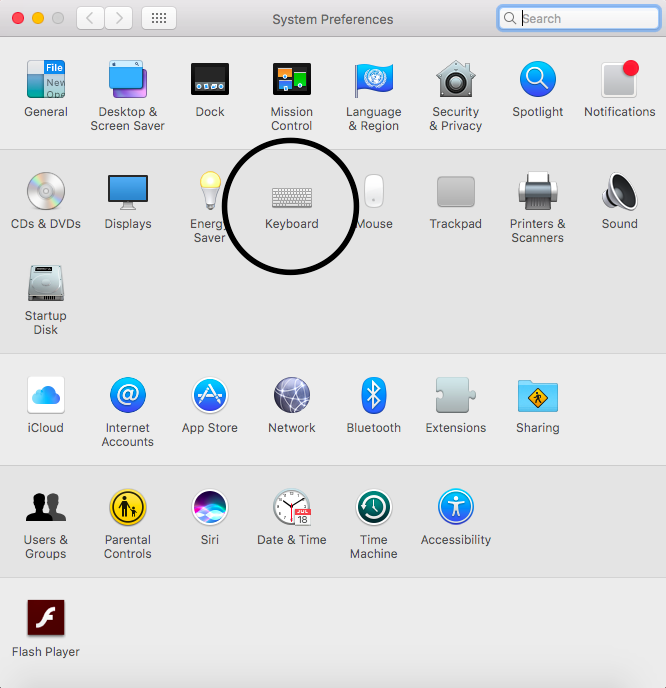
This will open a drop down menu. The option we are looking for should be the second from the top and is called "System Preferences". Click this and something like the following window should open:

Next, click the option labeled "keyboard"
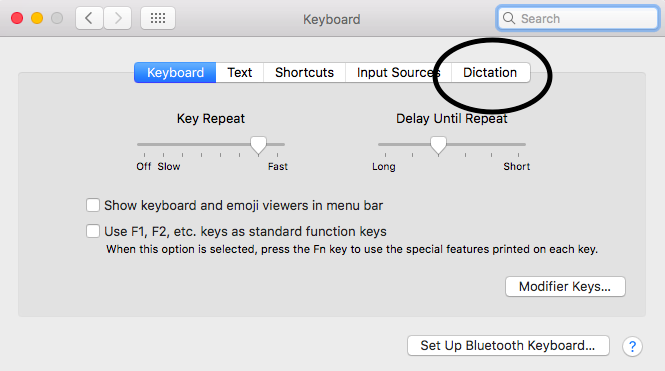
After clicking "keyboard" the following window should appear:

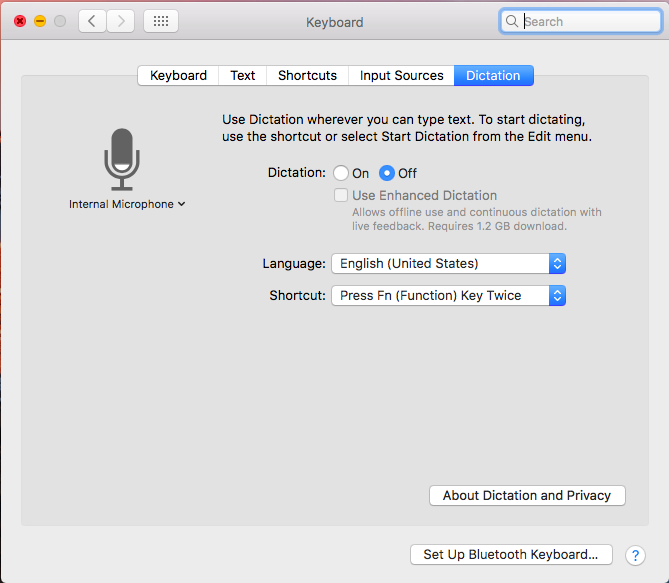
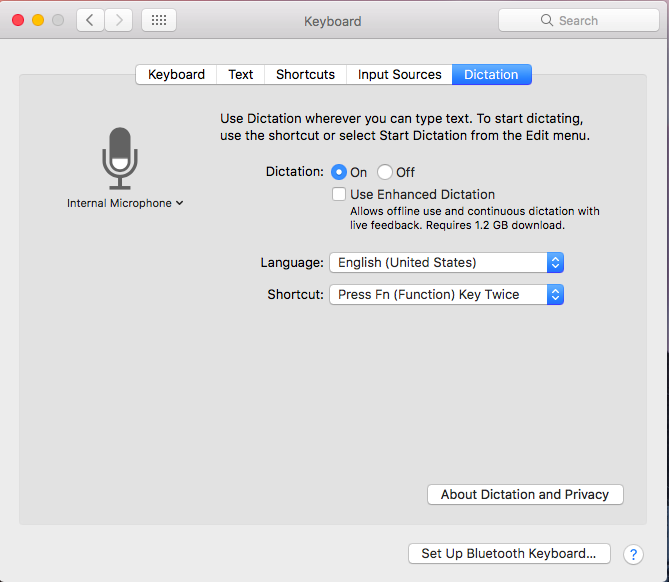
Select the option from the horizontal menu labeled "Dictation" and the following screen will appear:

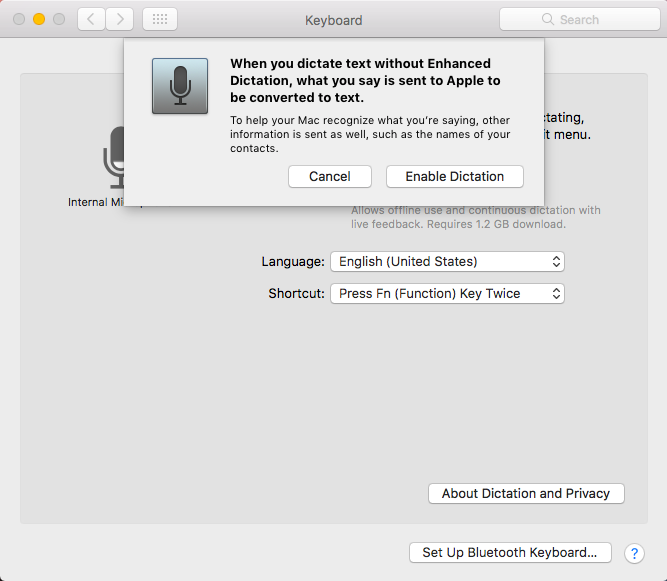
Turn on Dictation by clicking "on" and you will be prompted with this:

Click "Enable Dictation".
Now, the screen should look like this:

From here you are going to want to click the box beside "Use Enhanced Dictation" and if you are prompted with anything just agree and it should begin the download for using Enhanced Dictation. The reason that we want to use Enhanced Dictation is so that we can perform speech to text without having to be connected to the internet.
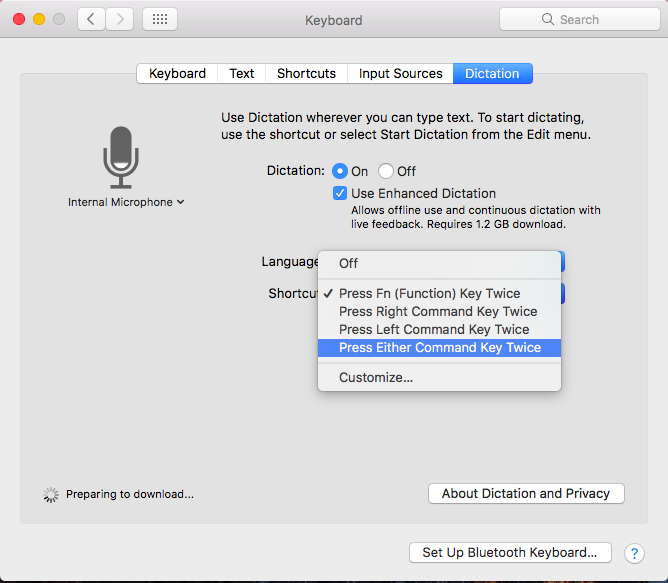
Finally, you need to change the option labeled "Shortcut" from its native setting to "Press Either Command Key Twice". You will do this by selecting the drop down menu next to the word "Shortcut" and selecting "Press Either Command Key Twice". Like so:

All done!!! Feel free to close your system preferences. ***IF EVERYTHING WENT SMOOTHLY STOP HERE AND PROCEED TO THE NEXT STEP, OTHERWISE CONTINUE READING BELOW***
------------------------------------------------------------------
*If you ran into problems like I did where the option to use dictation was not available on your machine follow these steps:
If you are having this issue you need to be sure you have the correct operating system for the MacBook. You MUST have an operating system loaded on the machine that both is supported on your MacBook and is capable of supporting Apple's Dictation in order for this tutorial to work.
If you are uncertain how to figure this out follow these steps as a starting point:
*The newer your Macintosh computer is the less likely it will be that you need to change its OS.*
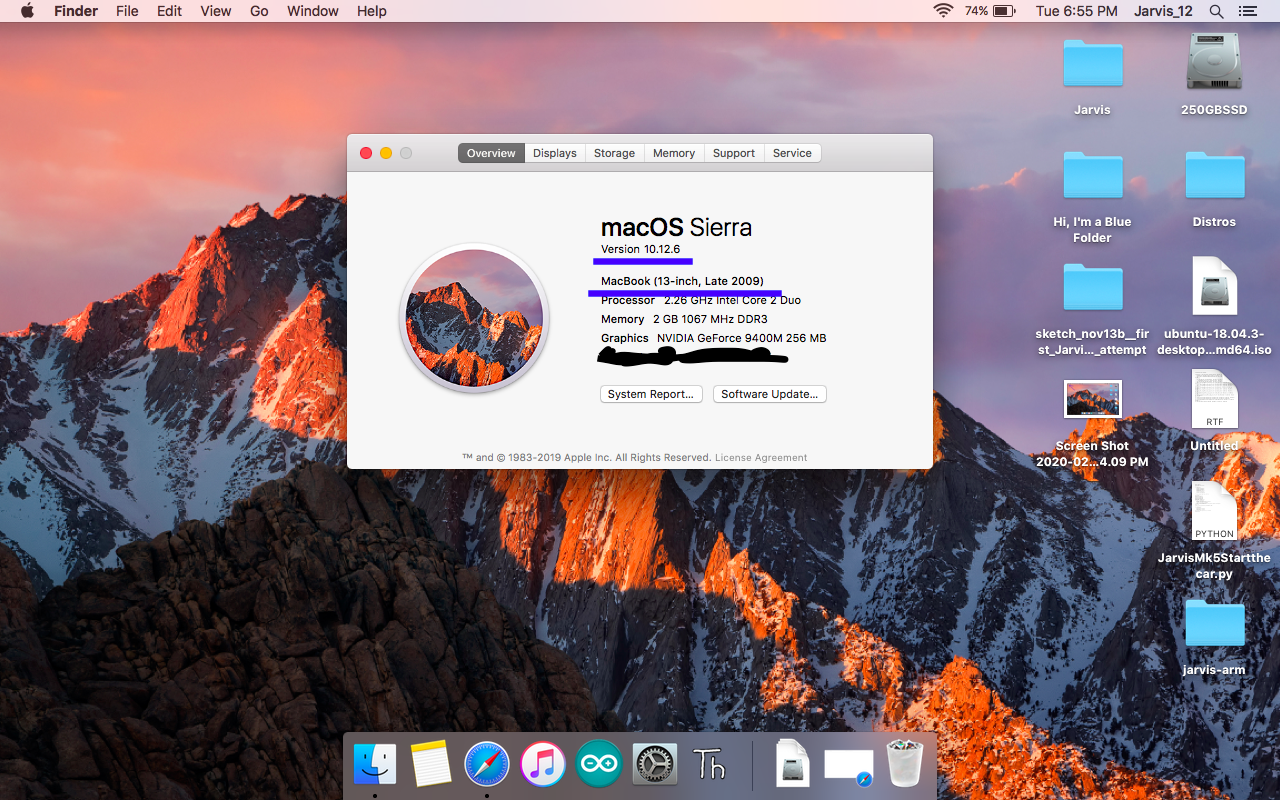
For this project I used a MacBook (13-inch, Late 2009) model. If you are unsure what model MacBook you have and/or which version of the Mac OS you are using go to the desktop, and click the apple icon in the upper left hand corner of the screen.

And select the option: "About this Mac"
After selecting "About this Mac" the following screen will appear:

I have underlined the 2 pieces of information that we care about in blue. The first is the Version of the operating system. In this case we are running Version 10.12.6 on a 13" Late 2009 MacBook.
This version of the Macintosh operating system is Sierra. If you are using a 13" Late 2009 MacBook you may need to go find a copy of Sierra and install/upgrade to it on your system. The reason I am running Sierra is that I looked around online and found that this was the only version of the Macintosh operating system that was both capable of running on my 2009 MacBook and also possessed Apple's Dictation feature.
-
3Download Python IDE and install packages
For this project I decided to take a crack at using Python for the first time, so if there are better methodologies for accomplishing this goal software wise let me know.
The IDE that I chose is called "Thonny". If you would like to use this IDE it is free to download from https://thonny.org. If you have a different one that you would prefer to use I would assume that as long as you are capable of running the program everything should be fine.
This program is dependent on a project named pynput located here: https://pypi.org/project/pynput/
For controlling things via USB It also requires pySerial located here: https://pypi.org/project/pyserial/
For Thonny installing the pynput library goes like this:
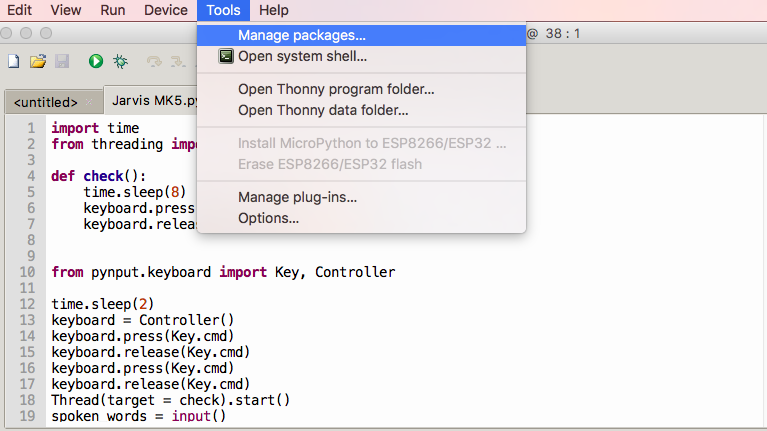
Open Thonny and then go to the Tools menu at the top of the screen. This will cause a drop down menu to appear, and the thing that we are looking for is "Manage packages". It should look like this:

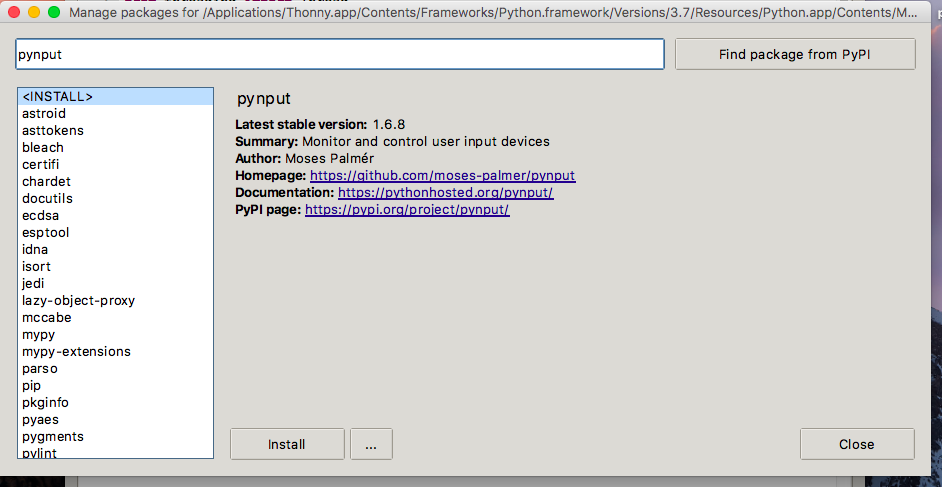
Next, type into the search bar "pynput" and search for it. The screen should look like this:

Click "Install".You may also need to install a package called "pySerial" if so, follow these instructions again, but instead of searching for "pynput" type "pySerial".
-
4Write Your Python Code
***A big THANK YOU to my friend Jimmie Becker! He helped me figure this code out***
Go to the file section of this tutorial and download the python file. It will take advantage of apple's dictation feature and use it to perform tasks based on spoken keywords. Another option is to copy and paste the code at the bottom of this instruction into the IDE of your choice and you're good to go: Once you have this program pulled up click run and see what happens. *It could require pressing run several times the first time you run it at any given point for the dictation software to load etc.*
What should happen is that a cursor appears and then the apple dictation microphone icon. You will then have several seconds to speak your command at which point the program will enter these words for you, read through them looking for keywords. These keywords will be "Jarvis", "start", and "go" when you first use the program, but you can easily change these to look for whatever words you would like to use. Try saying "Jarvis" and the program should print to the screen "At your service sir". If "start" or "go" is spoken then an "H" and subsequently an "L" will be sent to the serial port and turn on pin 8 and thus energize the relay just like in the Arduino code we performed earlier.
*If you keep getting an error related to the program not being able to locate anything on usbmodem621 you may need to change the number after "usbmodem" in the code to the proper number for your system. In order to do this open up the terminal and type or paste:ls /dev/tty.*
Then unplug the Arduino and run the command again to look for which information changed and take note of the number associated with the usbmodem you are plugging the Arduino into. This is the number that you need to put in place of "621" in the python code.
----------------------------
import subprocess
import time
from threading import Threaddef check():
time.sleep(4)
keyboard.press(Key.cmd)
keyboard.release(Key.cmd)
keyboard.press(Key.cmd)
keyboard.release(Key.cmd)
time.sleep(4)
keyboard.press(Key.enter)
keyboard.release(Key.enter)from pynput.keyboard import Key, Controller
time.sleep(2)
keyboard = Controller()
keyboard.press(Key.cmd)
keyboard.release(Key.cmd)
keyboard.press(Key.cmd)
keyboard.release(Key.cmd)
Thread(target = check).start()
spoken_words = input()
if "Jarvis" in spoken_words:
print("At your service sir")
if "start" or "go" in spoken_words:
import serial # you need to install the pySerial :pyserial.sourceforge.net
import time#your number following usbmodem might be different in which case you'll need to find out which one is your arduino
arduino = serial.Serial('/dev/tty.usbmodem621', 9600)def onOffFunction():
time.sleep(1)
arduino.write('H'.encode())
time.sleep(1)
arduino.write('L'.encode())time.sleep(1)
onOffFunction()-------------------------
-
5Setting up Arduino/ PhysicalPixel Tutorial
If you do not already have the Arduino IDE downloaded you can get it for free here: https://www.arduino.cc
Once on the Arduino website go to "software" then "downloads", select the correct system for your computer, and follow the installation instructions provided in the program.
------------------------
Once installed perform the following steps:
1. Plug your Arduino into your computer via USB.
2. Open the Arduino IDE
3. Go to the "tools" menu at the top of the screen.
Change the "Board" section of tools to the Arduino board that you are using (for the purposes of this tutorial I will be using an Arduino Uno. However, most Arduino boards should work for what we are going to be doing with them.
Change the "Port" section to whichever port your Arduino is currently plugged into *it will most likely be the only port listed with the word "Arduino" in the title*4. Now go to the "File" menu at the top of the screen.
- Then "Examples"
- Then "04.Communication"
- Then select "PhysicalPixel"
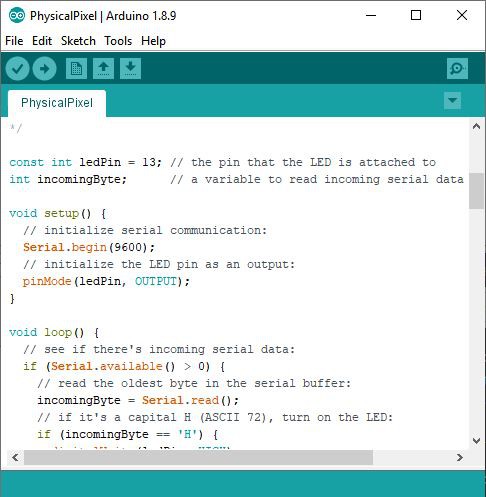
5. The following is the program that should come up *once you scroll down some you will see this*:
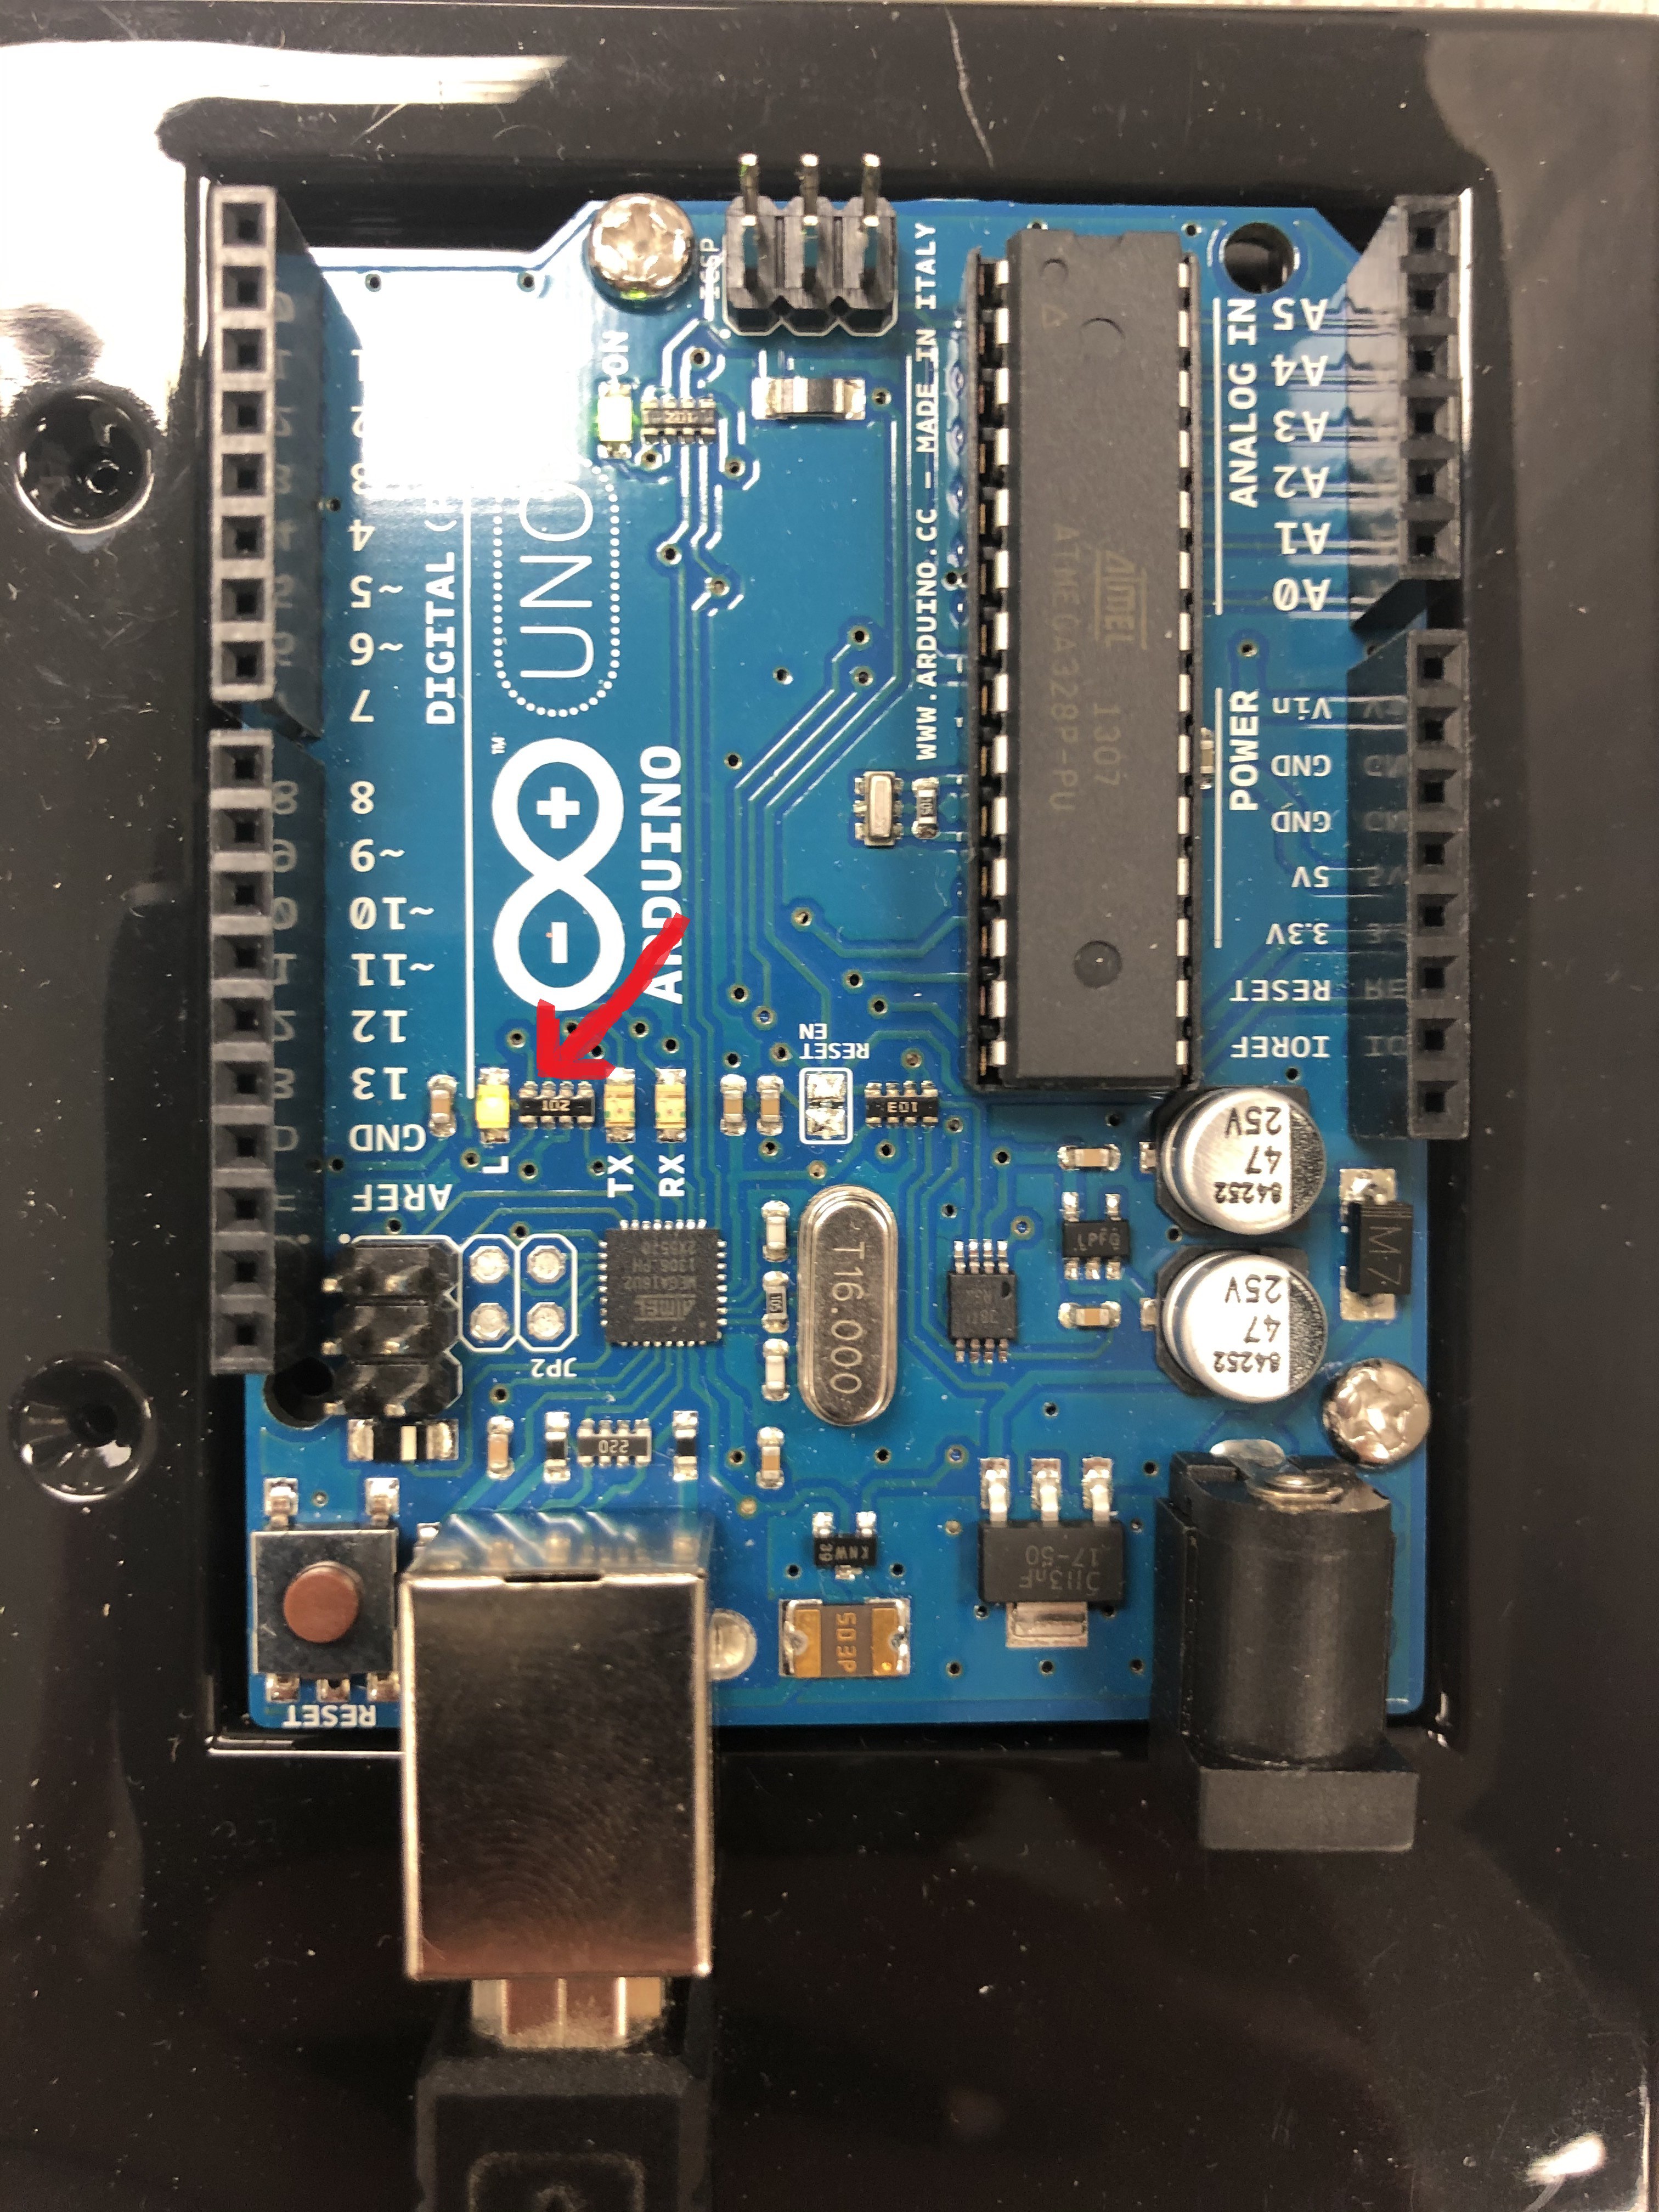
6. What this code is basically saying is that when you print an "H" to the serial connection you have between your computer and the Arduino via the USB cable that the LED located at pin 13 will turn on, and when you print an "L" the light will turn off. This LED is soldered onto the board on the Arduino Uno and on mine is yellow. *Don't worry if yours isn't illuminated currently*:

^ This is the onboard LED I am talking about.
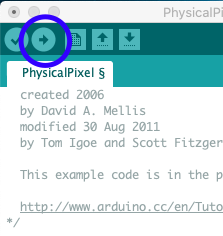
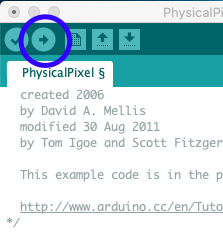
7. Now download the program to the board by pressing the arrow button in the top left hand corner of the window:

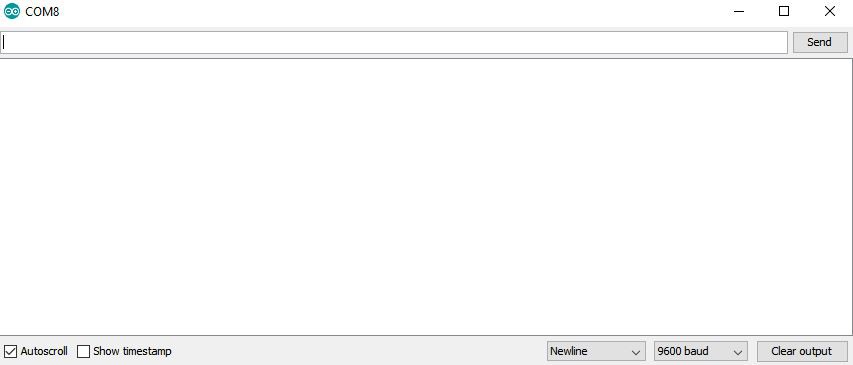
8. Once your program has been downloaded to the board go to the "Tools" menu at the top of the screen. This will make a drop down menu appear. The option that you are looking for is called "Serial Monitor". Select Serial Monitor, and the following window should appear:
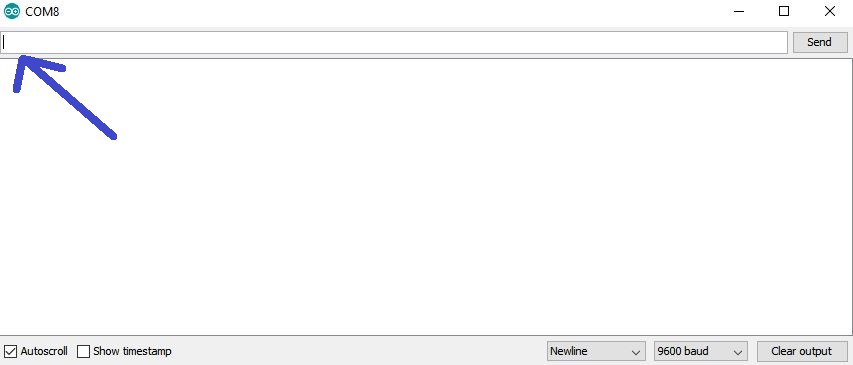
9. When this window opens the cursor should automatically appear where it needs to be. If not, click the space provided to make the selector appear here:
10. Now type a "H" . It needs to be a capital "H" or it will not work*, and press enter. This should turn on the on board LED.
11. Next type a "L" in this same window. This too needs to be a capital letter and press enter. This should turn off the on board LED.
-
6Altering the PhysicalPixel program to meet our needs:
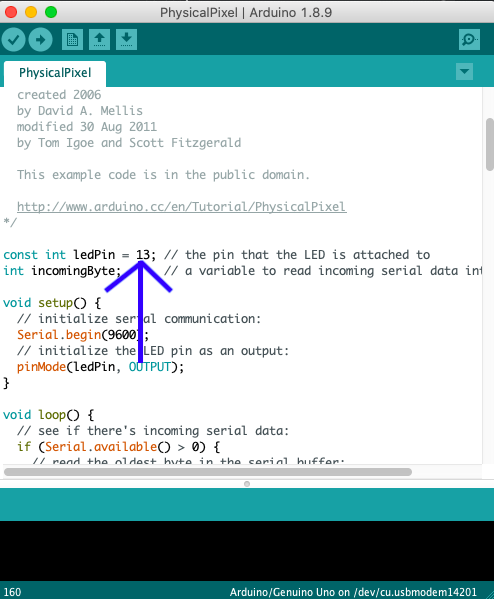
Now that you have the "PhysicalPixel" example code open, scroll down the page a little and the first non-grayed out text should look like the following picture:

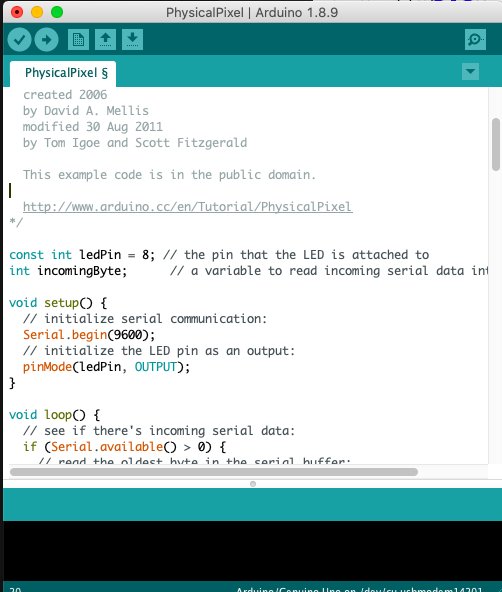
What we care about in this code is the number "13" that the blue arrow is pointing to in the picture. This needs to be changed from the number "13" to the number "8". The program should now look like this:

Now go click the arrow key in the top left of the window:

This will upload the program to your Arduino.
-
7Wiring Arduino to transistor and relay
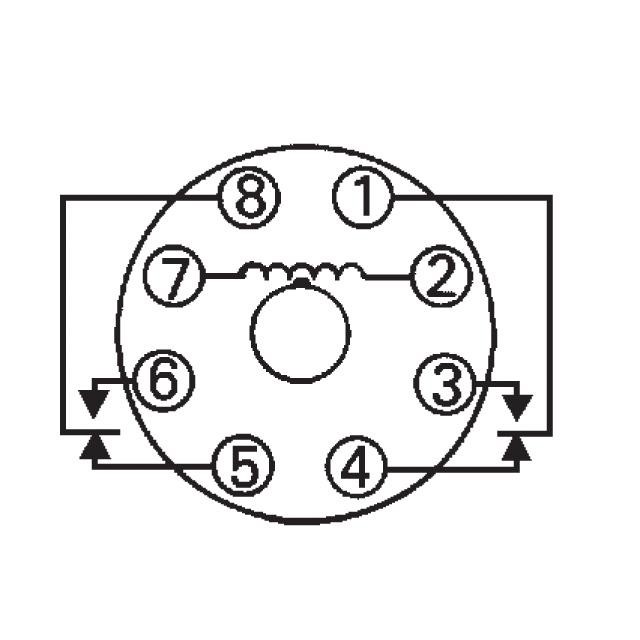
Here is a diagram for the KRPA-11DG-12 relay which I found at https://www.digikey.co.il/product-detail/en/te-connectivity-potter-brumfield-relays/KRPA-11DG-12/PB169-ND/45030:

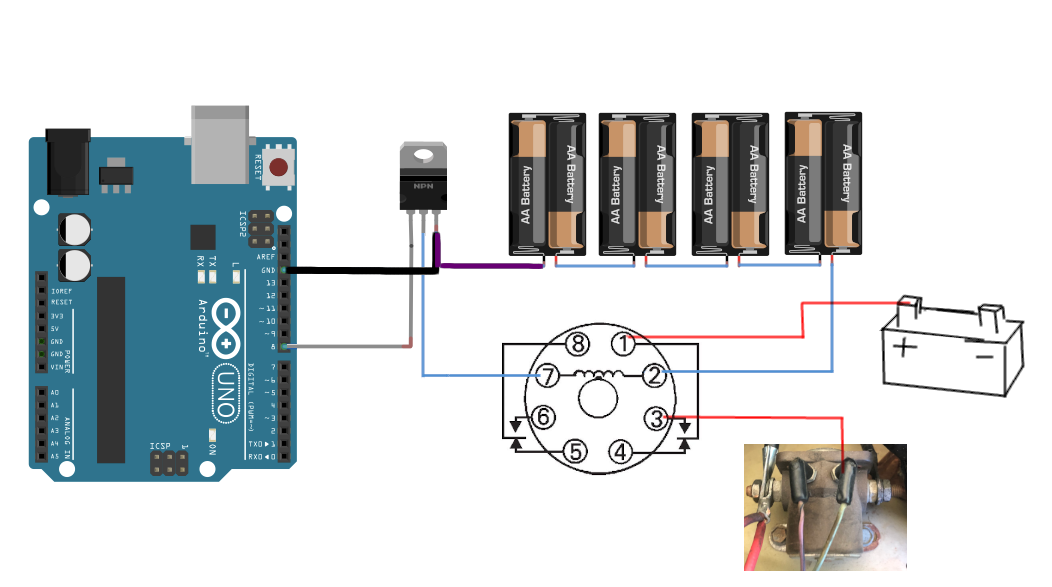
If you are not familiar with electromagnetic relays, they are basically a switch that gets flipped on and off by use of an electromagnet being energized. In the above diagram the electromagnet is located across the 7 and 2. When power is applied across these two locations then the connection between 1 to 4 and 8 to 5 will break and 8 to 6 and 1 to 3 will now be connected.
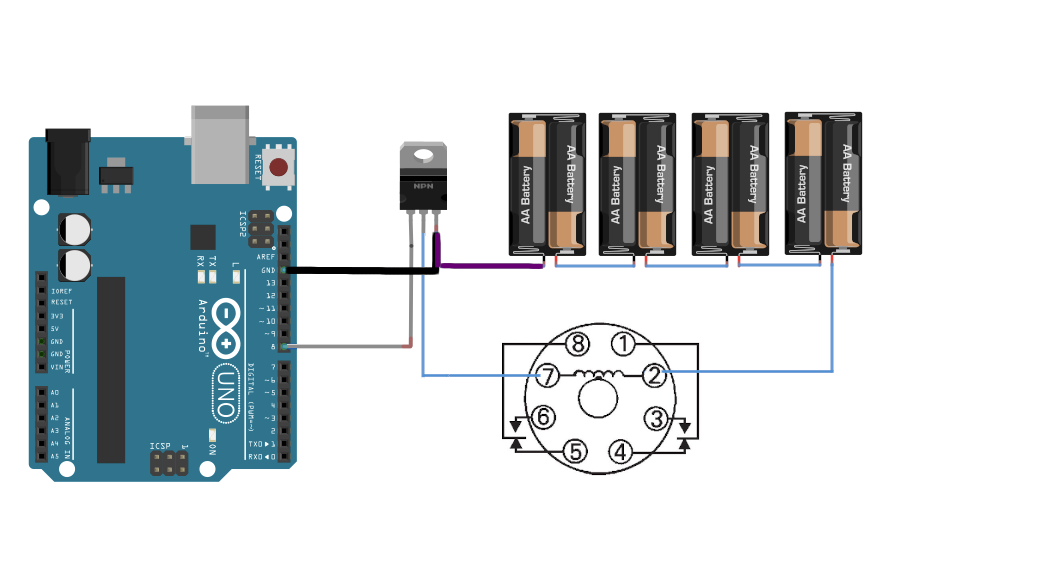
In order to drive this relay we will need a +12V input. Because the Arduino can not supply this as an output we will be using a transistor to energize the relay when it receives a signal from the Arduino.
If you are not familiar with transistors they have many applications, but we will simply be using one as a switch. Think of a regular switch but instead of being flipped on and off by mechanical means, this type of switch gets flipped on and off by an incoming voltage. In this case the incoming voltage is the voltage from Arduino pin 8 being turned on via serial communication like in the PhysicalPixel example.
This incoming voltage from the Arduino will cause the transistor to complete the path to ground for the relay and thus supply the +12V to the relay coil.
Here is a drawing of how to wire everything up:
Once you have everything wired up:
I strongly recommend opening back up the Physical Pixel program and printing an "H" and "L" to the serial monitor to be sure that you have everything wired up correctly. If everything is working then when you type an "H" and send it to the Arduino you should here a click coming from the electromagnetic relay. This click is the coil pulling the connections to their new location and is normal. Sending an "L" should then disengage the coil and thus return the inner workings of the electromagnetic relay to its unenergized locations. -
8Wiring system to Jeep/ vehicle with an external starter solenoid
First, bring everything outside. What we are going to do now is find the starter solenoid and hook our system that we built in the previous steps between this component and the wire coming from the ignition.
First: Go to your Jeep and open the hood. It will likely have more components on the inside than the one that I used for this project. It may also possess an entirely different engine, however as long as your automobile has an external starter solenoid this method should work.
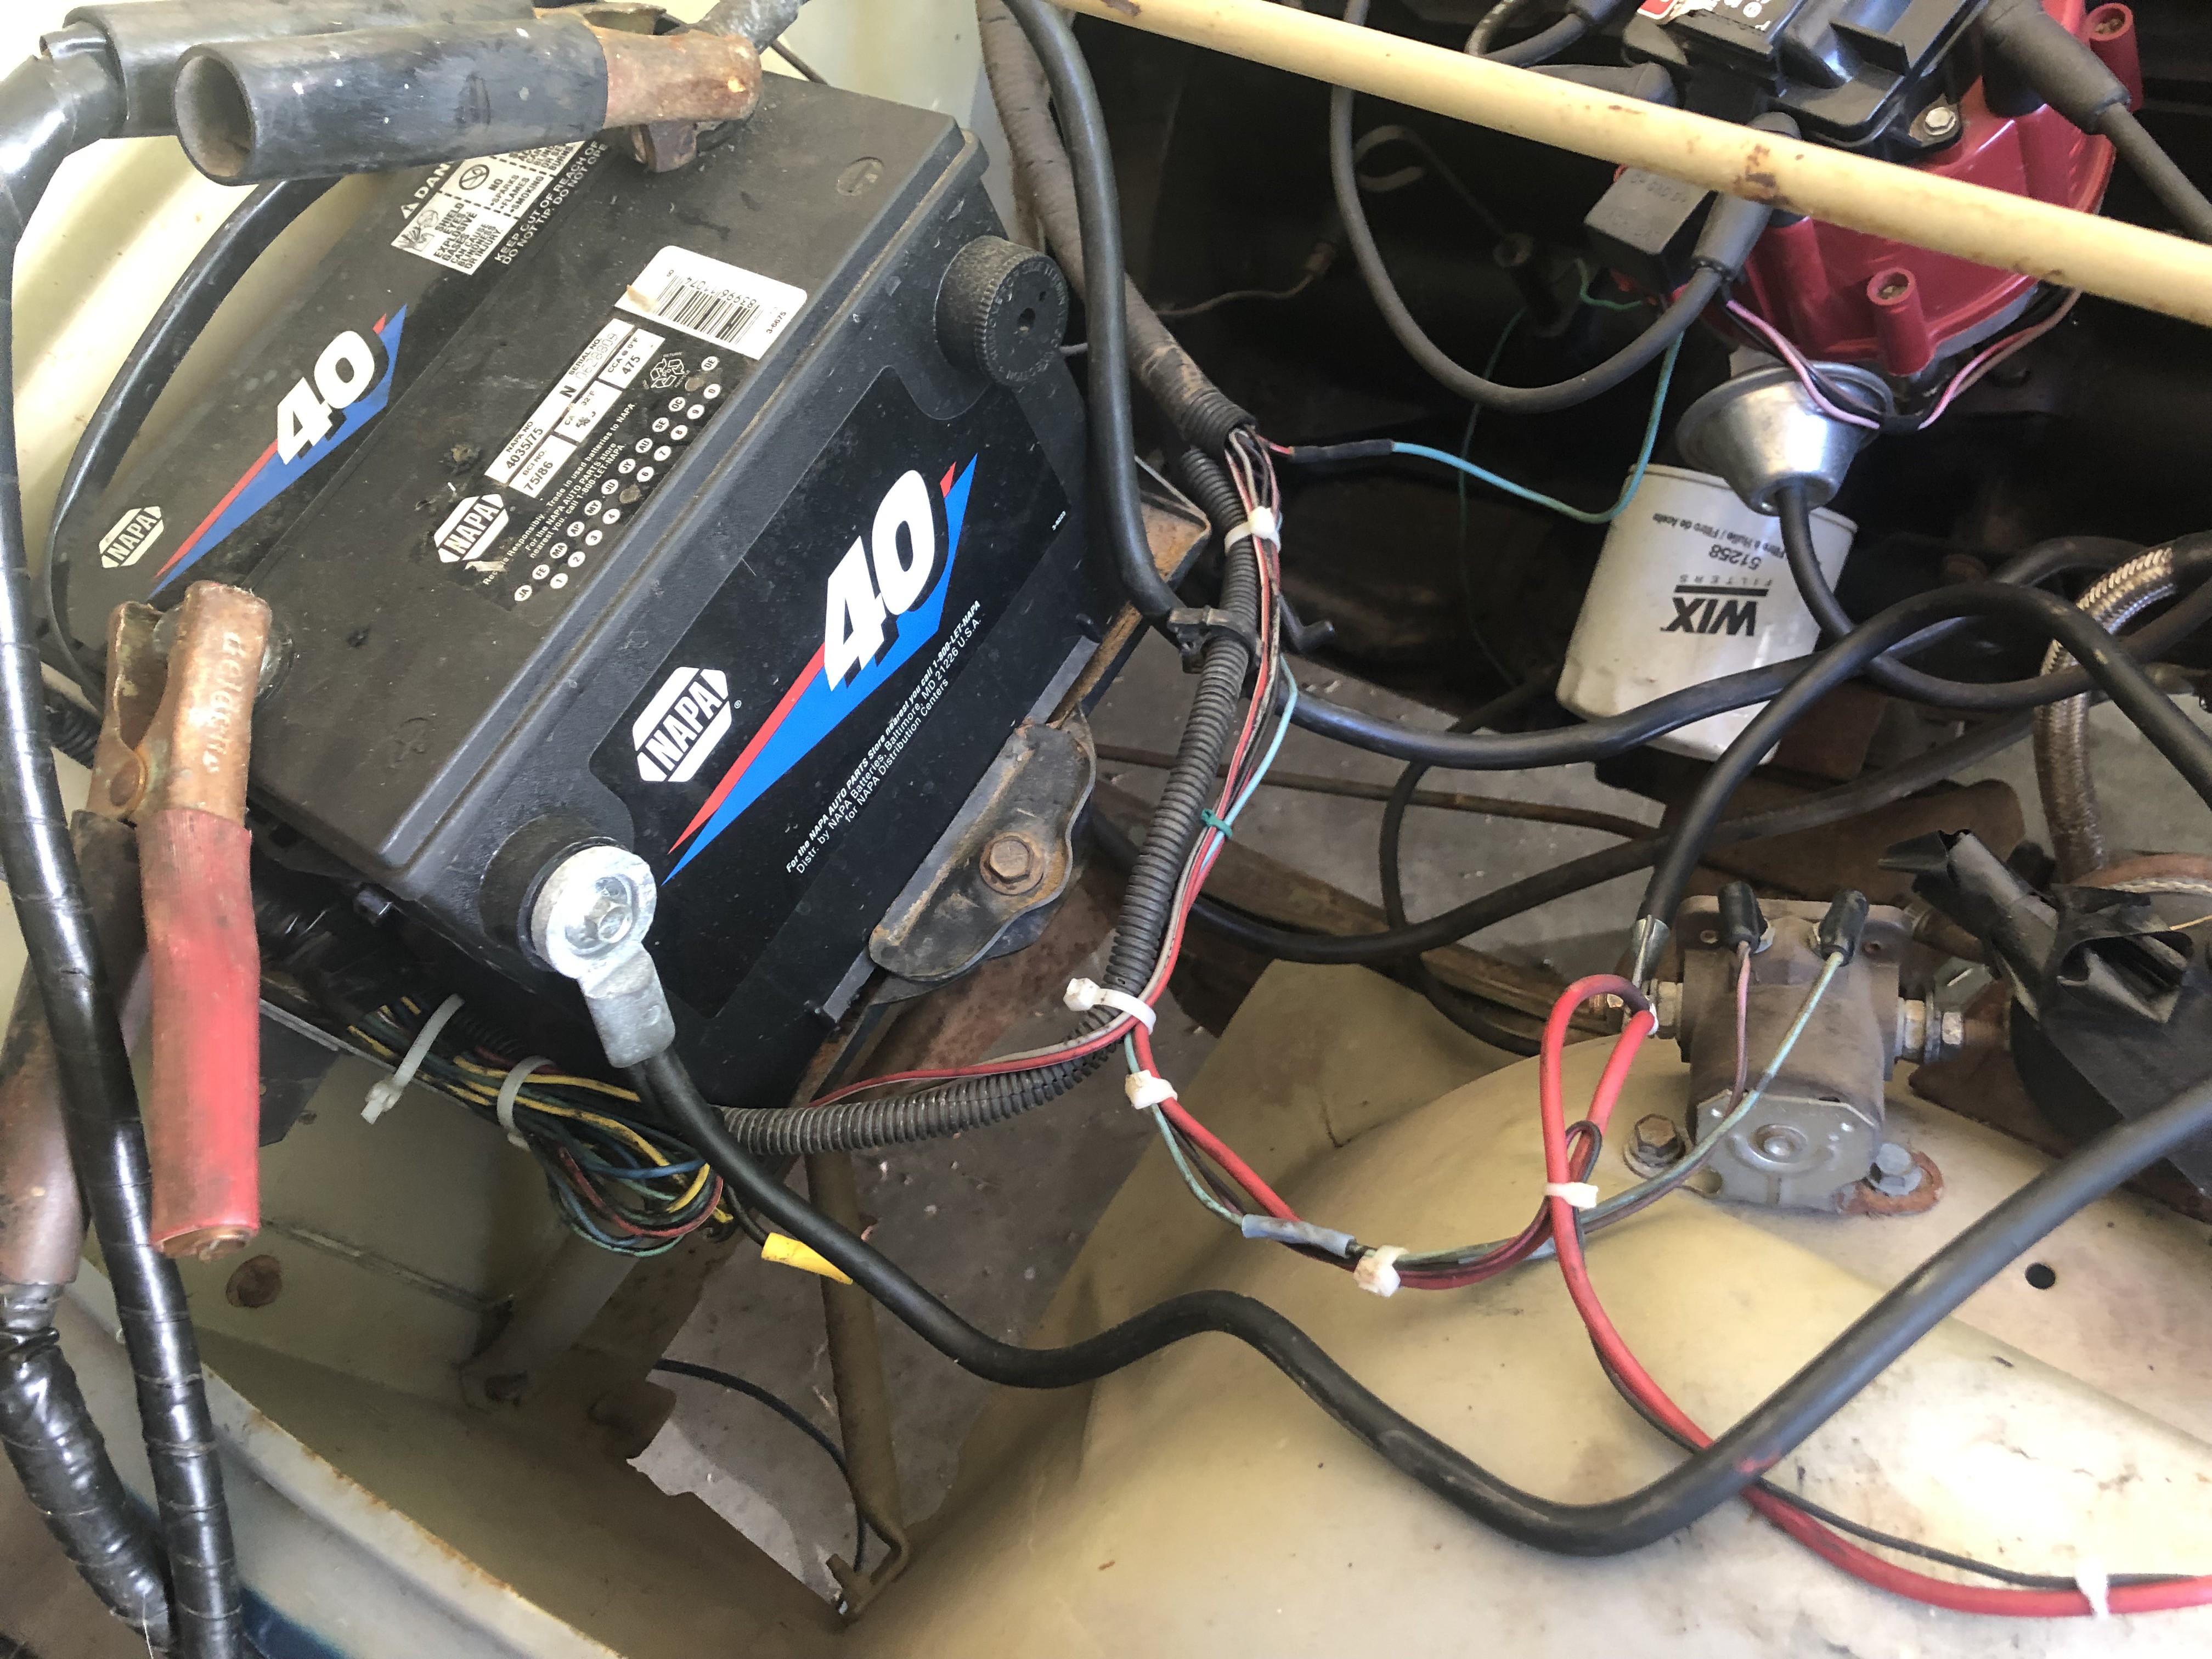
Here is the view from under the hood of the Jeep that I used:

Coming around to the left side:

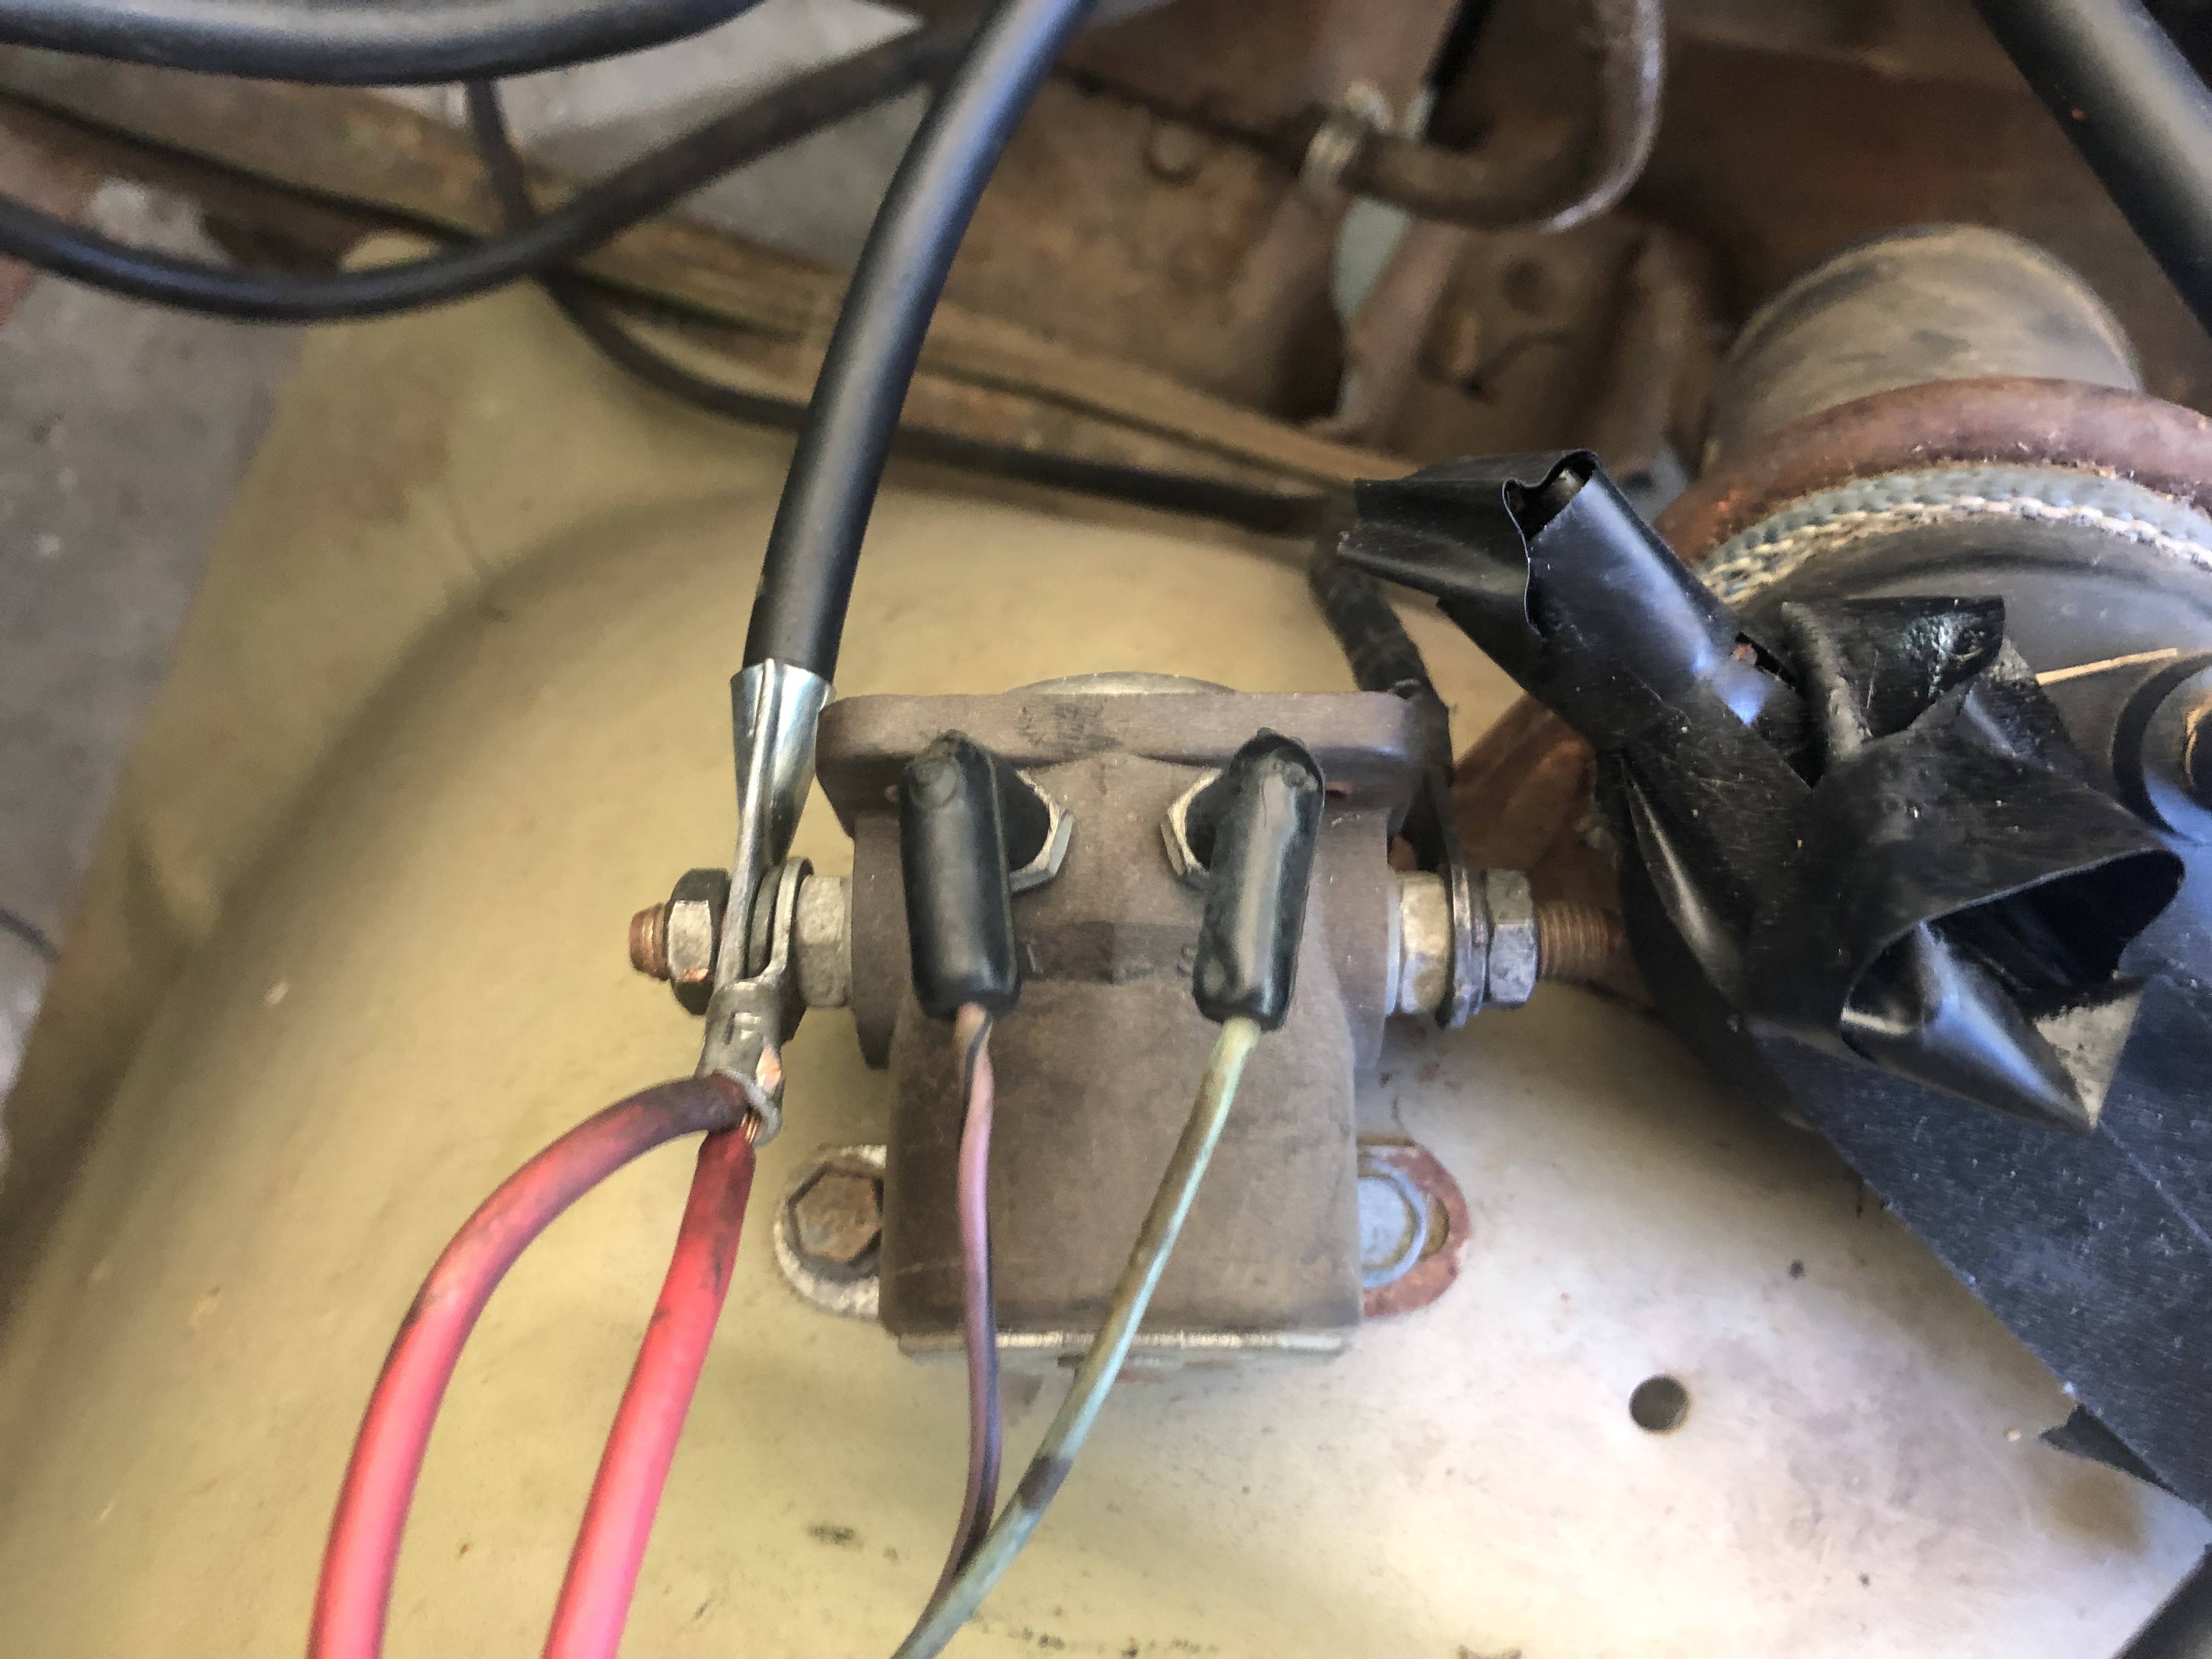
This is the component that we care about:
Now that you have located the external starter solenoid you need to figure out which of these wires is coming from the ignition. In my case it was the green wire pictured above to the right of the purple wire on top of the solenoid. An easy way of going about the identification of this wire is to unplug one of the wires on top, and turn the key in the ignition to see what happens. We are looking for the smaller gauge wire which, when unplugged, causes the ignition to be able to be turned halfway causing the accessories to come on, but when the key is turned all of the way the engine does not crank as it normally should.
------------------
Now that you've identified the wire on the starter solenoid it's time to wire it to our circuit. Pull the wire off of the starter solenoid and in place of it attach a wire (I used a small gauge jumper wire/ the kind with alligator clips) where the *in my case green* wire was attached and then attach the other end of that wire to a normally open location on the relay. In this drawing I have it attached to location 3. Now attach a second small gauge jumper wire from the positive battery to the common on the relay, in this case location 1 on the relay.

When the relay is closed it will complete the circuit and send the +12V to the starter solenoid as though the key were being turned all the way in the ignition.
-
9Start the Jeep
Now that you have everything hooked together: ***Go into the car and turn the key halfway so that all of the accessories get power.*** <-- the engine will NOT start if you do not have the key turned halfway. The engine will just make a cranking sound but never actually start! Once you have this system working this way, and you know how it all works you can then modify it to also turn on the accessories.
*If the Arduino IDE is open the python program may be incapable of sending the information via serial to the Arduino, so if you can't figure out why it isn't working then close out of the Arduino program and try again*
Click run on your program, wait for the microphone icon to appear, and speak your chosen command word. Should all go according to plan, there will be a brief pause as the program's preset time allotted for a command to be spoken runs out. The program will then read the words that were spoken and find the command. It will send a signal via USB to the Arduino. The Arduino should then send a signal to the transistor. The resistor should switch on the relay which should feed power to the external solenoid (mimicking the key being fully turned), and the engine should start.
If you have made it this far, CONGRATULATIONS!!!!! You just started your Jeep with a spoken command! HOW AWESOME IS THAT?!
*Now, use the exact same concept to turn on the accessories as well as the starter*
MacBook Speech Recognition Starts A Jeep
This is a project to start a 1976 Jeep CJ5 using a 2009 MacBook via Speech Recognition.
 John Forsyth


Discussions
Become a Hackaday.io Member
Create an account to leave a comment. Already have an account? Log In.