-
1First thing first - set up Linux Environment in Virtual Box
- Install Virtual Box.
- Download a Linux ISO - preferably small size like Lubuntu.
- Once you have Virtual Box installed, load up the Linux ISO and install it in the virtual HDD (follow the directions provided).
- When you have the Linux all installed - go to the Terminal.
-
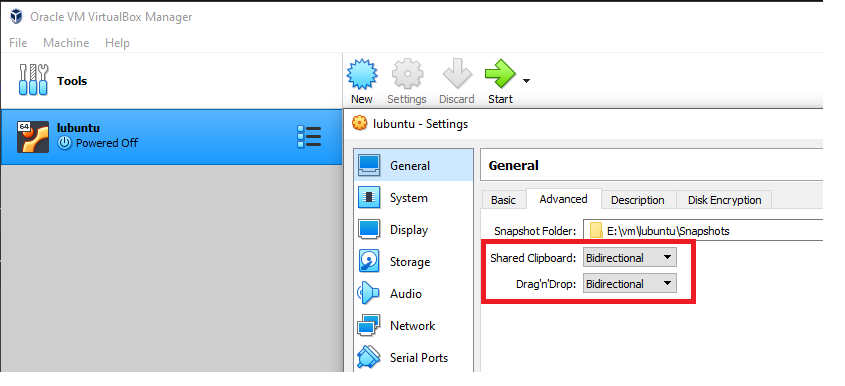
2Enable cut and paste to/from host machine to virtual Linux
On the Virtual Box manager:
Make sure these are selected in the settings.
Then, do the following:
[Source: https://askubuntu.com/questions/63420/how-to-fix-virtualboxs-copy-and-paste-to-host-machine]
1. Start the virtual machine
2. Click Devices menu
3. Select Insert Guest Additions CD image
4. Change to the directory where your CD-ROM drive is mounted (typically /media/<user>/VBOXADDITIONS_x.x.x/)
5. Go back to terminal, then key in "sudo sh ./VBoxLinuxAdditions.run"
6. Reboot the virtual machine!Thanks to the author for that directions in the source provided.
-
3Install dependencies and supporting software and drivers
You need these dependencies. Enter these in terminal:
- sudo apt-get install build-essential
- sudo apt-get install libusb-dev
- sudo apt-get install build-essential pkg-config
- sudo apt-get install libncurses5-dev libncursesw5-dev
- sudo apt-get install gcc-arm*
- sudo apt-get install python
References:
- https://askubuntu.com/questions/161104/how-do-i-install-make
- https://github.com/nealey/hdjd/issues/12, https://stackoverflow.com/questions/4853389/how-to-install-libusb-in-ubuntu
- https://whycan.cn/t_539.html
- https://www.cyberciti.biz/faq/linux-error-cursesh-no-such-file-directory/
- https://stackoverflow.com/questions/14180185/gcc-arm-linux-gnueabi-command-not-found
-
4Build the sunxi-tools and plug your Lichee Zero to the PC
This is a tough one - there are chances to fail during compilation, so keep an eye on the output!
Get the sunxi-tools, and then compile it:
[Reference: https://www.electrodragon.com/w/Sunxi-fel]
- git clone https://github.com/Icenowy/sunxi-tools.git -b spi-rebase
- After clone, in the folder, type "make && sudo make install"
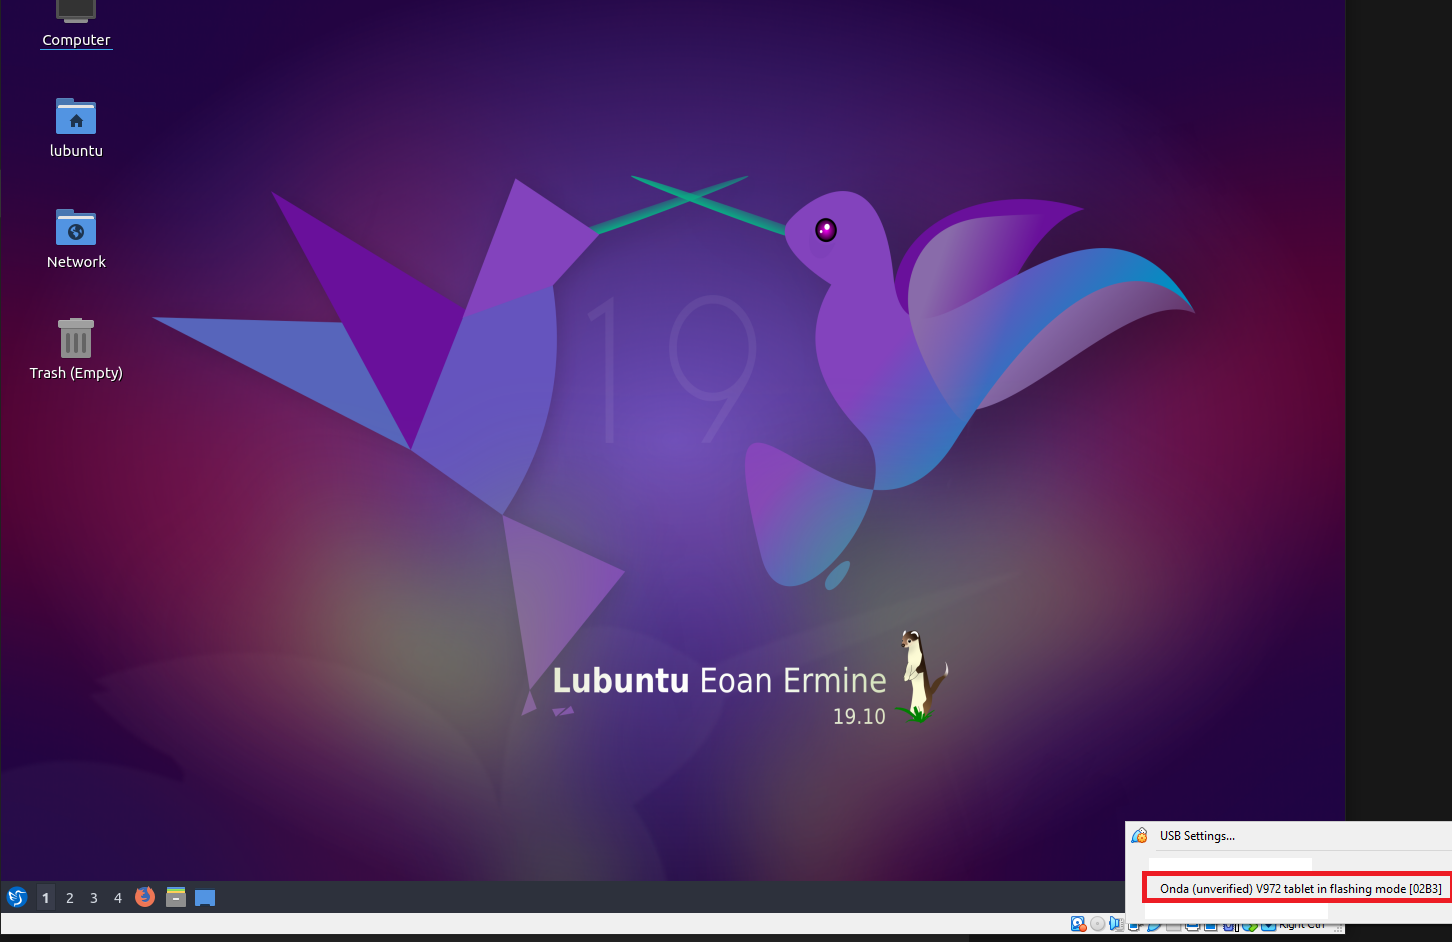
After all is done, plug in your Lichee Zero to your PC. Empty the SD-Card slot first! Make sure you hear a tone from your PC upon plugging in.
You need to connect the USB to the Virtual Machine Linux too!
Right-click on the little USB icon on the box and make sure you see this "Onda (unverified) V972 tablet in flashing mode":
Click on it if you see this one (highlighted in red box).
Now back in the terminal, run this:
sudo sunxi-fel version
You will get to see this message:
AWUSBFEX soc=00001681(V3s) 00000001 ver=0001 44 08 scratchpad=00007e00 00000000 00000000This message shows that the board is connected to the Linux system, with a Allwinner V3S processor detected.
-
5Take a break first!
Once you have successfully compiled the sunxi-tools and get it to detect the board, have a short break!
-
6Build u-boot for Lichee Zero!
Next, this one is gonna be very complicated. Expect failures to happen - possibly missing files or dependencies during compile. I will update this again if there are problems found.
Again in the terminal:
- git clone https://github.com/Lichee-Pi/u-boot.git -b v3s-current
- cd u-boot
- make ARCH=arm CROSS_COMPILE=arm-linux-gnueabihf- LicheePi_Zero_defconfig
- make ARCH=arm menuconfig (note: if menuconfig doesn't run because the terminal isn't the size, just maximize the terminal and run again!)
- make ARCH=arm CROSS_COMPILE=arm-linux-gnueabihf- 2>&1 | tee build.log
[Reference: https://licheepizero.us/build--uboot-for-licheepi-zero]
After compiling it, you get the binary file called u-boot-sunxi-with-spl.bin.
-
7Grab an SD-card, and copy the u-boot into it!
Of course, you need to get an SD-card. An empty one and unused is preferable! Make sure you do not have any important stuff inside! This action will wipe out the SD-card!
[Reference: https://www.olimex.com/wiki/Build_Bootable_SD_Card_with_Debian]
- Connect your SD-Card to the PC. And again, from the little USB icon on the VirtualBox window, select the SD-Card and it'll mount to the Linux system.
- In the terminal: cat /proc/partitions
- This list down the partitions. Take note of the partitions.
- In the terminal again: sudo fdisk -u=sectors /dev/sdx (where sdx is your SD-card name)
The example shows "sdd". - In fdisk: "d" (Key in "d", hit enter. Do it repeatedly until all partitions deleted).
Welcome to fdisk (util-linux 2.34).
Changes will remain in memory only, until you decide to write them.
Be careful before using the write command.


Command (m for help): d
Selected partition 1
Partition 1 has been deleted.
- In fdisk: "n", "p", "1" (Key in "n", enter, "p", enter, "1", enter)
When it asked for the first partition, type in 2048. Press enter, and enter again to select as default.Command (m for help): n Partition type p primary (0 primary, 0 extended, 4 free) e extended (container for logical partitions) Select (default p): p Partition number (1-4, default 1): 1 First sector (2048-3842047, default 2048): 2048 Last sector, +/-sectors or +/-size{K,M,G,T,P} (2048-3842047, default 3842047): Created a new partition 1 of type 'Linux' and of size 1.9 GiB. - In fdisk: "w" (Key in "w", hit enter)
Command (m for help): w
The partition table has been altered.
Syncing disks.
Yes! The 2048 blocks partition on sdd has been created for the u-boot to reside inside.
lubuntu@lubuntu-pc:~$ cat /proc/partitions
major minor  #blocks  name

  11        0    1048575 sr0
   8        0   10485760 sda
   8        1   10481388 sda1
   8       48    1921024 sdd
   8       49    1920000 sdd1
Now you have the partitions created, the remaining blocks that is not occupied/reserved with the bootloader in the SD-card is created. Example here is the sdd1:
sudo mkfs.vfat /dev/sdd1
Afterwards, put the u-boot-sunxi-with-spl.bin into the first partition.
Finally in the terminal, key in:sudo dd if=u-boot-sunxi-with-spl.bin of=/dev/sdd bs=1024 seek=8
You will see something like this (reference: http://cholla.mmto.org/nano_pi/uboot.html):384+1 records in 384+1 records out 393999 bytes (394 kB, 385 KiB) copied, 1.71146 s, 230 kB/s
And finally, key in "sync" and hit enter:sync
-
8Run u-boot!
If you have connected the Lichee Zero board, unplug it and insert the SD-card into the Lichee Zero board.
Then connect the UART0 on the Lichee Zero board to the USB->UART converter.
Get "TeraTerm" on your PC and set the serial to default 115200.
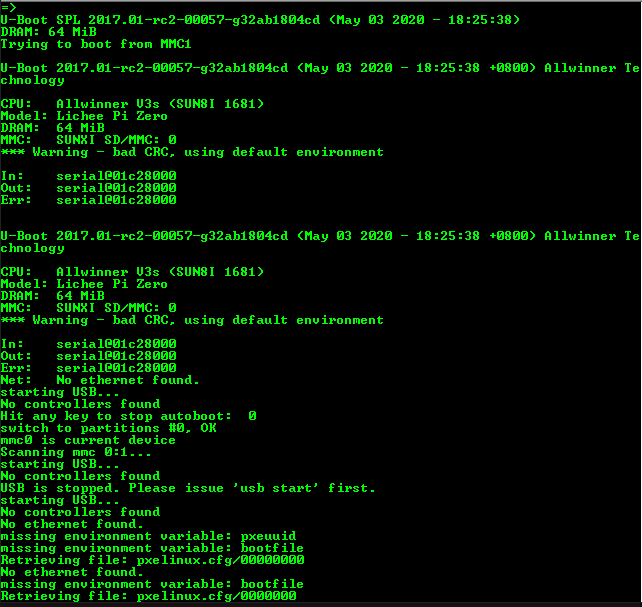
When all is ok, load up the TeraTerm, and plug in your Lichee Zero board:
You are inside U-boot now! It's waiting for your input.
Lichee Zero u-boot Getting Started!
What to do with a little SoC and an SD-card? Let's start with a little bit of u-boot!
Discussions
Become a Hackaday.io Member
Create an account to leave a comment. Already have an account? Log In.