Step one of any good design is to communicate the core idea, both to yourself and others. Let's get into it a bit with the LIDAR Compass idea!
The Concept
The main idea of the LIDAR Compass is to pair an ultra-low-cost 2D LIDAR (a lidar which spins in a circle ranging at every angle it passes through) with a visible laser emitter to create a sort of inside-out profilometer. You program a cross-section into the device running the LIDAR, and it measures the distance from itself to every point on that cross-section. For instance, imagine that the lidar is scanning a circle in a plane parallel to the ground, in the center of a room like in the SLAMTEC marketing image below:
Marketing image from SLAMTEC showing LIDAR in room
If the LIDAR is 3 feet from the wall directly to its right, and if we call "looking directly right" 0° angle, then we'd expect to see "range = 3ft" at angle 0°. The image above shows the LIDAR reference angle slightly tilted to the actual room angle, but let's assume they're aligned. Now, if the laser turns 45° to take its next sample, and if it's still looking at the same wall, by my math the wall should be 4.234ft away.
LIDAR 2D example with straight wall showing trigonometry
Now, let's turn this idea on its head, and consider the case where we want to MAKE a straight wall, maybe by putting framing studs in a straight line. We start by putting a stud at the bottom-right corner of that triangle, where the LIDAR shows 3ft. If we put one at the top-right corner and the LIDAR shows 4.234ft, we know the two studs are in a neat line, tangent to the LIDAR's 0° reference. If the second stud measures LESS than 4.234ft, we know the wall is going to be tilted. If we repeat for every stud on the wall, and if the LIDAR says the range to each is correct per the model, we know they're all in a neat row!
Of course, making straight walls is a silly example - we can easily make straight things, since we've got lots of tools built around the concept of straight-line measurements. Indeed, a chalk line and two measurements of the tape measure could accomplish the task above.
But what if we want to precisely make an arbitrary curve instead of a straight line? Using rulers and straight lines can get you straight walls, and if your clever, a straight line can also get you a perfectly circular radius. Beyond circles, though, the measurement task starts to get tricky and error prone.
LIDAR 2D example with curve. Looks kinda like a dome, huh?
Of course, the LIDAR doesn't have any trouble with that. All it does is measure the range to an object at any given angle. All we have to do is give it a table of angles and ranges, and it can tell us whether reality matches the table.
But it doesn't do us much good to build a whole dome, then measure it after we're done only to find out we built it wrong. The tool has to be able to tell us IN REAL TIME whether we're doing the "right" thing.
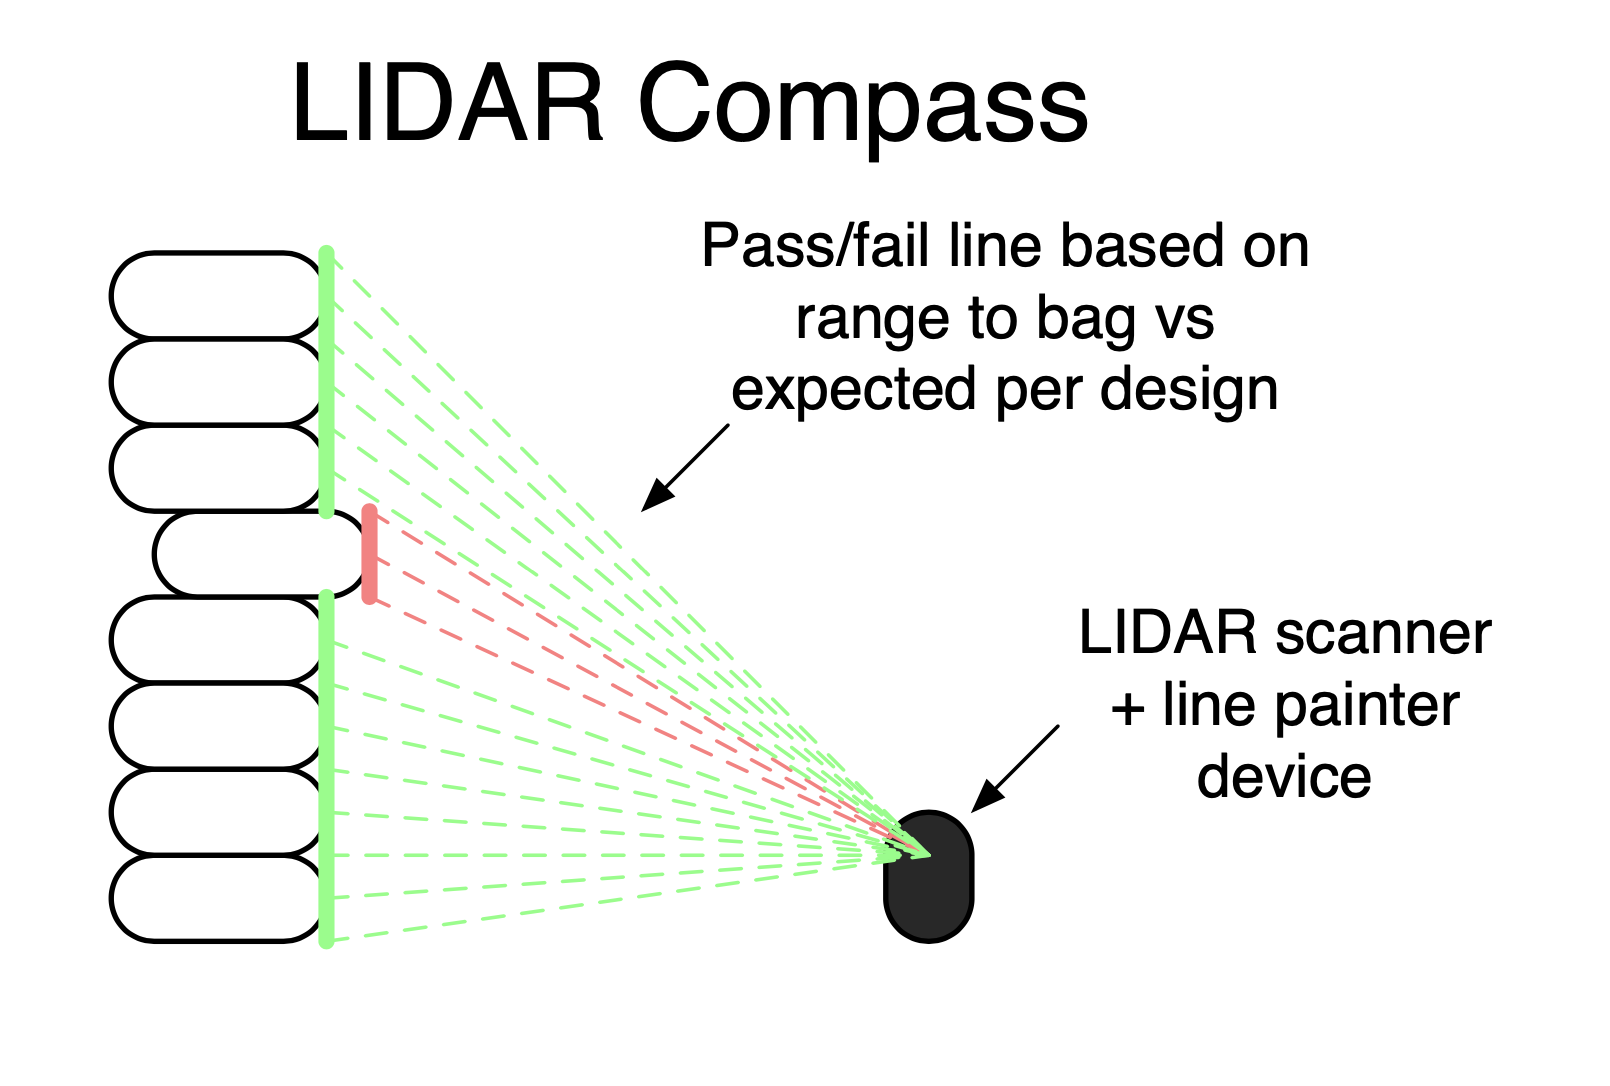
The second half of this equation is a laser EMITTER, paired with the measurement, that can show whether the current construction matches the digital profile the device has been programmed with.
Take the case where the LIDAR angle is 0°, and the LIDAR measures a 3ft range to the wall we're building. In this case, the distance is "correct" per the model of what we're trying to build. The LIDAR Compass device signals this by using a second laser to paint a green line over this section of the circle. Fast forward to 90°, where the wall hasn't been built yet and the LIDAR either measures infinity, or just errors with "no return." Along this section of the circle, the green laser remains dark, to indicate that the wall isn't in the right spot.
In other words, as you're building the wall, anywhere the wall is in the right spot gets painted green. If there's a section that's not green, you know it's either too close or too far. If you haven't PLACED a section of wall yet and need to know where it goes, just stick a finger in the way: if it lights up green, you know you should place the material right where your finger is!
The final piece of the puzzle is to simply turn this on its side, and paint a vertical circle instead of a horizontal one. Thus, we get to see whether the cross section of a dome is correct, rather than the entirety of any given layer. If we take this one step farther and rotate the entire device slowly, we get both! Green, and the wall's in the right spot.
Please Note: All personal information that could be used to identify interviewees has been exempt.
3 factors of CalEarth house that you like? 1) Shape is non-cube! circle is good
2) Material - one material you can built everything
3) Sustainable
1) Working with earth - connected to the material
2) Easiness of the construction, Has higher tolerance
3) Aesthetics of the structure
1) Dome and standing inside is a spacial feeling.
2) Organic Appearance
3) Cost
1) Earthquake Resistance
2) The types of materials used are abundant, earth, clay, soil.
3) Fast to build after earthquakes
1) Appeals to up and coming youth, luxury-chic style
2) Stable and protected from storms, gives feeling of safety and comfort -Cooling works nice at night, you sleep very good
3) Cost
3 factors that are your pain points to live in CalEarth house?
1) Not much experience in living in the houses, did not stay inside the house for different seasons.
1) Custom furniture is needed - "Cannot go to IKEA, Anymore"
2) Cannot mount anything on the internal walls of the house. Cannot drill anything into wall
3) The percentage of the space you can stand is less. and cannot hang paintings in the house, flat surface vs curved wall
3 factors that are your pain points to build a CalEarth house?
1) Labour intensive
2) Cost for labour
3) Weather is important and its limitation for the construction
4) Problem with rain because of not having a roof. It needs special care about the plasters
1) Soil + Clay composition (sometimes you need a lot of external material)
2) Labor intensive
3)if its not a workshop its really hard to find a labour
4) Tools are not available for the build process as they are manufactured for the flat houses
1) Limited to one story
2) Earthquake resistance
3) More physical effort, less technical effort
1) Abnormal appearance, not accepted/welcomed/trusted my some people
2) Not as strong as steel/concrete
3)Finding specialised labour
4) Safety at height
1) Outside Build; Extreme weather, rain, cold, keeping building protected during the storm.
2) Slow progress due to amount of time to commit.
1) Compass - can be improved
2) Ability to mix soil and control humidity -It takes time and labour
3) Mechanism to fill the bags
1) Anything that can help the worker to facilitate the filling of the bag can help.
2) Labor is expensive - the factor can be a big part of the cost of the house.
Things that you changed in your cal earth construction or house?
1) Burlup bags - organic
2) Added window, convection heating
3) Modification to roof: Wood support to make stronger
4) No widows, sand tunnel instead.
5)Add integrated furniture inside.
6) Additional weather protection on the outside
One pain point that has to be changed, according to your personal experience.
-Earth moving and earth filling is the most difficult to do, soil = complex
-Good way to use the campus - its really really important. Constant control of one person telling the profile.
-Would focus more on the vault structure - it is easy to use furniture and build it everywhere, + plastering is a problem Get material delivered, not use local
-Get people to engage with them/interact with them to become more comfortable
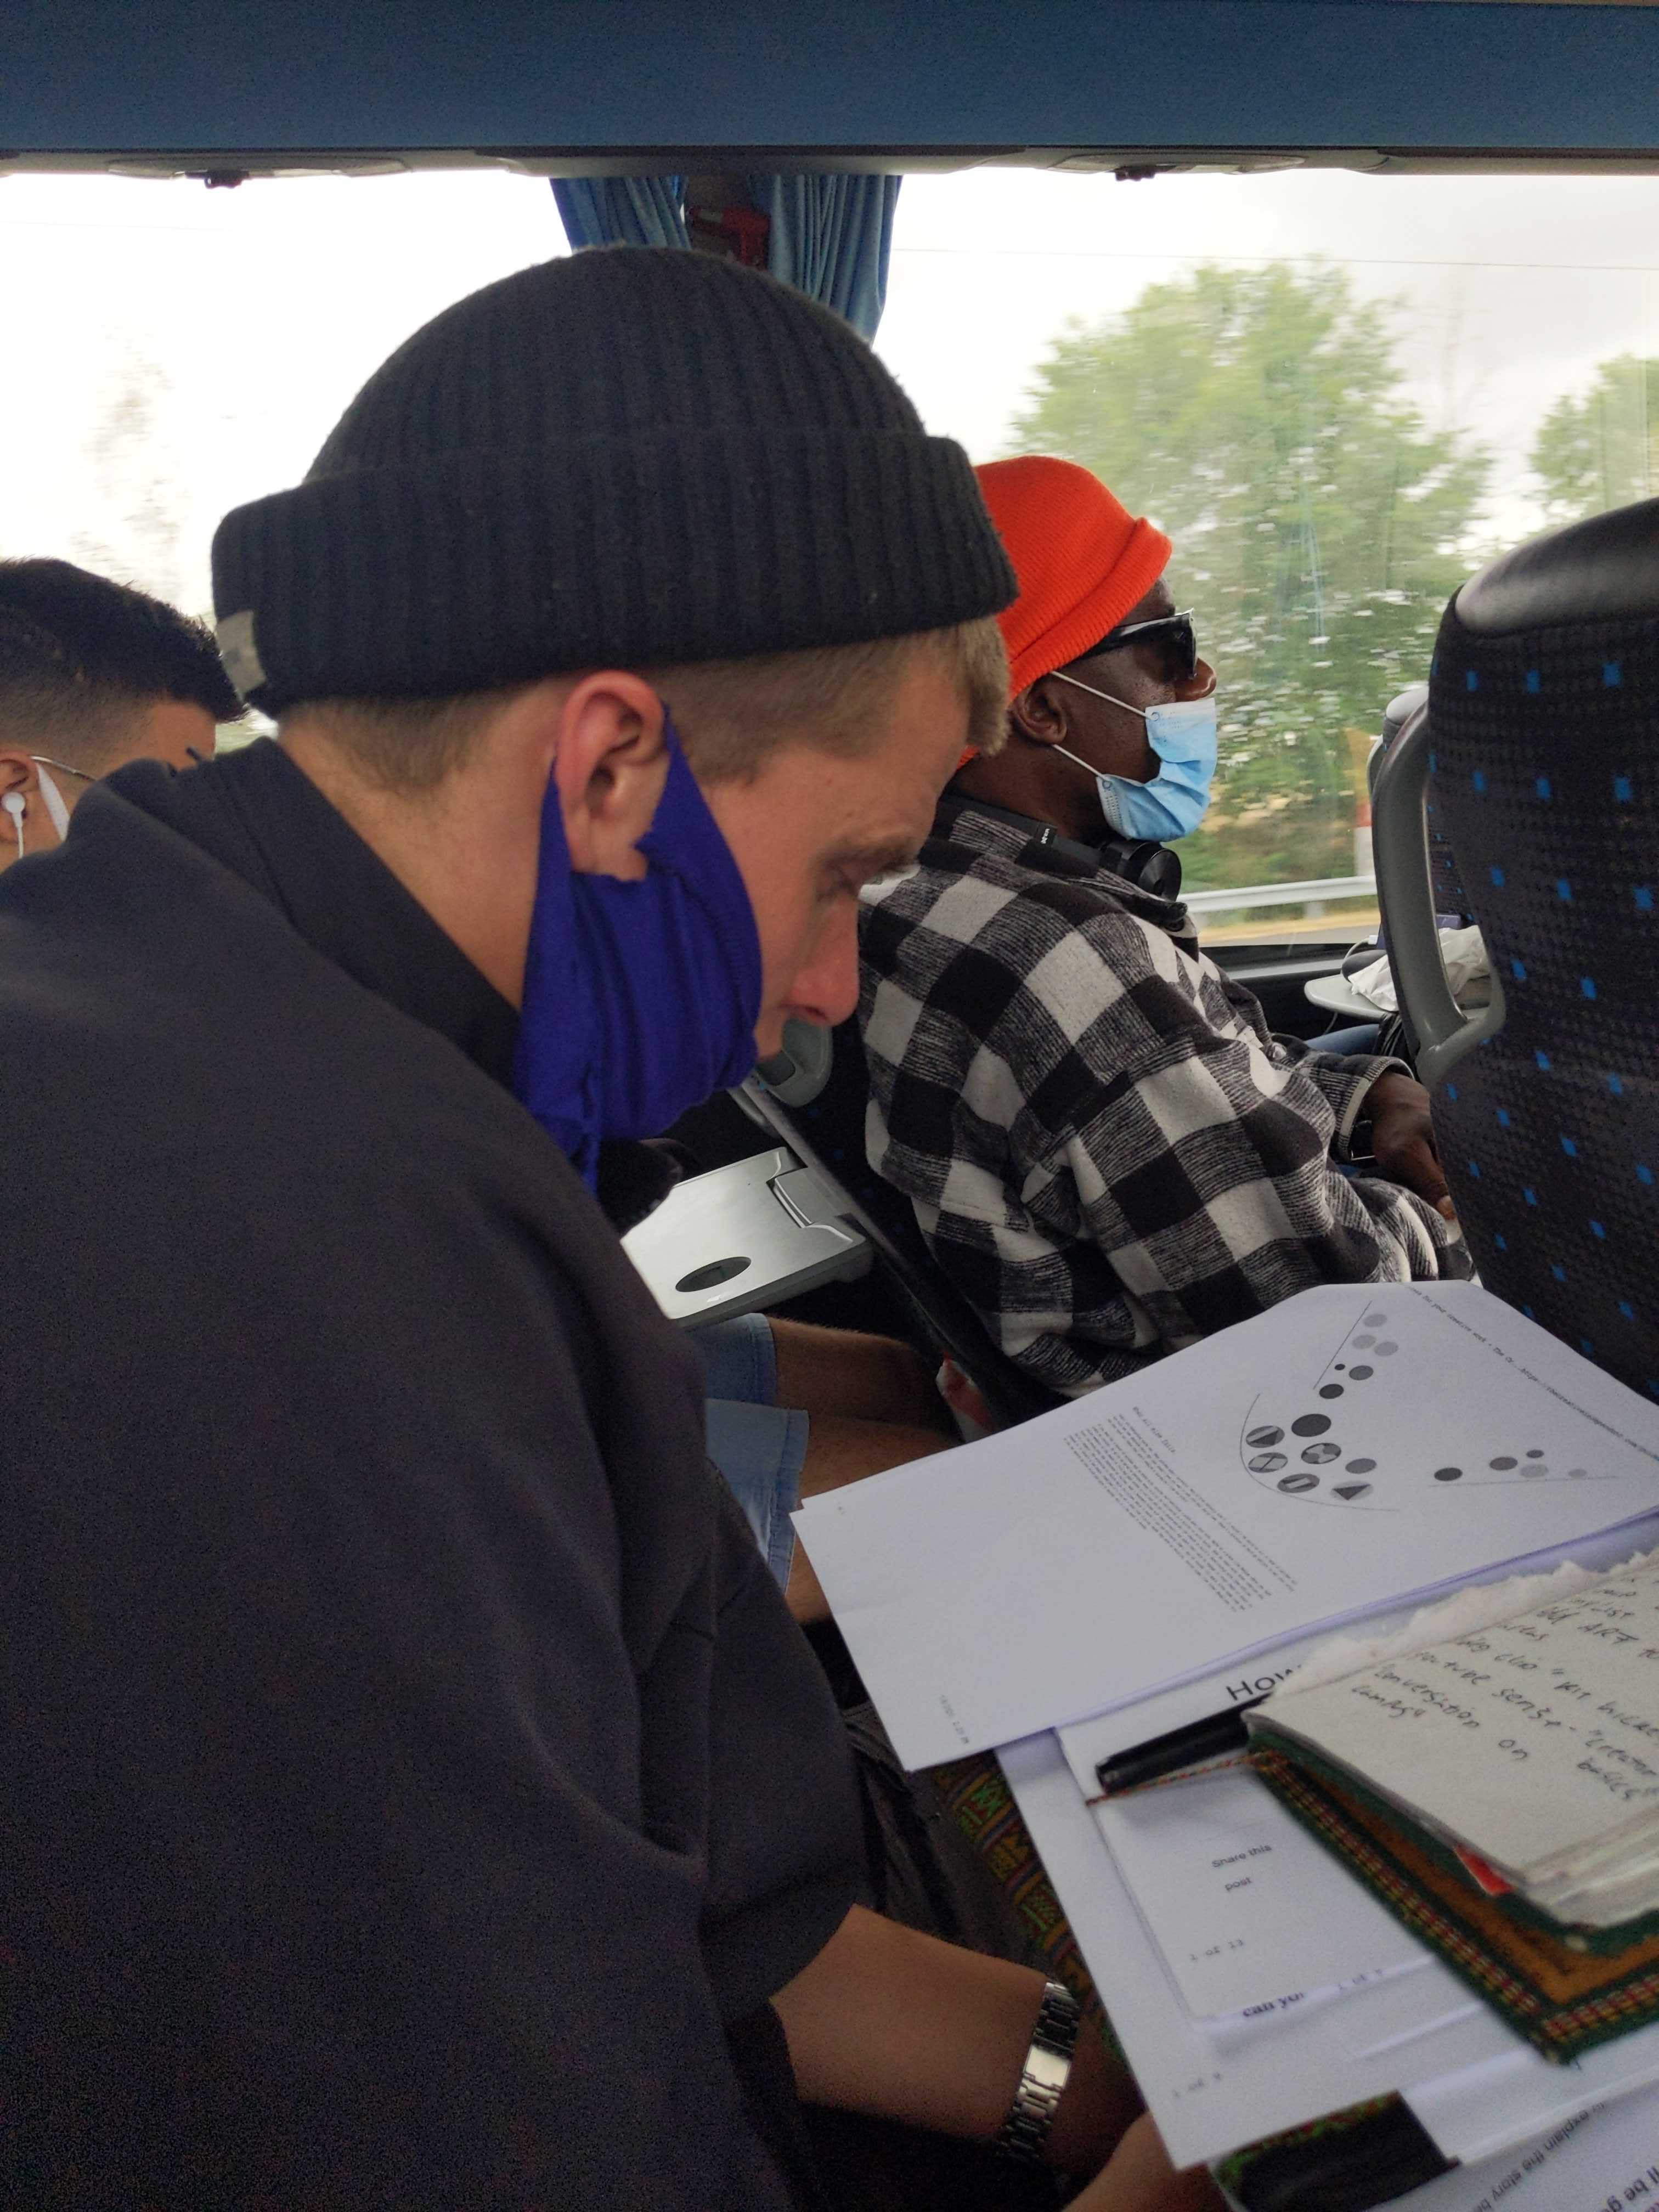
It was a slow start to the week, relocating from Eindhoven to France but we dont have time to let that 13 hour trip go to waste so we set up a little hot-desk on the bus.
Once settled in France I began listening to the interviews Sameera had conducted, taking notes and digitalising the results.
The Sail Compass - Helps builders follow the profile of the build.
Observations
The sail is being used as a reference for the build. Its not being used to push against as a backing for the earth filled bags. (observe that the bags are not touching the profile.)
The sail is being used by the builder as a support system to walk on the different layers of build and it is a good support system when there is no scaffolding in place on site.
Questions
If the profile is not taking the load and is just being used as a reference tool, then does it have to be so robust and have a complete profile shape?
Has the profile ever been used as a pulley to move material to the layers?
Is this the only sail profile style compass ever tried by CalEarth?
Does the compass profile have to take any form of loads?
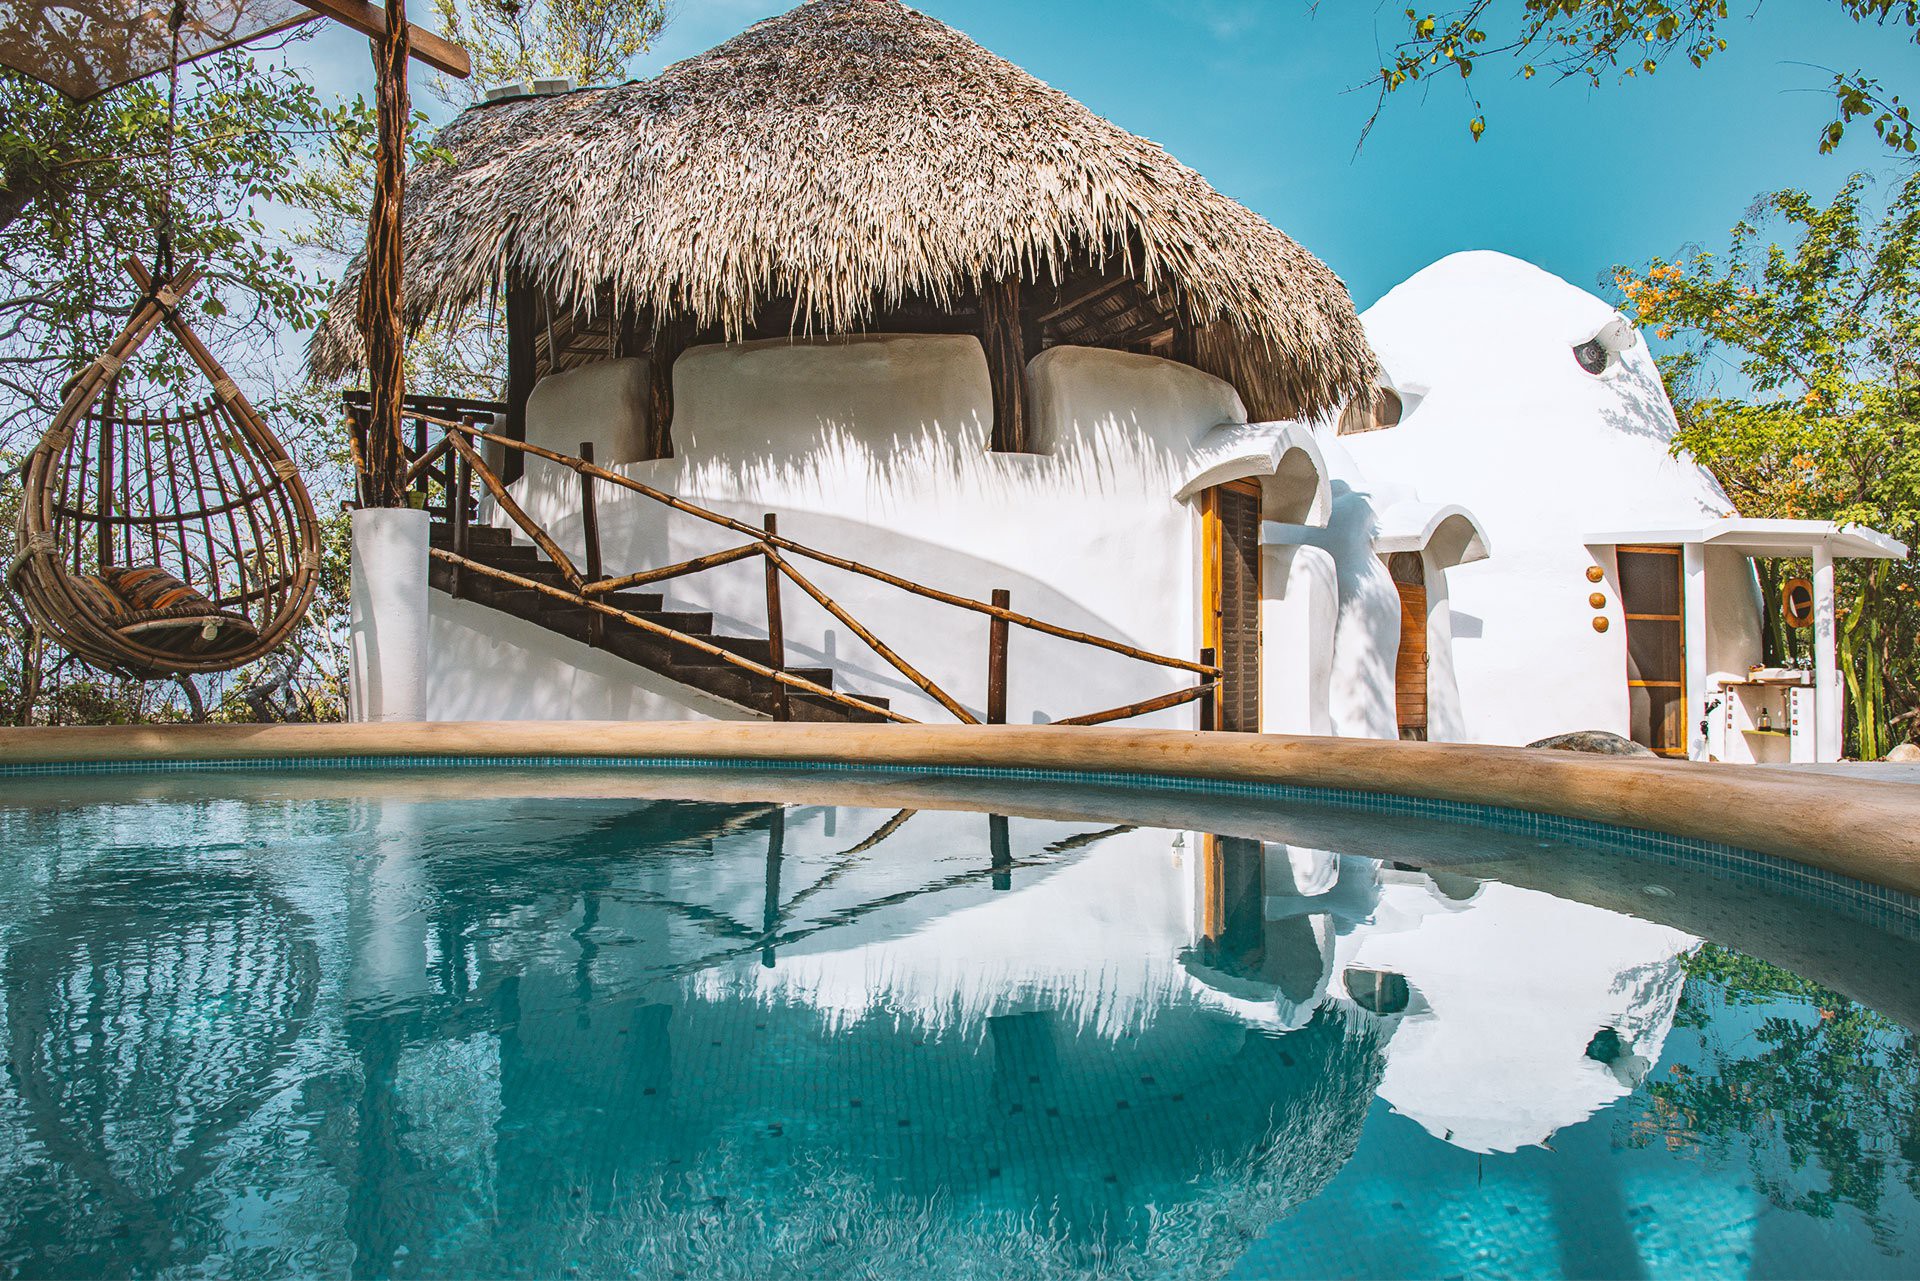
Eco-conscious homesteading project on an empty beach. Stay in our superadobe guesthouse for a unique, inspiring adventure. Location: El Venado, Oaxaca, Mexico.
From Mexico to Afghanistan we have been conducting interviews for the past few days.
Making the most of the summer sun and the Catalan architecture. Location: Needlab office in Barcelona, Spain
Discussing the top 3 pain points and learning about the changes the builders and inhabitants have made in their CalEarth homes were two among the most interesting questions we asked.
Are you curious to learn what the answers were? - Stay tuned.
As a team, we're still in the early stages of figuring out all the pain points of SuperAdobe construction and making a formal assessment about where lies the best value for money in addressing those pain points.
Even still, we've already learned some extremely interesting details of the process we wouldn't have expected, and naturally, we've got some ideas of tools we might build to address them.
For instance - you'd think (or I would, anyway) that the most labor-intensive (specifically time-intensive) part of building a structure from sandbags full of earth would be actually shoveling earth into those bags. Surely, you've got a lot of bag volume to pack, and going back and forth over and over with a coffee can must take a lot of time? As it turns out, talking with Marco at CalEarth, we found out that the biggest bottleneck of the process usually seems to be the person whose job it is to map out where the next bag goes.
Under the current process, this person uses chains and trigonometry to calculate how far the next bag layer is supposed to overlap the first one. But with a handful of people doing the easy and relatively rapid task of filling and laying bags, this one expert tasked with QC tends to get overwhelmed. In addition, it sounds like builds often end up wasting time on compass errors that require dismantling work to go back and re-do it. For example, if the chain gets twisted up and therefore shorter, the team may place even a layer or two of bags in the wrong position before realizing the error.
Being an electrical engineer by trade (and one who's used LIDAR professionally quite a bit lately), the first thing that jumped to my mind was a laser scanning system. The proposed device would sit in the middle of the foundation area and measure range on a circle, sweeping out a vertical cross section of the structure under construction. Bags that have already been placed will show up on the scan line, and the range to these bags will either be correct or incorrect based on a profile loaded into the scanner. For feedback, the same scan head could also EMIT a laser, perhaps with a green line where bags are positioned at the correct range (give or take some error) and a red line where they're incorrectly placed. We call this idea the LIDAR Compass.
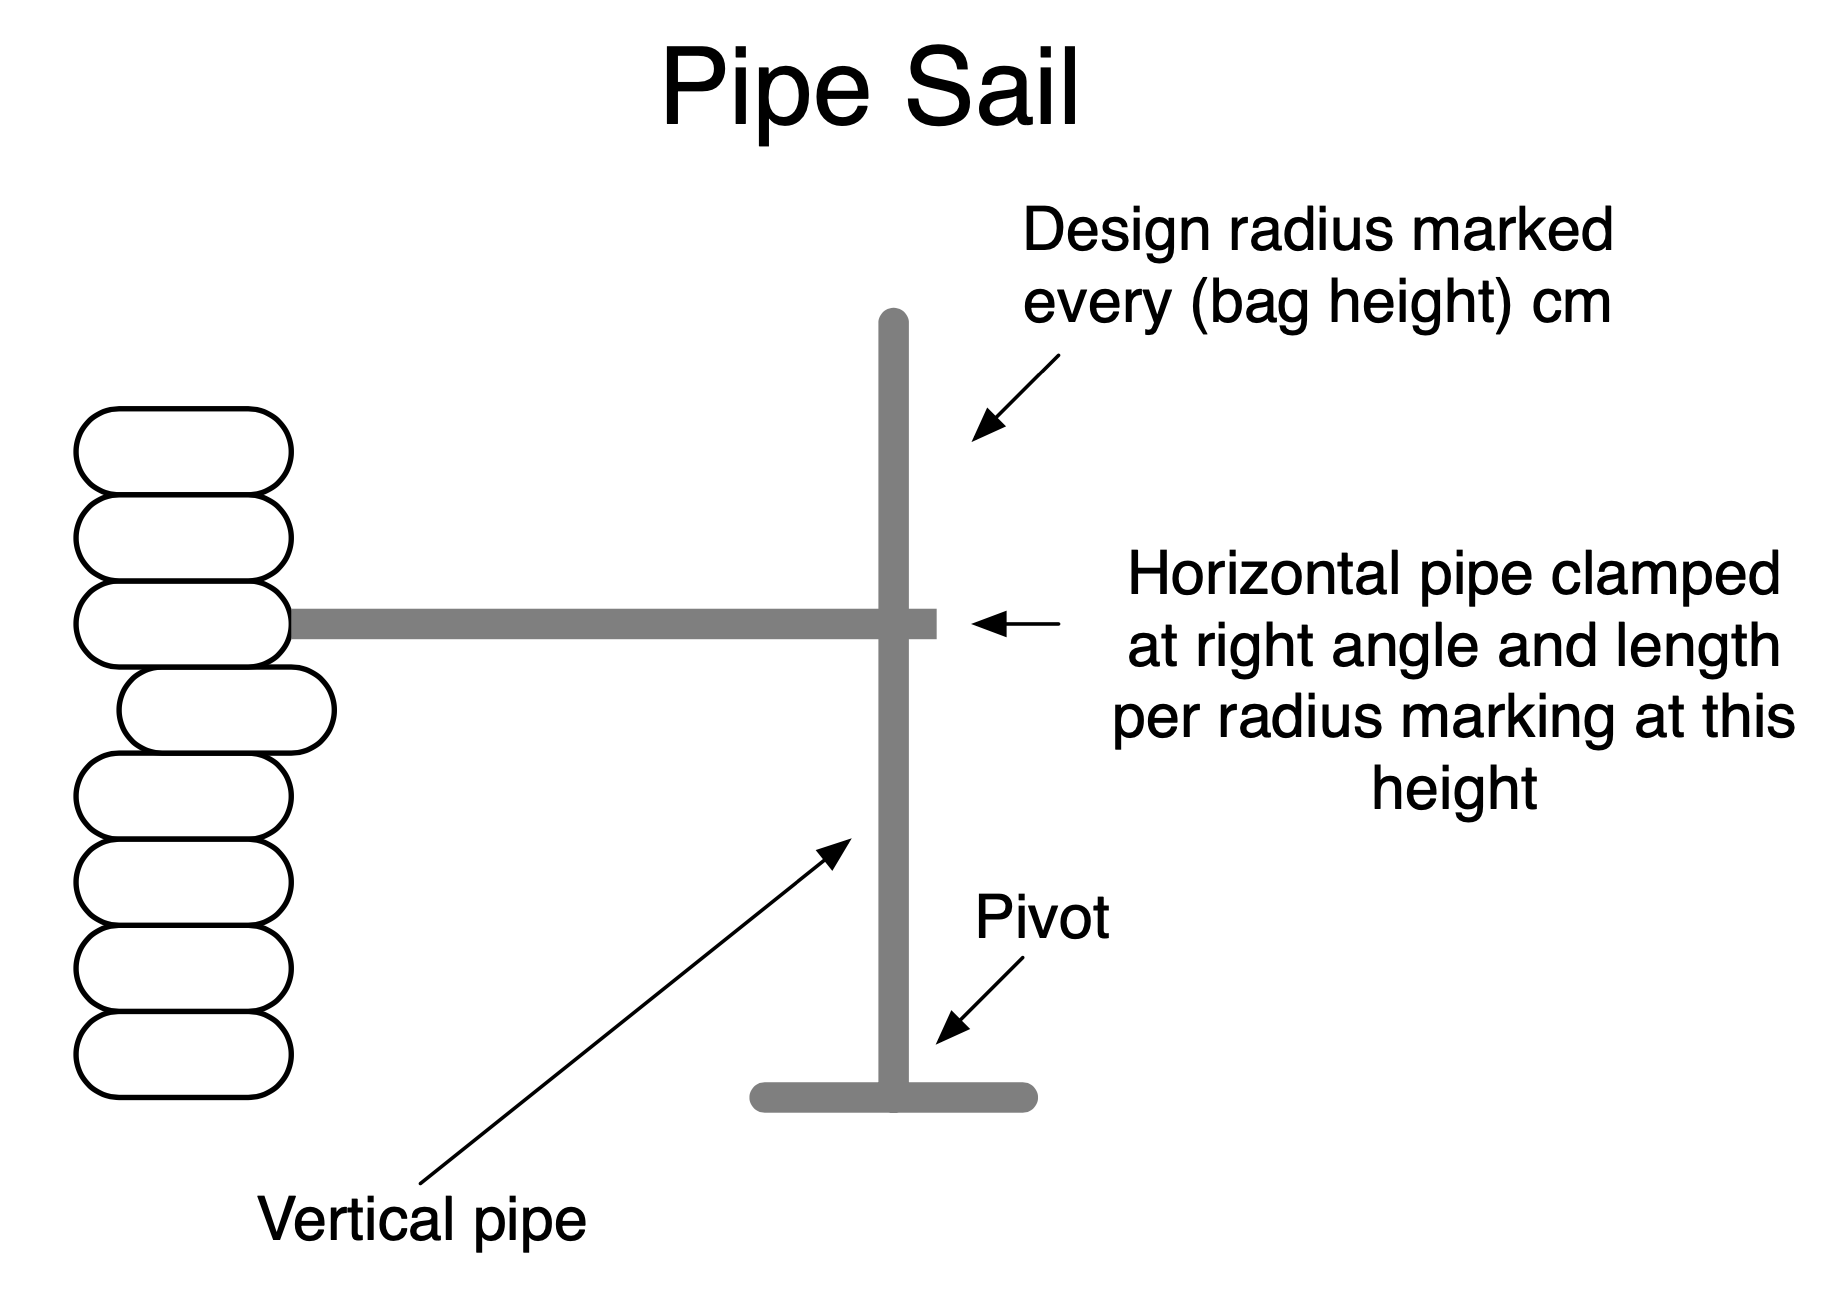
As it turns out, CalEarth has already come up with their own lower-tech solution to this problem, and sometimes uses what they call a "sail." This is a big sheet of wood cut to same profile as the inside of the finished dome, which can be rotated around a mast on the center axis.
The problem they've run into with the "sail" concept is that actual structures often have protrusions through the walls while being constructed, such as forms for windows or vents that poke into the inner volume of the finished dome. These pose an obstacle for the mast, since it can't sweep through space occupied by a protrusion, and some designs mean that the sail can simply never rotate in a full circle.
A relatively basic low-tech improvement to the "sail" tool we call a pipe sail. Instead of attaching a full-size profile of the dome to a pivot we could put just a vertical pipe on the center axis, with pre-marked radius measurements for every bag layer going up it. For every layer, builders clamp a shorter pipe at a right-angle, using a tape measure to set the length per the radius marking under the clamp. This doesn't completely solve the obstruction issue, but with with a simple chalk marking on the radius pipe, it could be unclamped and re-clamped at will to pass any obstructions.
Of course, there's much work still to be done to validate these ideas!
It is important to understand the needs of inhabitants of CalEarth houses. In order to understand the needs, we are conducting "user interviews" with the people who are living or have lived in CalEarth houses. The aim is to get to know their pain points - if there are any! and learn about improvements that they wish to have in the CalEarth houses.
Draft questions for the inhabitant's interviews. (make the questions the 5 why questions to understand the deep need)
Find inhabitants to interview.
Reach out to CalEarth community to find inhabitants.
Find individuals who took CalEarth workshops and reach out to them. (social media, LinkedIn, Find publication of self builds)
Interact with the inhabitants to ask for an interview.
Document the interview and analyse it.
Make notes of the key takeaways from the interviews.
Have a meeting with the team about the key takeaways.
1. What are the most three challenging parts of the build process? (In order of most challenging to least challenging?)
1.1 Describe, in a bit more detail, for each of these three challenges what makes them so challenging?
1.2 Have you ever had any ideas about what could make them easier?
2. What are the most three time consuming parts of the build process? (In order of most time consuming to least time consuming?)
2.2 Describe for each of these three challenges what makes them challenging?
2.3 Have you ever had any ideas about what could make them faster?
3. What Skillsets do you practice?
4. What tools do you commonly use, both within and outside of this project?
5. What software do you commonly use, both within and outside of this project?
6. What is the most limiting factor of the build: a. Human Strength b. Human Stamina c. Complexity (Physically) d. Complexity (Intellectually) e. Other
7. Are there any other changes to the build process you have thought about making?
8. What is the most useful innovation (technical/practical) you apply when building the domes?
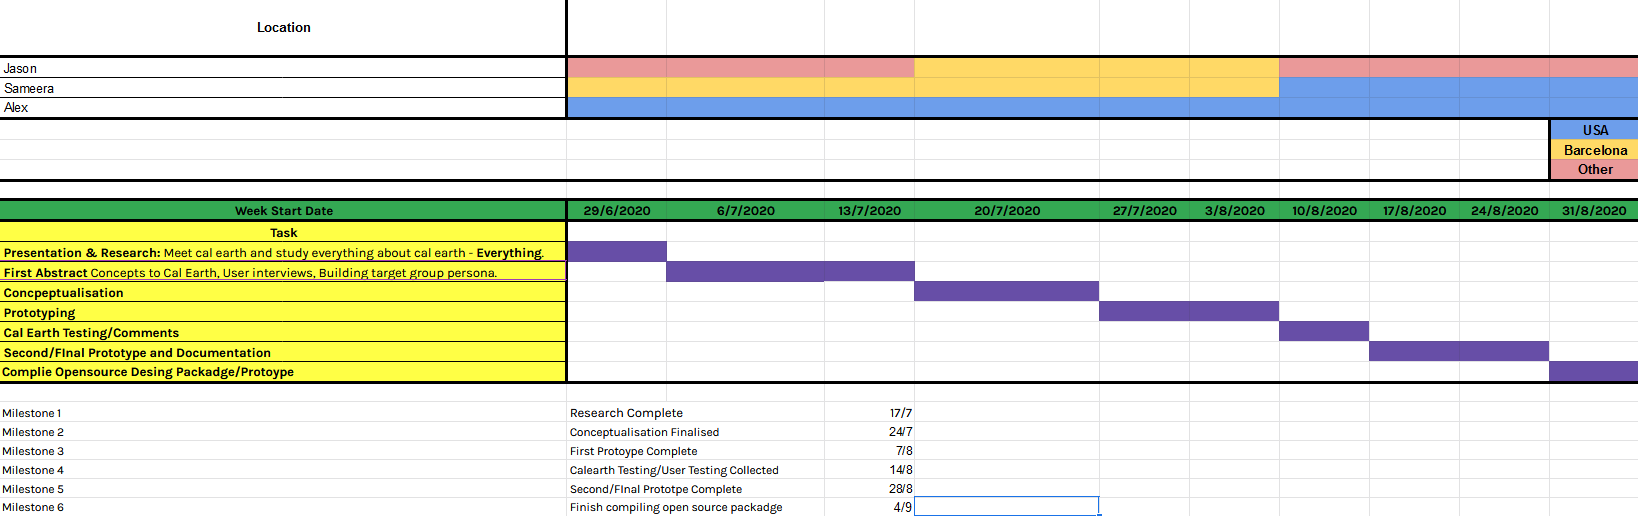
We began this week by defining our milestones and writing a Gantt chart to make sure we keep on track with everything.
Milestones:
Milestone 1
Research Complete
17/7
Milestone 2
Conceptualisation Finalised
24/7
Milestone 3
First Prototype Complete
7/8
Milestone 4
CalEarth Testing/User Testing Collected
14/8
Milestone 5
Second/Final Prototype Complete
28/8
Milestone 6
Finish Compiling open source Package
4/9
Gantt:We made the decision to swap the last two items on the list that suggested schedule to finish physical prototyping then compile all the documentation after as the final step.
 Supplyframe DesignLab


 Once settled in France I began listening to the interviews Sameera had conducted, taking notes and digitalising the results.
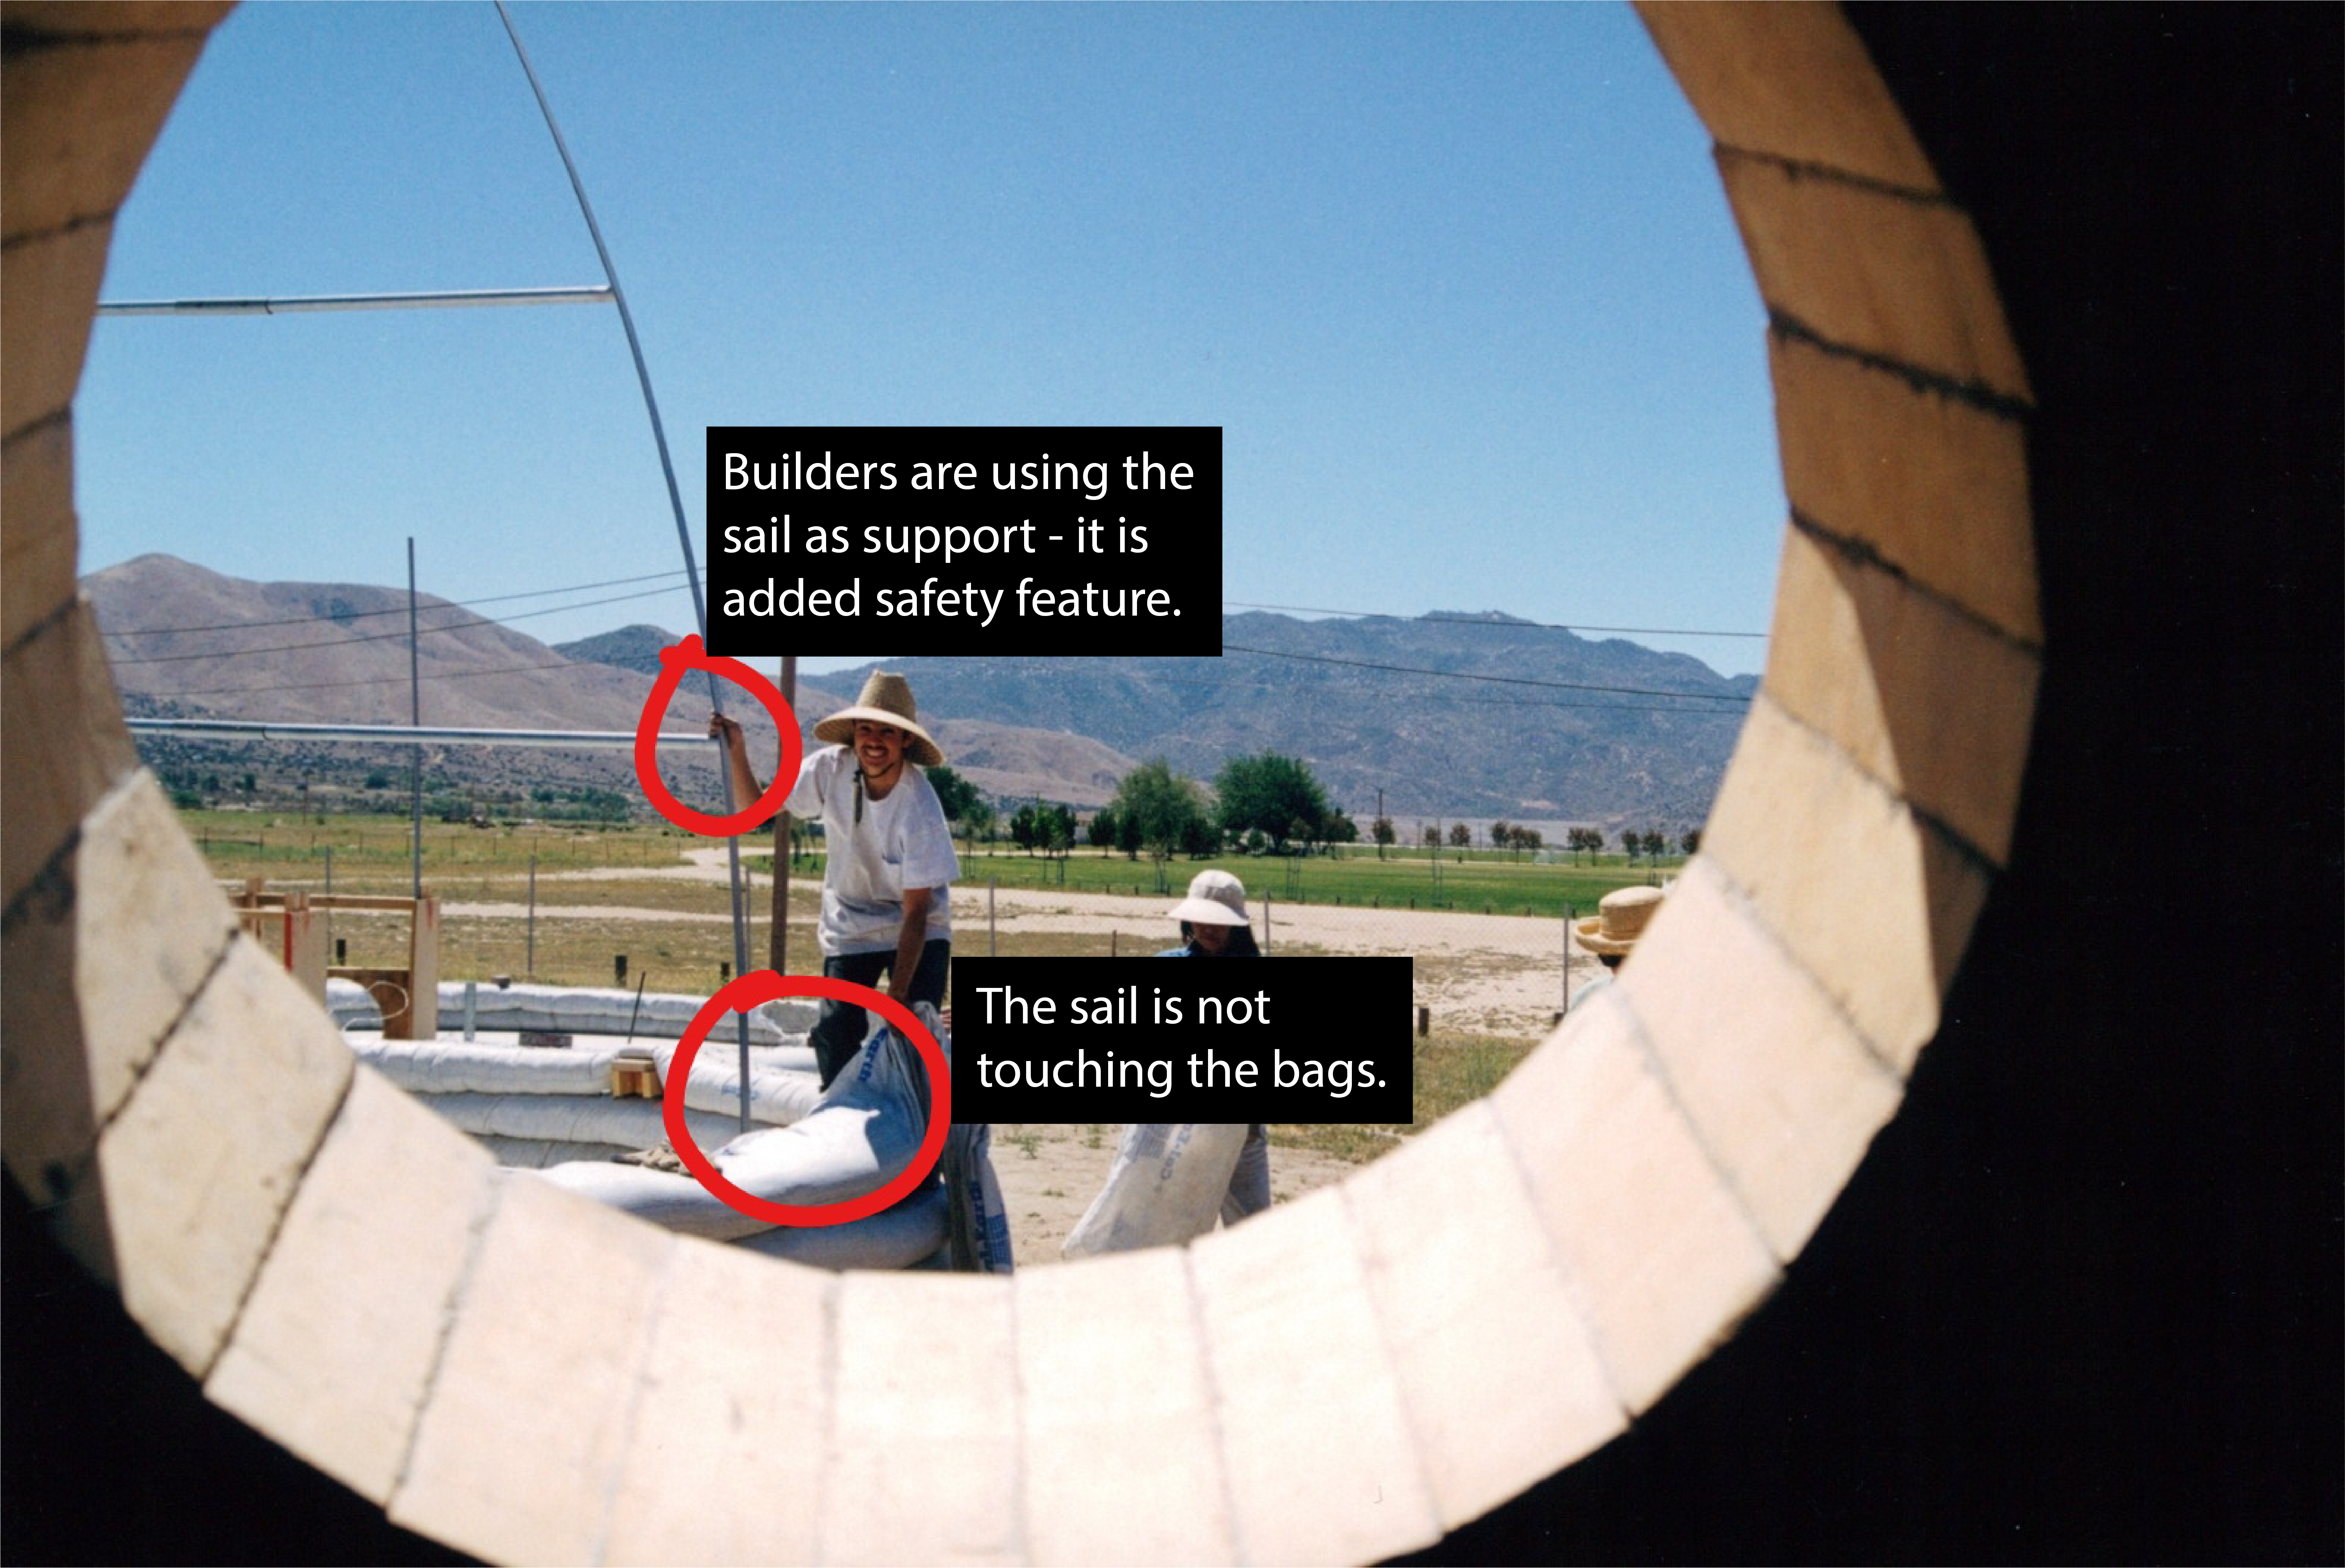

 We made the decision to swap the last two items on the list that suggested schedule to finish physical prototyping then compile all the documentation after as the final step.