Close
0%
0%

Programmable Kitchen Island Lamp

Parties end up in the kitchen, so why not give the kitchen lamp a party mode?

Similar projects worth following
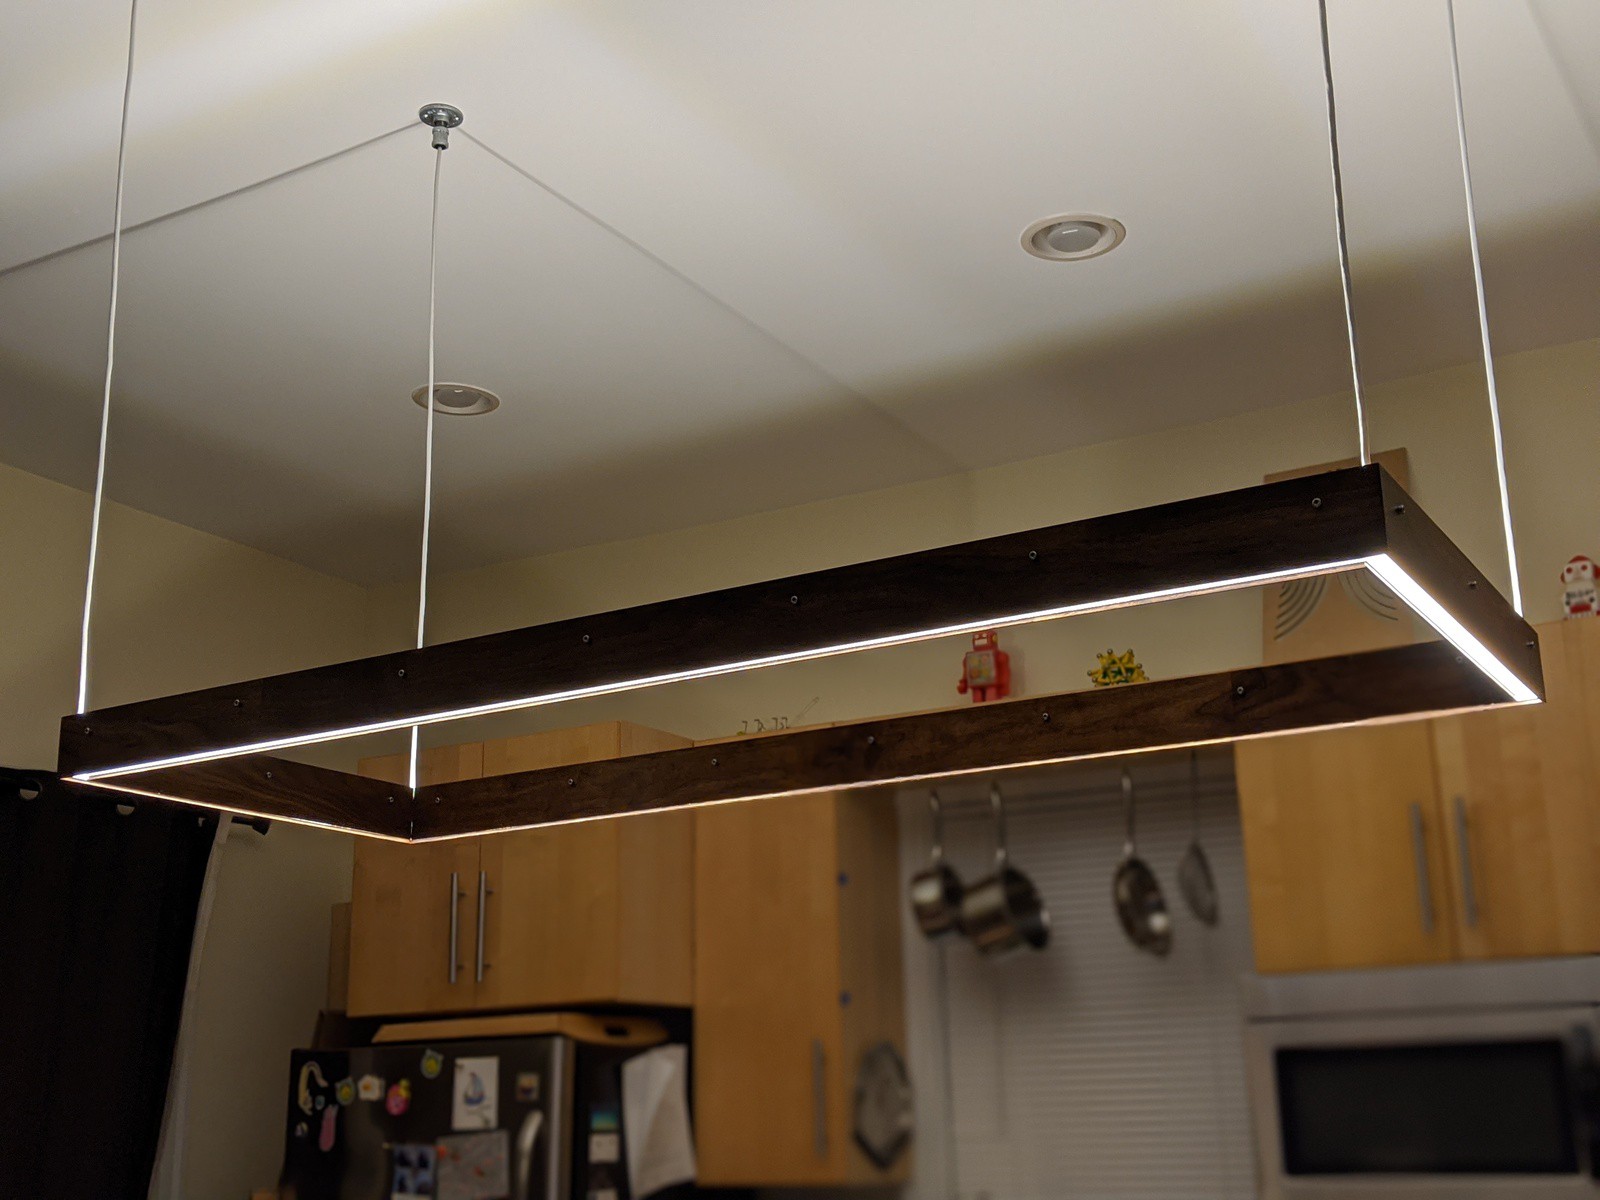
A lamp to go above my kitchen island that has a normal kitchen mode, plus a party mode. The normal mode is a nice, dimmable medium-white light (3700K) with separately-controllable LEDs facing both downwards and up to bounce off the ceiling. Party mode uses ~500 individually-addressable RGB LEDs controlled over the network by TouchDesigner. This allows me to program complex music-reactive animation patterns and have them light up the entire room.

In order to remain classy, the entire lamp is shrouded in a finished walnut housing, with diffusers on both sides. All the control electronics are hidden away in a 3D printed box attached to the ceiling. The cables hanging also transmit the power/data from the control box.

Key components

  • The light core, which consists of strips of LEDs stuck to 80/20 extruded aluminum beams
  • The finished walnut housing, which holds the diffusers and shapes the light
  • The control box, which hides away all the control electronics and is attached to the ceiling
  • The ceiling mounts, which are just ⅜" plumbing fixtures and a 3D printed part
  • The main LED controller, hiding in a nearby closet, which has many channels of programmable LED control

All the design for this project has been done in OpenSCAD. This allows the design to be fully parametric and adjustable.

Design goals

  • Be a great kitchen light
  • Elegantly blend into the space
  • Maximum flexibility
  • Network control
  • Party hard

For elegance and blending into the environment, this lamp should be as slim as possible and use materials that are already found in this space. The finished walnut housing matches other wooden details already in our kitchen. Having dimmable lamps facing downward as well as upward allows for a ton of flexibility. Party mode should be invisible until it's activated, but when it's active it's on. It should tie into the other programmable LEDs being installed throughout the house.

LED details

For LEDs, one critical element for maximum elegance was to ensure that both the white and RGB LEDs had a high enough PWM frequency. One of my pet peeves about programmable LEDs is that often people use LEDs that flicker when your eyes move around the scene. Too many programmable LEDs (like the extremely popular WS2811. I've recently learned that newer versions of this chip have been silently upgraded to faster PWM frequencies. Hooray!) use a PWM frequency of ~450Hz. While this is fine if you and your art isn't moving, as soon as you move your head (or eyes) you get an annoying digital artifact and can see the LEDs flickering.

I used WS2815 RGB LEDs both in part because the 12V power rails let me run a longer run without power injection, as well as their 2kHz PWM frequency. It's not the best on the market (that would be the SK9822 at 8kHz or APA102 at 19kHz), but at least it's not 450Hz. The DMX white LED driver I got happens to clock in at 8kHz, which was a delightful discovery.

For LED control, I'm using the Falcon F16V3 RGB LED controller. This will be used for a number of other LED art installations I'm working on around my house in addition to the kitchen lamp. This will give me a slick 30-60FPS of LED animation possibility, controllable easily through Python or TouchDesigner.

Housing

I wanted the lamp to have a classic classy look, match our dining room table which sports a dark reddish stain, and be relatively slim. I also specifically wanted the light to form a ring, as from photography I am familiar with the magical power of ring lights.

I measured the kitchen island, subtracted an amount that made logical sense, then mocked up a cardboard version to see what it would look like. With some minor tweaks, I was able to come up with some rough dimensions.

I've learned from working with LED strips for other projects that it's really useful to have your housing match the natural stride of your LED strips. That is, for the 60 LEDs/meter strips that I'm using, having the dimensions of the things the LEDs will be adhered to snap be laid out in 16.667mm (1/60/m) increments. I made sure that the white LEDs and the RGB LEDs had matching strides, though the white LEDs have their cut points in larger groups of 3. This then locked in the final dimensions of the lamp.
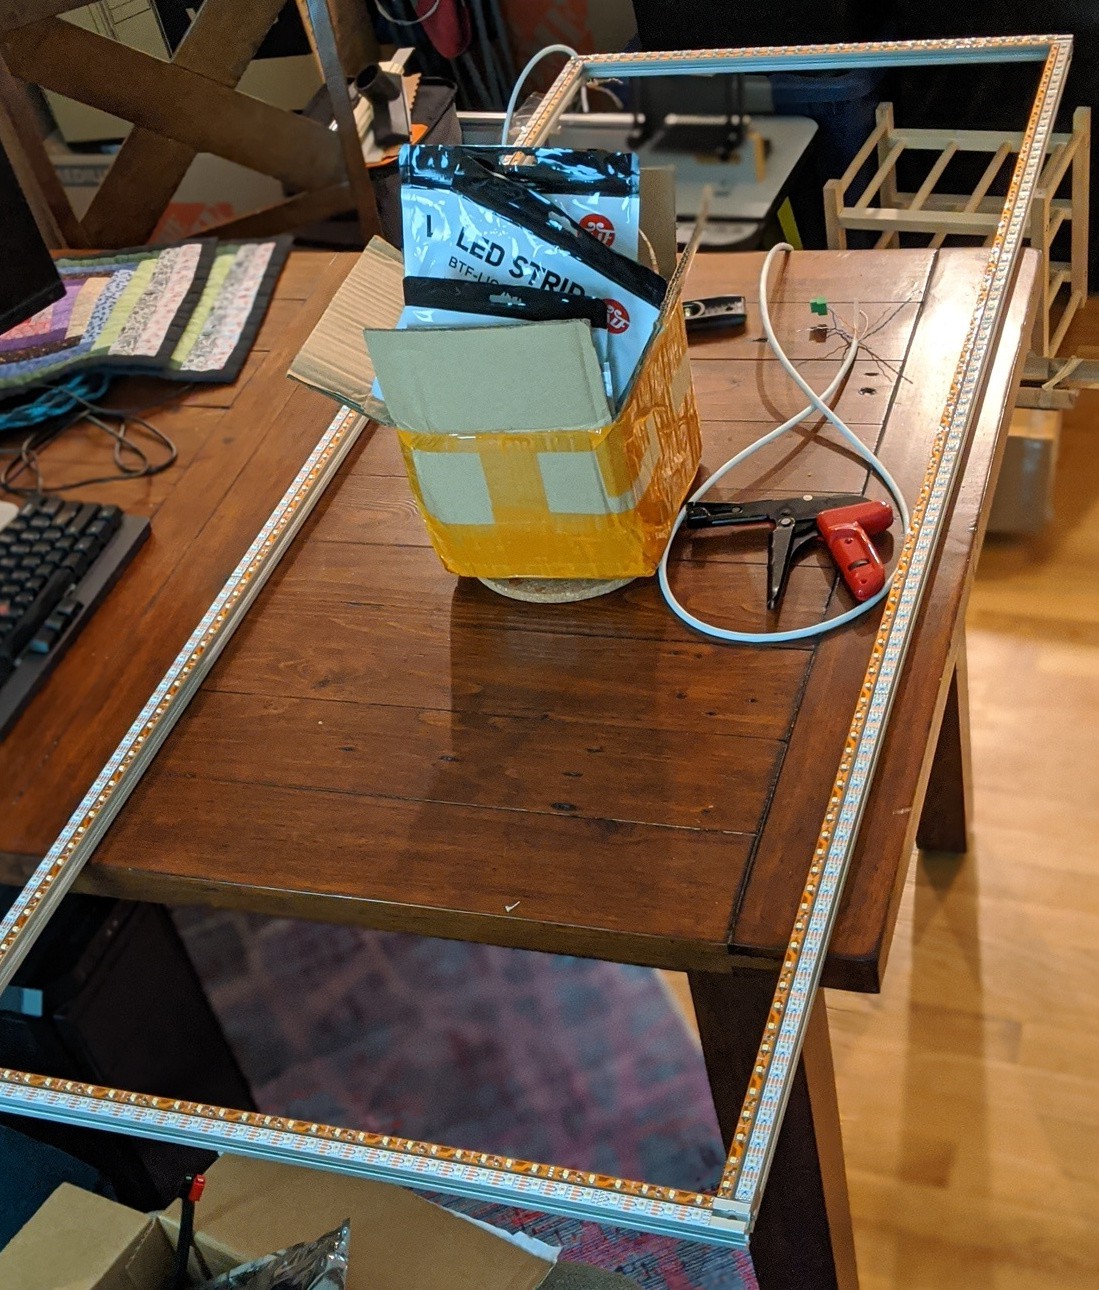

I knew I wanted to have the core of the lamp be rigid, possibly heat-dissipating, and easy to work with. I've been working with 80/20 extruded aluminum for another project and decided to order some of that. This made it super easy to adhere the wooden side panels to, gave the LEDs something to put some of their heat into as well as something to stick to. It's also dimensionally-precise and can be easily drilled with hand tools.

LEDs used for lighting a space work best when the...

Read more »

  • Complete!

    Steve Pomeroy07/21/2020 at 03:17 0 comments

    With the installation of the diffusers, the lamp is now complete. 

    For diffusion, I opted for Optix LED Satin HDF which has a matte side and a textured side. I thought the textured side adds a nice bit of detail and with 92% light transmission, I wasn't really losing anything. Usually diffusers that offer the kind of scattering this provides ends up with light loss of upwards of 60%, so this was a great find.

    The material was only available in 2mm thickness, so I ended up slotting them into the grooves instead of giving them a lip and having them sit flush with the bottom of the wood.

    Because I don't really have a full workshop set up yet, I ended up mitering the corners using a 45° rule and scoring+snapping. It worked well enough, but some of the angles didn't come out perfect and I had to hand file them to fix things up. 

    I didn't miter the diffusers on the top lights to keep things simpler. I don't think there's any loss of quality with the small holes there. The only downside is that this may be a place dust can get into the lamp over time.

    Over all, I'm very pleased with this project. I could have done some of the woodworking better, but considering I don't yet have a shop set up and this was my first project, I feel like it's a net success.

  • Gesture interface

    Steve Pomeroy07/16/2020 at 03:55 0 comments

    For fun—probably not for production—I whipped up a quick gesture interface for the kitchen island lamp. 

    It's triggered when your hand is directly above the Leap Motion controller. Raising/lowering your hand controls brightness, tilting it forward/backwards controls whether the upper or lower lights are lit, and tilting it to the side (rolling) fades between white lights and the RGB ones with a pattern playing.

    It feels (and looks) like magic!

    If I decide to actually use something like this in production, I may need to switch from absolute positioning to relative positioning. That is, to brighten the lamp, you put your hand in the target area and raise it. That would prevent the lights from flickering when you first put your hand back within the sensing area.

    This was made in TouchDesigner using a Leap Motion controller and a ton of Math CHOPs.

  • Housing installed

    Steve Pomeroy07/10/2020 at 04:00 2 comments

    Success! The housing has been installed. Some of the mitered corners will need some tuning so that there isn't light bleed, but they fit generally pretty well!
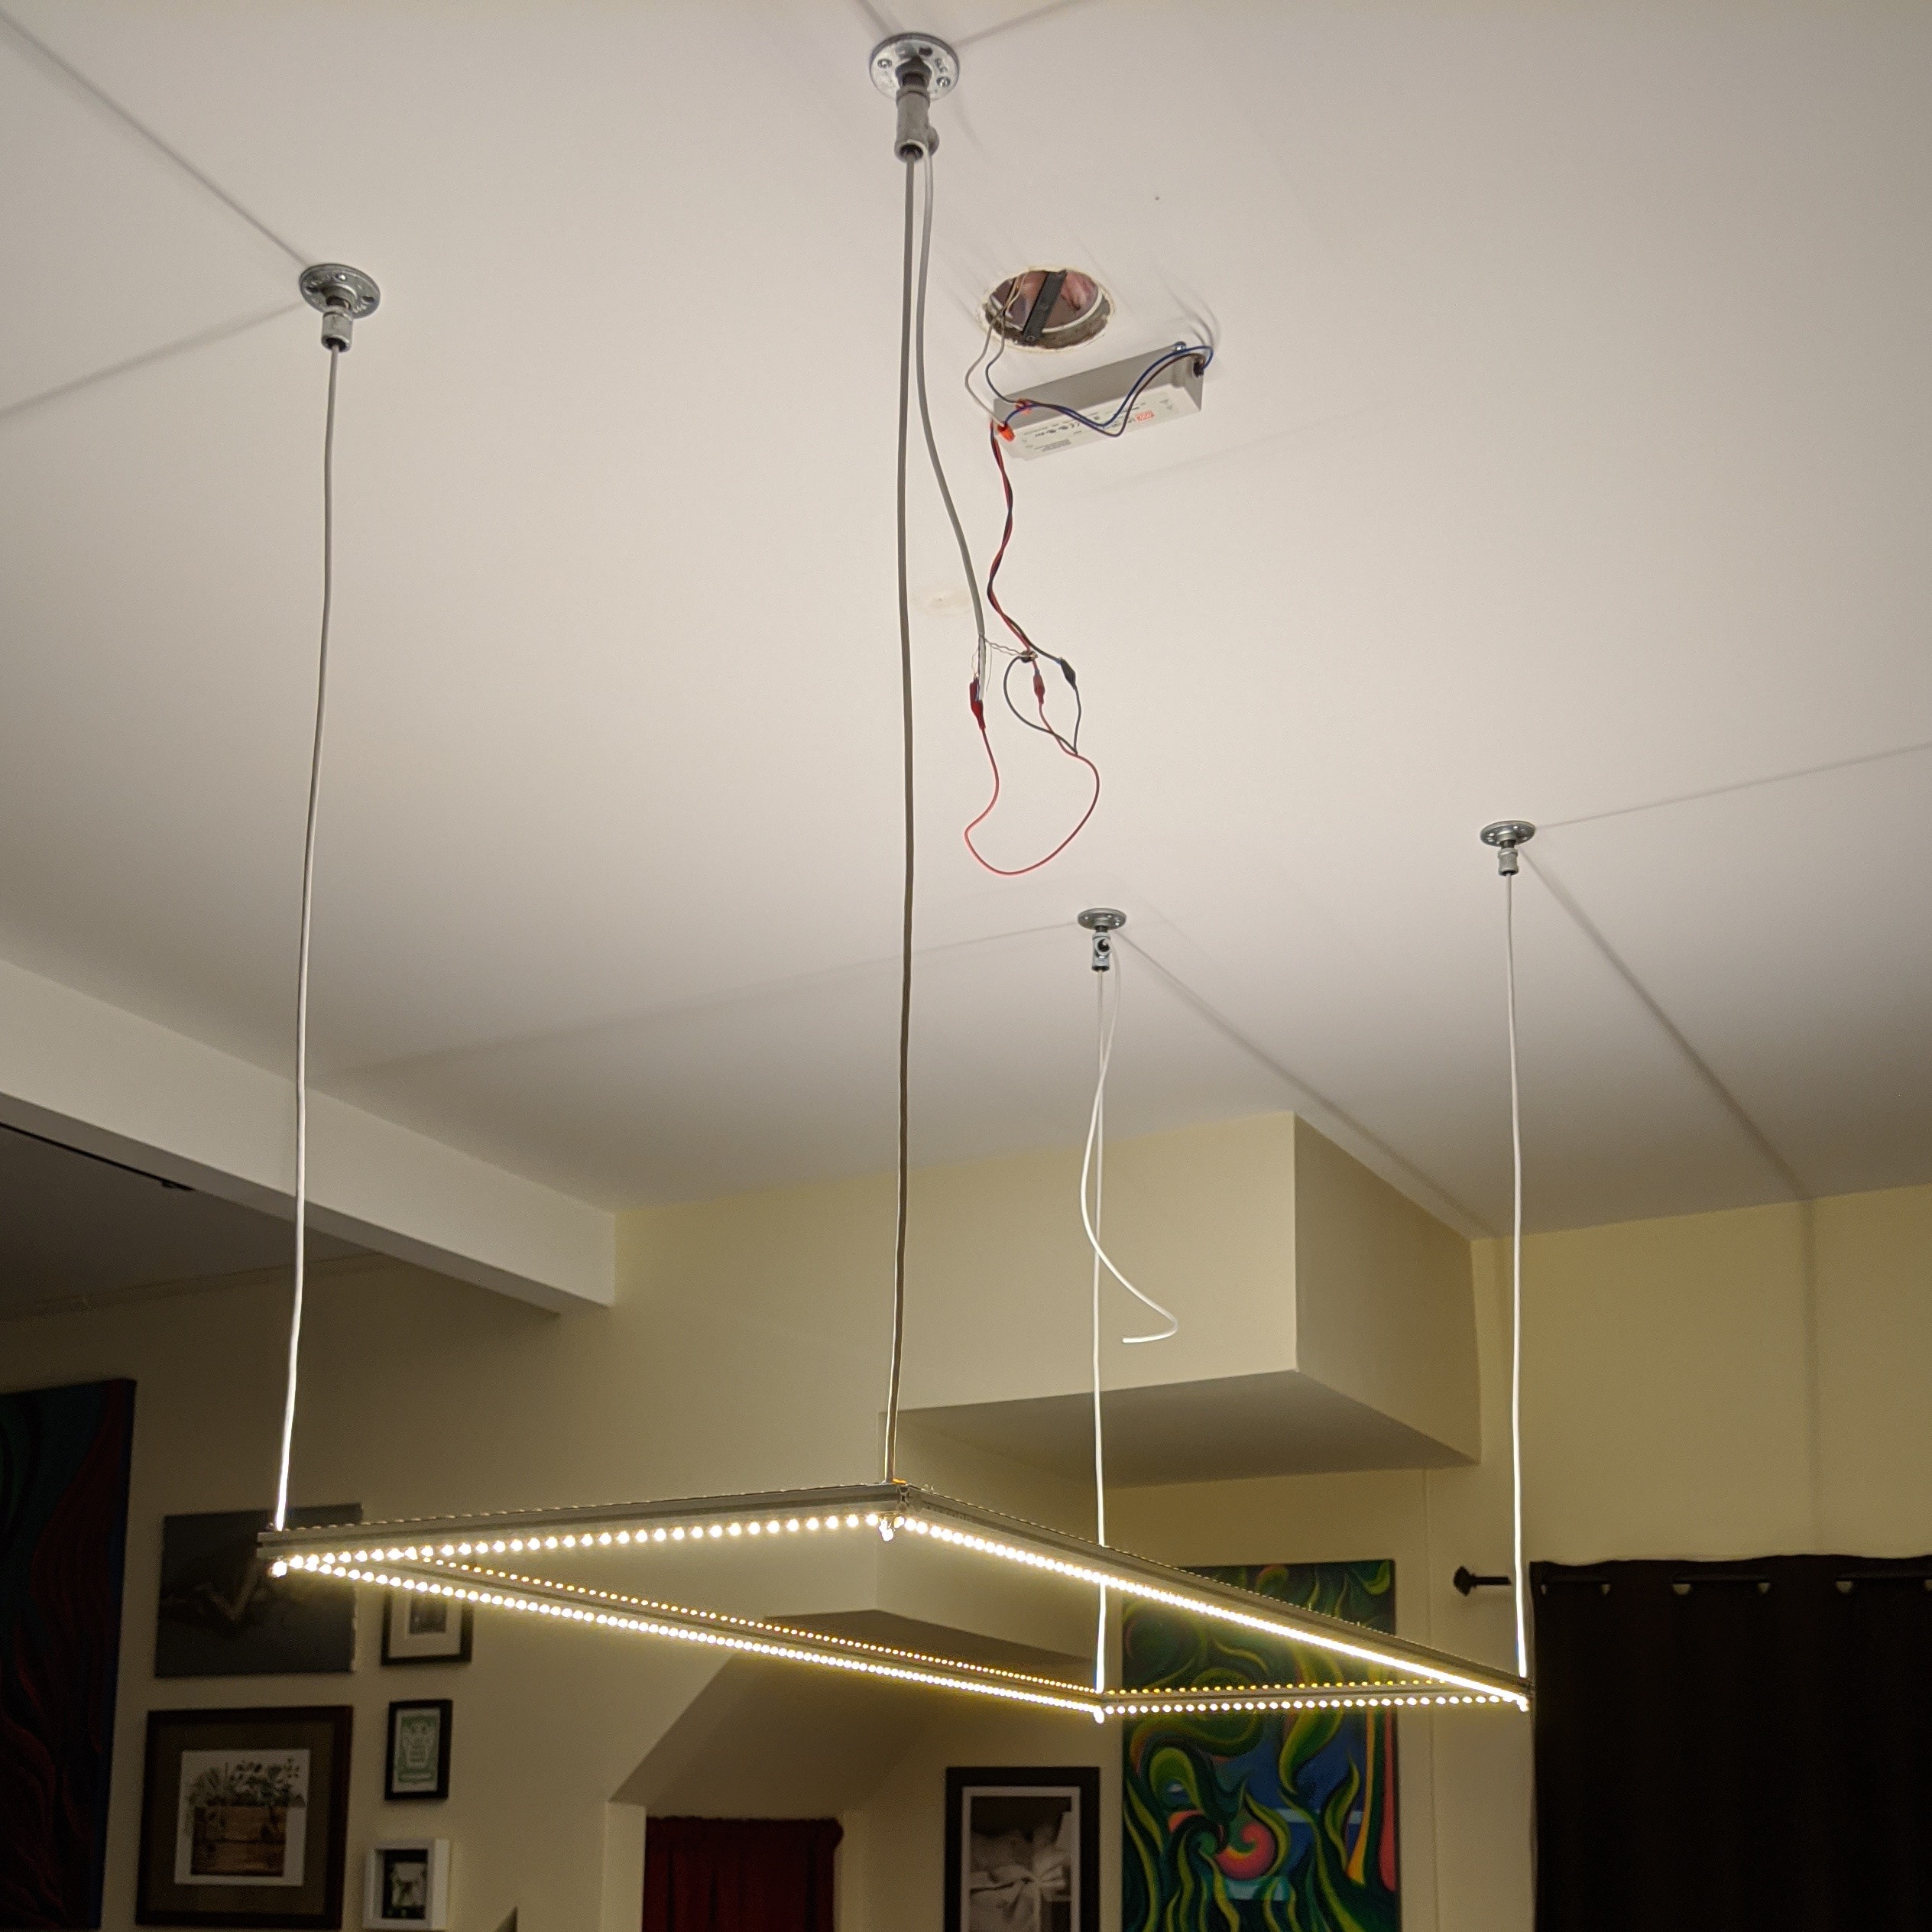
    The main component remaining is a diffuser on both the up and down lights, so that there aren't harsh shadows. I ordered some Optix LED Satin HDF which has a nice texture, excellent diffusion, and 92% light transmission. They'll be cut mostly to size from the reseller, I'll just need to miter the corners.

    I'm super excited with how well the lamp looks in both white and RGB mode, even without the diffusers. Check out this fun pattern:

  • Finishing the walnut housing

    Steve Pomeroy07/08/2020 at 12:00 0 comments


    The housing for the lamp is almost finished. All that remains now is putting holes in the sides to attach it to the 80/20 light core.

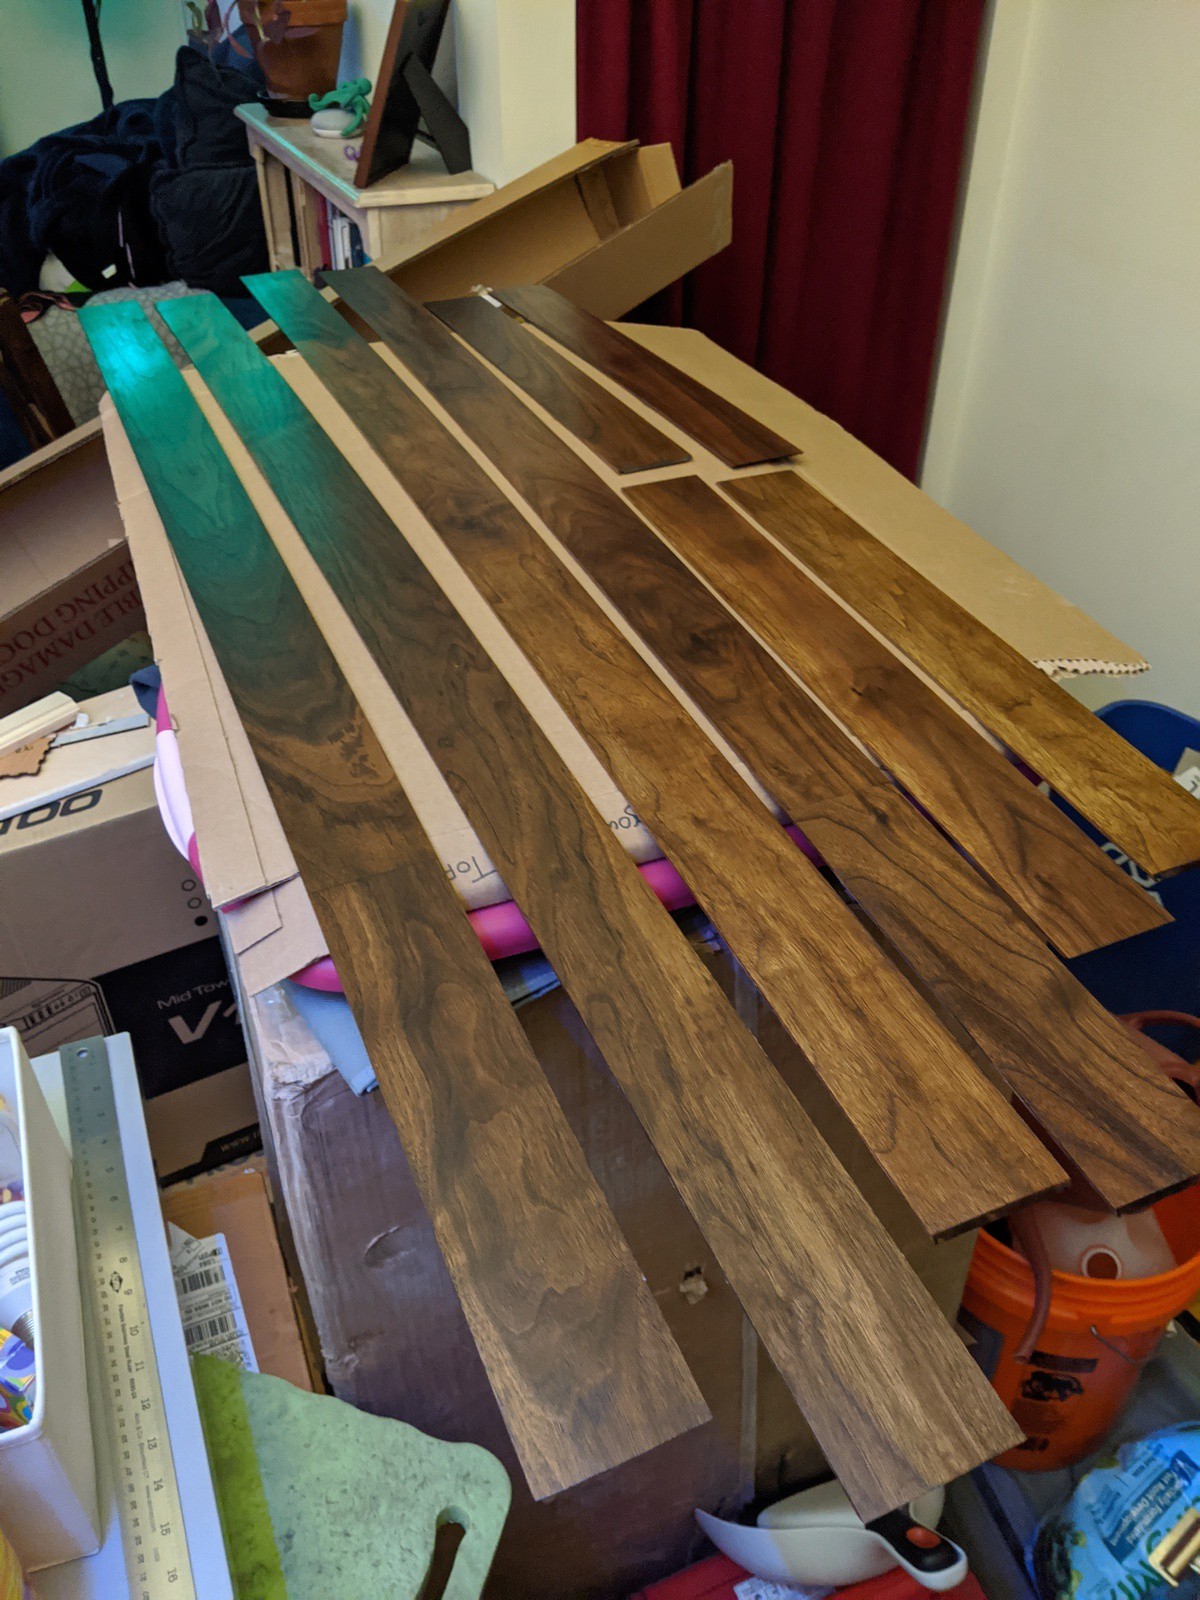
    The housing consists of ⅛" × 3"×48" walnut strips that have been trimmed, mitered, sanded, and finished. To make the long sides, I joined two strips with a simple lap joint and tried to match the grain a little. I chose sides such that the natural curve in the wood faces the aluminum so the entire thing will be pressed flat when screwed down.

    On the backs, I cut 3mm grooves 1.5mm deep and 2mm away from the edge with my router table. This will hold the acrylic to diffuse the light on the bottom and protect the LEDs from dust on the top. The acrylic will have a matching lip cut into the edges so that the bottom of the acrylic will be flush with the bottom of the wood to create a very clean look.

    The finish is a dark walnut stain with two coats of polyurethane on top. I used wood conditioner because I wanted to see what it did and that brought out the natural color. I almost decided to not stain it, but my partner recommended that I go with the stain to make the wood pieces match better.

  • Working on TouchDesigner support

    Steve Pomeroy07/07/2020 at 16:48 0 comments

    While I'm not entirely sure I'll use it in production, I've been playing with driving the lamp with TouchDesigner. 

  • Finished the electronics

    Steve Pomeroy06/30/2020 at 21:06 0 comments

    I finished the electronics today. The RGB and white LEDs on both sides can now be controlled via the main controller over sACN/E1.31! I tested everything out with QLC+.

    The DMX controller seems to work just fine without a ground wire. My understanding of this is that RS485 and thus DMX requires a common mode voltage between -7VDC and +12VDC, so as long as the grounds between my two power supplies (one for the main controller, the other for the lamp) don't have a voltage differential greater than that, then I'm fine. They're on the same house AC and are made by the same manufacturer, so that probably helps.

  • Light core installed on the ceiling

    Steve Pomeroy06/30/2020 at 13:09 0 comments

    I test-fit the core lighting system on the ceiling and tried out the white LEDs (up and down at the same time). Interestingly, the upwards white LEDs create a very rectilinear shadow of the wires on the ceiling. The effect is not bad, but also not intended. I'm going to roll with it, though: the room illumination it provides is excellent.

    The RGB LEDs work great too:

    Of course, this is only showing off the fact that all the LEDs light properly and checking out the light levels. Every one of the LEDs can be controlled, there's a ton more possibility than just a single color at a time. The downward RGB LEDs will be diffused and the upward ones will just have a clear dust cover on them, so the final effect will be very interesting.

View all 7 project logs

Enjoy this project?

Share

Discussions

petermankati80 wrote 08/31/2023 at 18:33 point

That's looks great i want this for my clinic Semblance check it.

  Are you sure? yes | no

algerganez wrote 07/27/2023 at 13:00 point

My cooperation with the project has been really beneficial to me. I'd want to share it with the best knife for sushi team so they can read it and apply something new.

  Are you sure? yes | no

grinderquery wrote 05/14/2023 at 04:38 point

you really did a great job to make a this electric lab for kitchen. I want to embed it with my kitchen design webpage https://grinderquery.com/best-electric-salt-and-pepper-grinder/.

  Are you sure? yes | no

calexjack742 wrote 05/04/2023 at 09:11 point

There has been a great deal of value to me in my involvement with the project. Would like to share it with the induction nuwave team so they can also read it and implement something new.

  Are you sure? yes | no

djxnhcfjdd wrote 07/28/2022 at 10:45 point

indeed there its seeming to be an extremely special thought basically its a cutting edge days tech thought that you shared here truly great I am likewise dealing with the comparative sort of thoughts here you can see https://zlinekitchen.com/

  Are you sure? yes | no

dchelaniushacker0 wrote 10/28/2021 at 08:52 point

What an impressive type of work you done here I fully support your idea here and would love to use it here on portable blender website you can see here.

  Are you sure? yes | no

gared34 wrote 03/04/2021 at 09:37 point

yes there its looking like a very unique idea simply its a modern days tech idea that you shared here really impressive I am also working on the similar kind of ideas here you can see https://ultimateknifekit.com/

  Are you sure? yes | no

pessomails wrote 12/24/2020 at 03:55 point

I like this LED design for kitchen. How can we connect it with custom board? I'm working on the impressions kitchen project, you can see here 

https://impressionskitchens.com/

  Are you sure? yes | no

Steve Pomeroy wrote 12/24/2020 at 15:48 point

I'm not sure I understand what you mean. Do you have an existing custom board (PCB) that you want to use?

  Are you sure? yes | no

ccspoz wrote 07/21/2020 at 05:52 point

Very slick! Nice to see you outlining the higher frequency options of LEDs. I'm also bothered by flickery LEDs - I'll definitely look into those other devices for a similar upcoming project. 

  Are you sure? yes | no

Steve Pomeroy wrote 07/22/2020 at 16:03 point

I learned recently that the WS2811s have been quietly updated to no longer have the horrible 450Hz PWM! So here's hoping that everyone's LED art ends up looking great. In general, I recommend double-checking any LEDs you buy. I've gotten ones that claim to be one part, but are in fact another with a different PWM frequency.

  Are you sure? yes | no

Similar Projects

Does this project spark your interest?

Become a member to follow this project and never miss any updates