Close
0%
0%

Mechanical 7-Segment Display

Clickety-clackety goodness to display a decimal number

Similar projects worth following
This is a fully 3D printed mechanical digit display. It uses a few print in place parts and a total of 34 printed parts per digit.

This is made under MIT License.


I’ve been able to get Filament during quarantine and a kilo will last me quite a while through designing and prototyping iterations. So I’ve been working on improving my design and making skills for mechanical gizmos.

adcurtin made one, here it is in action!

This design uses seven circular cams to pivot the 7-segment display elements. The manual knob can be turned forward or backward to increment or decrement the number by one.  This was inspired by Peter Lehnér.  The display elements in this version are on pivots rather than slides.  This causes the height to increase slightly but provides smooth motion of the rotating display elements. The main display and the lever links use print in place hinges. 

The design was performed in Fusion 360.  One key design variable is the cam diameter, primarily limited by the cam pressure angles and the sliding pin diameter. I’m interested to hear about other ways to design this that could be lower profile but without adding any springs or options to reduce the parts count. This incarnation uses 34 parts.  This could be reduced by modifying the lever pivots to fully print in place.  However I was never satisfied with the combination of tolerance and friction with full print in place evaluation pieces, so I relegated to printing the lever links as a separate piece that connects to the display element/display frame with two pins. 

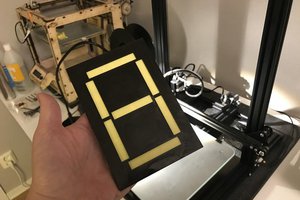
I printed this on a Creality CR-10S using PLA. The print in place pieces were printed with 0.2mm layer height, with the remainder printed at 0.28mm layer height. I used fluorescent red/orange paper segments attached to the flippy-flappy display segments with gummy funk.

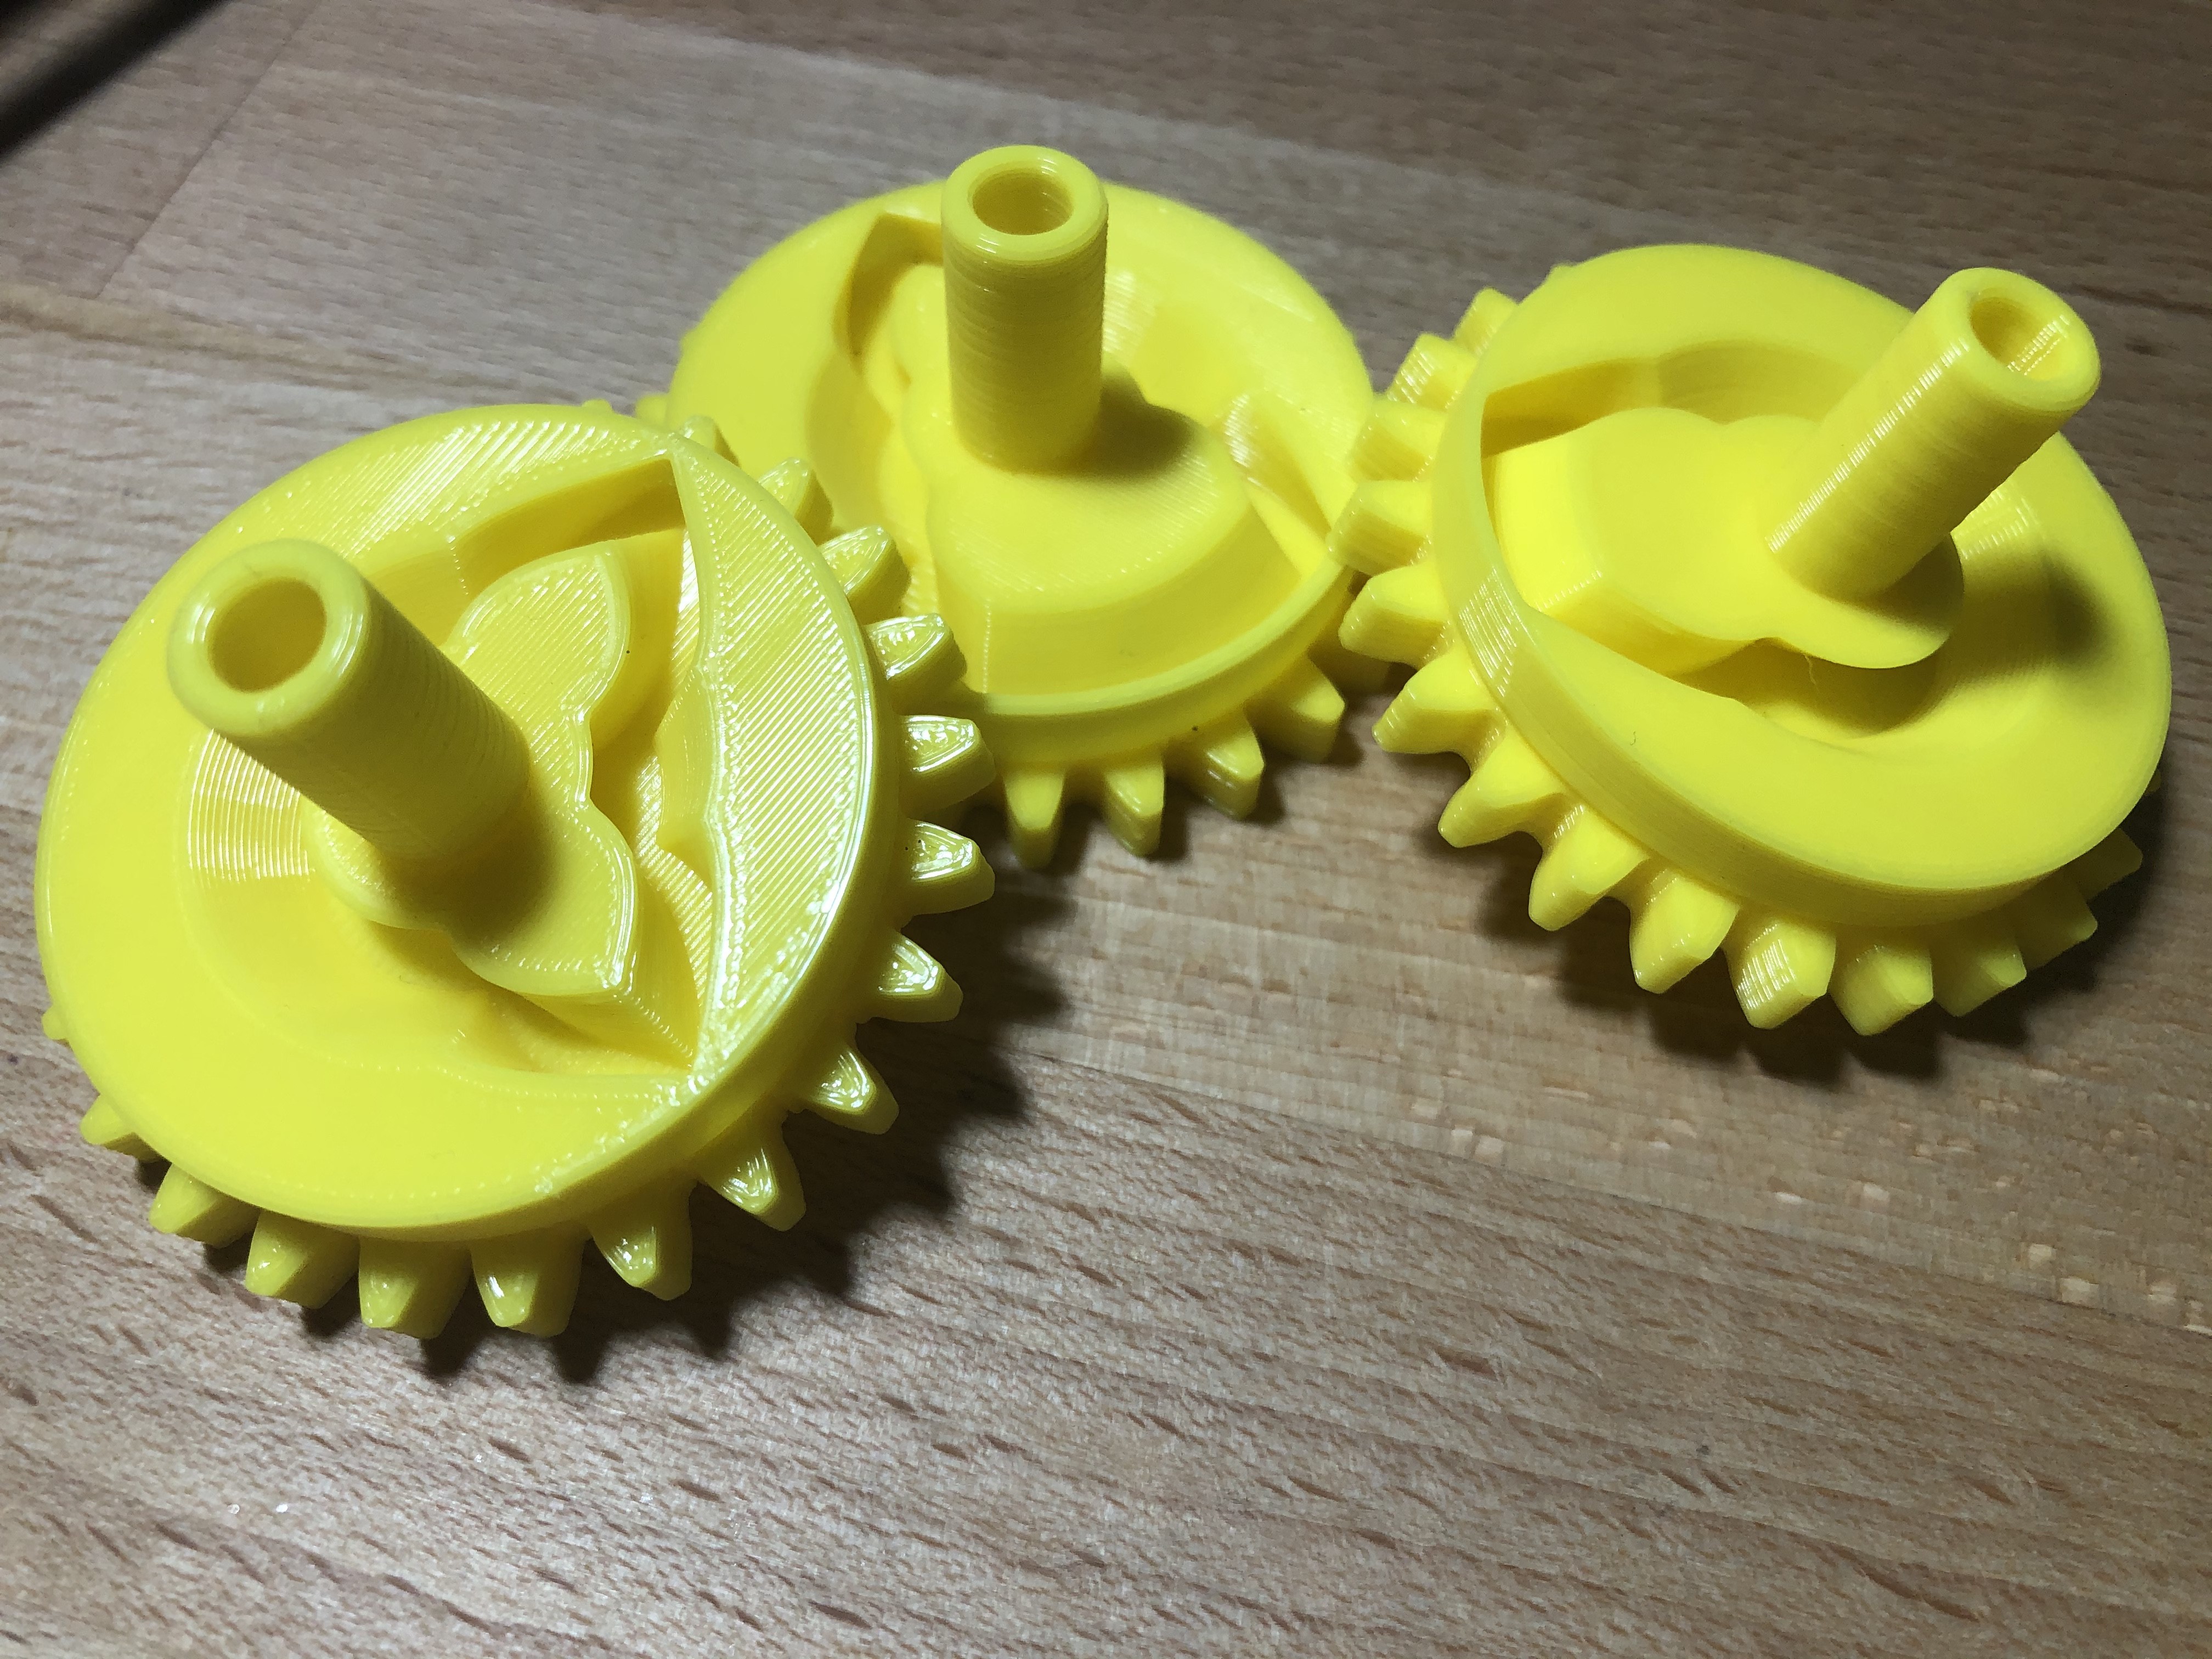
In case you were wondering, here is what some of the cams really look like. Each cam is a little different.  I put dots on the gear teeth to help line 'em up.
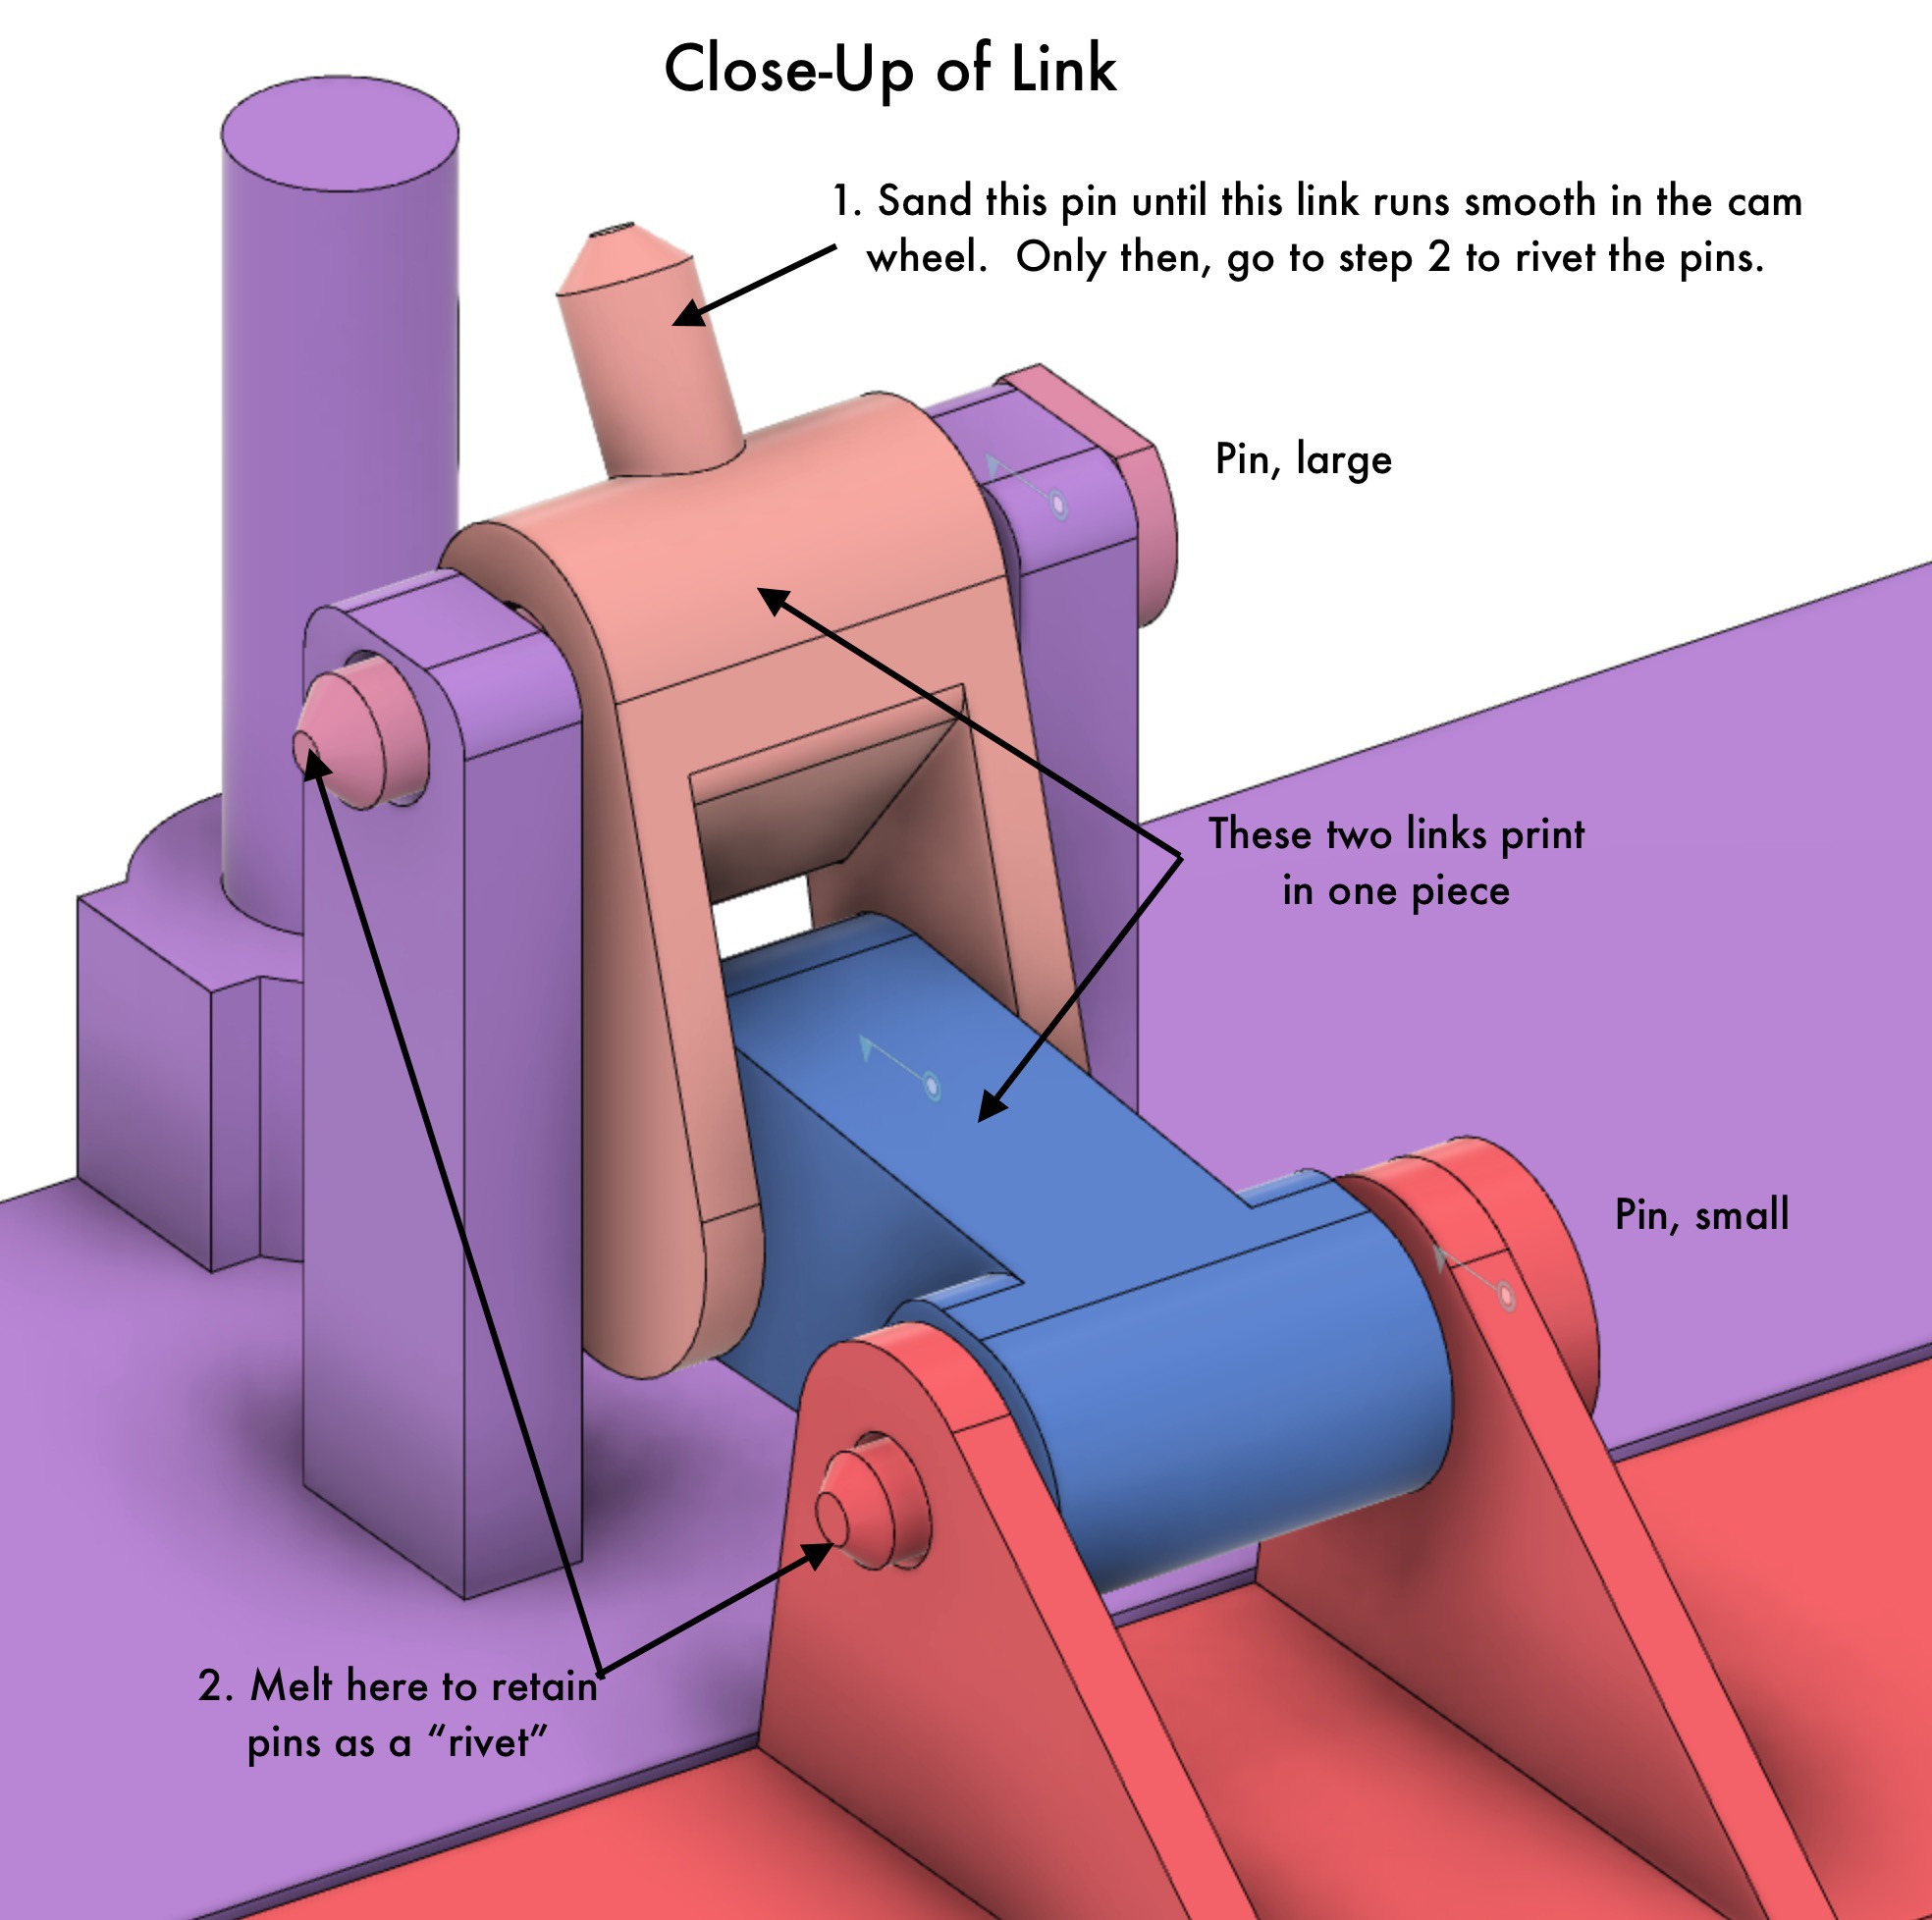
One construction note: Sand this pin around its periphery until it runs real smooth in the cams. Do that first and test it a lot to make sure the flap will flipittey-flappety real buttery smooth. Add some grease to these joints and the cams if you want. After that pin runs slick, then melt the rivets into their permanent home. Cause if you do step 2 first, you will probably need to undo the pins and go back to step 1.
Display test piece - smaller.stl

This is a smaller display unit you can use to test fit your parts, before you print out the big pieces. You can use this to tune your settings before printing the big display units.

Standard Tesselated Geometry - 113.95 kB - 07/26/2020 at 21:04

Download

Link_easier_to_print.stl

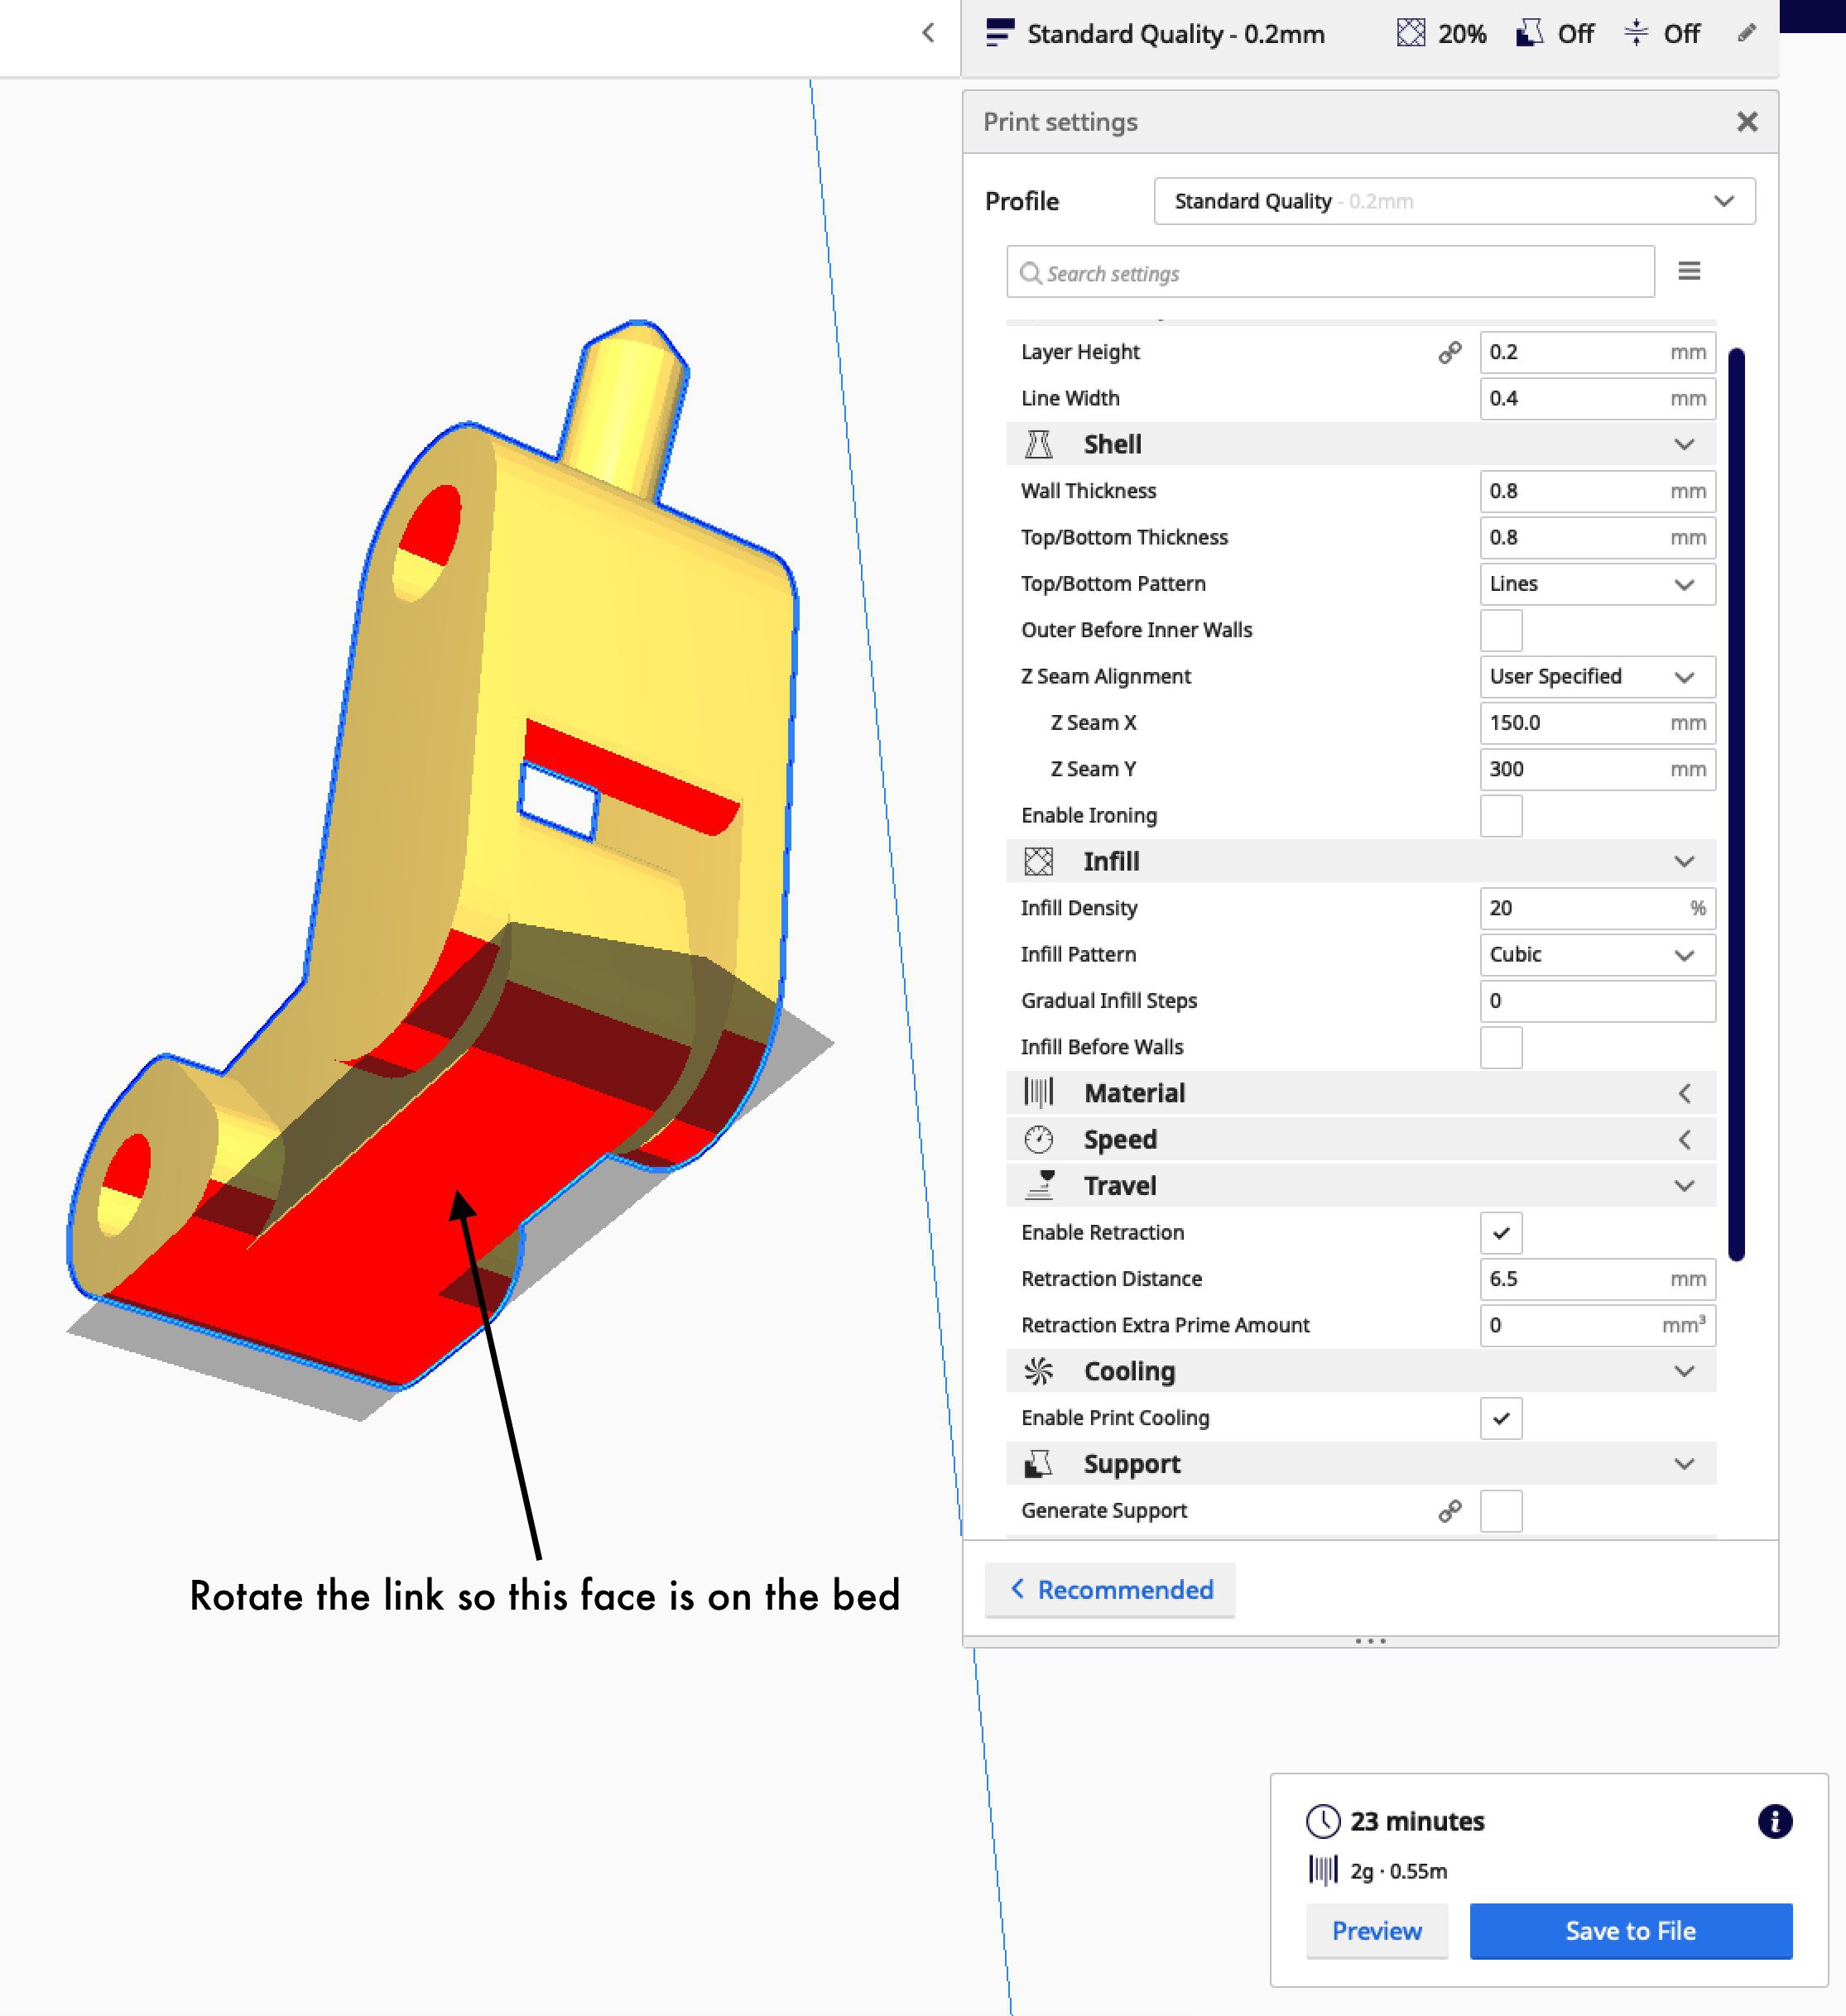
Caution! See instruction 3: Make sure you adjust this so it prints flat on the bed. It is a couple of degrees off, so it's easy to miss. I have a picture in the instructions that points out what I'm talking about. Per a request from adcurtin, here is a trial Link design that should be easier to print. I haven't personally verified, so maybe adcurtin can give us all some good feedback on whether it fits.

Standard Tesselated Geometry - 59.75 kB - 07/26/2020 at 18:21

Download

Link.stl

This link is harder to print since it has only a small contact area in one place. Once adcurtin verifies it, you may want to use the version called "Link_easier_to_print.stl". Caution! See instruction 3: Make sure you adjust this so it prints flat on the bed. It is a couple of degrees off, so it's easy to miss. I have a picture in the instructions that points out what I'm talking about.

Standard Tesselated Geometry - 59.36 kB - 07/25/2020 at 14:02

Download

kmatch98 - 7 segment display.f3z

f3z - 18.31 MB - 07/22/2020 at 22:05

Download

Hand wheel.stl

Standard Tesselated Geometry - 2.71 MB - 07/22/2020 at 19:54

Download

View all 20 files

  • 1
    CAM it up

    A major issue with getting this to work was designing the cams.   I found some guidance that the cam “pressure” angle is critical. Here is some guidance on the maximum pressure angle depending on the follower design. Actually when I found this info, I changed my design from a translating cam follower to a swinging cam follower. I found that the translating follower is more likely to jam than a rotating follower and that jives with this guidance. I couldn’t figure out exactly how to calculate the cam angle automatically in Fusion 360 but I made a sketch that I could drag a line around and estimate it.

    Maybe y’all can show me how to display the maximum pressure angle on my cams in Fusion 360. 

  • 2
    Print in Place can be your friend

    I’ve been reading tutorials about designing for print-in-place for 3D printing. I realized that it can reduce a lot of the assembly effort and reduce the parts count. Assembly is sometimes enjoyable (like LEGO) but I wanted to make this thing less fidgety if I could. My first target was to make as much as possible as print in place. I first made a test with a single display element with the front, the display piece and the two links and the two pins all as one piece. Yay I thought. But I had to ad some support for the links and somehow I never could get them designed so they had smooth operation and decent tolerance. Either they had too much friction and wouldn’t rotate smoothly or they were flopping around with too much wiggle room. So I decided to change the links to a separate print (but the two links print connected with printed in place)  and then I had to add these pins in. 


    This added back three more pieces per display element, which went against my goal, but in the end I was much happier with how it operates. Such is life I guess. I guess my goal should have been, make it work while not giving myself too many hassles. 


    Maybe our future selves will figure out a way to print more of it in one piece with tight tolerance and smooth link motion. Let me know, I’ll be the first to check it out. 

  • 3
    More details about making this thing.

    Here is a list of parts you will need, along with quantities:

    • 4 segment
    • 3 segment
    • Links (7 quantity)
    • Pin, large (7 quantity)
    • Pin small (7 quantity)
    • Cam A
    • Cam B
    • Cam C
    • Cam D
    • Cam E
    • Cam F
    • Cam G
    • Back Frame
    • 33T transfer gear
    • 13T drive gear
    • Handle
    • Bright colored paper to stick to the display flappers
    • Optional: m3 nuts and bolts (8) and some glue to fix the nuts to the display sections

    Total of pieces: 

    3D printed components (16 different components, total of 13+21=34 pieces)

    optional nuts & bolts

    Here's how I print the link, with the bottom on the build plate.

View all 7 instructions

Enjoy this project?

Share

Discussions

Ken Yap wrote 07/24/2021 at 05:57 point

Does it complicate the design much to slant the rectangle at about 10-15° like luminous displays?

Wonder if anybody is trying for the record largest mechanical 7-segment display in the world. 🤔

  Are you sure? yes | no

kmatch98 wrote 07/29/2020 at 03:22 point

Wow, looks great to me. I like the white on black look and the white transfer wheel. Glad you were able to get it to work! Now between you and me we can count up to 99! I’m really glad that it turned out. Did you end up using the “easy to print” links? Great work!

  Are you sure? yes | no

adcurtin wrote 07/29/2020 at 03:32 point

yup, I used the easy links. one thing I found that helped with the links is to push the two halves together and rotate as much as you can, then pull apart and do the same thing. It helps smooth the motion a bit.

  Are you sure? yes | no

kmatch98 wrote 07/25/2020 at 14:18 point

Hey adcurtin, you found the missing link!  Thanks for your patience.  I added the link STL file along with a few more instruction tidbits.  My frame is a pretty good press fit, but for permanent you can use some M3 bolts. If the instructions don't clarify, send more questions.  Oh, and I also added a list of all the pieces to make and quantities.  Check it out and let me know.  Also, if you make one, send a photo. 

  Are you sure? yes | no

adcurtin wrote 07/26/2020 at 17:49 point

thanks for the updates!

did you print the links with a raft or anything? I'm having a tough time printing them: the base (touching the bed) of the vertical part of the link is really small, and they're not adhering. Could the bottom of that be more squared off so there's more in contact with the bed?

  Are you sure? yes | no

kmatch98 wrote 07/26/2020 at 18:04 point

I ended up printing these without any support. But early on I had a couple that turned out weird due to the issues you mentioned but then later the same thing worked fine.  So I ended up just leaving it. But there’s really no reason for it to be so rounded here.

Give me a little bit and I can have something for you that will work printing better. In the meantime, is the link swiveling smoothly for you?

  Are you sure? yes | no

kmatch98 wrote 07/26/2020 at 18:29 point

Ok, I added a new Link for you to try.  I hope it will have enough clearance so it won't hit the cam axle, but let me know.

I also added some discussion about this in Instruction #5.  Keep the questions coming.

https://hackaday.io/project/173798/instructions

  Are you sure? yes | no

adcurtin wrote 07/26/2020 at 20:45 point

my first set just finished printing with a raft. I printed at 0.2mm, and the link is not loose enough for gravity to swivel the link, but they are able to move reasonably easily. I'm printing the easier link with 0.15mm layer height to see how that works.

Also, both links are 2º off from flat, so it's tough to tell they need to be rotated to sit flat on the plate. (even though you say to in the instructions)


I'm using PETG (I tried ABS too, but not with a raft, same problem with adhesion on those small spots).

Which orientation did you print the pins in, flat or on end?

  Are you sure? yes | no

kmatch98 wrote 07/26/2020 at 20:52 point

mine always have some friction so it sounds about right. Yeah the links are off axis, I put a note in the instructions but I should add a comment in description of the file. I only have used PLA and printed the swivelly bits at 0.2mm layer height and the rest at 0.28 mm (cams, pins, frame)

Keep us up to date on how these materials and settings work. I printed the pins on end. There’s not a lot of stress on them so I haven’t had any shear off between layers. 

Also I just realized it would be useful to make a minimal single sample display element so you can verify things without making a giant print. 

I added a test piece "Display test piece-smaller.stl" you can use to verify your print settings for the display before you commit the big pieces.  That's the kind of size I used to verify the link and cam operations.  It will probably save you some filament rather than printing the big chunks multiple times with different settings.  

Check out instruction 6 for some more tidbits of information.  https://hackaday.io/project/173798/instructions

Thanks for the questions, it seems like you are making good progress. 

  Are you sure? yes | no

adcurtin wrote 07/26/2020 at 21:23 point

do you get notified if I reply to myself here? the reply depth is limited. 

I already printed all the big pieces :), I just have 2 gears, the handle, links and pins left.

  Are you sure? yes | no

adcurtin wrote 07/26/2020 at 22:09 point

I'm guessing you didn't get notified for my comment replying to myself.

The new link is printing great at 0.15mm with no raft. no issues with the first 4. It's just a little bit looser than the 0.2mm print, but not much.


  Are you sure? yes | no

kmatch98 wrote 07/26/2020 at 23:52 point

nice to hear things are going well for you. Keep me posted when you run into more issues and I’ll see what I can do.

As for tolerance it’s a little tricky to get it just right. Too tight and it’s hard to rotate and too loose and the rotation range of motion won’t be enough to fully open or fully close the display.  Dunno if it will work for everyone but you are the second to try so let’s see if you can get it to work. I hope it’s close enough to look good for you when you get it flip-flopping around. 

 Good to hear you are making progress!

  Are you sure? yes | no

adcurtin wrote 07/25/2020 at 02:23 point

how many of each piece should I print? 7 of each pin? Is the link stl missing?

how is the frame held to the front digit pieces?

  Are you sure? yes | no

kmatch98 wrote 07/23/2020 at 16:08 point

I went through some heartache with how much of this I could print in place. Ended up at a decent place but had to give up my ideal of minimum parts count. Added a note to the instructions if you want to live vicariously through my saga. I’m better off for going through it. It builds character my dad told me. 

  Are you sure? yes | no

kmatch98 wrote 07/23/2020 at 13:56 point

I added Some more information in case you are interested, a few tidbits about how to be sure the thing runs smooth and a added a photo of some cams.  Each cam is a piece of work, and it took me a bit of paper and pencil to make charts for each of these and a circular diagram too.  I kept double-checking myself when I ran each cam through my mind because each one rotates different and you have to twist your brain to make sense of it.  I finally got them programmed right but had to sharpen the ole Ticonderoga pencil a time or two to get it.

  Are you sure? yes | no

rowan wrote 07/23/2020 at 11:11 point

Very well done mate :)

  Are you sure? yes | no

kmatch98 wrote 07/22/2020 at 22:09 point

Ok folks, I just updated the files with the STL files and the Fusion 360 file.  Check 'em out.  Get to clickety-clacking and let me know your questions and improvement suggestions.  Didn't realize I made it into an e-mail for Hackaday, thanks for letting me know.

  Are you sure? yes | no

mproctor13 wrote 07/22/2020 at 17:33 point

I have been interested in doing 3d printed mechanical clock with seven segment display. I would love to see your Fusion 360 file to get inspiration. 

  Are you sure? yes | no

fwacer wrote 07/22/2020 at 16:34 point

Awesome project! Would you consider posting the STL files used? (Thingiverse is good for that, or just in the files on hackaday)

  Are you sure? yes | no

Lee Stephens wrote 07/22/2020 at 16:23 point

You were featured in the Hackaday email. Fascinating. I'm interested to see how you get on. Looks like the kind of thing that would be fun to build.

  Are you sure? yes | no

kmatch98 wrote 07/20/2020 at 20:42 point

Dan and Mike thanks for the comments. This is really revision zero to prove everything out. After working on it for several weeks, just glad to get it working!

A few Ideas to be added:

How to attach a stepper motor

Adjust the gear ratios so it is an easy number for a stepper to drive 360 degrees

Add a homing function and/or sensor that each number has been clicked into

How to combine several digits with a Geneva drive mechanism.

if anyone wants a Fusion 360 file me know. I’m not the most organized but maybe you can get some ideas from it. 

  Are you sure? yes | no

Dan Maloney wrote 07/20/2020 at 20:05 point

That manual knob looks like it could easily be replaced by a gear to link multiple displays together -- hint, hint...

  Are you sure? yes | no

Mike Szczys wrote 07/20/2020 at 19:19 point

The segment flipping action is so satisfying, well done!

  Are you sure? yes | no

Similar Projects

Does this project spark your interest?

Become a member to follow this project and never miss any updates