 Ken Meyer
-
1Step 1
WARNING!
These instructions are somewhat premature and are intended to demonstrate the design for the hackaday.io prize competition. I'll be continuing to refine the instructions as I improve on the design and as issues crop up. Please get in touch with me to discuss what I'm confident in and what might need more work.
-
2Step 2
Set up and test Apitronics hardware
Set up the Apitronics Bees and Beaglebone Black Hive to make sure all the hardware is working. They should just work out of the box, but the firmware for both the Apitronics Bee and the Apitronics Hive are still being improved, so it's important to verify that you've got the hardware working before modifying anything.
Here's a link to the setup instructions.
You'll want to make sure that the Beaglebone Black Hive is wired (via ethernet cable) to the same network as a computer for viewing data and adding the sensor to the database for scaling. You can either access the hive's basic graphing capabilities by typing "hive.local" into the command bar, or if that doesn't work, find the IP address assigned by your router and type that into the command bar.
You should be able to navigate to a bee and see the various sensors (default of two onboard sensors for non-weatherstation Bees). The sensors are populated when the Bee first connects wirelessly to the hive, and they receive data both at the first connection and then every 15 minutes by default.
Here's what the dashboard currently looks like (it's being improved by the Apitronics team and could change):
![]()
-
3Step 3
Add the HX711 sensor board to the Apitronics Bee.
Connect the 4 wires from the scale to the 9-pin plug that passes through the weatherproof enclosure. These wires should be connected on the inside of the enclosure to E-, E+ (for excitation + and -) and A-, A+ (sense wires + and -) on the HX711 breakout board. The breakout board should be wired with Vcc to 3.3V, Gnd to Gnd, SCK to A0, and DT to A1.
Make sure the HX711 sensor is glued or taped out of the way where it can't be shorted out by any stray wires.
I'll add pictures and better instructions when I've completed this step myself -- in the mean time, if you want more details, contact me here or at hackerbee.com.
-
4Step 4
Reprogram the Apitronics Bee
Program the Apitronics Bee with this firmware that sends the load cell measurement back to the Apitronics Hive along with onboard temperature and battery voltage.
Here is a GitHub repository with the Apitronics Bee firmware I modified to include a library that allows reading of the HX711 ADC.
https://github.com/Deamiter/HiveLogger
Download the HiveLogger firmware above and open the BeeCore sketch in the appropriate (for your computer's OS), modified Arduino IDE from the Apitronics Bee repository.
To program the Bee, you need to enter the USB bootloader by removing the USB cable, turning the Bee off, then as you hold down the test button, turn the Bee on again. Finally, release the test button and plug in the USB cable and you can program the Apitronics Bee through the Arduino IDE.
A video making this clearer is available here.
In case of trouble:
Here's a repository with the original firmware from Apitronics.com. I found that it was helpful to go back to this original firmware occasionally when I had questions about whether I was having problems with my modified firmware or with a database on the HIve that I'd corrupted with previous firmware modifications.
-
5Step 5
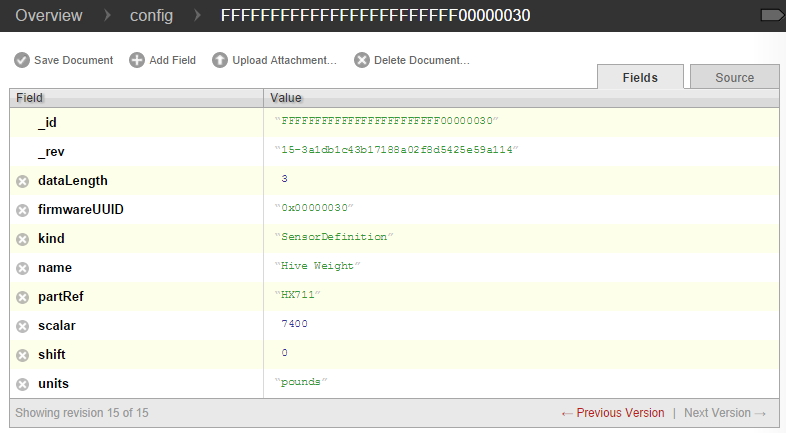
Add the hive scale sensor to the Apitronics Hive sensor database.
Follow the instructions in the Apitronics Wiki under the CouchDB section to add a sensor definition to the Hive. You can probably stream raw data without doing this (as long as your sensor UUID isn't already being used in the database by anything else!) but this is important for calibrating the scale in the next step.
I picked UUID 30 and set up my sensor following the Apitronics Wiki closely.
![]()
-
6Step 6
Calibrate the scale with a known weight.
Once the scale sensor is defined in the CouchDB on the Beaglebone Black Hive, you're ready to calibrate the scale. You could do this in the AHX711.h library, but I wanted to be able to calibrate the data remotely, so it's easier to do it in the CouchDB and simply stream raw data to the Hive. You can use the parameters "scalar" and "shift" to calibrate the sensor. Just place a known weight on the scale, press the test button in the Bee to send a datapoint, then remove the weight and press the test button again (I pressed the test button 3 times each to make sure the data was repeatable). Then calculate a scaling "scalar" value that gives an accurate reading when loaded with the known weight, and the shift value that gives a zero reading when unloaded.
There's significant drift in postal scales with temperature and some drift over time, particularly in the first few minutes of a major load change, so don't expect the reading to stay perfect. A more expensive scale can reduce this effect, and temperature compensation is relatively straightforward, but I haven't yet implemented it, and I'll probably want to add the temperature compensation in post-processing anyway to reduce the chance of lost data due to a programming error.
-
7Step 7
Install the scale.
The scale should be roughly level (beehives are often tilted slightly forward to keep water out, that should be fine) and fully supported on the bottom. The hive must be centered on the scale to avoid tipping.
-
8Step 8
Turn on Bee and Hive
As long as the units are close enough (hundreds of feet with minimal obstruction, more with direct line of sight), the data should start showing up with the hive immediately.
-
9Step 9
Install the Solar Panel
Ideally, it should be tilted at an angle equal to your latitude and pointed toward the equator to collect maximum sunlight, but laying it on top of the hive should also work as long as there are no sensors eating up excessive power (if they are, implement a better sleep mode or get a bigger solar panel!)
-
10Step 10
[OPTIONAL] Install the Apitronics Weatherstation
While not strictly necessary, I think it's important to have a local source of data rather than relying on differently-formatted data from NOAA or a Weather Underground station in your area. If cost is an issue, simply adding an external temperature probe might be good enough.
Follow the instructions on Apitronics.com to deploy the weatherstation.
Honeybee Hive Monitoring
Recording weight, hive temperature, and weather data toward better management and understanding of honeybees.

Discussions
Become a Hackaday.io Member
Create an account to leave a comment. Already have an account? Log In.