Create Your LED Chaser Project Using Wokwi Arduino Simulator
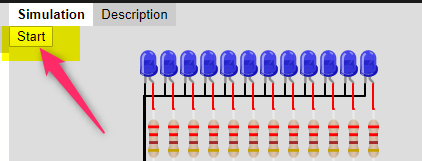
- Open the wokwi Arduino simulation for a simple LED blink page here. Note that wokwi Arduino simulator even works on your mobile browser as well
- Once it is open, you can see two sections. To the left is the Editor window. Simulation windows is in the Right.
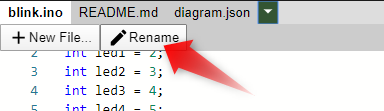
- diagram.json file is used to define the new elements and their connections respectively. Go ahead and have a look once. The ReadMe file is to share the information about the project and the source of the code etc.
- I have renamed the in the file from blink to LED chaser to make it more meaningful.
Please leave a comment if you have any questions. I will be glad to help you out
We will see the changes done in the INO file and JSON file
New Contents of the INO and Diagram.json File (you Can Copy and Paste It)
//initializing a variable for digital pin 2 to 13
int led1 = 2;
int led2 = 3;
int led3 = 4;
int led4 = 5;
int led5 = 6;
int led6 = 7;
int led7 = 8;
int led8 = 9;
int led9 = 10;
int led10 = 11;
int led11 = 12;

//Arduino 7 Effect code:-

#define t   30
#define t1  20
#define t2  100
#define t3  50

void setup() {
  // set up pins 2 to 13 as outputs
  for (int i = 2; i <= 13; i++) {
    pinMode(i, OUTPUT);
  }
}
/////////////////////////////////////////////////////////////////////////////////Effect 1
void loop(){

effect_1();
effect_1();

 effect_2();
 effect_2();

 effect_3();
 effect_3();

 effect_4();
 effect_4();

 effect_5();
 effect_5();

 effect_6();
 effect_6();

 effect_7();
 effect_7();
  }
//left to right and right to left
void effect_1()
{
for(int i=2; i<14; i++){
digitalWrite(i, HIGH);
delay(t1);
digitalWrite(i+1, HIGH);
delay(t1);
digitalWrite(i+2, HIGH);
delay(t1);
digitalWrite(i, LOW);
delay(t1);
digitalWrite(i+1, LOW);
delay(t1);
}
for(int i=13; i>1; i--){
digitalWrite(i, HIGH);
delay(t1);
digitalWrite(i-1, HIGH);
delay(t1);
digitalWrite(i-2, HIGH);
delay(t1);
digitalWrite(i, LOW);
delay(t1);
digitalWrite(i-1, LOW);
delay(t1);
}
}
/////////////////////////////////////////////////////////////////////////////////Effect 2
void effect_2()
{
int count = 13; // keeps track of second LED movement

  // move first LED from left to right and second from right to left
  for (int i = 2; i < 13; i++) {
    clear();
    digitalWrite(i, HIGH);      // chaser 1
    digitalWrite(count, HIGH); // chaser 2
    count--;
    // stop LEDs from appearing to stand still in the middle
    if (count != 7) {
      delay(t2);
    }
  }

  // move first LED from right to left and second LED from left to right
  for (int i = 13; i > 2; i--) {
    clear();
    digitalWrite(i, HIGH);      ...
Read more »
 mihai.cuciuc
 jeromekelty
 Md. Khairul Alam
 Lee Sampson