Close
0%
0%

FreeTouchDeck

a Bluetooth ESP32 TFT + Touch Macro Keypad

Public Chat
Similar projects worth following
Controlling your computer by using hotkeys and macros is a great way of speeding up your workflow. Unfortunately a device dedicated to doing that (for example Elgato's Stream Deck) will cost you about $120. That is why I designed FreeTouchDeck. You can build FreeTouchDeck yourself, which will cost you about $20 (including shipping!). It uses an ESP32 and a 3.5" touch screen. Keystrokes and macros are send via Bluetooth to your Windows, MacOS, or Linux computer.

You can customize your FreeTouchDeck by using the configurator. The configurator is a webpage that is hosted on the ESP32 itself. You can customize menus, buttons, logos and colours. You can also create your own button logos and upload them.

This is a really simple build and will take up less then an hour of your time. I designed it so it can be build using parts that can be easily found on AliExpress and Banggood but can also be found locally if you do not want to wait a while before the postman


The video above is not a tutorial, but a short introduction. It shows some of the features of FreeTouchDeck and explains how I got the idea.

FreeTouchDeck is designed around two parts that you can easily find on AliExpress or Banggood:

- A 38-pin ESP32-WROOM-32D Development Board from AliExpress*

- An ILI9488 TFT screen with XPT2046 touch controller from AliExpress*

*Full disclosure: these are affiliate links

If you want to build your own FreeTouchDeck, check out the build instructions below!

  • 1 × ESP32 DevKitC (38-pin)
  • 1 × ILI9488 Touch screen + XPT2026 touch controller

  • FreeTouchDeck Web Installer is born!

    Dustin Watts04/19/2022 at 09:53 0 comments

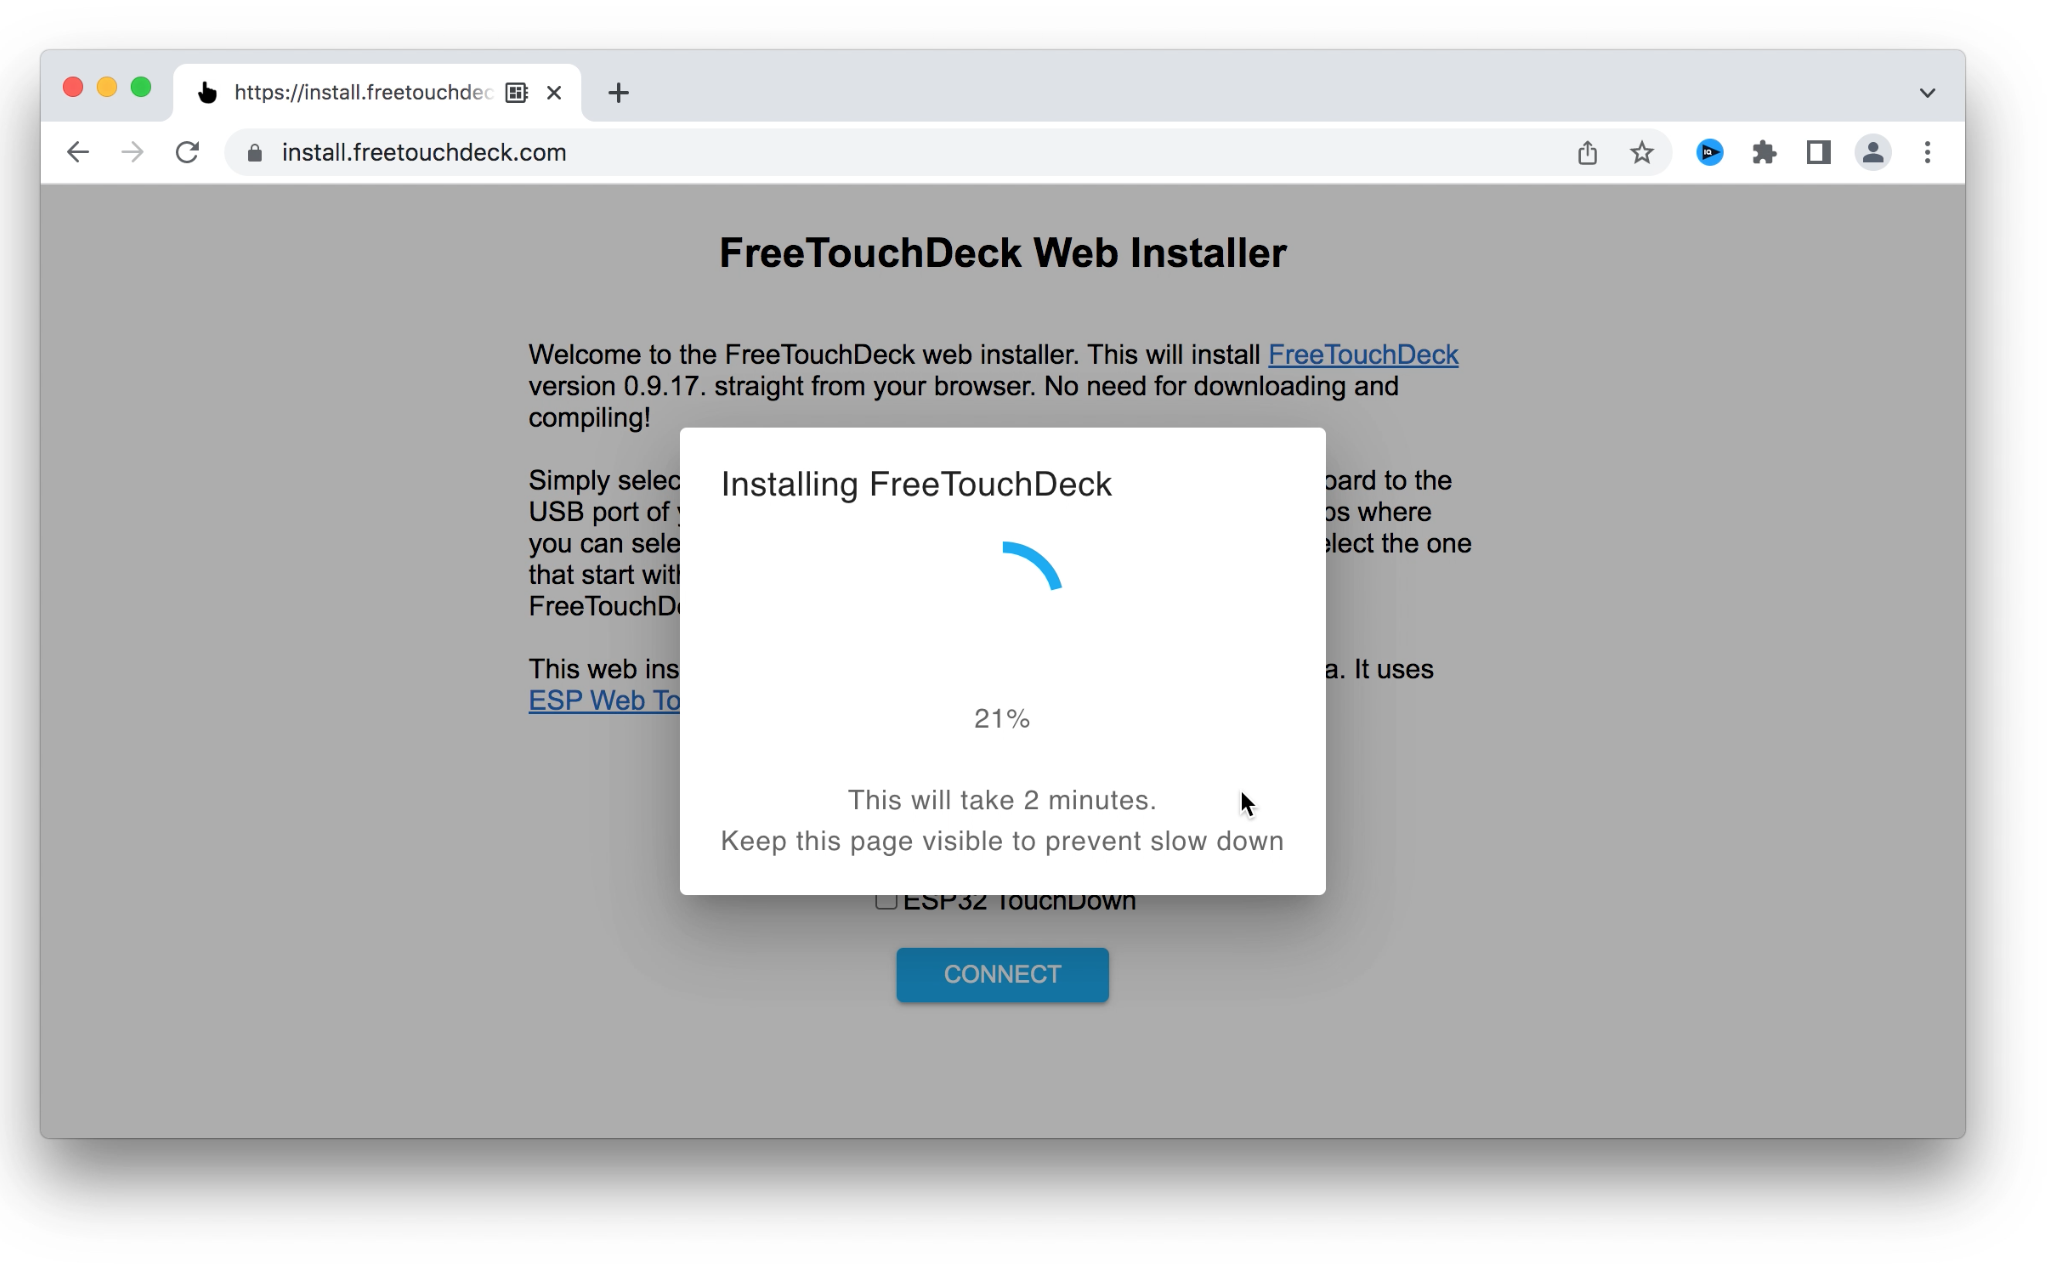
    Instead of having to install the Arduino IDE, downloading all the correct libraries, uncommenting #defines in the .ino file, and editing the User_Setup.h from the TFT_eSPI library, there is now an easier and more error-proof method of uploading the FreeTouchDeck code. It is called the "FreeTouchDeck Web Installer". Simply go to https://install.freetouchdeck.com and follow the instructions on the screen.

    The Web Installer is powered by ESP Web Tools by ESPHome, huge thanks to those people!

  • Edit wificonfig.json no longer necessary before upload

    Dustin Watts03/22/2021 at 21:52 0 comments

    Since version 0.9.11 it is no longer necessary to edit the wificonfig.json file. If you leave everything as default, when you start the configurator it will start an Access Point. You can connect this access point and change you WiFi settings there!

  • A step-by-step build video

    Dustin Watts12/20/2020 at 09:17 0 comments

    To accompany the build instructions here I made a step-by-step build video. It might be a good idea to watch the video before you start you build as it gives you an overview as to what is required to build your own FreeTouchDeck.

  • Created a Hackaday project!

    Dustin Watts11/14/2020 at 12:56 0 comments

    Although I have been working on FreeTouchDeck for a few months now, I never published anything about it. Except for a few tweets about it and talking about it on my Discord server. Today I spent a fair bit of time on creating this Hackaday project. I hope everyone can follow along, but if you have any remarks, please let me now!


    If you like to join me on my journey, either with tips, remarks, as a beta tester of even if you want to contribute code, please join my Discord server where I have a dedicated channel for FreeTouchDeck: https://discord.gg/RE3XevS

View all 4 project logs

  • 1
    Watch the video

    Before you start this project it might be a good idea to watch the video I made. The video in itself isn't a how-to, but more of an introduction to what FreeTouchDeck is and what it can do for you!

    Watched the video? Let's get the parts you'll need!

  • 2
    Get the Parts You'll Need

    If you do not already have an ESP32 and an ILI9488 TFT + Touchscreen lying around. You can find them pretty cheap on AliExpress. I used these parts:

    - A 38-pin ESP32-WROOM-32D Development Board from AliExpress*
    - An ILI9488 TFT screen with XPT2046 touch controller from AliExpress*

    Not all ILI9488 TFT screens are created equally. It is important to make sure you have selected a screen with touch!


    Download the FreeTouchDeck repository from Github: (https://github.com/DustinWatts/FreeTouchDeck)

    *Full disclosure: these are affiliate links

  • 3
    Hardware: Connect the TFT Screen to the ESP32

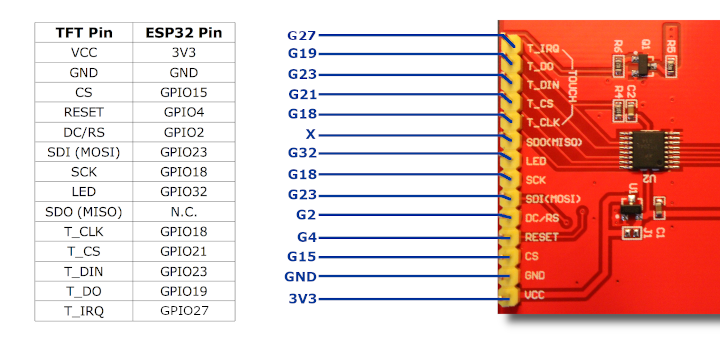
    The wiring may seem a bit daunting at first. But don't let all the wires scare you. It is pretty straight forward. The images above will help you when you wire your TFT + Touchscreen to your ESP32. This is also decision making time. There are few options when it comes to connecting the two together. You can use a breadboard, you can use prototyping board or you can order a PCB specifically to connect the ILI9488 + touch to the 38-pin ESP32 DevKitC. I'd like to point out that the breadboard option is only an option for testing your connections and screen. It is not very practical to have on your desk and loose connections can cause problems.

    It is important to know that these screens run at 3.3V. Connecting them to 5V can cause damage!

    These are the connections you need to make from the ESP32 -> ILI9488:

    3.3V -> VCC

    GND -> GND

    GPIO15 -> CS

    GPIO4 -> RESET

    GPIO2 - > DC/RS

    GPIO23 -> SDI(MOSI) and T_DIN

    GPIO18 -> SCK and T_CLK

    GPIO32 -> LED

    GPIO21 -> T_CS

    GPIO19 -> T_DO

    GPIO27 -> T_IRQ

    SDO(MOSI) is not used for the TFT screen, so you are left with one unconnected pin on the TFT module. That's ok!

    If you like to order a PCB designed to make it easy to connect the ESP32 and the TFT screen together, you can download the gerber files here: https://github.com/DustinWatts/ESP32_TFT_Combiner

    You can also order them directly from PCBWay where I had mine made: https://www.pcbway.com/project/shareproject/ESP32_TFT_Combiner_V1.html

View all 10 instructions

Enjoy this project?

Share

Discussions

Christian wrote 01/10/2022 at 12:40 point

Hi Dustin, 

I just received my order of the components incl the PCBand look forward to putting eth together. A maybe naive question re the power supply. How exactly does this work? 🙄External 3.3V?

Thanks!

  Are you sure? yes | no

asdasdf wrote 03/08/2021 at 10:38 point

Hi, I've just started the project and I'm going through the prototype pcb route. 
I can't see in the wiring diagrams any mention about the 4 pins on the right of the touch screen, but in your youtube video, you show an extra connector wired up. 

Could you please let me know the pinout for those to the ESP

Many thanks! 

  Are you sure? yes | no

Dustin Watts wrote 03/08/2021 at 11:25 point

Hi @asdasdf  You are welcome! The four pins on the right are for the SD card. The SD card is not used in FreeTouchDeck, so you can ignore those and just use them for support. So solder them, but don't connect them.

  Are you sure? yes | no

asdasdf wrote 03/08/2021 at 19:02 point

Ah ok, thanks!

Do you know if the WIFI SSID doesn't support spaces or something? My SSID is "Example Wireless-2G" but it's failing to connect despite knowing the details are correct.

  Are you sure? yes | no

Dustin Watts wrote 03/08/2021 at 19:20 point

@asdasdf It should support spaces. Did you enter your details directly in the wificonfig.json? Or are you using the serial monitor? If you are using the serial monitor, make sure you have selected "no line ending". It will not work if there is a new line or carriage return at the end.

  Are you sure? yes | no

asdasdf wrote 03/08/2021 at 19:50 point

Directly into the Json. I just get an "Unable to connect to Example Wireless-2G" Message after only a few seconds of trying to connect. It seems too short to be a timing out issue. But I'll continue checking. 

Thanks :)

  Are you sure? yes | no

asdasdf wrote 03/08/2021 at 20:15 point

Managed to get it working in the end. I increased the number of attempts before giving up, and increased the delay inbetween from 500ms to 2500ms. It now connects every time :). 
I must just have a dodgey connection here.

The configurator is great and I'll post a make of it when done. Many thanks!

  Are you sure? yes | no

Dustin Watts wrote 03/08/2021 at 20:57 point

@asdasdf Thanks for letting me know! I might have the connection timeout be configurable. Looking forward to the config you make! :)

  Are you sure? yes | no

Jonas wrote 03/08/2021 at 09:54 point

Cool project! I am thinking of building it myself and then upgrade the software to have a "program sensitive" interface so the right menu is shown depending on which software is in the foreground.

Maybe I am blind but where can I find the .ino file?

  Are you sure? yes | no

Dustin Watts wrote 03/08/2021 at 11:22 point

Somehow the links weren't there. I fixed it in the instruction, thanks for pointing that out. Here is the link just in case: https://github.com/DustinWatts/FreeTouchDeck

  Are you sure? yes | no

marazm wrote 02/15/2021 at 19:50 point

add virtual knob https://br.freepik.com/vetores-premium/botao-de-volume-controle-de-som-botao-de-musica-com-cromo-de-metal_3928618.htm

  Are you sure? yes | no

Tom Nardi wrote 12/07/2020 at 20:25 point

This is a phenomenal project, you've really covered all the bases here from the ESP32 firmware to the 3D printed case. I think you've left me no choice but to make one of my own.

  Are you sure? yes | no

Dustin Watts wrote 12/11/2020 at 11:07 point

Thanks Tom! Wow what a compliment! I'm looking forward to your build!

  Are you sure? yes | no

Similar Projects

Does this project spark your interest?

Become a member to follow this project and never miss any updates