WJCarpenter
-
A longer "dazzled" period
01/24/2021 at 19:35 • 0 commentsI had another one of those "extended dazzle period" burns today. I'm not sure if it's a characteristic of the way the water heater burns or if it's something to do with the behavior of the light sensor I'm using. In either case, I've decided to "cure" the situation (really, a workaround) by increasing the "dazzled" timeout (FULL_FLAME_DAZZLE_PERIOD in waterbug.yaml) to 12 minutes. That covers the period of the two incidents I have observed, and it won't really make much difference in an actual case of the pilot light going out.
-
Just when you thought it was safe to ...
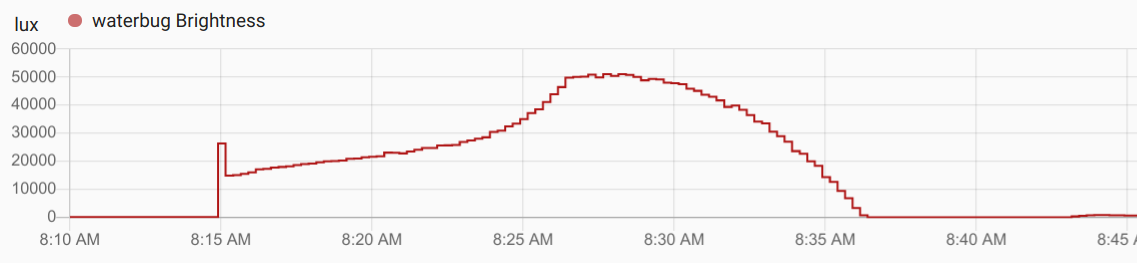
01/18/2021 at 23:31 • 0 commentsWell, here's a little mystery. Earlier, I included a graph of a typical water heater burn cycle, including the "dazzled" period of 3 minutes or so. Just today, I saw another graph shape that I had not seen before. It's mostly about the shape of the graphs, not the absolute durations.
Normal cycle:
![]()
Weird cycle:
![]()
I don't really know how much of the shapes of these graphs is due to the intrinsic intensity of the burner flame and how much is due to variation in the illumination sensors. In a normal cycle, the flame stops abruptly. In the weird cycle, the flame seems to taper off gently. The "dazzled" period was about 7 minutes long. It was long enough that I saw a few minutes of "pilot_off" animation on the LEDs. There was no significant wind going on. Before I got down to the basement to check it out, the display had returned to "pilot_on" animation. The next burn cycle, a few hours later, was back to the normal picture.
I'm hoping this is just some unaccounted-for characteristic of how the water heater burns gas and isn't some kind of wearing out of the TSL2591 sensor. The latter would be a bummer since it's only been watching the flame for a few months.
-
Retrospective and the future
01/17/2021 at 23:23 • 0 commentsHaving the Water Watcher display in the master bathroom does at least solve part of the problem. Decoupling the Water Bug from any listeners via MQTT messages means that I can change the Water Watcher and add any additional listeners without necessarily having to update the Water Bug or the existing listeners.
Here is the original Water Watcher patiently standing by in the master bathroom. Oh, look, the pilot light is working correctly.
![]()
There is another bathroom with a shower where I might put another clone of the Water Watcher. It's trivial to do with another M5 Atom Matrix. M5 makes a couple of other variations on the M5 Atom.:
- The M5 Atom Lite is a couple dollars cheaper. It has only a single RGB LED instead of a matrix.
- The M5 Atom Echo, still about US$10, also has a single RGB LED, but it contains a microphone and speaker. That gives the possibility of some kind of audible alert. (Now, if I could just work out a way to give a voice command to re-light the pilot light from the cozy comfort of my warm bed. Hmmm.)
There are lots of available MQTT clients for Android phones, so I can consider getting some kind of PagerDuty-like wake-up when the pilot light goes out. Although I'm not that crazy about getting up at 3am to reboot the server, uh, I mean to re-light the pilot light, it's all-in-all better than discovering that it's needed at exactly the time when the hot water is needed.
I guess I could train the family cat to re-light the pilot, but he's not allowed to go down into the basement. I could train him to recognize the "pilot_off" display and wake us up, but it would be hard to distinguish that from the other conditions where he wakes us up in the middle of the night ("Timmy fell down the well!", "are you still alive?", "I'm hungry/thirsty/lonely").
OTOH, this cat looks pretty obedient: Meow — the Slack Bot with the smart paw
-
The 20% solution
01/17/2021 at 20:50 • 0 commentsM5 recommends not using a brightness level above 20% when using the FastLED library (which is the library behind ESPhome's FastLED component). I'm pretty sure the reason for the recommendation is because of potential damage from heat generated by the LEDs.
I found that when I used the recommended 20% brightness and the "flicker" effect, the LEDs would sporadically turn themselves off after a few seconds. With a brightness of 25%, that doesn't happen. so that is the value that I settled on using. The exception is the "pilot_off" animation, which uses all of the blue LEDs in a blinking pattern and which might be on for several hours. It uses 20% brightness.
I originally used brightness values in the 30s for most animations, and the photos and video in this project were taken with those higher values. A side-effect of switching to 25% is that the orange color is generally a bit more red, with some orange coming in occasionally during the flicker. I could experiment with different RGB values to try to get back to more orange, but those kinds of experiments wear me out pretty fast. The colors shown for RGB values on any one of a million web page charts bear only a mild resemblance to the colors produced by M5 Atom Matrix.
The original brightness values in the pictures and video are:
- startup: 30%
- full_flame: 35%
- dazzled: 35%
- pilot_on: 25%
- pilot_off: 50%
-
The display animations
01/17/2021 at 02:32 • 0 commentsLike just about every other artistic effort in my life, things looked a lot better in my mind than in reality. There is only so much you can do with a 5x5 display, even if it is RGB. As every civilized person knows, an RGB LED is just 3 LEDs in the same housing. With the M5 Atom Matrix, you can sometimes see the individual components of whatever RGB color you've selected. From a distance, it's OK, but up close it's a bit, uh, discrete. In the end, I had to simplify my grand designs so that the displays were more symbolically meaningful and less literally artistic. I didn't have enough pixels for good pointillist artwork. (I had one graphic that was intended to show a match being lit into a flame by an unseen force, but it turned out that I had to explain what it was to my test audience. After I explained it, the reaction was something like, "yeah, I guess it is".)
It also occurred to me that I wasn't sure how I was going to orient the M5 Atom Matrix device in its final position. Even the otherwise reasonable "lots of flames shooting up" would look a bit wrong if the tops of the flames went sideways or down. In the end, I decided to use designs that were horizontally and vertically symmetrical, and I achieved some animations using built-in lighting effects provided by ESPhome's FastLED component.
Here are the animations that I finally used. To see the actual animation effects, you should watch the video I provided earlier. These still photos are just for easy reference. My code reacts to button presses of the front face of the M5 Atom Matrix by stepping through the different animations. That's my bony finger doing just that in the video.
The Water Watcher has one additional flame status state that the Water Bug doesn't send. The "startup" state is used when the Water Watcher boots up but before it has received its first MQTT message. I just wanted something visually distinctive, so I used the ESPhome "addressable rainbow" effect.
![]()
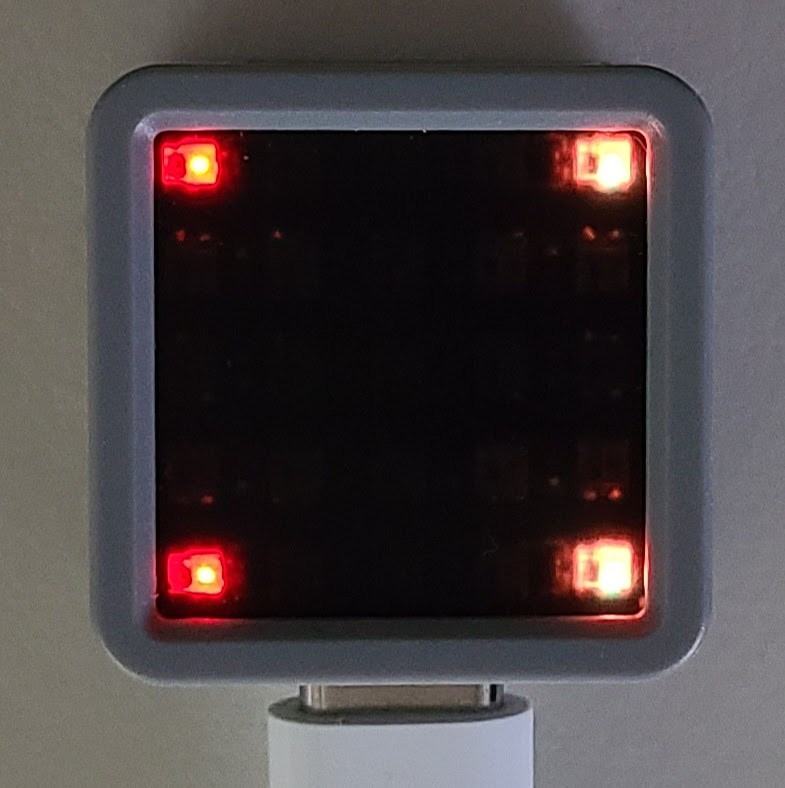
The "pilot_on" animation is displayed almost all of the time. There are only a few minutes a day when something else is displayed. I could have chosen to just have a blank display, but I wanted to have some indication that the Water Watcher was working and not dead. I settled for flickering dots (using the ESPhome "addressable flicker" effect) in each corner of the 5x5 matrix to imply "a little bit of flame" to suggest the pilot light.
![]()
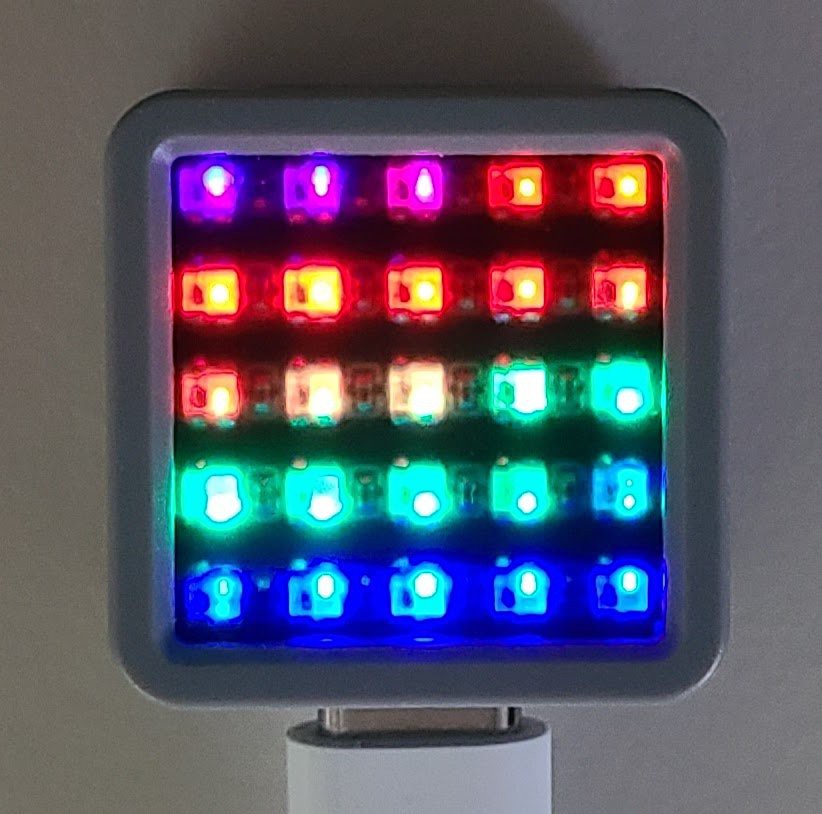
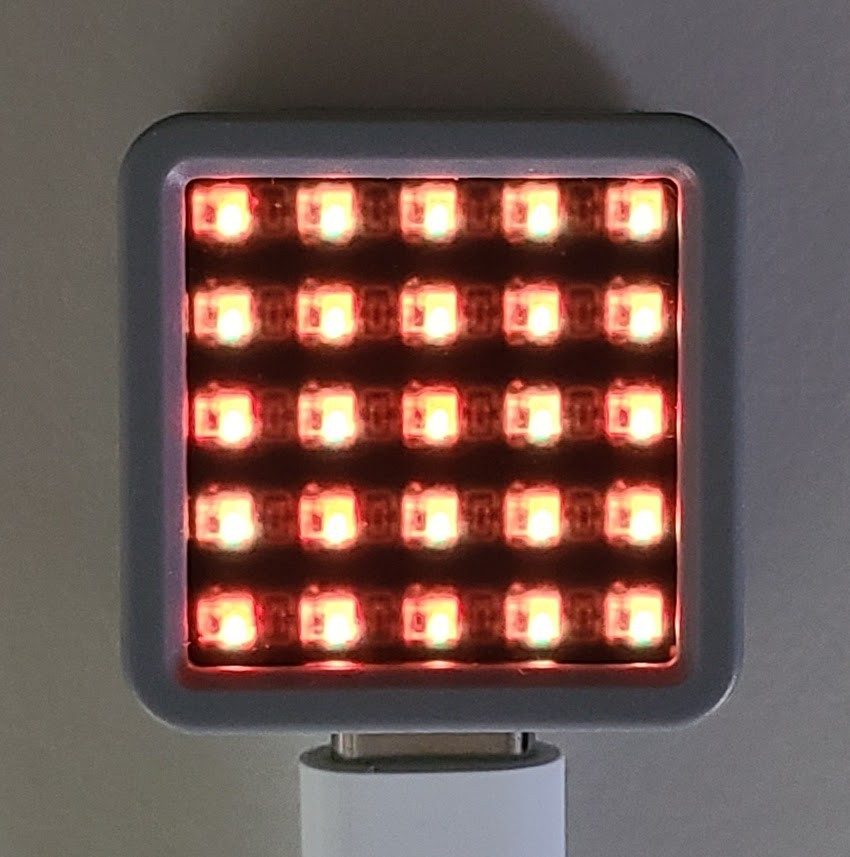
Analogous to the "pilot_on" animation, the "full_flame" animation is meant to suggest "a lot of flame". It uses the same RGB orange color and ESPhome "addressable flicker" effect, but in this case all of the LEDs are involved. (I get to see this display when I step out of the shower.)
![]()
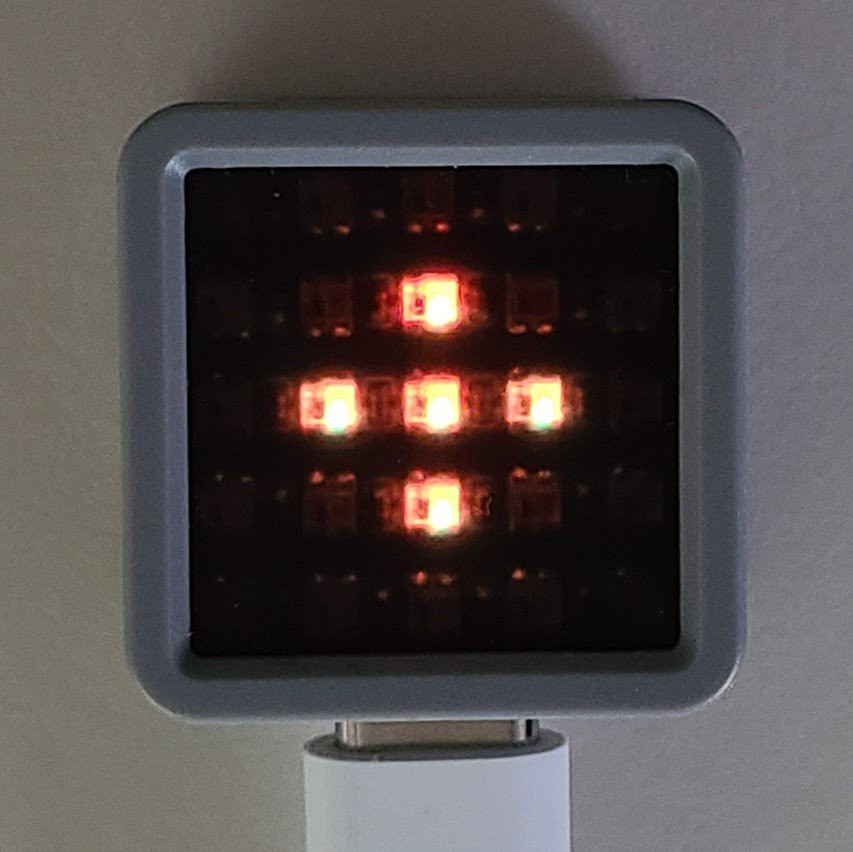
I chose to have the Water Watcher give s distinctive display for the "dazzled" state. It's just these five RGB orange pixels in the center of the display, again animated with the ESPhome "addressable flicker" effect. I don't have any illusion that this suggests to anybody else what's going on during the "dazzled" state, but it makes me nerdly happy to be able to see it as a distinct state.
![]()
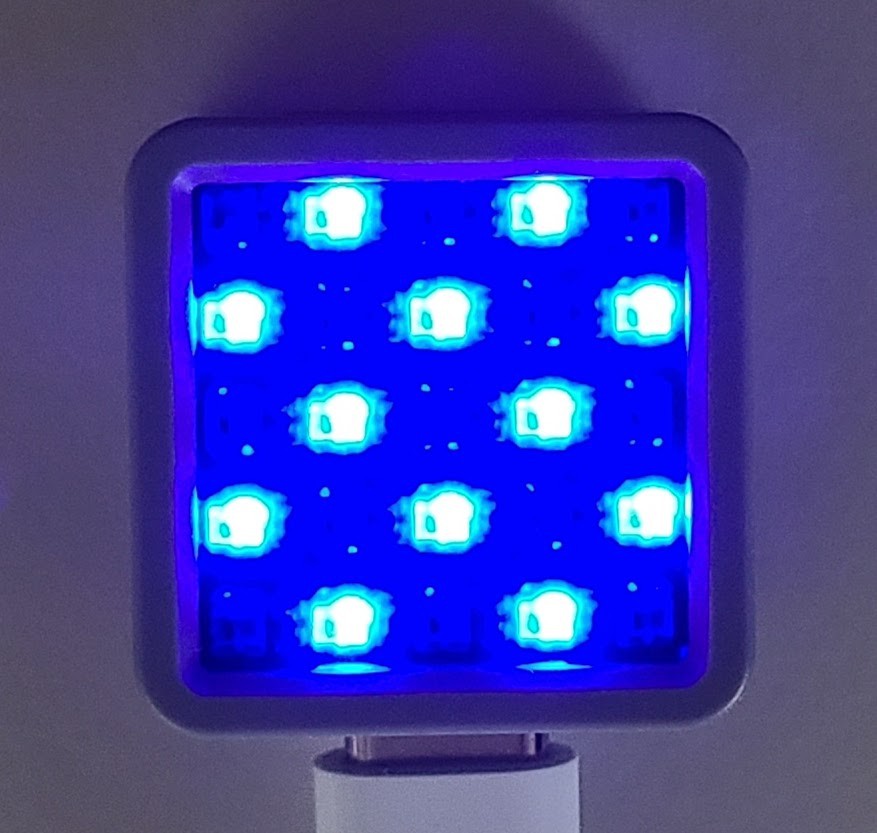
Finally, the reason we're all here: the "pilot_off" state. The animation for this is a lot of blinking and flashing of RGB blue. I wanted it to be very distracting and unavoidable. Even though I told the household members what it means, I expect the normal reaction to seeing it will be to ask me what the heck it is; mission accomplished!
![]()
Again, I recommend you watch the short video to see the actual animations. The flickering effect for the flames is fairly effective (and it took some experiments with parameter tuning to get it to be so).
-
Flame on!
01/17/2021 at 01:42 • 0 commentsI experimented with several different things, both on the Water Bug sensor board and the Water Watcher display board. I ultimately decided that the Water Bug sensor board would send a simple text message to indicate the status of the water heater flame. As I mentioned earlier, the lux values read by the TSL2591 aren't calibrated, so it's not especially meaningful to push those around for consumption. They do happen to go to my Home Assistant server, and I also send the lux values over MQTT to be displayed in the debug log output of the Water Watcher. The latter is for my own convenience so that I didn't have to monitor both devices to see what was going on during troubleshooting.
The Water Bug reads the lux value from the sensor every 30 seconds. Based on the experimental observations I mentioned earlier, it reduces that to "pilot_on", "full_flame", "pilot_off", or the special case of "dazzled". I keep track of the last time the Water Bug saw "full_flame". If it sees "pilot_off" within a short time after that, it sends "dazzled" instead of "pilot_off". The message recipient can decide what it wants to do about "dazzled" messages.
ESPhome provides a mechanism for knowing the wall clock time, either from the Home Assistant server or from an NTP server. It makes it available in a convenient object form that measures seconds since the Unix epoch. I use the wall clock time as part of the display for my various sensor boards that have a built-in OLED display. The Water Bug doesn't have a display, and it doesn't otherwise need to know what time it is. The ESP32 provides a high-precision timer for elapsed time since boot-up, and ESPhome makes that available in its "Uptime" pseudo-sensor. It's granularity is in seconds, but that's fine for this particular use, and it let me avoid the need to deal with the ESP32's timer in native code.
Once it has decided which piece of text to use for the flame state, the Water Bug sends that as a message on a particular MQTT topic. It then sends the raw lux value with the prefix "lux: " on the same MQTT topic. The only thing the Water Bug has to remember from earlier iterations of the 30 second loop is the last time it saw "full_flame".
The Water Watcher listens on that MQTT topic and reacts to the messages. It logs every message it sees to the debug log, but it only actually reacts to flame status messages that it recognizes. And, in fact, it only reacts to recognized messages if they are different from the last recognized message that it saw. The reason for that is to avoid some visually distracting repainting of the LED matrix when there was no actual status change. The reaction takes the form of some kind of display on the LED matrix. Those are animated and keep running until a different reaction is triggered.
The animations in the display and the rapid succession of the flame status and lux messages arriving over MQTT led to some kind of timing problem. I found that the listen-and-react model was not completely stable. I hypothesize that MQTT message strings were changing out from under my code that was trying to react to them. Since I don't know the internals of ESPhome's event looping all that well, I changed my code that listens to the MQTT topic so that it immediately copies the string and pushes it onto a FIFO queue as quickly as possible. The reaction code, which is configured to be single-threaded, then reads from that FIFO queue and triggers the display update when appropriate. That at least decouples the timing and gets rid of the instability.
-
The birth of the Water Watcher
01/17/2021 at 01:02 • 0 commentsPeriodically checking the sensor graphs on the Home Assistant web interface, or even on the mobile app, is not that great a way to be notified that the pilot light has gone out. It's more of an after-the-fact thing.. I started thinking about more appropriate mechanisms.
I wanted something that I could leave in some fairly visible location, something that could give an indication that would catch someone's attention, and something that would be meaningful to other family members. I considered a lot of possibilities, but I happened to come across these M5 Atom Matrix devices from M5:
![]()
These are pretty amazing for a device that costs less than US$10. It's size is 24 x 24 x 14 mm (approximately 1in x 1in x 1/2 in) and houses a 5x5 RGB LED matrix. Inside is an ESP32. It's powered through a USB-C connector and exposes connectors for several GPIO pins. There is a reset button on one side. The top face (with the LEDs looking out) is actually an enormous button that you can read through a GPIO. And, of course, it's got the usual wifi and other goodies you expect from an ESP32 device.
Once I started looking at this device, I stopped thinking I could make something better. Sure, it might be way overkill for the job I am giving it, but did I mention it costs under 10 bucks? Others had already worked out how to use it with ESPhome (for example, https://github.com/rnauber/ESPHomeMatrixLED), so I felt pretty confident about getting it to work. All that was left for me was to figure out how it should listen for status updates and what it should display for each possible state.
-
Measuring the light
01/16/2021 at 03:12 • 0 commentsThe TSL2591 gives a read-out of light intensity in lux. For those numbers to be numerically accurate, the device should be calibrated under lab conditions. Luckily, I wasn't as interested in the accuracy and precision of the values as I was in distinguishing among "none", "a little bit", and "quite a bit". I still refer to the values as lux values, but I always remember that they are probably not accurate.
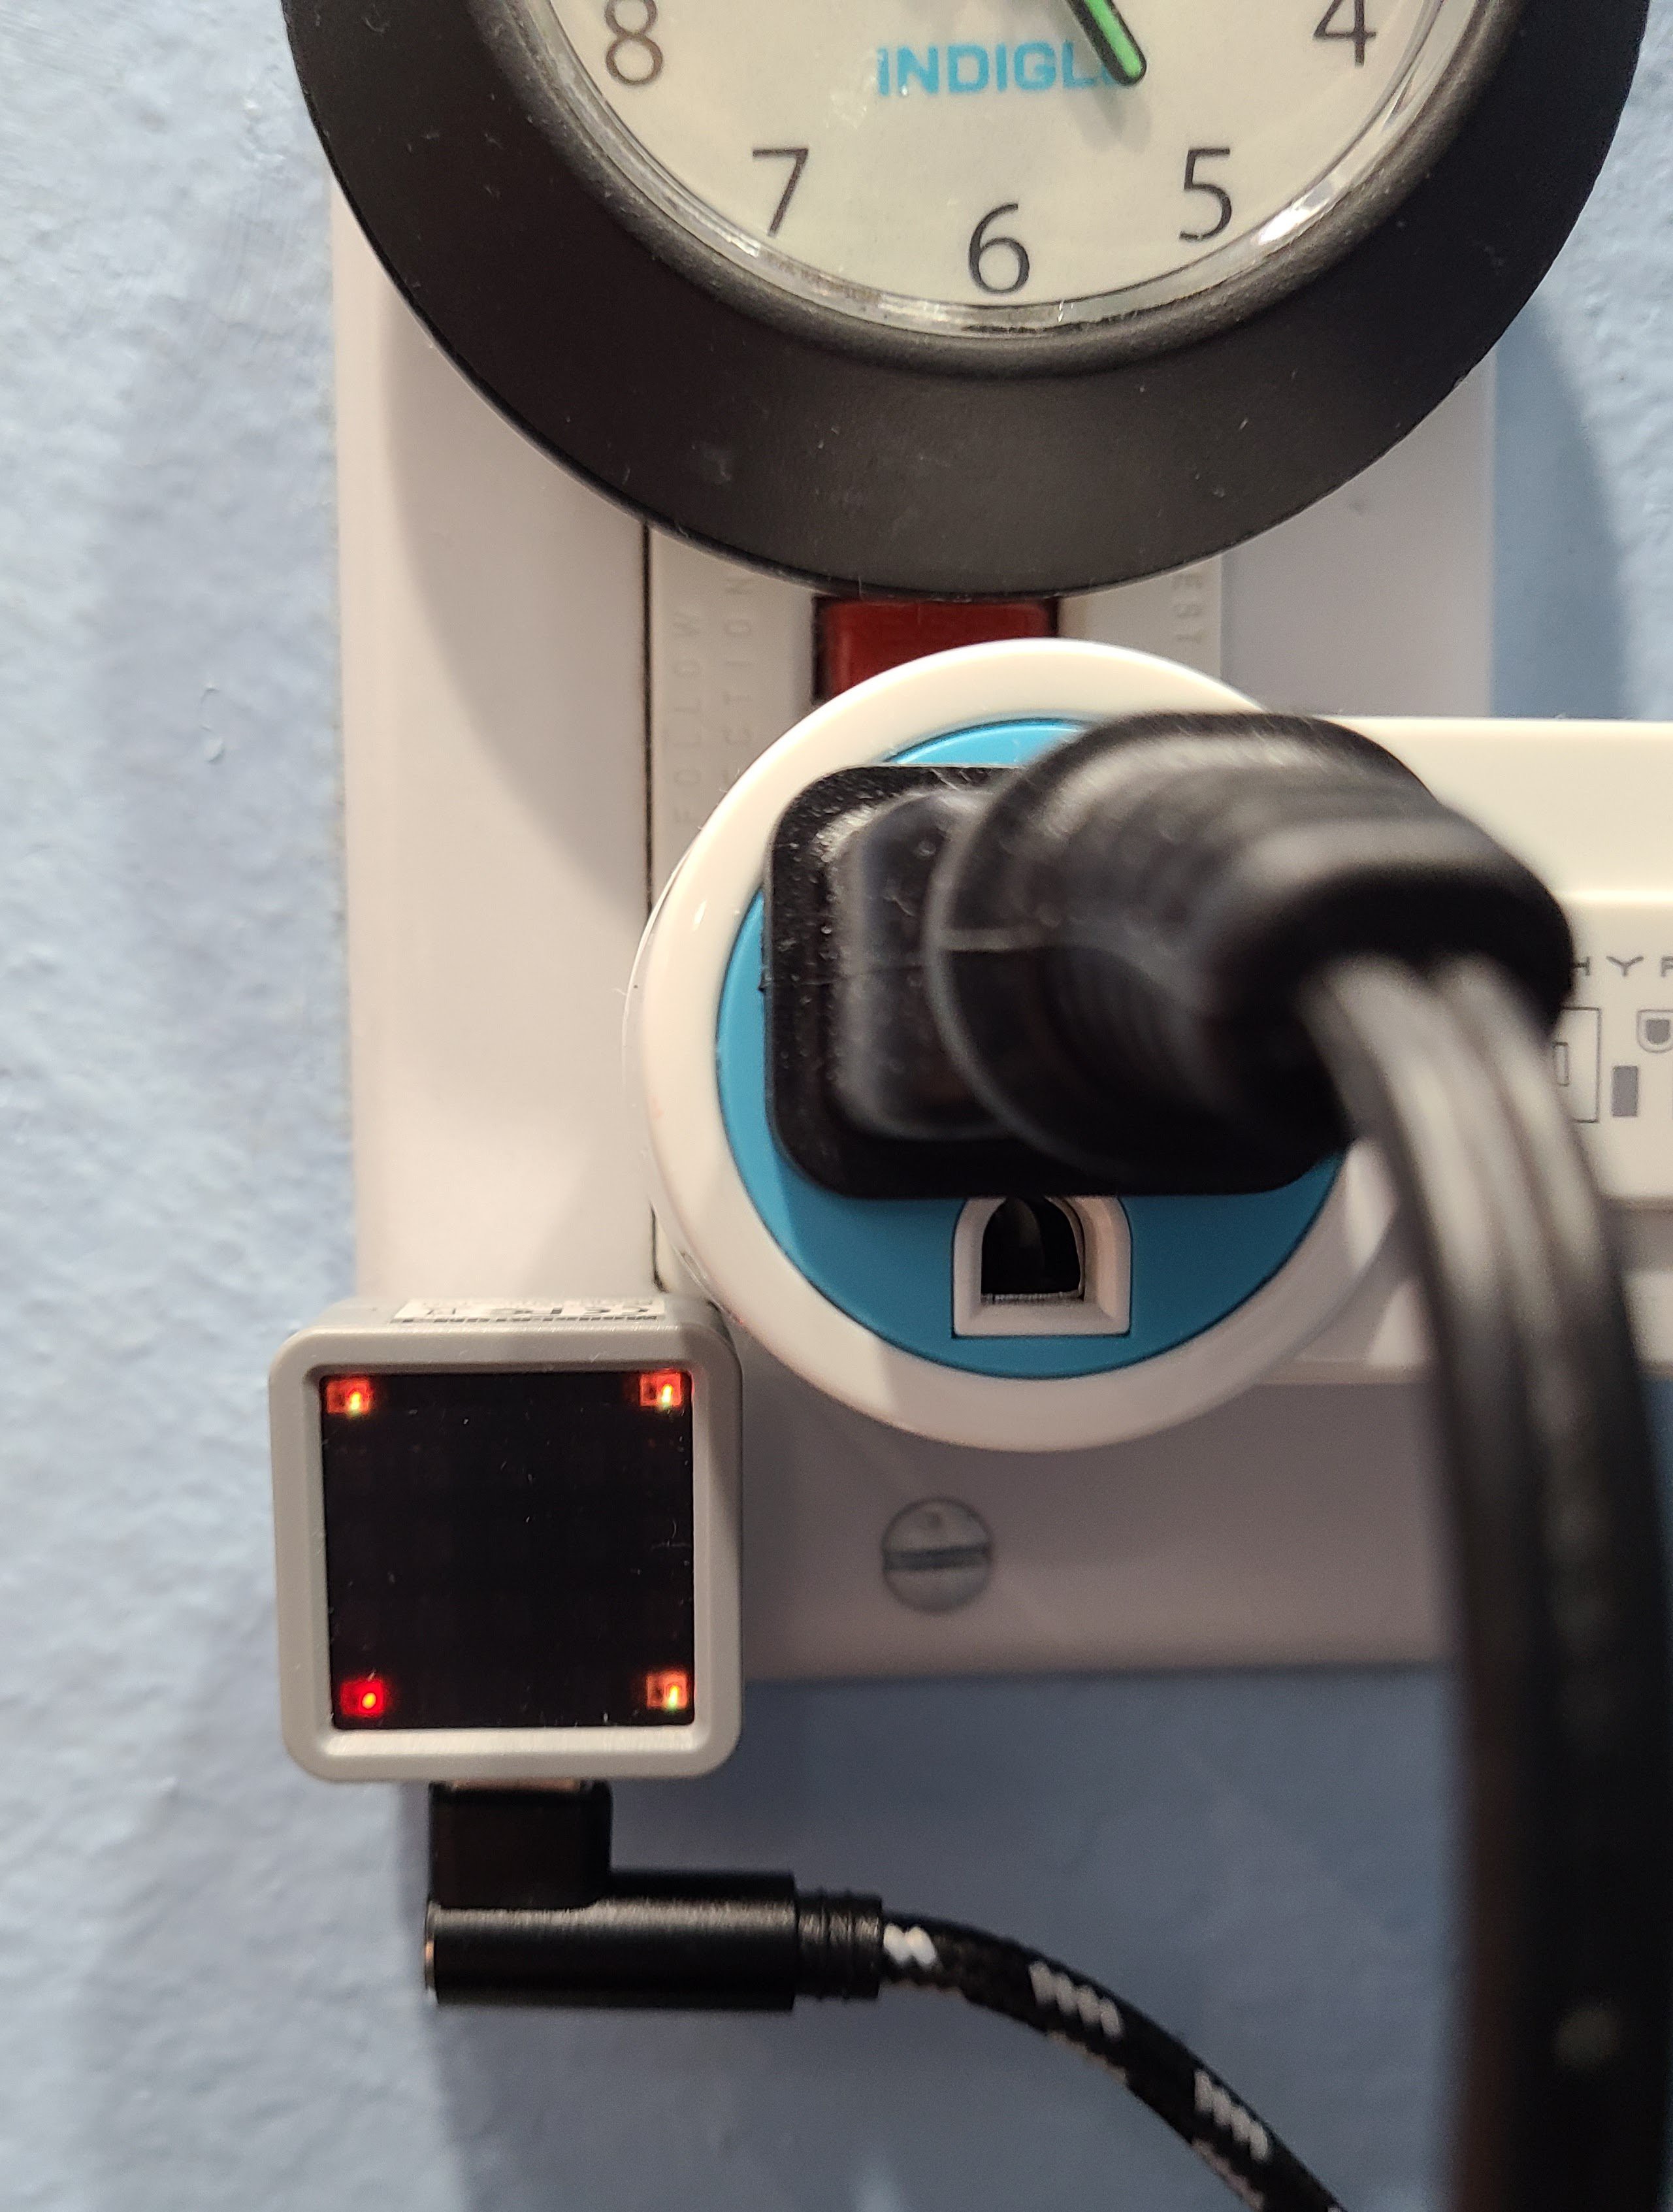
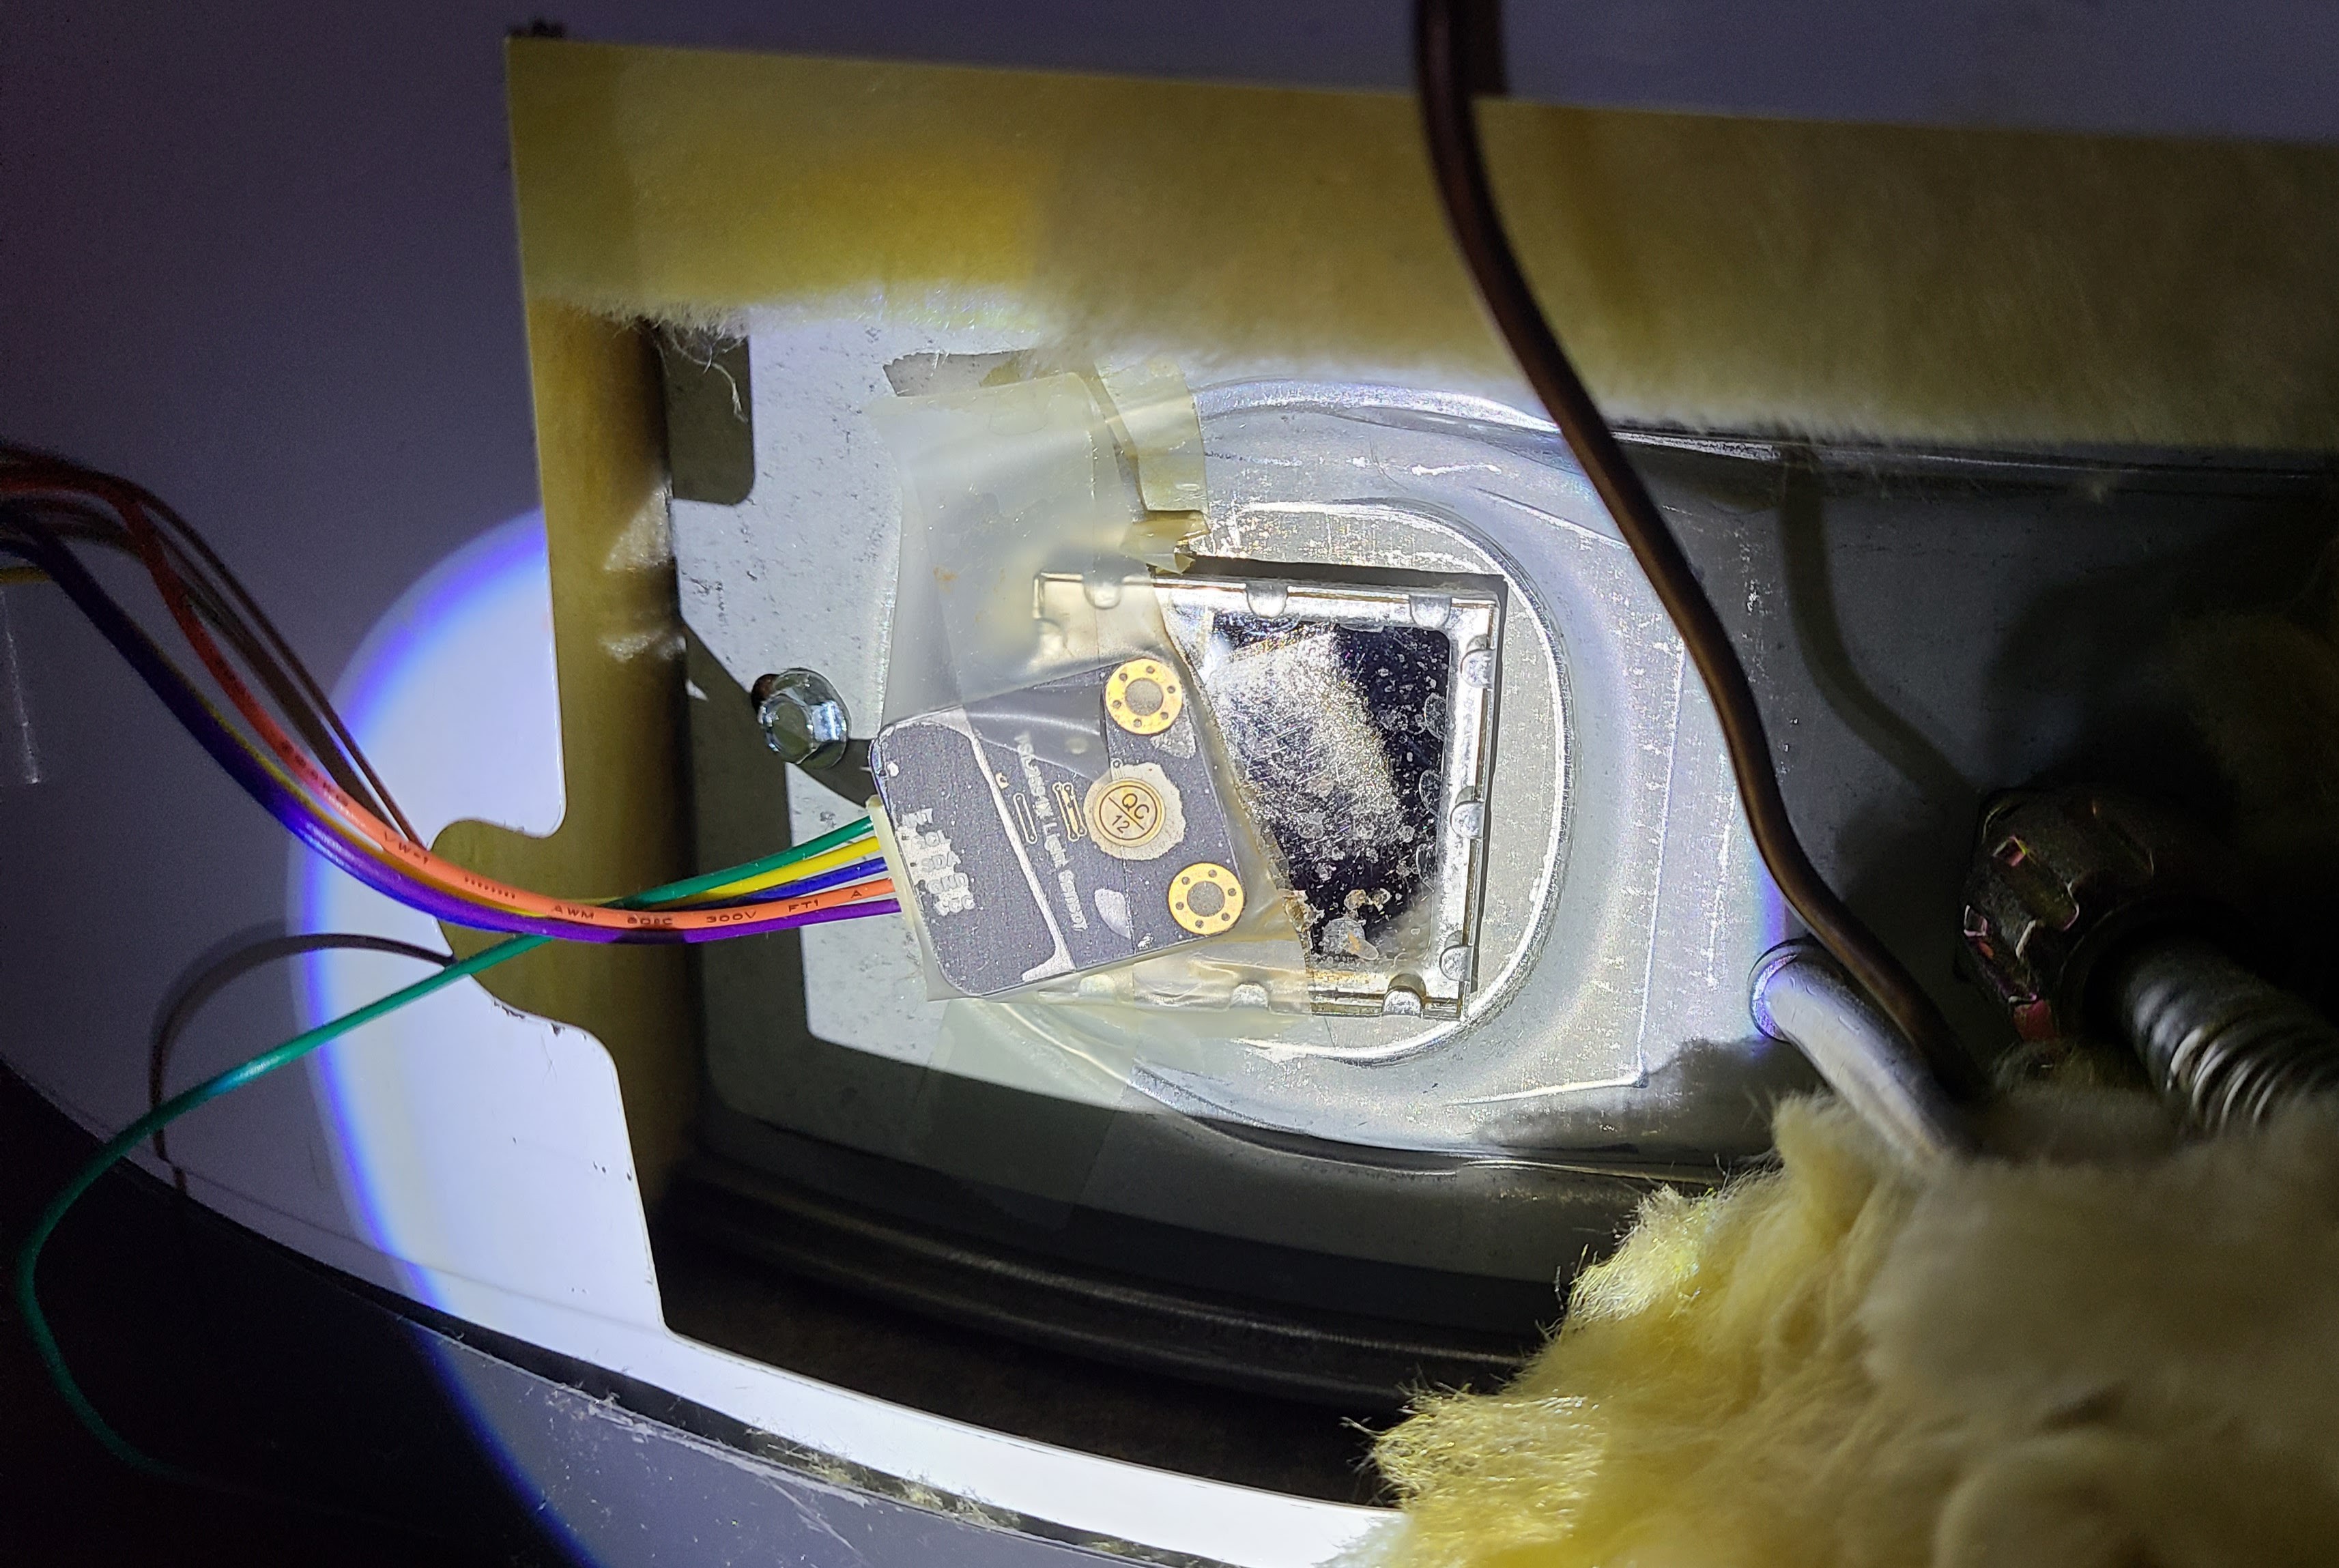
I "installed" the sensor with its face against the little glass window. I still have plenty of room to observe the pilot light during the re-lighting procedure. Although I only stuck it in place with some tape, the location is behind a metal plate and some insulation that only gets removed a couple of times a year when I have to re-light the pilot light. It seems happy where it is. As you can see, "QC 12", that's my motto. The angle is intentional to get the I2C wires to the notched gap. The ESP8266 board is to the left, just out of the frame.
![]()
After doing some experiments and observing the actual numerical outputs, I was happy to find a pleasant consistency.
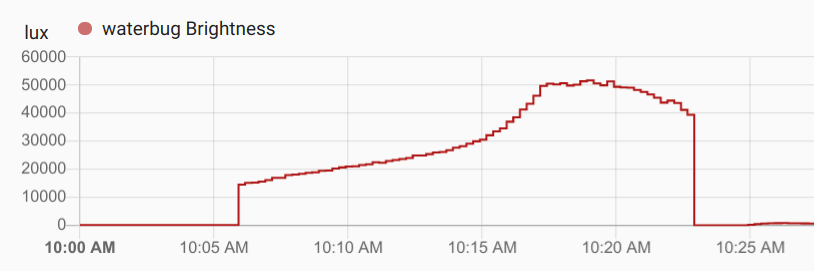
- With the pilot light turned off (and the cover back in place), the output was 0.
- With the pilot light on, the reading is somewhere between 50 and 100; generally in the 70s, though there is some drift.
- With the main burner ignited, the reading climbs up to 50,000-60,000.
- There was an unexpected effect when the main burner shuts off. The sensor drops down to a reading of 0 for a couple of minutes, then goes up to a reading of 300-400 for a minute or so, then settles down to the expected value of 50-100 for the pilot light. I compensated for that in software (refer to "dazzled" later in this description).
Here is a graph of the values for a typical burn cycle. At this scale, you can just barely see the drop-to-zero effect I described in the final bullet point above.
![]()
After getting this far, I would periodically check the graphs of the values in Home Assistant. I was kind of surprised at how seldom the main burner comes on. It's usually only when someone has a shower or we use a fair amount of hot water for something else. It seems the water heater keeps things toasty with passive insulation most of the time. That's nice.
-
Seeing the light
01/16/2021 at 02:51 • 0 commentsI thought detecting the flame status of the water heater would be pretty simple, but it turned out to have some unexpected characteristics. The burner element and pilot light are enclosed at the bottom of the water heater. There is a small glass window, perhaps 2 inches by 2 inches, through which you can observe the pilot light and the main burner. The purpose of the window is so that you can see if you are successful when lighting the pilot light..
It's kind of interesting how the pilot light and gas flow work. There is no electricity involved, so everything relies on mechanical and thermal interactions. If the pilot light goes out, the gas is completely shut off, including the gas supply to the pilot light itself. To light the pilot light, you hold down a switch which allows a tiny bit of gas to flow to the pilot light fixture. You then push a plunger switch, which I assume is a piezoelectric spark generator. It doesn't always light the pilot light on the first try. Even if it does, you have to continue holding the first switch for several seconds, or the pilot light will go out again. I believe that the pilot light itself warms up some small thermocouple enough to open up the gas supply for the pilot light. When the pilot light goes out, that thermocouple goes cold and cuts off the gas supply to the pilot light. Holding down the first switch bypasses the thermocouple mechanism. The reason to keep holding the first switch down after lighting the pilot light is to give the thermocouple a chance to get heated back up. At least, that's how I believe it works. I am not a lawyer (or a plumber).
Once the pilot light is lit and stabilized, you can turn up the main thermostat. That triggers the main burner to fire, being lit by the pilot light after the gas valve opens. It makes a very satisfying "whoosh!" sound when the main burner ignites.
All of that is very easy to see when you look with your naked eye through that little window.
The first thing I tried was using a common cadmium sulfide (CdS) ambient light sensor. Those cost only a few cents each. They work by providing a variable resistance more or less proportional to the intensity of light striking the sensor. I had a couple of those on hand, including one that was on a convenient break-out board. Unfortunately, nothing I did with the pilot light or the main burner made any difference to any of those CdS sensors I tried. For a while, I thought it was just a problem of getting the active face of the sensor pointed in the right direction. I even bought a few with a larger CdS face, hoping for more sensitivity. After a while, I concluded that they were just being stubborn and didn't want to tell me about the flames I was interested in.
The next thing I tried was a GY-302, which is a breakout board containing a BH1750 illumination sensor (Rohm doesn't make the datasheet available, but retailers make cached copies available). It provides a digital value over I2C, which is very convenient. Alas, it also did not care a whit about differences in the gas flame.
I spent quite a bit of time studying spec sheets for both light sensors and for natural gas flames. I couldn't see why those sensors didn't react at all, but I did see that the most intense part of the natural gas flame is in a frequency range that is not a sweet spot for those sensors. I can't blame the sensors since their job is to detect sunlight or artificial light that is somewhere between white and yellow intended for human eyeball consumption. You can see a little yellow in a natural gas flame, but most of it is blue.
Armed with this half-baked understanding of the light that I wanted to detect, I went in search of a capable sensor. At last I found it: the TSL2591. They are widely available on breakout boards with I2C interfaces from the usual places. I imagine they are all more or less the same, but the exact board that I got was this one:
![]()
To be honest, I hadn't completely convinced myself that this would do the trick based on my wavelength research, but I took a chance on it. I liked the fact that it advertised a very high dynamic range (600 million to 1). It also contains two distinct light sensors for different (overlapped) frequency ranges. You can use the values from the two sensors individually or as a combination of total light. A quick test showed that it gave a very clear reaction to the gas flame intensity.
ESPhome supports the sister component TSL2561 but does not have built-in support for the TSL2591 . I had tried to track down a TSL2561 to minimize my own hassle, but they seem to be rare. I think it's because they were obsoleted by the manufacturer who recommends against them for new designs.
ESPhome has facilities for using components that it doesn't already know about. A user in this thread https://github.com/esphome/feature-requests/issues/267 had already worked out the details, so it was pretty much a copy-and-paste job for me.
-
Software platform: ESPhome
01/15/2021 at 04:04 • 0 commentsFor some other projects, including the sensors already scattered around my house, I was already using ESPhome. The strength of ESPhome is that it makes it very, very easy to deploy standard sensors and a cornucopia of other devices. It provides the glue logic and mundane code to run the devices, and it also provides wifi connectivity, over-the-air updates, connectivity to Home Assistant, connectivity to an MQTT broker, and many other niceties. Most "programming" for ESPhome is done with YAML configuration, though there are escape mechanisms for doing things in C++ if and when you need them.
You can find copies of my ESPhome configurations in the "Files" section of this project. I'm not spending any time describing the ESPhome framework because there is plenty easy-to-find of documentation for it. Likewise for setting up an MQTT broker. (I use mosquitto, and you probably will, too, if you don't already have an MQTT broker.) My configuration files stand alone and also have plenty of comments. (Those comments aren't really for you. They are for me for when I look at the files after some time has passed.)
At the time I deployed the Water Bug and planned to have it monitor the pilot light, I wasn't sure what I was going to do to receive the pilot light status messages at the other end. I thought I might have Home Assistant trigger some kind of notification (and I still might in the future). But, since ESPhome allows devices to both send and receive MQTT messages, and since I already had an MQTT broker on my network for other reasons, I decided to have the Water Bug simply broadcast the pilot light status over an MQTT topic every 30 seconds. That makes it independent of having Home Assistant, though Home Assistant happens to be one of the clients that receives those messages.