WJCarpenter
-
The end of an era
09/10/2023 at 01:03 • 0 commentsThe time has finally come.
Some article I was reading reminded me that I should check the sacrificial anode rod in my water heater every once in a while. A conscientious person should check that about once a year and probably replace the rod every 2-4 years to extend the life of the tank. Well, I have never done that. While looking things over to see how hard it would be, I noticed the date on the sticker that was put on the tank when it was installed. It's now 12 years old. The conventional wisdom is that the life of a storage tank water heater is around 10 years. OK, forget changing the anode rod. I'm replacing this water heater with a tankless natural gas water heater, and that's just a few days away. The new water heater will have electronic ignition, so this whole project for monitoring the pilot light will be moot within a few days from now.
I am doing a small project for remotely triggering the recirculation pump on the new water heater (similar to what I described in an earlier project log, The double duty button, but a lot of details are different). If you want to read about that project, I'm describing it here: Calling for hot water.
-
Too bright or not so bright
08/16/2023 at 02:20 • 0 commentsAlong the way to implementing the ad hoc how water recirculation, I reflashed the Atom Matrix multiple times. Most of those times, the device lost its mind and turned on all the LEDs at full brightness. Sometimes it would recover if I cycled the power, and sometimes it did not.
I spent a lot of time fooling around with different past versions of ESPHome (which I run as a docker image, so trying older versions was pretty simple). I also did a little Internet-style research on the FastLED library, which is what is used to control the animations.
Eventually, through trial and error, I hit upon the answer. I display a rainbow animation at boot-up, just as a signal that no flame status message has been received yet. I added a few seconds delay before displaying that initial animation. My hypothesis is that I was previously interfering with the initialization of the WS2812C controller for the LEDs. Why this suddenly matters now is probably just other subtle changes in how fast things happen during the ESPHome start-up sequence. In other words, it was always a problem, and my luck suddenly changed
-
The double duty button
08/16/2023 at 02:12 • 0 commentsI have a hot water recirculating pump tied into my home plumbing. On a schedule, it pumps hot water from the water heater through the hot water piping. A temperature sensitive valve located at the distant end allows that pumped water to flow back down through the cold water piping. The idea is that there is hot water at the ready, and you don't have to waste water running it down the drain until it gets hot.
The timer on the recirculating pump is the tried and true analog type. It's a round dial, representing a 24-hour day, that slowly spins. Around the edges are a series of pegs that control whether the pump is on or off during any particular short time segment. Since I run Home Assistant for many reasons, I decided to convert the timer on the recirculating pump to be controlled by Home Assistant automation. No, I didn't rewire the timer. Instead, I turned all of the little pegs to the "pump is on" position, for all times of day and night. Then I plugged the pump into a smart socket. (The smart socket is an Sonoff S31 reflashed with ESPHome, as described in this and subsequent project logs.)
To control the smart socket, I created a Home Assistant schedule helper object. The schedule helper is a list of times when the schedule is "on"; otherwise, it is "off", and you can use the state of the schedule as a trigger in Home Assistant automations. I created an automation triggered by any state change in the schedule. The resulting action is a "choose", which turns the smart socket off if the state of the schedule is off and on if the state of the schedule is on. It works as desired. In YAML form, it looks like this:
alias: Hot water recirculation SCHEDULED
description: ""
trigger:
  - platform: state
    entity_id:
      - schedule.hot_water_recirculation
condition: []
action:
  - type: turn_on
    device_id: e3bfbdb764cdef92f454e345ec3e1042
    entity_id: switch.s31_green_orange_relay
    domain: switch
  - choose:
      - conditions:
          - condition: state
            entity_id: schedule.hot_water_recirculation
            state: "on"
        sequence:
          - type: turn_on
            device_id: e3bfbdb764cdef92f454e345ec3e1042
            entity_id: switch.s31_green_orange_relay
            domain: switch
      - conditions:
          - condition: state
            entity_id: schedule.hot_water_recirculation
            state: "off"
        sequence:
          - type: turn_off
            device_id: e3bfbdb764cdef92f454e345ec3e1042
            entity_id: switch.s31_green_orange_relay
            domain: switch
mode: queued
max: 10
If I want to change the schedule, I can do it in the Home Assistant GUI (or by manually editing a config file), and everything else automatically flows from that. (Heh, flows. Get it?)
For my own highly regulated self, that scheduling is enough. But there are others in the household who want hot water at various times that are not really suitable for predictable scheduling. I wanted to provide a way for them to summon the hot water without a lot of fuss. I decided to use the button already present on the M5Stack Atom Matrix device, the device that is already in use to display the hot water heater flame status. On the Atom Matrix, the entire front face is a GPIO button. I've been using it for a simple way to cycle through the display modes of the device. I'm now overloading that button to also signal the desire for hot water recirculation.
My first draft of the implementation was to create a Home Assistant input button helper. It's simple enough for an ESPHome device to call a service in Home Assistant, so it's pretty easy to have the physical button press on the Atom Matrix cause a logical press of the Home Assistant input button helper, and that in turn can be used to trigger an automation. I abandoned that scheme for a light-weight reason. The implementation of this project uses MQTT to communicate among the devices. The devices still show up in Home Assistant via the MQTT integration. To call the service to logically press the input button helper, I'd have to use the Home Assistant API integration. That all works fine, and the API and MQTT components in ESPHome co-exist just fine. I merely didn't want to add a new dependency.
Instead, I changed the visibility of the GPIO button (the "internal" attribute) from true to false. Even over the MQTT integration, the button then appears as an entity in Home Assistant. I created a new automation for ad hoc hot water recirculation. The automation is triggered by the transition of the GPIO button from off to on. (Along the way, I flashed a second Atom Matrix to place in another location. It's also a trigger, and the two triggers are ORed by Home Assistant.) The automation turns the recirculation pump on, waits for a delay of 15 minutes, and then turns it off.
How do the two automations work together? If either one of them has turned the pump on and the other one fires to turn it on, that's OK because there's no conflict. If the ad hoc automation tries to turn the pump off, we don't want to actually turn it off if the schedule is still "on". Someone might innocently press the button for ad hoc hot water, and we don't want to cancel the scheduled hot water. So, the ad hoc automation checks that the schedule is not "on" before turning the pump off. The scheduled automation doesn't bother to check if the ad hoc automation is running before turning the pump off because the scheduled "on" time is long relative to the ad hoc time.
The ad hoc automation looks like this:
alias: Hot water recirculation AD HOC description: Press the button, get 15 minutes action. trigger: - platform: state entity_id: - binary_sensor.waterwatcher55_button from: "off" to: "on" - platform: state entity_id: - binary_sensor.waterwatcherkb_button from: "off" to: "on" action: - type: turn_on device_id: e3bfbdb764cdef92f454e345ec3e1042 entity_id: switch.s31_green_orange_relay domain: switch - delay: hours: 0 minutes: 15 seconds: 0 milliseconds: 0 - choose: - conditions: - condition: not conditions: - condition: state entity_id: schedule.hot_water_recirculation state: "on" sequence: - type: turn_off device_id: e3bfbdb764cdef92f454e345ec3e1042 entity_id: switch.s31_green_orange_relay domain: switch mode: restart -
Long, long time ago
08/06/2023 at 20:05 • 0 commentsI've been thinking lately how i have not had a genuine pilot light outage for quite a while. In fact, for a long time. I think it's because I had solar panels installed on the roof a couple years ago, and some of the panels are in the same area as the exhaust stack for the water heater. I'm thinking that maybe that changed the airflow around that part of the roof so that the whatever-it-was-that-blew-out-the-pilot can no longer do that.
-
coming back to my sensors
11/18/2022 at 01:08 • 0 commentsIt turns out I was completely wrong about what was going on with my faulty sensor readings. It took me weeks to figure it out, partly due to my own carelessness. Here are some thing I tried that did not work:
- Piece by piece, I replaced every physical part of the system. That includes even things like the little breadboard that holds the ESP32 and the jumper wires that connect everything together.
- I changed the update intervals for the two sensors. My hypothesis was that there might be a weird timing error where device access on the I2C bus was overlapped. I had been using 30 seconds for the TSL2591 and 60 seconds for the BME280. I changed both of them to nearby prime numbers so that they would very rarely want to be read at the same point in time.
- I moved the BME280 to a separate pair of I2C pins. The ESP32 supports two separate I2C busses, and most of the GPIOs can be configured to be SDA/SCL.
- I changed my scripting around so that the ESPHome "interval" was used to ask the sensors for updates sequentially with short pauses in between. My hypothesis was that I could force access to the I2C bus to be a single device at a time.
- I switched the TSL2591 from powersave mode to always on. In powersave mode, the device shuts down between readings and needs to go through an ADC integration cycle of about 600 ms before values can be read.
- I changed the I2C bus frequency to a couple of different values.
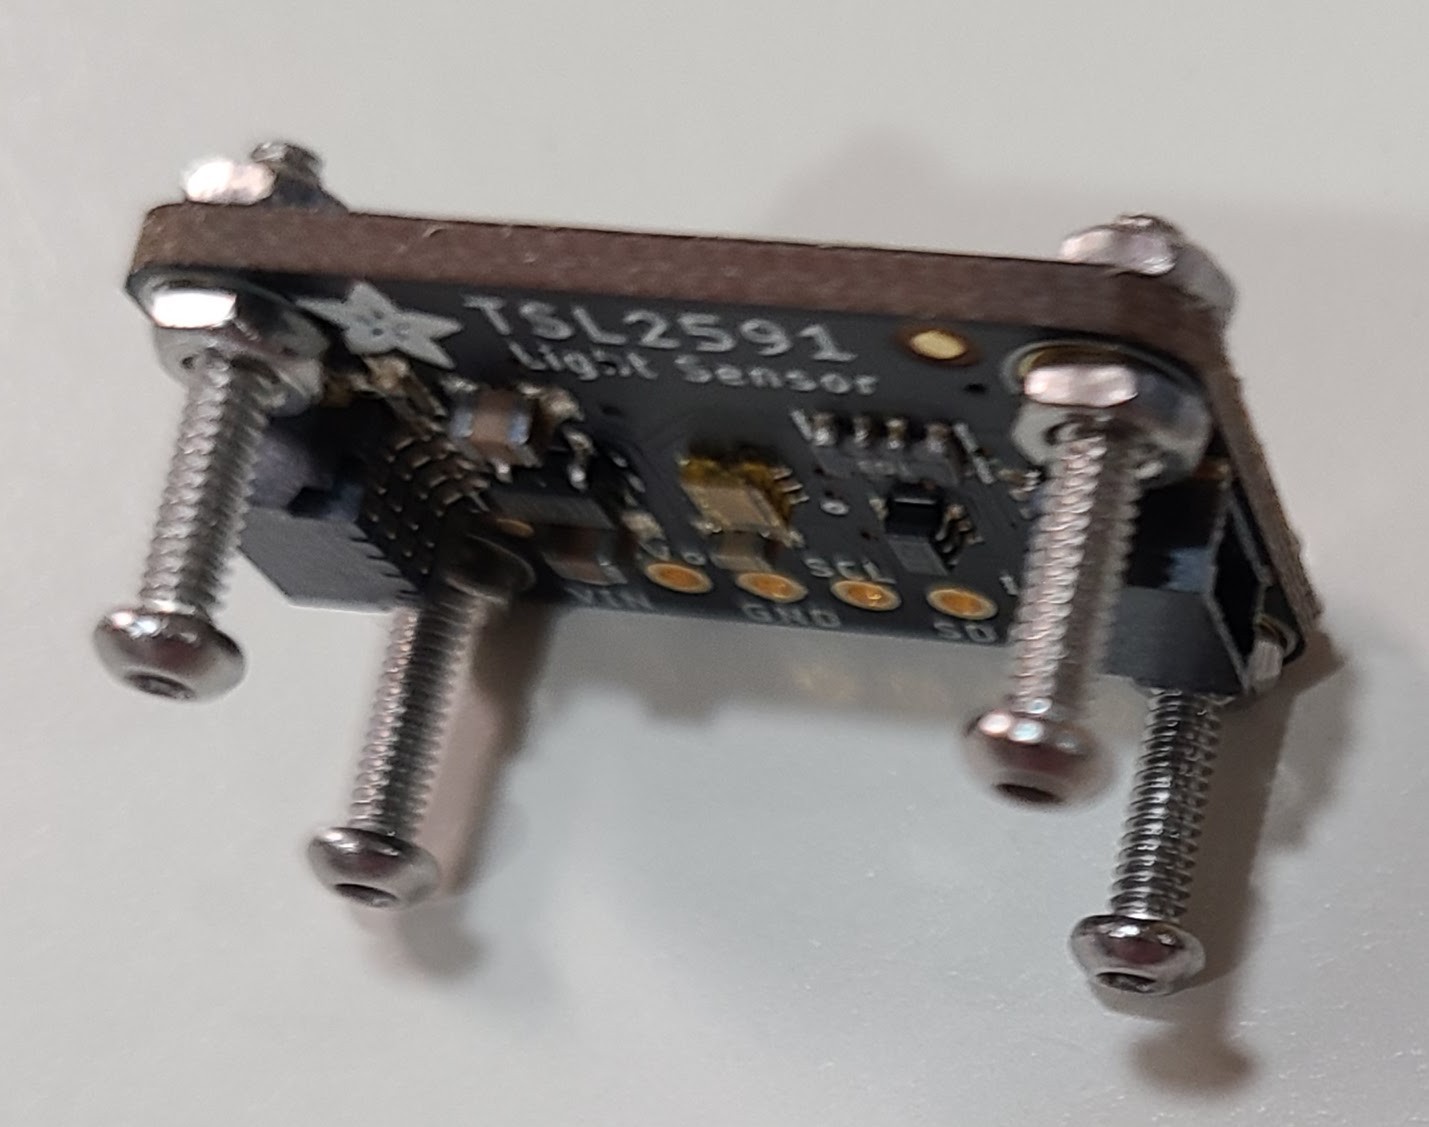
- With the idea that heat on the TSL2591 might be affecting the whole system, I used some screws and nuts to make stand-offs to hold the TSL2591 board a half inch or so away from the glass. Hee's a picture:
![]()
- I removed the TSL2591 completely away from the water heater glass and just had it watching a little lamp.
- I modified the scripting so that if a value was not actually read from either sensor, I would reset the I2C bus and the sensors. You can do that in a lambda call. Weirdly, that sometimes worked and sometimes rebooted the ESP32.
- I added a text sensor to make it easier for me to monitor what was going on without tailing the ESPHome log all the time. The same script that sends the messages over MQTT updates that text sensor with the same value. This is a standalone system, but since I also run Home Assistant, it's easy to monitor all the sensors, view a logbook of changes, view history, etc. I used the special text value "RESET_I2C" (just for the text sensor) so it was easy for me to see when that activity kicked in.
- I modified the script to notice whether things got better after resetting I2C. If not, and it carried on for more than a few minutes, I used another special text value "REBOOT_ME" for the text sensor. Early on, I got tired of tromping up and down the basement stairs just to cycle the power, so I plugged things into a WiFi-controlled smart socket that I could toggle from Home Assistant. I also set up a Home Assistant automation that would watch for the "REBOOT_ME" text and then cycle the power. I felt pretty smart about that, but I never actually saw it happen.
# This is an explicit text sensor that gets the same value as the # message we send to waterwatcher. No explicit update interval because # a value gets published when we do the rest of the flame status # processing. text_sensor: - platform: template name: "${node_name} flame status text" id: i_flame_status_text icon: mdi:fire update_interval: never- I set up another device that was an identical twin. It has the same model of ESP32 board, the same model of TSL2591, and the same ESPHome configuration (other than the node name). I had it laying around on my desk, and it worked perfectly. That was odd since the parts were those that I replaced early on in the troubleshooting.
- I moved the twin down to the basement, and it started being flaky. Could it be something like a few degrees colder temperature, trace amounts of natural gas fumes, lack of cosmic rays, ...?
OK, if you've read this far, you may have already guessed. The problem was the USB power supply that I was using. I assume it was marginal but worked OK for a year or two. Then it degraded for some reason to become "not OK". But wait, I had replaced the power supply as one of the many physical things in the system. Both the original and the replacement were just old phone chargers that I pulled out of my junk box. It looks like I replaced Crap with Also Crap. When I finally plugged the ESP32 into a high-quality USB power supply, things instantly became rock steady and stable.
-
Stuff and non-sensor
10/15/2022 at 22:54 • 0 comments[Edit: Forget all this. See next project log article.]
In July 2021, the TSL2591 ambient light sensor I was using went bad. I replaced it, and things went back to normal. In the last couple of weeks, that replacement sensor went bad. It's probably due to the somewhat warm conditions the sensor lives in. I have replaced it again with another Adafruit breakout board, and now things are back to normal. I guess replacing the sensor every 14-15 months is not too bad, all things considered.
Before the sensor went completely bad (giving a reading of 0xFFFF on one of its sensors), it sputtered for a while. By that, I mean that I could reboot the device, either with a software reboot of the ESP32 or with a power cycle of the entire setup, and the sensor would sometimes come back to operating normally. It also had a failure mode where both sensors reported 0 readings. Partly as an educational exercise for myself, and partly to while away the time waiting for the replacement part to arrive, I explored detecting the problem and automatically rebooting the ESP32. That's not too hard in ESPHome, but it's also not immediately obvious unless you go digging into the C++ platform APIs. I don't think there's any "on error, do this" in ESPHome.
I set up a recurring check with the ESPHome "interval" component. It runs an ESPHome script once a minute:
interval:
  - interval: 60s
    then:
      - script.execute: periodic_reboot
The script itself is imperfect but might still serve as a useful example.
  - id: periodic_reboot
    then:
      - if:
          condition:
            # We delay 10 minutes before rebooting. Otherwise, if the sensor is broken, we'll
            # instantly reboot after a reboot, and it will be very difficult to do a
            # firmware update or anything else.
            lambda: 'id(device_uptime).update(); return id(i_tsl2591).is_failed()  &&  id(device_uptime).state > 600;'
          then:
            - logger.log: {level: ERROR, format: "TSL2591 sensor is FAILED."}
            - switch.toggle: i_restart
The script checks for an error condition on the TSL2591 component. If so, it does the software equivalent of pressing the reset button on the ESP32 board. The first time I ran this, I didn't account for the fact that the first time the check happened was immediately at boot time, so an error in initializing the TSL2591 led to a boot loop. It's a bit tricky to be able to update the firmware in the ESP32 when it's in that condition. If I had already had the replacement TSL2591 on hand, I could have plugged it in and eased my pain. Instead, I just kept iterating attempted updates until I got lucky. The update include the check for being up at least 10 minutes before forcing the reboot.
The script you see above is not good enough because sometimes the sensor would seem to initialize OK and also not raise an error during a read cycle. Instead, it just gave back readings of 0. I also had a version of the script that checked for a value of 0 in the global variable CURRENT_FULL_SPECTRUM. That had the problem of causing reboots during the "dazzle" period that is a normal part of the flame cycle. I've thought a bit about various ways to make the check better, but in the meantime my replacement sensor arrived, and I've got better things to do, and yadda, yadda, yadda....
An interesting thing happened after I installed the new TSL2591 sensor. The BME280 climate sensor on the same I2C bus went bad. That sensor is not housed in the same heated environment as the TSL2591, so having it go bad at about the same time seemed a bit suspicious. I've now replaced that sensor (I had a couple of spares on-hand). My hypothesis right now is that the dying TSL2591 sensor put some kind of signals on the I2C bus that caused the BME280 to lose its mind, but beyond that I don't know much about what might have happened.
-
Back and in color
09/28/2021 at 03:27 • 0 commentsI finally got around to fixing the colors of the LED animations on the display device. For a long time, I thought that something had changed subtly in the color model used by ESPHome and that it would be a lot of bother for me to get back to the colors I wanted (and that show in the videos on this project). It turned out to be something simpler, though still an infrastructure change somewhere along the way.
To give the totally awesome "world on fire" look to the display, I'm using the ESPHome fastled component. Specifically, I'm using the addressable flicker effect. It has a tunable parameter for how much the flickering can vary from the base color of the LED. I had been using 25%, which looked good in the original incarnation with an older ESPHome release. I cranked that "intensity" value way down and, after some experimentation, settled on 7% variation. It now looks pretty much like I wanted.
I have updated waterwatcher55.yaml to reflect this change (and to correct one other unrelated typo.)
This is probably the last log entry for this project. That is, unless I think of something else. :-)
-
ESPHome supports the TSL2591
08/19/2021 at 02:29 • 0 commentsESPHome release 2021.8.0, just released, includes my PR to directly support the TSL2591 sensor. My previous waterbug.yaml depended on loading support as a custom component, along with the Adafruit TSL2591 library. The ESPHome support uses the ESPHome I2C abstraction and does not use the Adafruit TSL2591 library at all. A nice side-effect of that is no longer needing to configure a fake "spi:" entry because of the Adafruit standard sensor library's dependency.
Changes to waterbug.yaml to use the ESPHome support for TSL2591 are minimal and are mostly removing things. I updated the YAML files on this project to reflect the changes.
-
I see the light
08/06/2021 at 21:10 • 0 commentsWell, that was silly. I didn't pay close attention to this before, but what I have been calling "lux" throughout is not lux at all. It's still a useful value (for this scenario), but it's just not lux.
ESPHome supports the obsolete TSL2561 device but not the replacement TSL2591 device. Over the last few days, I undertook adding support for the TSL2591 device to ESPHome. (Here are the pull requests, if you are interested: https://github.com/esphome/esphome/pull/2131, https://github.com/esphome/esphome-docs/pull/1370). It was only while working through the details of that that I started paying more attention to what I was measuring.
What I have been calling "lux" is actually just the raw value of a 16 bit ADC for one of the sensors on the device. To get actual lux values, you have to do a calculation based on the ADC readings of both sensors. The calculation involves the configured gain, the configured integration time, and some empirically-determined coefficients. It is fairly complicated and scenario-specific to tune the calculation, but there is a calculation implemented in the Adafruit TSL2591 library. (Actually, there are 3 different calculations there, but 2 of them are commented out.)
In my ESPHome integration, I decided to make the raw ADC values available in addition to the calculation provided by the Adafruit library. That way, anyone who wanted to do their own calculation would have the inputs they needed (well, they also need a handful of physical characteristics that are out of scope for how much work I am willing to do for my own feeble efforts).
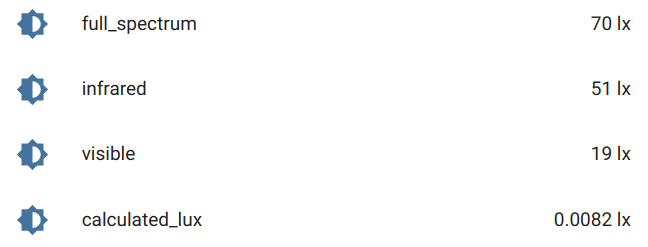
What does this mean for this project? Not much, in practice. I'm going to continue using that raw ADC read-out ("full_spectrum" in the graphic below), even given my better understanding of what it is, because it suits the coarse-grained conditional logic needed here.
I did not have an intuitive feel for real world lux values (like I do for furlongs, fortnights, and shillings and pence) until I looked at the Wikipedia article about lux. It has a nice table of a few examples. It tells me that what I see when the pilot light is on the order magnitude of some kind of moonlight on a clear night. Fair enough.
Here are some sensor readings that show the ADC values (600ms integration time, 428x gain) as well as the lux calculation from the Adafruit library:
![]()
-
Sense and sensor ability
07/06/2021 at 01:18 • 0 commentsA couple of weeks ago, readings from the light sensor went crazy. Starting at a certain point, the only two values ever reported were 0 and 64k. The latter (actually 0xFFFF) indicates saturation of the sensor. That was very bad for the use case, so I unplugged the upstairs display while I worked on it.
This started happening remarkably soon after I applied an ESPhome update and reflashed the code on the ESP8266 hosting the light sensor. Since the driver for the TSL2591 is a custom component in ESPhome's point of view, I thought maybe there was an incompatibility in the update. I spent a lot of time horsing around with trying to get an older version of ESPhome and matching PlatformIO working. That's probably a pretty simple thing for someone more familiar with that ecosystem, but I was basically in dependency hell. I eventually gave up and just ordered a new sensor in the hope that it wasn't a software problem after all.
Lo and behold, with the new sensor in place and firmware from the latest ESPhome, things were completely back to normal. So, I guess the sensor was bad after all. I haven't had a chance to play around with the CQRobot sensor to see if I could figure out what made it angry. I hope it's not the case that the heat coming through the viewing window eventually destroys the sensor. It would be a disappointment to have to replace it once or twice a year.
For the replacement sensor, I switched to Adafruit's board for the TSL2591. Like the CQRobot part, it has a nice socket for an interface cable, though it's a different size (a bit smaller in all 3 dimensions). I got lucky on shipping, and it arrived from New York City to my Seattle-area home in just 3 days. W00t!
The readings for the 3 interesting states of the gas flame are not the same with this board. That could be related to manufacture of the board, factory calibration of the sensor, or something as simple as my placement of the board onto the viewport window. (Since this board has connectors at both ends, it sits naturally on the glass at a different angle than the CQRobot board.) Even though they are not the same values, they were still just fine for the thresholds I had already put into the firmware.
(I was a little worried because I tested the board by shining a flashlight onto it. The readings were the 64k saturation value, and I feared it was a software problem after all. But I guess that just shows the high quality of my flashlight. Once I installed it on the water heater viewport, I got suitable values with no further adjustments.)