Close
0%
0%

Soil moisture monitoring in a flower garden

When do your flowers have enough water, and how do you know?

Similar projects worth following
A network of Bluetooth connected sensors and ESP32 modules to track the soil moisture and nutrients in a flower garden.

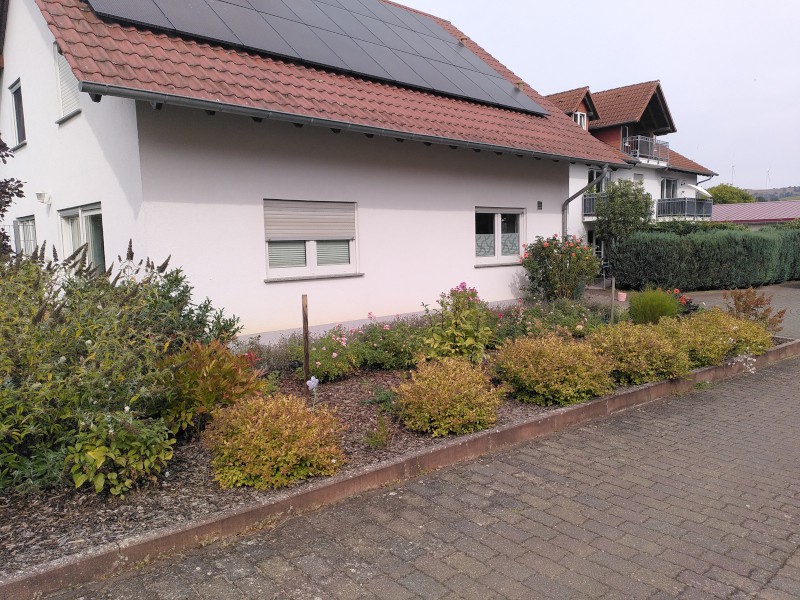
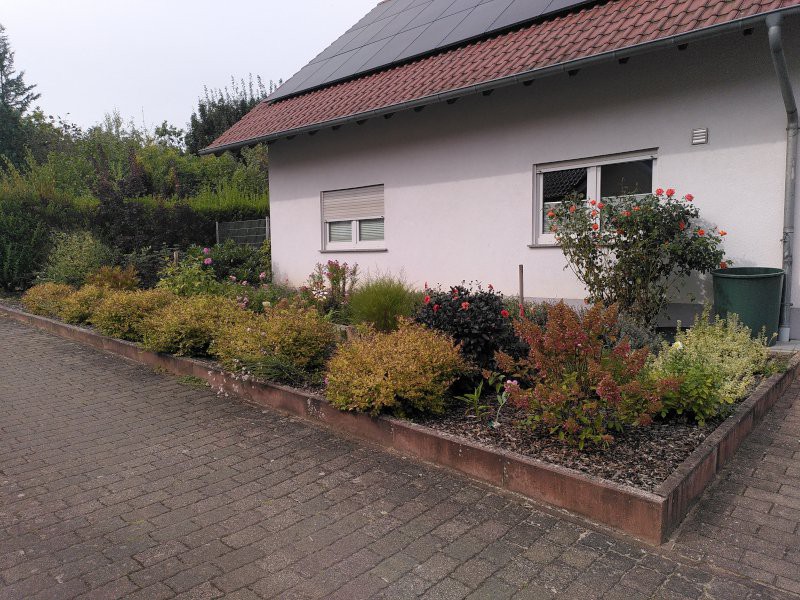
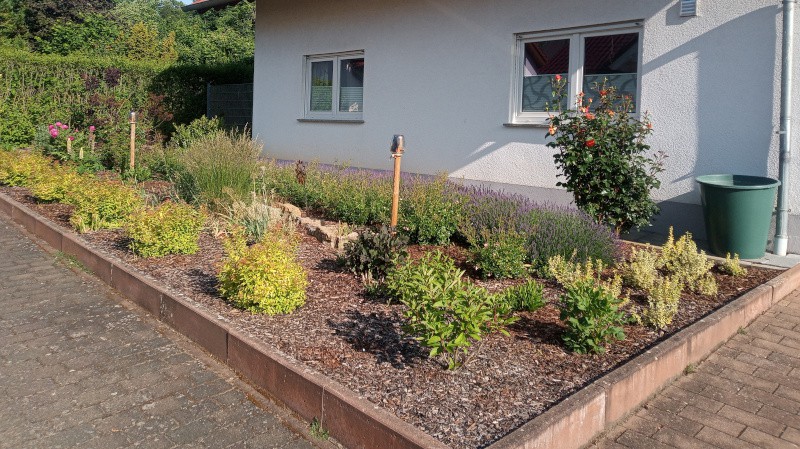
My wife and I transformed the (rather) small yard in front of our house into a flower garden.  It is full of roses, lavender, tulips, dahlias, and shrubs.  The open areas are covered in bark chips to keep down the weeds.
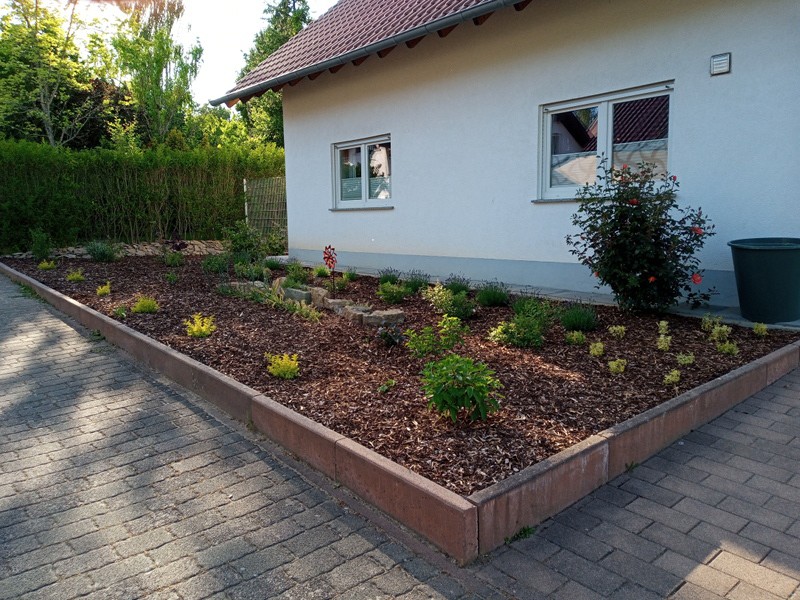
To make sure that the flowers stay properly watered, I put some Bluetooth capable sensors out in critical spots in the yard.

To my surprise, it turned out that I hardly need to water things at all - or do I?  Some times the moisture is at the low end of the suggested range, and stays there for hours.  Is that bad?  Did it maybe drop below the recommended levels at some times and places?  I don't know, but I want to find out for sure.

The sensors in the critical spots seem to show that there's always enough water in the soil under the 4 inches of bark that I didn't need to water things at all.

The soil moisture varies over the course of the day.  The soil dries out somewhat during the day and recovers during the night.

During the driest part of the day, the sensors showed that the flowers still had enough moisture available - if the charts provided by the sensor manufacturer can be trusted and if the measured spots truly represent the state of the whole garden.

The handful of sensors I used couldn't give me a very detailed picture of the situation.  I tracked things as well as I could with the original software from the sensor manufacturer, and cursed it every day.

The software is only intended to track the moisture and nutrients for single plants - it cannot combine data from multiple sensors.

Even for a single sensor, it has painful limits.  You can't display the last 30 days so that you can track things easily.  Nope.  It only shows you the last month - on the first of the month you have an empty chart.

I started planning a better system with my own software.

The current idea is to space sensors on a 1 meter grid through the front yard (and selected spots in the backyard) to provide a comprehensive picture of just what the water in the dirt is doing.

The sensors will monitored by several solar powered ESP32 modules which will transmit the collected sensor data via WiFi and MQTT to a Django program on a Raspberry Pi.

I want to generate an animated "heat map" style chart of the soil moisture to see how it develops over the entire spring and summer, and I want to use the daily charts to tell when (or if) I need to water things.

  • 21 × Garden sensors (Xiaomi or compatible)
  • 3 × ESP32S
  • 3 × Solar charged battery banks
  • 1 × Raspberry Pi

  • Mary, Mary, quite contrary, how does your garden grow?

    Joseph Eoff09/22/2024 at 13:47 0 comments

    I've been intending to update this project, but there's really no new data to share.

    The Raspberry Pi I had collecting the data died a while back.  I've replaced the SSD and reinstalled much of the software, but haven't gotten around to making it all work again.

    Instead of posting data, I'll just post a few pictures of the flower garden.

    All the flowers and shrubs are blooming and growing.  It looks kind wild, I guess.  I'm no landscape architect.  We just put flowers that we like in the garden and try to keep all the wilted flowers trimmed.  Nothing fancy, just a wild profusion of pretty things growing.

    I haven't had to water the garden this year.  I just make sure there's at least 4 inches (10 cm) of bark covering the ground, and the soil moisture regulates itself.

    I do give the garden 100 liters of water in the springtime, but that's more for the fertilizer.  I mix one liter of liquid fertilizer with 100 liters of water (the recommended ratio from the fertilizer manufacturer) and pump it through the watering drip lines my son and I installed before I found out that I don't really need to water the garden.

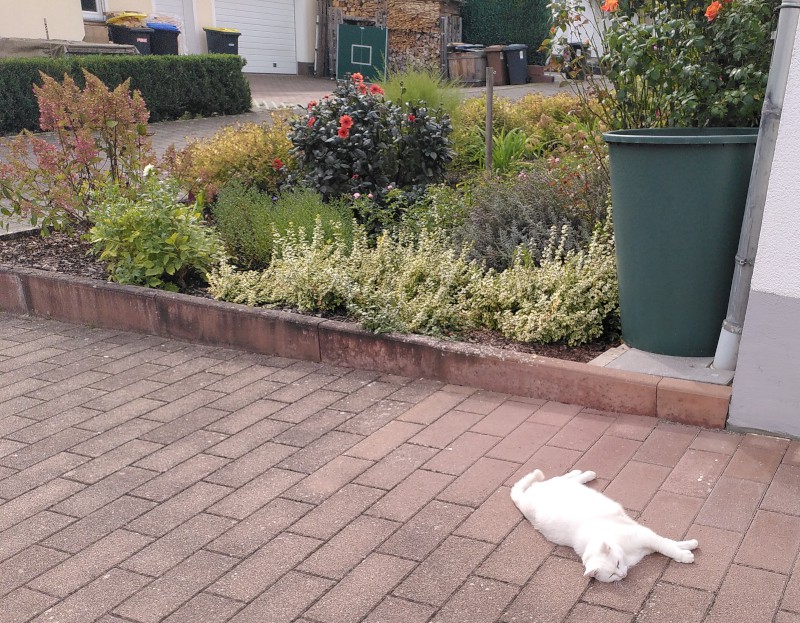
    We use the water in the rain barrel for the two potted roses that stand next to the front door of the house (to the right of the cat in the last picture.)


    Our cat Snow likes to sleep under the big rose bush by the rain barrel.  It's warm from the sun, but shady enough that she doesn't get a sunburn.  Yes, cats can get a sunburn despite the fur. As a white cat, she's especially susceptible to sunburn on her ears.

  • An update after a long pause

    Joseph Eoff06/04/2022 at 18:23 0 comments

    It may seem like I've abandoned this project, but it's not so.  I've been collecting data and monitoring the garden - I just haven't been writing about it. I've been doing other things, and keeping busy.

    Since I think I may have found a cause for the problems I was having with the control nodes, I thought I'd take the time today and implement a possible fix - and write an update while I was at it.

    The possible fix amounts to properly closing the WiFi connection after a timeout occurs.  It's a simple one line fix - call "WiFi.disconnect()" before trying to connect again.

    It hasn't caused any problems, but it's hard to tell if it really helped.  The problems only occur sporadically, and only when the nodes are in actual use (outside, in their jars, doing their jobs.)

    We'll see.

    The garden itself is doing fine.  Everything is all healthy and green and blossoming.

  • RSSI - paint by the (RF) numbers

    Joseph Eoff07/21/2021 at 18:56 0 comments

    A couple of days ago, I extended the Mud-Py software to record the received signal strength indication (RSSI) values from the sensors and the control nodes.

    Due to a bug in the Mud-Py-MQTT-Bridge component, I didn't get data until last night - the bug prevented the system from recording any data at all.

    That's fixed, so I thought I'd share a first look at the radio signal distribution in my garden.

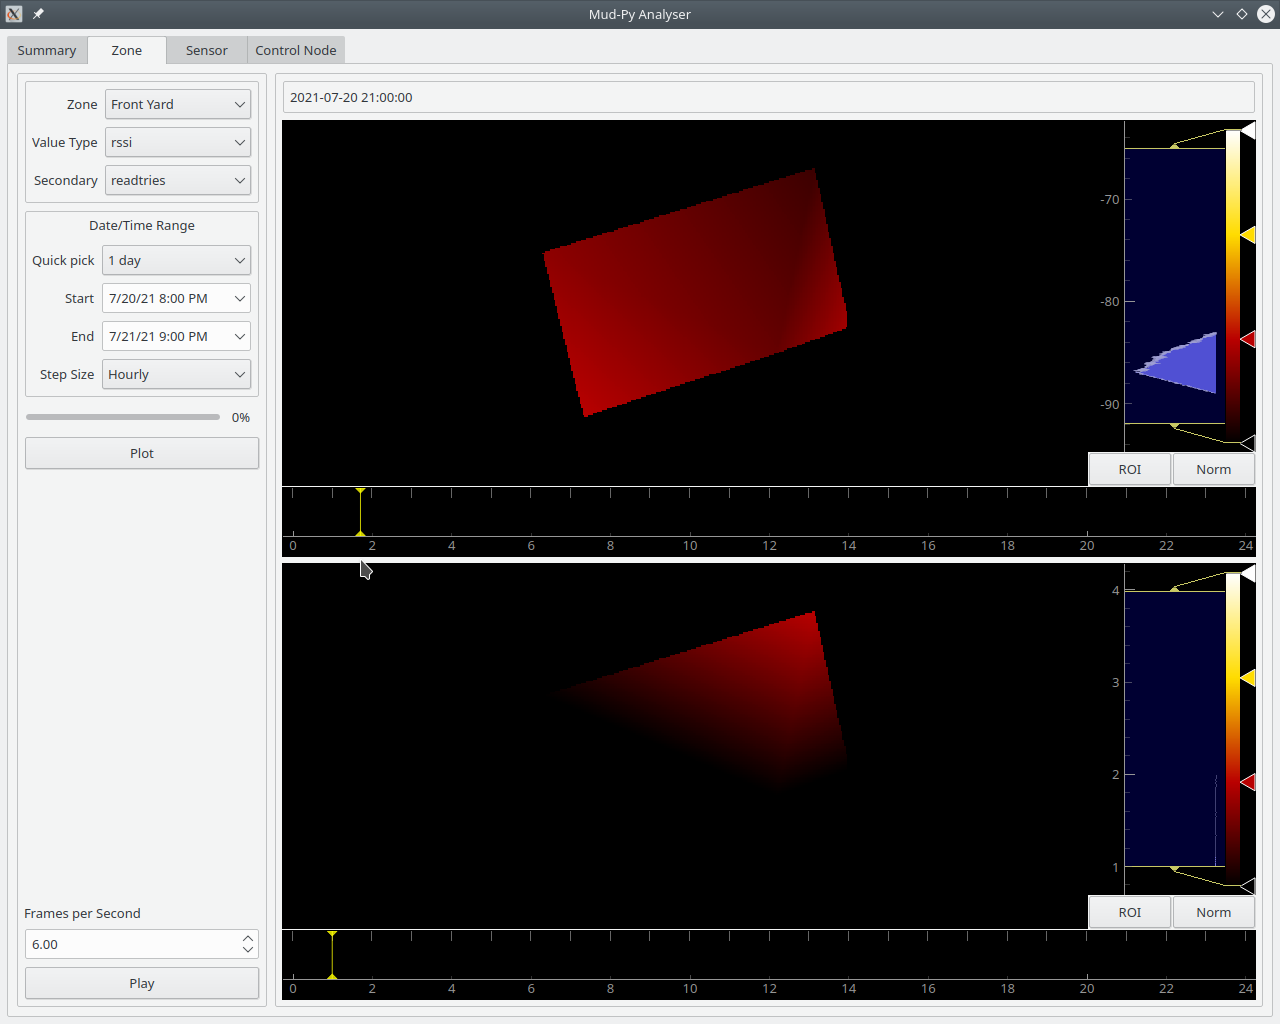
    This from yesterday evening, just after I got the bug sorted out:
    The upper plot is the RSSI, the lower plot is the read-try pseudo-sensor.
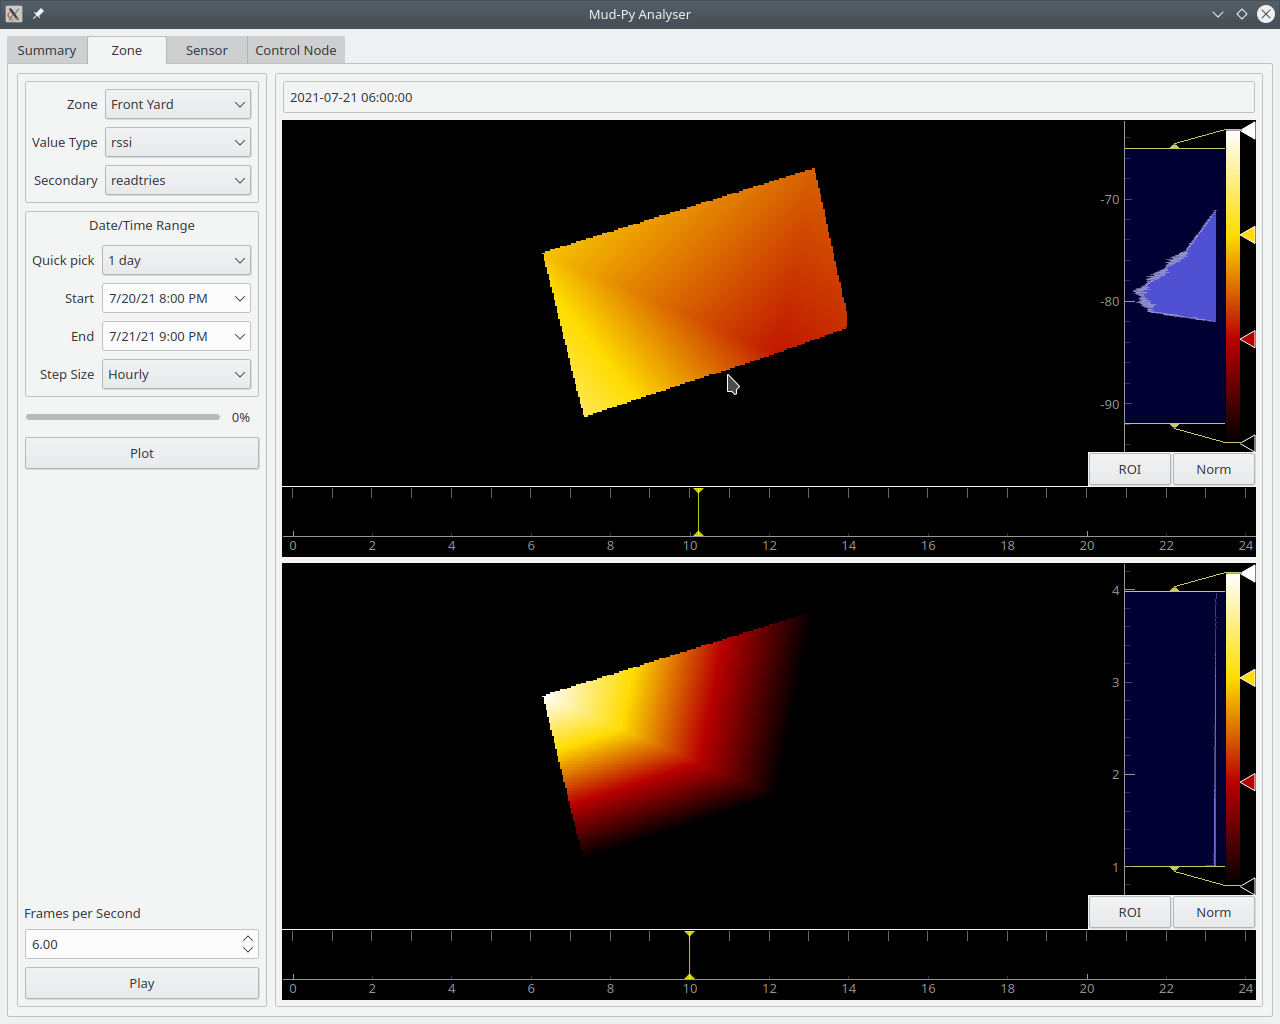
    They sort of match. 

    Ideally, the lower plot should be black, indicating data read on the first try.
    The upper plot would ideally be an even color color all over.

    The RSSI plot shows the upper right corner being slightly weaker than the rest of the yard while the read-try shows that it took more attempts to read the sensor in the upper right corner  than it did elsewhere.

    So far, so good.

    It doesn't always line up that well, however:

    That's the same layout as above, but from about 6 o'clock this morning.
    The upper left corner shows a fairly strong signal, but it still took the four try maximum to read from the sensor in that spot.

    The interesting test will come when we get some rain.

    The forecast says we won't be getting rain until next week sometime, though we may get some thunderstorms before then.

    I can't wait to see what the RSSI numbers look like when it is raining.

  • Some pictures and some small improvements

    Joseph Eoff07/19/2021 at 21:35 0 comments

    The soil moisture data collection is still running.  I haven't been looking at the data much, though.

    We've had a lot of rain in the last weeks.  Not every day, but often enough that I don't have to worry about the flower garden at all.  It rains on and off for a couple of days,  then we get some sunshine, then the whole thing repeats.

    The control nodes have been driving me bonkers.  They've gotten to where they hang up.  I check the raw data a couple of times a day.  Sometimes, I'll find that the one control or the other (or both) haven't been sending data.  I have to go out and cycle power on the misbehaving ones, and then things are OK for a couple of days.

    I've been meaning to see if I could improve the error handling, but never got around to it - until today.

    Someone on the Earth Sciences stackexchange asked about ways to measure the rain intensity without measuring rain fall volume, so I mentioned the way the rain interferes with reading my soil moisture sensors.  We chatted a bit, and I realized that I really ought to be collecting the received signal strength indications (RSSI) from the sensors' Bluetooth communications and from the control node WiFi communications.

    That gave me the needed boost to sit down and dig out the MudPy code and have at it.

    Implementing the RSSI functions was pretty straight forward, as was updating the two control nodes.  The hard part was getting the server to actually use the new code.  I had forgotten how the webserver and the mqtt client worked.  It took me a while to realize that I needed to restart the uWSGI server and the mudpy-MQTT client demon as well as the nginx webserver.

    The server is updated now, and I've got RSSI data showing up for the sensors and the control nodes.

    I was going to put a plot with RSSI data in here, but it looks like it's going to take another one hour poll cycle to get all 16 sensors in a single data set.  I'm not going to wait that long - it is time to shut things down and catch some shuteye.


    ---------

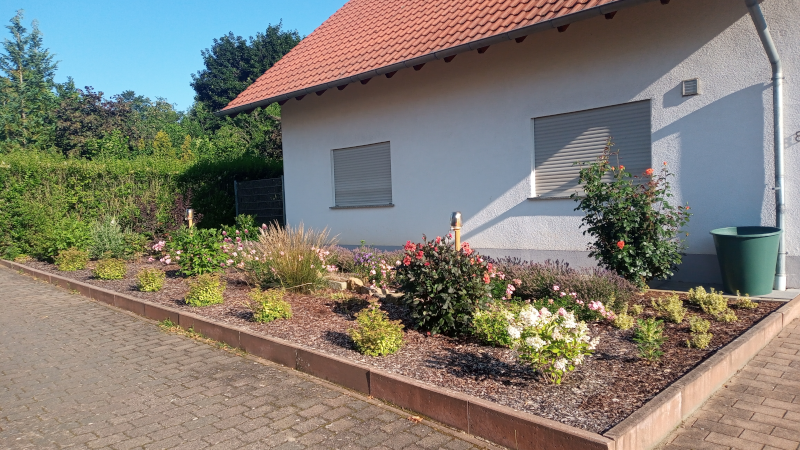
    In case any of y'all are interested, here's what the garden currently looks like:

    The tulips are long gone and the lavender is starting to fade.
    In trade, the dahlias are blooming as well as the little teacup roses. The summer lilac is also starting to blossom. 

    The shrubs along the front edge have little pink blossoms as well.  We planted some climbing flowery things at the foot of the posts holding the control nodes.  You can't see them yet, but we hope they'll eventually grow up the posts and make them look less like sore, industrial thumbs.

    The garden has a mixture of things that blossom at different times so that we get a changing mix of colors and blossoms.  It keeps things from getting too boring.

    When we set things out last year, it looked kind of bare.  The folks we bought the plants from told us that it was fine, though.  The plants would spread and look better in the second year.  They've done that.  The lavender and the little rose bushes are spreading like mad.

  • Update - Prize and current weather

    Joseph Eoff06/08/2021 at 20:15 0 comments

    The soil moisture monitoring project won a prize in the "Data Loggin' Contest".  The prize was a $100 Tindie gift certificate.

    I thought it over for a while, and had a good look around Tindie, then decided I'd like a useful tool.

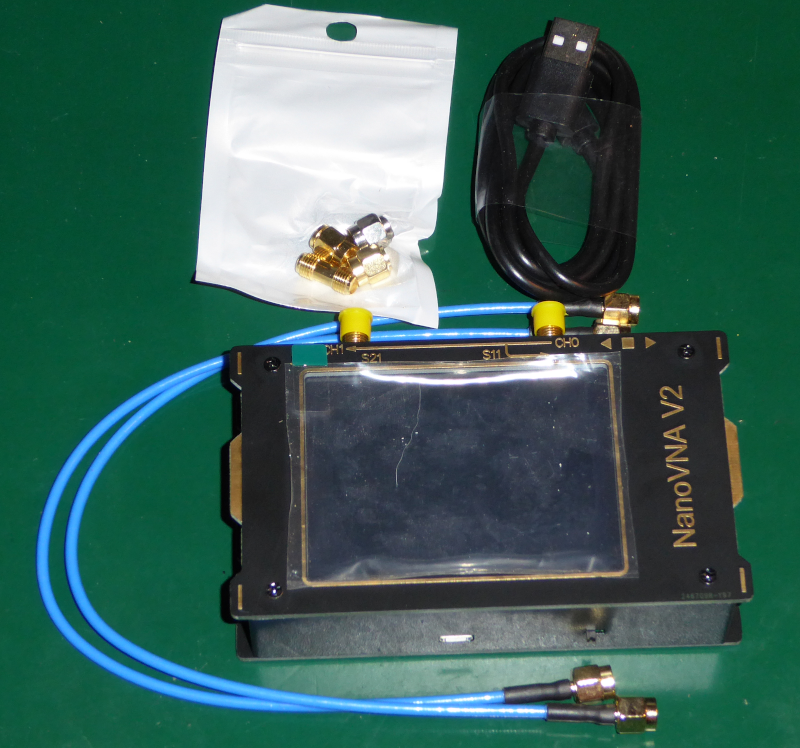
    I used the prize to order a NanoVNA2.

    I haven't done much with it except to turn it on and see if it is alive.
    I have some ideas for things to try out with it, but I'm going to need to buy some adapters first.

    I haven't posted updates to the soil moisture project since the contest ended.  I needed a break from it, and I also had something new come up at about the same time.  I'll describe that "something new" some day in a project page here on Hackaday, but not now.

    The soil moisture project is still running.

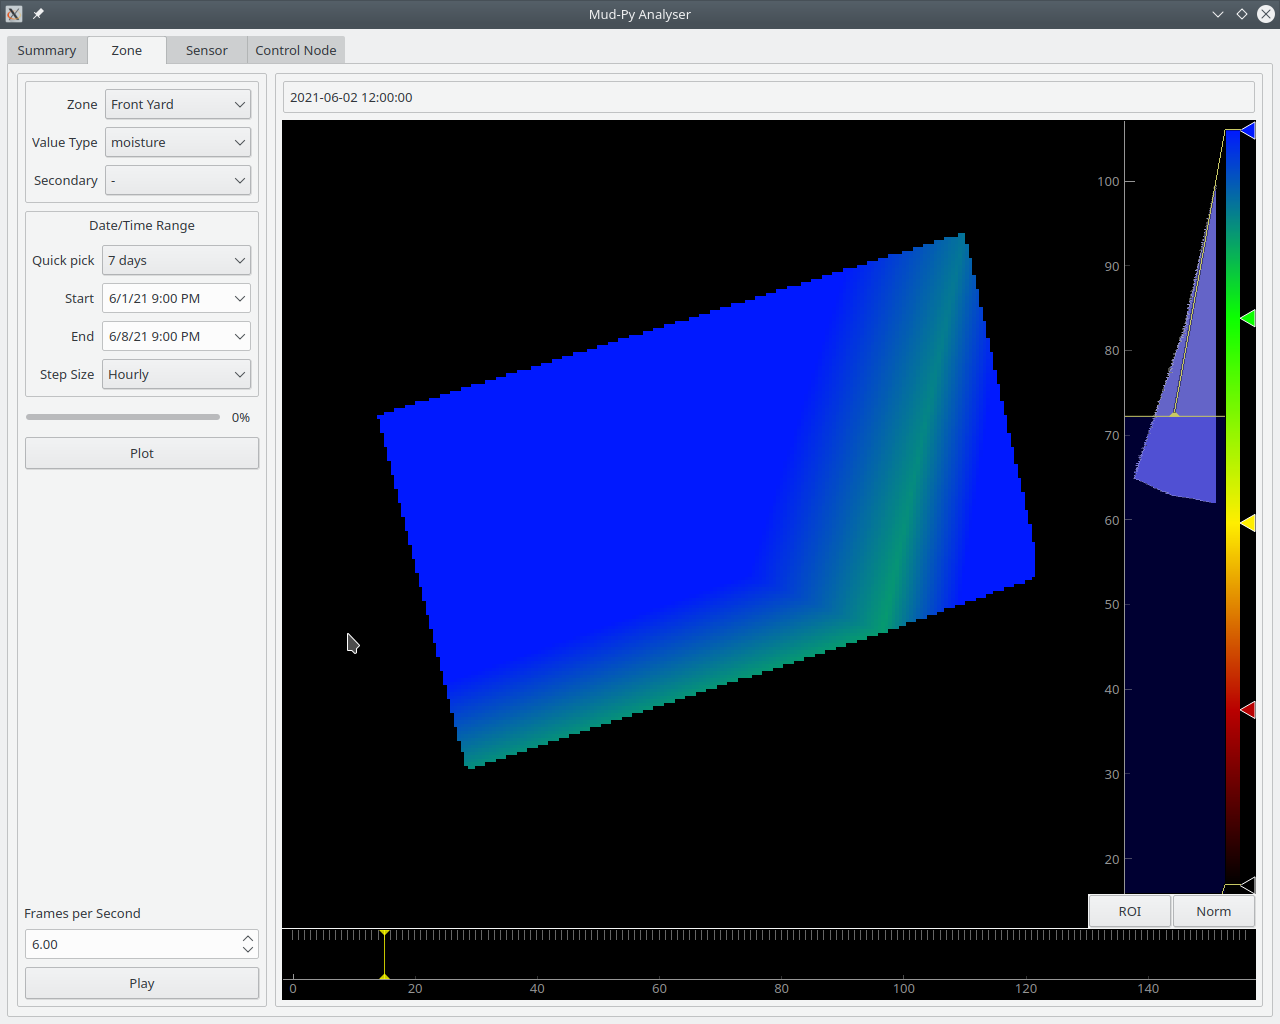
    I have loads of data collected.  I need to make some improvements to the software - I've found that the heatmaps are not correct.  There are areas of the yard that I know don't get that much moisture, but the heatmap shows them as being right up there with the wettest spots.

    We had a really hard rain last week.  One of the local creeks came up about 5 feet from its bed and flooded the surrounding fields. My house is up on a hill so we don't have to worry about flooding.

    We did get a lot of rain, though.

    The heatmap says the whole yard was soaked.  I know it isn't true because individual sensors close to the house stayed at about 35%.  That chart up there says the whole yard was above 60%.
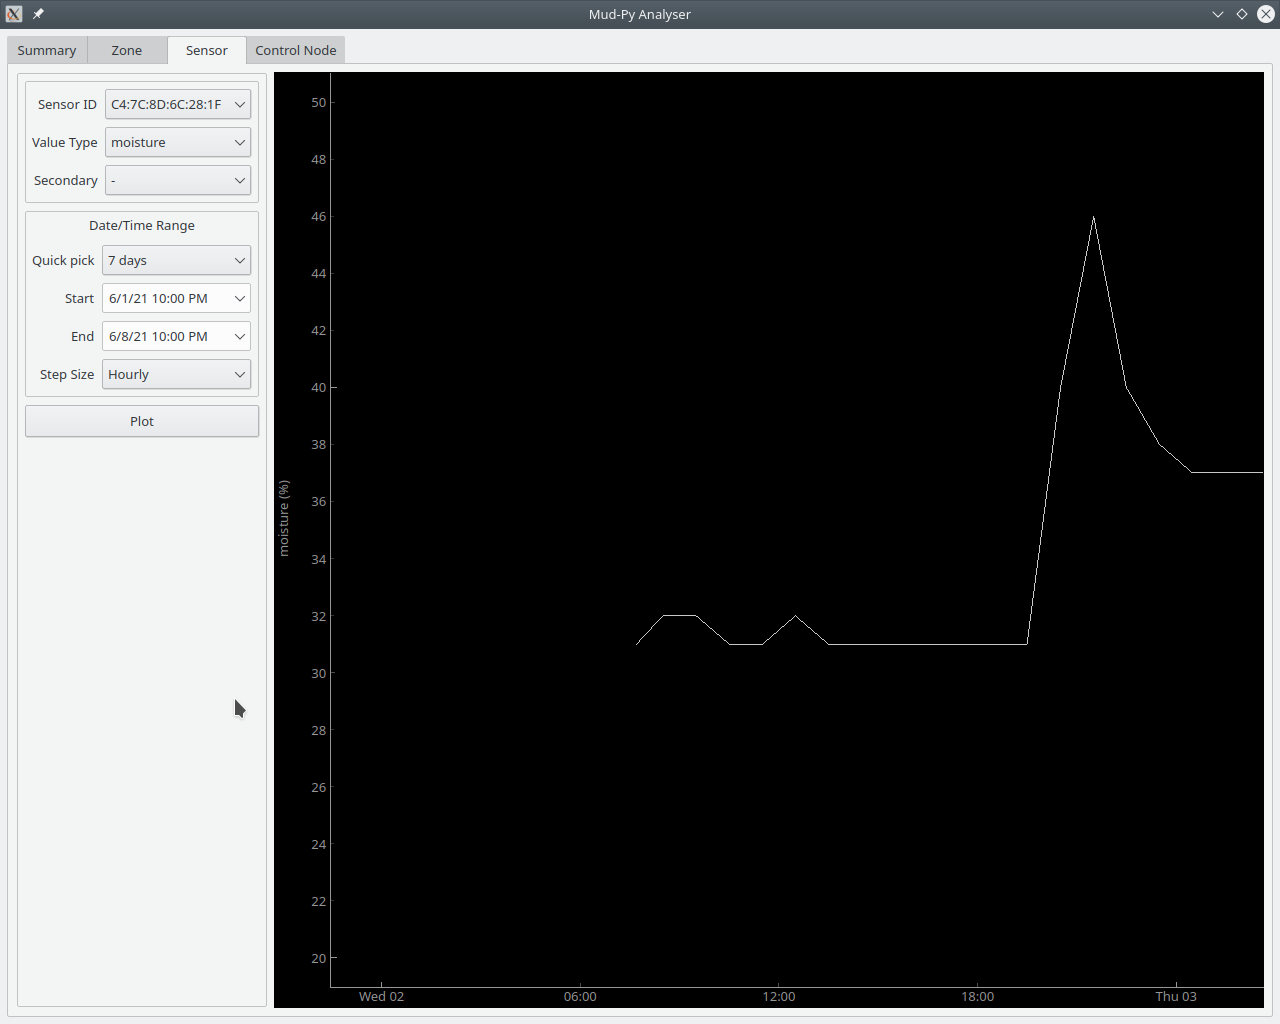
    This is one sensor showing the same time period:
    The flat area to the left is a little over 30% - at the same time the heatmap is showing 60% over the whole yard.
    Something in the interpolation is wonky.  The data (in the database) are correct, it's just the heatmap that displays it wrong.

    I'll be working on that as I get time.  I've been rather busy lately, and I don't see me getting to this for a few weeks.

    I've got something else to do this weekend.  I'm going to see if I can combine work and exercise to lose some of this spare tire I'm dragging around.  That'll get its own project page if it works out.

  • What does rain look like?

    Joseph Eoff05/01/2021 at 19:07 0 comments

    I was asked in the comments to this project what the sensors report when it rains.

    While I did  take note of some rain days (the zone pages and the sensor pages in the Mud-Py web-site have notes fields for just such things,) I found that I can locate rainy days from the collected data - despite there not being any sensor specifically dedicated to detecting rain.

    There are two signs of rain that show up in the recorded data.

    The first is that the battery voltage of the control nodes dips on overcast days.

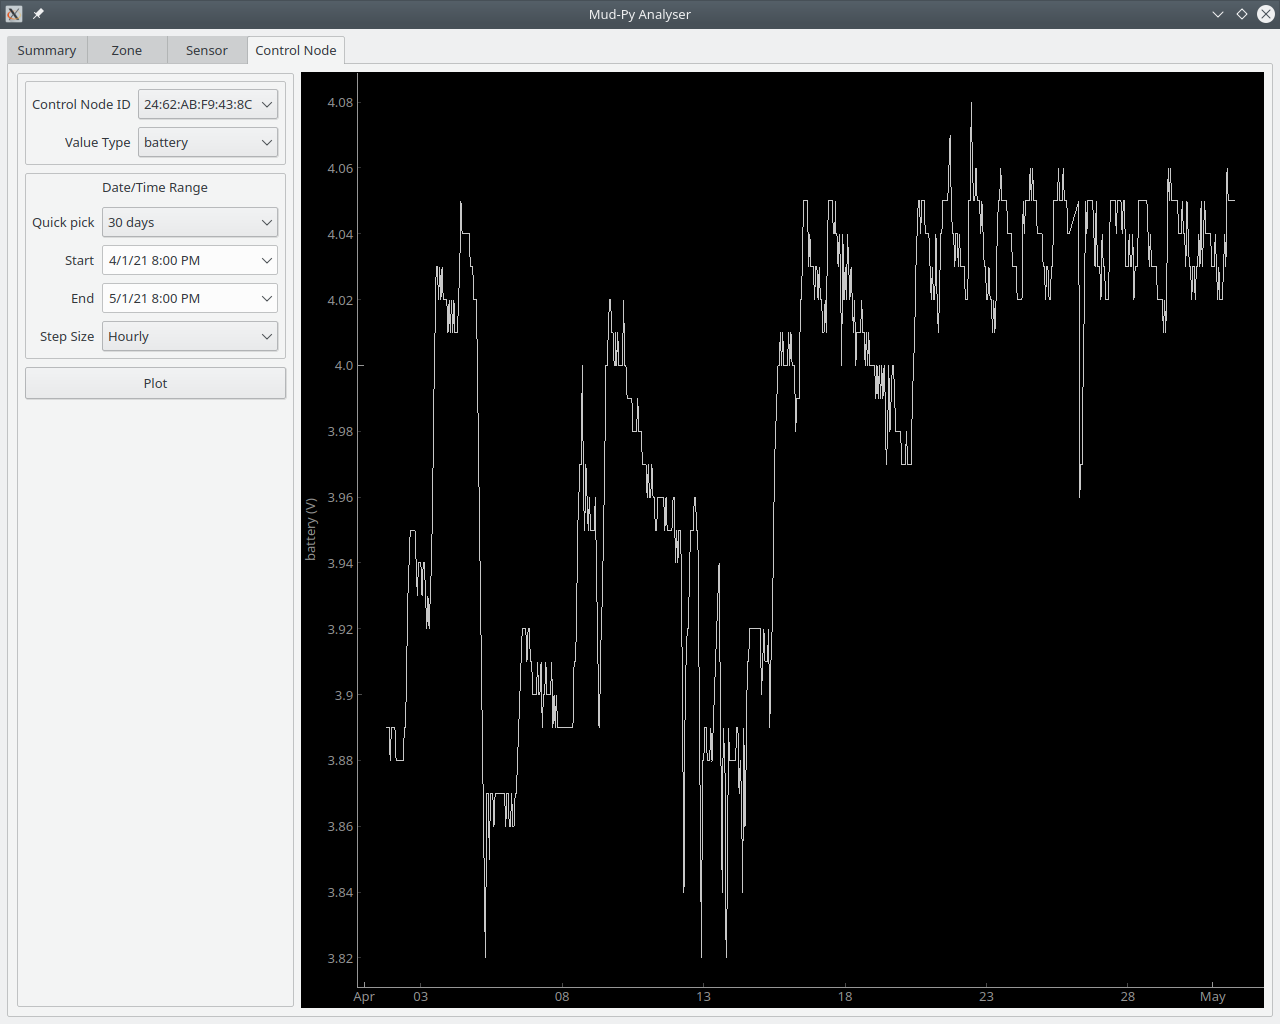
    That's the battery voltage of one of the control nodes over the last thirty days.  The early part of April was rather nasty, weather wise, and it shows in the battery voltage.  The solar cells weren't getting enough sun to fully charge the battery.  Since about 20 April, things have been better.  The battery voltage zig-zags over the day and night cycle, but it has stayed rather high.
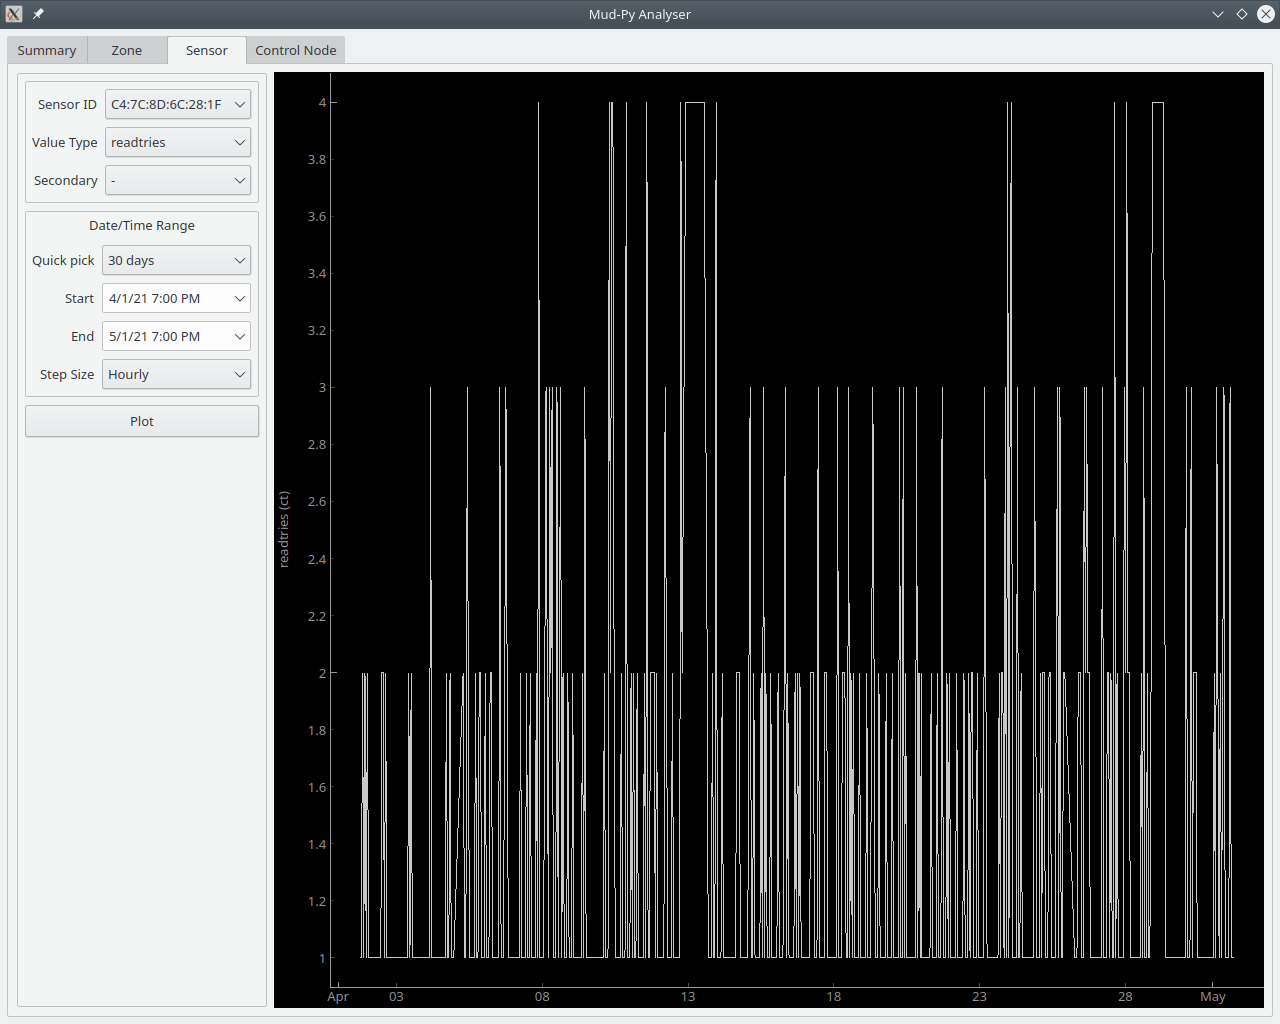
    The other way that rain shows up in the data is in the "readtries" pseudo-sensor.
    The control nodes will try up to four times to read the data from each sensor. They report that count as part of the sensor data.
    I originally intended to use that to determine if I needed to reassign sensors to a closer control node.  I did actually make use of that during the first few days I had the sensors outside, and reassigned some of them to get more reliable connections.

    The "readtries" count goes up when it rains.  The sensors are read with Bluetooth low energy.  The low power and high frequency make it susceptible to interference from rain - rain drops can block or scatter the signal enough to cause read errors.

    It is also likely that rain water on the sensors (and the jars protecting the control nodes) blocks the Bluetooth signal rather than just the falling rain.

    This is the "readtries" count for one sensor for the last 30 days:
    Most of the time, it is read on the first try.  It often gets up to two tries, and sometimes three.  Between 8 April and 13 April, it has periods where it gets up to four tries.  That's when it rained here.
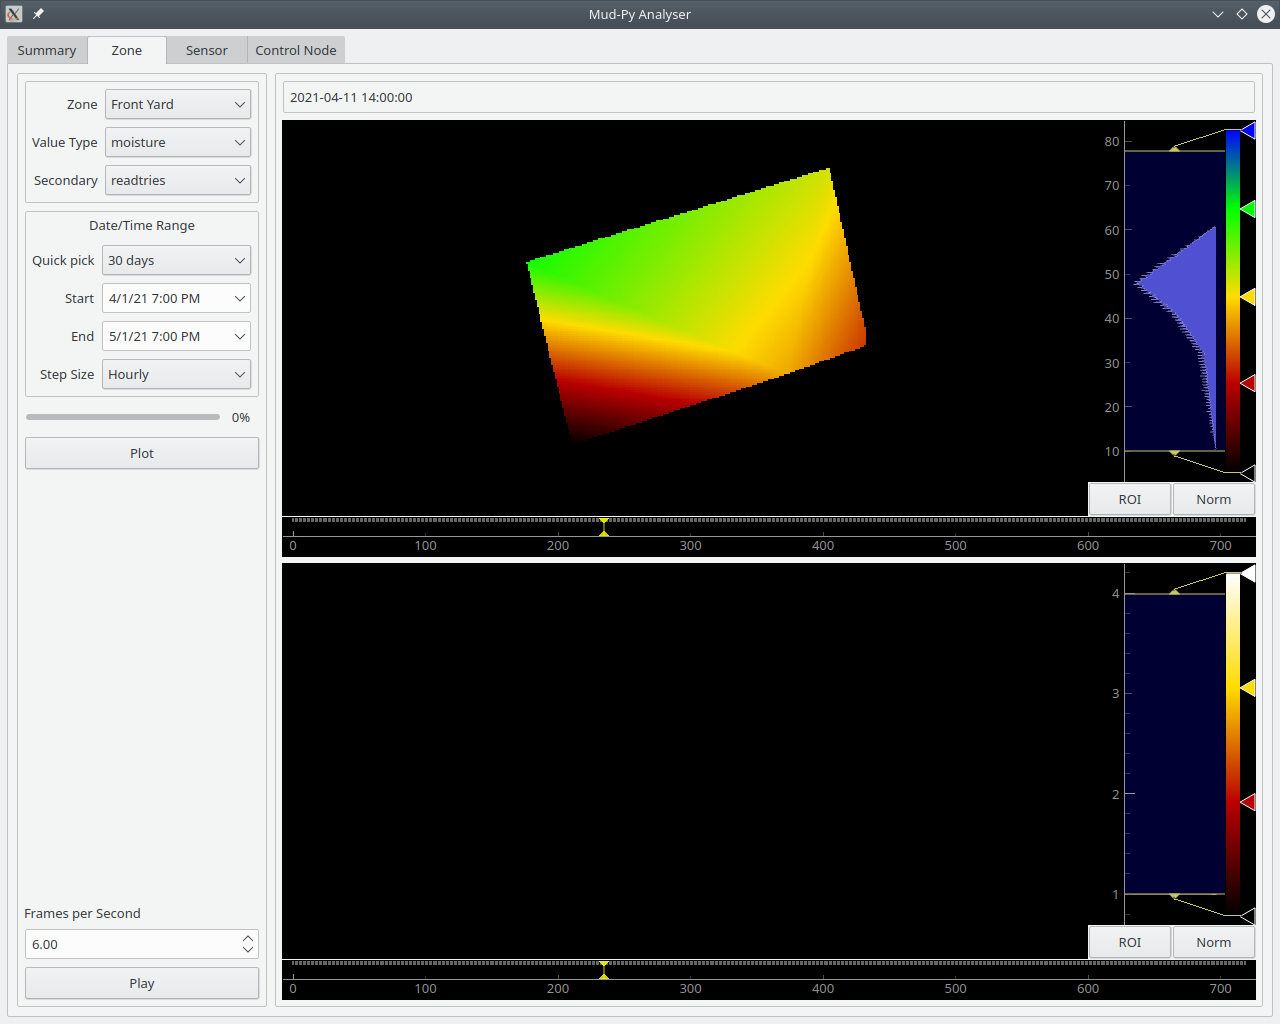
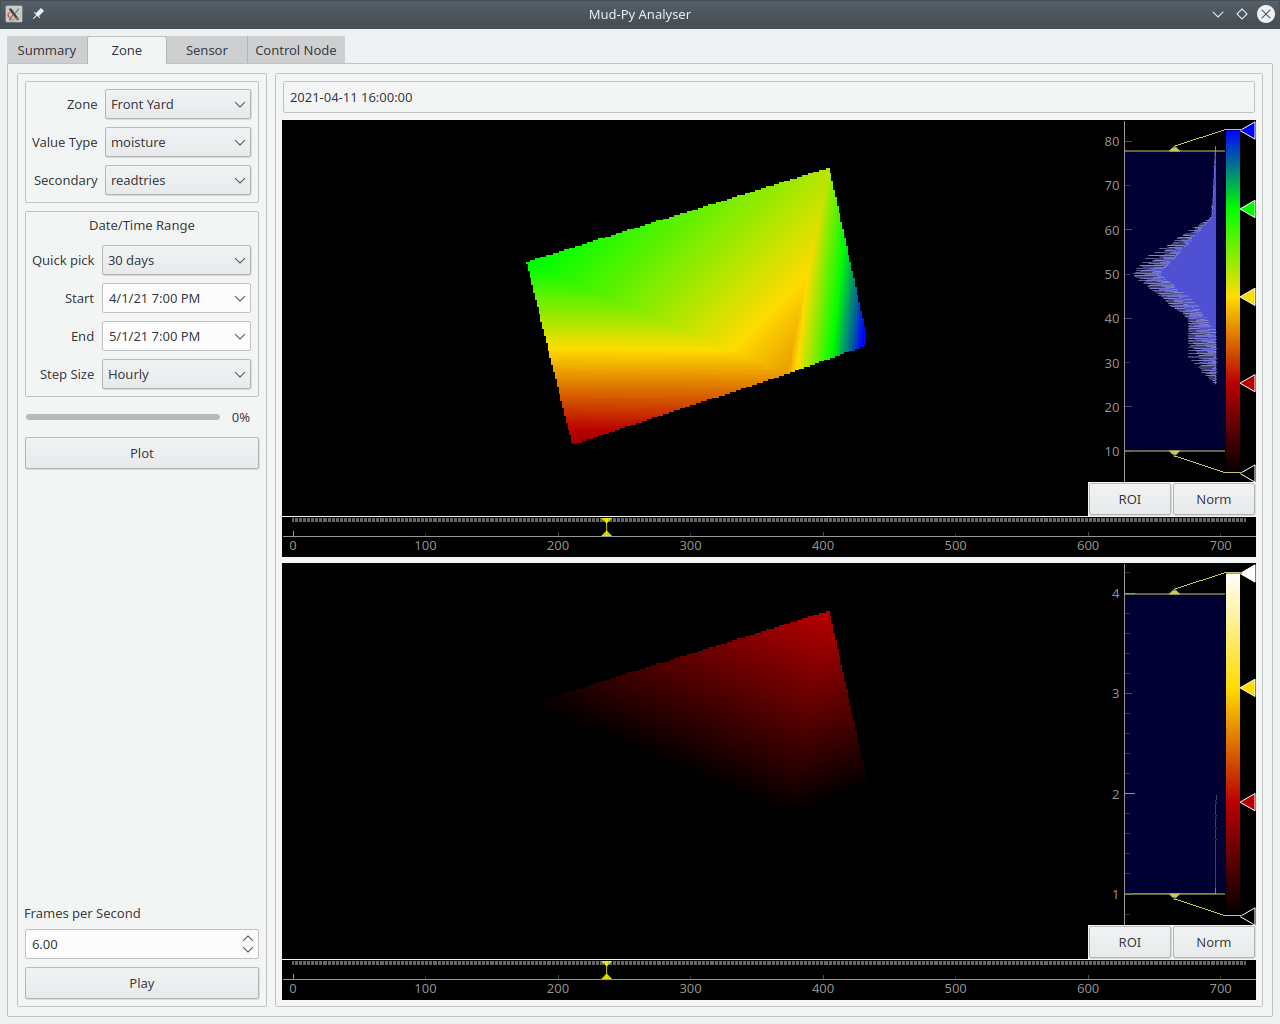
    This is about 2:00 PM on 11 April:


    The "readtries" is black - low values, no trouble reading from the sensors.  The corners of the yard down by the street are somewhat dry.

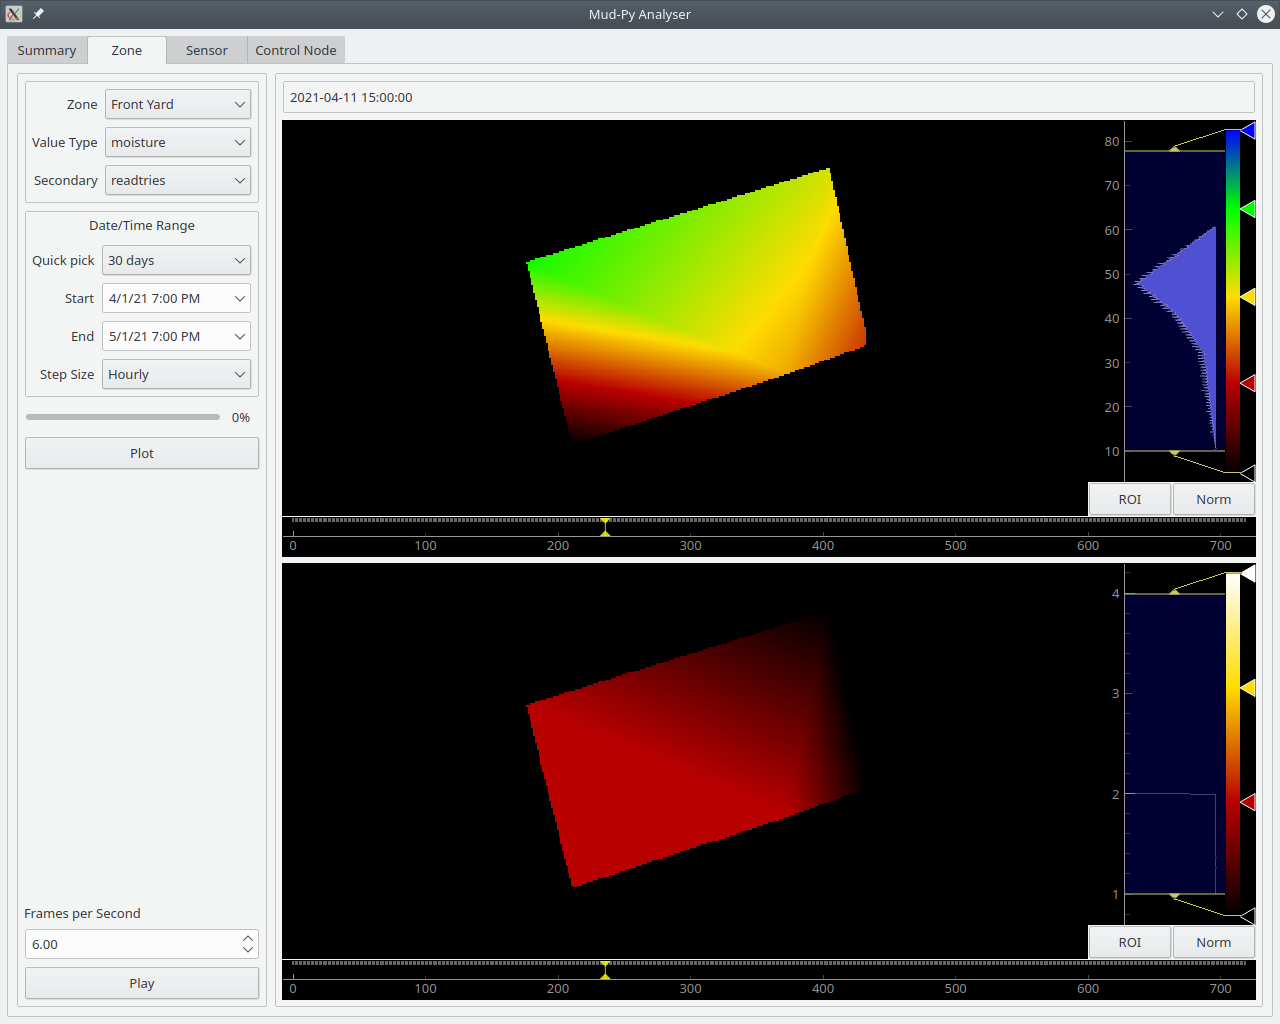
    At about 3:00 PM, it starts raining:


    The "readtries" goes up over the whole yard.  It hasn't rained enough to make any difference yet.

    At about 4:00PM, the rain has slacked off.  The "readtries" has dropped, but the soil moisture has risen:


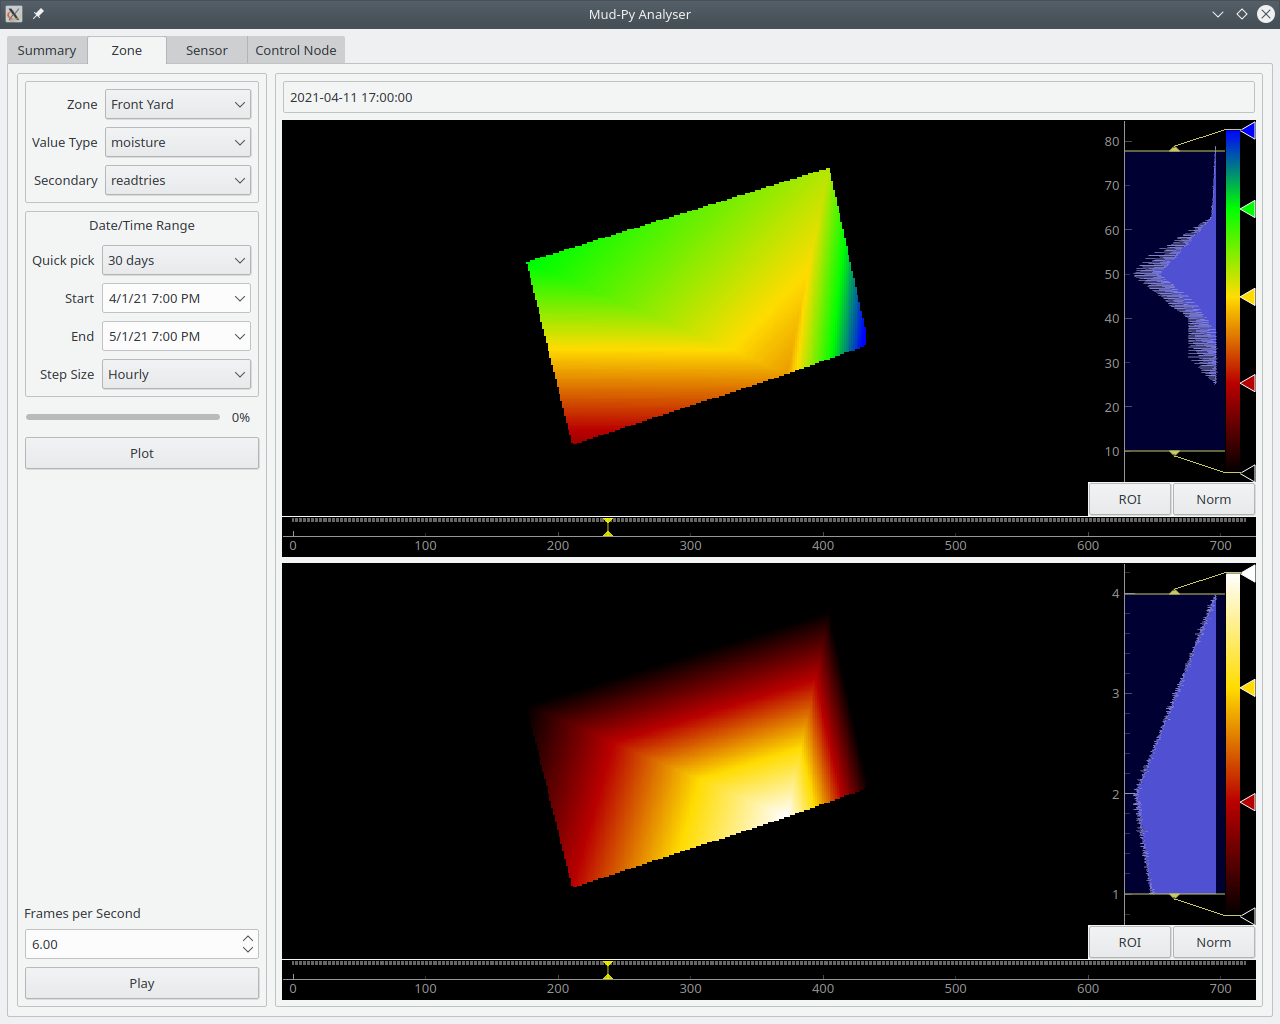
    At about 5:00PM, it started raining again, but harder - the "readtries" hits maximum over a larger part of the yard:

    An hour later, and it is still raining.  The lower part of the yard is collecting some serious moisture:
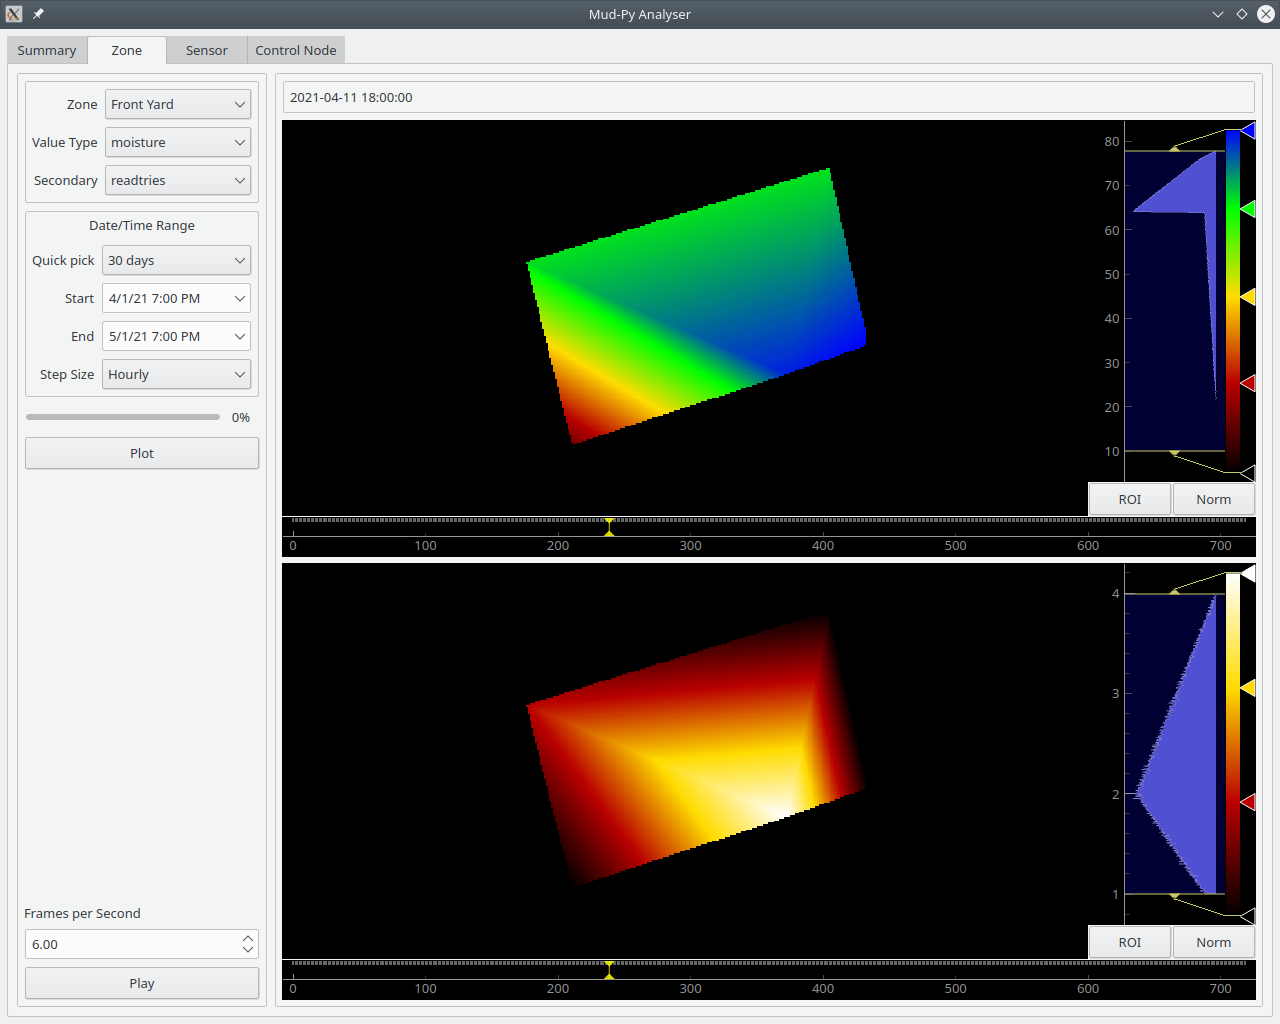
    A couple of hours later, and the rain is dying down again - the "readtries" have dropped over the whole yard:

    The whole yard has over 50 percent soil moisture.  The water hasn't had time to seep down into the lower layers - it is still up in the top 10 centimeters (4 inches) or so where the sensors can "see" it.
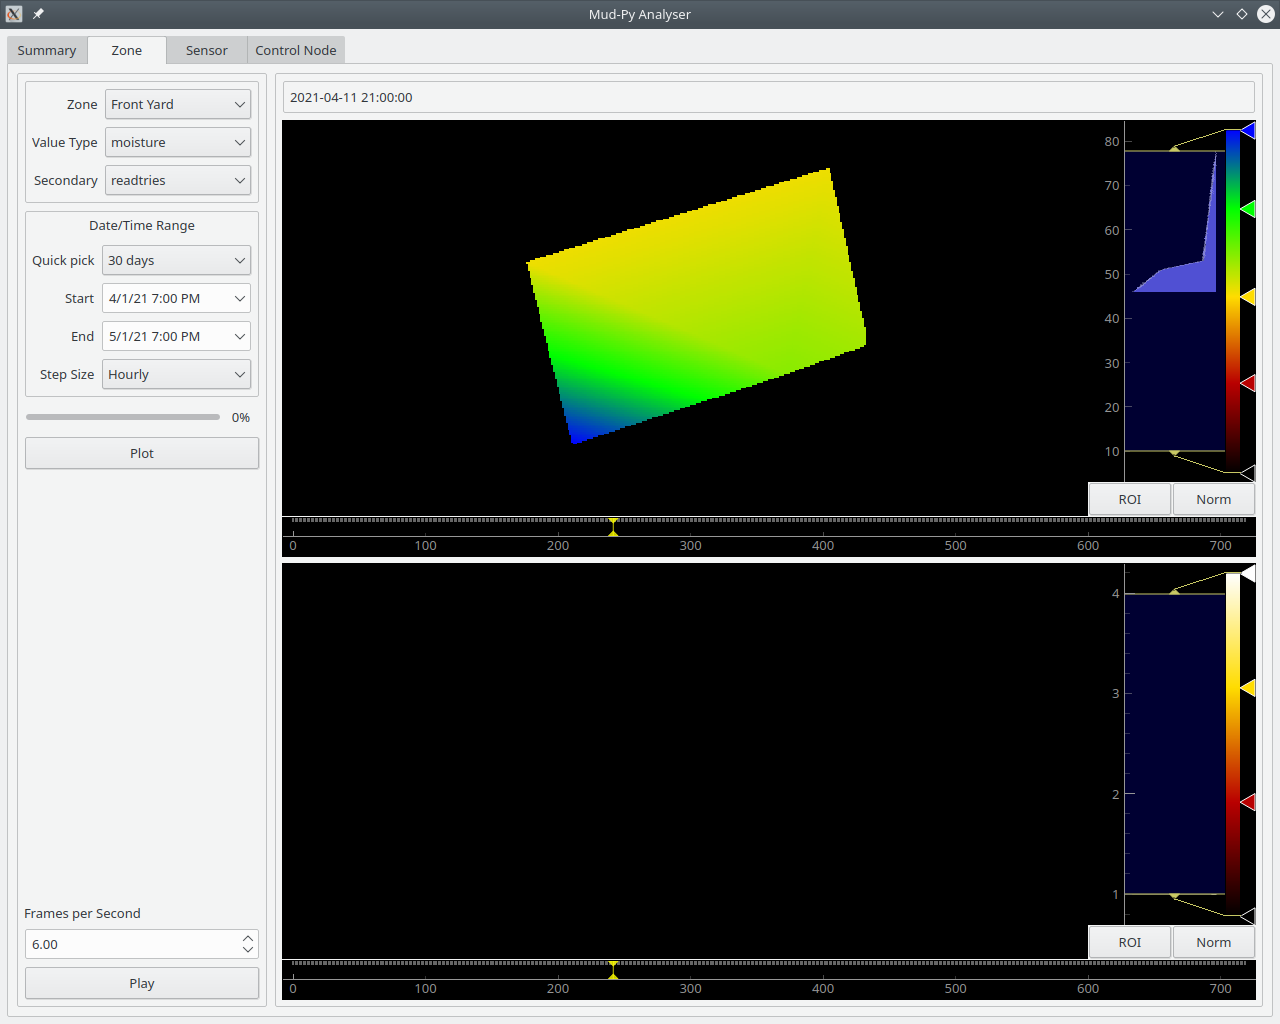
    An hour later, and the rain has stopped entirely:

    The moisture over most of the yard has dropped a bit.  The lower left corner there has finally gotten a little water - it seems to lag behind the rest of the yard, even on other days.
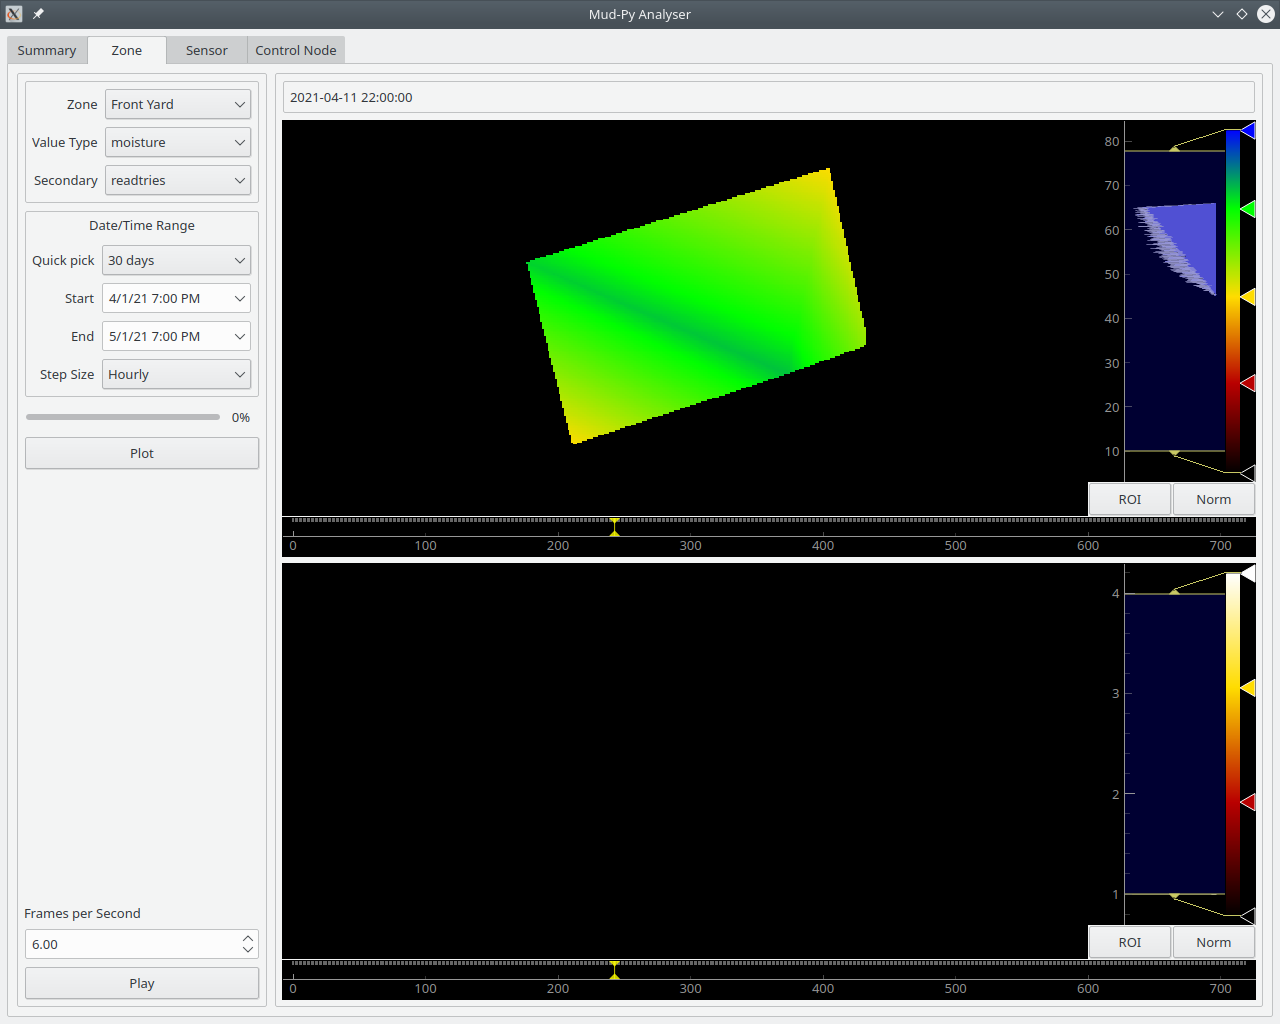
    Another hour (about 10:00 PM) and the moisture has evened out over the whole yard:

    The rain has pretty well stopped.  It stayed overcast until around 13 April, with occasional showers.  That afternoon and evening of 11 April was the hardest rain, though.
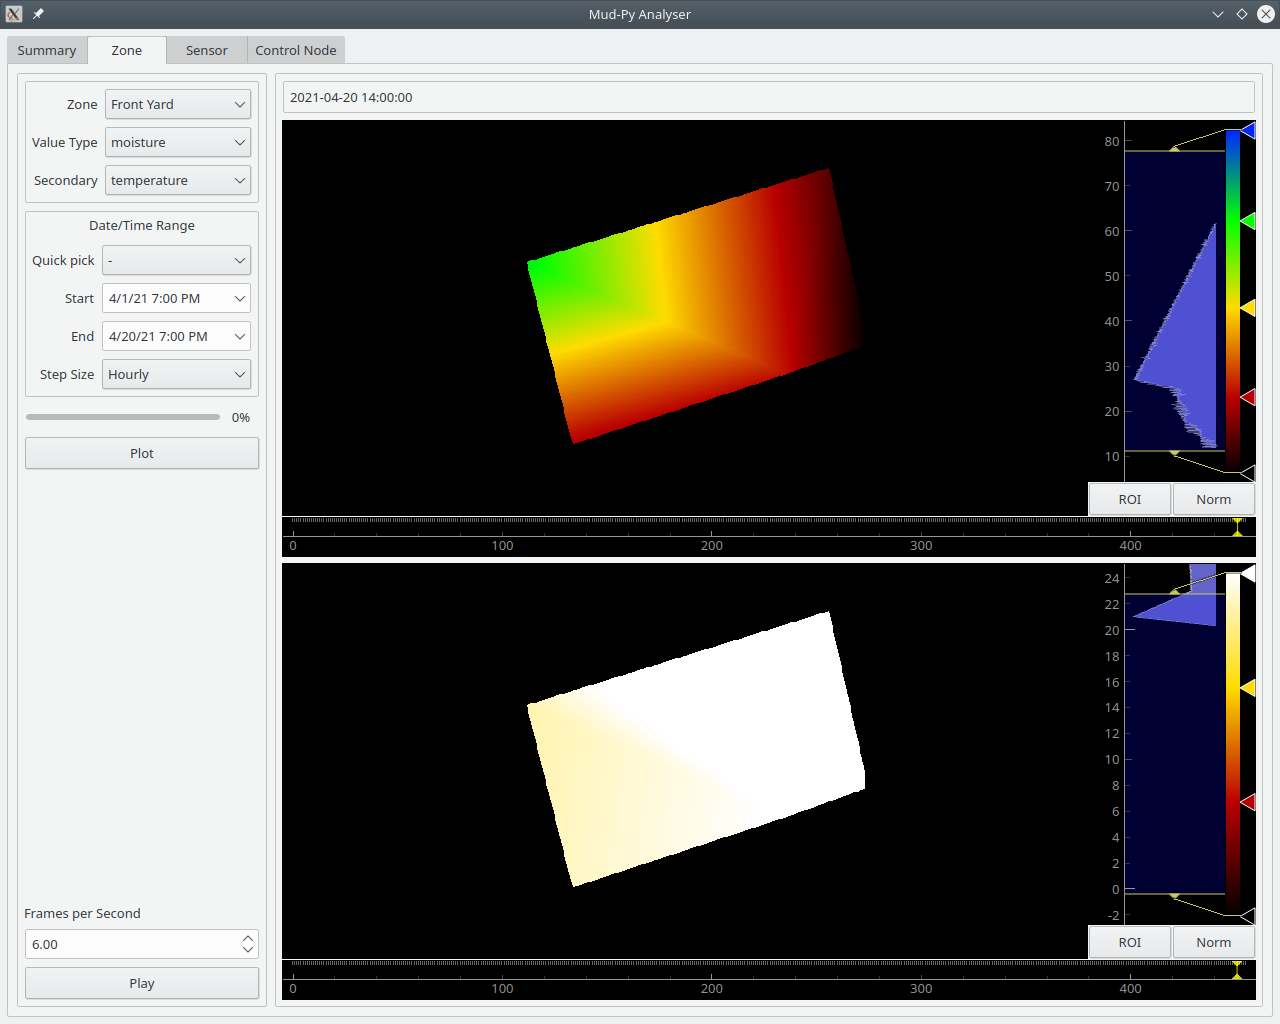
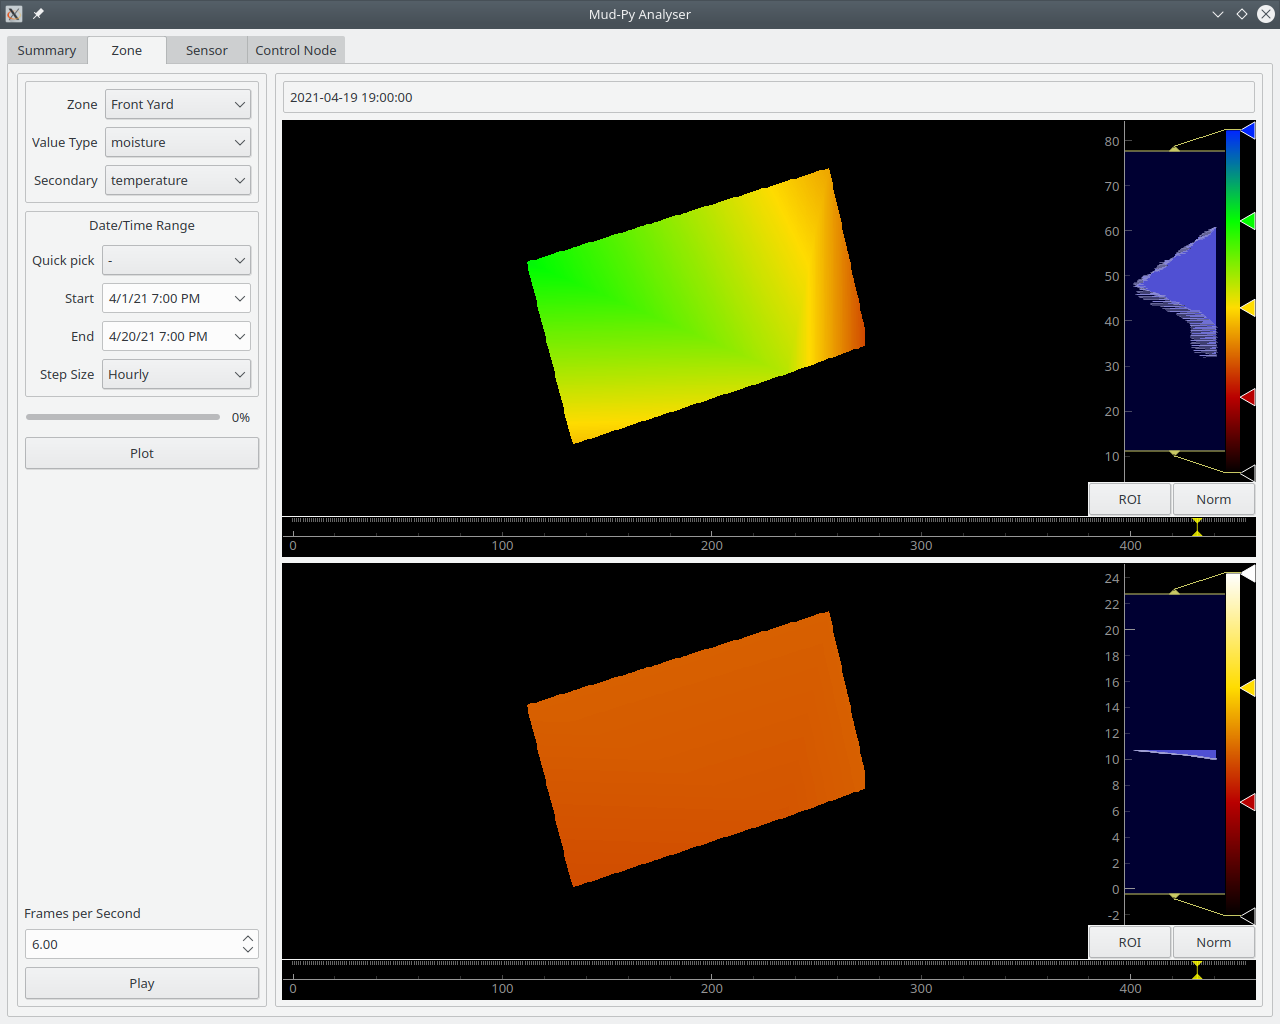
    There you have it:  A complete "sensors' eye view" of a rain shower.

    Here is a complete video of the "rainy day."


  • Status Update and Some Preliminary Conclusions

    Joseph Eoff04/20/2021 at 19:46 0 comments

    I did a little work on the Mud-Py Analyser this evening, adding in a synchronized "secondary zone view" so that I can compare data from two sensor types at once.

    I especially wanted to be able to view soil moisture and temperature at the same time.

    The video below is a comparison of soil moisture and temperature for the last 20 days.


    There's some surprises in there, at least for me.

    I expected something simple like "hotter = dryer." 

    It ain't so.

    It turns out that there's significant changes in soil moisture during the night time.  There are times when it is cool at night, and the soil moisture just drops only to climb again. 

    This is the kind of thing I expected:


    That's a warm afternoon with temperatures above 25 degrees C (heading for 80 degree F.)   The soil moisture dropped drastically in the areas I would expect it to. The lower edge is the street, and the right edge is the driveway - the street and the driveway both have deep layers of crushed rock that don't hold moisture at all.

    What I didn't expect was this:


    Compared to this:
    That first image is in the 7 o'clock evening as things are cooling off.  It's still around 11 degrees C, and the soil moisture has gone up compared to what it was under the mid-day sun.
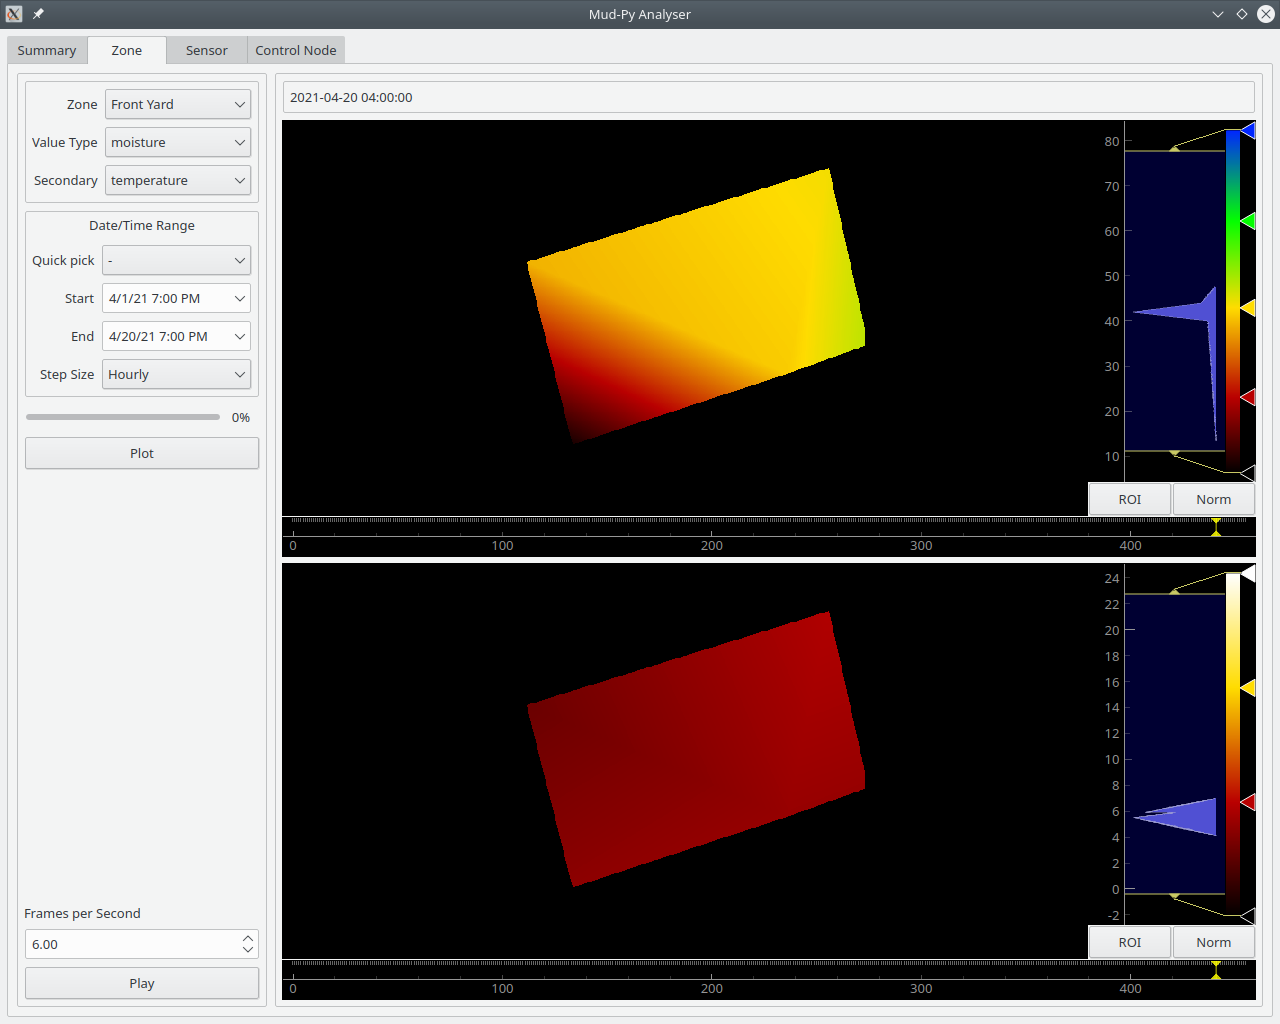
    The second image is at 4 o'clock in the morning, with temperatures around 5 degrees C.
    The soil moisture has dropped over the entire yard compared to the previous evening, and that lower left corner is practically dried out.

    If you scrub through the video, you'll find that the soil moisture has a quite active "night life."  Things change a very good bit at times when I'd expect them to settle down.

    I looked at some of the individual sensors while I was at it.
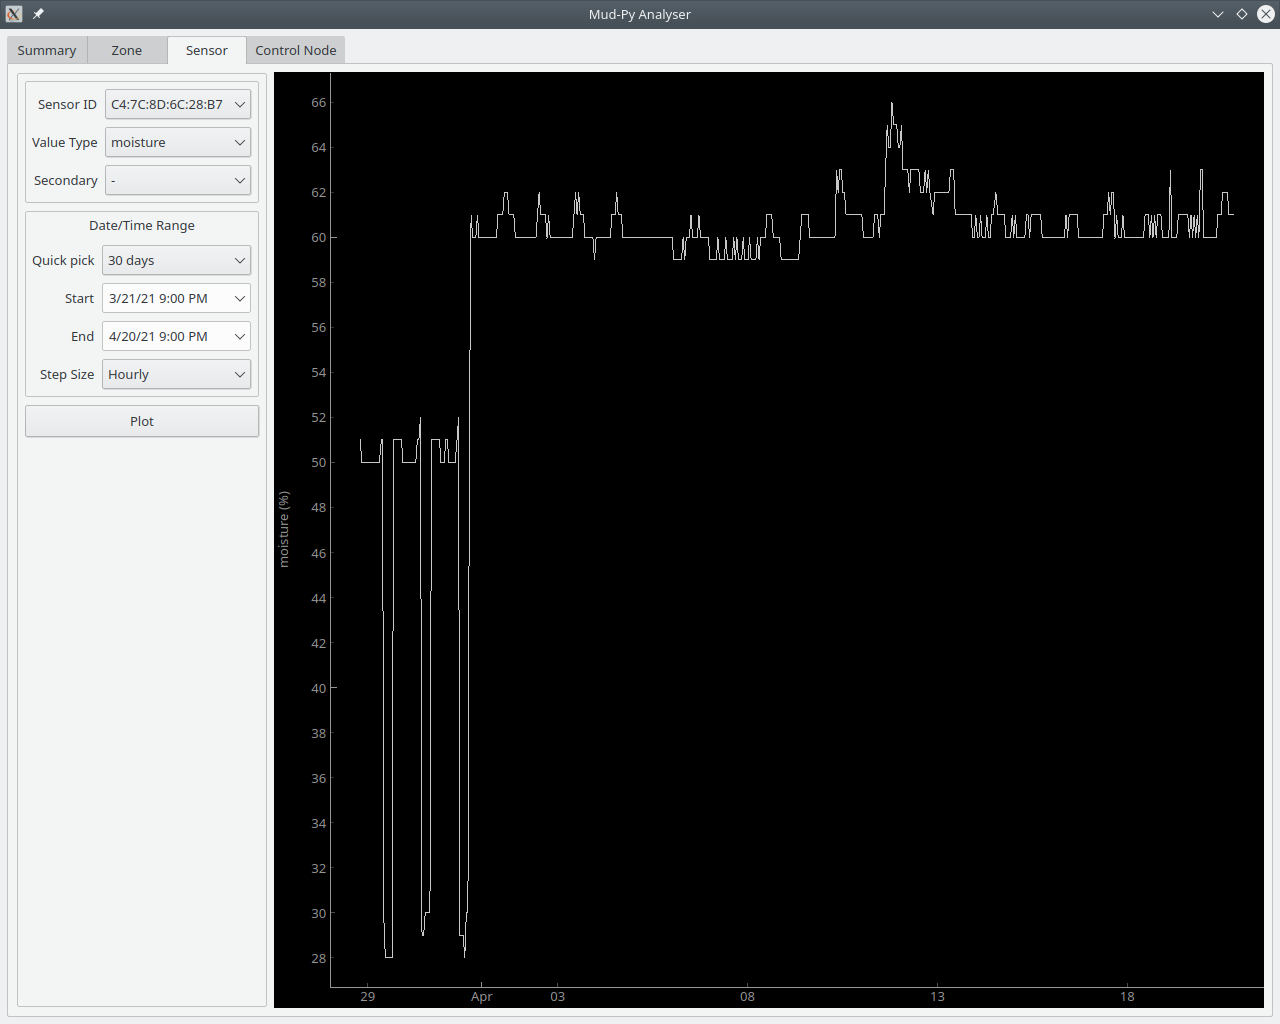
    Some do only change slowly, like I'd expect.
    Like this one:
    It wanders up and down a few percent, but is has stayed pretty much stable since we got rain around the beginning of April. You can also see where we got more rain around 12 and 13 April.
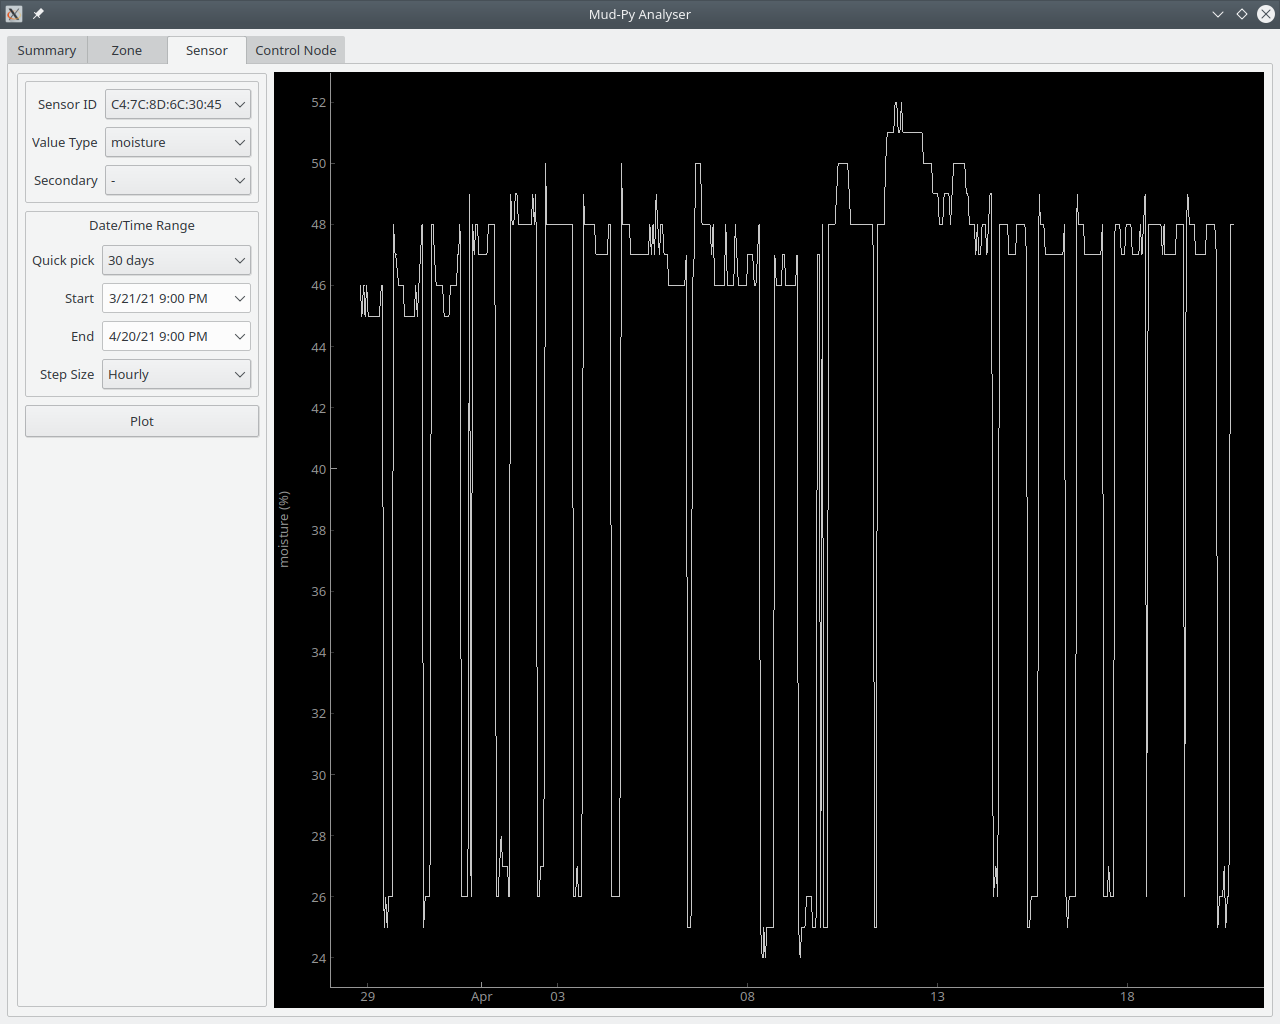
    Then there are ones that just yo-yo up and down all the time:

    I'm going to have to see if I can tell what the difference is in the soil around the sensors that have large variations and the ones that are more staid.  Maybe the bark over the dirt is deeper or something.
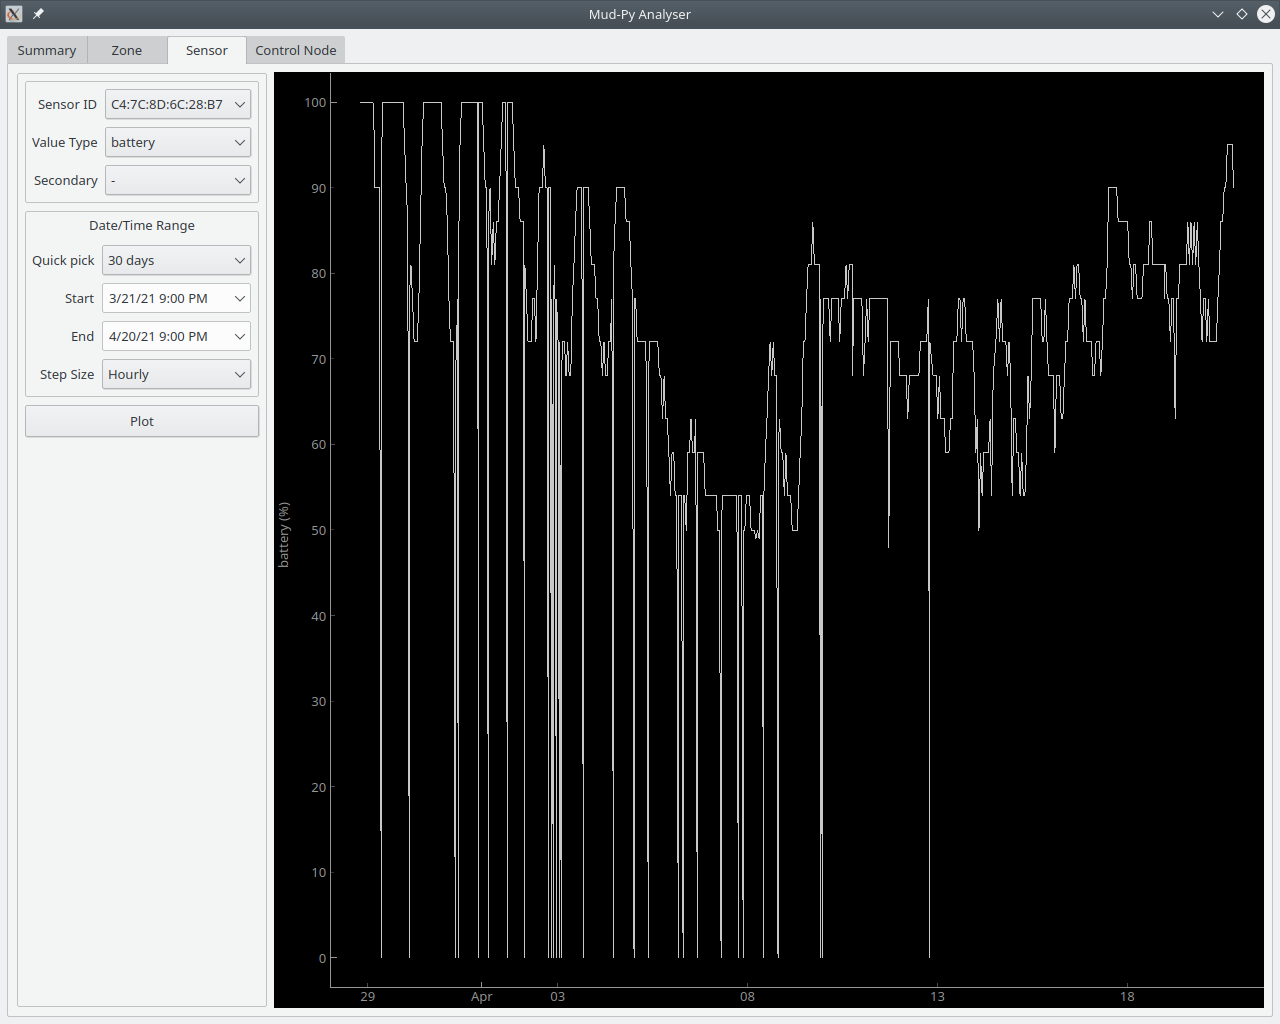
    The sensor batteries seem to be recovering some now that things are warming up.  Yesterday and today were fairly warm, and the battery capacities have risen again:


    Cold increases the internal resistance of the coin cells which makes the sensor think the battery is losing capacity.  As they warm up again, the internal resistance of the cells drops and the sensor duly reports a higher capacity.

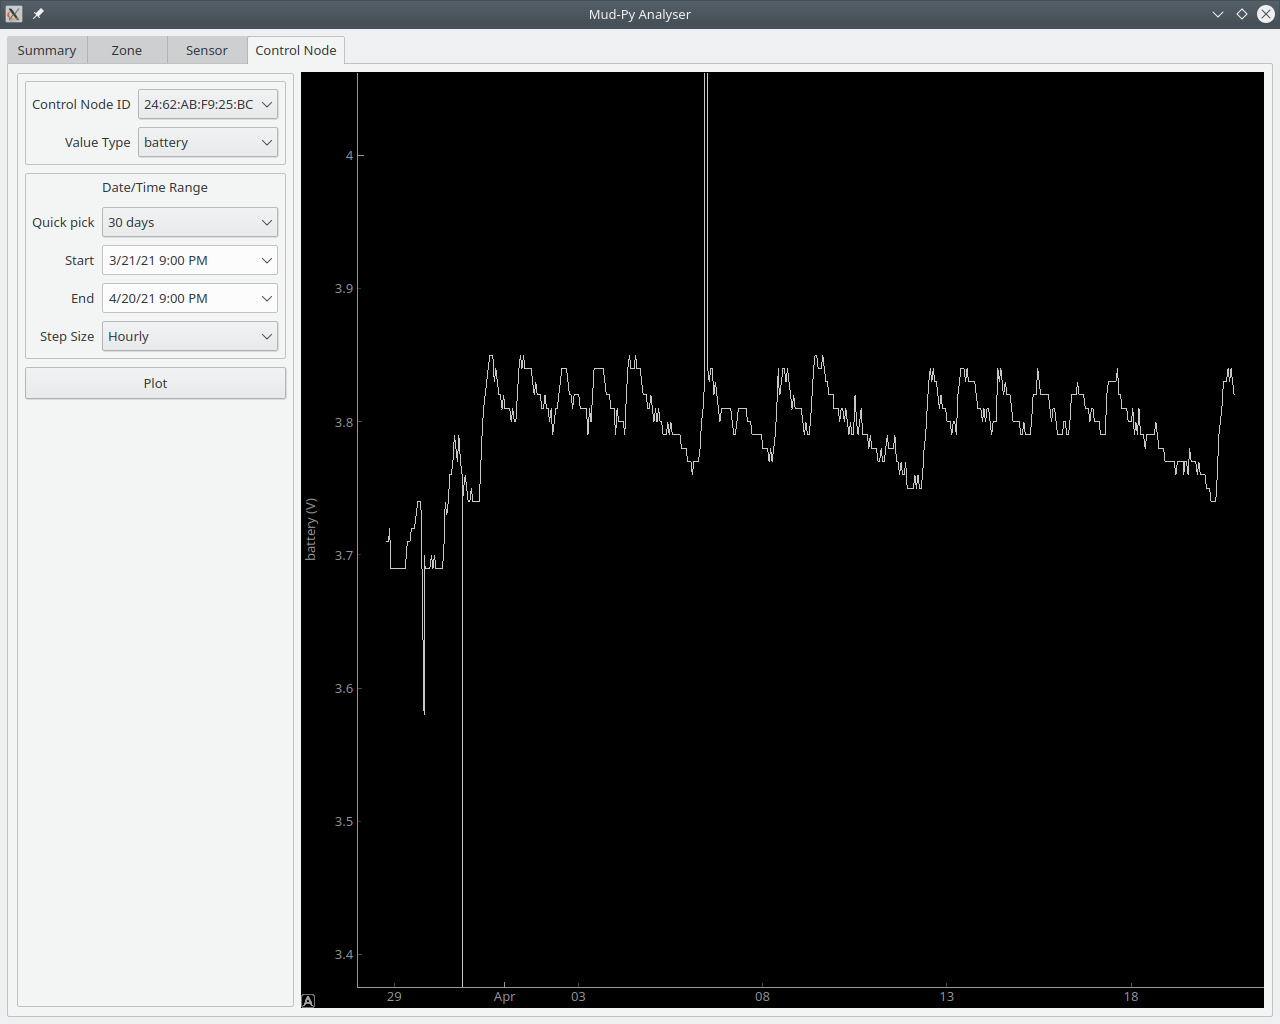
    The lithium cells in the power banks for the control nodes (the ESP32S modules) don't seem to be bothered by the cold:

    There's a slight daily variation of the voltage as the cells charge during the day and then discharge a bit at night.  You can also see the days when it was cloudy here.  Those are the longer stretches where the voltage drops for two or three days.  I think I can safely say that the power banks will be able to power the control nodes for at least a week of bad weather.
    I'll see about implementing dual views for the individual sensors, and see what that can tell me.

  • More Progress and a Change of Plans

    Joseph Eoff04/13/2021 at 20:12 0 comments

    I posted some pictures last time around showing some of the data from my yard.

    There were some bugs, though, and I also wasn't happy with the representation of the area of the yard.

    I looked into what was causing the bugs, and decided that I was doing something wrong with the SciPy interpolate.interp2d function.  I had originally intended to use the SciPy interpolate.griddata function, so I switched to that and got the results I expected - mostly.

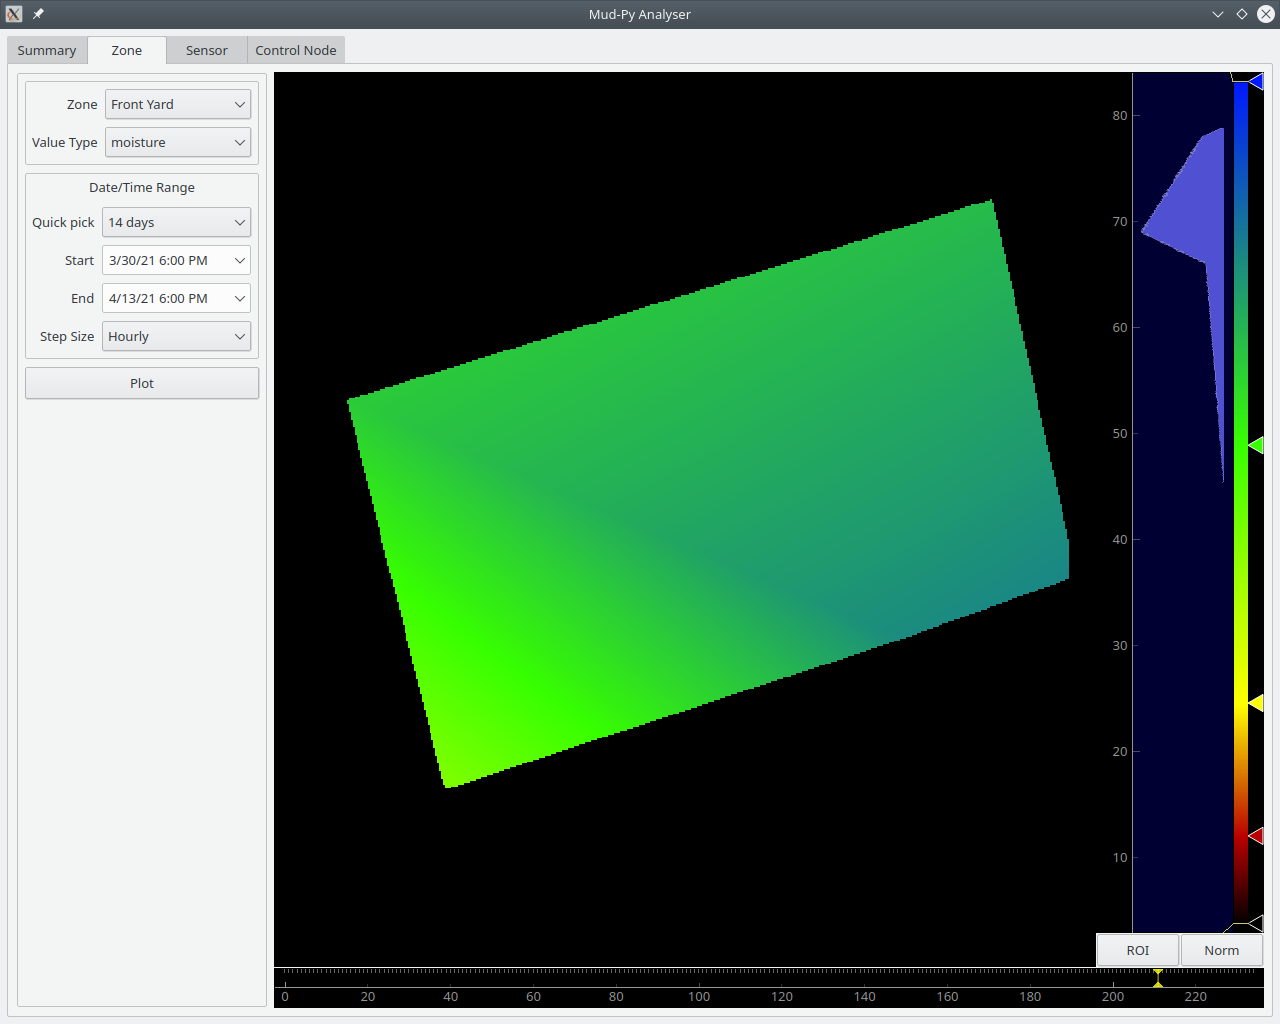
    This is a plot from a couple of days ago:


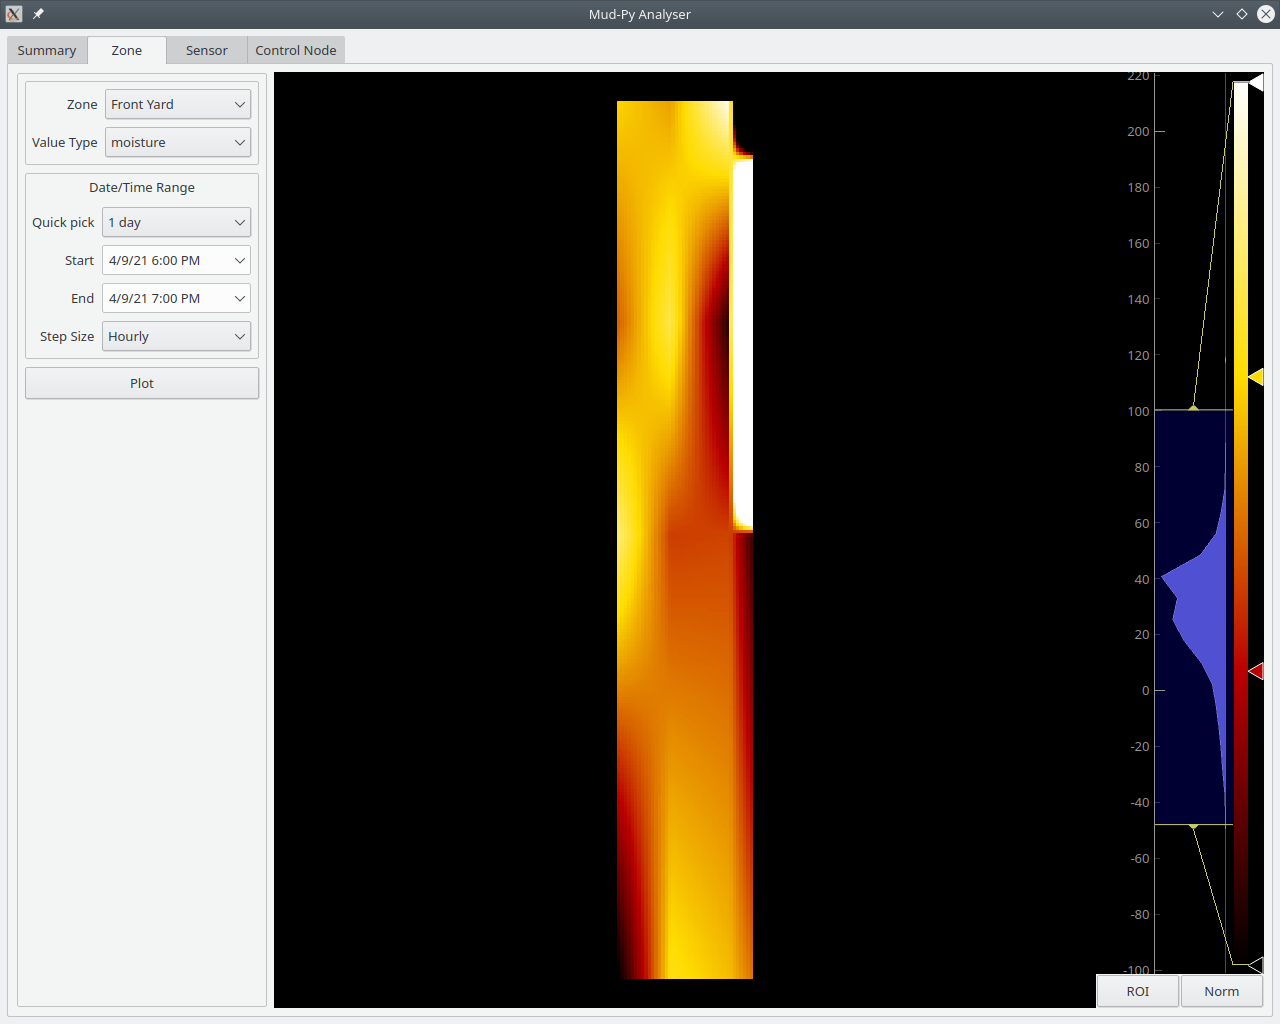
    The shape of the yard is now correct.  The bogus data is gone - it was never in the database, it was all in an incorrect interpolation.  The griddata interpolation gets it right.

    That picture shows a moment when it was raining here.  The blue(ish) areas have around 70 percent soil moisture. The green is around 50 percent.

    The animation part works, but I don't have it rigged to render to video yet.  I did a screen recording of an analysis run instead. 

    Here's a video of the soil moisture in my garden for last 14 days:

    That's fourteen days, at 24 plots per day, compressed down to just a few seconds.  Sixteen sensors contributed data through two control nodes.  That's over 5300 data points interpolated into a video.

    That bunch of rambling, flickering colors has been in my mind for over a year now.  It's nice to finally see it in real life, reflecting real data.


    From the video, you can see that things started out a little dry a couple of weeks ago.  We had some warm weather and sunny days for a while, and things dried out a bit.  It turned cooler after a few days, so the soil moisture stayed a little more stable.  Towards the end we got some rain, resulting in times where the soil was temporarily wetter than is really good for the plants - that's the blue areas.

    All of the parts are in place, now.  It's all "just" improvements from here on out.

    There's still lots of improvements to be made, though:

    1. Convert the interpolation to translate from WGS84 coordinates to meters by way of UTM before interpolating.  Degrees are only linear over the very short distances.  Anything larger than my yard would be very distorted.
    2. Implement a "compare" mode to show two sensor types simultaneously.  It'd be nice to correlate soil moisture with temperature  or light to see what's driving the variations.  Playback the main display, and have the secondary sensor track it  - synchronized animation of the two data sets.
    3. Implement a Date/Time display for the animation.
    4. Fix the "non-existent date" bug - there's one hour on the day of the daylight savings time switch over that doesn't exist. The animation generator hits that one hour and causes a date/time exception.
    5. Implement the overview page.  I need to see which sensors are showing low moisture and where they are.  I also need to see stats on the batteries so that I can replace them as needed.
    6. Implement "maximum, average, and minimum" functions for the animation to make it easier to see where there's not enough water.
    7. Save and recall the color settings for the various sensor types so that I don't have to adjust the histogram manually.
    8. Probably lots more that I can't think of right now.

    With a bare minimum of analysis functions working, I think it is time to submit this to the "Data Loggin'" contest.

  • Heatmap - Nearing the Goalline

    Joseph Eoff04/09/2021 at 20:58 0 comments

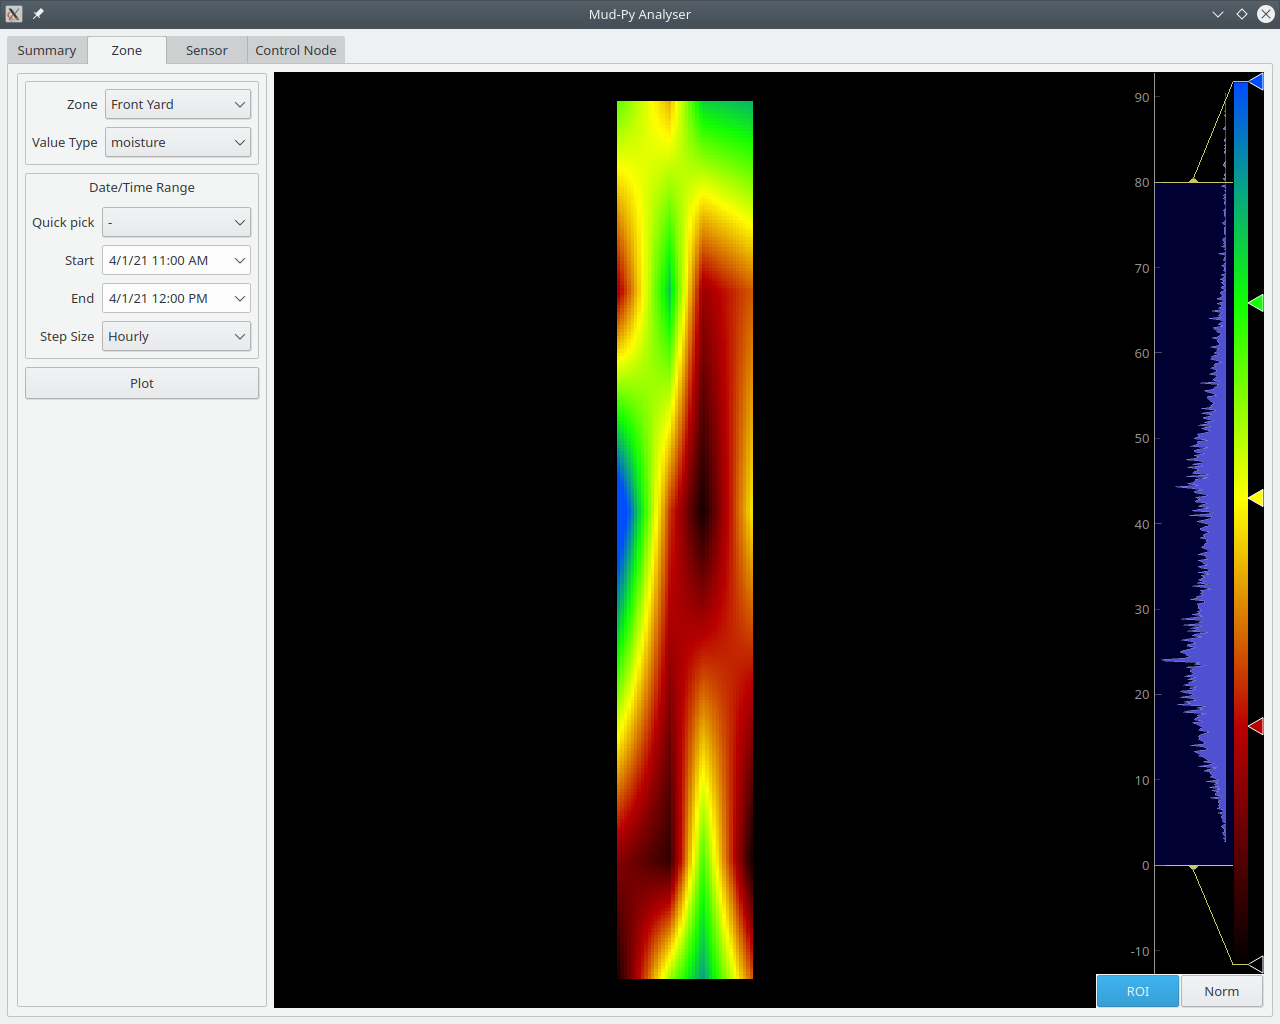
    The pieces are slowly coming together.  I got my first heatmap view of the data this evening.

    That's the distribution of soil moisture in my garden from 1 April, just before noon time.
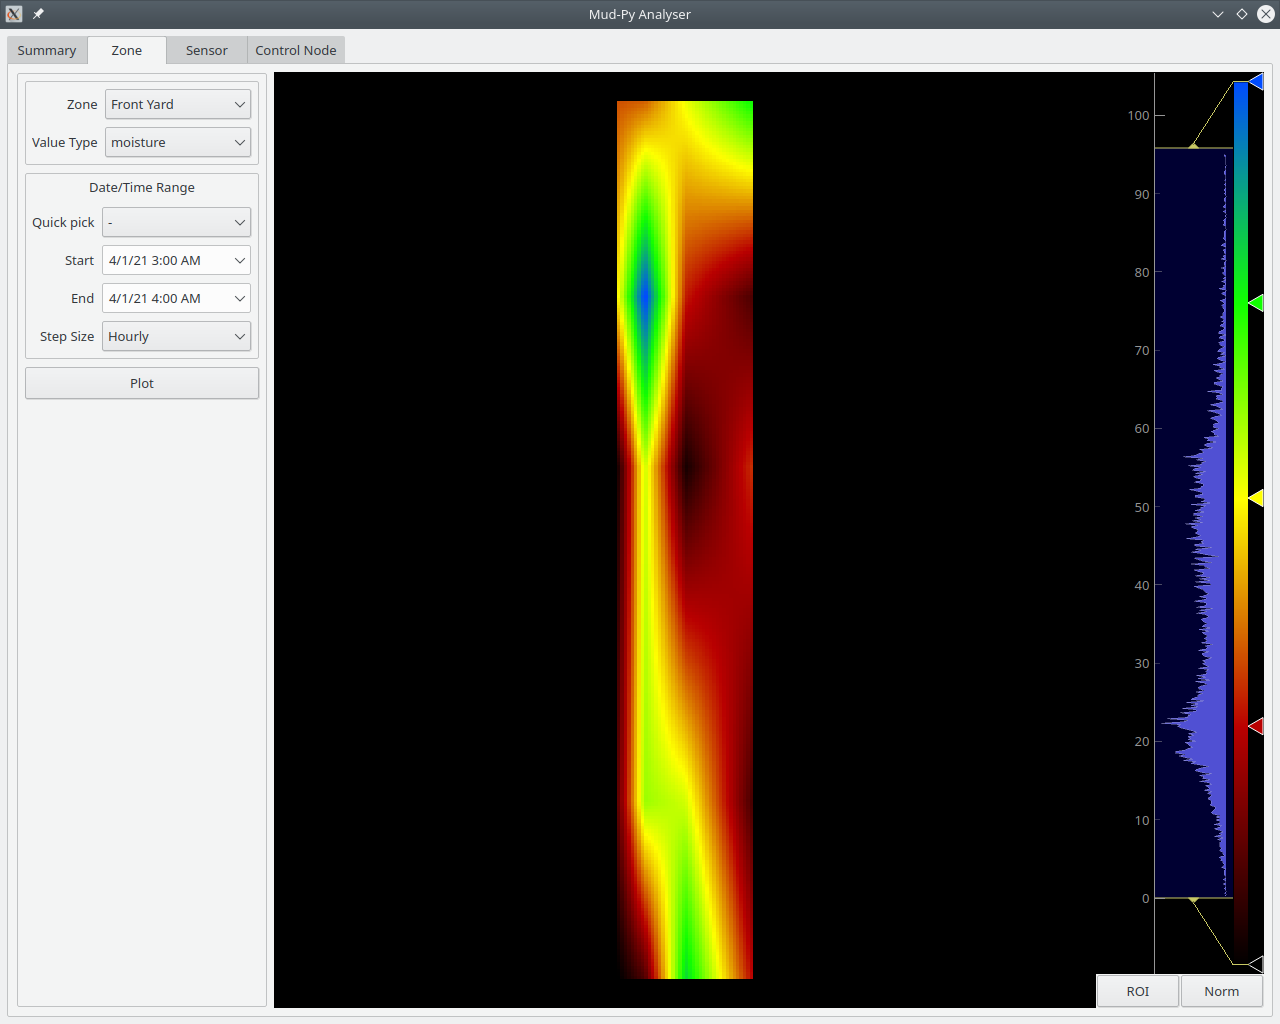
    This is the same day, but between 3 an 4 AM:

    As you can see, the moisture changes over the course of the day.
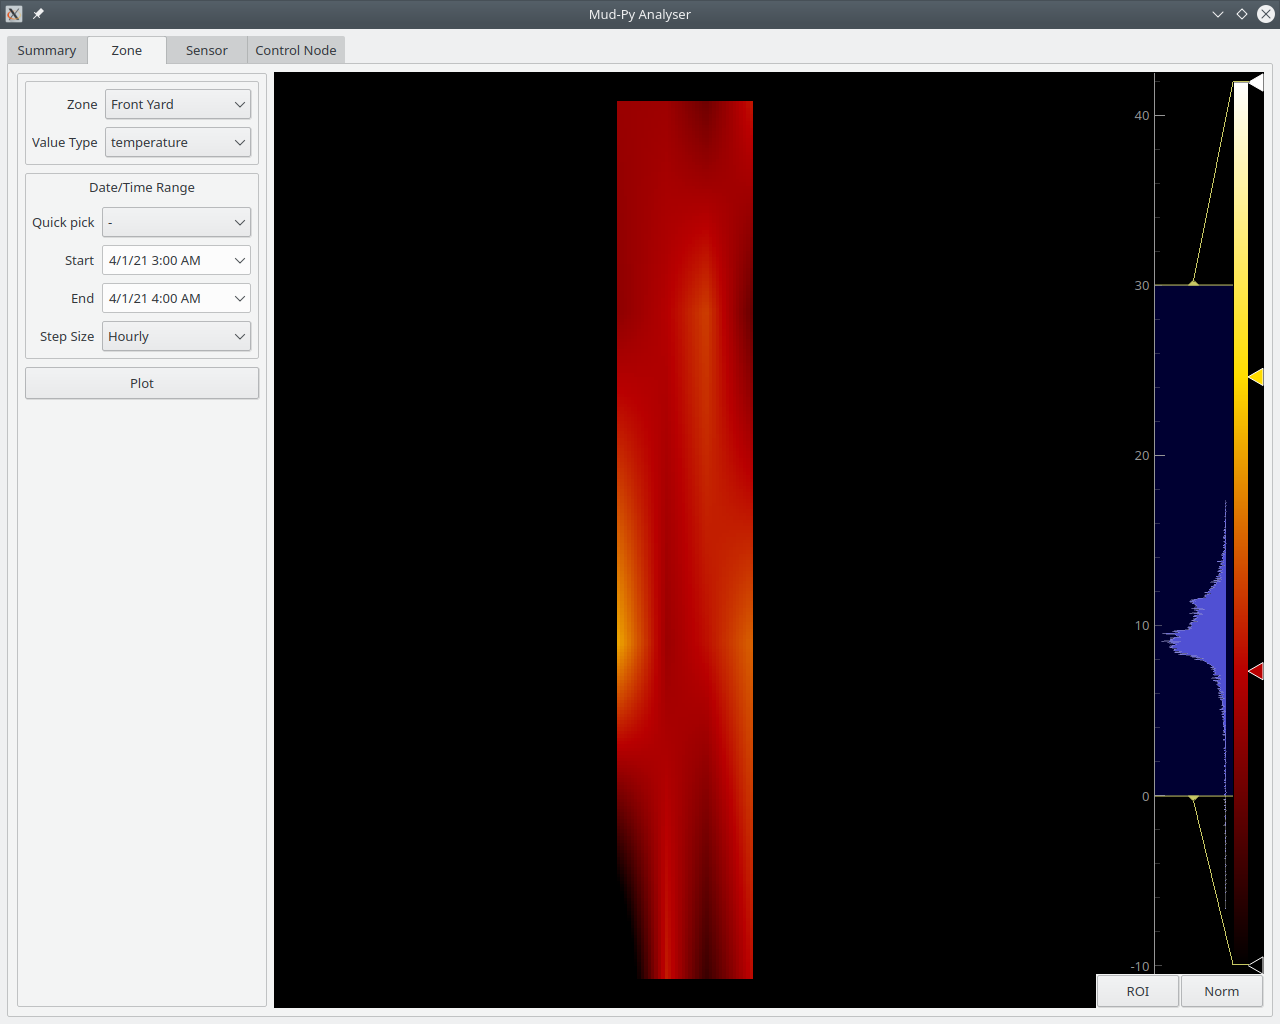
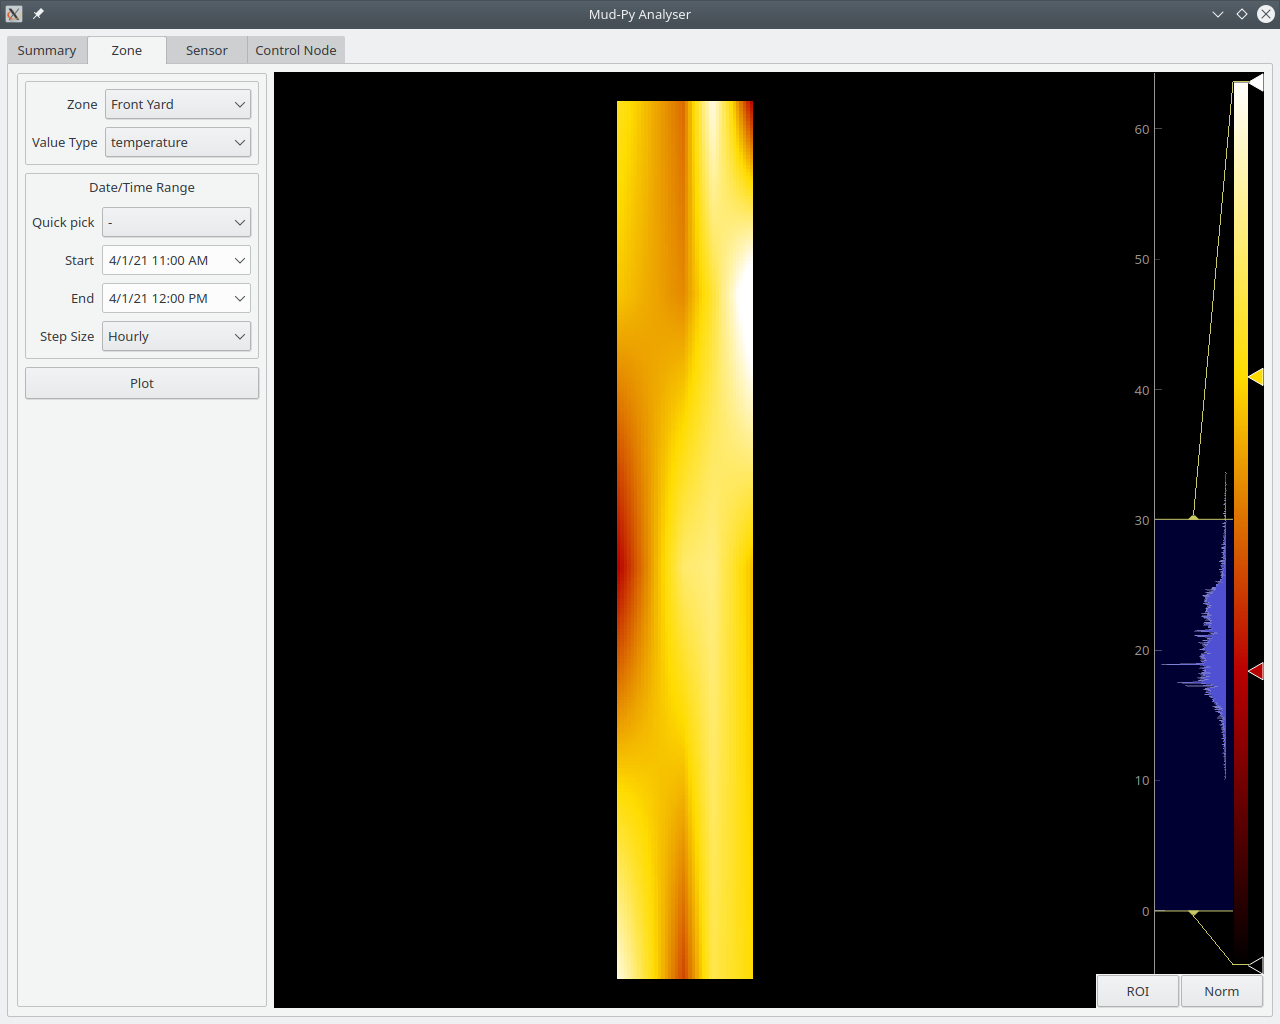
    I can also plot the other types of data:


    That's the temperature between 3 and 4 AM on 1 April.

    For comparison, the same day just before noon:


    There's still quite a bit to do, but it is getting there.

    I've got to group the data for the animation steps, and lots of other things.

    It turns out that the pyqtgraph ImageView control that I'm using can accept stacks of images for time sequences - that'll make the animated displays easier.

    I've got to find the source of some bugs first, though.

    Things like this:


    That's a soil moisture plot from this evening.  It runs from -40 percent to way over 100 percent - but only on the heat map.  The data behind it is all within the proper range (0 to 100 percent.)  There's something tricky going on with the interpolation.  I think maybe missing values cause the interpolation to freak out.

    I'll look into that later this weekend.

  • First Glimpse at the Data

    Joseph Eoff04/07/2021 at 19:28 0 comments

    I spent a little time implementing the sensor data plotter this evening.  I can now plot the data for single sensors over any time period.

    A quick look at the data collected over the last week delivered some surprises.


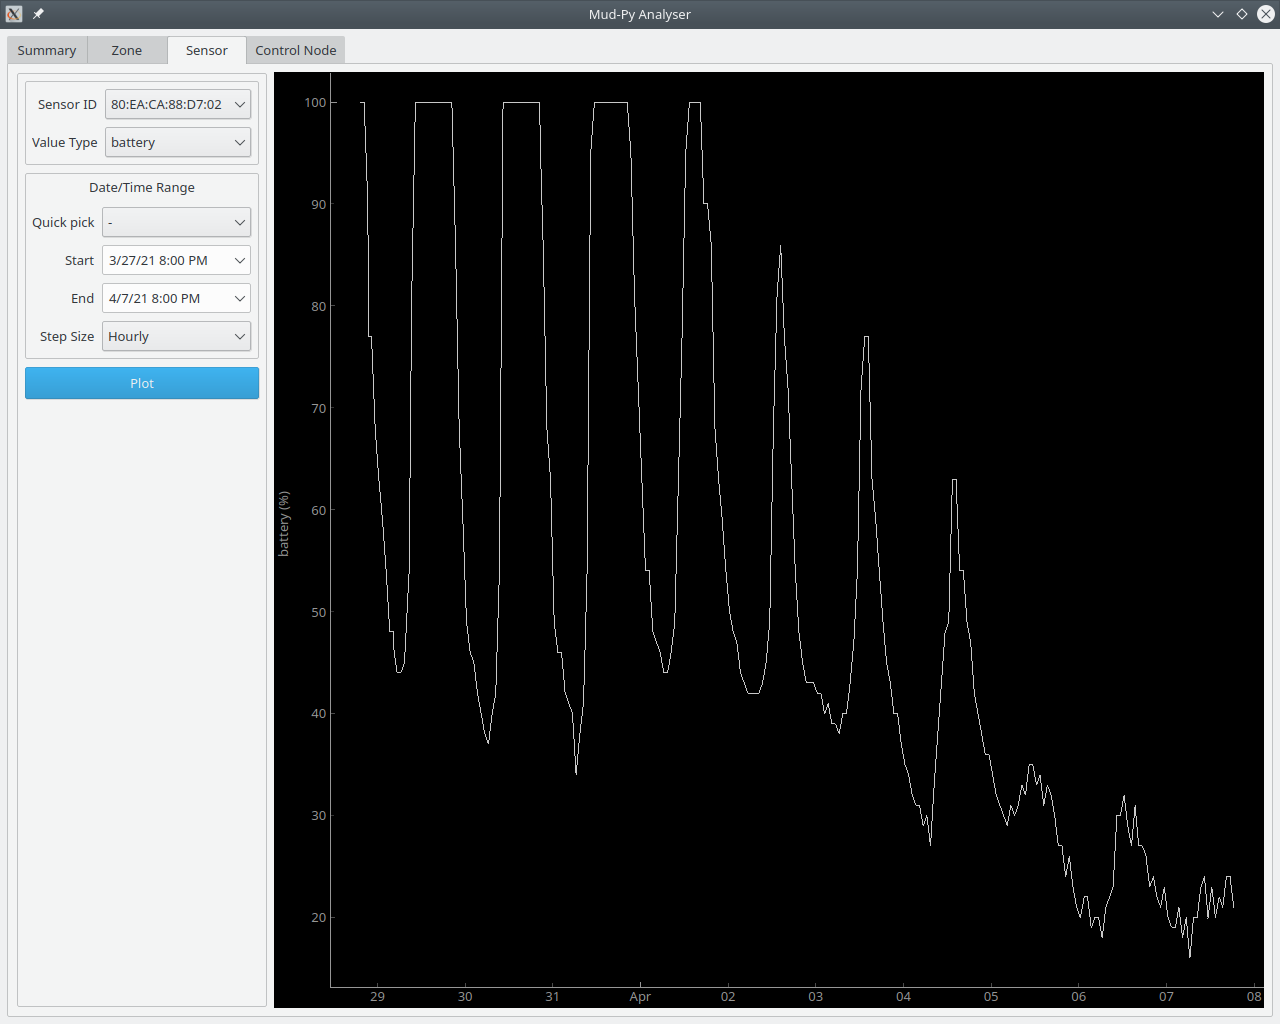
    First off, CR2032 coin cells do not like cold weather.  The sensors are powered by coin cells, and the sensors report the battery capacity along with the other values.

    We had some warm weather when I put the sensors out, with days around 20 to 25 degrees Celsius (mid 70s for Fahrenheit types.) The nights were much cooler, though.

    Here's the battery capacity plot of a typical sensor:

    This is the temperature plot for the same sensor:
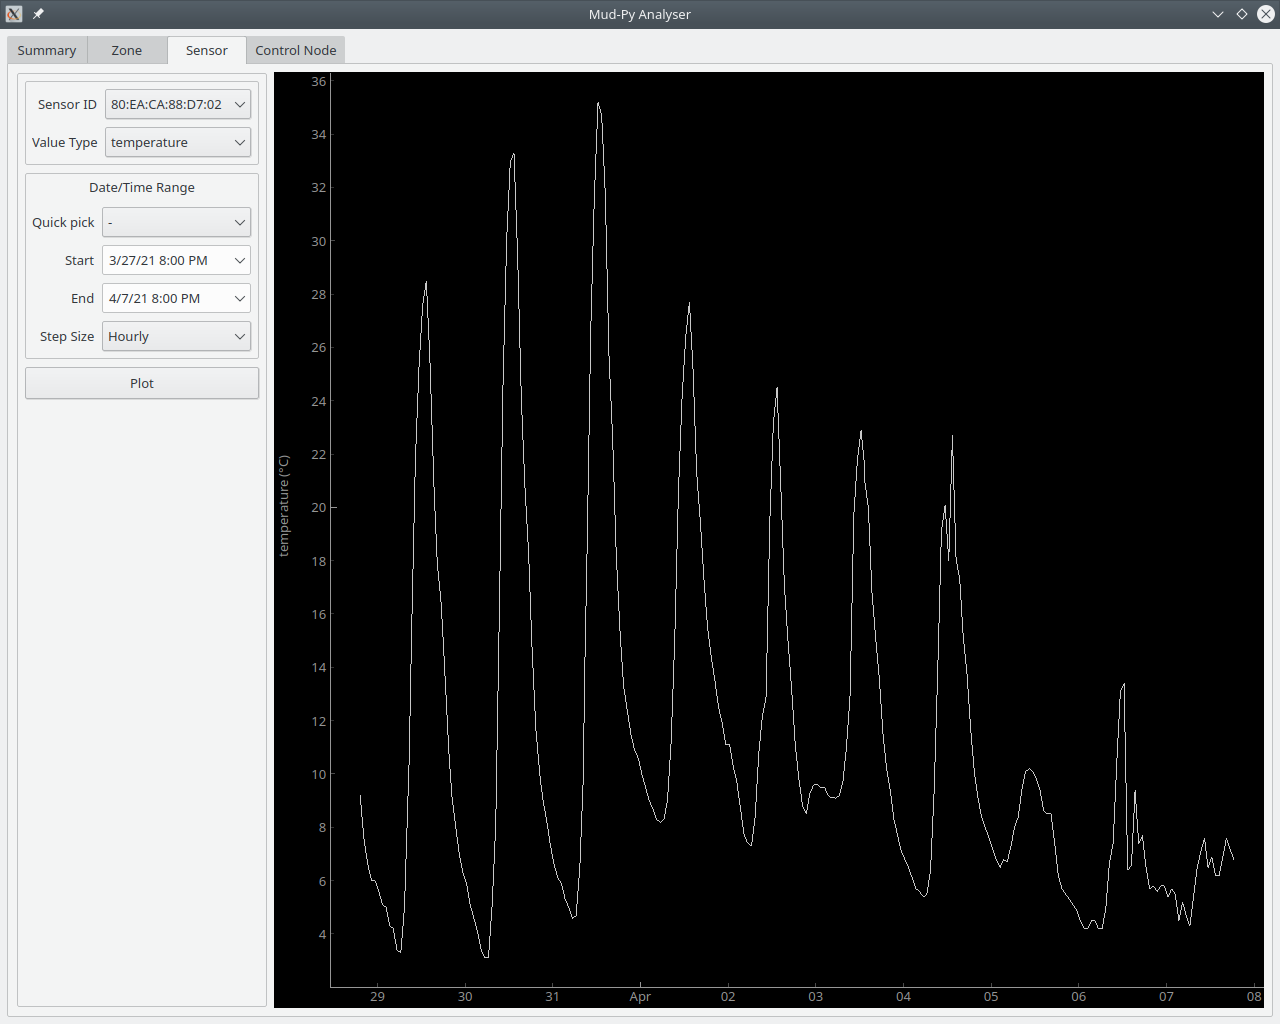
    The lowest capacity matches the lowest temperatures on each day.  The last three days have been cold, with temperatures staying below 10C (50F) all the time.  The battery capacity has stayed low, as well.  If it doesn't warm up, I may end up having to replace all the sensor batteries.
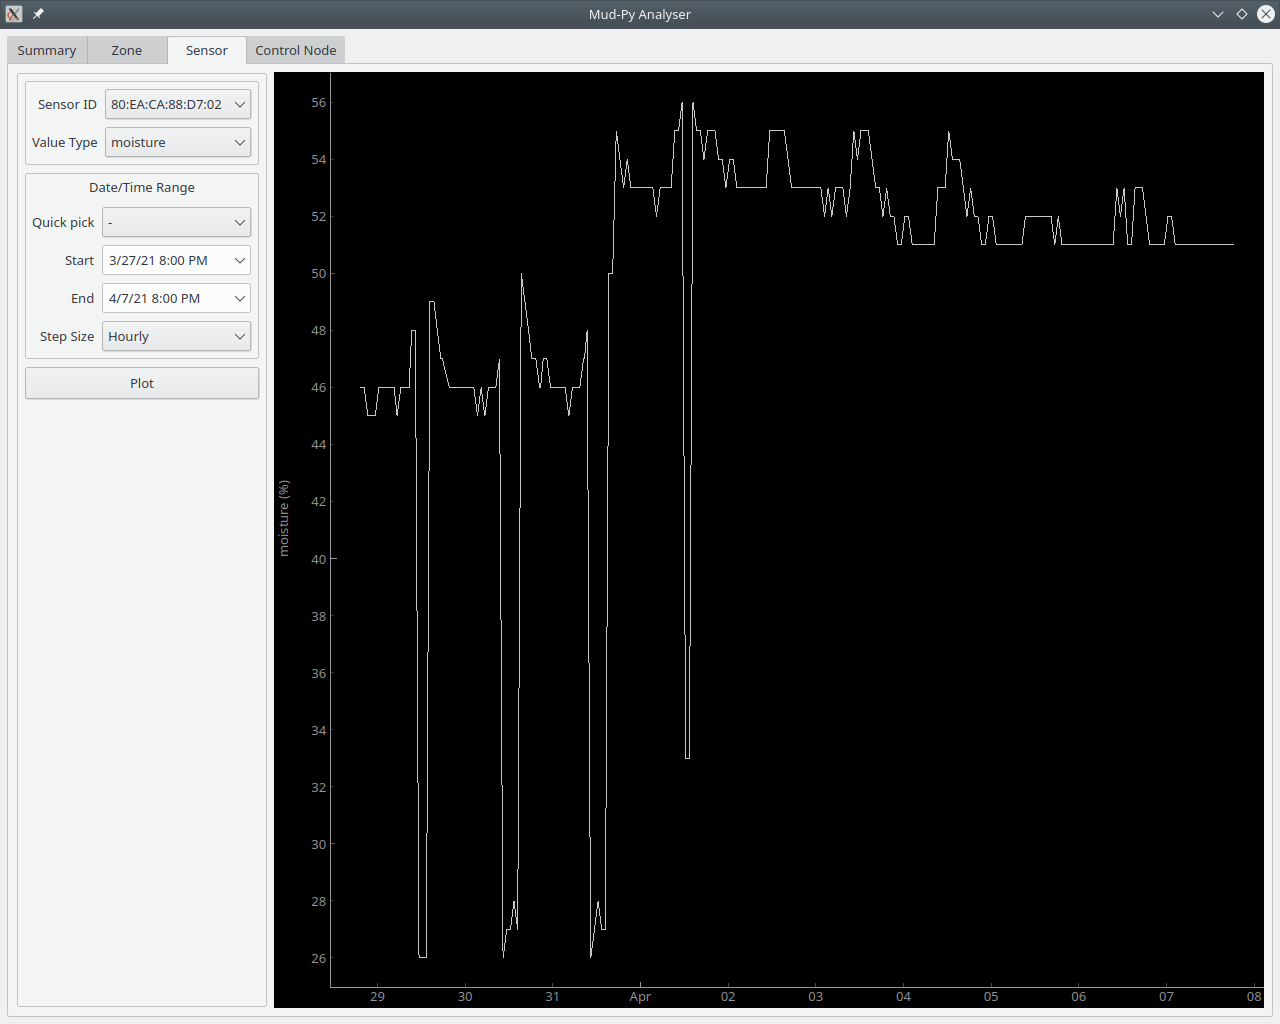
    This is all about the soil moisture, though, so lets have a look.

    This is a rather typical sensor:
    The moisture dropped each day around noon time when it was warm.  Since the temperatures have gone down, the moisture has stayed more stable during the day.
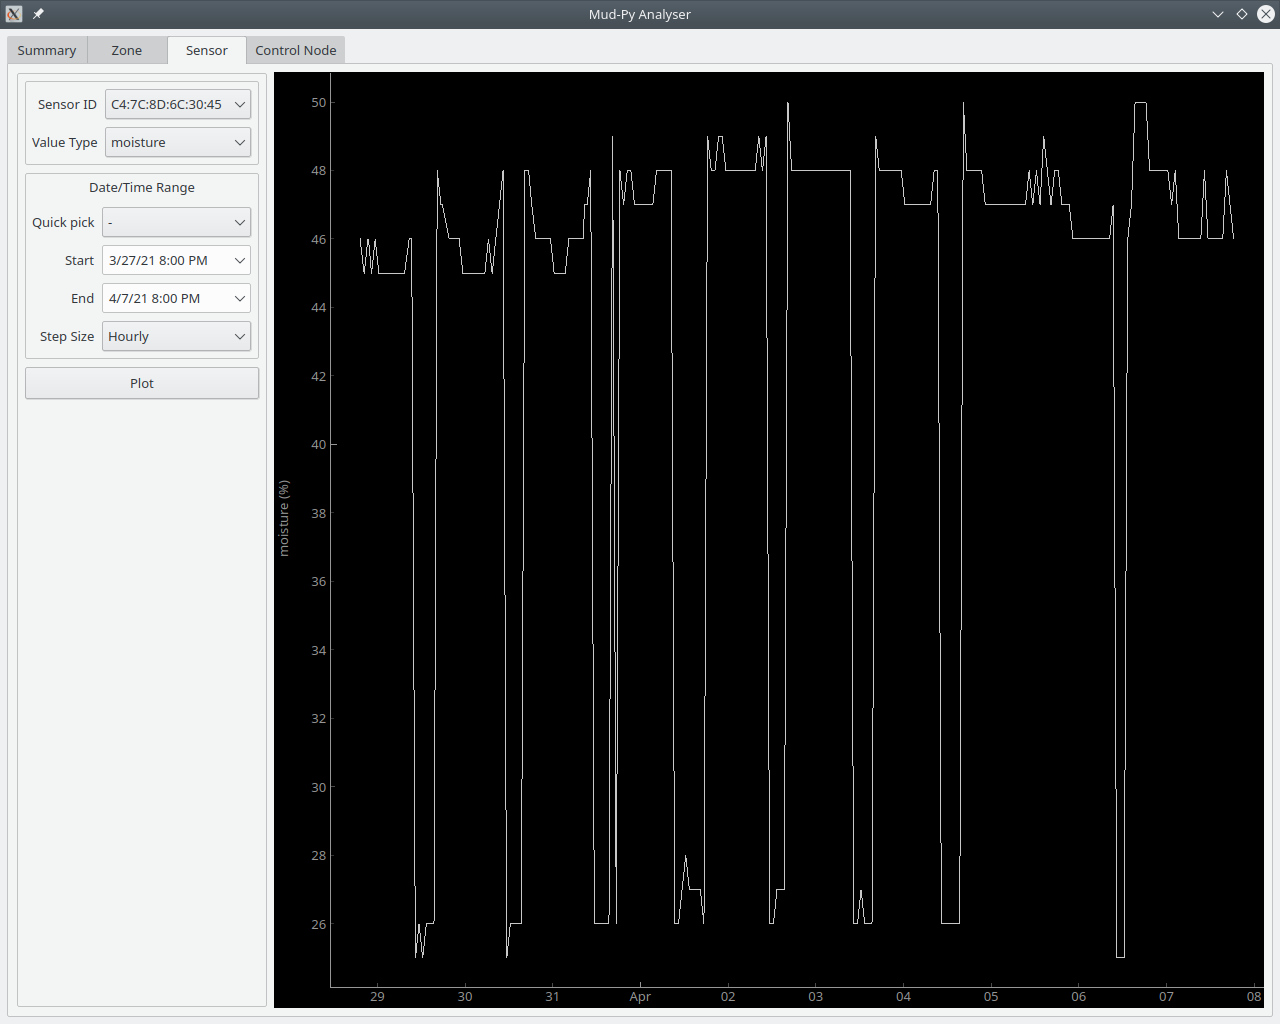
    This sensor shows rather more concerning data:

    It dropped more drastically during the day, and still had drastic variations after the weather cooled down.
    When I implement the "Daily" step size, I'll have to include a maximum, minimum, and average for each day.  The average alone isn't much use when you have such variations all the time.

    Besides the battery, temperature, and moisture, the sensors also measure soil conductivity and light.

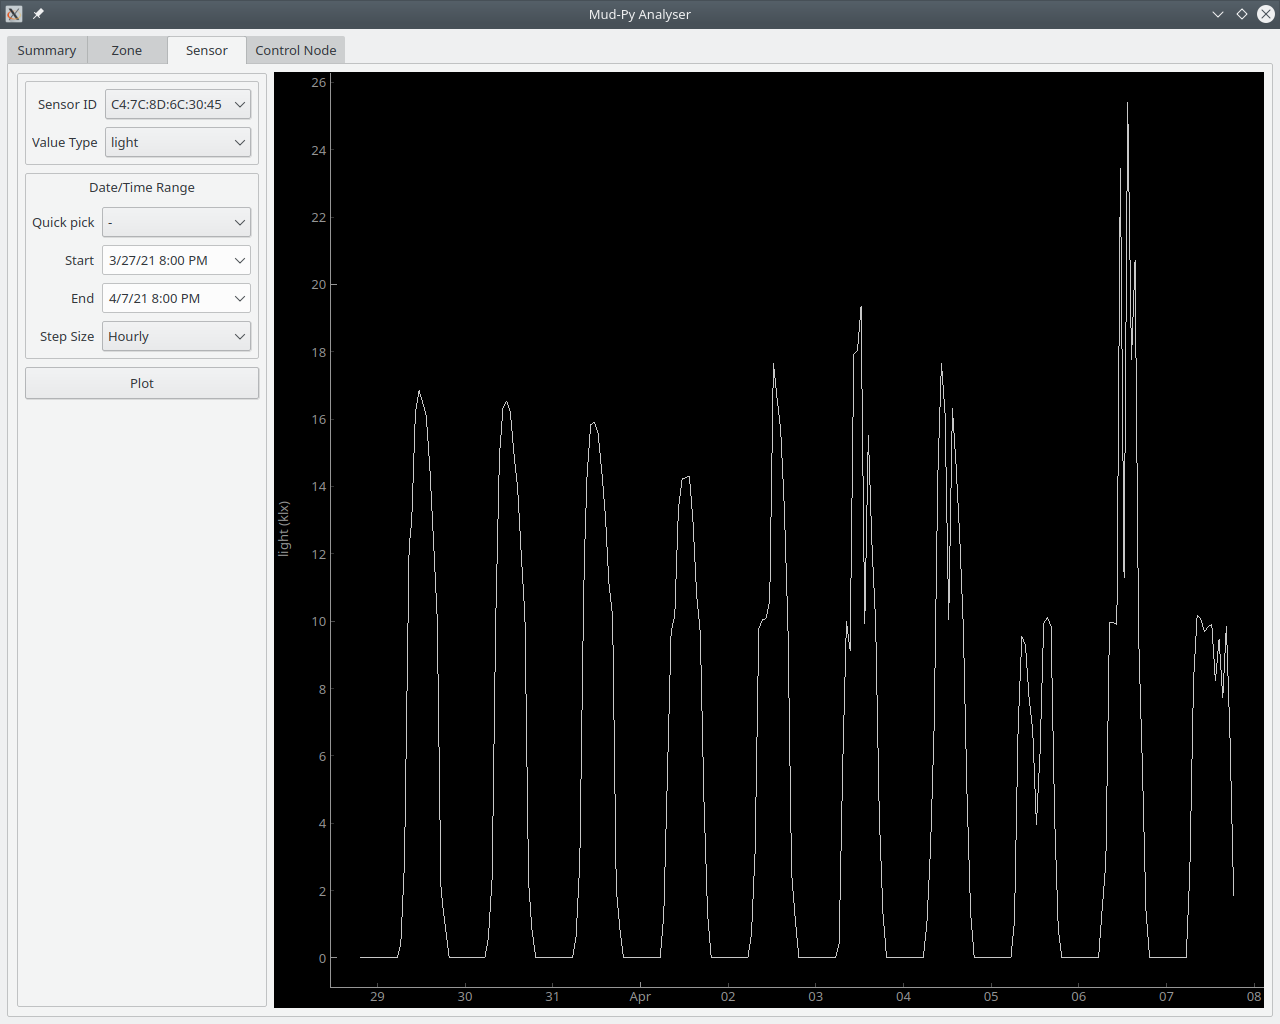
    Here's a typical plot of the light:

    Brightest during the daytime (duh) and zero at night.  The street light isn't bright enough to register at night.
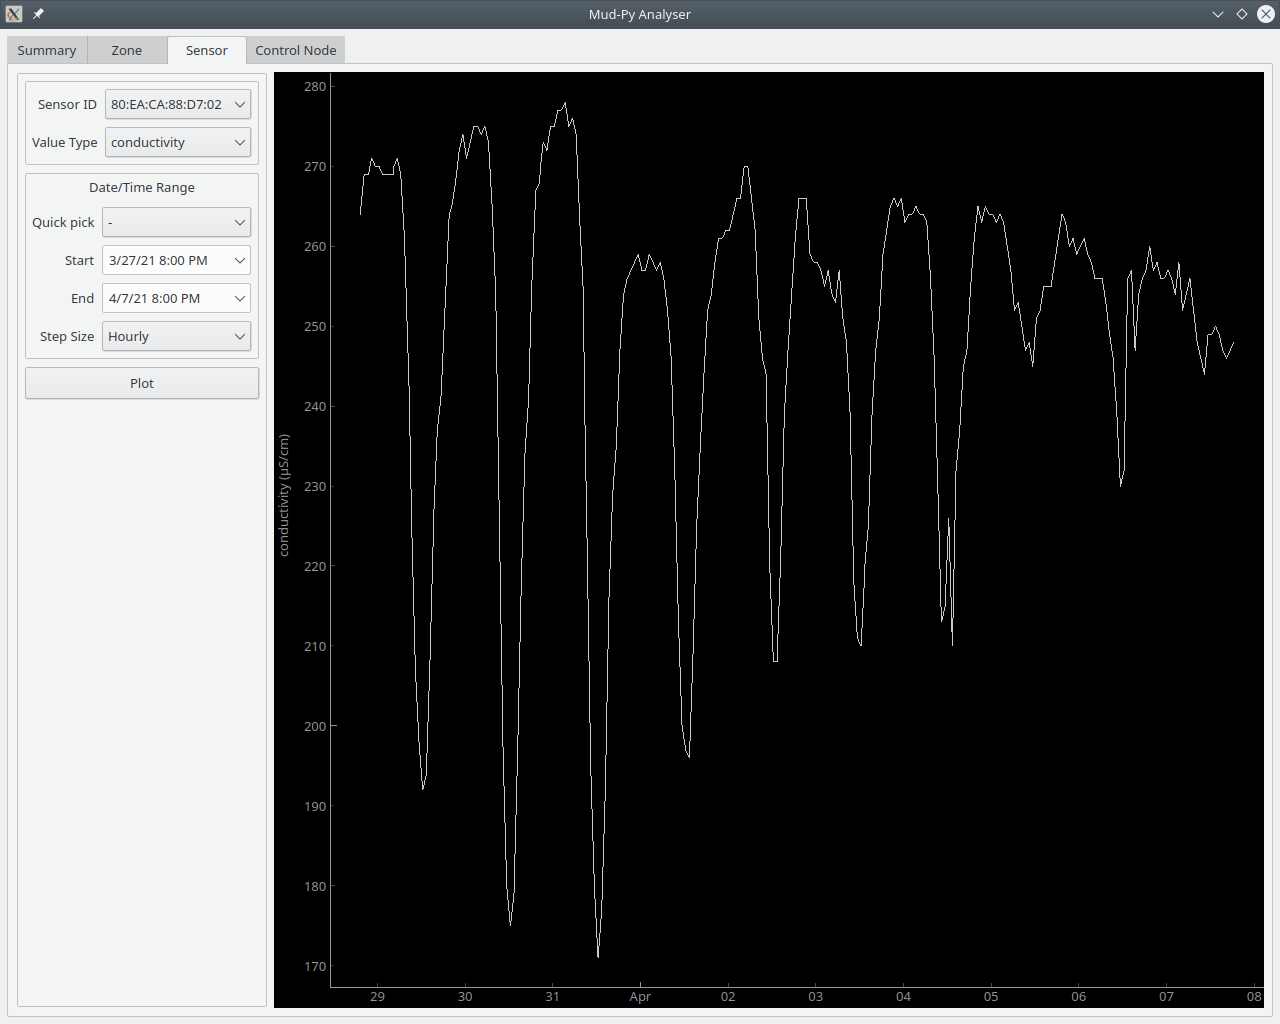
    Conductivity is a proxy for soil nutrients.  More conductivity corresponds to more nutrients in the soil.

    Conductivity also varies with the soil moisture. The nutrients have to be dissolved in water to conduct electricity.  When the soil dries out, the conductivity drops.  You can see how it varies over the course of the day just like the moisture varies.
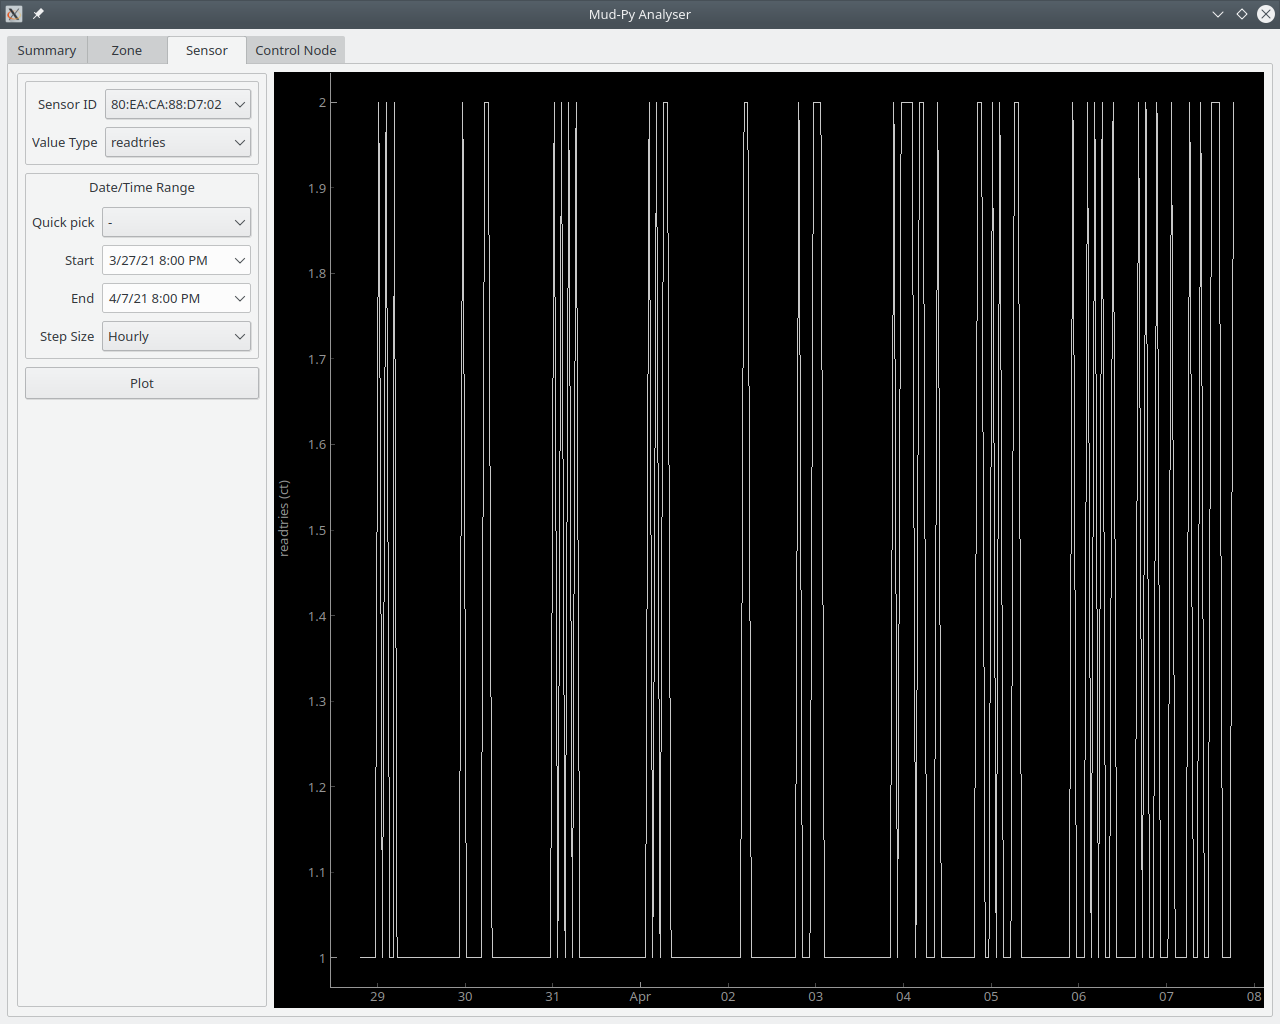
    I implemented a sort of "pseudo-sensor" when I wrote the software for the control nodes.  The control nodes report a "readtries" value for each sensor after reading the data. This value says how many attempts it took to read to sensor data from the sensor.  It should ideally be 1 - read correctly on the first try.

    I find that the temperature (and therefore battery capacity) has an effect on the readtries - it takes more attempts to read a sensor when it is cold.

    Here's the "readtries" plot of one sensor where the battery capacity has dropped to below 30 percent from the last couple of cold days:

    The closely spaced lines over to the right correspond with the battery capacity dropping below 30 percent, and they correspond to the temperature staying below 10C.


    Given how much the plots change over the course of the day and how different the measurements are for the individual sensors, I expect the heat map view will be rather lively.

    I'll get started on that soon - right after I finish the "Daily" step size for the sensor data plot.

View all 28 project logs

Enjoy this project?

Share

Discussions

dotslash wrote 05/01/2021 at 20:58 point

Do yourself the favor and check out capacitive soil moisture sensors. There is a clone of the official chirp from catnip electronics for a lot less on aliexpress. I didn't feel guilty since I already bought a whole bunch of sensors from them. I used a special coating for the sensor but it should be possible to use nail polish. The xiaomi things just seem to use a galvanic measurement so you can't use fertilizer and those electrodes will rot away. I tried it back then with dirt cheap sensors and two steel nails as electrodes.

The good thing about their sensor is that you can go into deep sleep with it.

  Are you sure? yes | no

Joseph Eoff wrote 05/01/2021 at 21:13 point

The Xiaomi sensors I used have capacitive sensing for the soil moisture.  They also have galvanic sensors to measure conductivity as an (indirect) measure of nutrients.  You can see the (stainless steel) conductivity knobs in my photos. The photos don't show the traces for the capacitive sensing, but they are there.

I used the Xiaomi sensors for two reasons:

1. They are weather and waterproof.

2. They use capacitive sensing.

Since they use Bluetooth, I didn't have to run wires through the yard under the bark.

Along with the soil moisture monitoring and the nutrient monitoring, the sensors also report light, tempetature, and battery level.

The Xiaomi sensors are expensive, but they work well.

  Are you sure? yes | no

John Opsahl wrote 05/01/2021 at 04:03 point

Congrats on Data Loggin' contest "Data Wizard" prize.

I enjoyed depth of detail and enthusiasm in your project logs. A great example of how many interesting insights you can learn from a single distributed senor type. Fun to watch the data visualizations and try to guess what is causing the changes. 

Do you have heat map on an instance where it just started to rain? 

Maybe the earth worms are causing the large night time fluctuations. :)

Hope you and your wife are enjoying your smart flower garden.

  Are you sure? yes | no

Joseph Eoff wrote 05/01/2021 at 19:21 point

Hello, John.

Thank you for your response, and for hosting the contest.

I had fun putting the system together and getting it to work right.  You've seen my blog posts, so you know I've been planning this for nearly a year.  Your contest gave me a push to tackle the project and do it **now** rather than "whenever I get around to it."

The Hackaday project logs are at about the level of detail and verbosity I usually try to hit on my blog.  Enough detail to make it interesting, and try not to bore people to tears.

I posted another log entry about the rain.  It turns out there's a good bit more detail to see when it rains than just "it gets wet."

I occasionally questioned how wise it was to use Bluetooth enabled sensors, given their short range and susceptibility to interference.  It turns out to have been a (double) blessing in disguise.

I doubt my wife would have agreed to running wires through the garden to collect data from sixteen sensors. That's the first "blessing in disguise" - a high "wife acceptance factor."

The second "blessing" is that it turns out I can actually make use of the weak Bluetooth signal to gather information that the sensors can't explicitly detect - they have no "it's raining now" detector, but counting how many attempts it takes to read each sensor gives a reasonable "rain proxy."

I still have loads to do in extending the software and understanding my yard.

There'll be more project logs and blog posts as I go along.

  Are you sure? yes | no

PB wrote 03/31/2021 at 12:42 point

That is a nice setup.

Is it possible that the sensors leach toxic substances into the soil?

Have you taken into consideration the sensor materials and  corrosion/electrolysis by-products?

  Are you sure? yes | no

Joseph Eoff wrote 03/31/2021 at 13:14 point

I'm not using homemade sensors. 

I'm using proper sensors that measure moisture via capacitance so the moisture sensors won't corrode the way most homemade one will. 

The only thing exposed to the soil is a couple of stainless steel buttons (for conductivity) and the fiberglass of the sensors prongs.

I have six sensors that I'm re-using from last season as well as 15 brand new ones of the same type.  The ones that spent all of last spring, summer and fall in the dirt show zero corrosion and work as well as the new ones.

  Are you sure? yes | no

newblicious wrote 03/04/2021 at 00:04 point

Nice. looks like a highly useful project

  Are you sure? yes | no

Joseph Eoff wrote 03/04/2021 at 00:07 point

I'm working on it.  There's still loads to do.

It's more out of curiousity than need.

I want to know what's going on.

  Are you sure? yes | no

Similar Projects

Does this project spark your interest?

Become a member to follow this project and never miss any updates