-
1PCB Wiring
The easy way out and to save hassles of soldering, you could probably use the Wemos's OLED Display addon. But the addon screen is just 0.66". There are larger displays availble, but you need to get your hands dirty and make the connections. The Wemos D1 Mini - OLED Display wiring is shown below. In the diagram below, the display's SCL pin is connected to Wemos's D1 pin, display's SDA pin is connected to Wemos's D2 pin, display's ground to Wemos's ground and display's Vcc to Wemos's 3.3V pin. Just in case you wish to make a single PCB of the Wemos and the display, you can design the PCB in Fritzing and get the PCBs printed from https://jlcpcb.com.
![]()
-
2Getting the I2C Address
After putting all the parts together, the Wemos or the NodeMCU is ready to be programmed. Most of the SSD1306 I2C OLED displays have the default address set to ```0x3c```. Just to double check, I would suggest you to run an I2C address scan. My library suggestion is the "i2cdetect" by Mike Causer.
![]()
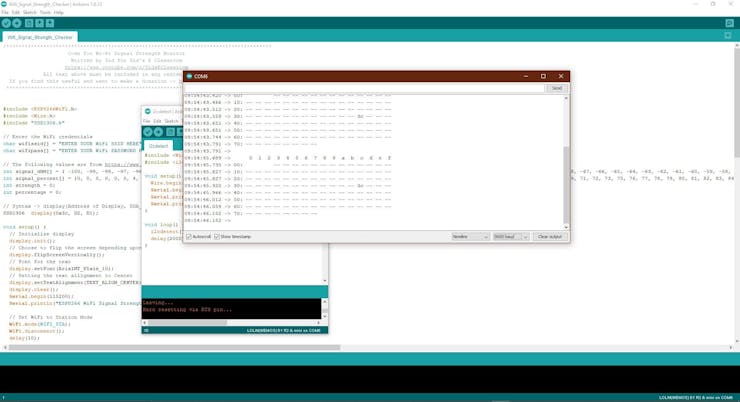
Use the i2cdetect example to check for the OLED's address.
![]()
After uploading the sketch, open the serial monitor and set the baud rate to the value given in the code to see the detected address as shown below.
![]()
-
3SSD1306 Library
There are a number of different libraries for the SSD1306 based chipset. The one that I have used is the "ESP8266 and ESP32 OLED driver for SSD1306 displays". This library works great.
![]()
-
4Arduino or Wemos Code
In the arduino code set your WiFi credentials
char wifissid[] = "ENTER YOUR WiFi SSID HERE";
char wifipass[] = "ENTER YOUR WiFi PASSWORD HERE";
Normally, the signal strength is displayed in dBm. But for a non techie person, the signal strength in terms of % would appeal more. Catering to people from both the spectrum, the program is set to display the signal values in both dBm and %. The dBm scale is non-linear or other words logarithmic. I have used values from this article in this program to map the signal strength in dBm to %.
int signal_dBM[] = { -100, -99, -98, -97, -96, -95, -94, -93, -92, -91, -90, -89, -88, -87, -86, -85, -84, -83, -82, -81, -80, -79, -78, -77, -76, -75, -74, -73, -72, -71, -70, -69, -68, -67, -66, -65, -64, -63, -62, -61, -60, -59, -58, -57, -56, -55, -54, -53, -52, -51, -50, -49, -48, -47, -46, -45, -44, -43, -42, -41, -40, -39, -38, -37, -36, -35, -34, -33, -32, -31, -30, -29, -28, -27, -26, -25, -24, -23, -22, -21, -20, -19, -18, -17, -16, -15, -14, -13, -12, -11, -10, -9, -8, -7, -6, -5, -4, -3, -2, -1};

int signal_percent[] = {0, 0, 0, 0, 0, 0, 4, 6, 8, 11, 13, 15, 17, 19, 21, 23, 26, 28, 30, 32, 34, 35, 37, 39, 41, 43, 45, 46, 48, 50, 52, 53, 55, 56, 58, 59, 61, 62, 64, 65, 67, 68, 69, 71, 72, 73, 75, 76, 77, 78, 79, 80, 81, 82, 83, 84, 85, 86, 87, 88, 89, 90, 90, 91, 92, 93, 93, 94, 95, 95, 96, 96, 97, 97, 98, 98, 99, 99, 99, 100, 100, 100, 100, 100, 100, 100, 100, 100, 100, 100, 100, 100, 100, 100, 100, 100, 100, 100, 100, 100};
I made some quick calculations and indeed this is the closest representation that you can get.
Set your display's address and the pins used if it is different from the one given in the code.
SSD1306 display(0x3c, D2, D1);
It follows the format
SSD1306 display(Address of Display, SDA_PIN, SCL_PIN)
Based on the orientation of the display, you can either comment out or retain the command to flip the display.
display.flipScreenVertically()
Feel free to play around the code and try new things. After all its a learning process.
-
5Demo
Checkout the following video to see the device in action.
WiFi Signal Strength Scanner Monitor or Checker
Scan or monitor home or office WiFi signal strength using an ESP8266 (NodeMCU)


Discussions
Become a Hackaday.io Member
Create an account to leave a comment. Already have an account? Log In.