Close
0%
0%

5 Phase Step Motor Driver Board

A simple driver board for a small Oriental Motor 5 Phase Step Motor

Similar projects worth following
Wandering around in the web site at a surplus shop, I found some little NEMA 11 step motors. The motors support 500 steps per revolution in full step mode or 1000 steps/revolution in half step mode. Reading more, it turned out that they are the Oriental Motor Vexta or 5 phase variety.
www.mpja.com/Stepper-Motor-NEMA-11-72Deg-75A-USED/productinfo/31131+MS/
Most step motors use either 2 phase (Bipolar) or 4 phase (Unipolar), and there are a variety of chips available to drive them. These little beasties don't appear to be supported by anything but the manufacturers chips.
This seemed like a good way to burn a few lockdown hours, and the motors were inexpensive.
In the past, I have designed a few step motor drivers, but not messed with a current chopper type driver. This seemed like a good opportunity to play with a current chopper driver design, so I ordered a couple of the motors.

Overview

The simplistic circuits shown in old books for driving step motors work fine at very low step rates. When the step rates start to increase, the motor torque output falls off very quickly. There are two reasons for this:

1) Motor back EMF generation.

2) Motor winding inductance.

Back EMF is a "feature" seen in most DC motors and step motors. When the coils move through a magnetic field, they generate a voltage. In the case of step motors, the magnetic field moves and the coils are stationary. The polarity of the generated voltage is opposite the polarity that would be required to drive the motor in that direction. The result of this is that the net voltage across the coils is the input voltage - the back emf voltage. The faster the motor turns, the less voltage availible to the coils.

Motor winding inductance is just the physics of the motor construction. The number of turns in the coils of wire and the magnetic structure of the motor set the inductance. Inductance opposes changes of current. Skipping the calculus, assuming that the drive voltage is constant, the current rises at a fixed rate. As the step rate increases, the amount of time for the current to rise in each step gets shorter so the motor current drops off. For a step motor, the net voltage across the coil does not stay constant as the speed goes up, the net voltage across the coil drops from the back EMF generated.

Raising the input voltage will overcome both of these problems, at the cost of creating one new problem. The new problem is that when the motor is stopped or moving slowly, the higher voltage across the coils will drive too much current and the motor will heat up rapidly. The solution to this problem is to regulate the current into the motor.

The inductance of the motor makes it fairly easy to regulate the current. When a voltage is applied across an inductor, the current rises linearly with time. If you measure the current flow and turn off the voltage when the current rises to the desired level, the average current is pretty well controlled.. The rest of the step motor driver system already supports switching the voltage on and off to each coil rapidly, so all that is needed to regulate the current is to install a low value resistor between the transistors on the low side and ground, and a comparator to sense the voltage across that resistor. The resulting circuit is called a chopper drive circuit because of the on/off action of the current regulation.

When the current rises to the desired value and the comparator switches off the voltage supply to the coil, the current already flowing circulates through the motor coil and the diodes protecting the transistors. These diodes may be internal to the transistors in the case of MOSFETs or external. It is not uncommon to use external diodes to help the internal diodes (called body diodes) on MOSFETS because the body diodes tend to not be great diodes. In operation, the current circulating takes a while to decay, so it does not drop to zero instantly when the supply transistor switches off. When the current drops below the set value, the supply side transistor turns back on. The current cycles above and below the desired value fairly closely.

As mentioned in the introduction, these motors are 5 phase motors. The drawing below shows the configuration of the windings (TM Oriental Motor)
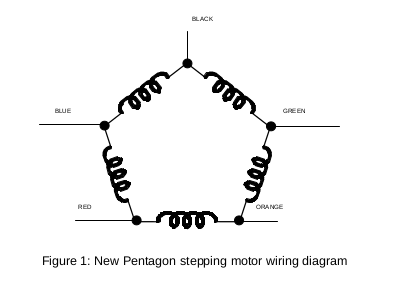
None of the step motor driver chips that I saw will support this configuration other than the ones sold by Oriental Motor.

There is good documentation on the MPJA web site for the motors and drivers, so I designed the step generation logic in 74HC logic. When I was done, the implementation would have been at least 12 chips. After adding the power and gate drivers, this was starting to look like a medium sized 4 layer board which would be expensive. As a way to reduce board area, I found some little Xilinx CPLD (Complex Programmable Logic Device) parts that would be large enough for the step generation...

Read more »

Step_Driver_5_wire.pdf

Schematic for the driver board.

Adobe Portable Document Format - 636.12 kB - 03/24/2021 at 16:51

Preview

  • Step Sequencer CPLD Design

    Bharbour03/25/2021 at 23:28 0 comments

    This is a simple full step sequence. It does not implement half stepping or any microstepping options. The CPLD is large enough to put a half step seqencer into it, but I don't think a microstepping sequencer would fit. The step signal is used as a clock signal for the sequencer. The RSTN reset signal and DIR direction input signal control the operation of the sequencer.

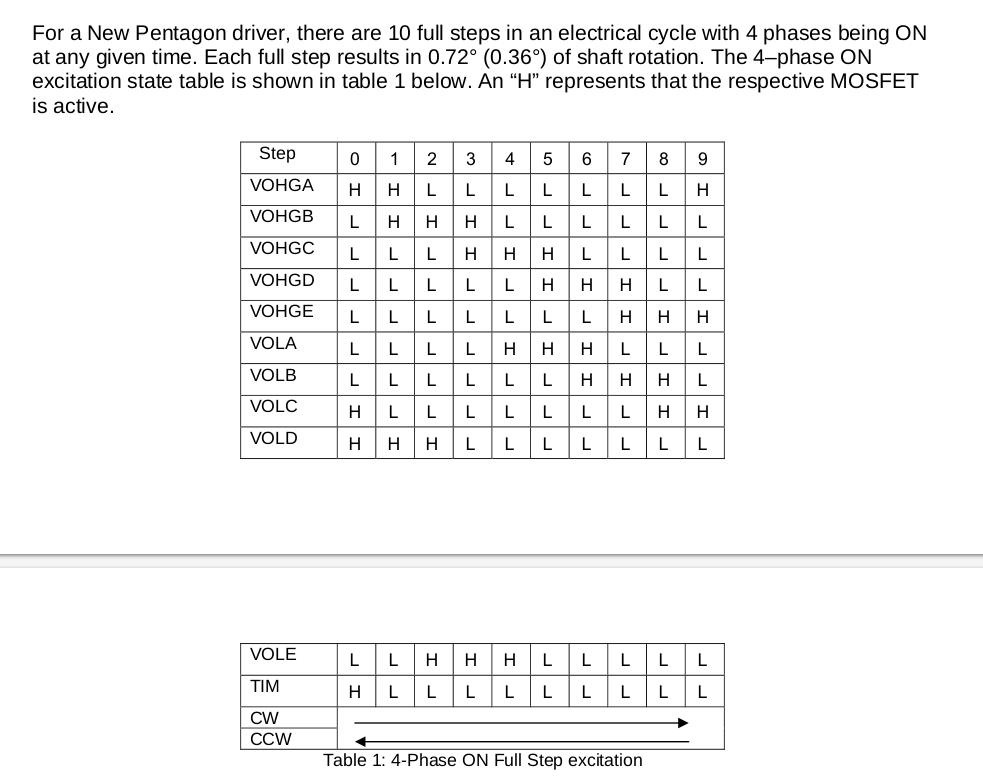
    Another snippet from Oriental Motor's documentation shows the phase sequence required to drive these motors.

    Full Step Phase Sequence Table from Oriental Motor Driver Documentation
    Full Step Phase Sequence Table from Oriental Motor Driver Documentation

    In full step mode, there are 10 unique states that repeat infinitely based on the Step and Direction inputs to the Step Sequence Generator. This sequencer is implemented in Verilog and synthesized using Xilinx's proprietary tool chain called ISE.

    `timescale 100ns/100ns
    
    // revised 1/21/2021 from table in 5PhaseNewPentBipolarDriver.pdf
    
    module StepDriver_FullStep (
      input wire    rstn,       // system reset signal
      input wire    step,       // step input really a clock signal
      input wire    dir,        // direction input
      output wire   pha_hi,     // Phase A high side output
      output wire   pha_lo,     // Phase A low side output
      output wire   phb_hi,     // Phase B high side output
      output wire   phb_lo,     // Phase B low side output
      output wire   phc_hi,     // Phase C high side output
      output wire   phc_lo,     // Phase C low side output
      output wire   phd_hi,     // Phase D high side output
      output wire   phd_lo,     // Phase D low side output
      output wire   phe_hi,     // Phase E high side output
      output wire   phe_lo      // Phase E low side output
    );
      reg  [9:0] seq;           // Sequencer registers
      wire [9:0] seq_next;      // Next state for sequencer registers
    
      // generate the next state data for the sequencer based on the current
      // sequencer value and the dir line.
      assign seq_next = dir ?  {seq[8:0],seq[9]} : {seq[0],seq[9:1]};
    
      // Instantiate the state register
      always @(negedge rstn or posedge step)
      if (rstn==1'b0)
        seq <= 10'b0000000001;
      else
        seq <= seq_next;
    
      // generate the phase signals from the one hot sequencer
      assign pha_hi = seq[0] | seq[1] | seq[9]; //|{seq[3:0]};
      assign phb_hi = seq[1] | seq[2] | seq[3]; //|{seq[4:1]};
      assign phc_hi = seq[3] | seq[4] | seq[5]; //|{seq[5:2]};
      assign phd_hi = seq[5] | seq[6] | seq[7]; //|{seq[6:3]};
      assign phe_hi = seq[7] | seq[8] | seq[9]; //|{seq[7:4]};
    
      assign pha_lo = seq[4] | seq[5] | seq[6]; //|{seq[8:5]};
      assign phb_lo = seq[6] | seq[7] | seq[8]; //|{seq[9:6]};
      assign phc_lo = seq[0] | seq[8] | seq[9]; //|{seq[9:7],seq[0]};
      assign phd_lo = seq[0] | seq[1] | seq[2]; //|{seq[9:8],seq[1:0]};
      assign phe_lo = seq[2] | seq[3] | seq[4]; //|{seq[9],seq[2:0]};
    
    endmodule


    The timescale line at the top of the file is used for simulation. I used Icarus Verilog and GTKWave for simulating the file. The testbench file that drives the simulation is not shown here. The timescale statement does not effect the synthesis results at all.

    The "module" statement assigns a name to the module.

    Following the module statement is the port list. All of the input and output signals of the module are defined, along with their direction and types.

    Next, the counter registers and next state generation logic signals are defined. In school, we were taught to design state machines with counter logic and decoding the counter values to drive the output signals. This state machine uses what is called a "One Hot" method rather than a counter to keep track of the state. It is implemented as a bi-directional 10 bit shift register. It is simpler to implement and simpler to decode than an actual binary counter would be.

    Combinational logic generates the next state based on the value of the direction input signal:

      // generate the next state data for the sequencer based on the current
      // sequencer value and the dir line.
      assign seq_next = dir ?  {seq[8:0],seq[9]} : {seq[0],seq[9:1]};

    This line controls the direction of the shifting by selecting the current state signals to the left or to the right of each bit for the next state. Note the...

    Read more »

View project log

Enjoy this project?

Share

Discussions

Similar Projects

Does this project spark your interest?

Become a member to follow this project and never miss any updates