Close
0%
0%

Monsterrhino printer car

The Monsterrhino printer car is a pen plotter on wheels that can print images on almost any flat surface.

Similar projects worth following
If you have an idea that incorporates motion control of stepper motors you can go for cheap Arduino extension boards or for premade boards e.g. for 3D printers or expensive industrial solutions such as Siemens PLCs. If you go down the cheap road you have to do the wiring and you have to deal with a low level interface to the stepper motor, meaning you need to program on the level of a single step. Furthermore it is complicated to do operations such as simultaneous homing of two axes. To have something between the cheap root and the industrial we created the Monsterrhino products. They are thought to be plug and play , allowing you to start your project without concentrating on getting your motors to turn or low level programming such as setting microstepping and homing operations.

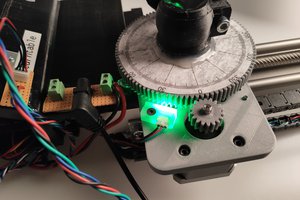
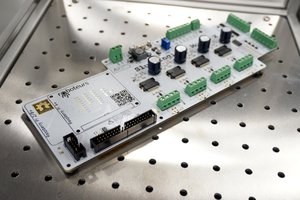
The Monsterrhino printer cart is made up of a z-y cross slide that moves a pen in z (lifting up) and y direction. The cross slide itself is mounted on a bent aluminium sheet metal part. Furthermore are 4 stepper motors mounted on the aluminum chassis acting as hubs, two of them are used to move the cart forward in x direction on the 3D printed wheels. The tires of the wheels are printed with a flexible filament (Filaflex) and the rims with ABS. The tires hold due to the convex shape of the tire and the rim. The ABS rim gives a tight fit on the shaft of the stepper motor. The stepper motors are driven by a MonsterrhinoMotion card. The MonsterrhinoMotion card is a multipurpose stepper driver card that combines power management, stepper drivers, CAN  and USB interface, encoder and limit switches, and a STM32 MCU that can be simply programmed using the Arduino IDE and the associated library. The 5” touch display is driven by a MonsterrhinoControl card connected to a Raspberry Pi 4. The MonsterrhinoControl card acts also as a power supply for the Raspberry Pi, converting the 24V supply of the MonsterrhinoContorl to 5V for the RPi. The Raspberry Pi runs a Python program to convert the image into lines that are further converted to axis commands that are sent via CAN bus to the MonsterrhinoMotion card. The z-y axis use magnetic limit switches, the Monsterrhino Hall Sensor, for the simulaneous homing. The status of the machine is indicated by Monsterrhino RGB LEDs that are connected to the MonsterrhinoControl, each LED can be individually addressed and a RGB color can be set. The whole cart is powered by a 24 V LiPo battery with 18000 mAh.

Tire.STL

The tires are printed with TPU from Filaflex with 85 shore.

sla - 498.03 kB - 03/31/2021 at 07:57

Download

Rim.STL

The rims are printed with ABS.

sla - 525.96 kB - 03/31/2021 at 07:57

Download

Chassis.STL

sla - 473.13 kB - 03/31/2021 at 07:57

Download

  • 1 × MonsterrhinoMotion card Motion control card for 4 stepper motors
  • 1 × MonsterhinoControl Power supply, CAN controller, Monsterrhino RGB LED controller extension shield for Raspberry Pi
  • 1 × Raspberry Pi 4
  • 1 × Monsterrhino RGB LED Individual addressable RGB LED
  • 1 × Monsterrhino Hall sensors Magnetic switch with LED indicator

View all 8 components

  • 1
    Assemble the car
    • Connect the MonsterrhinoMotion and MonsterrhinoControl to the 24V source (e.g. battery). Foresee a power switch at the 24V line.
    • Connect the CAN between MonsterrhinoMotion and MonsterrhinoControl
    • Connect the display to the MonsterrhinoControl
    • Connect the limit switches to the inputs of motor 3 and 4 on the MonsterrhinoMotion
    • Connect the 4 Monsterrhino RGB LEDs to the MonsterrhinoControl
    • Connect the motors: motor 1 and motor 2 are the front wheels, motor 3 is the z axis, and motor 4 is the y axis
  • 2
    Setup the Raspberry Pi 4
    sudo python3 led.py sudo pip3 install pillow
    sudo apt-get install python3-pil python3-pil.imagetk
    sudo apt-get install python3-opencv
    sudo apt-get install libhdf5-dev
    sudo apt-get install libhdf5-serial-dev
    sudo apt-get install libatlas-base-dev
    sudo apt-get install libjasper-dev sudo apt-get install libqtgui4 sudo apt-get install libqt4-test
    sudo pip3 install numpy

    Now you should be able to run the software by executing following command in a terminal:

    sudo python3 MonsterrhinoPrinterCarGUI.py
  • 3
    Setup the MonsterrhinoMotion
    • Open the Monsterrhinostep-Lib through your ArduinoIDE (File->Examples->Monsterrhinostep->monsterrhinostep) and copy the content of the three files in https://github.com/Monsterrhino/MonsterrhinoMotion/Projects/MonsterrhinoPrinterCar/firmaware to the according files of the Monsterrhinostep-Lib (monsterrhinostep, User_Function1 and User_Function2).

    • Compile and upload to your MonsterrhinoControl (further information of how to do that can be found in the docs) - and thats it!

View all 5 instructions

Enjoy this project?

Share

Discussions

Similar Projects

Does this project spark your interest?

Become a member to follow this project and never miss any updates