-
1Step 1 - connect the hardware
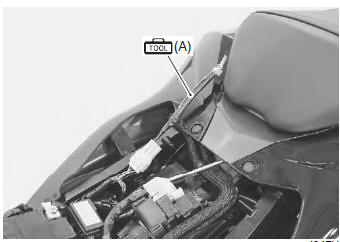
First, we have to wire up the mini::bike to the motorcycle. Therefore we need to find the diagnosis port in order to get access to the K-Line connection. In case of a Suzuki GSX-R 1000 it is located under the seat:
![Position of Diagnosis plug Position of Diagnosis plug]()
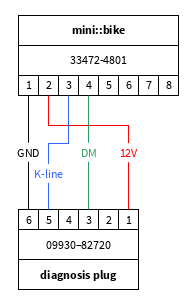
Connect the mini::bike to the diagnosis plug. For the Suzuki, the connection should be like the following:
![mini::bike wiring diagram mini::bike wiring diagram]()
The DM in the drawing stands for "Dealer-Mode". This replaces the little switch it usually needs to set your motorcycle into "Dealer-Mode". With the mini::bike, an onboard optocoupler does the job.
-
2Step 2 - connect to your PC
After sucessfully connecting the mini::bike to the motorcycle, It's time to connect the mini::bike to your PC.
You'll need a USB Type C to USB Type A cable to get the job done.There is a detailed description on how to get started with the board::mini series on GitHub.
-
3Step 3 - flash the software
When everything is set up correctly, the last step is to flash the example code we provide on GitHub.
Download or clone the code and open it in the ArduinoIDE. Click the "Upload" button in the upper left. After successfully flashing the code to the board, you should see the data of your motorbike in the serial console.
K-line to CAN Converter
bridge vehicle communication busses with the [mini::base + mini::bike]
 Sebastian Kruse

Discussions
Become a Hackaday.io Member
Create an account to leave a comment. Already have an account? Log In.