 Arnov Sharma
-
1Built Instructions
Before starting this project, you require ESP32 Boards core installed on Arduino IDE which is a necessity. Install them from here-https://github.com/espressif/arduino-esp32
- So first, open SimpleTime sketch which can be found in Example>ESP32>Time>SimpleTime
this is the generic internet clock sketch that we will use as a base sketch.
#include <WiFi.h>
#include "time.h"

const char* ssid       = "YOUR_SSID";
const char* password   = "YOUR_PASS";

const char* ntpServer = "pool.ntp.org";
const long  gmtOffset_sec = 3600;
const int   daylightOffset_sec = 3600;

void printLocalTime()
{  struct tm timeinfo;  if(!getLocalTime(&timeinfo)){    Serial.println("Failed to obtain time");    return;  }  Serial.println(&timeinfo, "%A, %B %d %Y %H:%M:%S");
}

void setup()
{  Serial.begin(115200);    //connect to WiFi  Serial.printf("Connecting to %s ", ssid);  WiFi.begin(ssid, password);  while (WiFi.status() != WL_CONNECTED) {      delay(500);      Serial.print(".");  }  Serial.println(" CONNECTED");    //init and get the time  configTime(gmtOffset_sec, daylightOffset_sec, ntpServer);  printLocalTime();
  //disconnect WiFi as it's no longer needed  WiFi.disconnect(true);  WiFi.mode(WIFI_OFF);
}

void loop()
{  delay(1000);  printLocalTime();
}
Our goal here is to Display the time which is in the serial monitor on TTGO's Display and for that, we have to change a few lines of code in this sketch.
- We first add our SSID and Password in this sketch.
const char* ssid       = "YOUR_SSID";
const char* password   = "YOUR_PASS";
- Now we have to add gmtOffset_sec which can be found from here. for example, I live in India and GMT here is +5:30.
- +5:30 in seconds is 19800s so we add 19800 in the GMT offset
const long gmtOffset_sec = 19800;
Next is the daylightOffset_set, if your country has daylight saving time then set it according to that time in seconds, and if not then set it to zero.
const int daylightOffset_sec = 0;
Find out about the daylight saving time from here.
This will be the final sketch (not exactly final, this is just for serial printing the time)
#include <WiFi.h> #include "time.h" const char* ssid = "xxxxxx"; const char* password = "pppppp"; const char* ntpServer = "pool.ntp.org"; const long gmtOffset_sec = 19800; const int daylightOffset_sec = 0; void printLocalTime() { struct tm timeinfo; if(!getLocalTime(&timeinfo)){ Serial.println("Failed to obtain time"); return; } Serial.println(&timeinfo, "%A, %B %d %Y %H:%M:%S"); } void setup() { Serial.begin(115200); //connect to WiFi Serial.printf("Connecting to %s ", ssid); WiFi.begin(ssid, password); while (WiFi.status() != WL_CONNECTED) { delay(500); Serial.print("."); } Serial.println(" CONNECTED"); //init and get the time configTime(gmtOffset_sec, daylightOffset_sec, ntpServer); printLocalTime(); //disconnect WiFi as it's no longer needed WiFi.disconnect(true); WiFi.mode(WIFI_OFF); } void loop() { delay(1000); printLocalTime(); }- Plug your TTGO board
- Select the right board in the Board manager
- select the right port
- hit upload
- Now open the serial monitor and you will see the current time printing repetitive at an interval of 1 second.
If your time is not correct then this might be because of an error in UTC offset and daylight saving offset.
Now, this was the basic Internet time sketch, for displaying this on the TTGO T1 board, we only have to use a simple function that lets us display anything on TTGO's display.
But before that, you need to install this library which is a TFT Display library that we require for this task.
We first add the TFT_eSPI library and other important lines of code which is required to print anything on the display.
Here's the main sketch
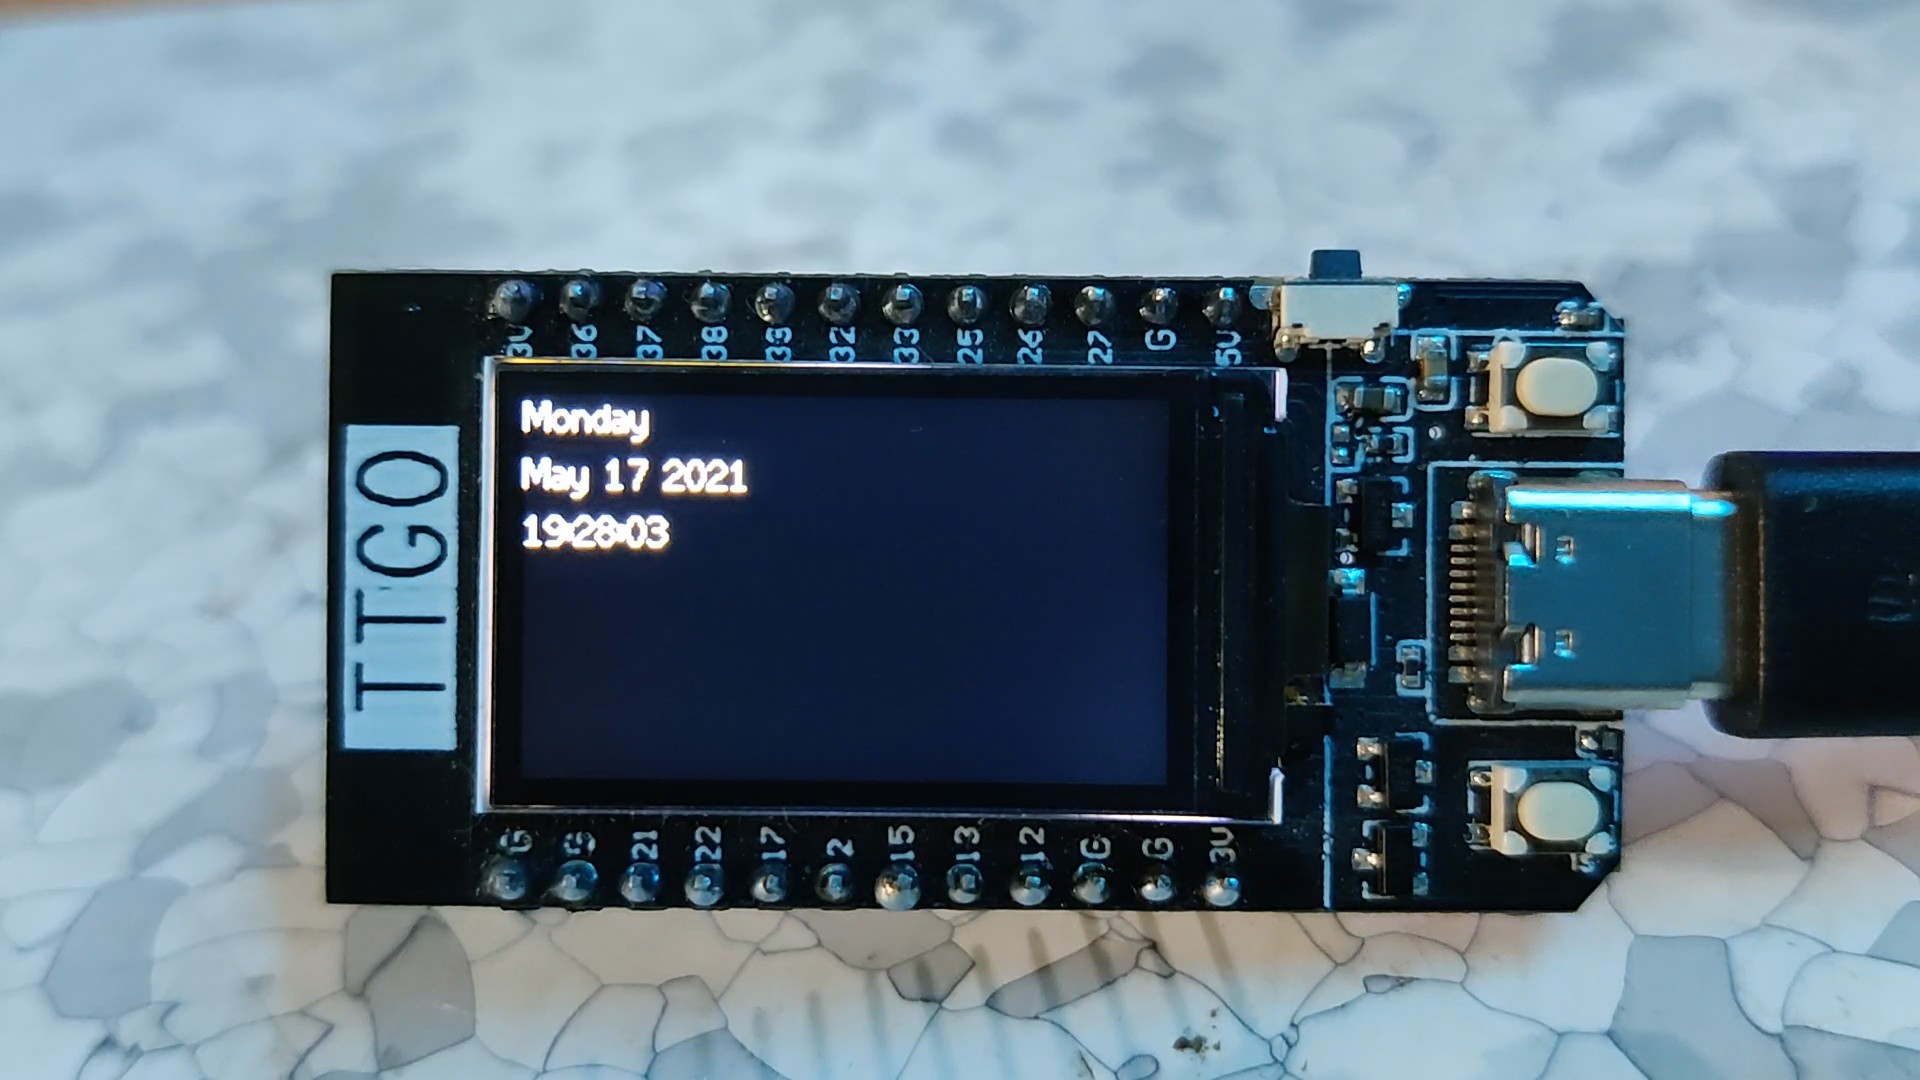
#include <TFT_eSPI.h> // Graphics and font library for ST7735 driver chip
#include <SPI.h>
#include <WiFi.h>
#include "time.h"

const char* ssid       = "xxxxxx"; //add your WIFI Credentials
const char* password   = "pppppp";

const char* ntpServer = "pool.ntp.org";
const long  gmtOffset_sec = 19800;    //UTC Offset!
const int   daylightOffset_sec = 0;


TFT_eSPI tft = TFT_eSPI();  // Invoke library, pins defined in User_Setup.h

#define TFT_BLACK 0x0000 // black

void setup(void) {  tft.init();  tft.setRotation(1);    Serial.begin(115200);    Serial.printf("Connecting to %s ", ssid);  WiFi.begin(ssid, password);  while (WiFi.status() != WL_CONNECTED) {      delay(500);      Serial.print(".");  }  Serial.println(" CONNECTED");    configTime(gmtOffset_sec, daylightOffset_sec, ntpServer);  printLocalTime();
  WiFi.disconnect(true);  WiFi.mode(WIFI_OFF); }

void loop() {

delay(1000);
printLocalTime();
}


void printLocalTime()
{  struct tm timeinfo;  if(!getLocalTime(&timeinfo)){    Serial.println("Failed to obtain time");    return;  }    tft.fillScreen(TFT_BLACK);  tft.setCursor(0, 0, 2);  tft.setTextColor(TFT_WHITE,TFT_BLACK);    tft.setTextSize(1);  tft.println(&timeinfo, "%A");
  tft.setCursor(0, 20, 2);  tft.setTextColor(TFT_WHITE,TFT_BLACK);    tft.setTextSize(1);  tft.println(&timeinfo, "%B %d %Y");
  tft.setCursor(0, 40, 2);  tft.setTextColor(TFT_WHITE,TFT_BLACK);    tft.setTextSize(1);  tft.println(&timeinfo,"%H:%M:%S");

}
Upload this sketch to your TTGO Board and This will be the result-
![]()
As for the battery, I used a 3.7V 500mA Lipo cell which I have salvaged from an old project.
Also, we can change the size of the font by changing this line of code from 1 to 2.
tft.setTextColor(TFT_WHITE,TFT_BLACK); tft.setTextSize(1); //Change it to 2 tft.println(&timeinfo, "%A");
I have to change the connecting wire of the LiPo cell to a smaller connector wire which was included with the TTGO T1 board.
This was the basic setup for this watch project.
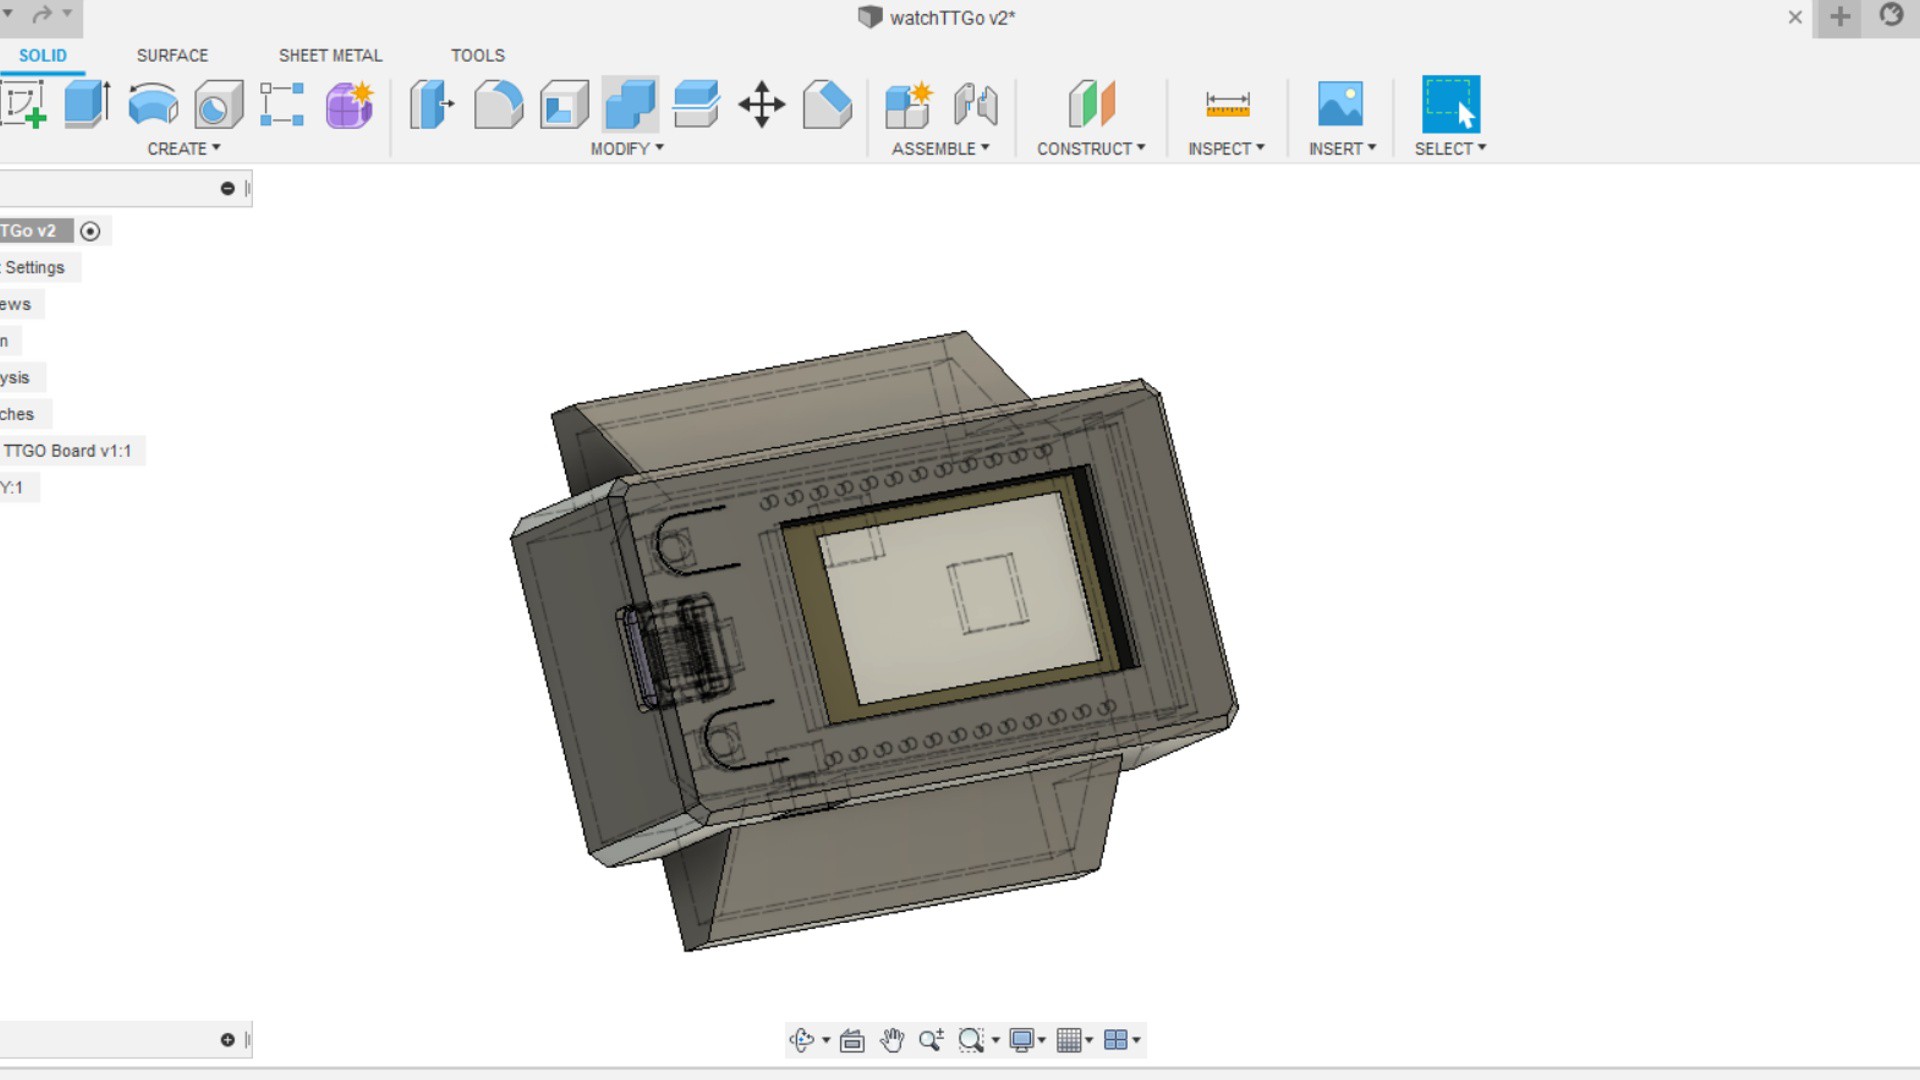
Next is to design a Body for this setup. For that, I will be using Fusion360.
Custom Body Concept
![]()
I designed this Body for the TTGO board which looks like an M5StickC board, the 3D Model for this TTGO Board was downloaded from grabcad user MIMOSA
For now, I haven't decided on the wrist strap for this project, I will probably buy the generic leather strap for this project as well.
This is all for part 2 though, the basic setup of this watch project is this, a TTGO T display board hooked up with a LiPo Cell which displays the current time and date on its DIsplay and this all is enclose nicely in a 3D Printed Body.
TTGO T Display Based Internet Clock
Yet another Internet clock for ESP32 which displays the current time on TTGO's Display.
Discussions
Become a Hackaday.io Member
Create an account to leave a comment. Already have an account? Log In.