Close
0%
0%

Robotic Flexor

A passive linear actuator based on a simple solenoid to recreate the flex motion of biological muscles.

Similar projects worth following
There have been many attempts to create artificial muscles for robotics, but most attempts have come with major cons: too slow, high voltage, bulky design, too much heat, non-scalability, high cost.. etc. However, almost all of those attempts are overlooking the fact that linear flexing motion can already be achieved, even efficiently, using electromagnetism E.g. with solenoids. This project is my own attempt at designing and building robotic 'flexors' into robots using different configurations.

Anyone who has worked with servos knows that it is difficult to achieve natural movement. They are built to give a constant velocity and torque which results in jerky movements. To combat this, there needs to be some passivity built into the design. Some robots use springs, but that means that the passivity cannot be adjusted. More expensive designs use a rotary passive actuator based on large geared down DC motors. However, they are bulky, have many parts, and the price range is greater than most people can justify.

Desired motion:
Most biological muscle only contracts when energy is applied, and remains passive all other times. Because of this, there are typically two opposing  muscles: flexors and extensors. A holding force can be achieved when the right amount of energy is put into the two opposing muscles. My first design uses one pwm signal per flexor or extensor to achieve a similar mechanism.

Wont that cause inaccurate movement?
Yes. That is the point actually. Modern robots need to handle unpredictable movement. AI is at the point where it pairs well with  manipulators that need to be adjusted on the fly. Robots are learning to learn on their own so we no longer have to hand code walking gates.

  • Building a coil winding machine

    josh collins10/24/2021 at 17:29 0 comments

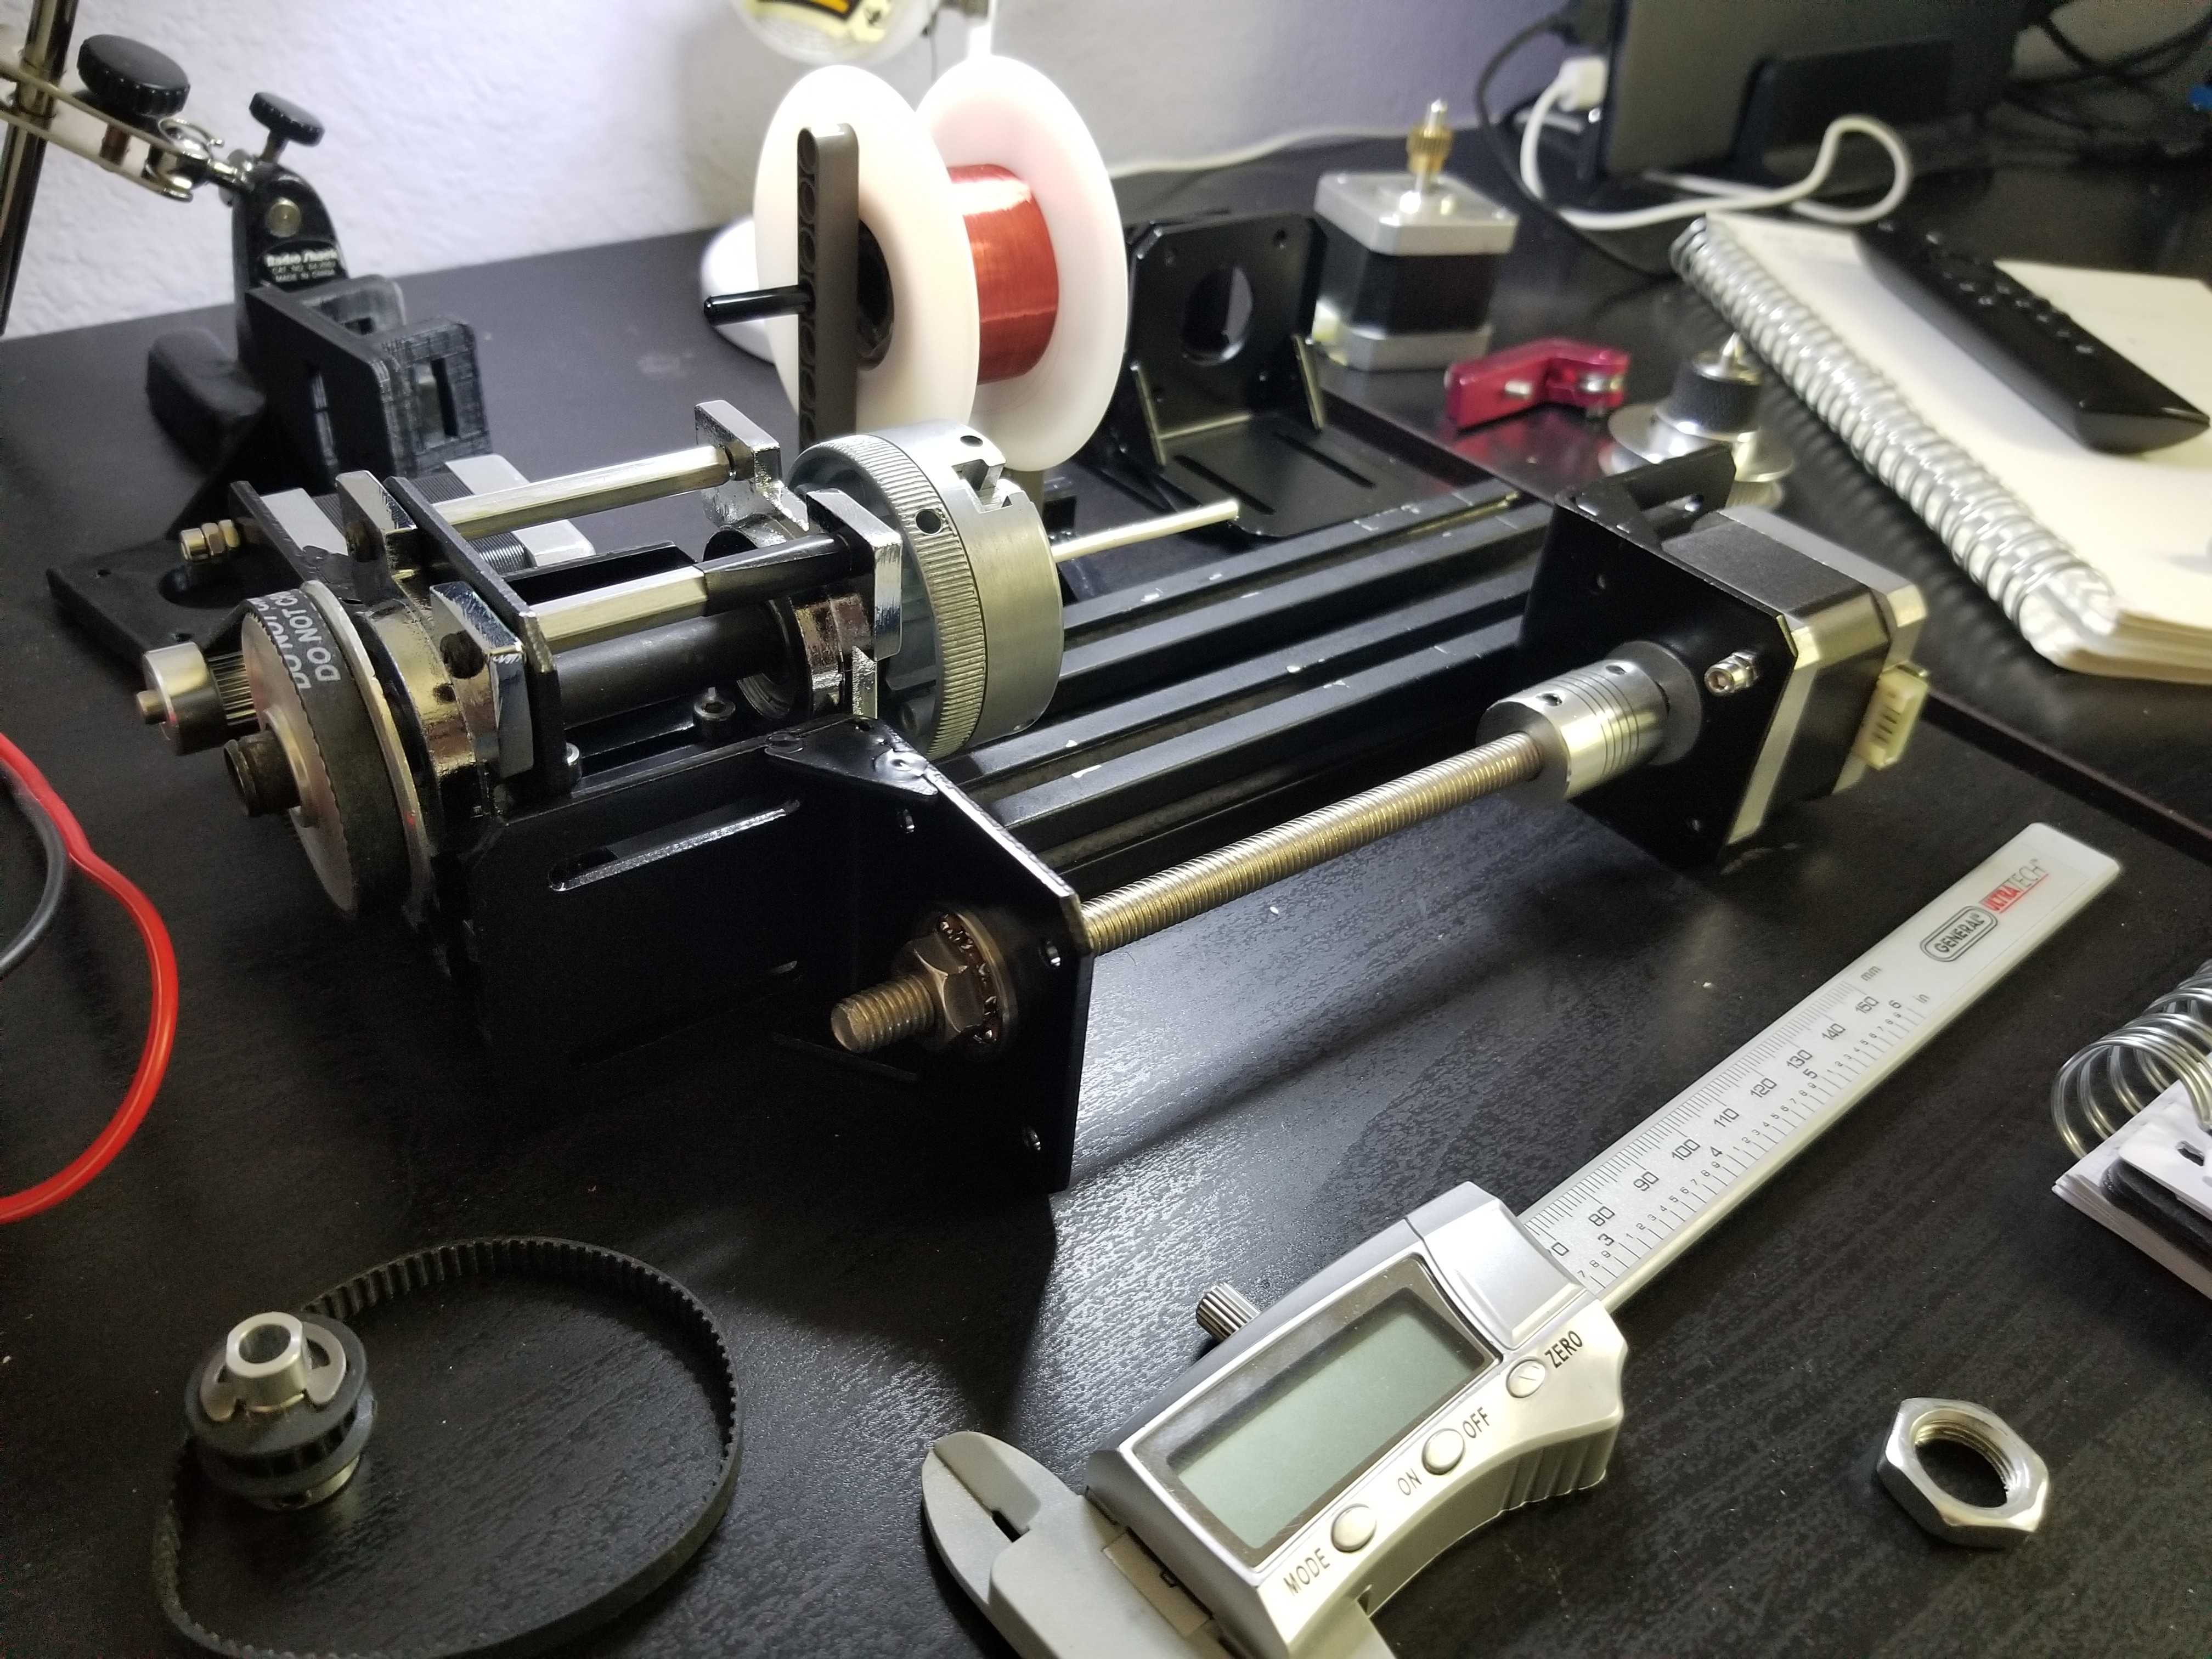
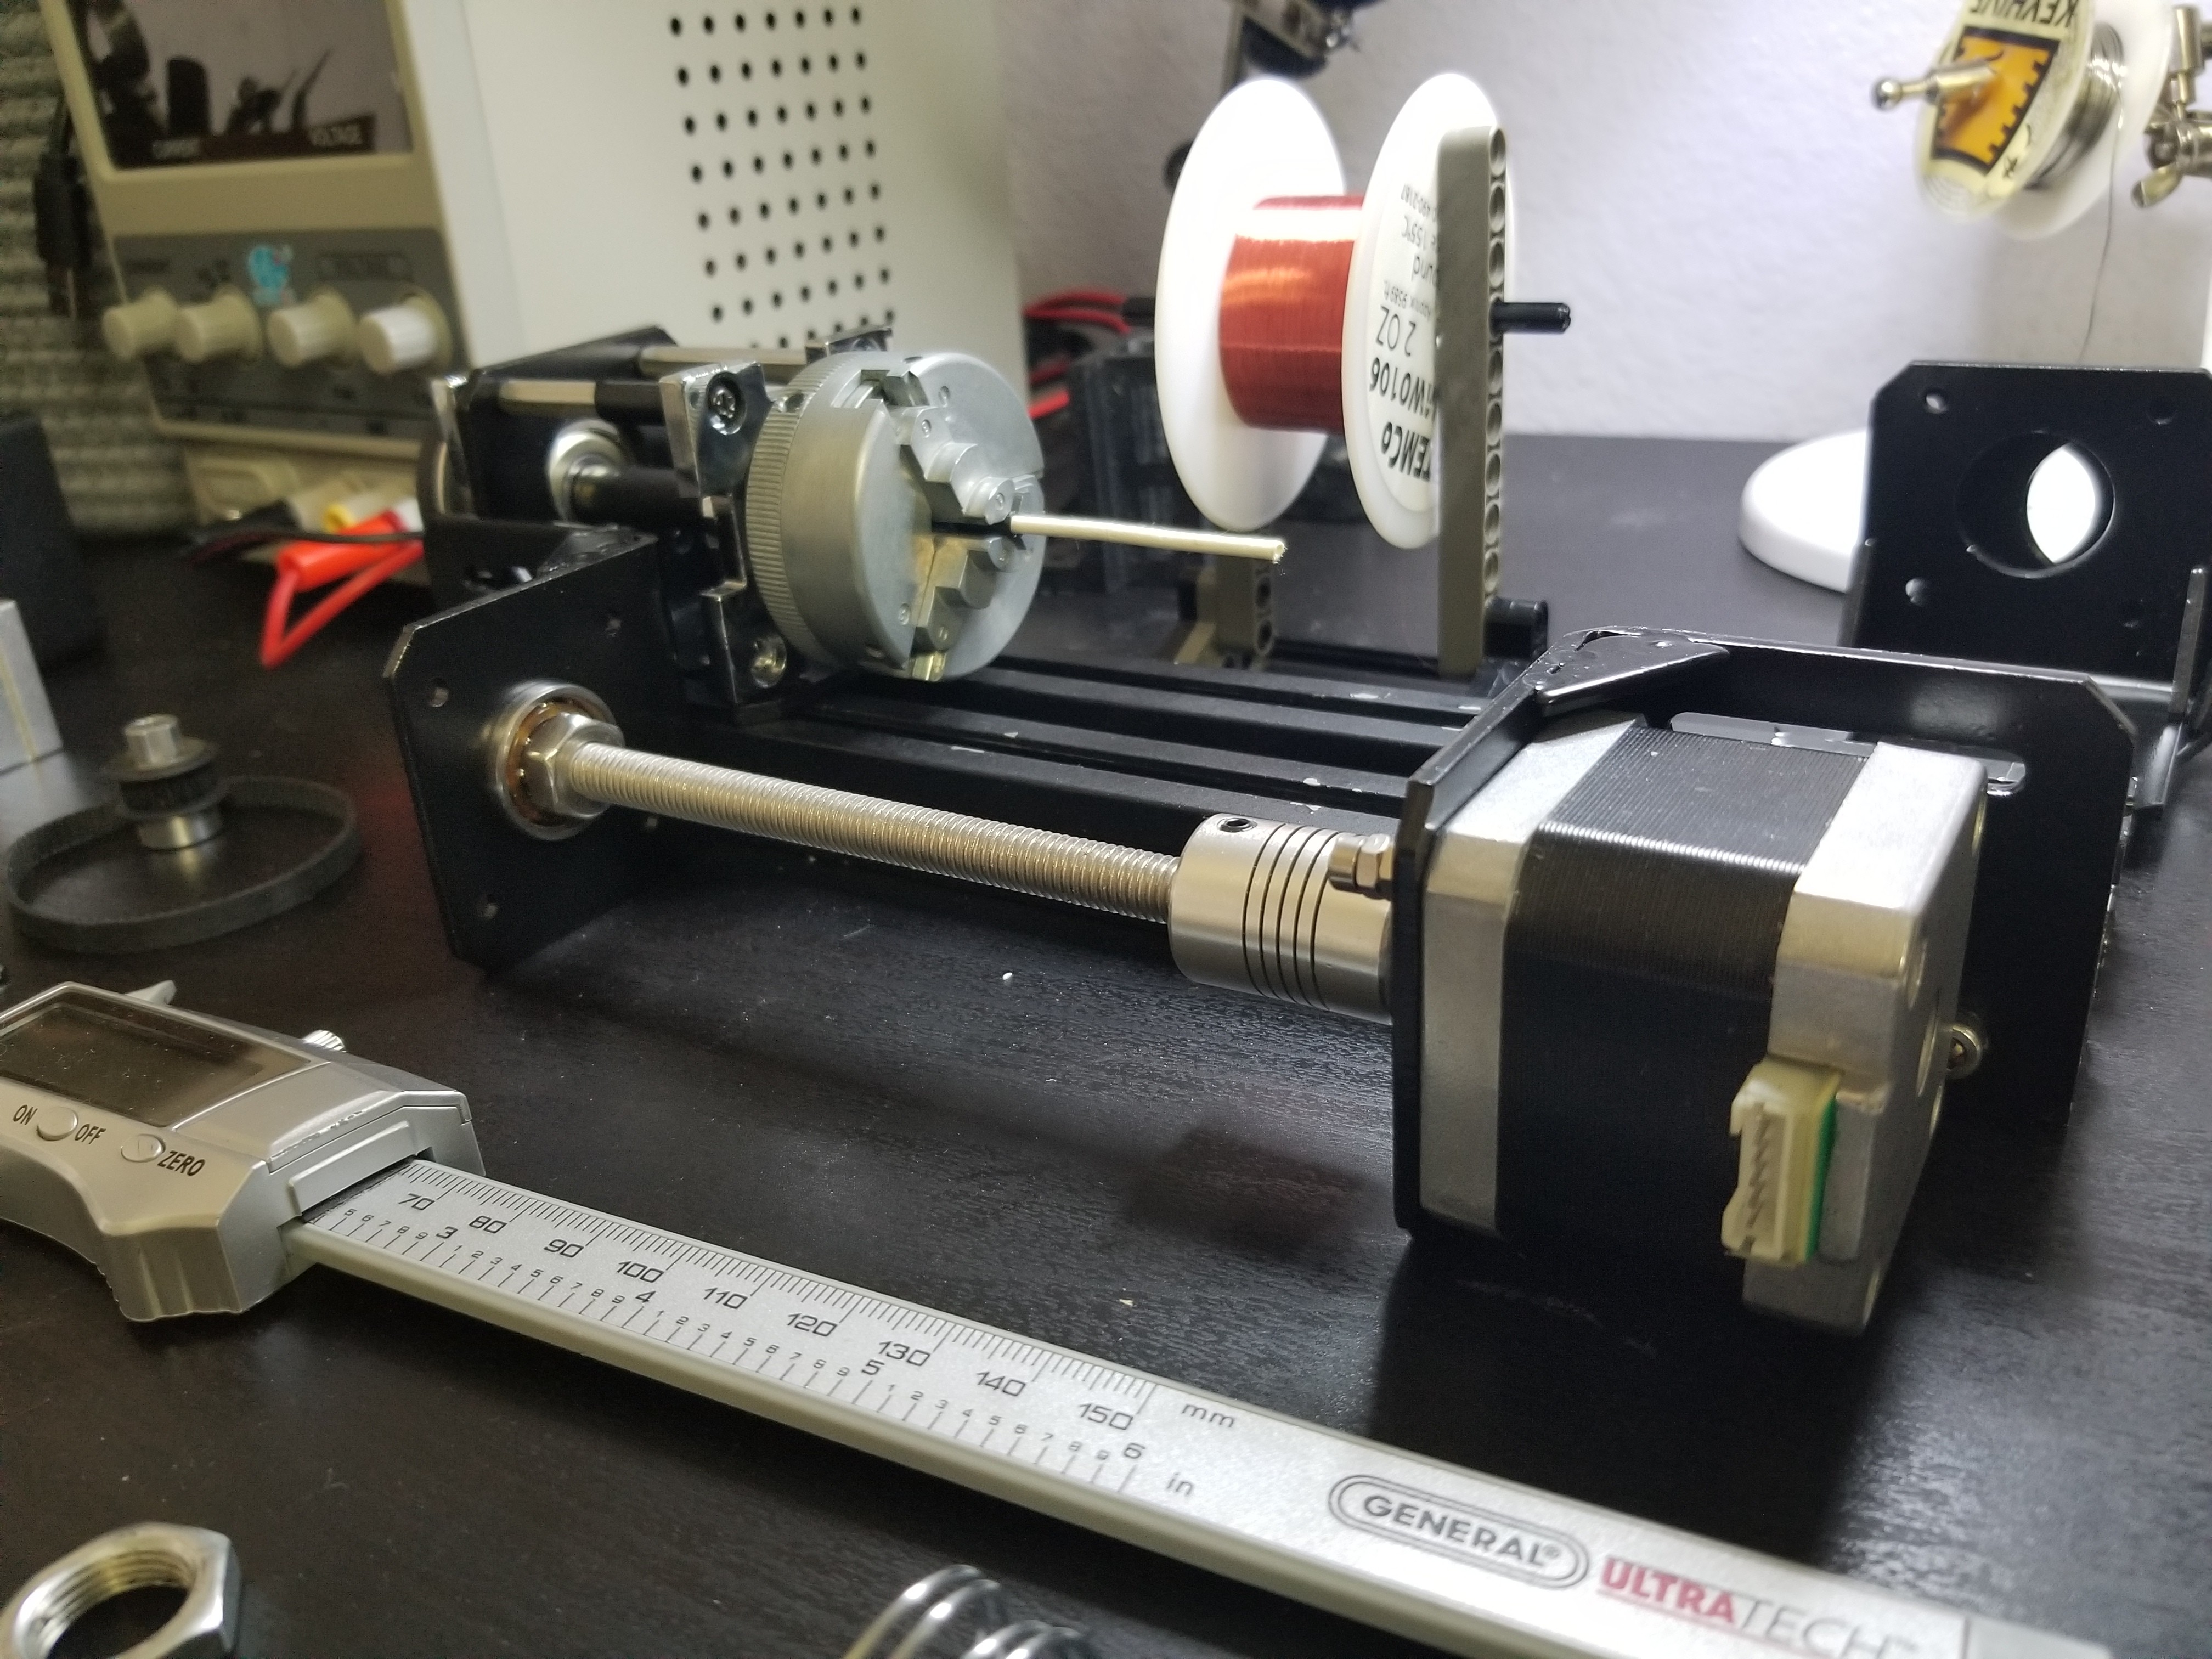
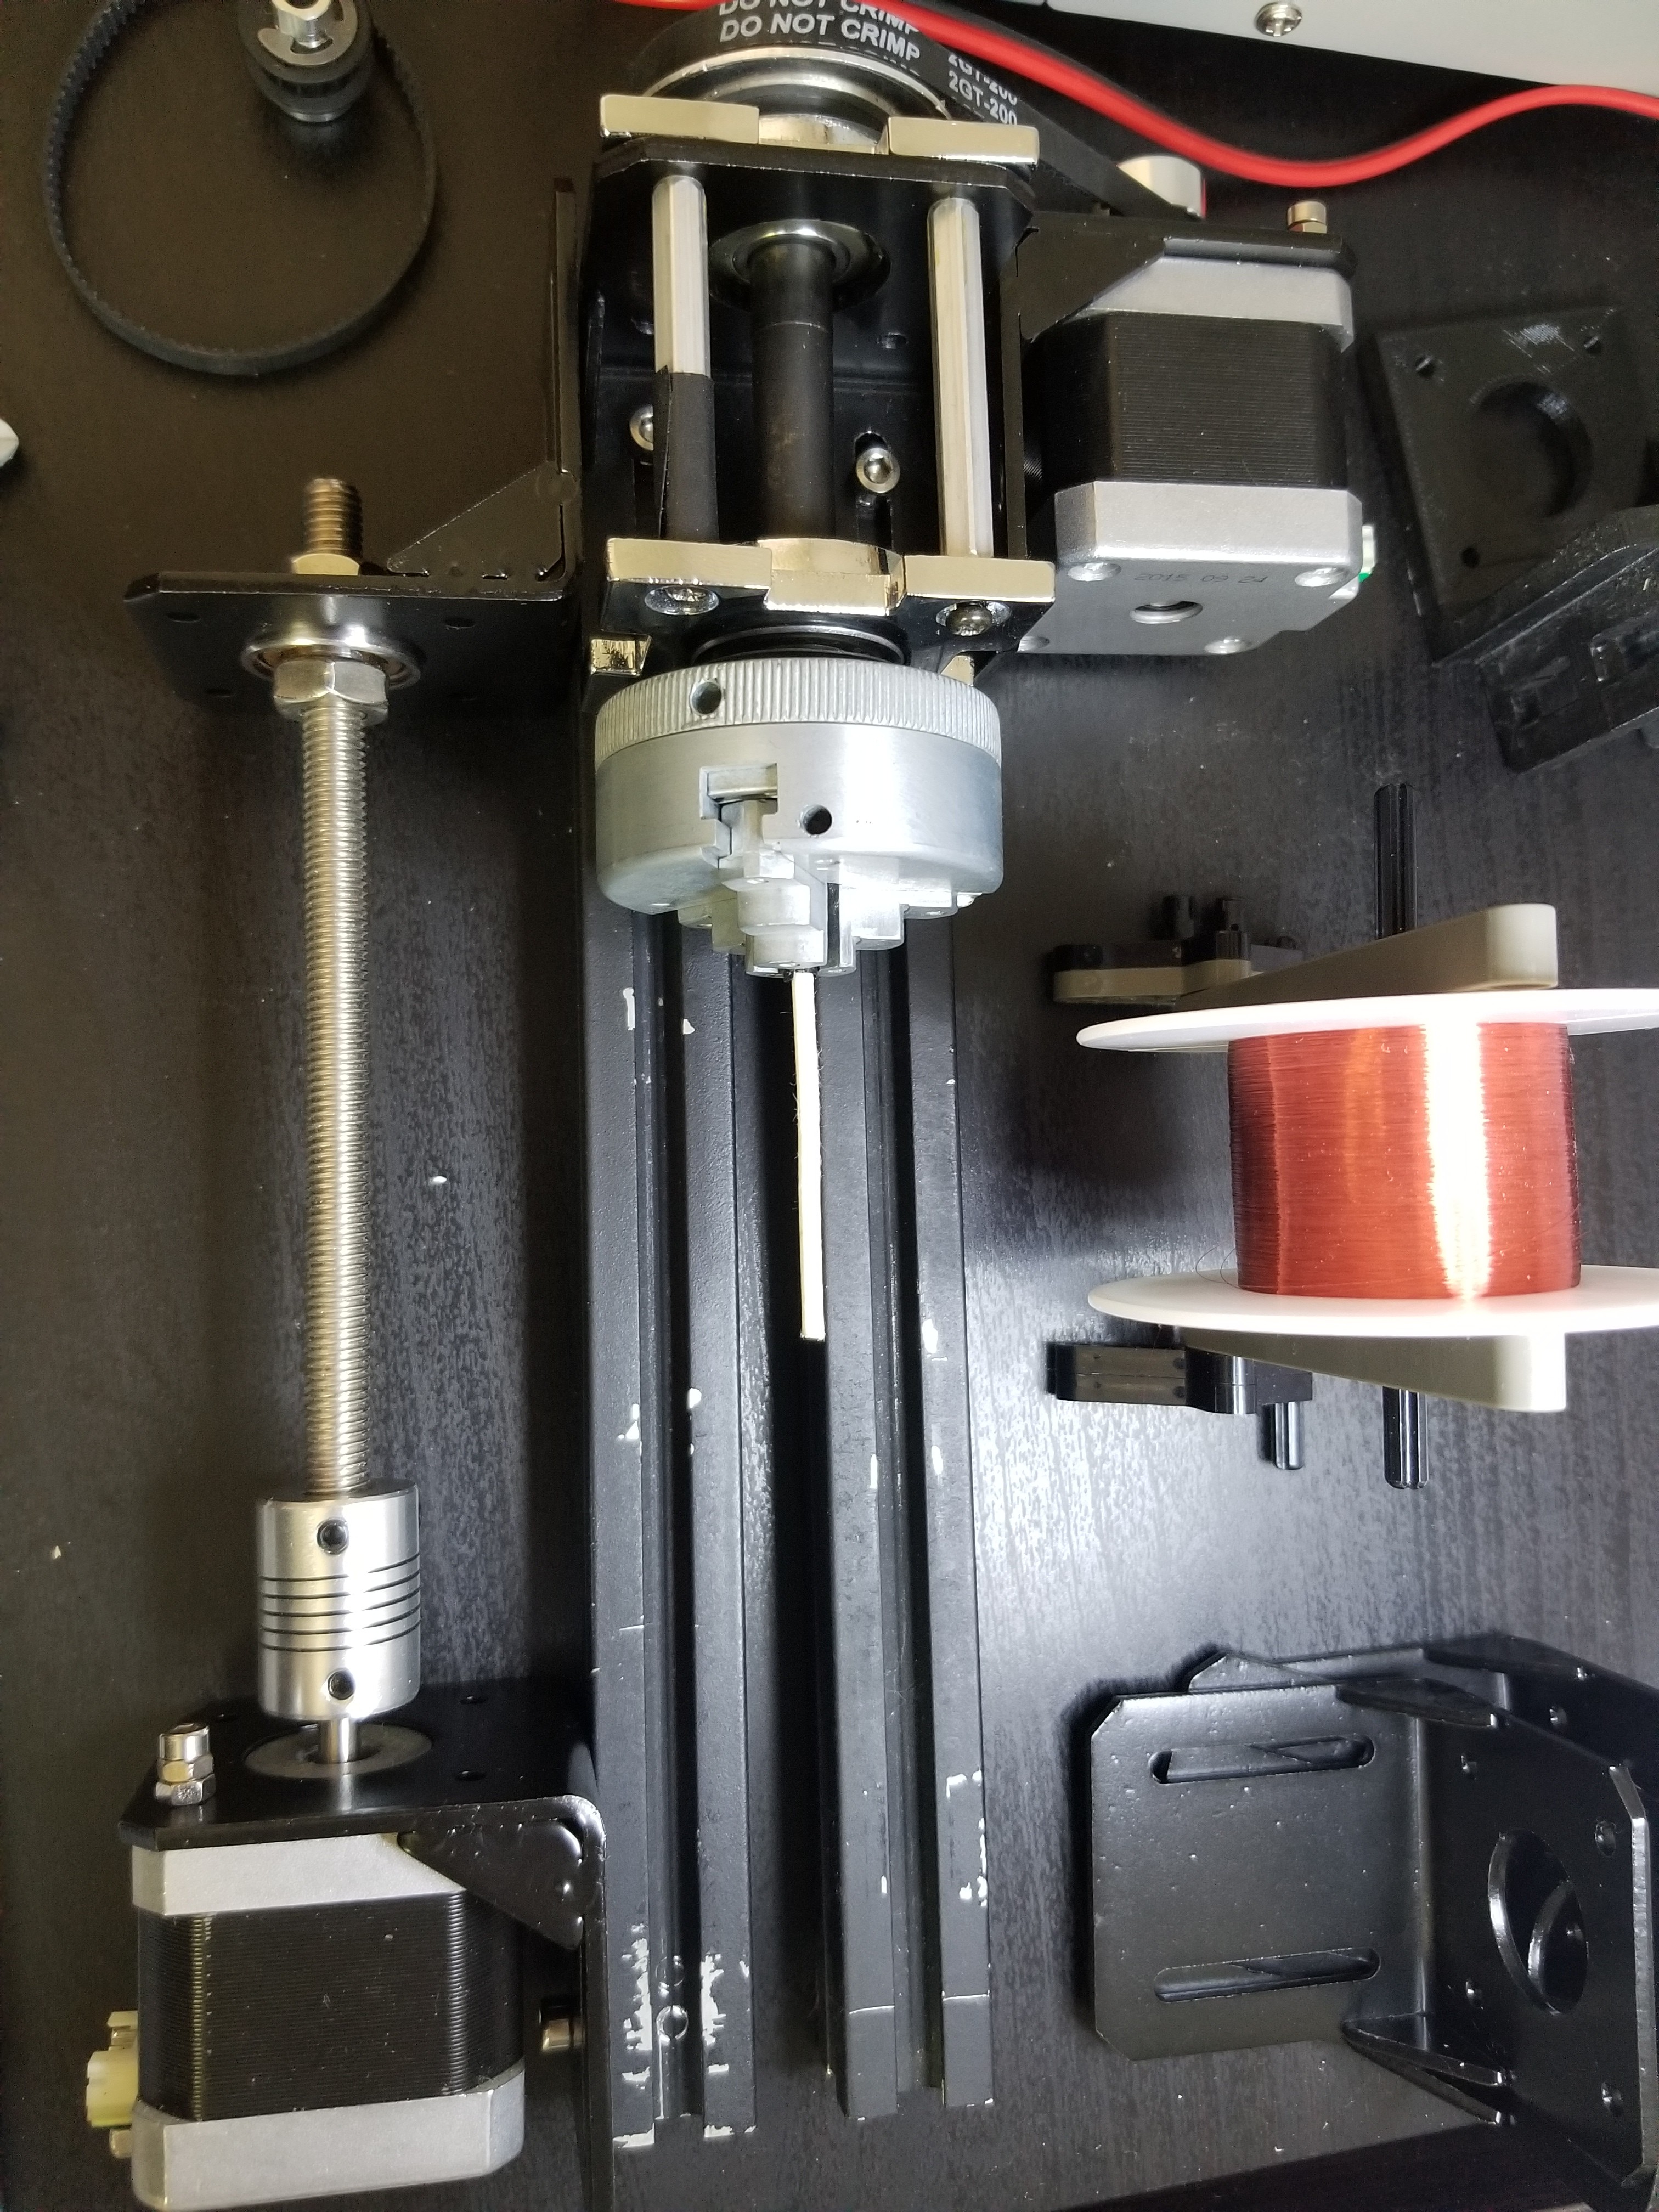
    To test out my calculations, I need to build coils in different sizes, using different gauges of wire, and differing number of turns. winding them myself is very tedious, and often not wrapped efficiently enough to deliver the output that I need. To fix this I decided to build a coil winding machine using stepper motors to ensure that it is capable of winding coils tight enough. I had some parts left over from a mini lathe and an old 3d printer that I don't use which works perfectly with some modifications. It isn't finished yet because I need to design and 3d print some parts for it, but that should come in the next update.

  • Trying thinner wire

    josh collins10/05/2021 at 16:28 0 comments

    At the moment the solenoid design works fine, but really doesn't offer much force. One way we can increase force is by increasing the turn count. To do that without sacrificing too much room, I can just use thinner gauge wire. Of course this will increase resistance, and therefore heat, but I'm not worried about that at the moment. 

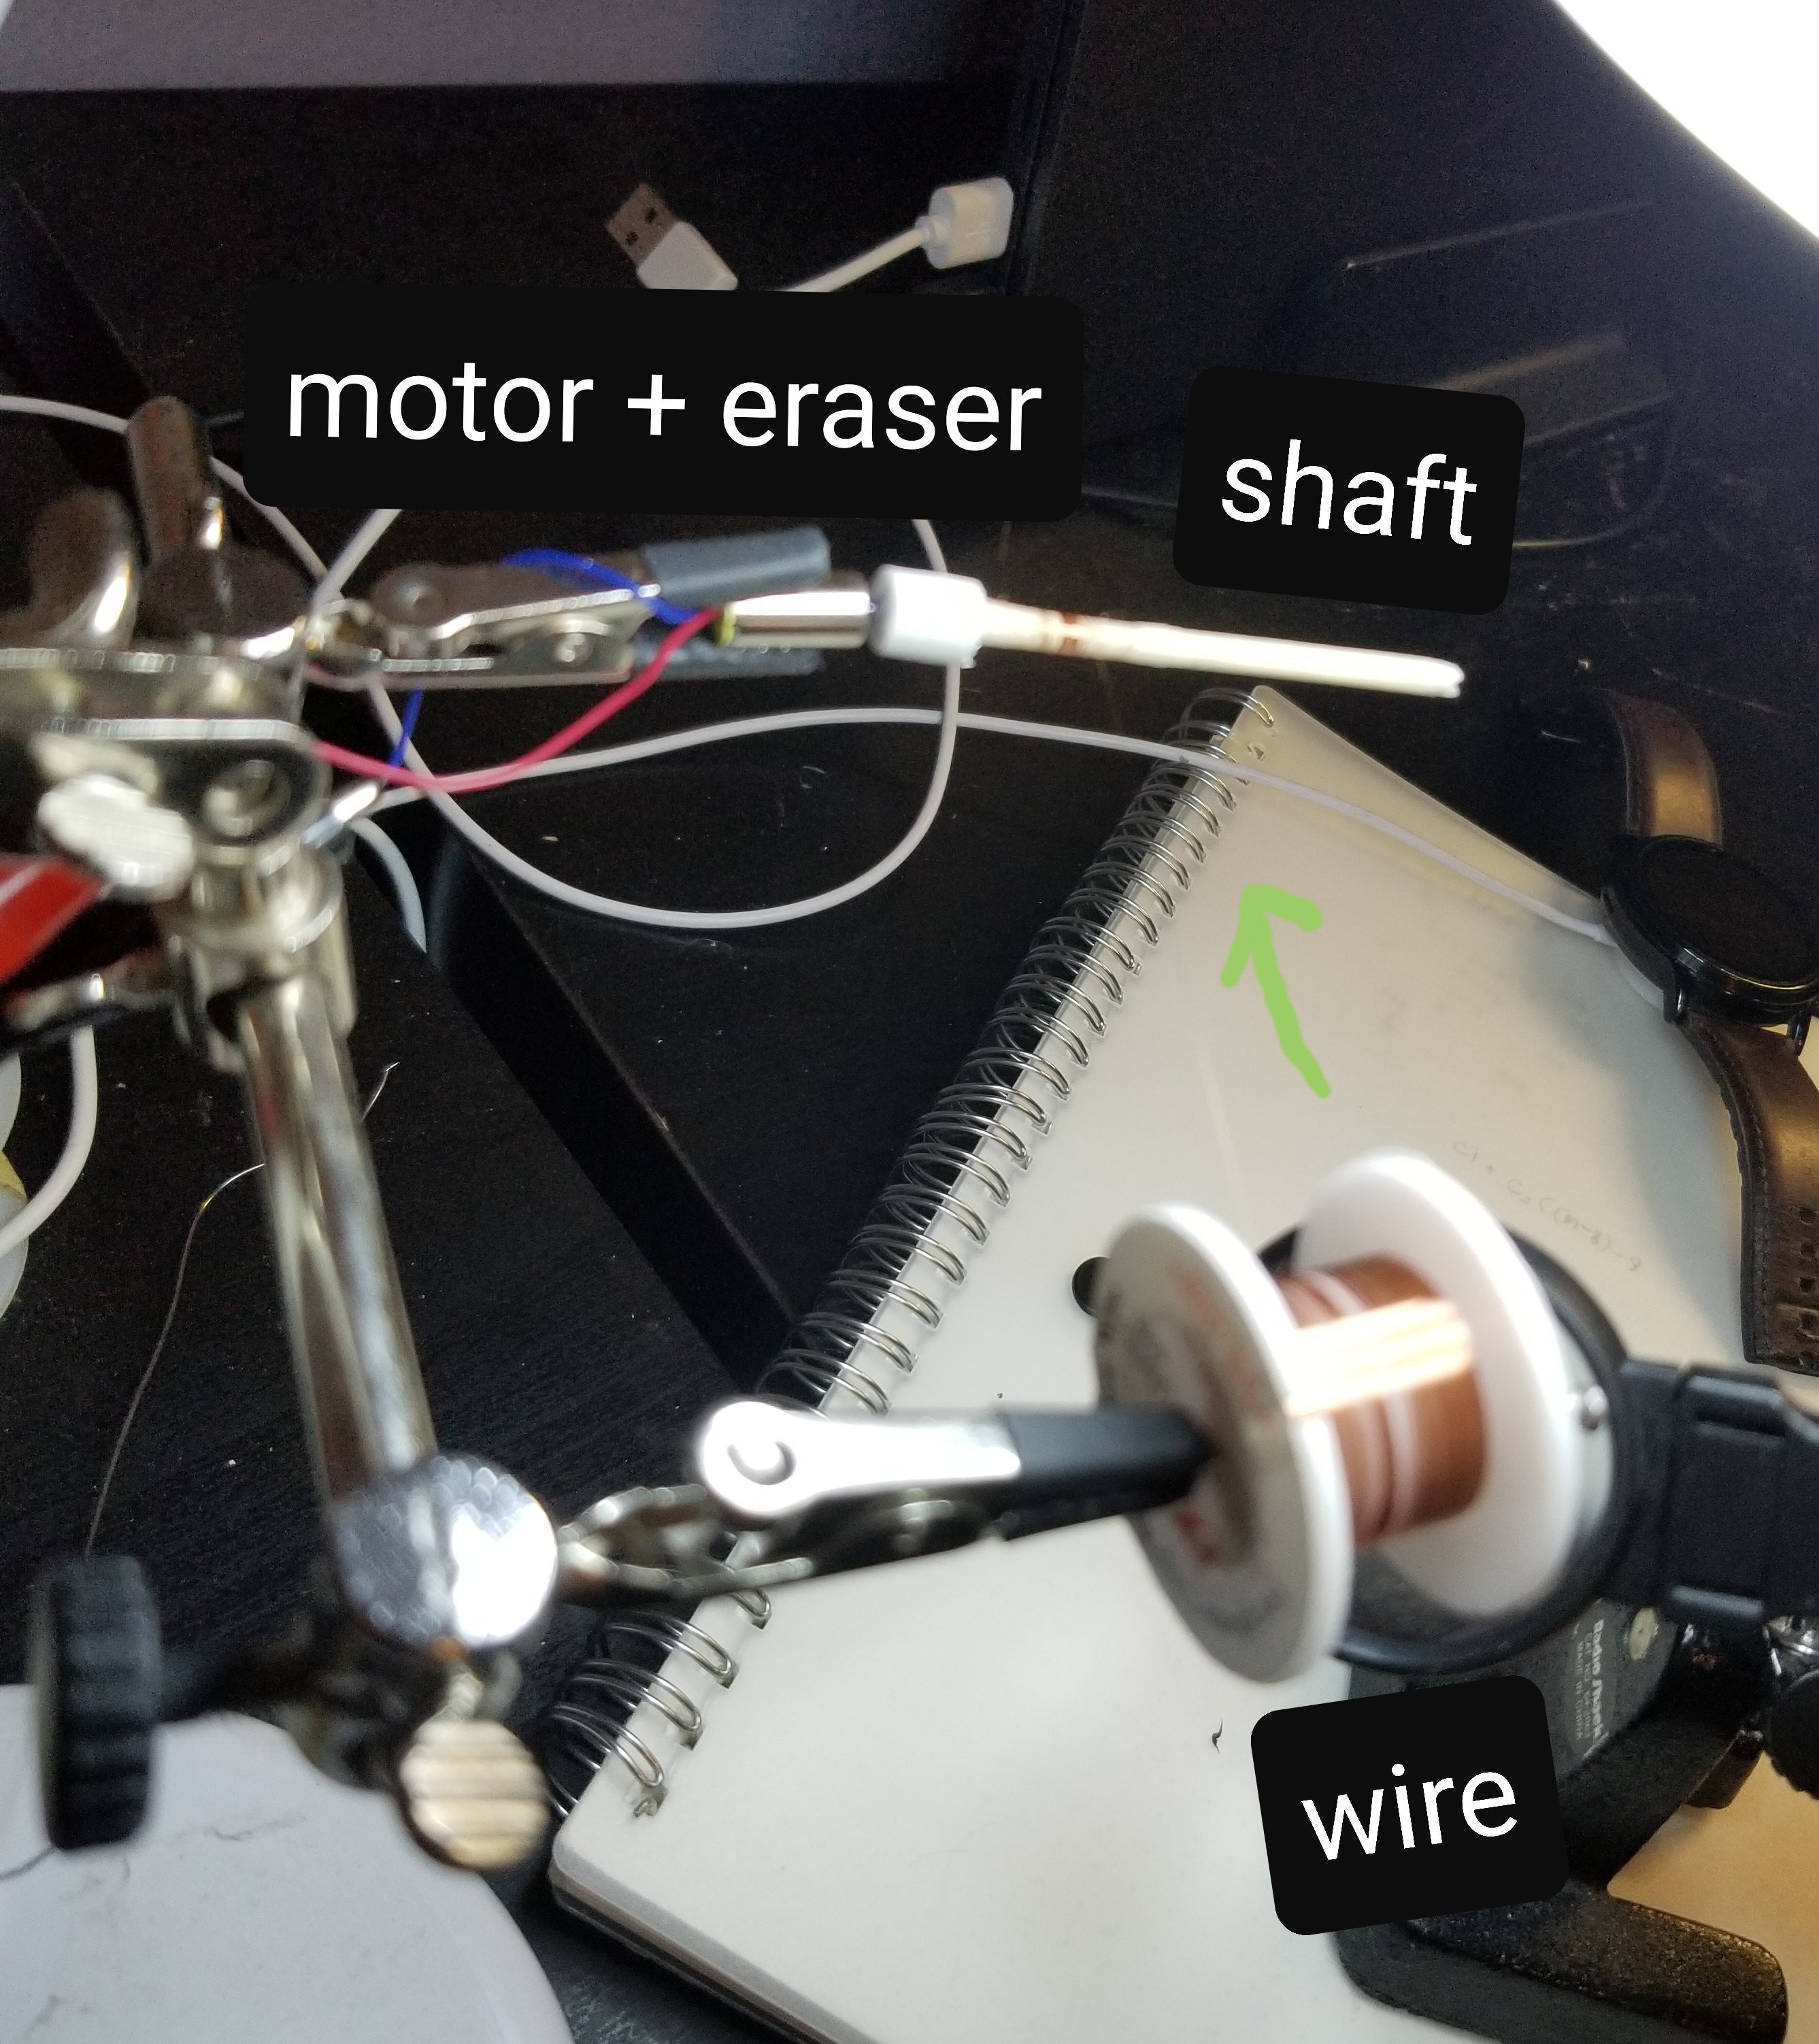
    Naturally, I decided to find the thinnest, cheapest wire I could fine (.02 mm). This unfortunately turned out to be a nightmare. It is extremely tedious trying to use .02 mm wire. It is thinner that a strand of hair, so it kept breaking under barely any force. To deal with this I built a setup below.  I used helping hands to hold the parts in place. The spool rotates on a nail while a tiny motor spins the shaft to wrap it. the shaft is made of a q-tip with painters tape wrapped facing sticky-side-out. I attached the shaft to the motor with a mechanical pencil eraser. I find that these make an ok-ish adapter when in a pinch.

    All this actually would have worked pretty well if it wasn't for the fact that the spool was hopelessly tangled up. At most I got around 60 turns before the wire broke. So I just ordered some .05 gauge wire that will hopefully be less likely to break, and have been wrapped better. I will make another post once it arrives. In the mean time, I'm updating the python code to calculate the heat produced by the wire.

  • Arm design

    josh collins09/03/2021 at 15:59 0 comments

    Antagonist solenoids

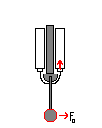
    Much like muscles, a simple solenoid can only move in one direction. The idea is to have two opposing solenoids pulling in opposite directions just like flexor and extensor muscles in an arm. This comes in handy when trying to hold a position while resisting outside forces. If you instead used a servo then you would only have a constant force in one direction. You can accomplish this with stepper motors giving more precision, but solenoids can distribute their weight throughout the arm, so it's momentum doesn't affect the movement as much, and they potentially take up less space in the design, especially since they can be driven by an analog voltage.


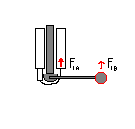
    In these examples the arm is vertical. In order to get the most force at the end of the arm, the solenoid force should be perpendicular to the arm. To solve this, I use a string guided along an arch to pull the arm attached to a pulley. The original force (F0) is 0 because there is no opposing force yet. 

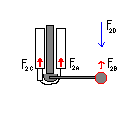
    The torque of gravity at the pulley will be the force of gravity * length to the center of rotation * sin( angle of arm ), where the angle is 0 when extended. The torque of the solenoid will be constant since the string is always pulling parallel. To hold a position, this gives us: F1A = (forearm length) * (force of gravity) * sin(angle) / (arch radius). To get a force F1B, we can do the same thing backwards and subtract the force of gravity at the end.

    You can add in outside forces like F2D here just like we did above. To use the opposing solenoid just subtract the force F2C from F2A. The Force over time of the opposing solenoids actually goes much deeper because a sudden opposing force will give different results because of the nature of solenoids, which I explained in previous logs. I will probably focus on that in the next log.

  • Many Small vs One Large Solenoid?

    josh collins08/04/2021 at 18:39 0 comments

    The idea

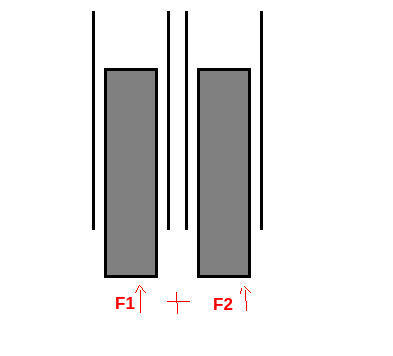
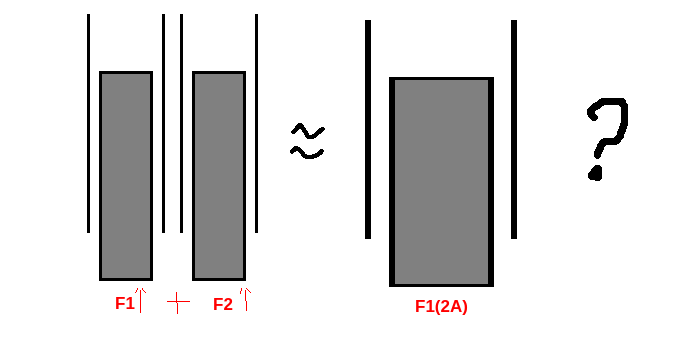
    If you have one solenoid that produces a single force. You can of course double this force by having two of the same sized solenoids next to each other pulling up on the same object.

    This of course will use up 2 times the amount of current though. What happens if we double the amount of solenoids, but shrink the cross sectional area to have a diameter 1/2 the original size?

    This may seem like an obvious answer for some, but I wanted to make sure my assumptions were correct, just in case.

    To test this I added this code to the code from my previous log: 

    # Note that these parameters are mostly arbitrary, 
    # since the state of the solenoid doesn't really
    # matter. All that matters is the difference in
    # the measured forces 
    # between different 
    # This will be the applied current
    current = getHoldingCurrent(opposingForce)
    voltage = current*resistance
    # The time change were giving the force function
    t = .001
    # The quantity of solenoids
    quantity = 1
    # The distance that the core is inserted into
    # the solenoid for this test.
    l = length/2
    r = resistance
    
    # Stores the previous force so we can find the
    # difference between it and the new force.
    last = 1
    sum = 0 # Used to find average change in force
    n = 30 # Number of tests
    f = 0
    for i in range(n):
        I = current/quantity
        f = quantity*force(I, t, l, 0)
        print(f)
        sum += f/last
        last = f
        coreRadius/=2
        crossSectionalArea = m.pi*(coreRadius**2)
        quantity*=2
        resistance = r/quantity
        I = voltage/r
    
    print("Average change in force when replacing a solenoid with 2 solenoids with half the diameter F1 = F0*", sum/n)

     Results:

    5.889953125000001e-07
    7.362441406250001e-08
    9.203051757812501e-09
    1.1503814697265627e-09
    1.4379768371582033e-10
    1.7974710464477542e-11
    2.2468388080596927e-12
    ...
    9.977968709316854e-28
    1.2472460886646068e-28
    1.5590576108307585e-29
    1.948822013538448e-30
    2.43602751692306e-31
    3.045034396153825e-32
    3.8062929951922815e-33
    Average change in force when replacing a solenoid with 2 solenoids with half the diameter F1 = F0* 0.12083335296651042

    Conclusions:

    As you can see, the force decreases significantly when we replace a single solenoid with two having half the diameter. This is because the cross-sectional area is a dominating factor in the force since it is used in the calculation of both the inductance and the force. Another reason the force goes down is because we are actually decreasing the cross sectional area, because two circles with with diameters equal to the original radius, will have a smaller area than the original circle. One way we might improve is by instead of doing half the diameter, we use diameter / sqrt(2) which gives an equal cross sectional area. This is still defeated by the resistance that goes down each time we double the solenoid count, and therefore require a larger current. If we keep the current the same, then each individual solenoid will receive less and less. Basically It is a bad Idea to use many small solenoids, and the bigger the cross sectional area, the better.

  • Converting calculations to code

    josh collins07/24/2021 at 04:16 0 comments

    Now that I have formula for finding the force I can put it into code, which will allow me to use different parameters for things like the size of the solenoid, the relative permeability of the core, the core mass, and so on. I can also plug in other functions in place of variables, which is particularly useful for finding the self inductance over time because it depends on the position of the core.

    CODE: https://github.com/gramcracker/flexor/blob/master/calculations.py

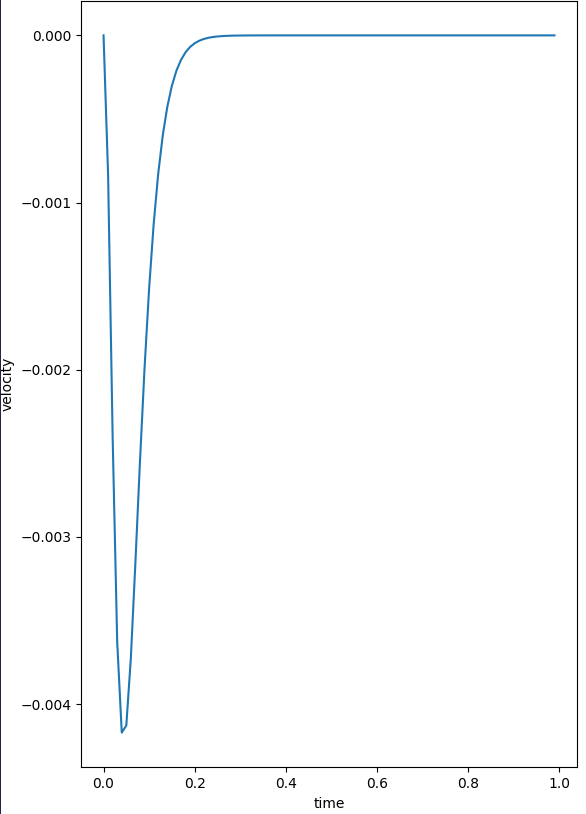
    Test 1.

    Using a python library called matplotlib, I am able to visualize the data, and make sure that it matches up with what I expect to see. In the code I use a series of functions to find the velocity over time based on the changing inductance. My prediction was that if I calculate the current needed to hold the core at a arbitrary position, and I plug it into the velocity function over time it should go from negative velocity to 0, meaning that it is being held in position. You can see that is exactly what happens.

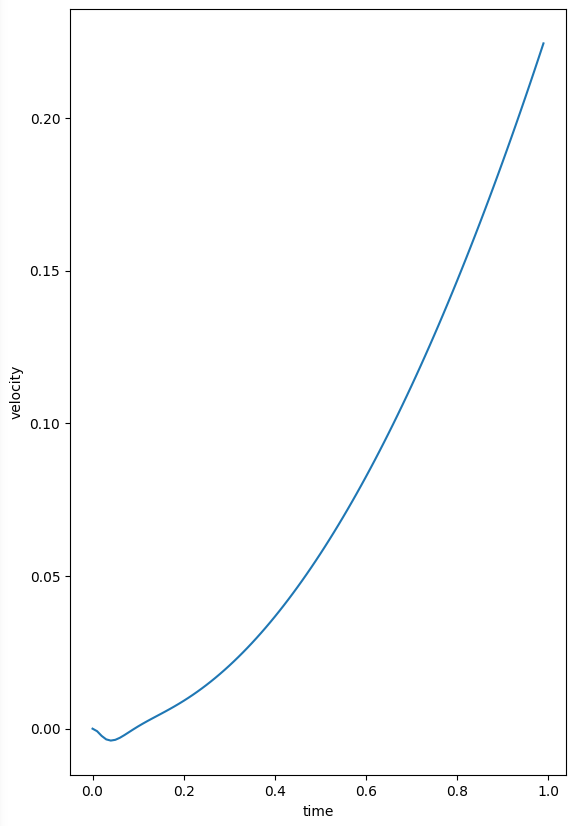
    Test 2

    Now if I increase the holding current a smidge, I should see the velocity continue to go up, instead of plateauing. This is exactly what happens in the graph  below. This result is from just a .01 increase in current! Notice the little dip at the bottom showing the pull of gravity getting smoothed out.

    Now I can use something like an arduino, and program it as a driver to take a position to move to and the time to travel, then with the calculations above, determine the current to move to the position. When / slightly before (to get smoother motion, or better power consumption) the position is reached, the current should be decreased again to the holding current.

  • Recalculating

    josh collins07/20/2021 at 05:56 0 comments

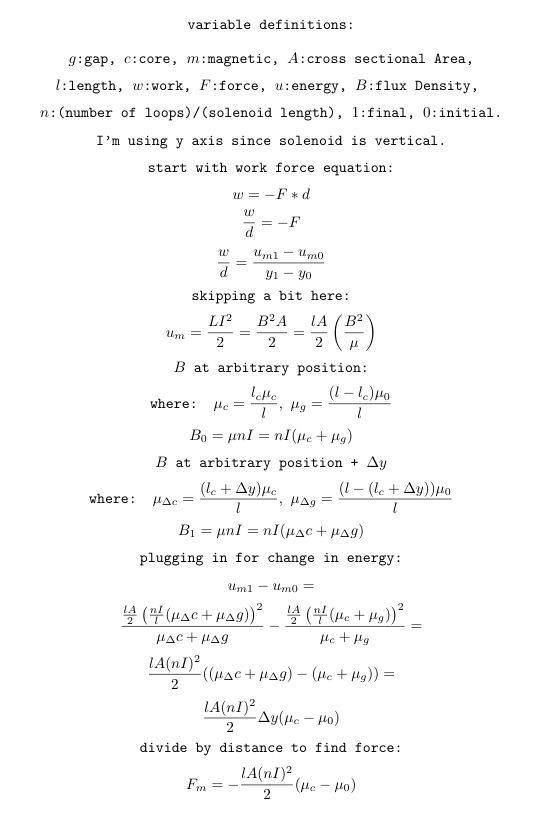
    In the post before the last, I realized I had miscalculated, so this is my fix. It's almost the same Idea, except I find the change in energy over distance, instead of using energy explicitly at an arbitrary point. I have also done a comparison to another interesting coil geometry that seems promising. I will show my calculation for that, and possibly other geometries in my next update though. I this version decided to add some variable definitions to help understand. I also skipped through simplifying a little bit.

  • Mistakes were made

    josh collins07/18/2021 at 05:18 0 comments

    In my last post, I show how I thought I could solve for the magnetic force of a solenoid. I decided to use the equation of a solenoid with no core as the magnetic energy and find the force by plugging in flux density B of a solenoid with its plunger at an arbitrary position, then dividing it by the length. I didn't think about the fact that Force = change in energy / length. Instead I was trying to find force using a specific position, which doesn't really make much sense. I realized this the day after posting it, but I haven't had time to work on this lately, so In the next post I will rework the math.

  • Finding relation between current and force

    josh collins07/15/2021 at 05:35 0 comments

    NOTE: This is actually wrong! and I explain why in my next log.

    Explanation:

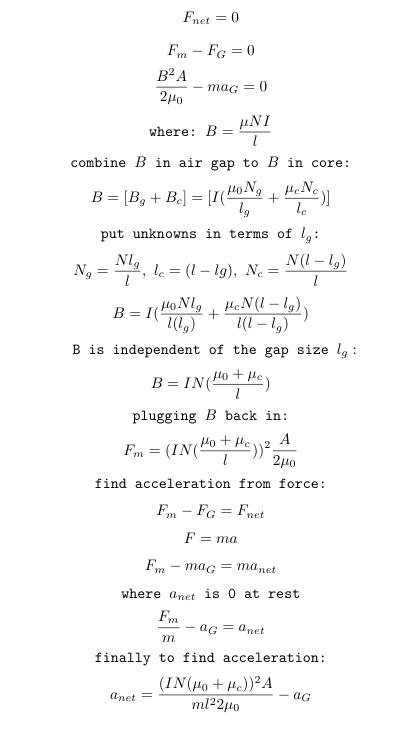
    Going along with my hanging spring analogy from last time, I can see that the net force between the inductor, and gravity would equal 0.

    That means that the magnetic force would equal out the force of gravity. I can find the force of a solenoid by multiplying the magnetic energy by the cross sectional Area A. Since the flux density B changes, I had to combine part of B containing the core and part of B with an air core. It turns out that after writing both B's in terms of the length of the gap, the unknowns cancel out, and the position of the core becomes negligible. I then plug B back in to find the magnetic force. now that I know how to find the magnetic force, I can use that to find the required current to hold a position, or to accelerate the core upwards.

    Solving for the force / acceleration:

     Python code to find holding current:

    import math as m
    
    gravity = 9.8
    #permeability of free space
    mu_0 = 4*m.pi*10**(-7)
    #mu_r means realitive permeability to free space
    # mu_r_ElectricalSteel = mu_0*4000
    # mu_r_PureIron = mu_0*200000
    # mu_r_Iron = mu_0*5000
    # mu_r_CarbonSteel = mu_0*100
    
    #NOTE: I tuned this number to get the calculation to match
    mu_r_unknown = mu_0*12
    
    coreMu = mu_r_unknown
    coreMass = 0.000785 #Kilograms
    length = .035 #Meters
    numLoops = 110
    coreRadius = .00165 #Meters
    crossSectionalArea = m.pi*(coreRadius**2)
    
    #Using formula to find current that can keep net acceleration at 0
    def getHoldingCurrent(opposingForce):    #NpA is just newton per amp because it's the force divided by current    NpA = ((numLoops*(mu_0+coreMu))**2)*crossSectionalArea / (2*(length**2)*mu_0)    return opposingForce/NpA
    
    print( getHoldingCurrent(coreMass * gravity) )
    
    #RESULT:
    #.85

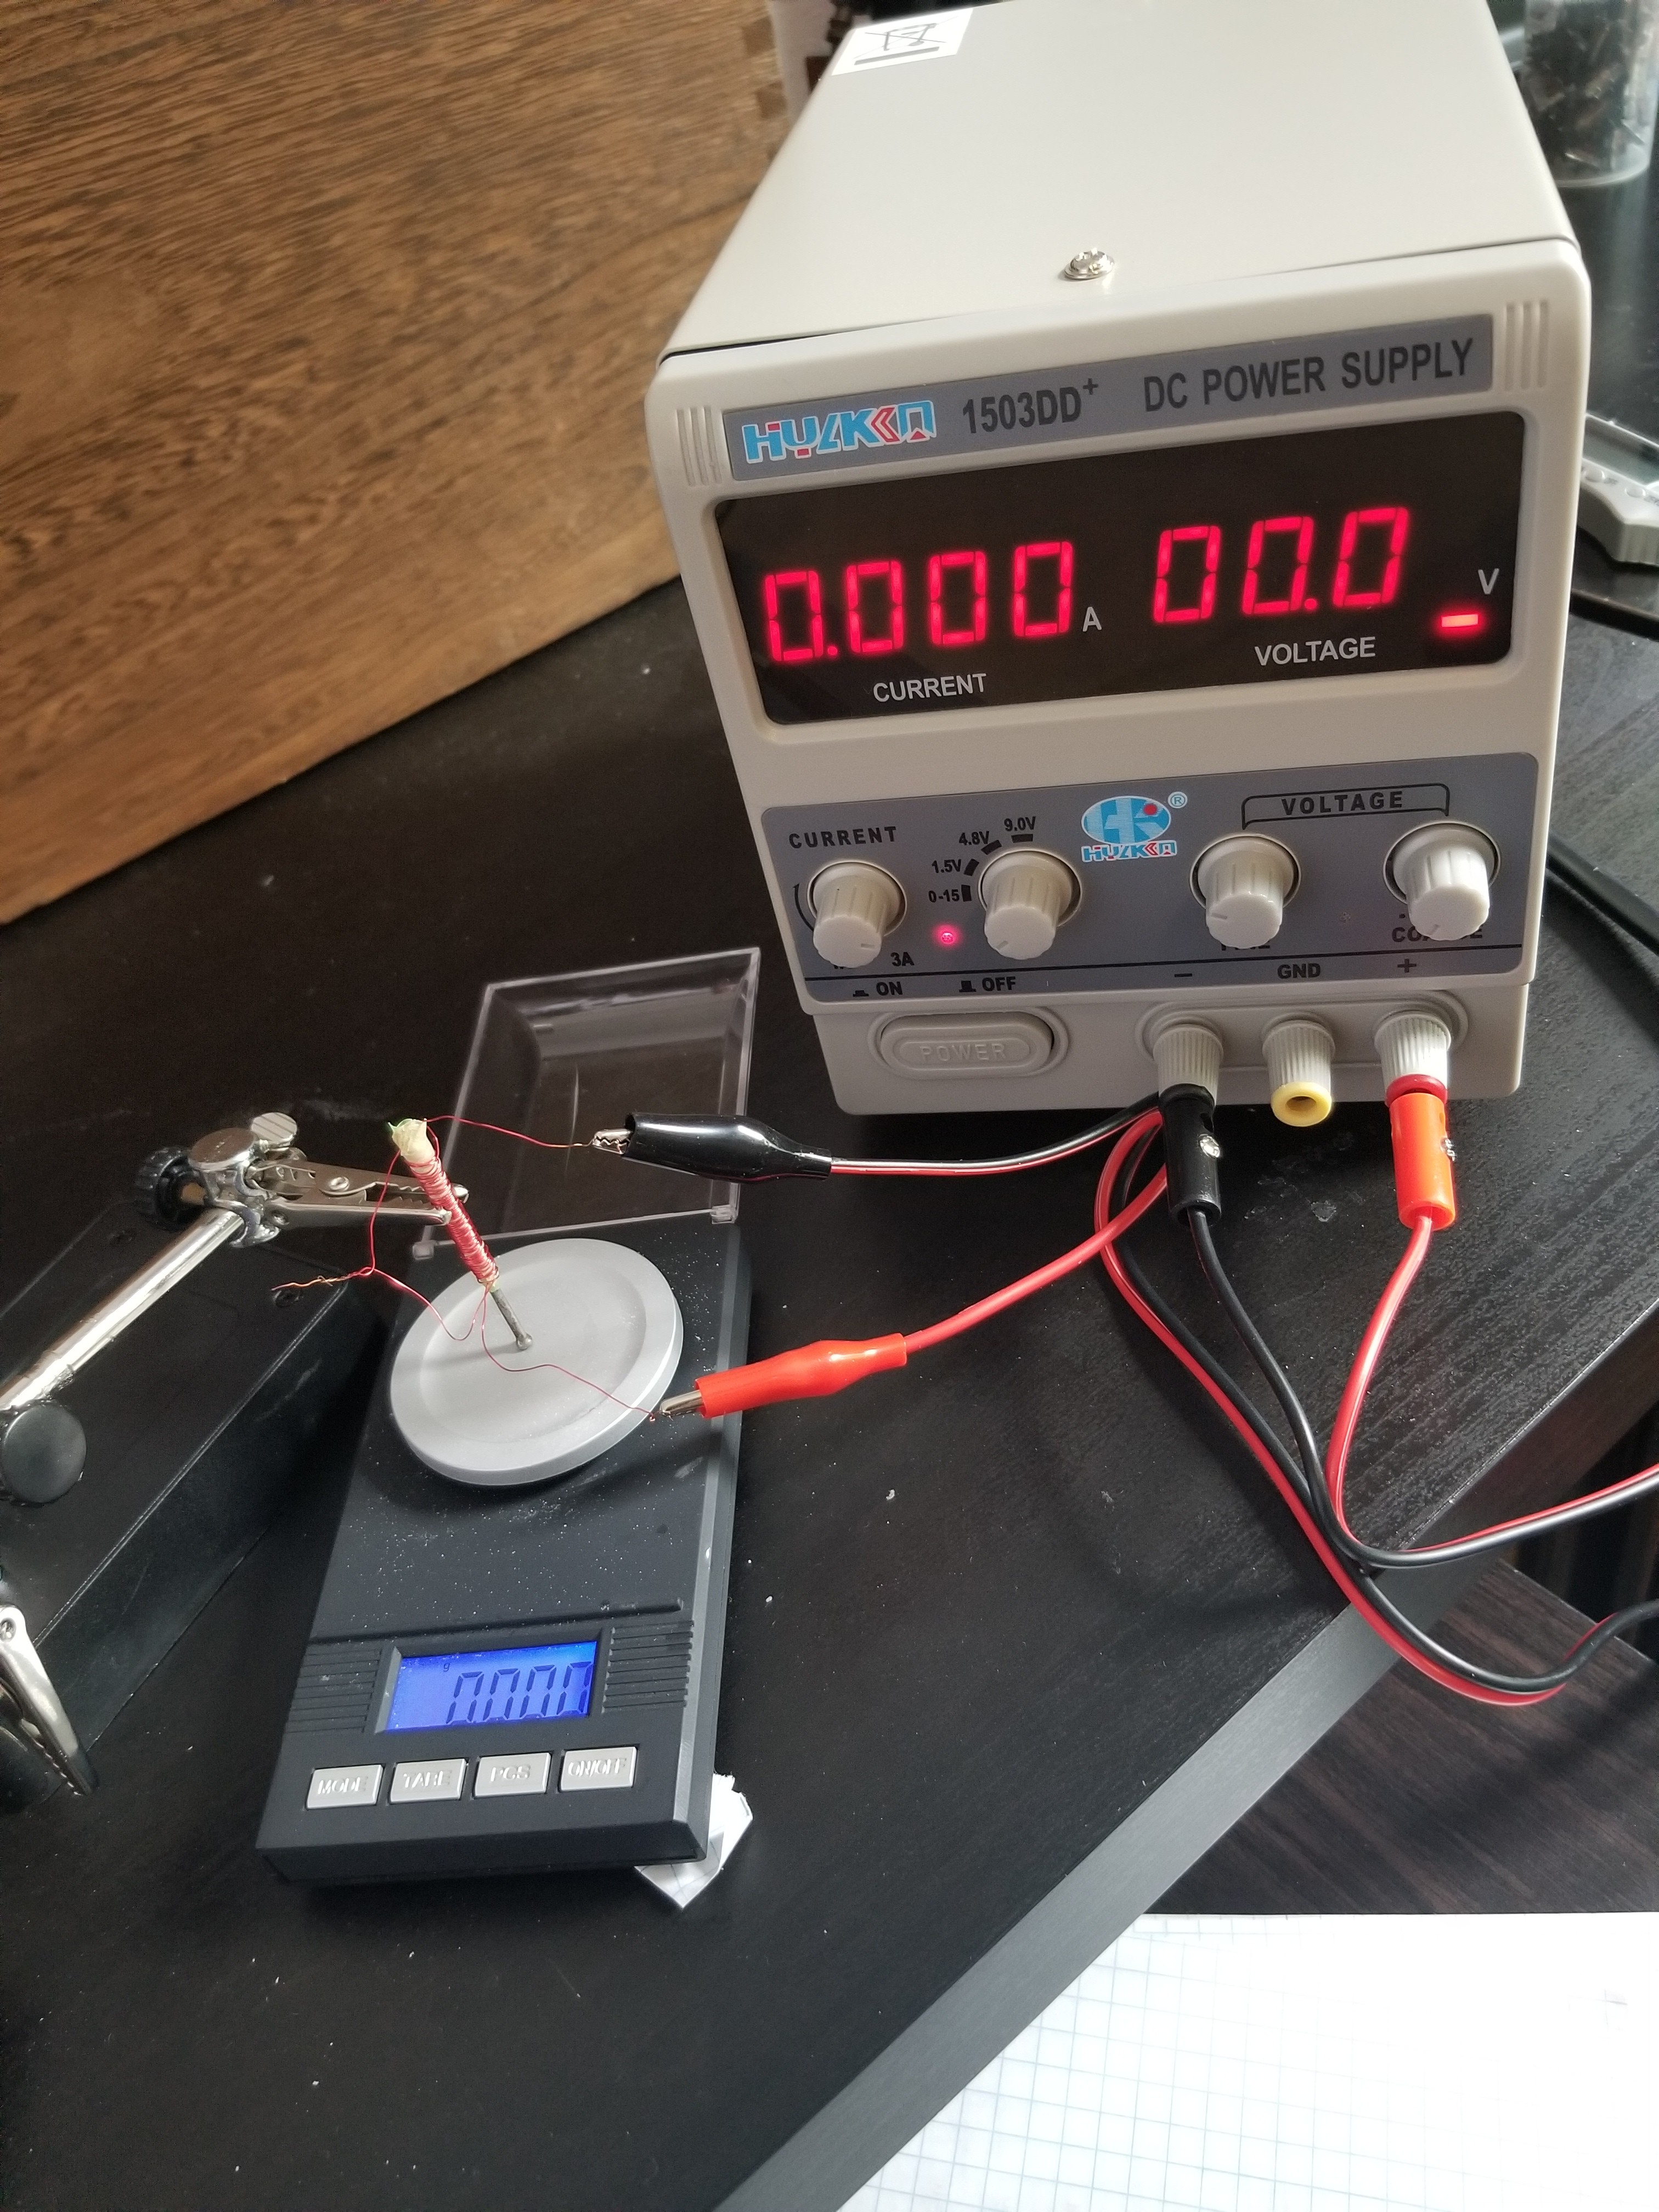
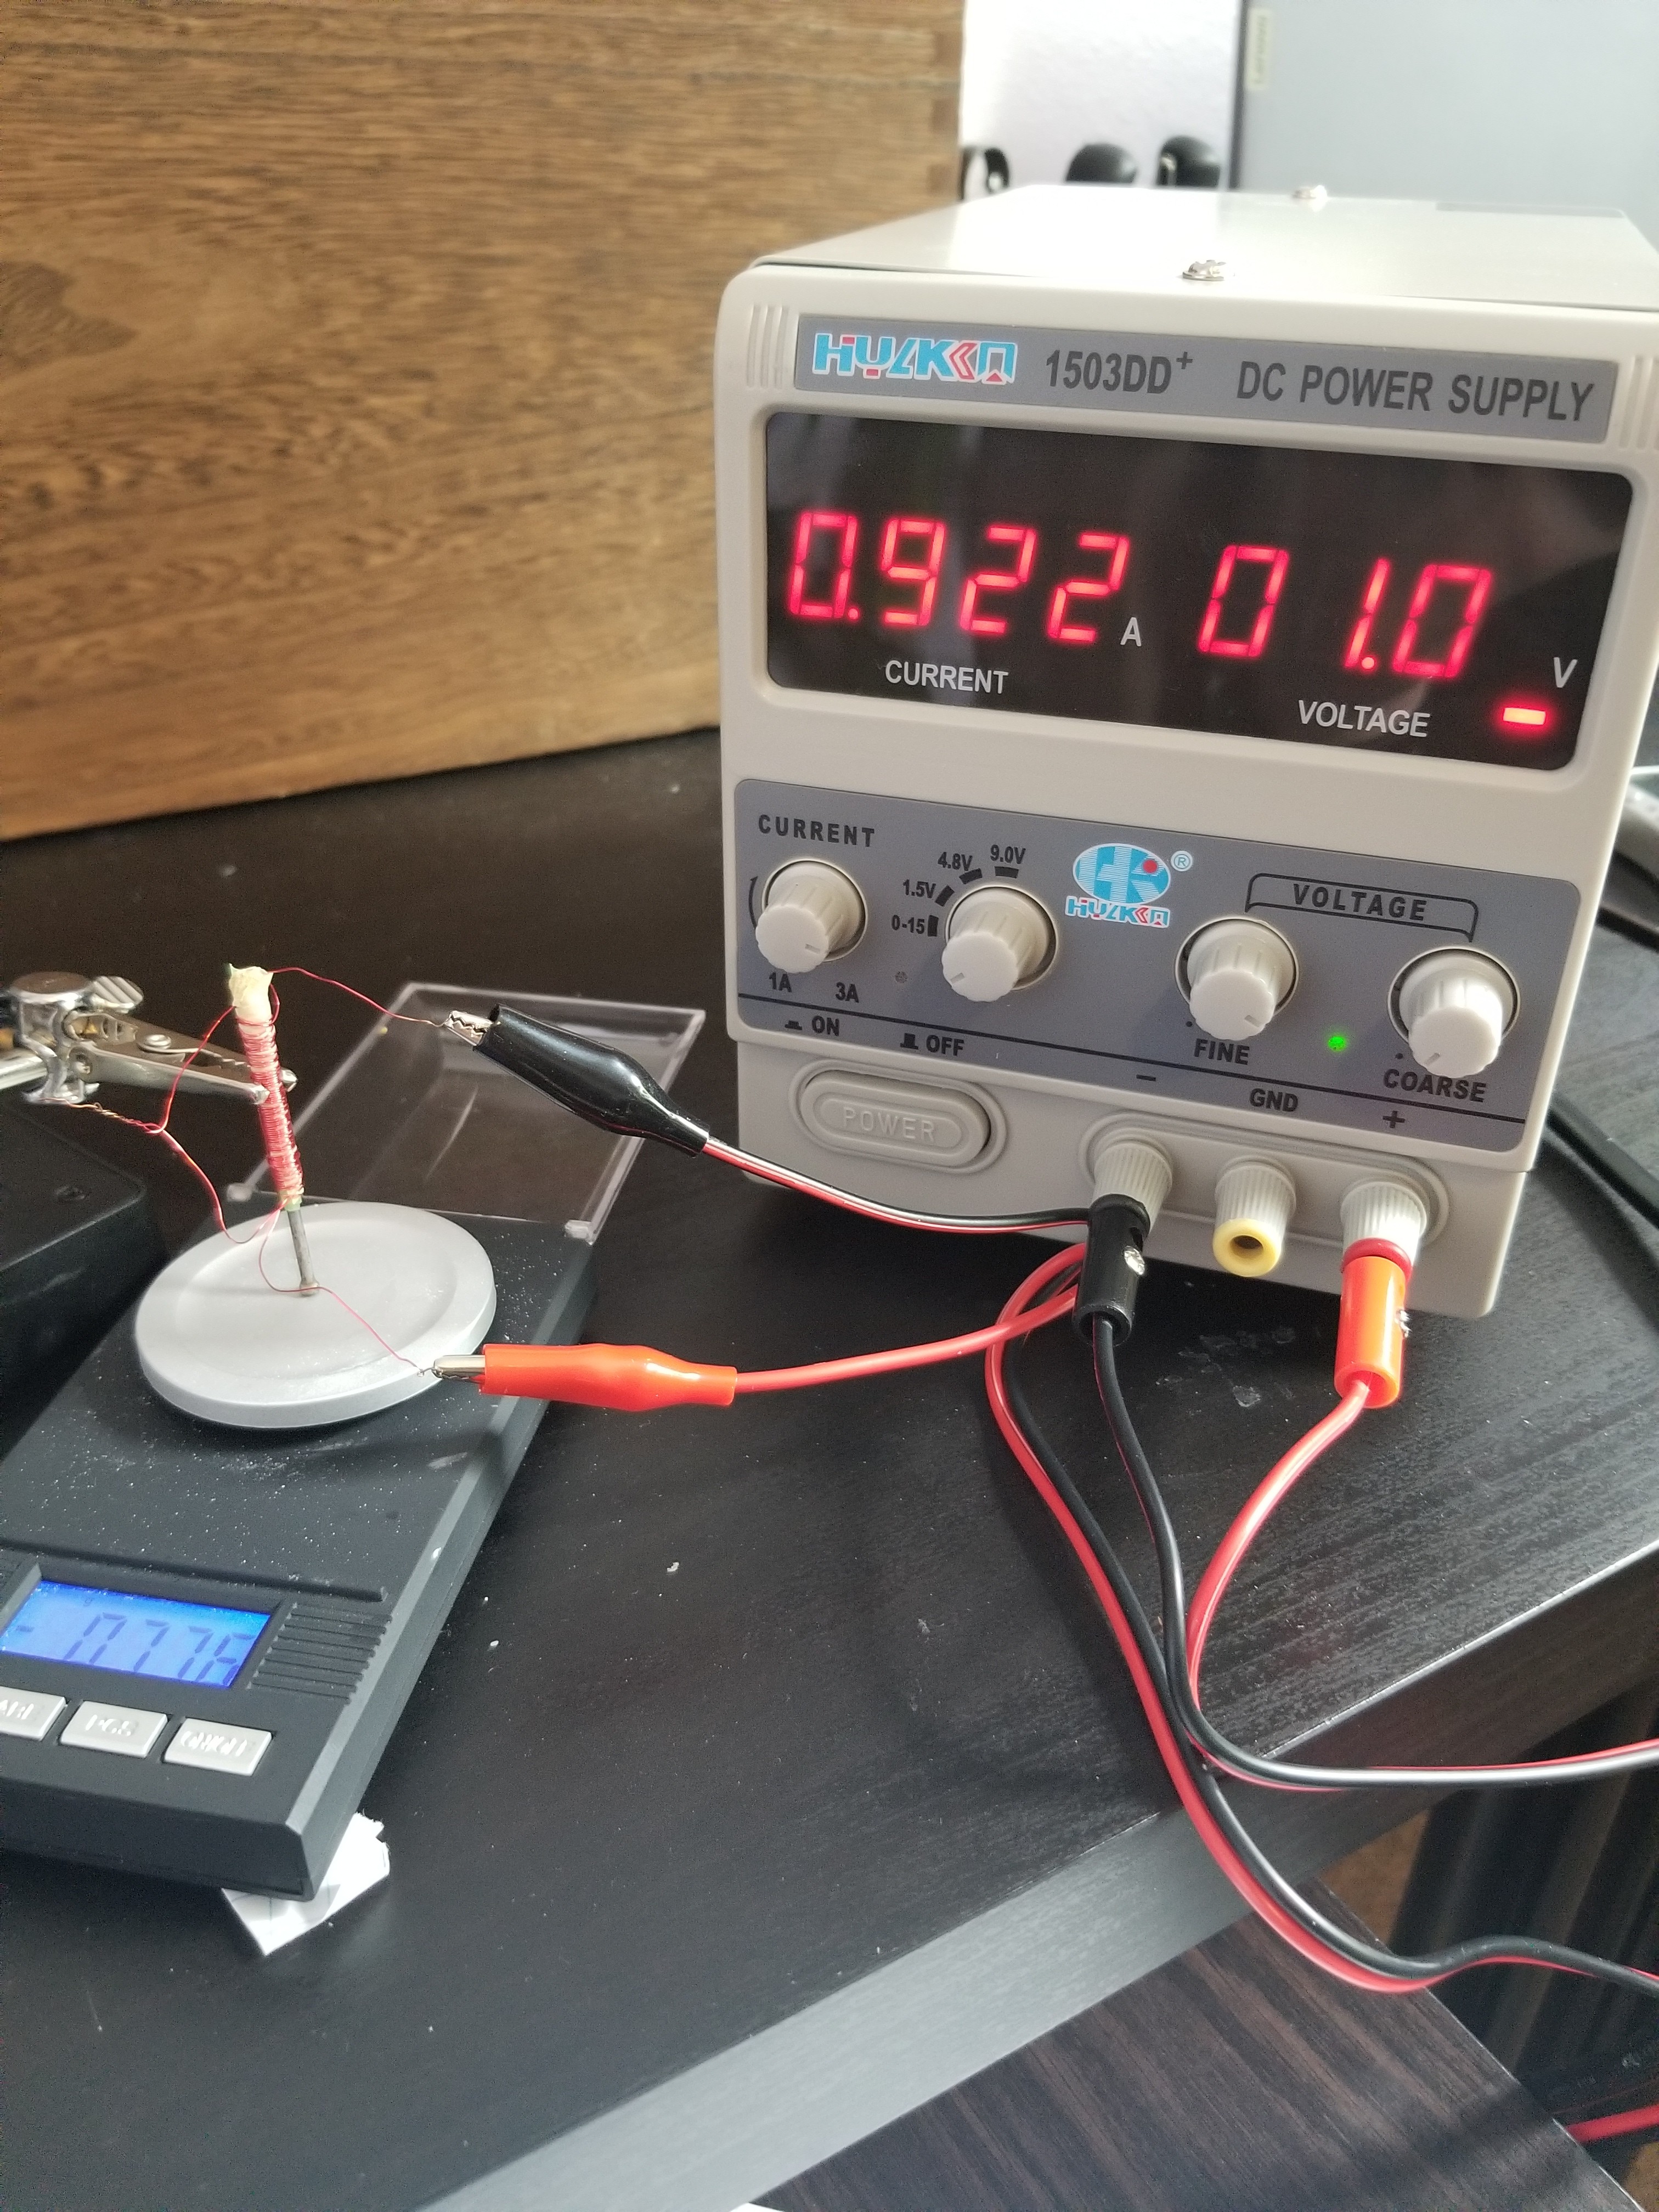
    Testing calculations:

  • Magnets prove to be difficult to solve for.

    josh collins07/14/2021 at 06:46 0 comments

    Not the physics I'm used to

    Solving for the force of a solenoid with a plunger seems like it should be a simple equation, until I realized that the core isn't magnetized until it is induced, then there is a dipole moment, and then as it moves the core of the solenoid gradually changes from air to the core material. Of course this is a differential function. To simplify it I have come up with two different ways of thinking about it.

    In terms of energy

    The first and probably better way is to compare it to a vertical spring in a conservation of energy equation. Since I can calculate the magnetic energy, and differentiate it with respect to the change in y to find the force, I can equate the force of the solenoid to the force of the core mass * gravity, and plug in the

    Magnetic Circuit

    The second way I thought about it was as a magnetic circuit with an air gap. If the air gap is on a hinged arm, I can work out the incremental force of the field at the gap. I could also find the flux density by imagining unrolling the solenoid to represent a rectangular circuit. This would be useful for designing an enclosure. The air gap is located inside the inductor, so the flux density also changes based on the change in how much of the core is enclosed at a time.

    A new appreciation for magnets

    Looking into how to solve this has reignited my spark for magnets. It seems crazy that they actually work in the first place. Hopefully in my next log I will have some equations to show, and possibly some code. In later logs I plan on writing a driver based on my calculations in order to position the solenoid. 

  • Proof of concept

    josh collins07/07/2021 at 19:45 0 comments

    This is just a simple example of a solenoid to use as a reference in order to  get an Idea of how to improve the design. For This I just used .16 mm magnet wire, a finishing nail made of high carbon steel (probably), plastic straw, and some tape. At this stage, I can already tell that I can probably improve by using a different number of turns, smaller gauge wire, and a different material for the core. First I will take measurements, and do some calculations in the next log.


View all 10 project logs

Enjoy this project?

Share

Discussions

Similar Projects

Does this project spark your interest?

Become a member to follow this project and never miss any updates