Super 8 digitiser
Aiming for a low cost but high quality way of copying from super 8 cine film to a modern digital format.
Aiming for a low cost but high quality way of copying from super 8 cine film to a modern digital format.
To make the experience fit your profile, pick a username and tell us what interests you.
We found and based on your interests.
20211010_122900_HDR.jpgJPEG Image - 1.67 MB - 10/15/2021 at 11:19 |
|
|
I'm afraid I've been rather lazy about updating this project as it's moved on.
Some changes I've made have been:
Expect some updates next year as I get these modifications in place.
Finally, here's a scan I made on the original system using a camera phone and a paper screen. It's home footage by an unknown filmmaker. I would love to get the original scan back to them so, if you recognise yourself, do let me know!
Up to this point everything has been held together with bits of tape and the force of gravity. Rather than explain how I put this together in detail, I'll post some pictures. Essentially it was a matter of screwing the projector to a board to which I attached a cardboard screen and a wooden mount for a mobile 'phone, ensuring everything is in the same place each time I come to capture a reel of film.
Up to now I have been running the camera without any synchronisation to the projector, then manually removing duplicates and blurred frames. This is both tedious and time-consuming!
I have now obtained a cheap Bluetooth AB-Shutter control. I prised it apart with a knife to get to the push-button solder pads. My release has two buttons, one for Android and one for iOS. In practice either button triggers my Android mobile, so I just attached wires to the most convenient.
Once that was done I soldered those wires to some stiff household mains wire. A number of similar projects use a magnet and reed switch to sense frame advance. My cheaper and simpler approach is to use some conductive copper tape on the main pulley and arrange my two wires to be shorted across it once per rotation - aluminium foil would probably work just as well.
The video below shows how it works. I wanted to show how the Bluetooth shutter control flashed for each contact, but since it would only do that whilst paired with my smartphone, I ended up with a series of very short videos!
In operation it works very well, triggering the camera just after the claw has finished pulling down the frame, although I'll admit the timing was more luck than judgement.
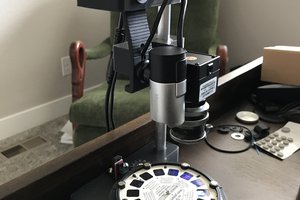
The photos below show my experimental set-up. It's simply a gutted projector with a slower motor and a cooler LED lamp. The lamp still gets hot, so is cooled by a fan. Its wide beam is also masked off by a piece of foil. A smaller LED would probably be a much better solution, but I'm using what I had available.
There's a book propped up as a screen and a gorillapod stand for my camera-phone to photograph the frames as they go by.
I'd like to mount this in a more solid manner, with some enclosure around the screen so I can operate the system in the daytime. The fan needs to be moved to allow for a bigger take-up spool and I need to be able to plug in a power cable for my 'phone whilst capturing - at the moment the USB socket rests on the table. Other additions would include a shutter release switch to synchronise the projector and camera and some way (VNC, miracast?) of viewing the screen remotely.
Super 8 only has a frame rate of 18fps, so there's a visible judder to the movement. In order to smooth the motion I attempted to apply some frame interpolation using RIFE ( https://colab.research.google.com/github/HeylonNHP/RIFE-Colab/blob/main/RIFE_Colab.ipynb ) . The frame rate here was doubled to 36fps.
Whilst the camera movement looked smoother it also looked less natural. The process also introduced some strange looking visual artifacts. Maybe this would have worked better with cleaner input frames. There are also a number of settings to adjust in RIFE.
For my second attempt at scanning, I increased the camera resolution from 1920x2560 pixels to 2448x3264. The resulting capture was not as good. Increasing the resolution increased the amount of visible noise on the pictures and they looked a bit overexposed too. I fixed the focal length, but left the exposure settings on auto. I'm using Open Camera on an LG G7 ThinQ.
I still have no sync between my camera and projector, so I had to manually remove blurred frames and duplicates.
This time I sorted out the keystoning by running the photos through ImageMagick and using the perspective transform to re-map the corners of the projection to the corners of a 1440x1080 rectangle. In this case the command was as below.
mogrify -distort Perspective '540,424 0,0 3140,388, 1440,0 680,2290 0,1080 2930,2370 1440,1080' *.jpg
I compiled the frames into a movie using FFMPEG, like this -
ffmpeg -framerate 18 -pattern_type glob -i '*.jpg' -c:v libx264 -pix_fmt yuv420p -vf crop=1440:1080:0:0 out2.mp4
My final result was less distorted, but otherwise inferior to my initial attempt
Here's my first attempt at a capture. I'm driving my projector with an old motor from a video recorder via some gears that came out of a flatbed scanner. My light source is a 50W LED which I've masked off with some foil. This projects onto a piece of card which I photograph with my mobile 'phone. As yet there's no sync between the projector an the camera - it just takes a shot every three seconds, which is close to the projector's frame rate. I used FFMPEG to combine the frames and came up with the file below. There are a few jumps where the camera moves, and horrendous keystoning - but I think it has potential
Create an account to leave a comment. Already have an account? Log In.
Thanks for following. Your project sounds interesting too. 800x600 seems quite a low resolution, but if you've been able to get good results then that's probably sufficient. I have tried using webcams for this in the past, but without much success.
At the moment I haven't done any real editing on my movie files, I've just used FFMPEG to compile the individual frames. I'm running GNU/Linux and I'm looking for some editing software so I'll give KDEnlive a go. I'm looking for something that will support colour correction and grain reduction.
I can't really see the mecanical aspect of the projector. So cannot see if what I will propose you will work. But what about controling the motor to make sure the frame will be in place before a camera snap the photo of the image. You could synch all this if the computer that control the motor be a raspberry pi with a camera module and the whole process would be very smooth and stable. Same as a few already said, if you project to a thin piece of paper and you flip the image you would have the perfect setup.
At the moment there's no synchronization between the camera (my camera-phone) and the projector. I'm aiming to add sync and there are two approaches I could use.
I could control the motor to advance the film every time a photograph is complete. The main advantage is that the film will run through at a rate determined by the speed of the camera. On the downside this does require additional hardware and software.
Alternatively I could trigger the camera from the projector. The film advances one frame per turn of the main shaft, so it's easy to trigger a contact each time. It will require some extra hardware ( a bluetooth shutter release ) but I shouldn't have to write any additional code to get it working.
with what you just told me I have a simple solution. But you will have to code some stuff. Take a arduino compatible module, put a switch that will sens the position of the main shaft. With that with the arduino you can control the motor. send a signal to a bt shutter from one of the pin as output wait a few second till the image is recorded start back the motor till the frame is in place ( sensor on the shaft) and the process continu. You will need to open the BT shutter and make sure you can access the input of the signal that trig the shutter signal to the phone it will surely be a line that you pull low. (if you dont want to interconnect the bt shutter to the arduino by fear of voltage level difference a small optocouple will do the job. This will make everything work in synch as the arduino will trigger every thing in sequence and even totally unintended in case a film is pretty long and the delay between shots are long ;-)
I don't think the arduino will be necessary in my set-up. As the projector is now, the film advances slowly enough for my camera to photograph each frame without pausing, so there's no need for a controller to slow things down. The film gets pulled through the gate with an intermittent mechanism so the projected image is only moving for maybe a sixth of the time it takes for the shaft to rotate. This leaves me plenty of time to get a good still image.
It's possible I might need some extra time if I were to try HDR photography, in which case I'd try something along the lines you're suggesting. I have some spare ESP8266 modules and could add a relay control for the projector motor if needed - but I'll keep things as simple as possible for the time being.
If you have an esp8266, I think you would be able to simulate the BT shutter in software as if memory is right (which is not always true) the esp 8266 can do BT It would be even simpler than any other type of control.
That is what I did (see comment below) - detect, when the picture is in place using the projectors capabilities. And also I made a foto of the backlit picture, I did not project it on any screen.
Could you use a thin paper screen, like tracing paper for a projection surface. Then just use any camera or smartphone to snap a picture of the backside of the paper screen, and perform a digital edit to fix the mirror orientation.
Also you could probably remove any glass optics and just project straight from the light onto a paper screen, use a digital edit to fix the oblong shape.
I've not tried back-projection because that comes with an extra set of problems. I'd need something stiff enough to stay flat and it would need to be evenly transparent. Ideally I'd want to use a ground glass screen so there's no more depth than needed. Photographing a reflected screen is simply easier. Since I'm capturing at around 4K resolution, scaling each image to 1440 x 1080 is straightforward enough and doesn't noticeably degrade the image quality.
Nice project. I did something similar with the 8mm movies of my father. But A little bit different, I think: I made a photo of every single frame using a webcam and afterwards used mencoder to build a movie out of the frames. I also noticed, that the old webcam was sufficient, because the resolution of these old films was so bad. (my small project log, only in german: https://zappzarazupp.de/index.php?page=8mm-filme-digitalisieren)
Danke! You have a better optical set up than me. My system needs the projector and camera to to both focus on the card screen. I use FFMPEG rather than Mencoder, but I think they work as well as each other.
Become a member to follow this project and never miss any updates
By using our website and services, you expressly agree to the placement of our performance, functionality, and advertising cookies. Learn More

 W. Jason Altice
 Mike Rigsby

 Gradivis
Interesting project. I've been planning something similar to digitise a lot of old Standard 8mm film that my father took in the 1960s. I have a Eumig projector and was going to make a screen using the white backing from a broken laptop display as a screen. If I can make a proper mount for it, by adjusting the angle it should be possible to cancel out any geometry errors due to the camera and projector being off axis. I intend to try this with a Logitech webcam. I am a long time Linux user and found a nice webcam tool called UVCview for controlling the webcam. It has image control to adjust exposure and colour balance, and both frame rate and frame size control. After some test I decided that 800x600 was adequate as the original film was onlu about 480x360. The synchronisation is going to be the problem. I am looking at how to hack UVCview to get at the "shutter" trigger. I have managed reasonable results with no sync and the camera running at 30fps. I've been using KDEnlive to edit with, and this has produced good results with upscaling to 720HD. I'm a retired video editor, and haven't done any DIY video since the days of analogue tape! I shall follow your project to see how you do.