Pero
Pero-
Grounding & Wiring
12/17/2021 at 23:23 • 0 commentsIt turned out to be a problem in my wirings.
What I thought was the most logical pinout of my audio socket turned out to be wrong. When a 3.5mm jack is plugged in, the tip of it gets tied to the metallic shielding on a pin 2, what made me initially believe was reserved for the GND, that is for the sleeve of the jack. But no, it's tied to the tip.
There also seems to be an error in the datasheet, bc after inspecting it, it turns out that pin 3 is actually jack sleeve, while pin 1 is its ring. After inspecting the connecter with a more caution this time, I found out that proper way to connect it is :
Pin 1: R (jack ring)
Pin 2: L (tip of the jack)
Pin 3: GND (sleeve of the jack)
Pin 4: NC (metal piece tied to the Pin 2)Unfortunately, it only improved a little my signal-to-noise ratio. After examining contacts with multimeter for the 100th time, and left without ideas, I fiddled with the jack in and out of the socket. And marvelously, found a position where the sound gets crystal clear!
Crystal clear sound only comes out when:
HPLOUT is tied to the R in+
HPROUT is not connected
GND is tied to the L in+
Additionally, extra noise reduction is achieved when the GND from PB is tied to the PE of the amplifier (that is also tied to amp gnd at one single point)This is very curious, since the preamp behaves as it is a differential input amplifier and it is not.
-
Streaming Spotify music
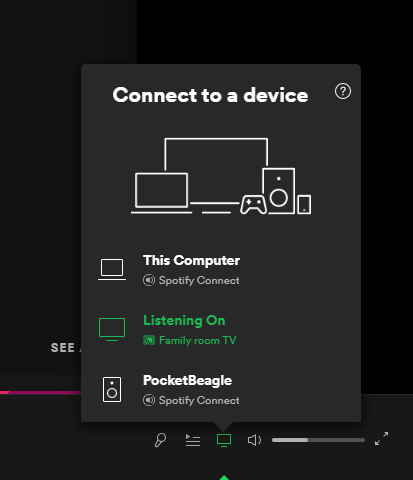
12/13/2021 at 22:27 • 7 commentsAfter finally getting the sound to play, at least on my headphones, the main part of my project was due: making Spotify stream from my PocketBeagle!
This turned out to be the most simple task of all so far. I literally followed the instructions from Raspberry Pi installation page, even though, I'm not using the Raspberry Pi. I didnt even bother building the code from the source. And it worked, from the first try! How cool is that?!
I put my Spotify user data in the config file (.config/spotifyd/spotifyd.conf ) and started the program, in no-deamon way: ./spotifyd --no-daemon. And there it was. No error messages in the kernel, just a banner with "Started A spotify playing daemon" tagline. And on my smartphone/destktop app there was an option of casting the music stream onto the PocketBeagle:
And it connected effortlessly. The music was on, controlled by my Spotify app. It worked! Excitement!
I also got the daemon service running, so that all of the stream messages run in the background.
-
Finally, some music
12/13/2021 at 22:11 • 0 commentsI'm using this project in a combination with my previous project, the HiFi Audio Amplifier, for my home music system. Unfortunately, I didn't manage to get anything more than noise and hum out of my speakers.
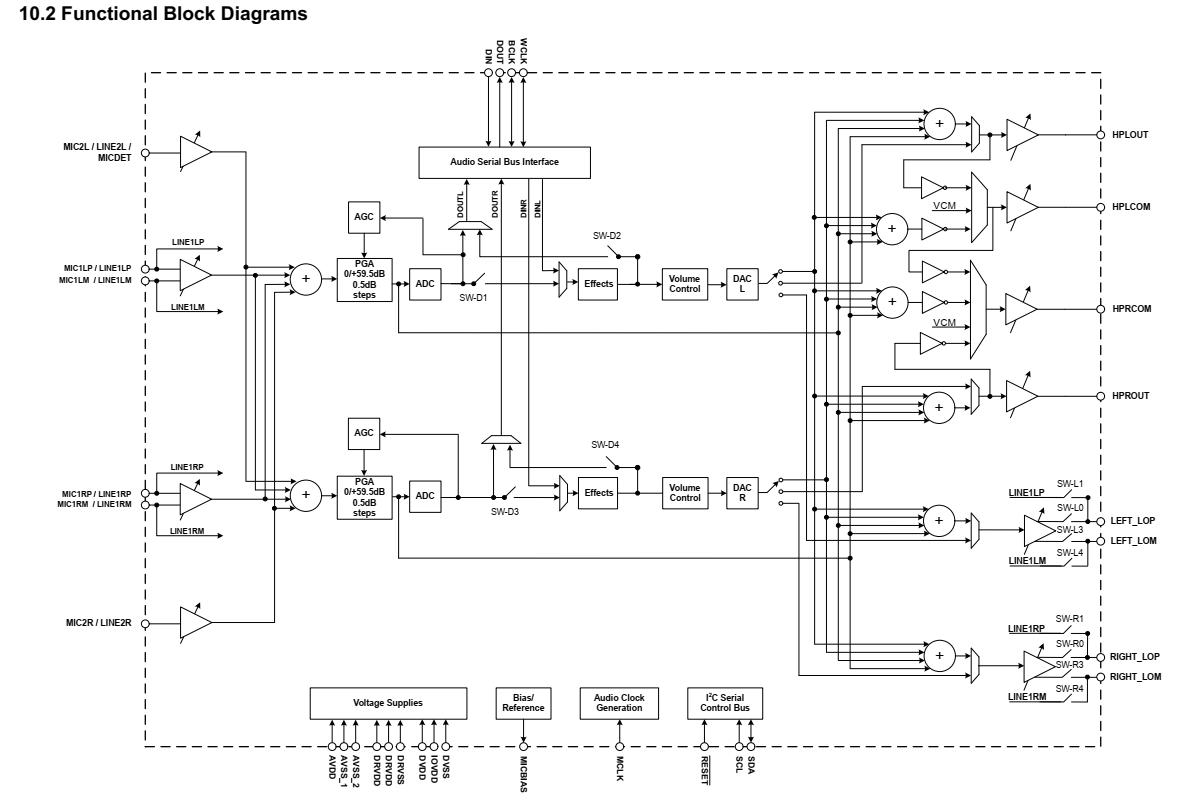
With hope that all is okay with my hardware, drivers, and the device tree, I needed a way to easily configure my codec properties, until something happens. To make a sound comes out, or, really anything, that noise was unbearable. How can I change the codec settings, like the volume, filtering, mixing etc. if Linux by default doesn't let you play with the registers once they're used by kernel?
Well, there comes a programming interface to configure some pieces of code in the kernel, dedicated specifically to the sound cards, called ALSA. It allows you to play any sound file, using the program called aplay, or to mix the output channels, using the program called amixer.
The amixer lets you change all of the user options implemented in the TLV320AIC codec, like various sound levels, mux control, AGC and so on. The block diagram of the codec comes really helpful in understanding what to configure:
For example, to get an output from the high power outputs of the codec (HPLOUT and HPROUT) I need to route the two DACs (L and R) to their respective outputs. For that I would need to look closer into the settings like HP, HP DAC, Left HP Mixer DACL1, Right HP Mixer DACL1 and similar. My basic settings were
- 'HP' is on, so that the HP outputs are turned on
- 'HP DAC', that is DAC volume control is turned on to max
- 'Left DAC Mux' is set to DAC_L2, since I want the sound directly from the DAC, no mixing with other channels
- 'Right DAC Mux' is DAC_R2, same reason as above
- 'Left HP Power Down mode' is set to high impedance as well as the 'Right HP Power Down mode'
amixer is very versatile, but crazy hard to work with. It is a command line program, based on set/get procedure. You need one PocketBeagle ssh session to play a sound file in a loop, and another session to fiddle with the amixer. I spent an immense amount of time configuring the sound card this way, until I learned there is a much more user friendly, graphic program called alsamixer, where I can configure all of it, using only up and down arrows.
In the end, I managed to get some music playing, but not on my amplifier, where I wanted it. Only when I plugged my headphones in, I got the crisp clear sound coming out.
-
I2S Data
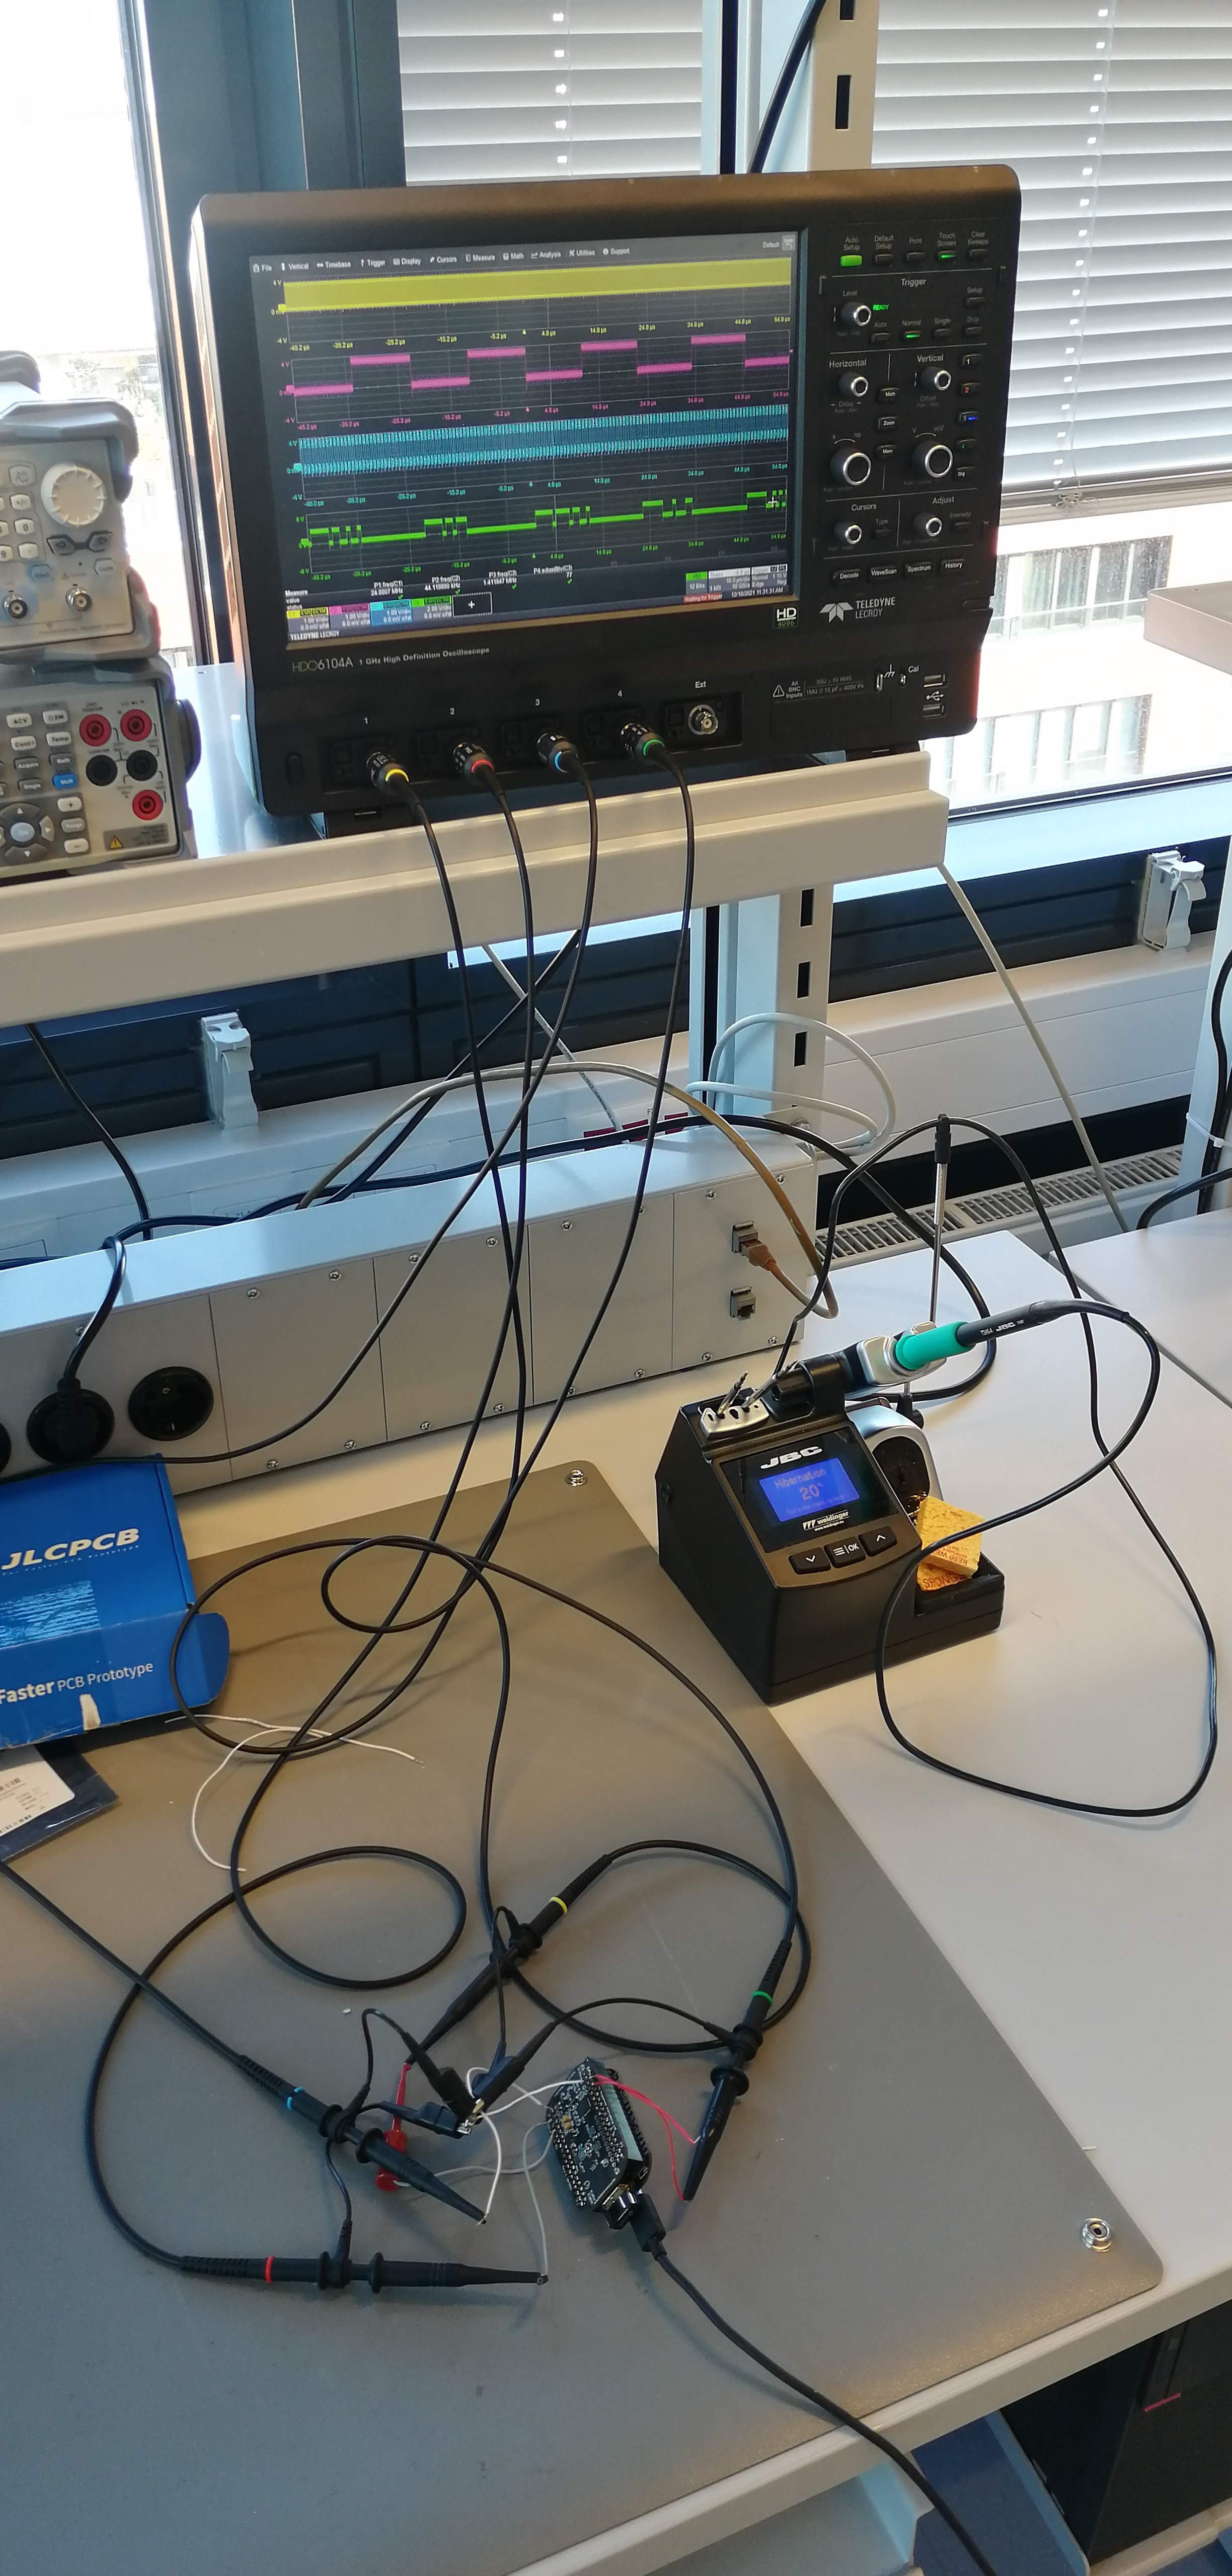
12/12/2021 at 21:07 • 0 commentsHooking up my sound card to the scope revealed the following:
- Master clock at 24 MHz
- Word clock (a sample rate) at 44.1 kHz
- Bit Clock at 1.41 MHz
![]()
Knowing that desired audio file has the sample rate of 44.1 kHz, 16 bit resolution, and two channels, the bit clock of 44.1 x 16 x 2 = 1.411 MHz works out fine. Data is emitted only during the low-phase of the WCLK, which is unexpected, since the datasheet specifies that, in I2S mode, the data should be emitted in both phases (for the left channel during the low phase, and for the right channel during the high phase).
-
Device Tree Overlay
12/12/2021 at 20:31 • 0 commentsWhen I was researching for this project, my first find and the inspiration was Bela, the audio platform based on the BeagleBone. Bela utilizes the same TLV320AIC3104 codec in their sound card, but in very advanced way with real-time co-processor (PRU) that surpasses the kernel inner timings. That was a bit too much for me, since I need to learn how to get the basic audio working. The guy on their user forum told me that if I want to use the codec with the PocketBeagle in an easy way, I could simply invoke the BB-AUDI-02 overlay device tree overlay.
At this point I still had no idea what device tree overlays are nor how to use them. But after sniffing a bit around, things came to their place. My learning curve was as follows:
- First, in embedded Linux, there needs to be a way for kernel to know what hardware is the CPU connected to when the system boots up. This has been solved by something called a device tree, a piece of code that tells kernel where the drivers of that hardware are, and how to configure them. Reference.
- Device tree is compiled together with the kernel - so every change in the hardware, or in their respective drivers, would require you to re-compile everything, a tiresome and time consuming process. That's why some smart people have developed a something called a device tree overlay, another piece of code that kinda lies on top of the existing device tree backbone and tells kernel, on the run, how the drivers should be configured. Now, you can use an existing image and play with the HW any way you want. Reference
- In BeagleBoard eco-system there was a solutionn to easily load and unload the device tree overlays, called cape manager. And there is a guide on how to use it for the Audio Cape, that I based my sound card on. What seemed like an easy-peasy tutorial, turned out to be a lot harder endeavor, because the Cape Manger is discontinued in the kernel versions released since 2017 or so.
- An U-boot Overlay was introduced instead. It is the same piece of code as a device tree overlay, but instead of being loaded on the run, it is loaded by the bootloader during the boot process. A proper usage of the U-boot overlays consists of getting a valid dts file for your hw, compiling it into the dtbo file and editing /boot/uEnv.txt file and rebooting the device.
- Valid dts files can be found in the BeagleBone overlay repo. There is a valid dts file for the Audio Cape (BB-BONE-AUDI-02-00A0.dts), but it wont work on my PocketBeagle. The reason is a different pinout and clock setting of the two boards, BBB and PocketBeagle. In this DigiKey Tech Forum thread there is my attempt with the help of Robert Nelson, a Linux guru at BeagleBoard.org to fix the overlay to work on the PocketBeagle. It involves pinmux modifications.
- Although the pinmux issues were solved with Robert's help, my cape wouldn't work. Sound card was recognized by the alsa system, but the aplay wouldn't exit when I made it play a sound file. Also, the sound would never come out. The reason turned out to be invalid clocking settings between two. But, some years ago, a user at Bela Forum surpassed this issue by modifying existing TLV320AIC3104 dto made for the PocketBeagle. The modification is essentially changing the I2C instance from i2c1 to i2c2, where the TLV320 codec is connected on our (my and Bela) cape.
- After doing the same, and compiling the new dts file, editing /boot/uEnv.txt and rebooting, the capes got recognized, and aplay worked. There was, unfortunately, still no sound at my speakers.
-
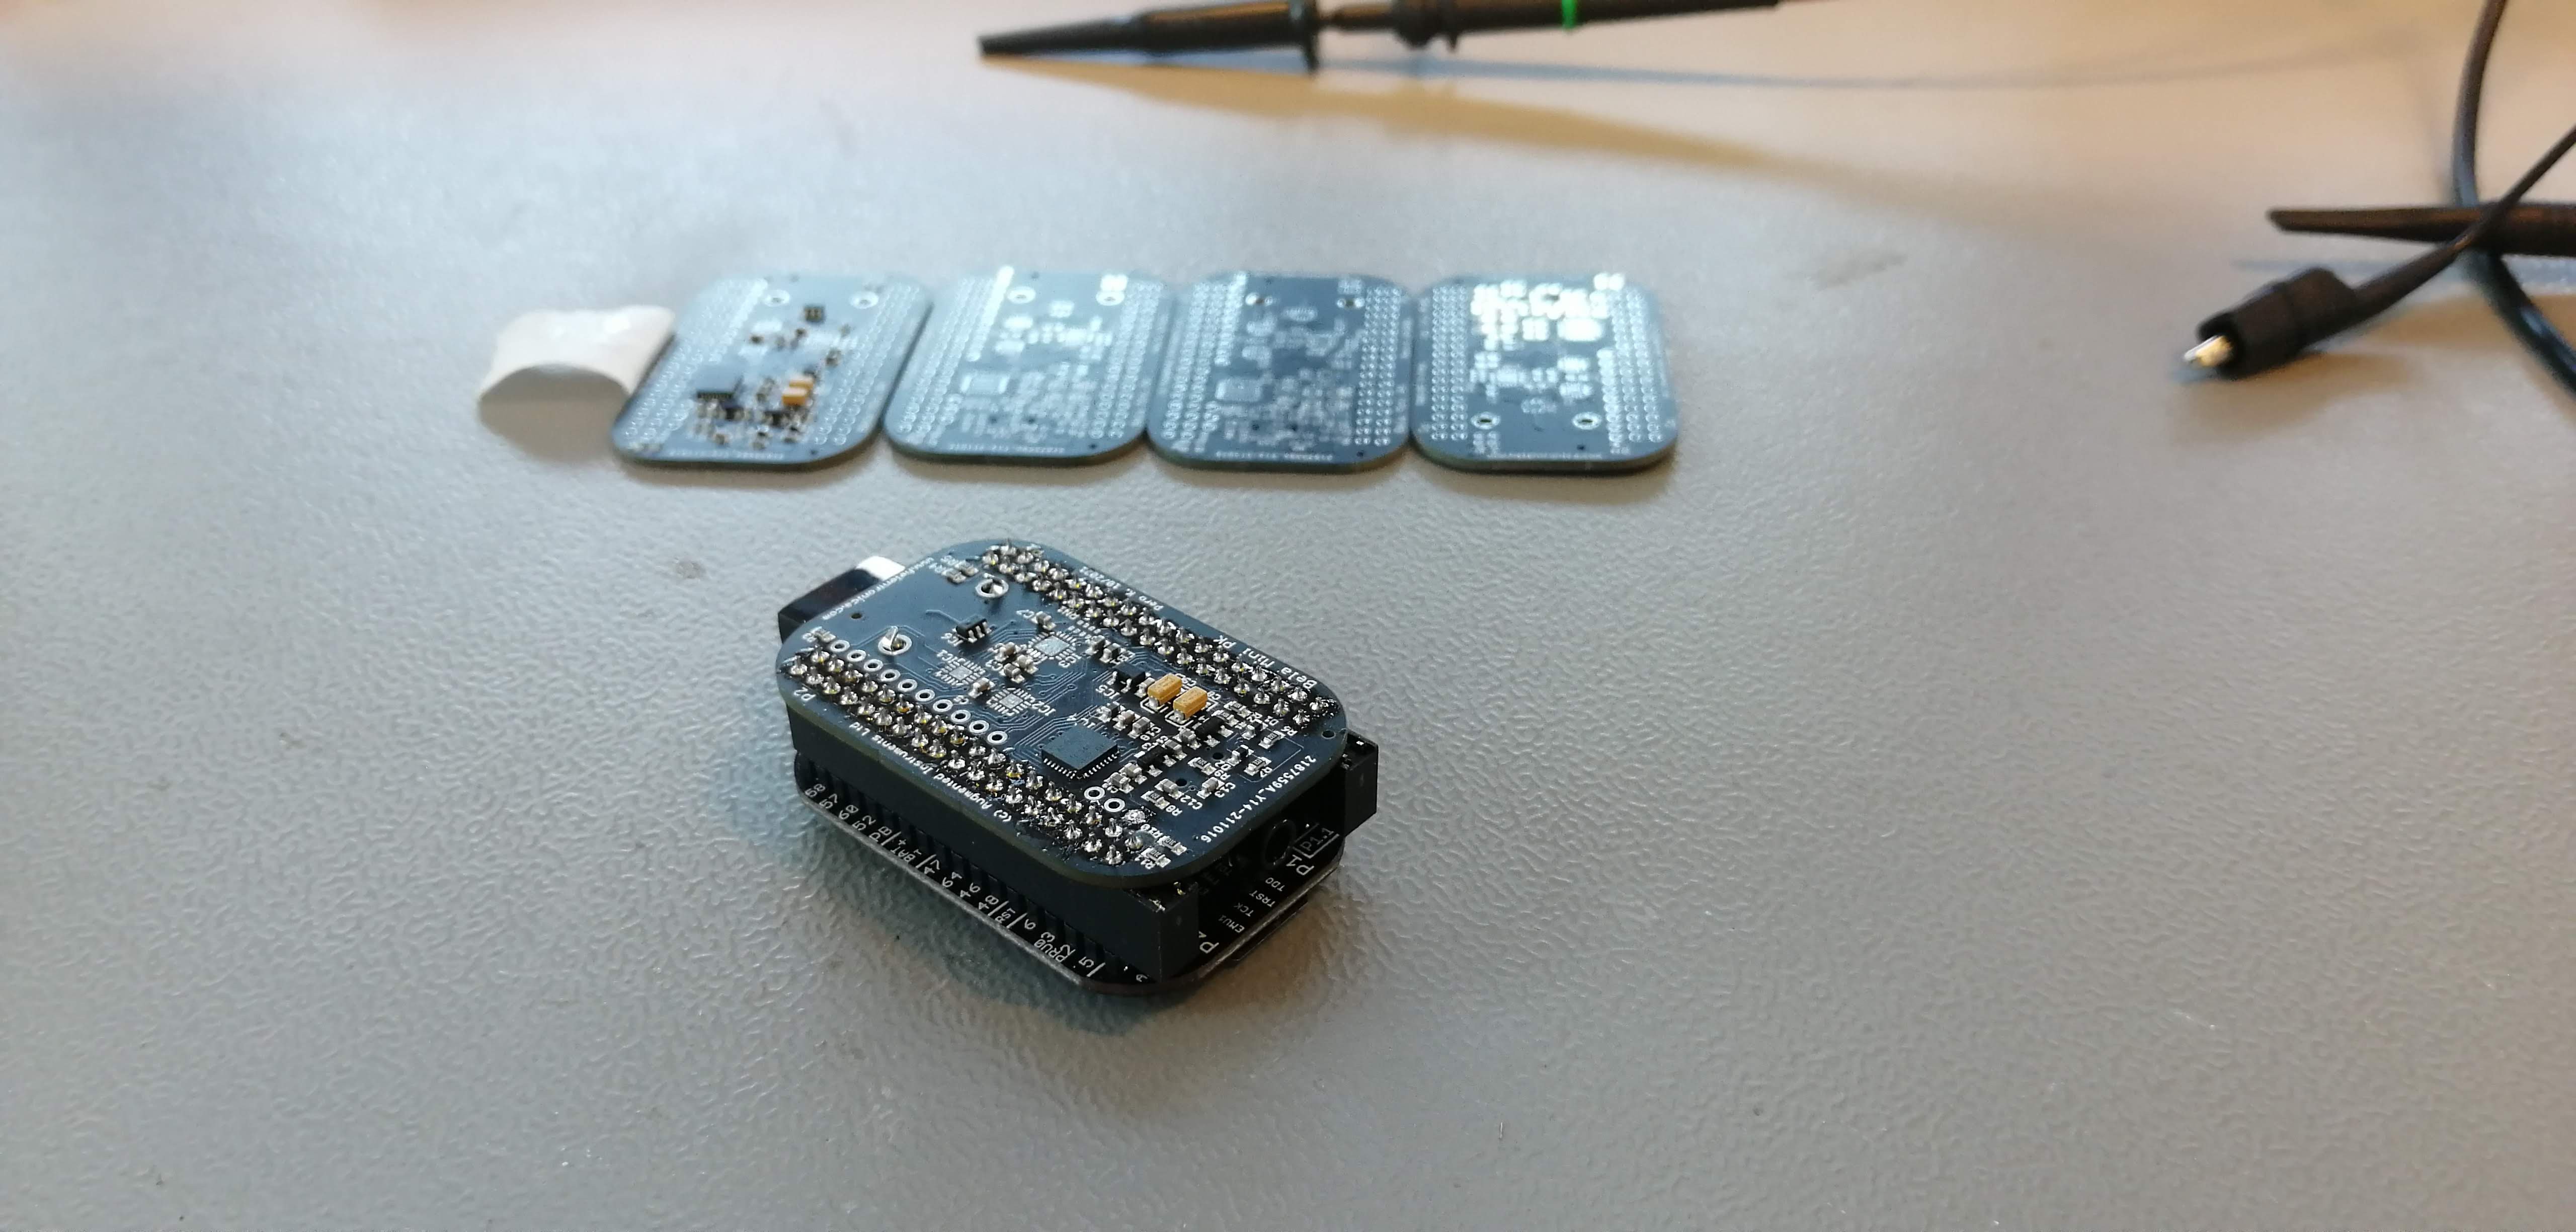
Got the capes!
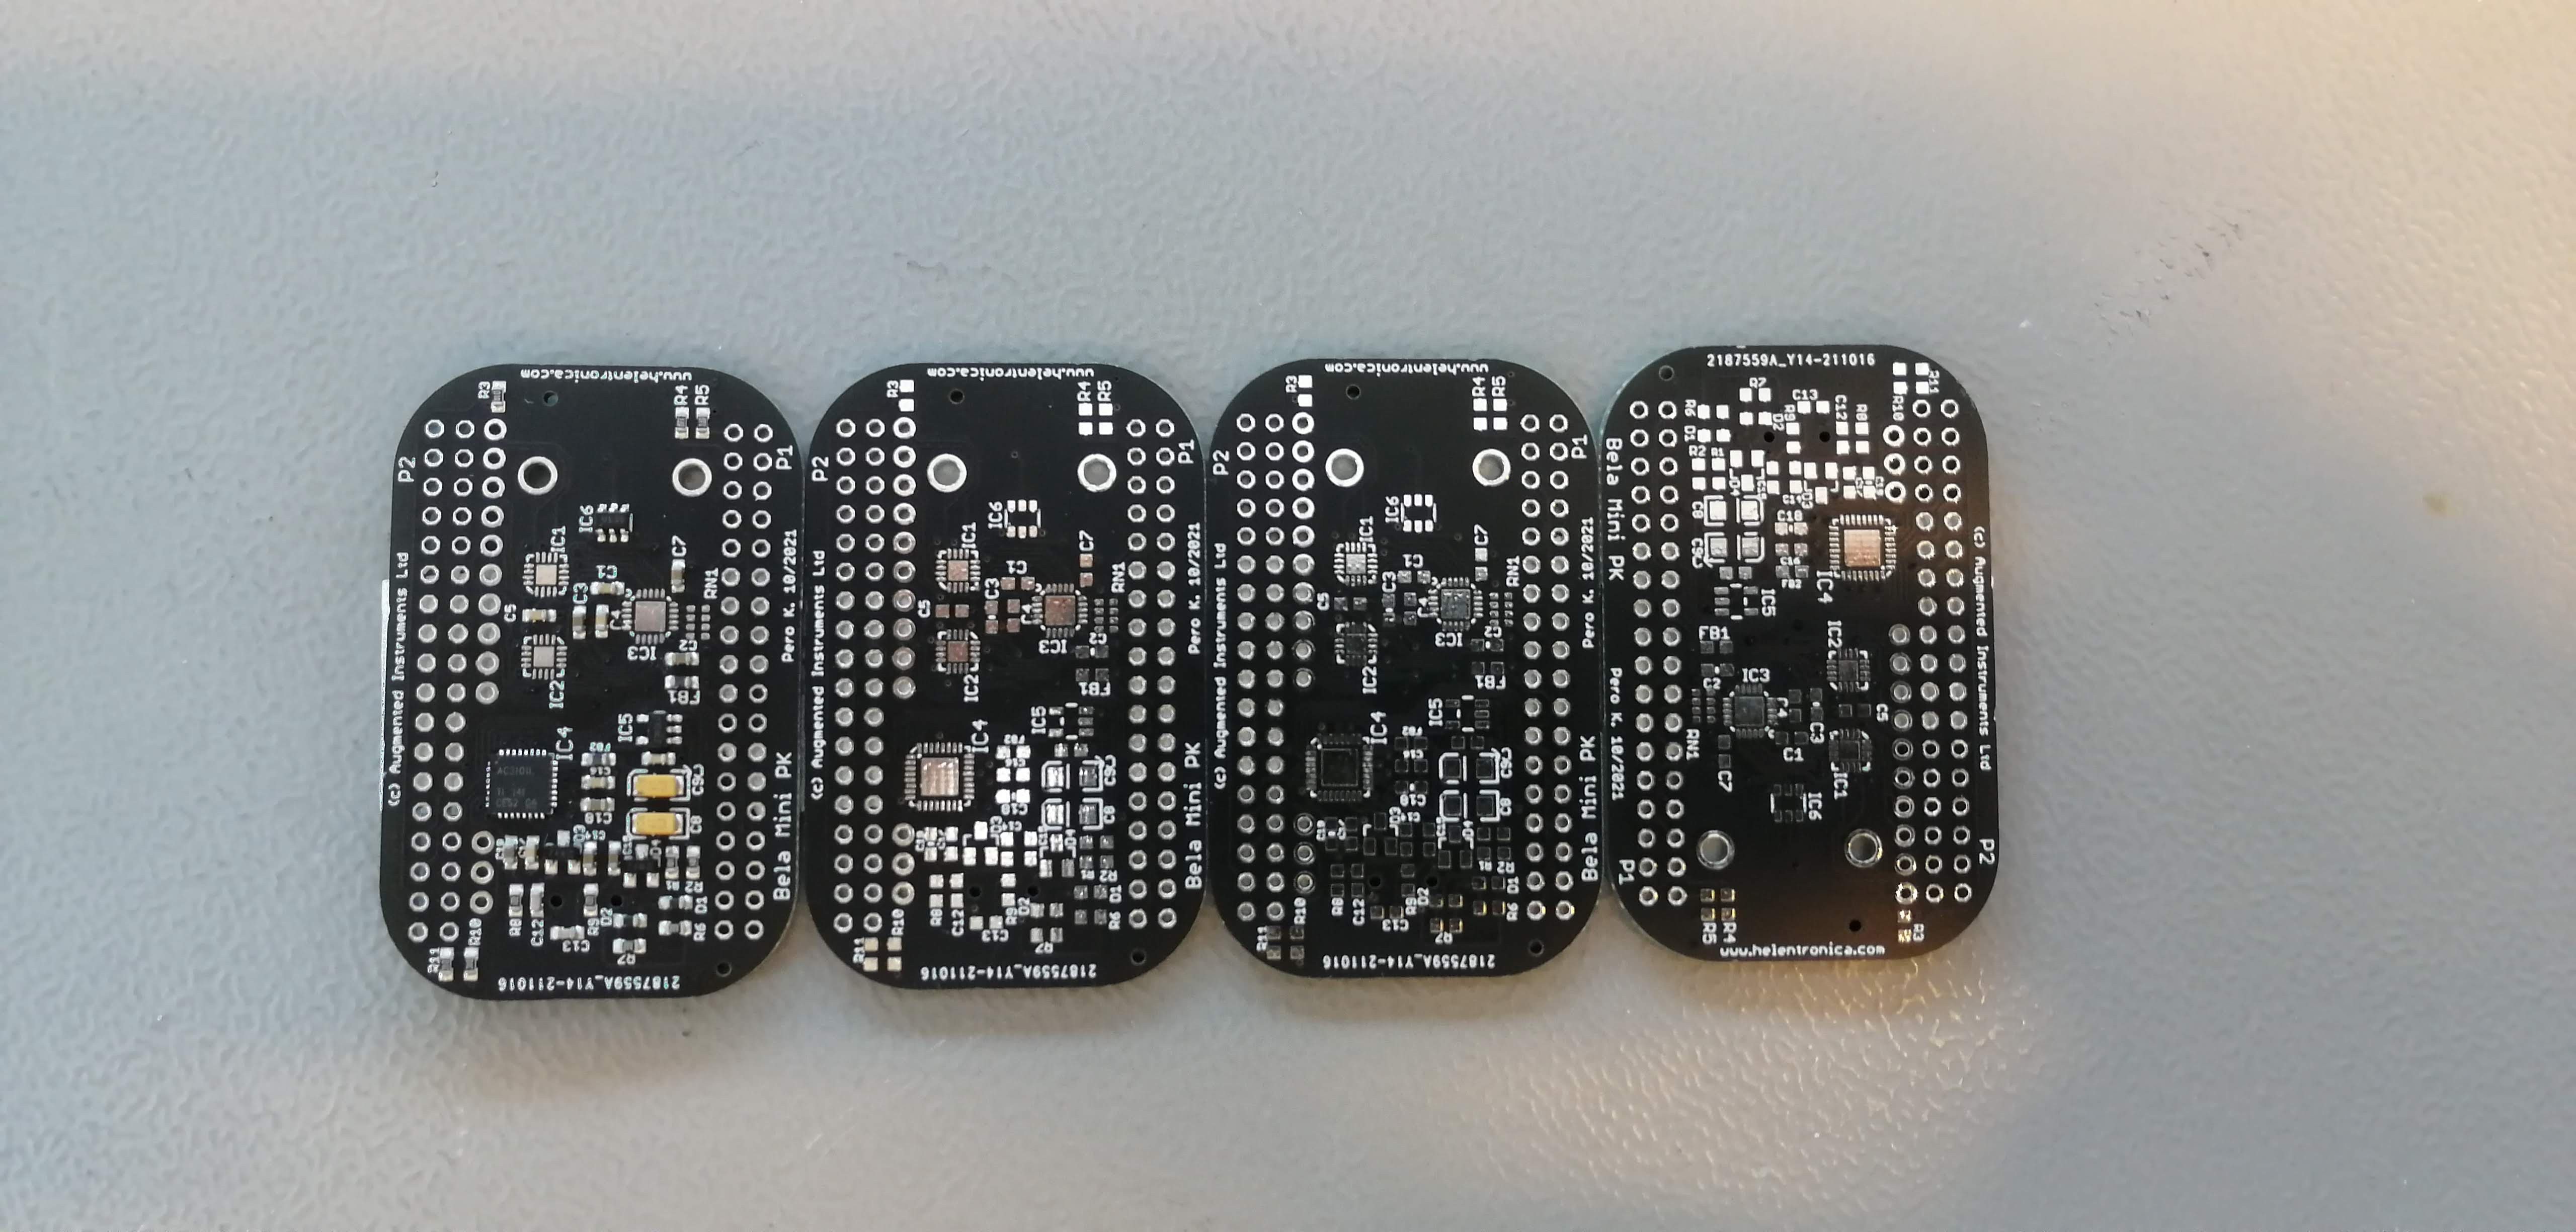
12/12/2021 at 19:06 • 0 commentsThe assembled PCBs arrived from China! They look pretty good, as if the JLCPCB improved their quality over the last few years since the last time I used them.
![]()
![]()
-
Testing Spotifyd on Ubuntu VM
10/20/2021 at 08:25 • 0 commentsSpotifyd is a program that enables streaming Spotify remotely, like you do on a Chromecast. It can run as a daemon service, or a normal program. After building and installing it on my Ubuntu virtual machine, it is very important to have a configuration file stored in `~/.config/spotifyd/spotifyd.config`. You need a Spotify premium user number, password, and comment out the commands you dont use, like the command that gets executed after the song is skipped. Also, the proxy server should be commented out.
It is important to setup the backend option properly, as well. I thought it was "alsa", but it only worked with "pulseaudio". Make sure to check what is allowed by typing `spotifyd --help`. I was figuring out for days what was wrong when the error about "not being able to write to pulseaudio" was all over the console.
If you want to run it as a normal program, for dev purporses, just type `spotifyd --no-daemon`. It should connect succesfully and display:
''''
Loading config from "/home/pero/.config/spotifyd/spotifyd.conf"
No proxy specified
Using software volume controller.
Connecting to AP "gew1-accesspoint-a-h9cf.ap.spotify.com:443"
Authenticated as "1116304529" !
Country: "AT"
''''
Now you can check on your smartphone Spotify app if the device is visible and can you connect to it.Funny enough, if I run compiled-by-me version, than it recognize alsa normally. Pre-compiled binary, downloaded from release shelf only works with `pulseaudio`. No idea why is that so.
In any case, I managed to bring the strem to work when I commented out these lines in .config file:
`device = "alsa_audio_device"`, and
`control = "alsa_audio_device"`Now spotifyd works both as daemon and a "normal" program. Cool.
-
Audio Cape Design
10/19/2021 at 07:34 • 0 commentsPocketBeagle has a SiP that contains TI AM3358 CPU that has no I2S. Instead, it has the McASP. From the reference manual: "The multichannel audio serial port (McASP) functions as a general-purpose audio serial port optimized for the needs of multichannel audio applications. The McASP is useful for time-division multiplexed (TDM) stream, Inter-Integrated Sound (I2S) protocols, and intercomponent digital audio interface transmission (DIT)."
Hopefully, I don't need to write the code for McASP myself. I have found existing PocketBeagle add-on boards that provide audio outputs. There are two capes that kinda support audio outputs via McASP to interface the TLV320AIC audio codec. One is the Bela (on-going art/sound platform with fancy IDE), the other one is BB-BONE-AUDI (that seem to have disappeared from the market). They both have similar/same pin connections to the codec:
TLV320AIC3104 Connector AM3358 MCLK P1.29 PRU0.7 - MCASP0-AHCLK WCLK P1.33 PRU0.1 - MCASP0-FSX BCLK P1.36 PWM0A - MCASP0-ACLKX DIN P2.32 PRU0.2 - MCASP0-AXR0 DOUT P2.30 PRU0.3 - MCASP0-AHCLKR RESET# P2.26 PMICGOOD SCL P1.28 I2C2_SCL SDA P1.26 I2C2_SDA HW Project
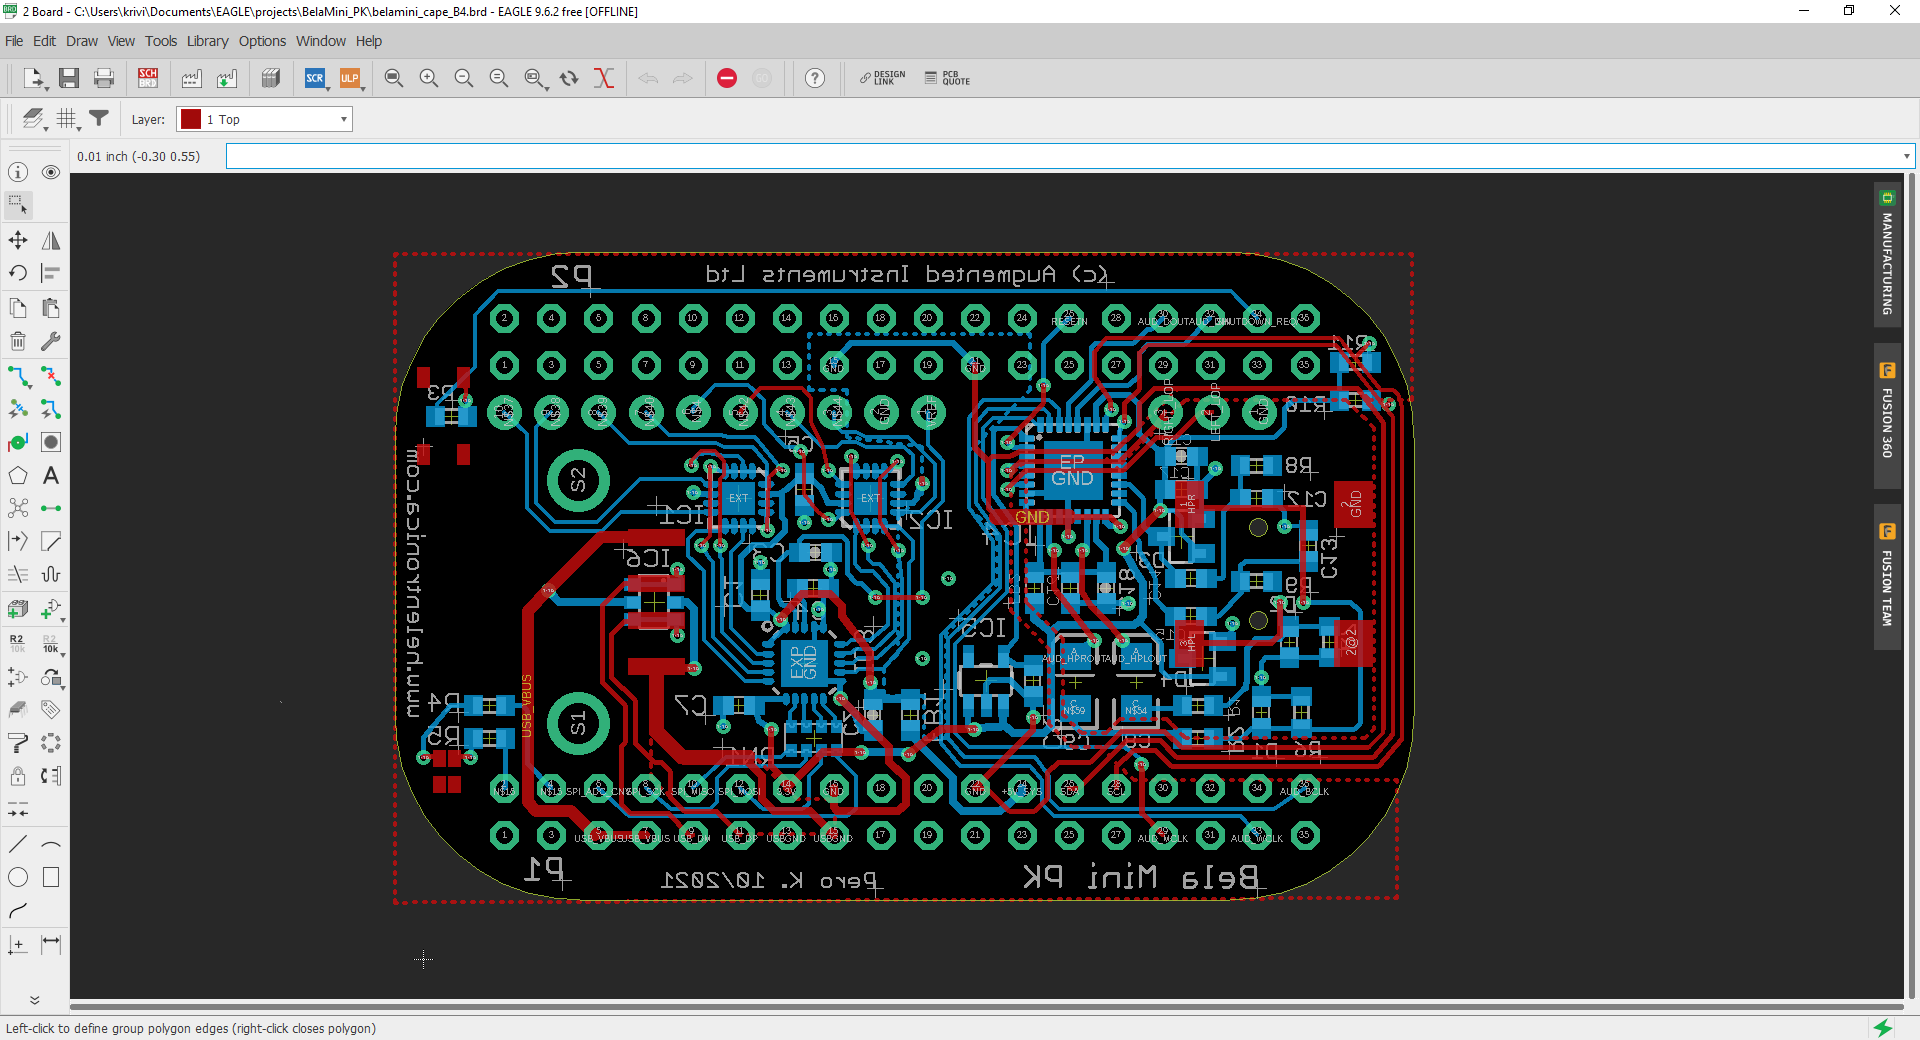
I have modified an existing BelaMini Rev B4 Design, by adding a 3.5mm audio jack. It was a nice trip down the memory lane of using Eagle.
![]()
I have ordered PCBs from JLC-PCB. Since they also offer a cheap SMT assembly service too, I decided to let them do the soldering. There is a limitation, however, they only work with the components they have on LCSC stock. As you can guess, my chip TLV320AIC3104 is not stocked there. Fortunately, there was an alternative: TLV320AIC3101 - a chip with integrated speaker amplifier. Everything else is the same, and should to the job just as fine.