Close
0%
0%

RoHA (Respiratory Health Analyzer)

RoHA Project is an IoT based Sensor Node that analyze a persons respiratory health and report its status on device and web application.

Public Chat
Similar projects worth following
RoHA project is an effort to build an intelligent IoT device that could be used by general public and help them to analyze their respiratory health. This project uses AWS IoT Edu Kit (M5Stack) Core 2 and AWS IoT core. The Machine Learning (ML) model is built using EdgeImpulse. Currently the system analyze cough and healthy breath, the more advance machine learning model is being built that could also help in identifying more deadly diseases such as COVID-19 and pneumonia.

Introduction

There is a huge demand for fast and effective detection of COVID-19. There are many studies that suggest that respiratory sound data, like coughing, breathing are among the most effective techniques for detecting the COVID-19. The aim of this project is to show that how the most common respiratory illness such as cough can be detected using voice data and differentiate between healthy breathing and coughs. The same technique can be used to identify other serious respiratory disease such as pneumonia, COVID-19 etc. There are many studies show that the COVID-19 can be easily and effectively identified using cough recordings. Following is the link to such findings:

Above are the few findings. In this project I have developed an ML model using Edge Impulse Studio that uses mel-frequency cepstrum (MFCC) to extract voice features from sound recordings and classify between healthy breath and cough. Building the Machine Learning (ML) model that detects COVID-19 requires highly accurate and large amount of voice recording data which is currently not available. But this project shows that such system could be easily build using the technique given here. However the data for building such system can be collected using the technique described in following article:

Utilize the Power of the Crowd for Data Collection

But this also require lot of time and peoples contribution. Apart from analyzing the sound data, there is also a need to maintain a proper distance while going in public places to minimize the spread of respiratory related infections. The sensor node in this project also alerts its user to maintain proper distance when they come closer to other people in public. Thus the system helps in creating/maintaining the Healthy Spaces.

The Project Name

The name of the project is Respiratory Health Analyzer abbreviated as RoHARoHA is an Urdu word which means soul or life. The aim of this project is also to save the human life through creating Healthy Spaces.

The Architecture

The following figure show the architecture of the RoHA project. The tinyML model is developed using Edge Impulse. This tinyML model processes the human voice using MFCC to extract features from it which can be used to perform analysis on the patterns of voice data. This model takes input from built in microphone on AWS IoT Edu Kit and analyze the respiratory health based on the sound recording. The inferencing result is then displayed on the sensor node and data is also sent to AWS IoT Core using MQTT protocol. The data is then forwarded to DynamoDB for permanent storage. The custom web app is built using PHP, gathers the data from DynamoDB and display the status of respiratory health, cough count and healthy count. The sensor node also detect human distancing using PIR sensor and alert the person about it on the sensor node screen.

RoHA Architecture

RoHA Architecture 

The Steps

Following are the steps involved in developing this project:

  1. Create a tinyML model using Edge Impulse
  2. Setup environment for AWS IoT Edu Kit
  3. Configure AWS IoT core
  4. Configure IAM
  5. Configure DynamoDB service
  6. Create AWS IoT rule for DynamoDB
  7. Test the AWS IoT rule and DynamoDB table...
Read more »

portb.jpg

Port on M5Stack Core 2

JPEG Image - 917.42 kB - 10/22/2021 at 16:28

Preview

circuit_diagram.png

Circuit Diagram

Portable Network Graphics (PNG) - 860.12 kB - 10/22/2021 at 16:28

Preview

View all 7 components

  • 1
    Create a tinyML model using Edge Impulse

    In this step we will build the tinyML model using Edge Impulse to analyze respiratory health of a person. I am building a tinyML model on to labels cough and healthy breath for testing purpose. However any one can easily build the model for identifying any any other respiratory illness using the same technique given that the data-set is available for that particular disease that one wants to identify.
    I myself continuously working on gathering and finding the data-set for Covid-19 and pneumonia etc. so that I can update my model to work for these diseases as well.

    Before you can start developing the tinyML model, you need to have an account on Edge Impulse which is free for developers. Once you have the account, login to your account, choose create a new project

    Create new project

    Image: Create new project

    and choose name to your project and then click on create new project button.

    Give name to your project

    Image: Give name to your project

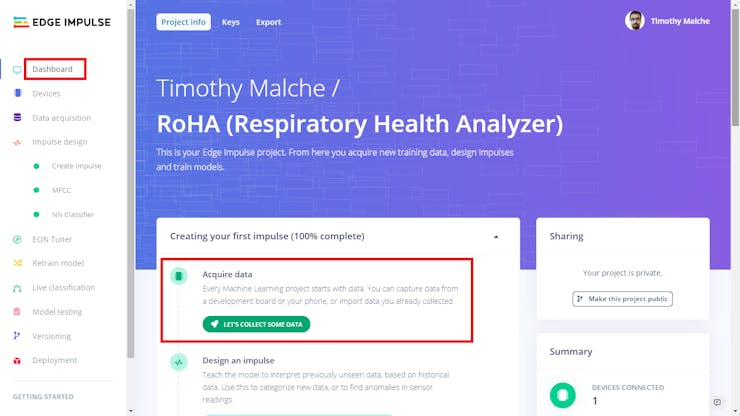
    after this, the next step is gathering the data for your project. For this go to dashboard and click on lets collect some data button.

    Collect Data

    Image: Collect Data

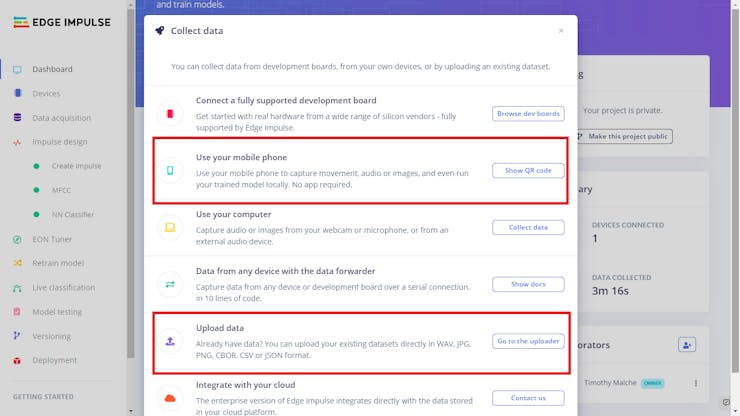
    When you click the button the following screen will appear.

    Choose data option

    Image: Choose data option

    In this screen, if you already have data-set in WAV format then you can use upload data option, other wise choose use your mobile phone option to record data for the model. If you choose upload data option the following screen will appear, from here you can choose one or multiple files and specify label for those group of files and than click begin upload button to upload data.

    I have used use your mobile phone option which opens the following window.

    QR code for mobile

    Image: QR code for mobile

    You need to scan this code to upload data from mobile phone. Once you scan and click on the URL, you need to go through the steps as illustrated in following figure.

    Steps to record data

    Image: Steps to record data

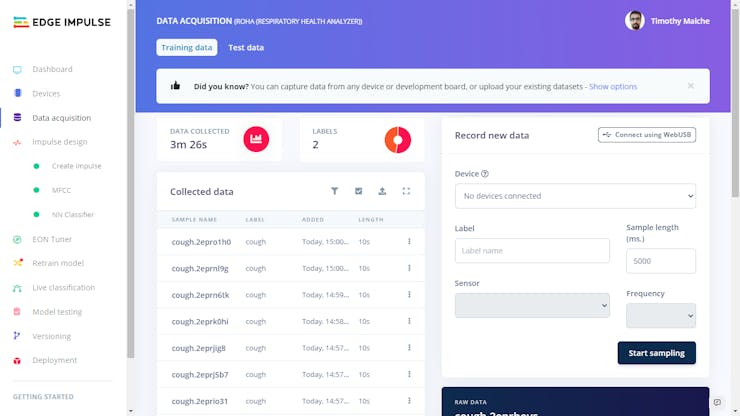
    In STEP 1 once your phone is connected, click on collecting audio button. In STEP 2 click give access to microphone button. In STEP 3 specify label (cough and healthy breathing in this example), length values and click on start recording button. Then record the data as in STEP 4, the data will be automatically uploaded to Edge Impulse after recording is done. You can record data for different labels in this way. The uploaded data is visible on your project's dashboard on Edge Impulse.

    Data on Edge Impulse

    Image: Data on Edge Impulse

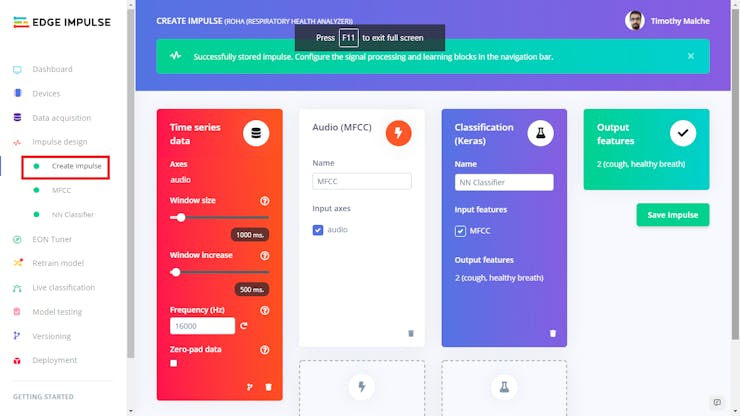
    After this choose Create Impulse under Impulse Design in the left navigation and add processing and learning blocks as per following figure.

    Design impulse

    Image: Design impulse

    Then go to MFCC and verify your data. You can filter out data at this step.

    MFCC verify/filter data

    Image: MFCC verify/filter data

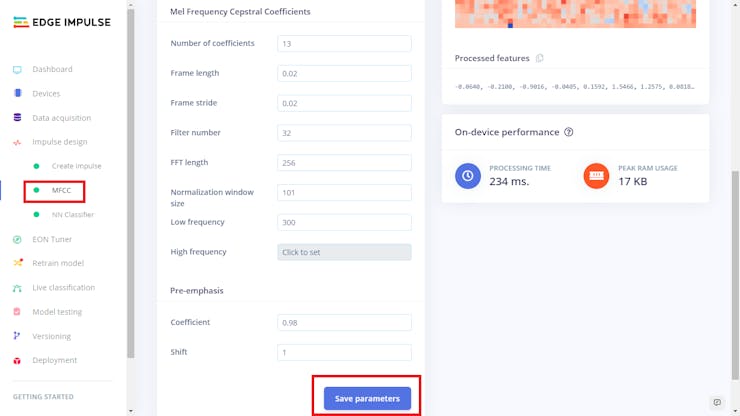
    Once you done, click on save parameters option.

    MFCC: save parameters

    Image: MFCC: save parameters

    After this the following window will appear, in this window click on Generate Features button.

    Generating features

    Image: Generating features

    Then choose NN Classifier from left navigation.

    NN settings

    Image: NN settings

    You can change settings or leave it default. Then click on start training.

    Start Training

    Image: Start Training

    Your model will be trained and you will see the result.

    Training output

    Image: Training output

    Model accuracy

    Image: Model accuracy

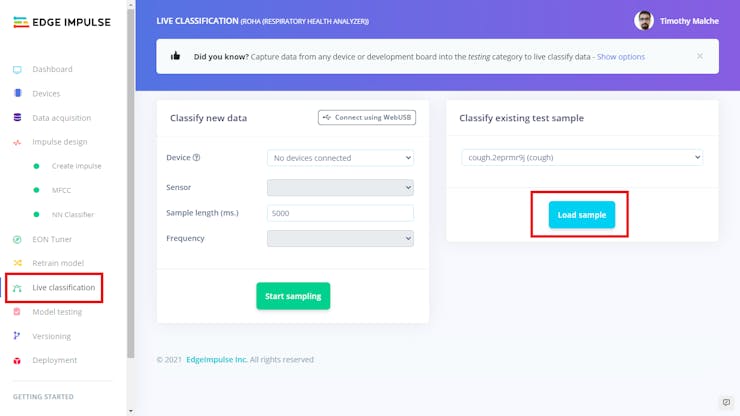
    From the above figures we can see that our model is perfectly build and trained on data. You can choose Live Classification in the left navigation to test the data. You can then choose your phone to get data for live sampling by clicking start sampling button or load the existing sample test data by choosing sample data from drop down list and clicking load sample button.

    Load sample

    Image: Load sample

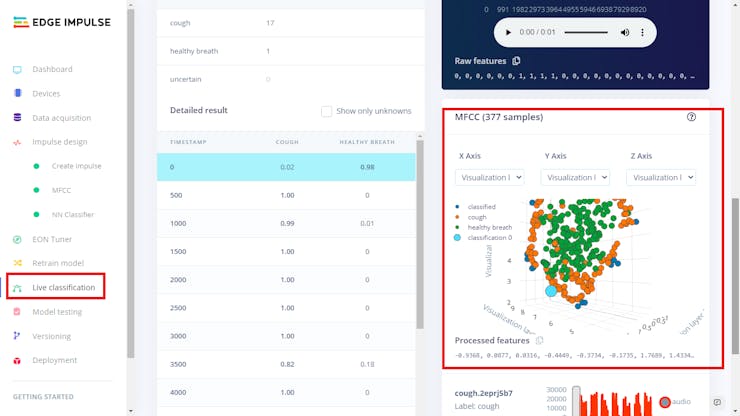
    When you load the sample, the live classification will be done and you can see the model performance.

    Live classification result

    Image: Live classification result

    Live classification test your model against single sample at a time. You can choose the Model Testing option to test your model against multiple test samples from test data. For this click on the Classify all button and you will see the model performance. As you can see in following figure that my model is working perfectly.

    Model Testing

    Image: Model Testing

    Once you done the testing choose Deployment from left navigation to create the library that we will use later on to build the firmware. In the window that appear choose Arduino Library.

    Deploy as Arduino Library

    Image: Deploy as Arduino Library

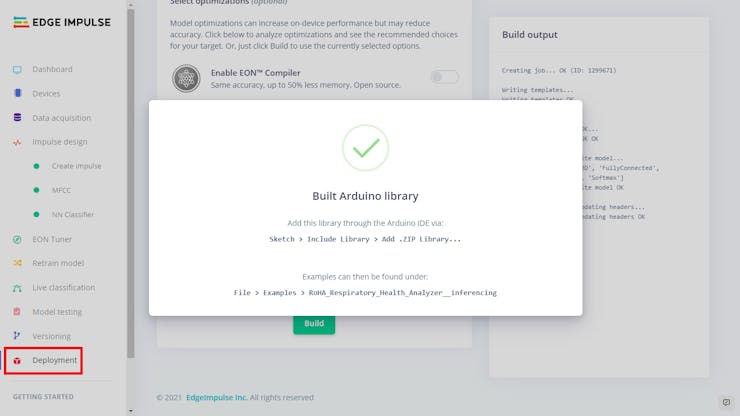
    Now scroll down and click on build library button.

    Build the library

    Image: Build the library

    The Edge Impulse automatically build the library and it will be automatically downloaded as zip file.

    Arduino library as Zip file

    Image: Arduino library as Zip file

    Keep this zip file for next step.

  • 2
    Setup environment for AWS IoT Edu Kit

    Now in this step we are going to set up the environment for the AWS IoT Edu Kit.

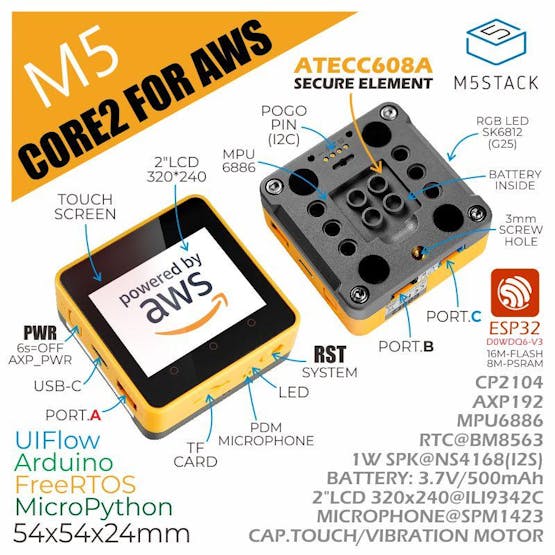
    M5Stack Core2 ESP32 IoT Development Kit for AWS IoT EduKit

    Image: M5Stack Core2 ESP32 IoT Development Kit for AWS IoT EduKit

    First download the official Arduino IDE. Now first we need to install ESP32 Boards Manager. For this open up the Arduino IDE, and navigate to File -> Preferences -> Settings.

    Arduino settings

    Image: Arduino settings

    Add the following ESP32 Boards Manager URL to Additional Boards Manager https://m5stack.oss-cn-shenzhen.aliyuncs.com/resource/arduino/package_m5stack_index.json

    Additional Boards Manager URL

    Image: Additional Boards Manager URL

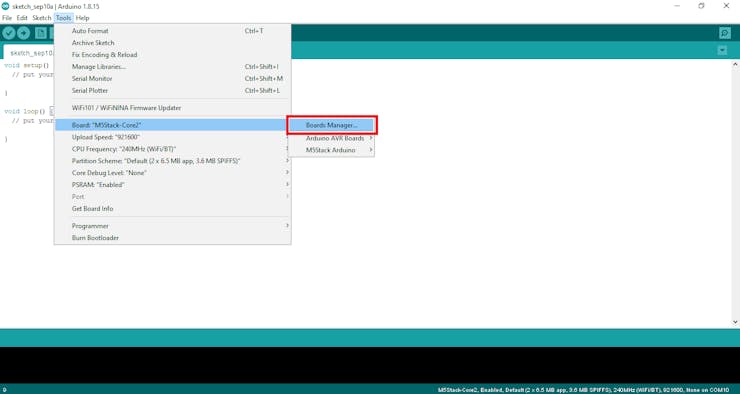
    Then go to Tools->Board->Boards Manager

    Boards Manager

    Image: Boards Manager

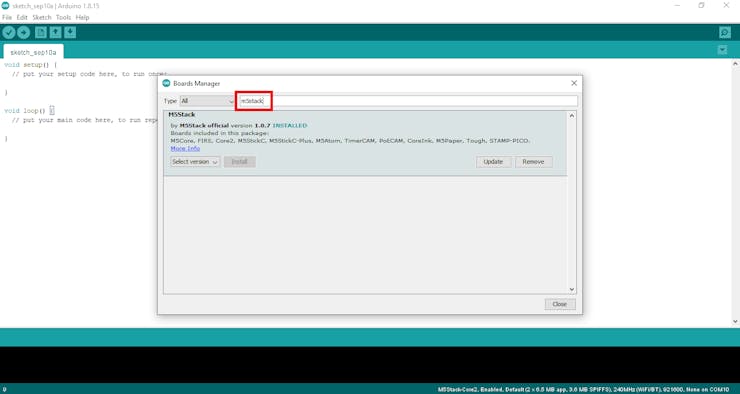
    And search m5stack in the Boards Manager window, and click Install.

    Install M5Stack Board

    Image: Install M5Stack Board

    Once board is installed, go to Tools -> Board: -> M5Stack Arduino -> M5Stack-Core2 as your board as shown in the following figure.

    Select board

    Image: Select board

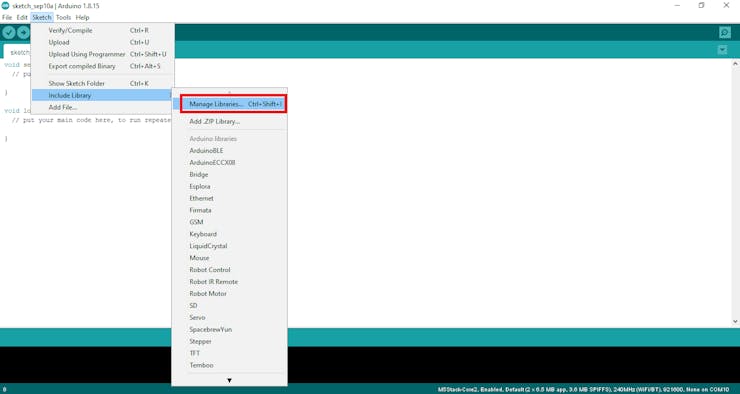
    Now we also need M5Stack Library to work with. Go to Sketch -> Include Library -> Manage Libraries...

    Manage Library

    Image: Manage Library

    Then search M5Core2 , find it and click Install.

    Install M5Core2 Library

    Image: Install M5Core2 Library

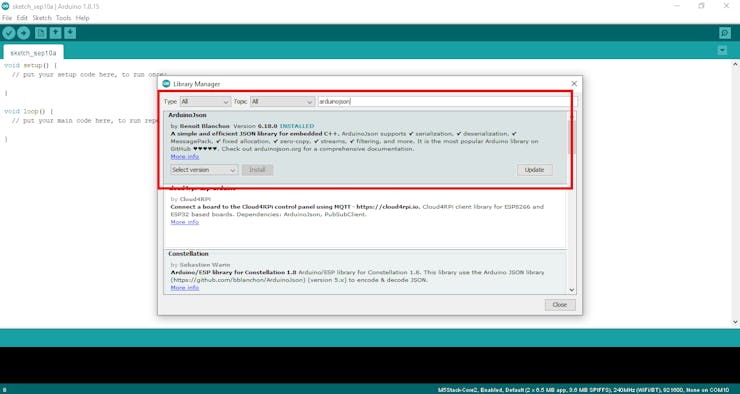
    You will also need ArduinoJson library that we will use later on.

    Installing ArduinoJson Library

    Image: Installing ArduinoJson Library

    Now we will add the zip library for our model that we have developed using Edge Impulse. For this go to Sketch -> Include Library -> Add ZIP Library...

    Add ZIP Library

    Image: Add ZIP Library

    and select the ZIP library.

    Select ZIP library

    Image: Select ZIP library

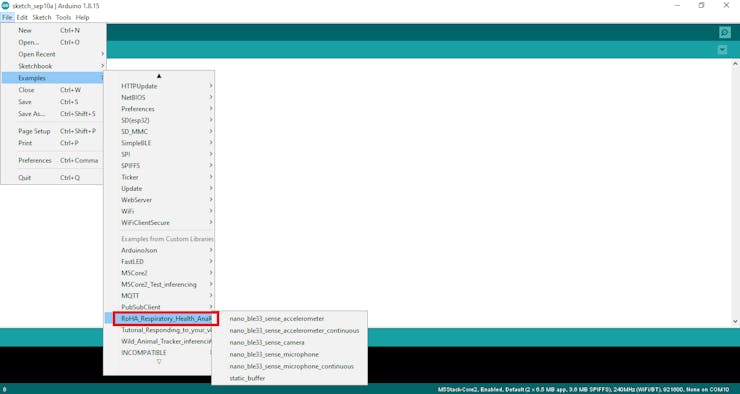
    Once the library is installed you can see it in Arduino IDE.

    RoHA Library is installed

    Image: RoHA Library is installed

  • 3
    Configure AWS IoT core

    For this step first you need AWS account and need to sign in to the AWS Console your account.

    Sign in to Console

    Image: Sign in to Console

    If you don't have account then click on create new account otherwise sign in.

    Sign in to AWS Console or create account

    Image: Sign in to AWS Console or create account

    After you sign in you will see AWS Management console. We will use the search box to access different services.

    AWS Management console (main page)

    Image: AWS Management console (main page)

    In the search box type AWS IoT and select IoT Core.

    Select ASW IoT Core

    Image: Select ASW IoT Core

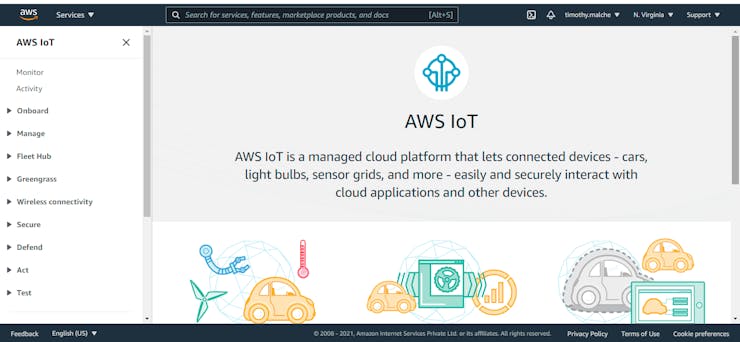
    You will see the following page.

    AWS IoT main page

    Image: AWS IoT main page

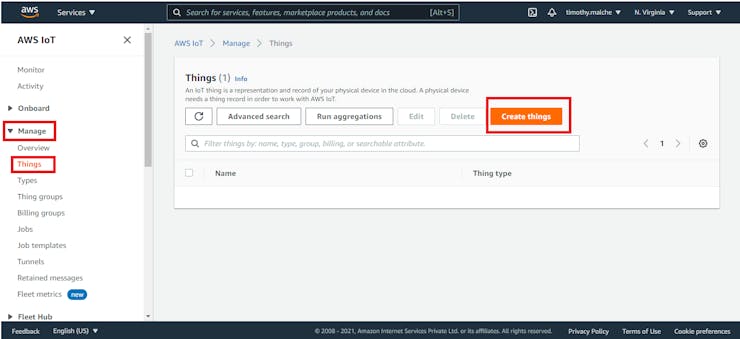
    Now go to Manage in on the left navigation and choose Things and in the window on the right click Create things Button.

    Creating Things

    Image: Creating Things

    In the next window choose Create single thing option and click on Next button.

    Create a single thing

    Image: Create a single thing

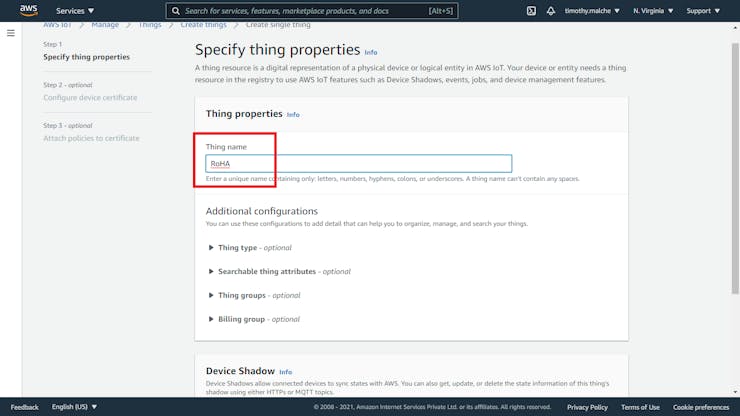
    Next, specify your Thing name.

    Specify Thing name

    Image: Specify Thing name

    Leave other settings as it is and click on Next button.

    Create Thing

    Image: Create Thing

    In the next window choose option Auto-generate a new certificate and click next.

    Auto-Generate certificate

    Image: Auto-Generate certificate

    In the next window click Create policy. It will open in new window. You can also create and attach policy later on but its good to create it here.

    Create policy

    Image: Create policy

    In the window that appear in new tab/window of your web browser, specify a unique name to the policy and Action as * and Resource ARN as * as well and under Effect select Allow. After this click on Create button.

    Policy Settings

    Image: Policy Settings

    Policy created

    Image: Policy created

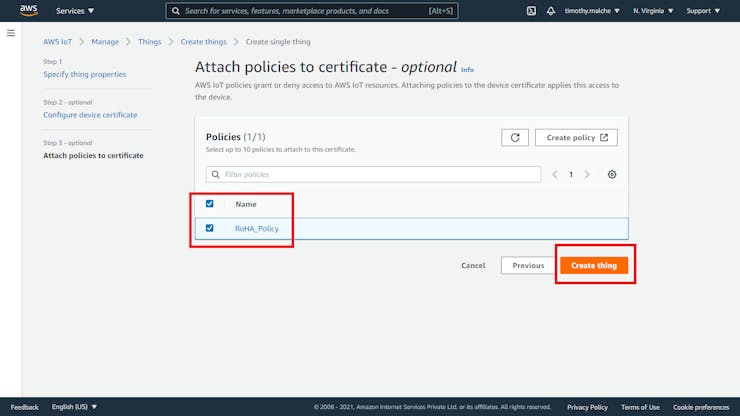
    Now come back to previous window from browser tab there you will see the name of policy you have created. Now select the policy to attach it with your Thing and then click on Create thing button.

    Attach policy and create thing

    Image: Attach policy and create thing

    When thing is created you will be prompt to download certificate and keys. Download them and keep at safe place.

    Download certificate and keys

    Image: Download certificate and keys

    After you have downloaded, click Done button.

    Create Thing

    Image: Create Thing

    You will see your thing created with the policy attached to it.

    Thing created

    Image: Thing created

View all 11 instructions

Enjoy this project?

Share

Discussions

Similar Projects

Does this project spark your interest?

Become a member to follow this project and never miss any updates