Andrea Piccinno
-
Upper exoskeleton module parallel development
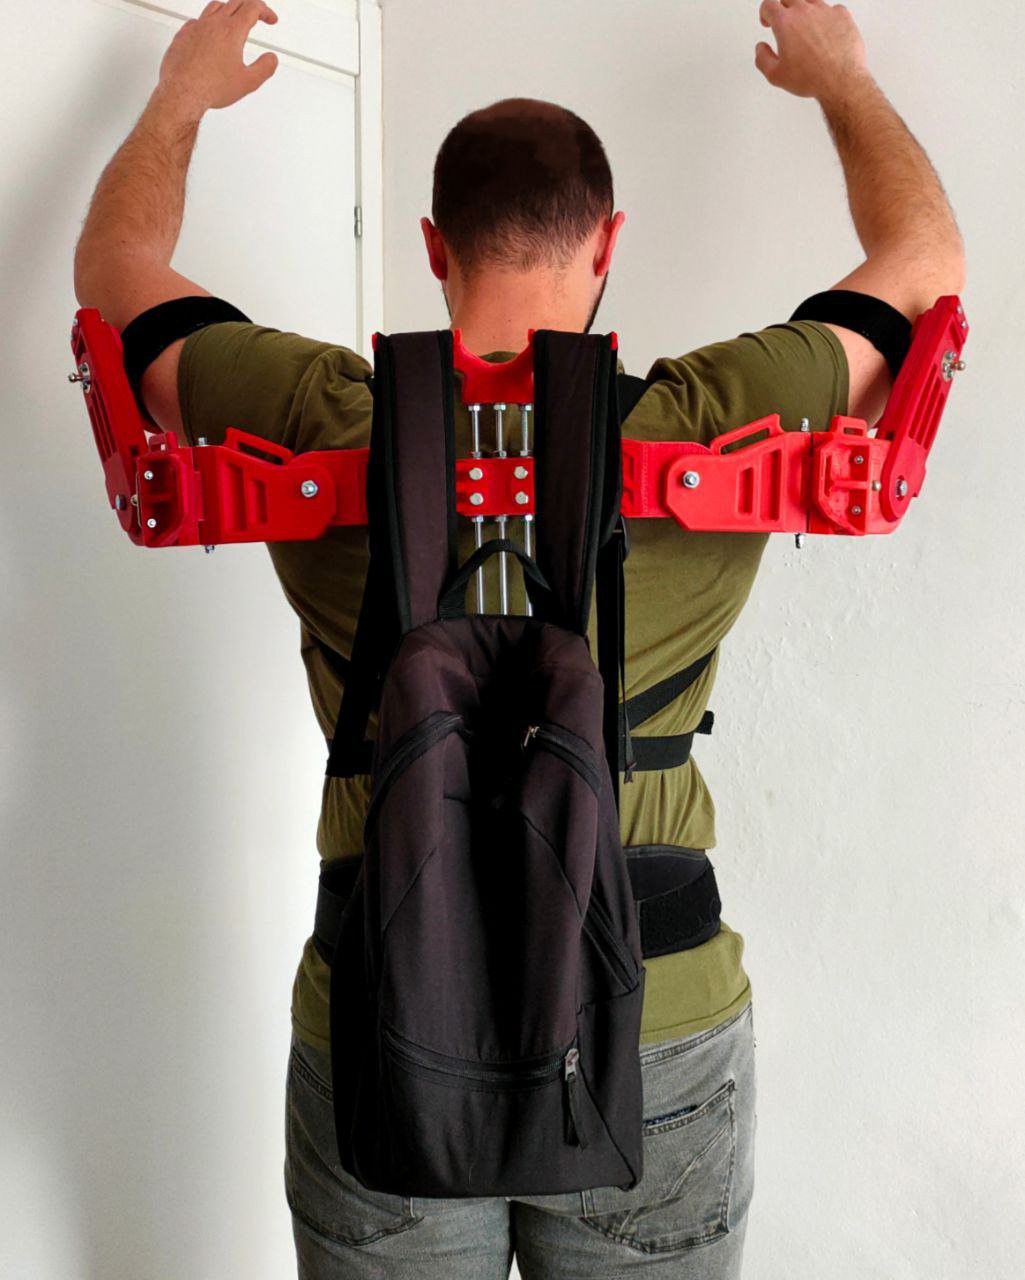
04/27/2022 at 20:36 • 0 commentsSince I had basically ready the shoulder module from the full body exoskeleton (still to be completed), I started a quick parallel development of an upper limb solution, very similar to commercial exoskeleton.
The aim will be, depending on the case, to support the user in keeping the arms either in front or up the head therefore relieving the shoulders.
In this design, contrarily to the full body one, the spine will be still (from above the sacrum) since it it intended for safety of the user. It still allows forward leaning but keeping the upper back straight.
Range of motion is full and support is provided by gas springs (design 1) or elastic bands (design 2).
Following video shows a preview of the design 1.
Many features are still missing here, as for example a cover bracket for the rods which will allow the user to carry a backpack without feeling it on the shoulders but rather on the hip (see picture below).
![]()
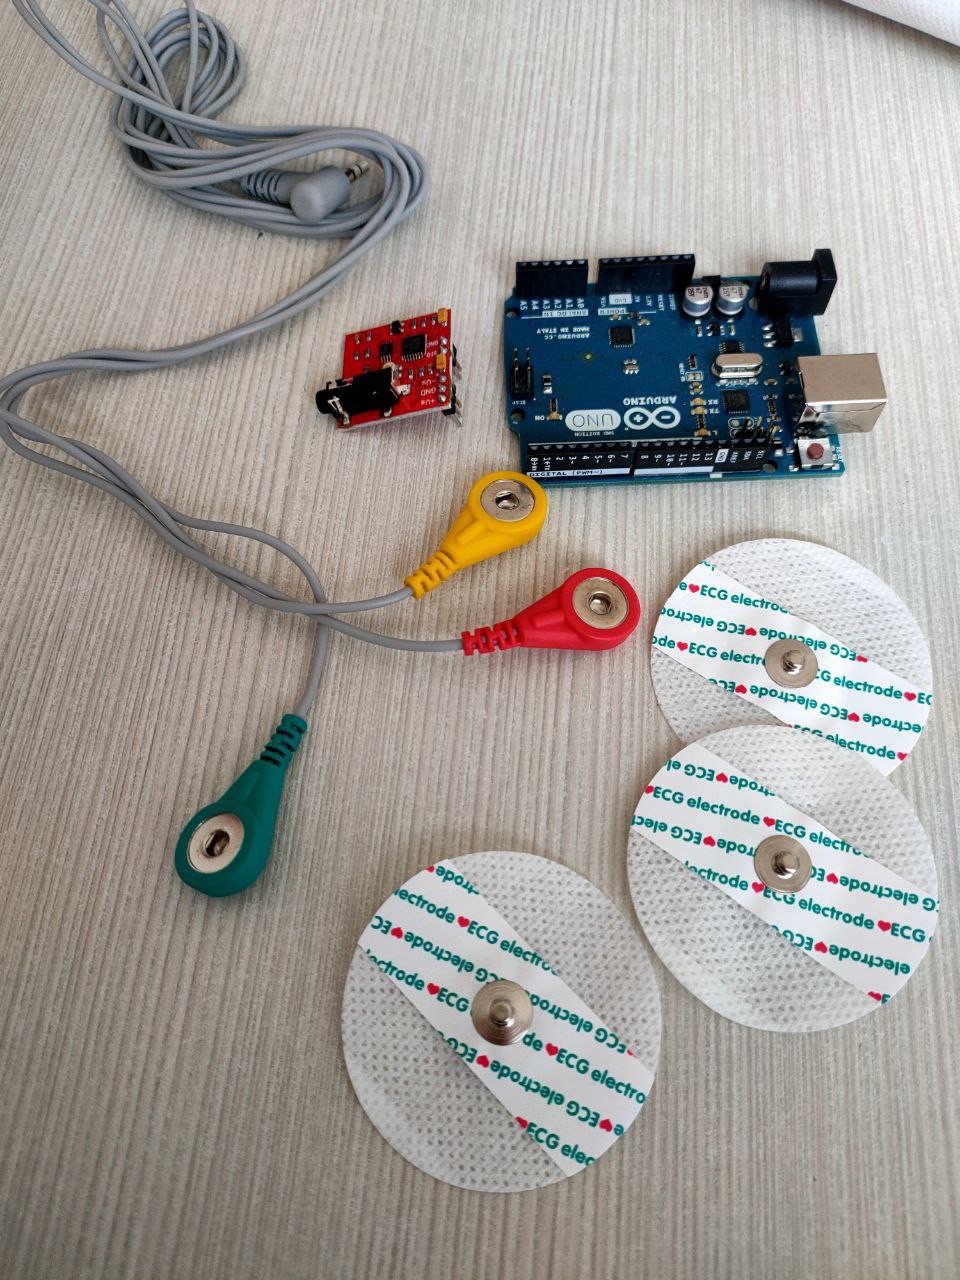
As soon as the design 2 is ready, I will start some testing by recording muscle activity with and without the exoskeleton.
In order to do this I setup a very simple EMG project with Arduino that basically requires the following components:
Arduino UNO
AD8226-based EMG sensor
3 electrode pads
A 3-lead connecting cable
2 9V batteries
Connecting Wires & Jumper wires![]()
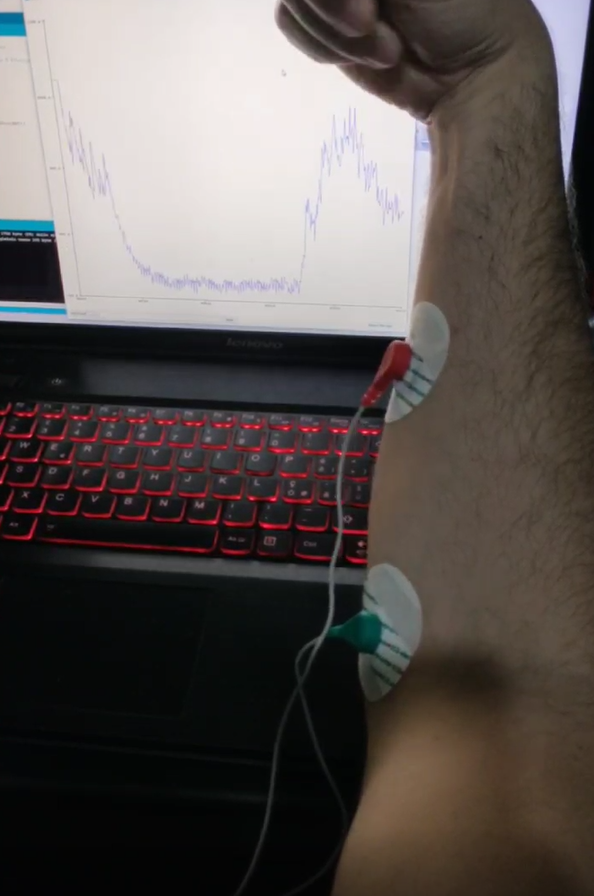
In this way I should be able to ready muscle activity in order to compare it in the standard case and with the exoskeleton on.
![]()
Updates about the Arduino code and the signal post processing code will follow as it's all work in progress.
-
Standing test #1
04/21/2022 at 20:14 • 0 commentsOne of the aim I had in mind from the beginning of the project, was for the exo to be able to stand on its own in a static position.
This is not a must in general for exoskeletons, particularly passive ones, but I consider it a "nice to have" since any unbalance of the exo on its own, would need to be compensated by the user. The fact that this type of exoskeletons is mostly lightweight makes this not a big deal, however, as a personal challenge, I tried to achieve this, at least in a static position, since dynamically would be impossible for a passive system.
Having an exoskeleton standing on its own would mean that the center of gravity of the frame is located properly and that all forcing elements are preloaded correctly therefore trying to bring the user to that static equilibrium position.
Here is a first test I made with the whole body (arms still missing) achieving a good result since the exoskeleton already stands on it's own placing the feet correctly. It is still not a stable solution since the hip torsion springs are still missing (this would give stability to the position) but in this way some features of the design can be highlighted.
For example the fact that the legs can rotate around z independently from each other (notice the left leg way more rotated than the right one). Or for example the fact that the core gas springs compensate the weight of the shoulders/arms which otherwise would cause the exoskeleton to learn forward creating a torque around the spine pivots.
Following preview video of the exo standing will clarify all the described aspects.
-
Shoulders update
04/13/2022 at 20:56 • 0 commentsFinally both shoulders have been printed and are ready with some updates (not only visual).
In particular the attachment points for the gas springs has been shifted on both axis in order to have the following results:
- Gas springs are preloaded at rest condition (this compensates the initial sticking point at actuation)
- Arm sliding axis at rest condition is inclined 10° updwards.
Both gas springs guarantee a growing reaction force the lower the arm is, therefore a bigger torque at the shoulder joint. They could be eventually replaced by tension springs in order to keep the hands pointing upwards.
This specific shoulder module of the exoskeleton is going to be used and adapted separately in order to create a second upper limb exoskeleton. I am going to work soon on this and the main modification is going to be the spine, since in the case of a single upper limb exo that component has no need to being bulky and super felxible.
Meanwhile, here is a preview of how both shoulders look like now (one scapula is still missing but I'll print that soon).
![]()
-
Achilles' tendon spring assembly
04/05/2022 at 21:23 • 0 commentsBoth springs have been finally assembled on the Achilles tendon area.
They have been printed with different materials (both have a safety factor considered in calculation to account the material difference) and the new one (left foot) is definitely stronger. Additionally the salt annealing treatment enhances its fatigue life to the limit.
Functionality of both spring have been tested and they correctly guarantee the return of the leg in vertical position after the squat movement. Here is a preview video of both spring, both on the legs alone and on body.
-
Achille's tendon spring
04/02/2022 at 20:48 • 2 commentsSince left foot is getting printed, I also made ready a second tension spring to be placed in the Achille's tendon area. Differently from the previous one, this has been salt annealed in order to boost its mechanical properties and therefore be able to have a higher fatigue life @ working max deflection.
Here you can find a short video with the main steps about the annealing process and below its detailed description.
What is salt annealing?
It's a thermal treatment of 3D prints that turns the inner structure of prints from amorphous to crystalline and therefore highly increases its mechanical properties (UTS almost doubles).How to do it (in this case for PLA+)
- Print your part with 100% infill (the part shall not have inner voids)
- Remove supports and perfectly clean and sand the surface (don't leave strings or other imperfections)
- Completely cover the part in fine salt (sand or talc would work too, the finer the better) and make sure salt goes in all voids. Once covered, slightly press the salt and make it a compact block. This is an important step since the function of the salt is to keep the piece on place avoiding deformations when the piece softens.
- Preheat an electric over at about 100°C (above glass transition temperature but below melting point of your material)
- Leave the piece in over for 1 hour (control the salt temperature is stabilized)
- Remove from over and let cool down to room temperature
- Enjoy your strong piece -
Leg movements
03/30/2022 at 20:35 • 0 commentsWhile I wait for the second foot to be ready, I tried wearing both legs and trying to take some steps in order to check if there is any weird clash or issue.
So far walking seems ok and also side abduction movements are quire smooth. Of course feel while make the overall structure stiffer since ankle has no degree of freedom about z for the moment.
Here is a short preview of both legs connected to the waist (I had to hold it since there is not yet attachment to the body).
-
Gait simulation #1
03/28/2022 at 20:46 • 0 commentsAs I started to print the left half of the lower body, soon it will come the moment of the "heavy" tests, such as walking or full body loading.
As I normally don't like to leave things to fate, also for this aspect I setup some simulations. Specifically here is a gait simulation. In order to keep the model light, only some of the degrees of freedom have been used, reason why on some points the movements might look stiff.
The overall aim was to check anomalous clashes or constrained movements and overall everything seemed to be ok. Of course physical test will have the last word. For the moment here is a preview of one of the simulations.
-
Push-up test (arm only)
03/23/2022 at 21:39 • 0 commentsI got many questions about the arm piece regarding overall flexibility.
In particular, it the overall range of motion and degreed of freedom would be enough to perform a whole push-up. I have simulated this beforehand on Fusion360 and results seemed to be ok.
However real test has always the last word, so here is a push-up test wearing the whole arm.
Movements are quite smooth and also support is provided by the rear tendons which aid arm extension.
I might updated the wrist upper piece design in order to reduce contact with the hand which might feel disturbing after continuous usage. Tests with the whole exoskeleton will follow.
-
Wrist ready - wearability test #1
03/21/2022 at 21:24 • 3 commentsAfter 2 iterations for proper wrist pivot location, finally I achieved a good compromise.
Overall, the wrist has 2 degreed of freedom, one dependent from the other, which make it quite comfortable and allow pretty much all main movements.
First rotation is given by a custom made bearing all around the wrist/forearm, second rotation is about 2 608RS bearings placed on the sides of the real wrist.
The whole piece is jointed to the articulated hand. Next step will be a movement /wearability test with the rest of the exoskeleton and then hand actuation.
-
Full wrist bearing test #1
03/17/2022 at 21:22 • 0 commentsFinally printed both pieces for the wrist bearing. It is constituted by 2 similar pieces placed symmetrically in order to compensate unbalanced loads. Each piece has 2 rails of steel ball bearings plus a centering feature. Once assembled movement is smooth and wrist pivot seems to be placed in the right point.
Now there will be the attachment with the hand piece to double check that everything is in the right place and proportions. Meanwhile here is a quick preview of the bearing design and functionality.
3X0 - 3D Printable exoskeleton concept
A functional 3D printable full body exoskeleton - Passive concept development