-
1The code of the digital snow globe
Good old new modern style
Modern times make modern solutions possible. Therefore, the step to a digital snow globe is not that difficult anymore. All you need is a display, a battery, an accelerometer and a microprocessor.
The M5Stack Core module provides a perfect base for a small and handy digital snow globe. All the necessary parts are already nicely built into one housing.
The integrated acceleration sensor can be used to determine the orientation of the device. No high accuracy is required here. The snow should only always fall downwards according to the direction of gravity. Therefore no sensor fusion or temperature correction is needed, just the values of the acceleration in X and Y direction.
The physical snowflake model
Fortunately, the physical simulation of free falling snowflakes is quite simple.
Snowflakes have a small mass and a large surface area. In a vacuum they would fall as fast as a 50kg dumbbell, but in the atmosphere the air resistance slows them down. They reach their maximum velocity after a short acceleration phase and then fall to the ground at a constant speed. This is not only beautiful to look at, but also pleasantly easy to simulate.
Within each time interval of the snow fall simulation, each snowflake just need to be moved by a constant value in the direction of the gravitational force. That’s it.
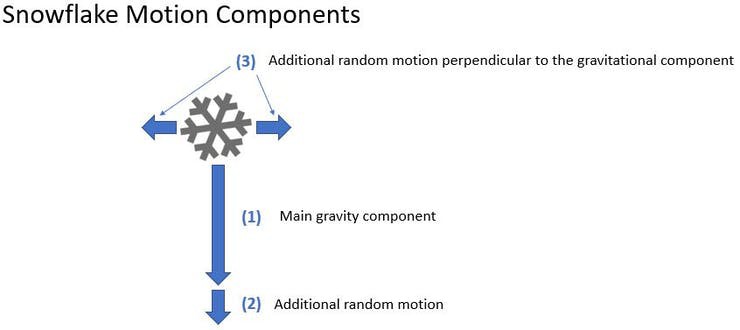
But if you do it exactly like that, it will not look realistic at all. What makes snowflakes so fascinating to watch, is the way they fall slowly but unpredictably. Due to their light weight, they not only fall slowly to the ground, but their direction of movement is also changed by small air movements. To simulate these air movements and their effect on each snowflake would make the software very complex.
A simple solution is to use random values added to the falling motion. In addition, each snowflake gets its own speed factor, so that not all snowflakes fall at the same speed. This is also the case in nature, because the different shapes and sizes of snowflakes result in different falling speeds.
// get the acceleration data
// values are in g (9.81 m/s2)
M5.IMU.getAccelData(&accX,&accY,&accZ);
// use gravity vector for movement
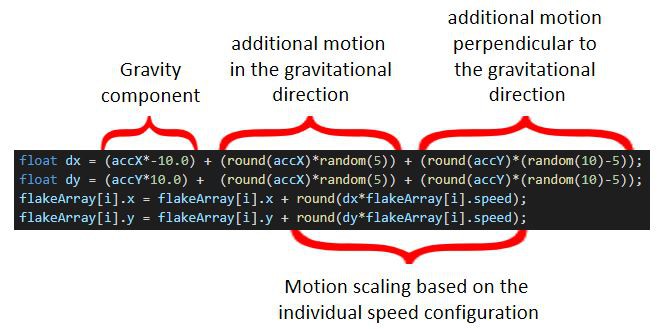
float dx = (accX*-10.0) + (round(accX)*random(5)) + (round(accY)*(random(10)-5));
float dy = (accY*10.0) +  (round(accX)*random(5)) + (round(accY)*(random(10)-5));
flakeArray[i].x = flakeArray[i].x + round(dx*flakeArray[i].speed);
flakeArray[i].y = flakeArray[i].y + round(dy*flakeArray[i].speed);
// push the snowflake to the sprite on top of the background image
img.drawXBitmap((int)(flakeArray[i].x-flakeWidth),    (int)(flakeArray[i].y-flakeHeight),    snowflake, flakeWidth, flakeHeight, TFT_WHITE);
This shows the virtual forces that move the snowflake:
![]()
And this explains how the code works:
X-Mas Content
Content is, of course, an important issue. A beautiful background makes the snow globe really beautiful. But where do you get beautiful content? It is very important that you pay attention to the copyrights when you use an image from the Internet. I wanted to use one of my favorite cartoons by Ralph Ruthe. So I asked him by mail whether I may use the image. And indeed he found the project funny too and allowed me to use the image for non-commercial purposes. So be careful! If you download the code, then keep in mind that you are only allowed to use the image for private purposes!
To best way to show images on the display of the M5Stack is, if they are available as an array in RGB565 format. The array can be stored in a header file. Then this file only needs to be included and you can access the image. A good explanation of the RGB565 format can be found on Thomas Bath website. The display of the M5Stack has a resolution of 320x240 pixel. An image at any kind should be available in this resolution. To converted it into an RGB565 array, a special tool is needed. There is a good documentation available here (or on github). Another tutorial can be found in this video.
How to animate the stuff:
The simulation should be displayed smoothly and without flickering. To realize this, a Fullscreen sprite with 16bit color depth was used.
// Sprite object "img" with pointer to "M5.Lcd" object
// the pointer is used by pushSprite() to push it onto the LCD
TFT_eSprite img = TFT_eSprite(&M5.Lcd);
The 16bit sprite is large. You will need the PSRAM of the M5Stack Fire to get this code running. And you need to enable the PSRAM in the compiler. With PlatformIO, simply add the following lines in the platformio.ini file:
build_flags =
-DBOARD_HAS_PSRAM
-mfix-esp32-psram-cache-issue
First, the background image is drawn into the sprite and then each snowflake is drawn on top of it. Once this is done, the sprite is pushed to the screen without clearing the screen. This makes the simulation run nice and smooth, so it's a joy to watch. Just like a real snow globe.
M5Stack Christmas Snow Globe
Modern times make modern solutions possible. Therefore, the step to a digital snow globe is not that far.
 Hans-Günther Nusseck


Discussions
Become a Hackaday.io Member
Create an account to leave a comment. Already have an account? Log In.