Petoi
Petoi-
Petoi Coding Blocks Released For Block-Based Programming Support
05/01/2023 at 09:25 • 0 comments![Petoi Coding Blocks Released for Block-based Programming Support]()
Petoi is proud to release Petoi Coding Blocks, a new way to program the Petoi robots. It's a drag & drop programming environment similar to MIT Scratch and supports Mac, Windows and Linux.
In case you wonder how it's different from the other block-based programming environment Tinkergen:
Petoi Coding Blocks Codecraft by Tinkergen OpenCat support compatible with OpenCat 2.0 and all Petoi robot pets only compatible with Bittle running on OpenCat 1.0 which is no longer updated Connection type wired and Bluetooth connection wired connection Underling code implementation generation it uses the Python API and can generate Python codes that students can study it uses the C++ API and can generate C++ codes that students can study Free curriculum coming in mid May available We highly recommend you using Petoi Coding Blocks now.
-
Big Steps For Robot Dog Bittle To Walk Over A Gap - Open Source Quadruped Robot Kit
05/01/2023 at 09:13 • 0 commentsWe did some coding to make legged robot Bittle walk over a gap that is 8.5cm wide. The distance between its front and back shoulders is only 10.5cm.
The skill is available for download at GitHub. See here for more details, to reproduce this challenging move in coordinating the limbs of this nimble quadruped robot.
Note: due to the limited memory size on NyBoard(the default board on Bittle)., the skill is only valid on ESP32 quadruped robot controller BiBoard with a larger memory size.
![Big steps for robot dog Bittle to walk over a gap - open source quadruped robot kit]()
-
Petoi Quadruped Robot Dog Bittle Review By Magpi & Hackspace - Build Your Own Miniature Boston Dynamics Spot-Like Robot Dog With Raspberry Pi & ROS
05/01/2023 at 08:54 • 0 commentsWe'd like to share the Petoi open source robotics kit Bittle in-depth reviews by the MagPi, the official Raspberry Pi Magazine, and HackSpace, the monthly magazine for people who love to make things and those who want to learn.
These reviews cover how to build your own miniature Boston Dynamics Spot-like robot dog as well as Raspberry Pi & ROS integrations with quadruped robot Bittle:
![MagPi 2022 Nov petoi robot dog bittle review]()
![hackspace 2022 nov petoi robot dog bittle review]()
-
OpenCat Imitation Tutorial
12/19/2022 at 09:58 • 0 commentsOpenCat Imitation Tutorial
Let the robot be your Avatar!
In this tutorial, we will introduce how to use the Ailia in python language to implement Nybble cat robotics kit(an OpenCat open source robot) to imitate various human body movements.
git clone https://github.com/PetoiCamp/OpenCat-Imitation
1. Run on a regular computer (Mac/Linux)
Requirements
- Python 3.6 and later
- It is recommended to install the Anaconda3 IDE. For the specific installation method, please refer to the following link: https://docs.anaconda.com/anaconda/install/
- Open the Anaconda Prompt (Windows) or the Terminal (Linux / macOS) and enter the following commands to create and activate a virtual environment (the environment name is "venv", and can also be customized to other names):
conda create --name venv conda activate venv - Follow the guide to install the Ailia SDK, it will be used for pose detection. The guide mainly includes the following steps: download and install the ailia SDK and the related python library files.
When downloading the Ailia SDK, you need to enter the correct email address to receive the download link address and license file. The free license is valid for only one month. The SDK is about 2GB, so it takes time to download.
Move the downloaded license file (AILIA.lic) to the directory where
bootstrap.pyis located ({ailia sdk directory}/python), and then follow the steps to continue installing the Ailia SDK.cd {ailia sdk directory}/python python3 bootstrap.py pip3 install .Download the requirements.txt from this page (https://github.com/axinc-ai/ailia-models) to the directory wherebootstrap.pyis located before running the following command:pip install -r requirements.txt.It may take 30 minutes. - Use the USB uploader or Bluetooth module to connect the robot and power it on. The computer needs to be connected to a camera device.
- Run the following command to start the OpenCat Imitation program:
cd {your file directory}/OpenCat-Imitation/
# set python import path
export PYTHONPATH=$PWD:$PWD/serialMaster
python opencat_imitation/imitation.py -v0
You can execute run.sh within OpenCat-Imitation/
2. Run on the Jetson Nano 2GB Developer kit
You may want to run the demo on a Jetson Nano to experiment with some GPU features.
The developer kit uses a microSD card as a boot device and for main storage. It’s important to have a card that’s fast and large enough for your projects; the minimum requirement is a 32GB UHS-1 card. Many projects with Jetson Nano 2GB Developer Kit will utilize swap space on the MicroSD Card due to only 2GB physical memory. For this reason, we recommend 64GB or larger microSD cards. High-endurance microSD cards are also recommended.
- Please refer to the user guide to record the system image file (JetPack 4.6) into the microSD card and complete the system initialization.
The system image file link in the user guide (https://developer.nvidia.com/embedded/learn/get-started-jetson-nano-2gb-devkit#write) points to JetPack 4.6.1, download and burn it to a microSD card After that, system initialization may fail when the Jetson Nano is started. So we recommend using the earlier version: JetPack 4.6.
2. Use a network cable to connect the Jetson Nano development board to a router or other computer hosts so that it can access the Internet.
3. Clone or download the code from GitHub, and install the Ailia SDK according to the guide, the specific method is the same as the above step 3 in Run on the host computer, but NO need to execute the statement:
pip install -r requirements.txt4. Install the relevant python library files using the following command: sudo apt install python3-pip sudo apt install python3-matplotlib sudo apt install python3-scipy pip3 install cython pip3 install numpy sudo apt install nvidia-jetpack pip3 install dataclasses pip3 install pyserial
5. Connect the camera and complete its configuration by referring to the relevant guide. Please refer to the technical documentation to complete the setup if you use a USB camera the relevant technical documentation to complete the setup. To connect the USB uploader, you need to use the following command:
sudo usermod -a -G dialout $USERto increase user rights.6. Start the program, please refer to step 4 and 5 of Run on a regular computer. Now the OpenCat imitation program can run on the Jetson Nano development board. You can refer to other relevant technical documents to improve the program's performance, such as enabling openCV to support CUDA acceleration.
-
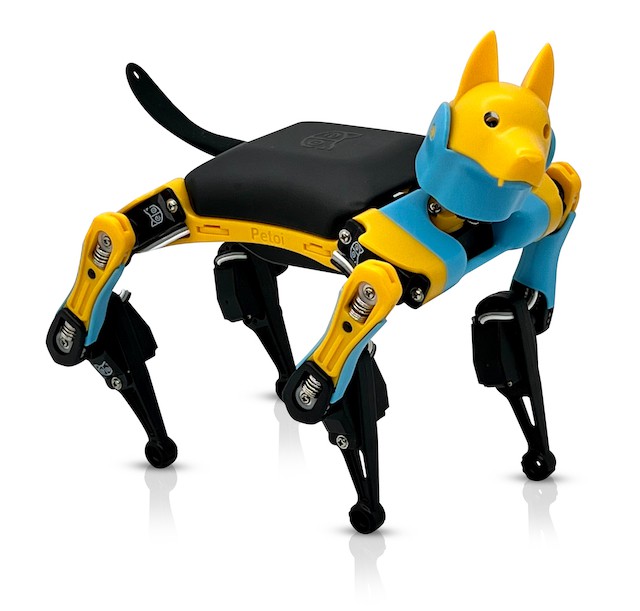
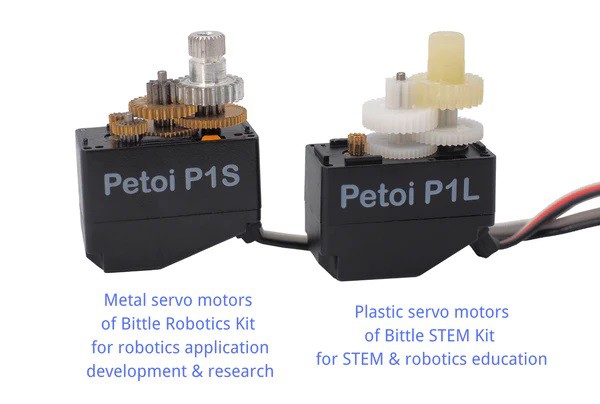
Petoi Launches Bittle STEM Kit
12/19/2022 at 09:39 • 0 commentsPetoi, the maker of futuristic robotic pets, today launches the Bittle robot dog STEM kit, a lower cost version of its palm sized robot dog that can help teach tech enthusiasts, young and old, about STEM, robotics and coding.
![]()
Small but agile, Bittle can be programmed to walk, do tricks and roll around just like a real dog. Differing slightly from Bittle V1, the STEM kit contains plastic-gear servos instead of metal making it lighter and more flexible with different movements.
![]()
-
New Product - BiBoard, A High-Performance ESP32-Based Microcontroller
11/21/2022 at 03:39 • 0 commentsWe just released BiBoard, an ESP32-based robot dog controller that's equipped with high-performance processors, larger memory and storage, and wireless connections, the Audio function is also included.
Check the following demo videos of running BiBoard on Bittle to see its great performance:
Arduino developers, Robotics coders, programmers, developers, and engineers would love this great board at a reasonable price.
-
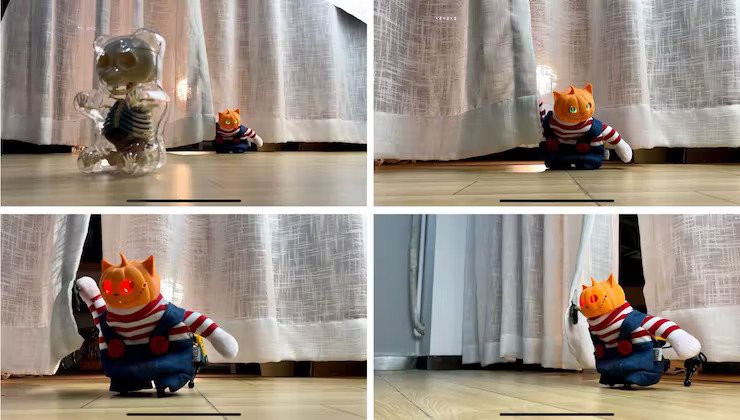
Robot Dog Programming Tutorial: Bittle Vs Gummy Bear On Halloween
11/21/2022 at 03:29 • 0 commentsLearn how to dress up Bittle and program it to play Halloween comics
![]()
Story
Hi there,
It's been two years since our launch of the Bittle robot. Last weekend, I made a horror comic clip with Bittle to celebrate Halloween. You may check out the final cut and read the following tutorial to make your Petoi robots play like a pro.
Idea
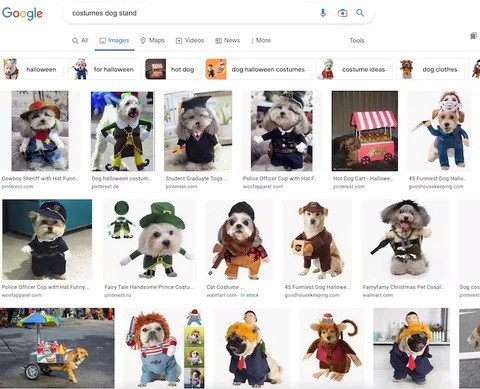
The idea comes from many cute animal videos that dress dogs/cats in costumes.
![]()
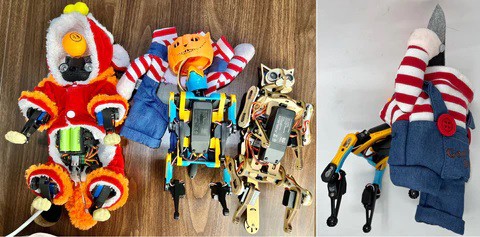
I have both the Bittle dog and Nybble cat robots handy. Since their leg structures are very similar to the real ones, I think it would be funny to dress them up. However, the robots are about 15cm in body length, so I adjusted a lot to fit them into the tiniest costumes for real pets.
![]()
Hardware
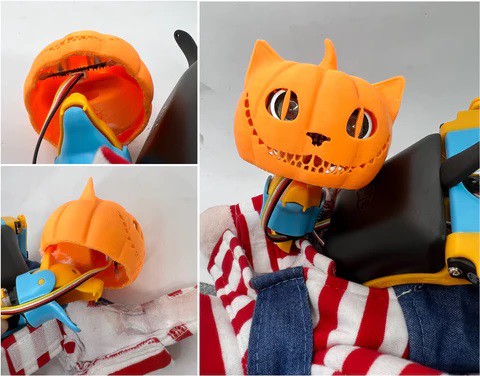
I have printed a pumpkin cat head before, but the original Thingiverse design file seems deleted. You may find some variants or design your own.
I ODMed some ultrasonic sensors with RGB LEDs. It has three WS2812 RGB LEDs in each column. They can be programmed as blinking eyes using the Adafruit NeoPixel library.
I inserted the ultrasonic sensor into the pumpkin head. I also glued a small plastic block between the pumpkin and Bittle's head to raise the pumpkin above the tall collar.
![]()
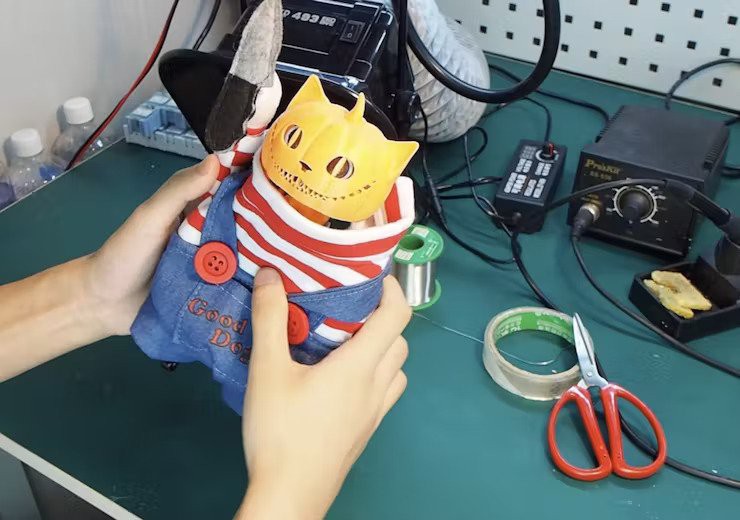
Now the main character is ready to go.
![]()
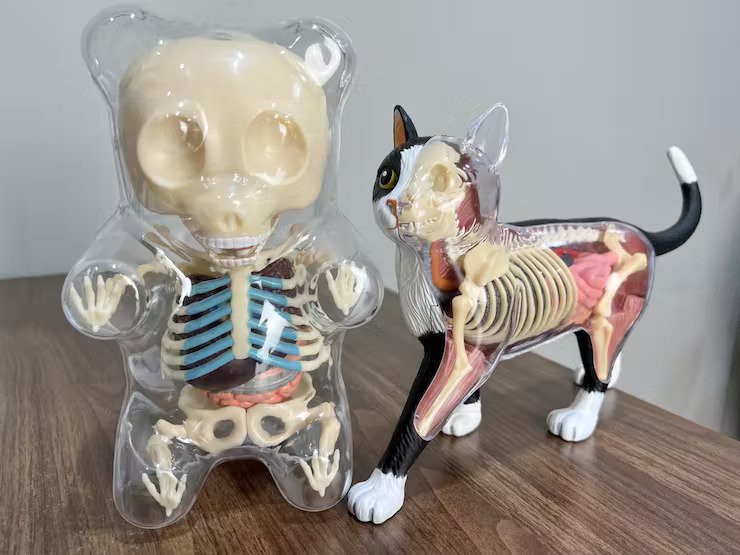
Storyline
I need to add some dramatic storylines to make the simple movements less boring. I have some anatomy models for reference when designing bionic robots. They happen to fit the Halloween theme perfectly.
![]()
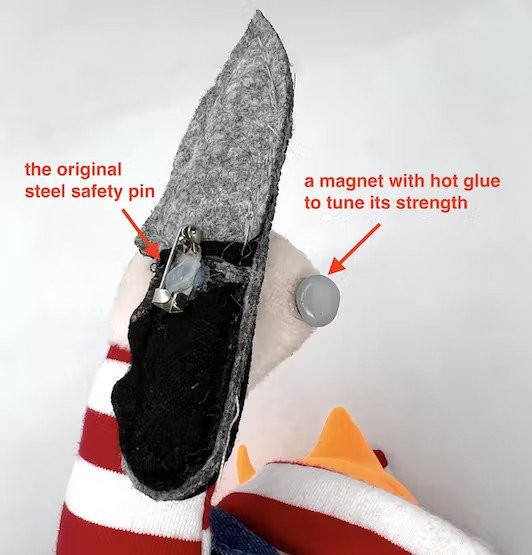
They also look pretty creepy. The assassin (Bittle) should get shocked when facing his mighty victim. I glued a small magnet to the assassin's hand to make the dagger detachable. The magnet's strength is tuned by a thin layer of hot glue so that the dagger will drop with a moderate shock.
![]()
I will also utilize the built-in behavior "check-around" and "backflip" to make the assassin observe the surroundings and jump backward when shocked.
Software
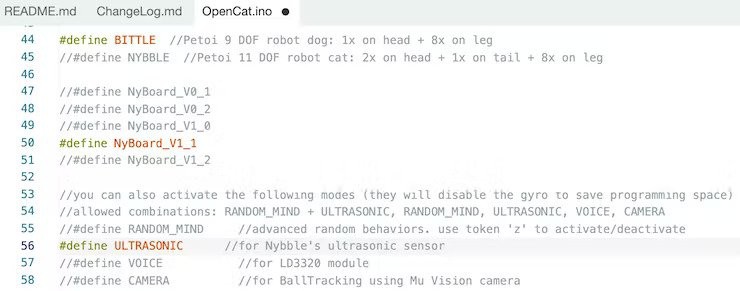
Over the past years, I've optimized the OpenCat software to make it user-friendly. I only need to uncomment the macro definition to activate the LEDs on the ultrasonic sensor.
![]()
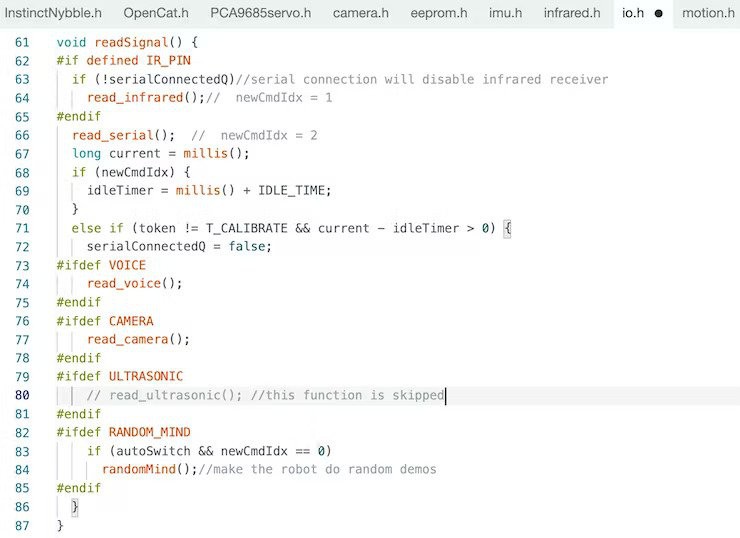
I need to disable the distance measuring function to stop the robot from automatic reactions.
![]()
The basic Arduino code defines the instinctive motions and reactions of the robot. It's pretty encapsulated so that users don't need to worry about the tedious hardware details of a complex robot. A set of top-level string commands can control it through the serial port.
![]()
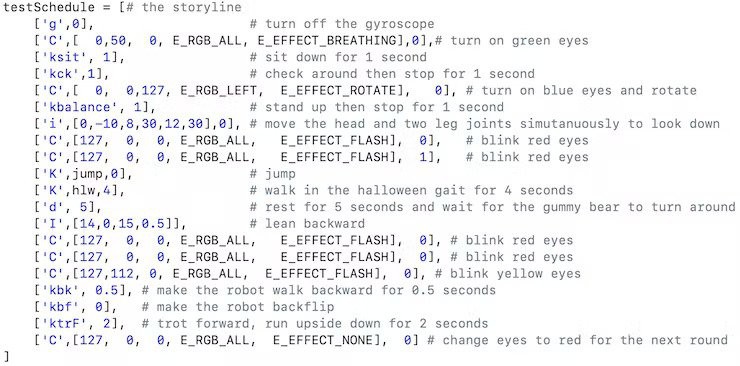
I used the Skill Composer to create and preview a new jump behavior. Below are two demos showing how the Skill Composer works.
I used a Mac to create a Python script and align all the events in order. You can read it like a regular play script.
![]()
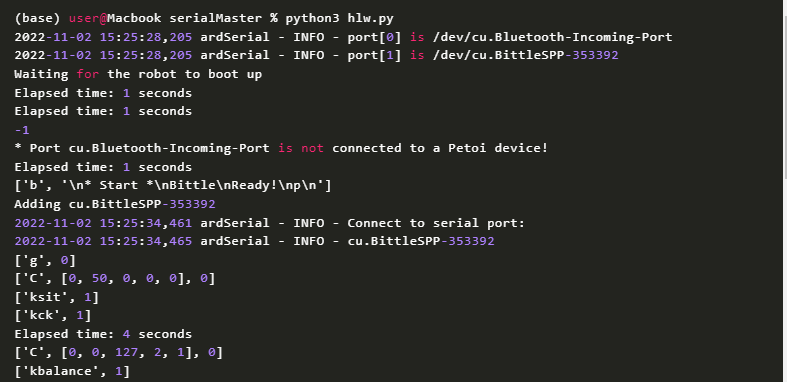
The script is executed in the terminal by python3 hlw.py. It will send queries to all the existing serial ports in parallel, decide if a serial port is connected to a Petoi robot, and then send the tasks over the serial port. The serial port can be wired or wireless connection. For the video, I used the Bluetooth dongle to eliminate the wires.
![]()
After the workflow is well-tuned, I can make Bittle repeatedly play the sequences and shoot videos from different perspectives with a single camera. Bittle is the most patient actor and only complained about a low battery once!
![]()
I shot about 4 hours to collect all media resources. It took about 20 tries to get the dagger to drop in the best direction. The post-editing took more time to search for the proper licensed BGM, clip the appropriate time window, align the soundtrack with motion, and make other tedious adjustments to achieve the best results.
![]()
Result
The final video (at the beginning of this post) turned out cinematic. My friends loved it, and I even got likes from a few professional film directors. They want to use Nybble or Bittle as the hero in their movies.
Below is another story between the Nybble cat and Sox.
It may look like a waste of time to make a short video. However, I think it's a good demo to show how much we have improved the user interface of OpenCat robots.
- We have made the Arduino Uno-based NyBoard V1_2 and ESP32-based BiBoard V0 fully functional and open-sourced their codes on GitHub.
- We have improved the code structure and unified the Arduino motion code for Nybble, Bittle, and a coming 12 DoF model. And the Uno version and ESP32 version share the same code structure.
- Above the motion base, we have implemented high-level controllers in Python script and Tinker GUI on Mac, Windows, and Linux. It can upload firmware, calibrate the joints, and design skills. New skills developed by the Skill Composer or simulation can be sent over to the robot in real-time to test their performance in reality. Gymnastic motions such as climbing upside down and rolling on a high bar can be developed with a few clicks in less than an hour.
- We developed a smartphone app for iOS and Android. It allows programmable buttons to configure and control the robot for competitions.
- We also implemented a micro-python package (to be translated) that turns the WiFi dongle into a minimal standalone master computer. It also allows group control for multiple robots.
- We have made brief tutorials on Raspberry Pi and ROS integration with the Petoi robots.
- We keep revising the documentation center and adding tutorial videos to improve the user experience.
- We developed an introductory C++ curriculum based on Bittle.
![]()
- We also improved the components and packaging a few times since our initial launch. We now offer various kits with pre-assembled components and fully pre-assembled and tuned robots to simplify the building and coding experiences.
So far, we have sold about 10, 000 Petoi robots worldwide through our online store and Amazon. The users' feedback is vital for product quality and features iteration. Technology is only valuable when the general public other than its inventor can benefit from it. That's why I've been spending a lot of time polishing the boring bits of the released products. With the fundamental toolchain built during these two years, I hope more users can make full use of their Petoi robots. I look forward to more creative projects on our forum!
~~
Rz and the Petoi Team
-
Voice Control for Petoi Bittle with Raspberry Pi
11/16/2022 at 04:49 • 0 commentsLearn how to use a voice control module for Raspberry Pi with Petoi Bittle — a palm-sized, open-source, programmable robot dog for STEM and fun. - by Friende Peng, intern engineer at Petoi in 2021 summer.
Things used in this project
Hardware components
-
OpenCat Bittle
- Raspberry Pi 3 Model A+
- Mini USB Microphone
- Petoi - USB Adaptor
Software apps and online services
OpenCat, an open source robotics quadruped framework
-
Raspberry Pi Raspbian
- Arduino IDE
Story
Introduction
Petoi's Bittle is a palm-sized, open-source, programmable robot dog for STEM and fun. Bittle can connect with Raspberry Pi and can be easily extended. The goal was to develop a real-time voice control module for Bittle and command Bittle to do some actions.
Demo Video
Voice Control Petoi with USB Adapter & MacBook Pro
Voice Control Petoi with Raspberry Pi Model 3 A+
Abstraction
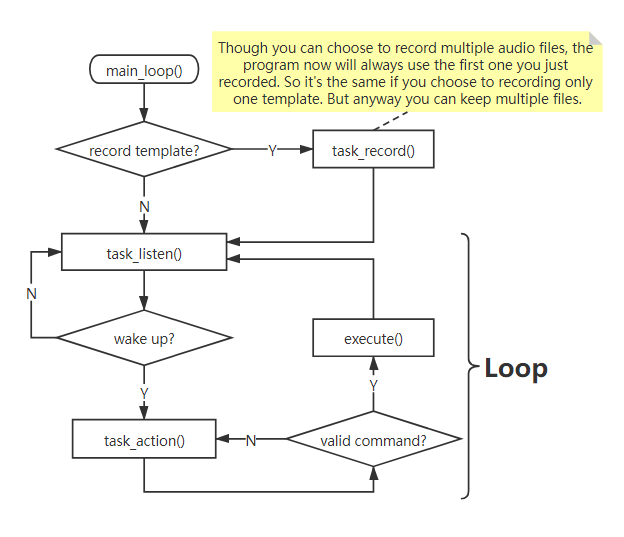
The conclusion is that I use VAD(Voice Activity Detection) + DTW + Vosk
Use Python to record
I used PyAudio at the beginning, but it is an old library. So I used Sounddevice and Soundfile instead.
Command/Key Words Recognition
From a functional point of view, the methods to do this can be divided into:
- Speech to Text. And then look up the commands in the text. One good thing is that this can be combined with NLP applications but this is an overkill for Speech2Text.
- Use acoustic features to do analysis and detect commands.
DTW (Dynamic Time Warping) (Used)
This belongs to the second category and it's similar to template matching. DTW can calculate the cost to match one piece of audio with template audio. We can pick the audio with the lowest cost. This method does not need training and is also applicable even if you want to add new commands. The bad thing is that the calculation is time-consuming. But at least the command audios are short in time and we can find ways to eliminate the silence and extract MFCC(Mel-frequency Cepstral Coefficients) feature.
CNN for Command/Key Word Recognition
This is a demo Speech Command Recognition with torchaudio — PyTorch Tutorials which is done by PyTorch Official. But we need to re-train the model when we have new commands coming in.
Voice Activity Detection
I was inspired by a blog Audio Handling Basics: Process Audio Files In Command-Line or Python | Hacker Noon. The blog mentions that we can eliminate the silence part of an audio recording according to the short-term energy of audio data. A Python library called librosa provides some functions for doing that.
Speech Recognition
I tried some open source methods:
Offline recognition, provides lightweight tflite models for low-resource devices.
Requires 16bit 16KHz mono channel audio. A new version supports Chinese.
I tested it by using non-strip and stripped audios with both large and small size models but it did not do well. For example:- 起立 -> 嘶力/成立
- 向前跑 -> 睡前跑
- 向前走 -> 当前走
So I tested it again using English:
- Hey Bittle
- Stand up
- Walk forward
- Run forward
I have used 16 recordings for now. An empty result is shown when it encounters OOV(out of vocabulary) words. "Bittle" would be recognized as "be to". After silence elimination, some results have changed from wrong to correct, and some have changed from correct to the wrong (this may be due to the reduction of the silence between the pronunciation of words).
16 English Tests, 9 were correct &16 Chinese Tests, 3 were correct.It does not have lightweight models and the models are near 900MB. It's too big for a Raspberry Pi.
It provides multiple ways such as using Google/MS Api. The only one method to offline recognition is no longer being maintained.
Vosk provides offline recognition and light-weighted models for both Chinese and Chinese. The documentation is not complete.
A test result for the Chinese model
Non-strip Correct----------|----------Stripped Correct----------|----------Total correct 16/21----------------------------|-----------16/21--------------------------|-----------32/42
Prepare environment
Simple Version (Run on Pi):
bash rpi_simple.sh
Complete Manual
1. Enter Pi's terminal:
sudo apt-get update && sudo apt-get upgrade
2. Install portaudio:
sudo apt-get install make build-essential libportaudio0 libportaudio2 libportaudiocpp0 portaudio19-dev libatlas-base-dev
3. Create a new virtual environment with python==3.7.3 and activate it.
- If you use venv:
spython3 -m venv /path/to/environment
4. Install Scipy. Download the wheel file
spython3 -m venv /path/to/environment
Make sure you download the one with cp37-cp37m-linux_armv7l in its name.
5. Install librosa:
- Deactivate the environment and then:
sudo apt install libblas-dev llvm llvm-dev export LLVM_CONFIG=/usr/bin/llvm-config
- Activate the environment and then: Note: The correct version number of llvmlite can be found at pypi. You should determine according to the llvm version installed by the first command above. Same for numba's version.
pip install llvmlite==[correct version number]
pip install numba==[correct version number]- Download and unzip librosa source code. Then cd into the directory.
python setup.py build
python setup.py installExample for version number: llvm==7.0.1 corresponds to llvmlite==0.32.1 and numba==0.49.1.
6. Install the remaining dependencies.
pip install -r requirements_pi.txt
7. Download vosk model. Download vosk-model-small-en-us and vosk-model-small-cn. The former is for English(US) and another one is for Chinese. Both of them are small and portable models.
8. Current codes use English Model for default, download and extract the model. Move the folder you just got into ./models. Make sure the folder name is the same as vosk_model_path in your config.
Run
1. IMPORTANT: Let terminal enter my_vosk and input:
python main.py
2. You can skip the recording step. A pre-recorded file is saved at ./recordings/template_1.wav A file with raw in its name means the wave file has not been stripped(silence) yet.
3. Finetune the threshold for wakeup recognition. In config.yml, the value is now 0 for easy debug. After "开始监听(start listening)", check the console for DTW.normalizedDistance. For example:
- Before you say the "wakeup word", the value is between 115-125;
- After you say the "wakeup word", the value should decrease. Maybe between 105-117.For this case, you can set threshold as 120(strict) or 115(not so strict).
4. You should go into command recognition after waking up Petoi. There are many pre-defined commands in cmd_lookup.py. You can say "stand up", for example.
5. If you want to use Chinese model(similar for other languages):
- Unzip the Chinese model and put the folder into ./models Set the vosk_model_path in config.yml.
- Set the cmd_table in config.yml as below:
cmd_table:
package: my_vosk.common.cmd_lookup
table_name: cmd_table_cn
build_dict: build_dict_cnLogic
![]()
Code
Github Repository
This is a voice control module for Raspberry Pi with Petoi Bittle.
-
-
OpenCat 2.0 Released For Petoi Robot Dog And Robot
11/15/2022 at 10:44 • 0 commentsPetoi's popular open source quadruped robotic pet framework OpenCat has been upgraded to 2.0 with major updates to the Arduino codes.
![]()
We redesigned the code structure to make the workflow easier to understand and modify:
Improved the smoothness of motion and the speed of balance adaption.
Fixed many bugs in the original workflow. For example, the robot no longer skips commands randomly.
Combine WriteInstinct.ino and OpenCat.ino into a single OpenCat.ino. Use the #define MAIN_SKETCH macro to switch between the two modes.Python API Updates and Demos
We have more detailed documentation of the OpenCat Python API and demos to help users connect the robot with another program, such as voice, vision, gaits trained by deep learning, and ROS. It also allows the robot to perform an infinite length of tasks defined by a preset scheduler.
OpenCat - Open Source Quadruped Robotic Framework
OpenCat is the open-source Arduino and Raspberry Pi-based quadruped robotic pet framework for Boston Dynamics-styled programmable robots