Andreas Eriksen
-
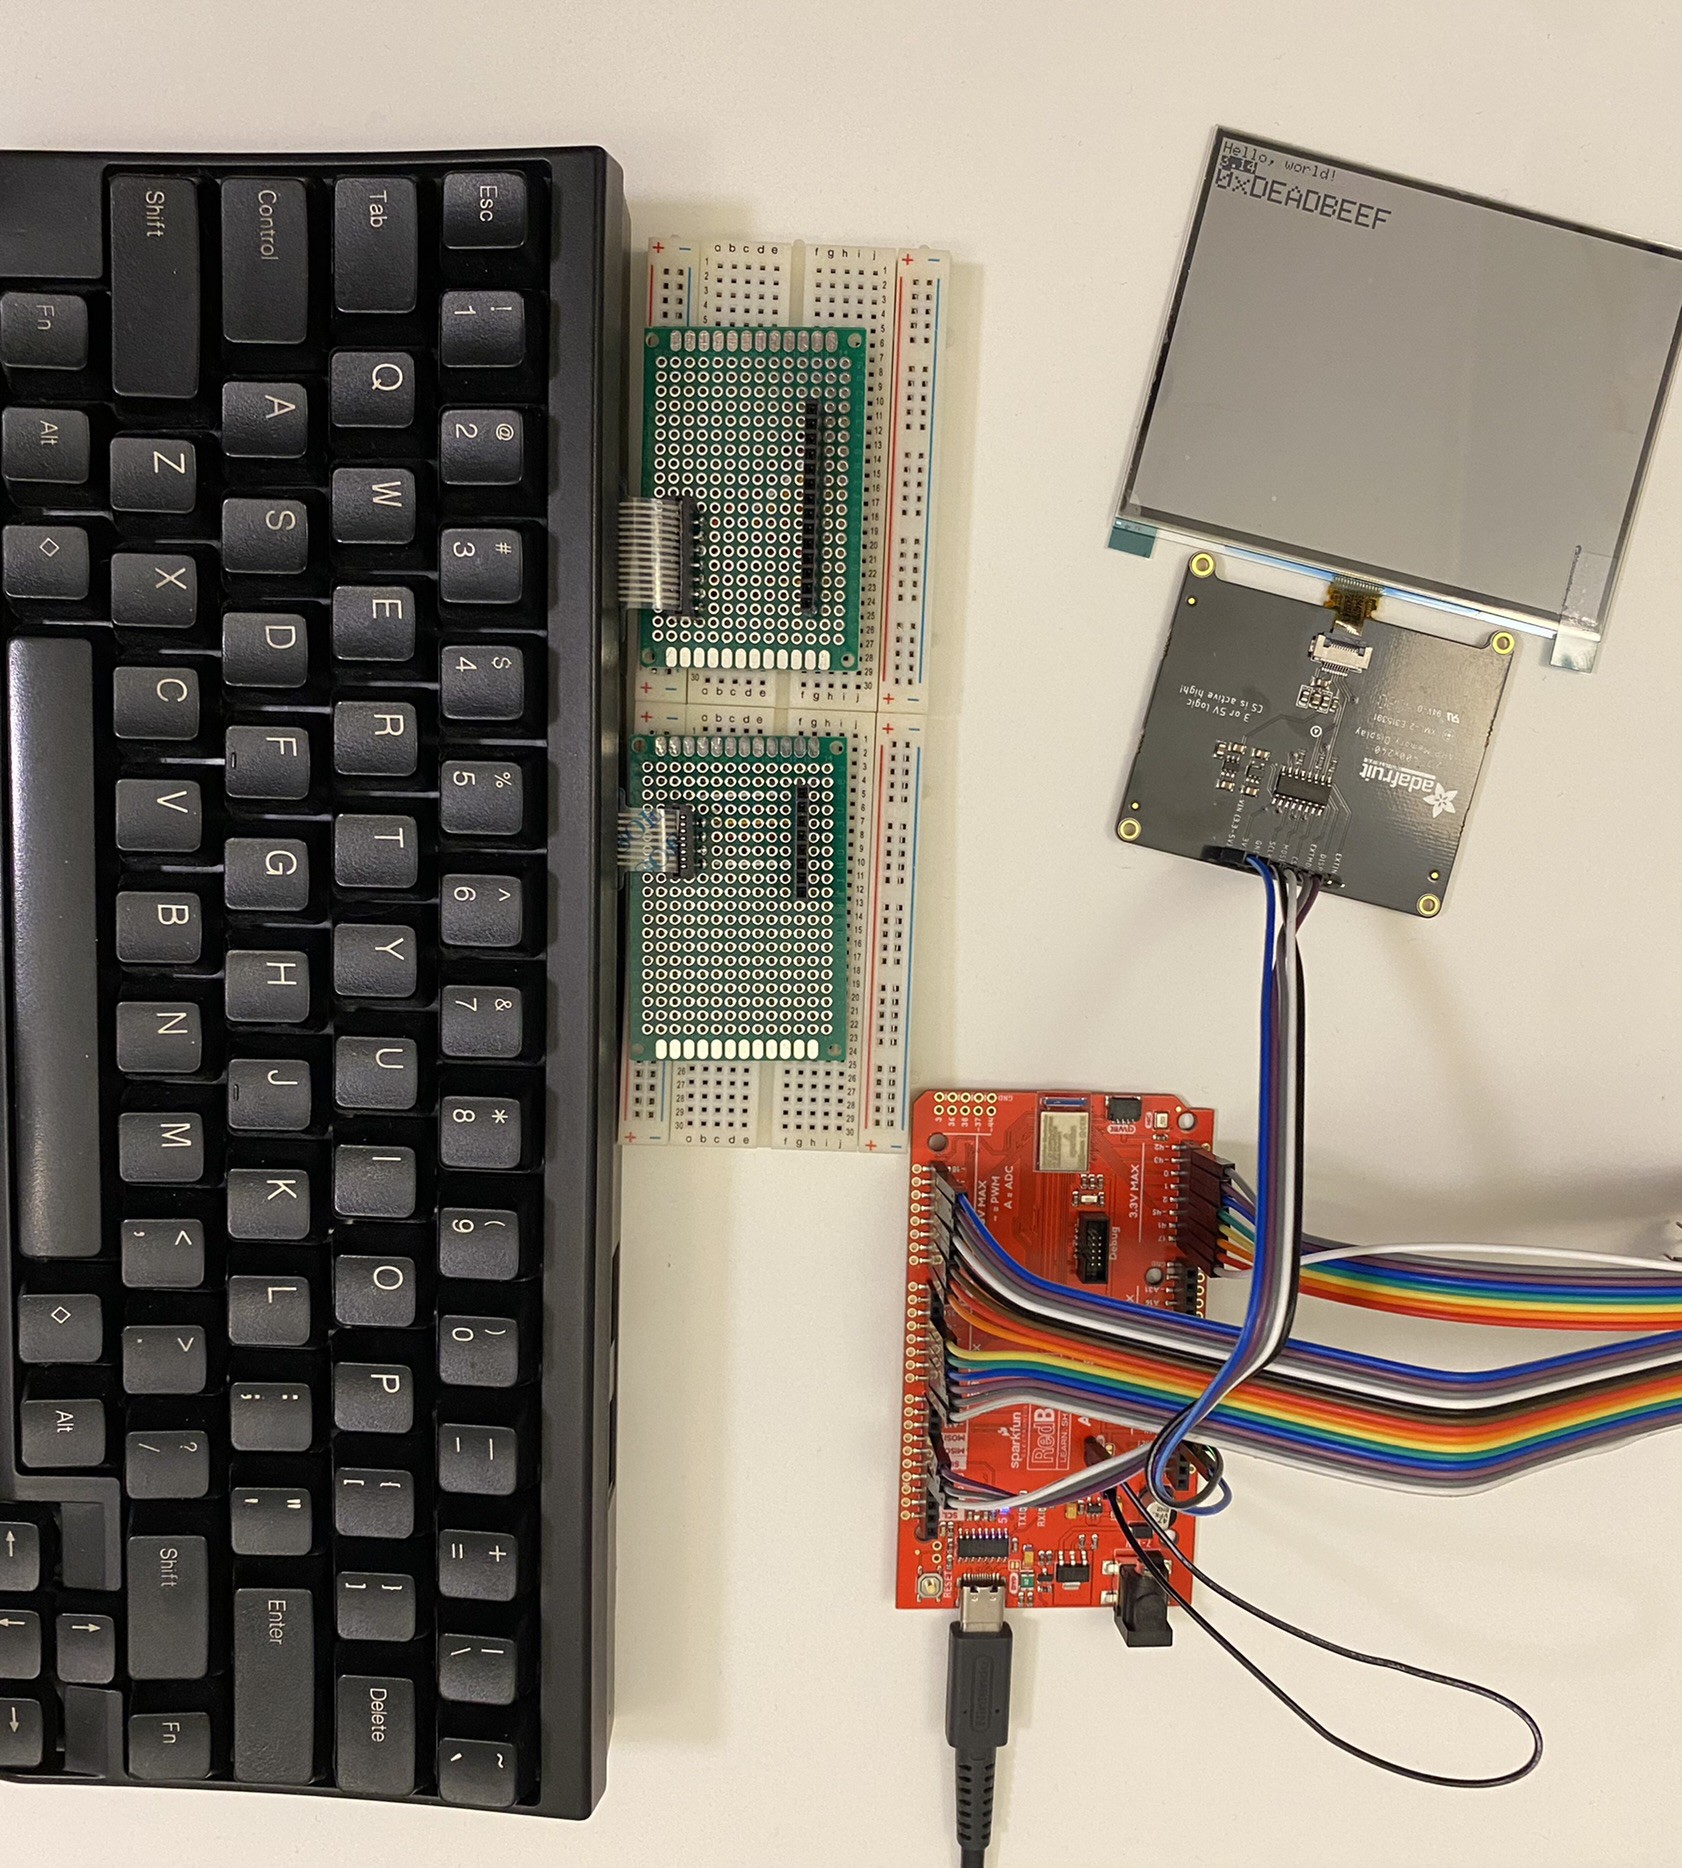
Seeing double
08/10/2024 at 05:35 • 0 comments![]()
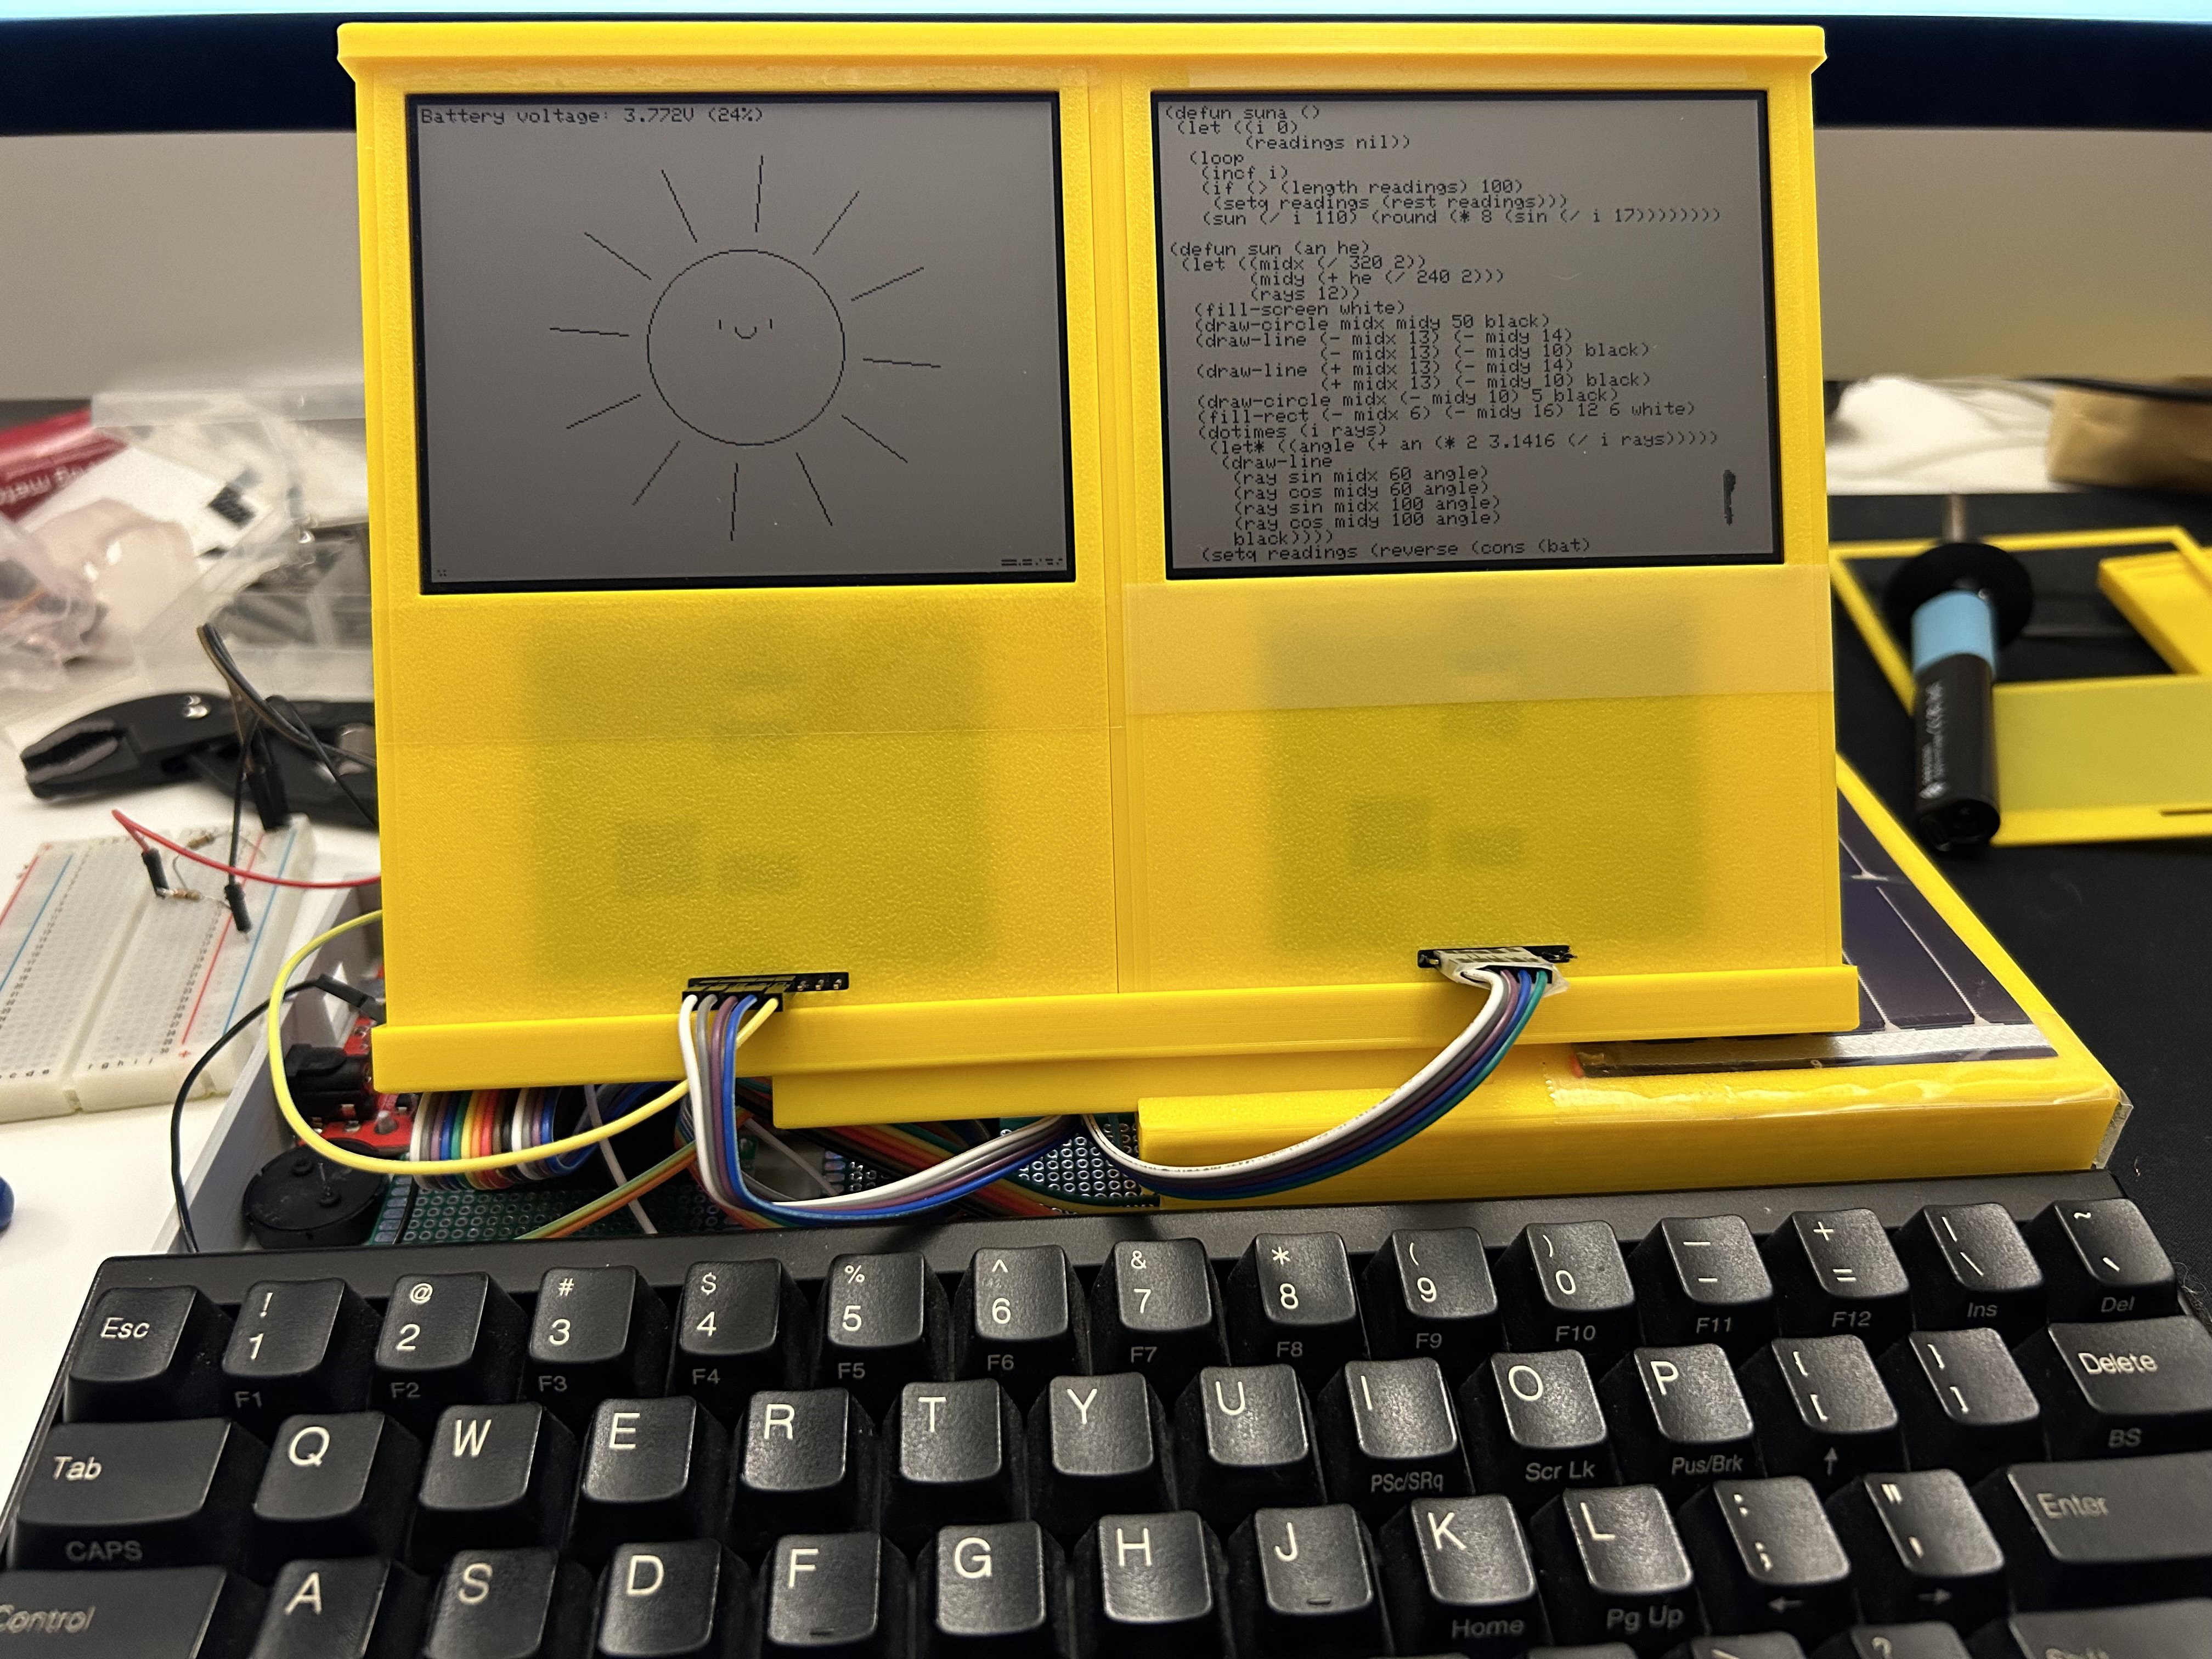
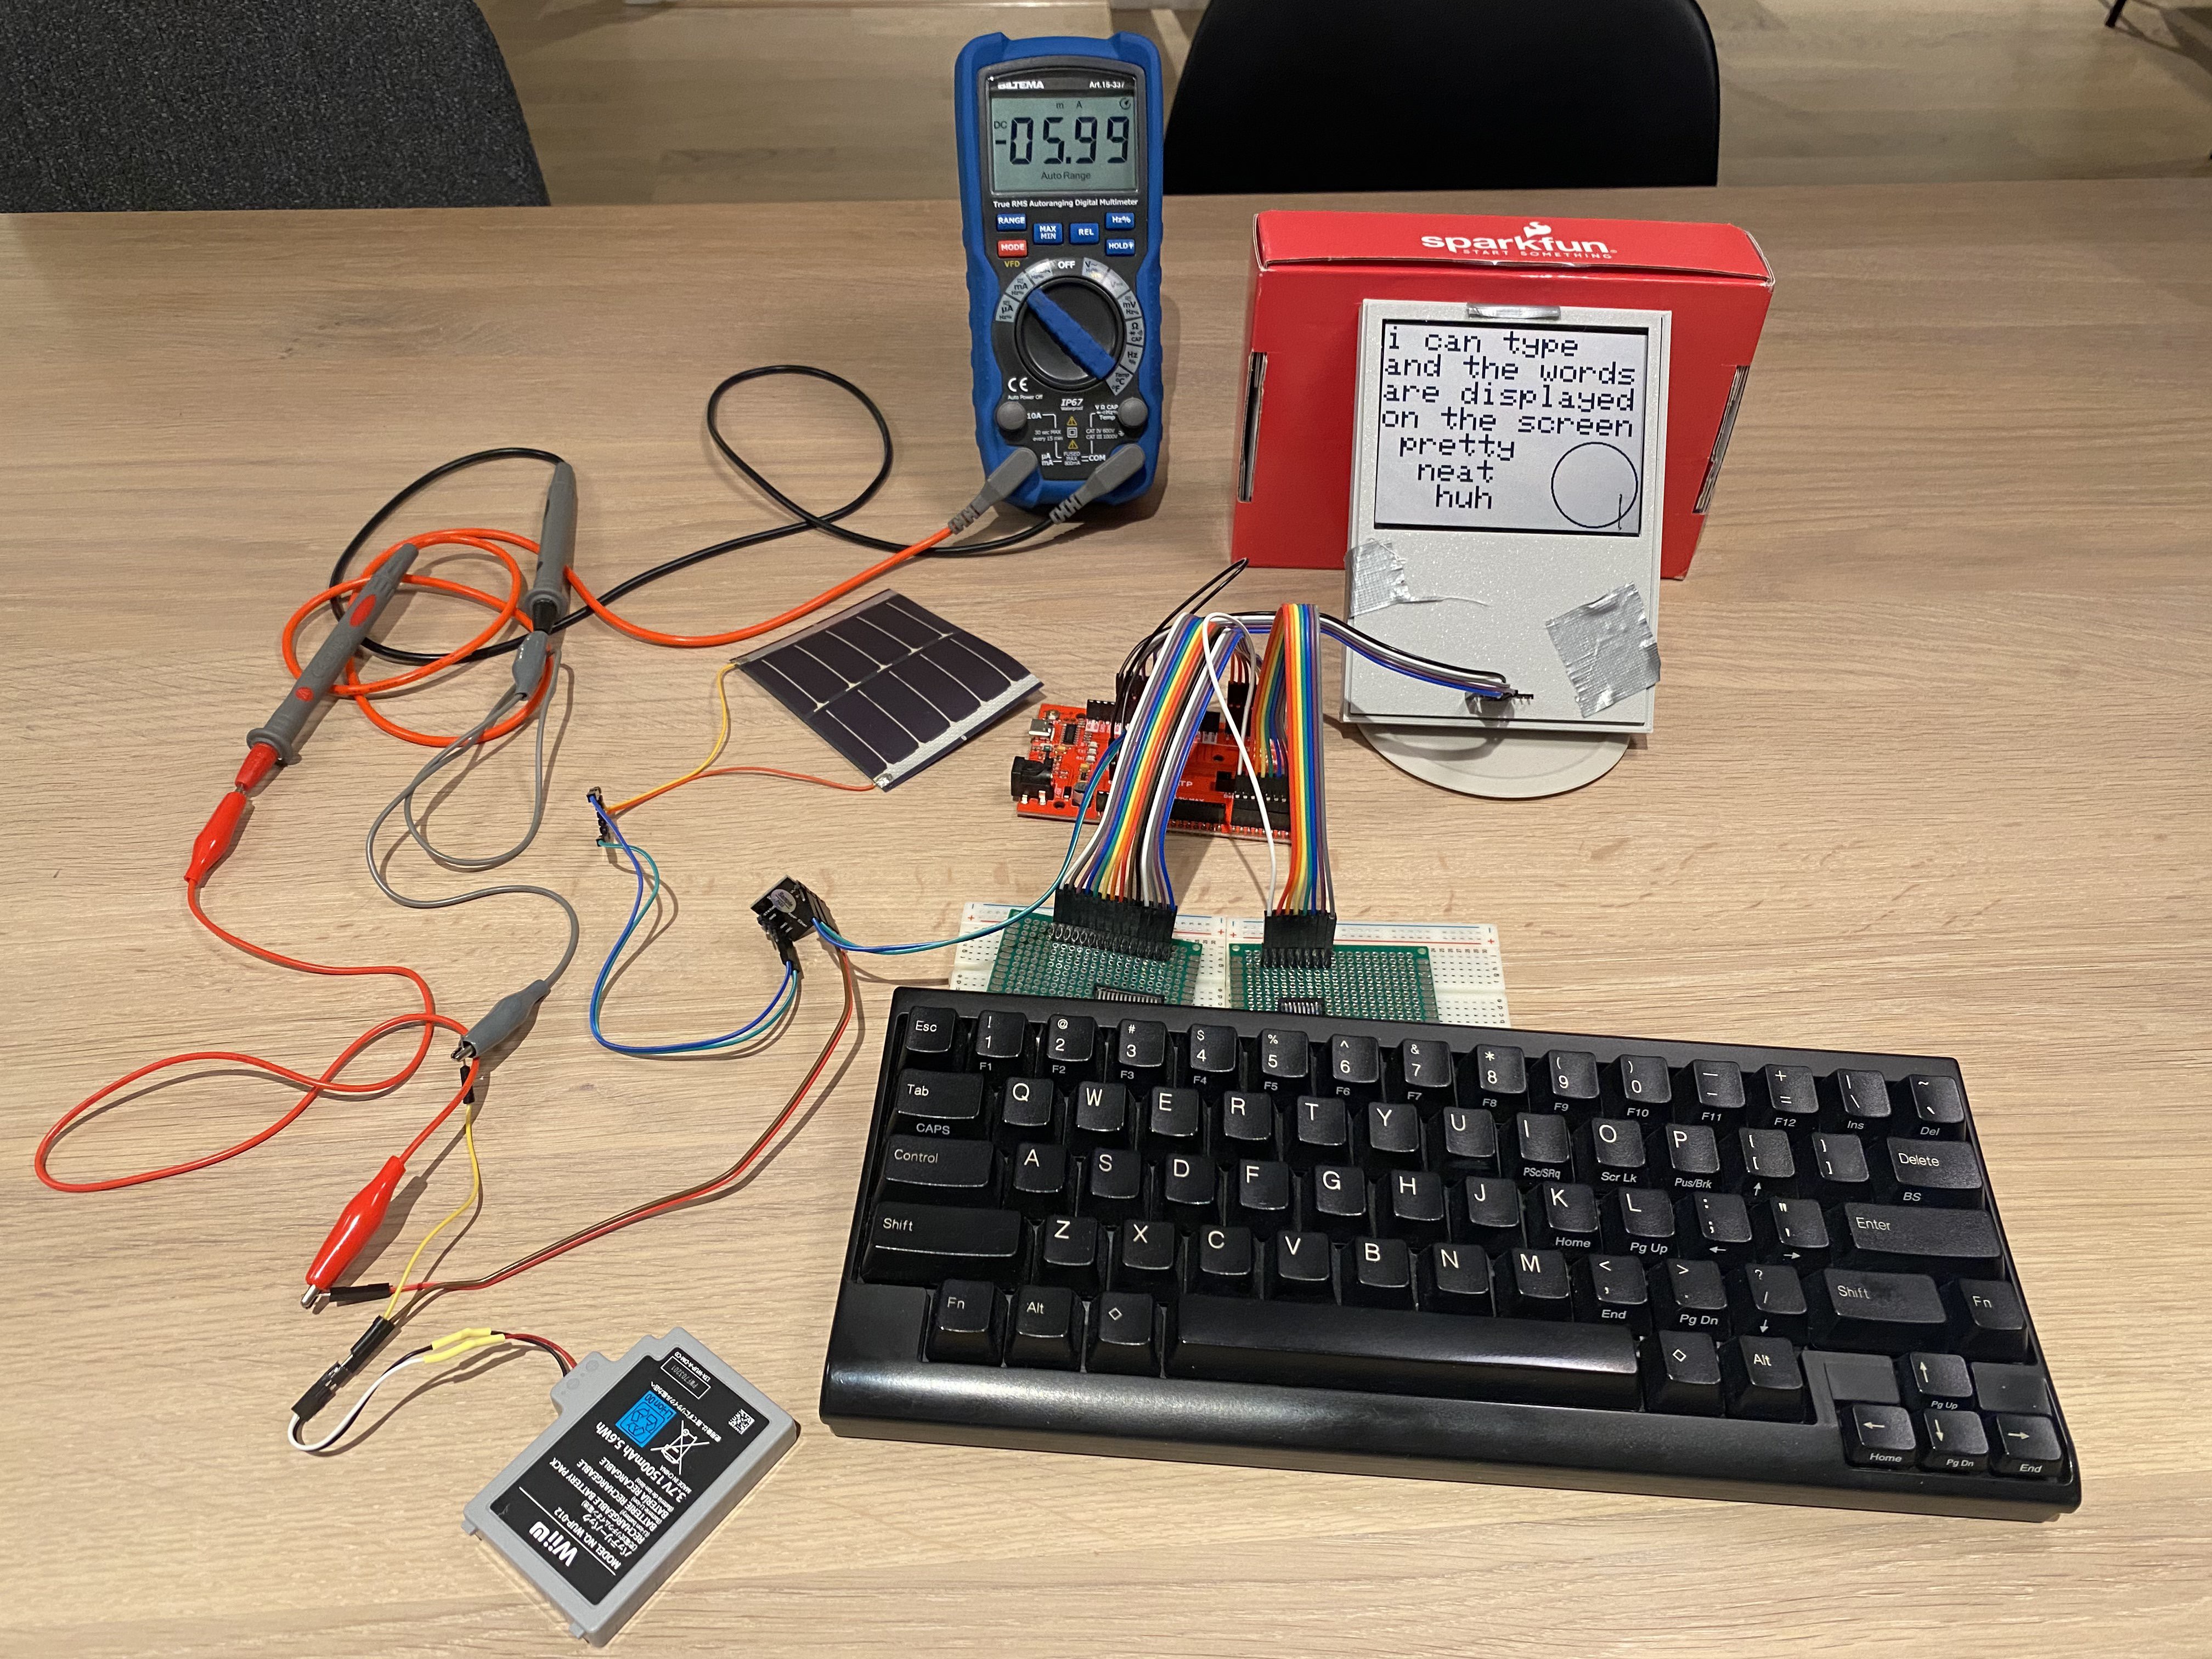
Got dual displays hooked up and working now, and also some very basic battery voltage measurement to keep track of state of charge.
Considering this mostly "feature complete" on the hardware prototype now - Also working again on making a PCB, which will make the project more compact and include a custom mechanical keyboard (but like most things, it's hard as a beginner).
-
Schematic and CADs
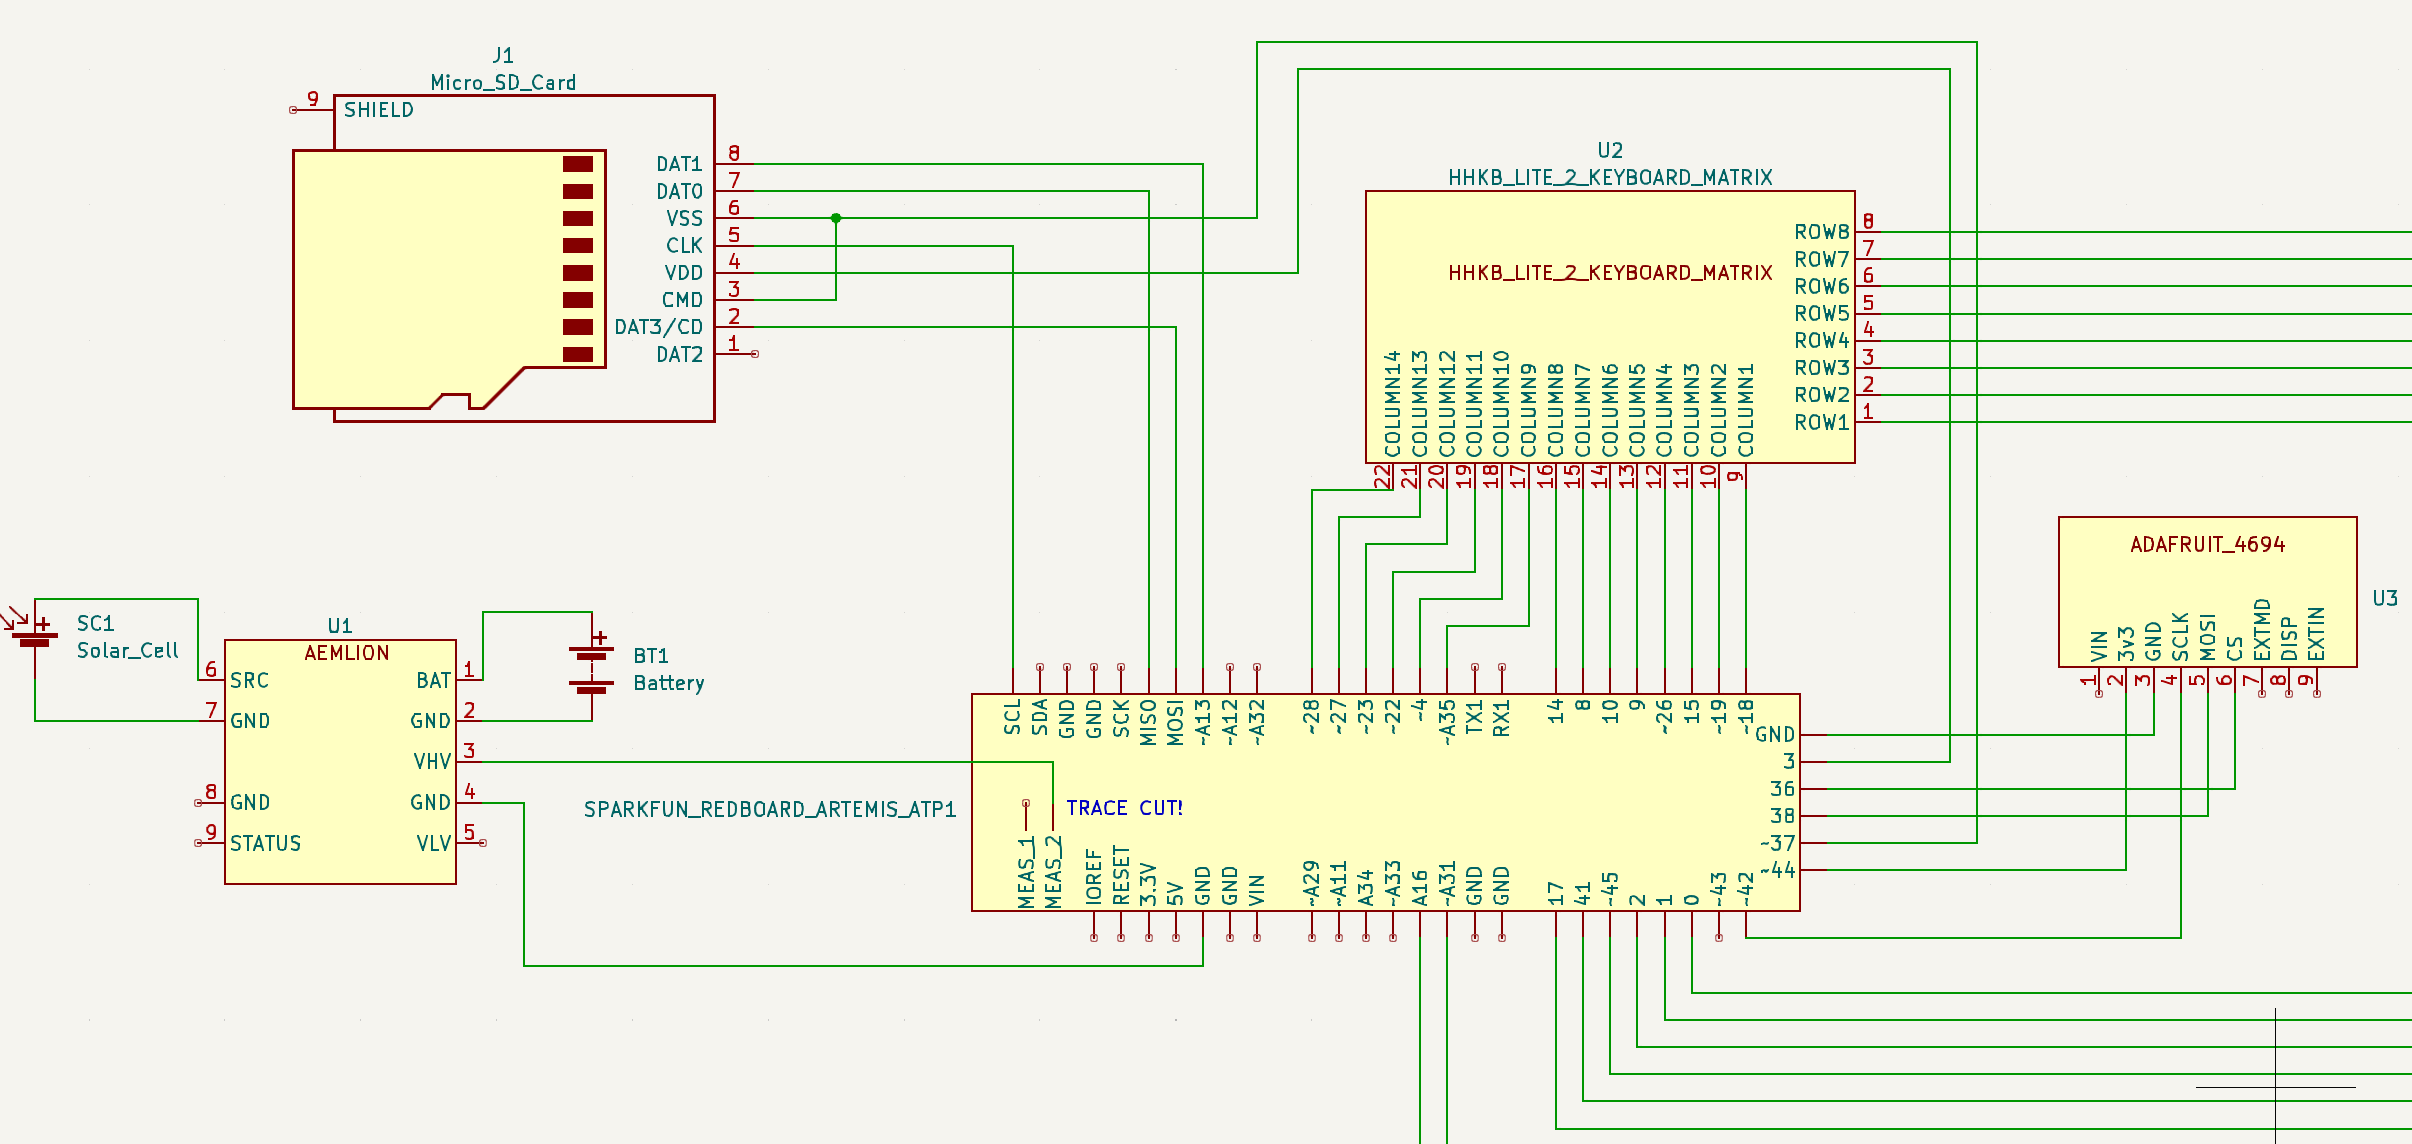
03/19/2023 at 16:42 • 1 commentSince the last update, I've downloaded KiCad and learned enough(?) to create a basic schematic for the project, which you can now find under the "files" section!
I had to make my own symbols, I guess it's unusual to make a schematic for development boards wired together like this. But still it should be enough to be able to convey how it's all connected.
![]()
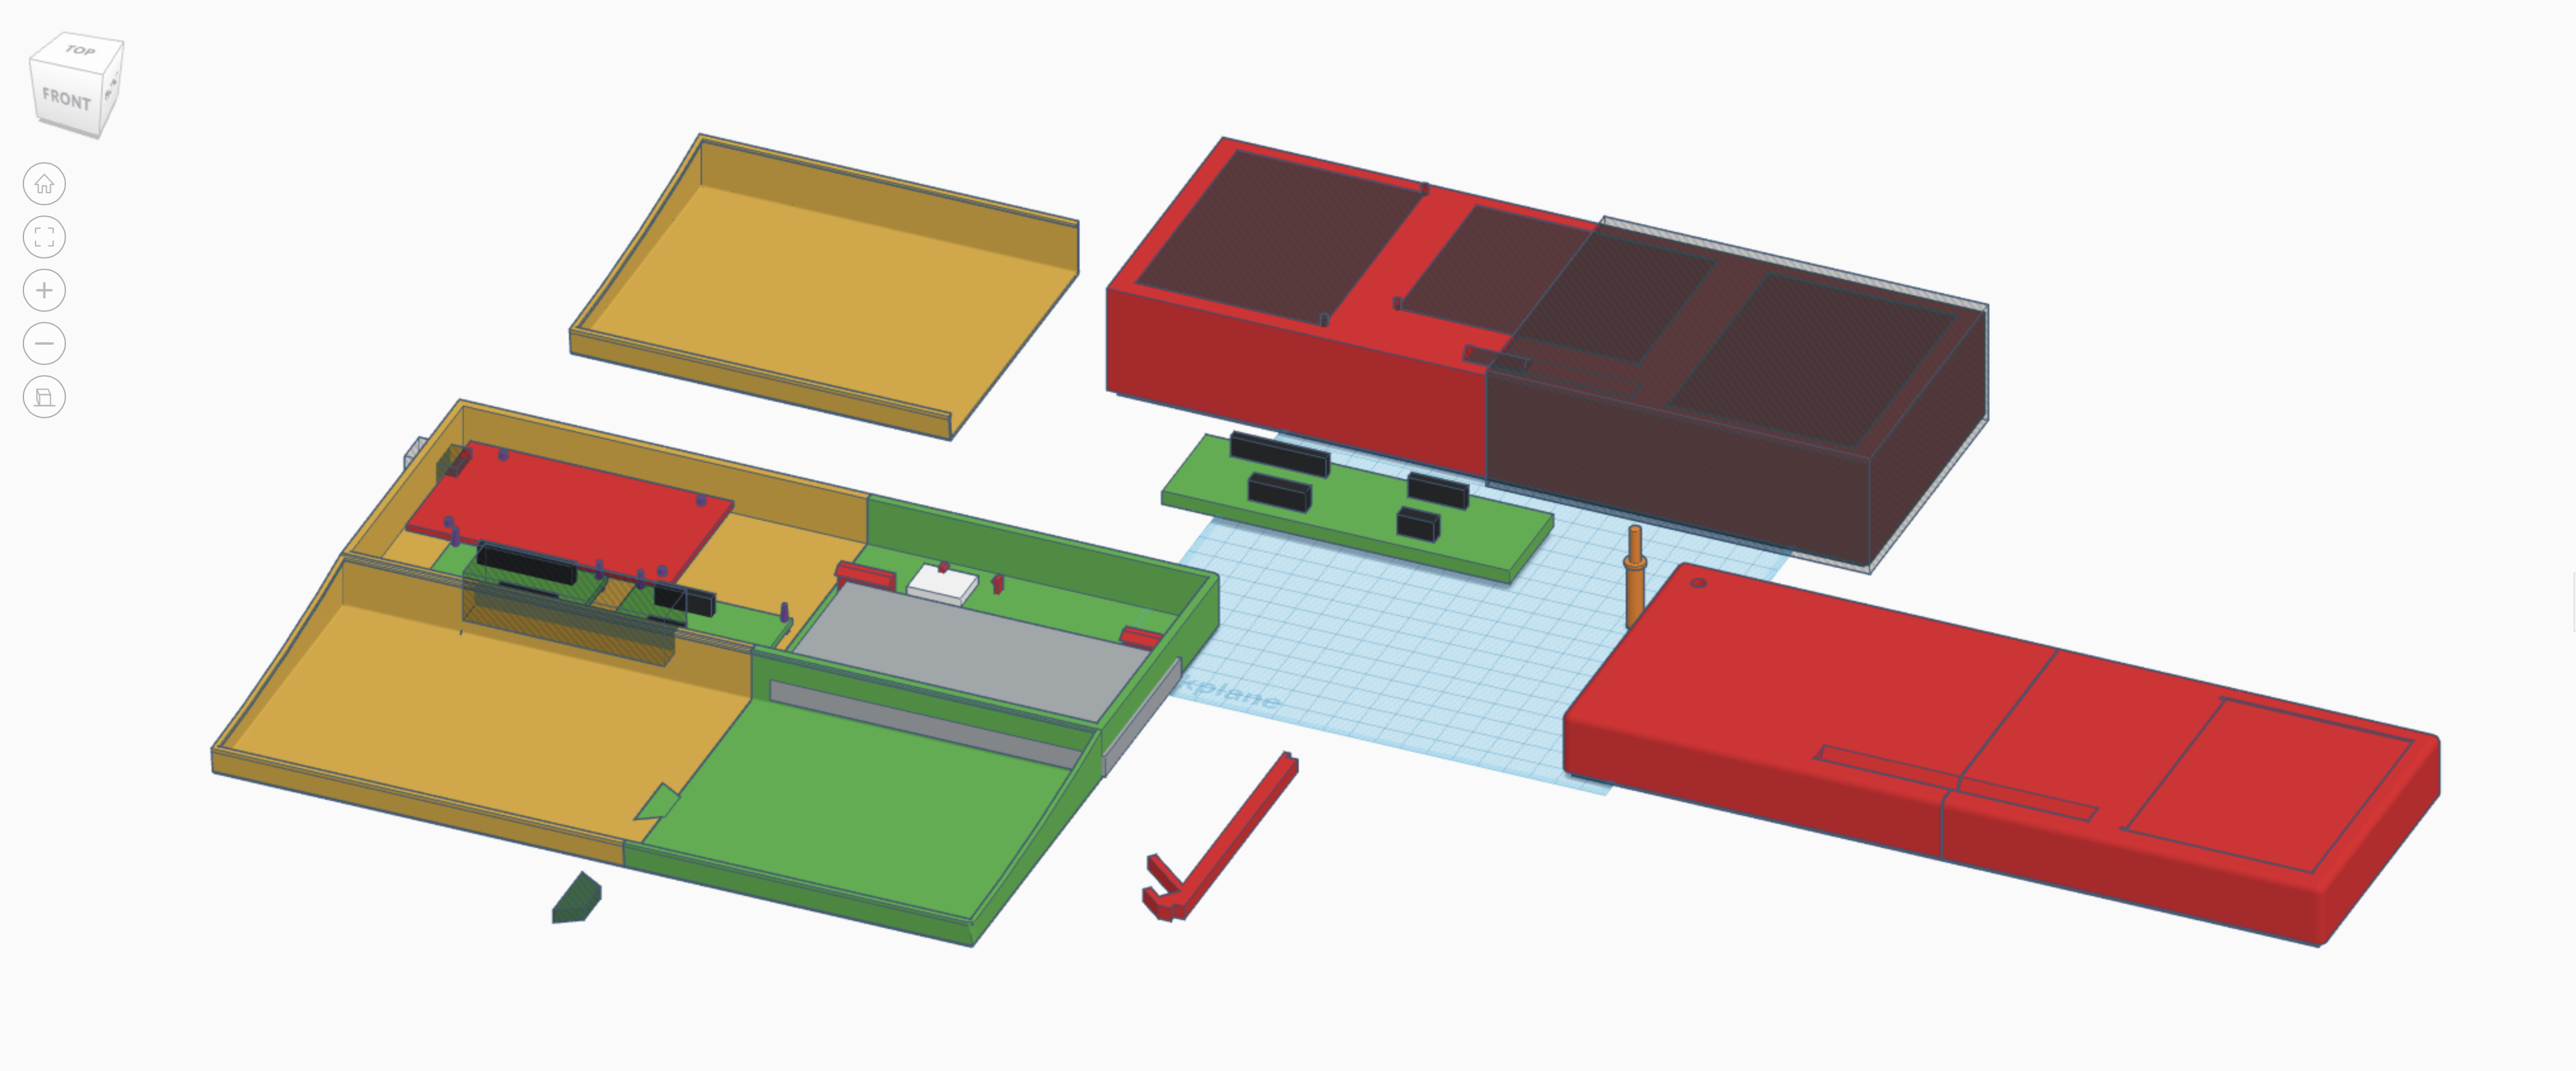
I've also made my WIP, learn-as-I-go style TinkerCAD designs for the case and screen holder public:
https://www.tinkercad.com/things/igAFacjZWDP
https://www.tinkercad.com/things/jHrsHk9PIVb
![]()
The bottom and top need to be printed in two parts to fit on my 3D printer bed - which makes me wish I had a bigger one ...I would definitely recommend printing the screen holder as the flex cables for the screen is fragile and won't survive long unprotected (at least on my desk, which is a mess where things get pushed around frequently).
I've tried bringing the current version of the PotatoP around with me in my backpack, which has confirmed two things:
The first: It's fun to bring it around with me to show off and hack on, and I wish I could do it all the time.
The second: It's currently too fragile for me to actually do that. Wires keep getting disconnected, the case pops apart, the keyboard shifts out of position and stops working until I disassemble and reassemble it. It's also pretty thick, taking up most of the space in my backpack when I do bring it, and as it doesn't have a proper hinge for the screen, I have to carefully and separately pack the screen and hook it up each time.
So my current priority is to keep teaching myself more KiCad, and design a PCB with all the necessary components such as the stand-alone Artemis module, but also possibly a (separate?) custom mechanical keyboard PCB with a similar layout - and a new, much smaller and slimmer 3D printable case for it all.
This should make the project much smaller, more robust, and much easier to reproduce as you won't need to source and dismember a very specific and somewhat rare keyboard to build it. It should also make it a lot cheaper to make one. It might even be possible to have produced a pre-assembled PCB with all or most of the necessary components already soldered on.
I have hope that even starting from 0, it shouldn't be too hard, as all the breakout/development boards in the project are open-source designs that can be mashed-up into a combined PCB. For now, I'm experimenting with smaller and simpler projects such as the DigiSpark from this nice Youtube KiCad 7 tutorial, and waiting to see if that project ends up working before making something more complicated. :-)
I'd love to hear your suggestions for what such a design should be like: should I break out a GPIO section for the unused pins? Should it use a lithium-ion-capacitor instead of a battery? Or perhaps replaceable (rechargeable) AA batteries? Should I add a tweeter for basic sound output?
-
Going viral and miscellaneous
03/11/2023 at 00:41 • 0 commentsGoing viral
I did two things since the last project log that had a much bigger impact than I expected.
First, I uploaded a short video to Youtube in which I add a tiny new feature to my text editor. I made this to be shared on the uLisp forum, as a quick demo for anyone particularly interested.
This highly compelling movie consists of 3 minutes of typing mistakes, several long pauses of nothingness where I count the number of closing parenthesis to type out, set to a soundtrack of a clacking keyboard and labored breathing. With an interlude of forgetting what the key code was, right after checking it, and then checking it again.
The second thing I did was to submit my project to the 2023 Hackaday.io Low-Power Challenge, after which hackaday.com wrote an article about it - and on my birthday! It got some attention, and went viral enough to be picked up by a humbling number of other tech writers, among them a hackster.com article. That article was submitted in a Hacker News post which was voted to the top of the front page for quite a few hours.
I got very excited and spent hours refreshing HN, reddit and youtube to answer comments and questions, during the time I should have been sleeping before the next day of work. If I didn't reply to your comment (there or elsewhere), apologies.
That the video I made would get 14 000+ views was unexpected - 230 hours of probably innocent peoples lives have been spent watching it - and if I had known, I would have put in more effort. It might have helped.
To conclude, I am very happy to see that so many are interested in my hobby project! And several people have approached me to offer assistance, which I greatly appreciate. I am really hoping this will speed along work on the project.

Running the "primes" program from the UXN source distribution while measuring power usage 
Power measurement while running UXN rom - this is with the cpu at 100% and each discovered prime printed to the display (in hex). Some actual miscellaneous project updates
It's been a long time since the previous project log. I haven't really worked on it as much since then, as I'm trying to get other commitments out of the way first. Here's what I can remember doing:
- I fixed the bug where holding down the arrow keys would greatly increase power consumption. As a bonus, the keyboard scanning code is also much faster now, although still a bit of a mess.
- I rewired power to the SD card through some particular special function GPIO pads on the Apollo3. This allows me to completely turn off power to it when it's not being used, which helps a lot. I got a hopefully lower power storage module in the mail but have not tested it yet.
- This brought max observed average power consumption down to 2mA, which is how I ended up claiming 2 years of battery life.
- I published the source code to https://github.com/andreer/PotatoP - it's somewhat incomplete as there are also bug fixes and optimizations to the Artemis Arduino core and the Adafruit GFX / Sharp Memory Display libraries which I have not yet published. Don't know how best to - I'll get to it.
- I put up a list of components on this project page, which should include all the materials needed to replicate this project.
- I will need to publish a schematic and 3D printing files too. It's not just a matter of uploading existing files, as what I have was cobbled together haphazardly over a long period, and I didn't take notes.
- I rewrote the text editor to use a list-of-strings data structure. It's not perfect, but editing latency - the delay from my finger touching the key to when the display has finished displaying a new character - is now down to 40ms for reasonably sized files, measured by counting frames from the 240fps slo-mo mode on my iPhone. Compare with danluu's excellent summary of input latency.
- I can now edit files of up to about 30kB before it crashes.
- I integrated code for very basic UXN support. UXN is a virtual machine specification made by the super cool Hundred Rabbits artists collective. The PotatoP can now run hardcoded UXN programs and print output from the UXN console device to the display. I'd love to finish implementing graphics output for this some time soon, so I can run their impressive collection of games and programs on my computer.
It does actually seem like a bit when it's all typed out doesn't it ... and I'm much too late for bed again. And my TODO list keeps growing. But I'm definitely enjoying myself.
-
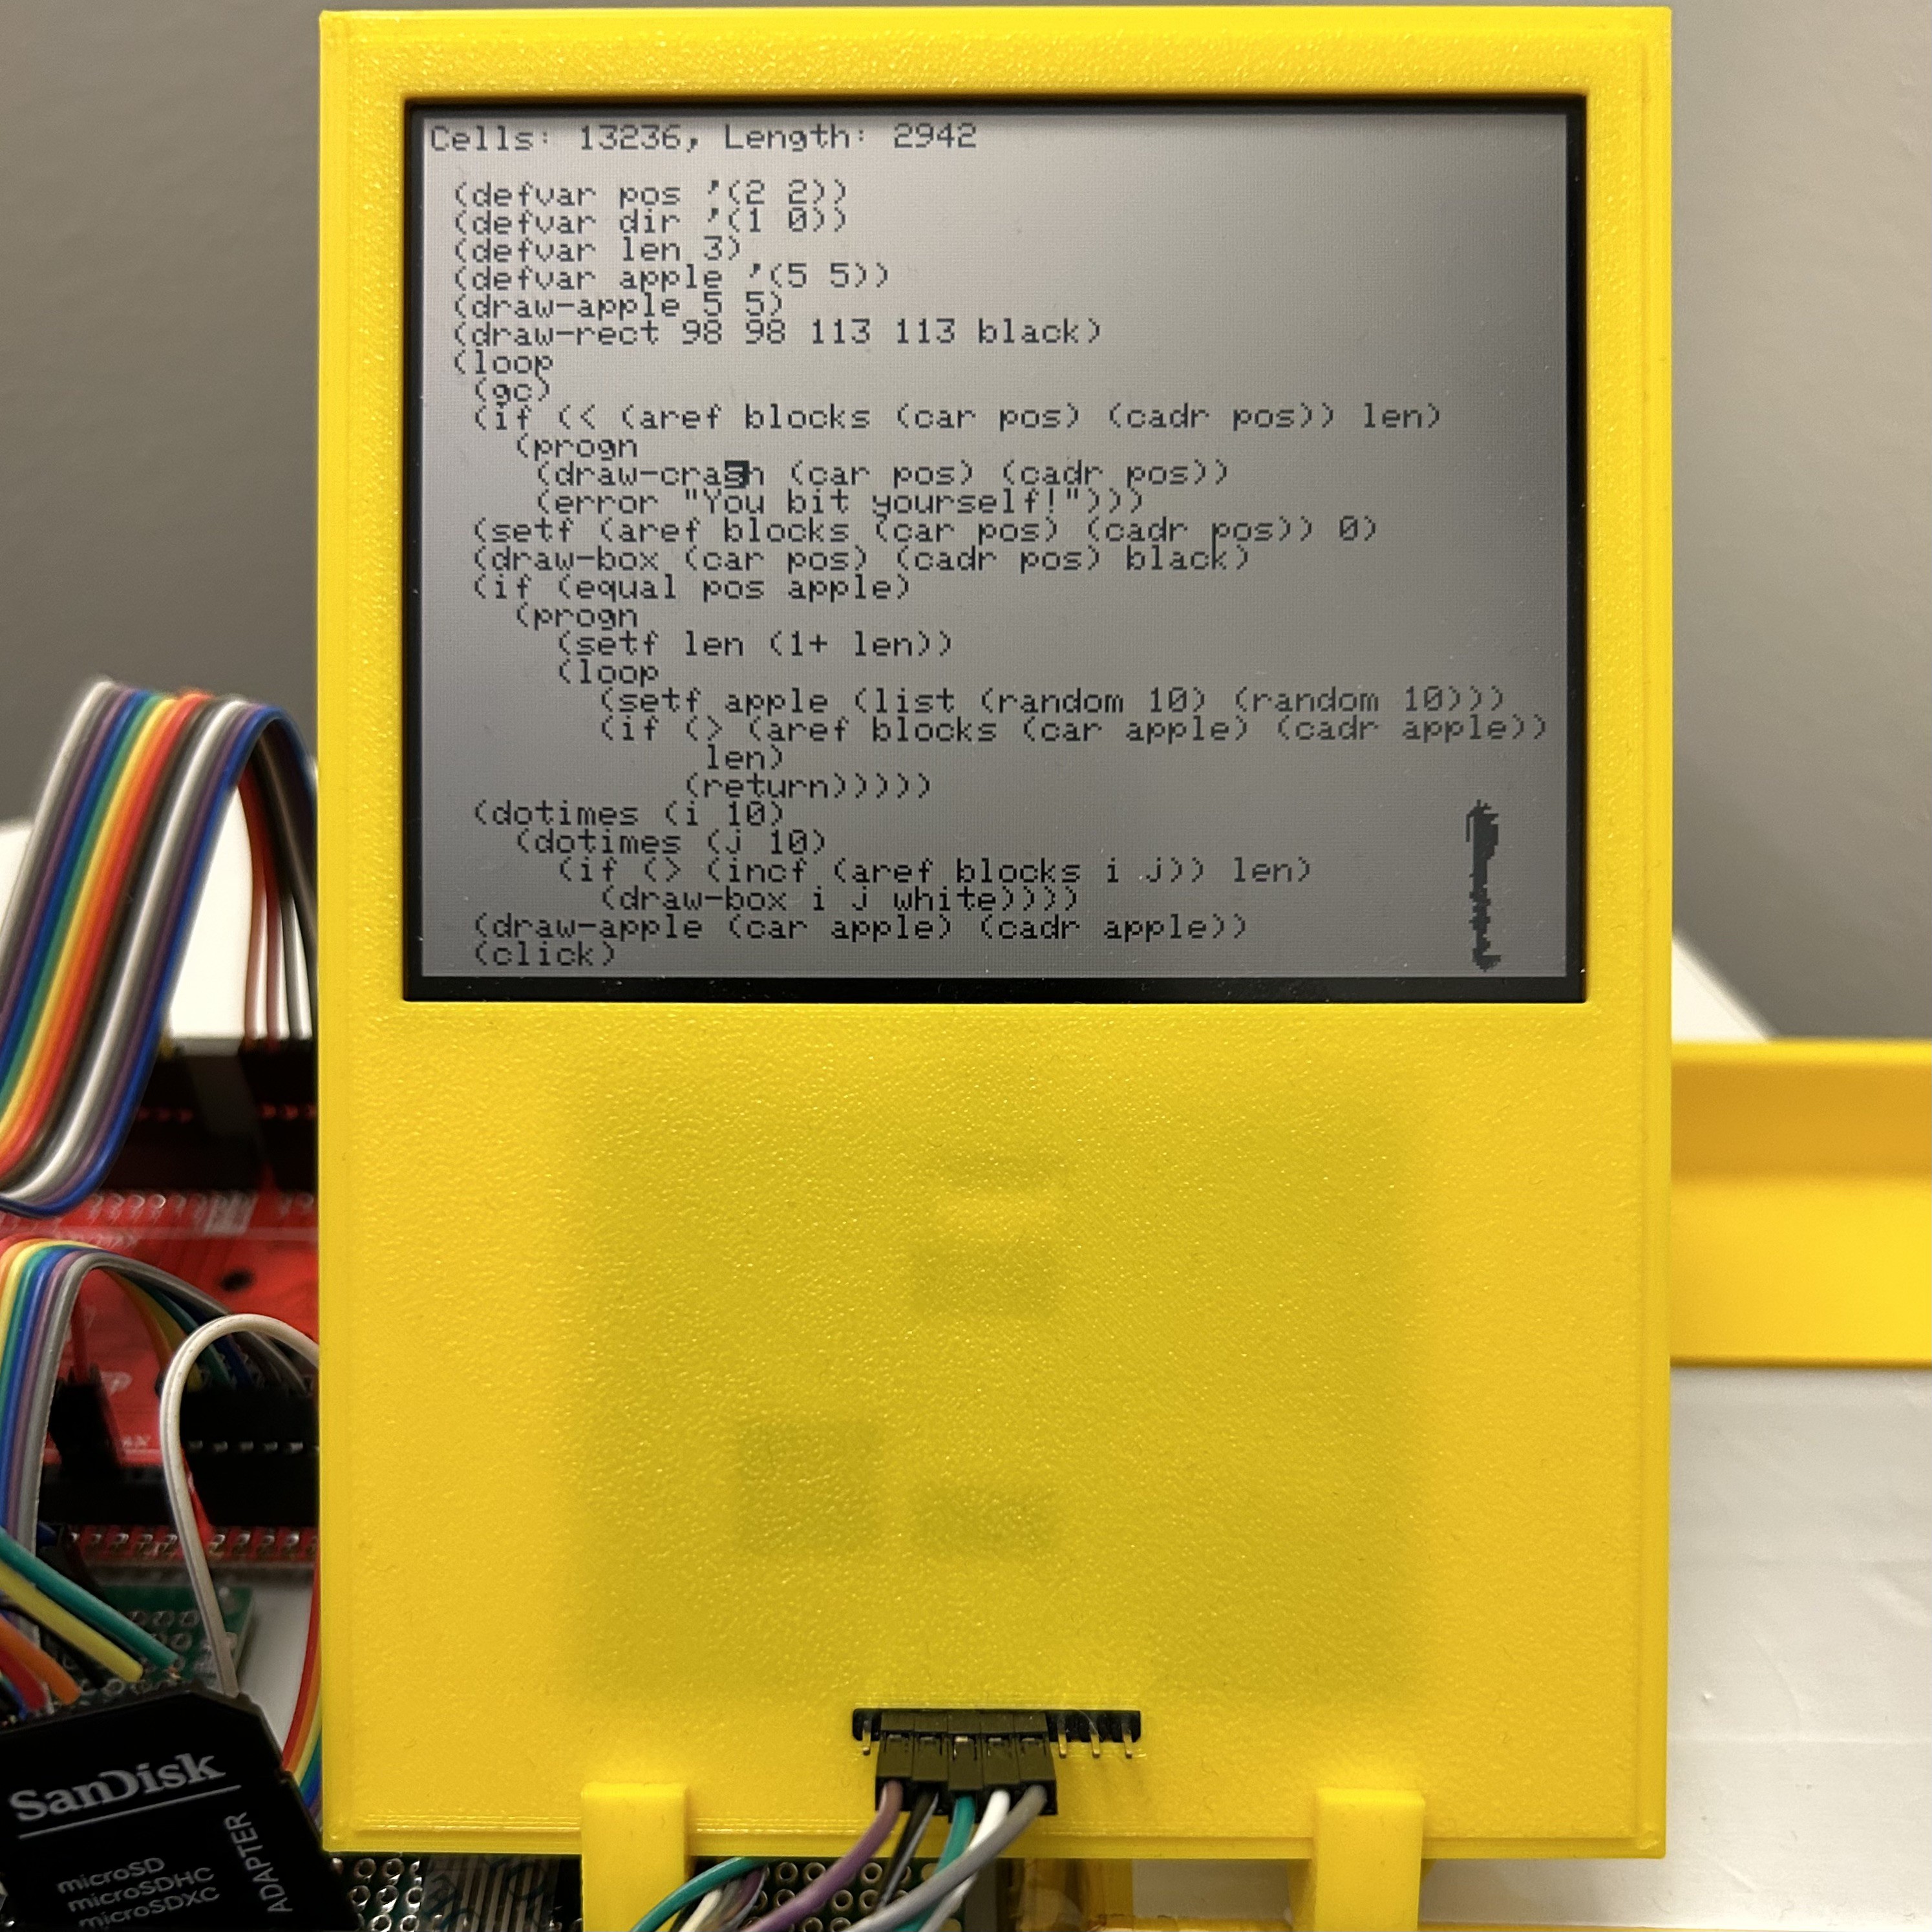
Snake!
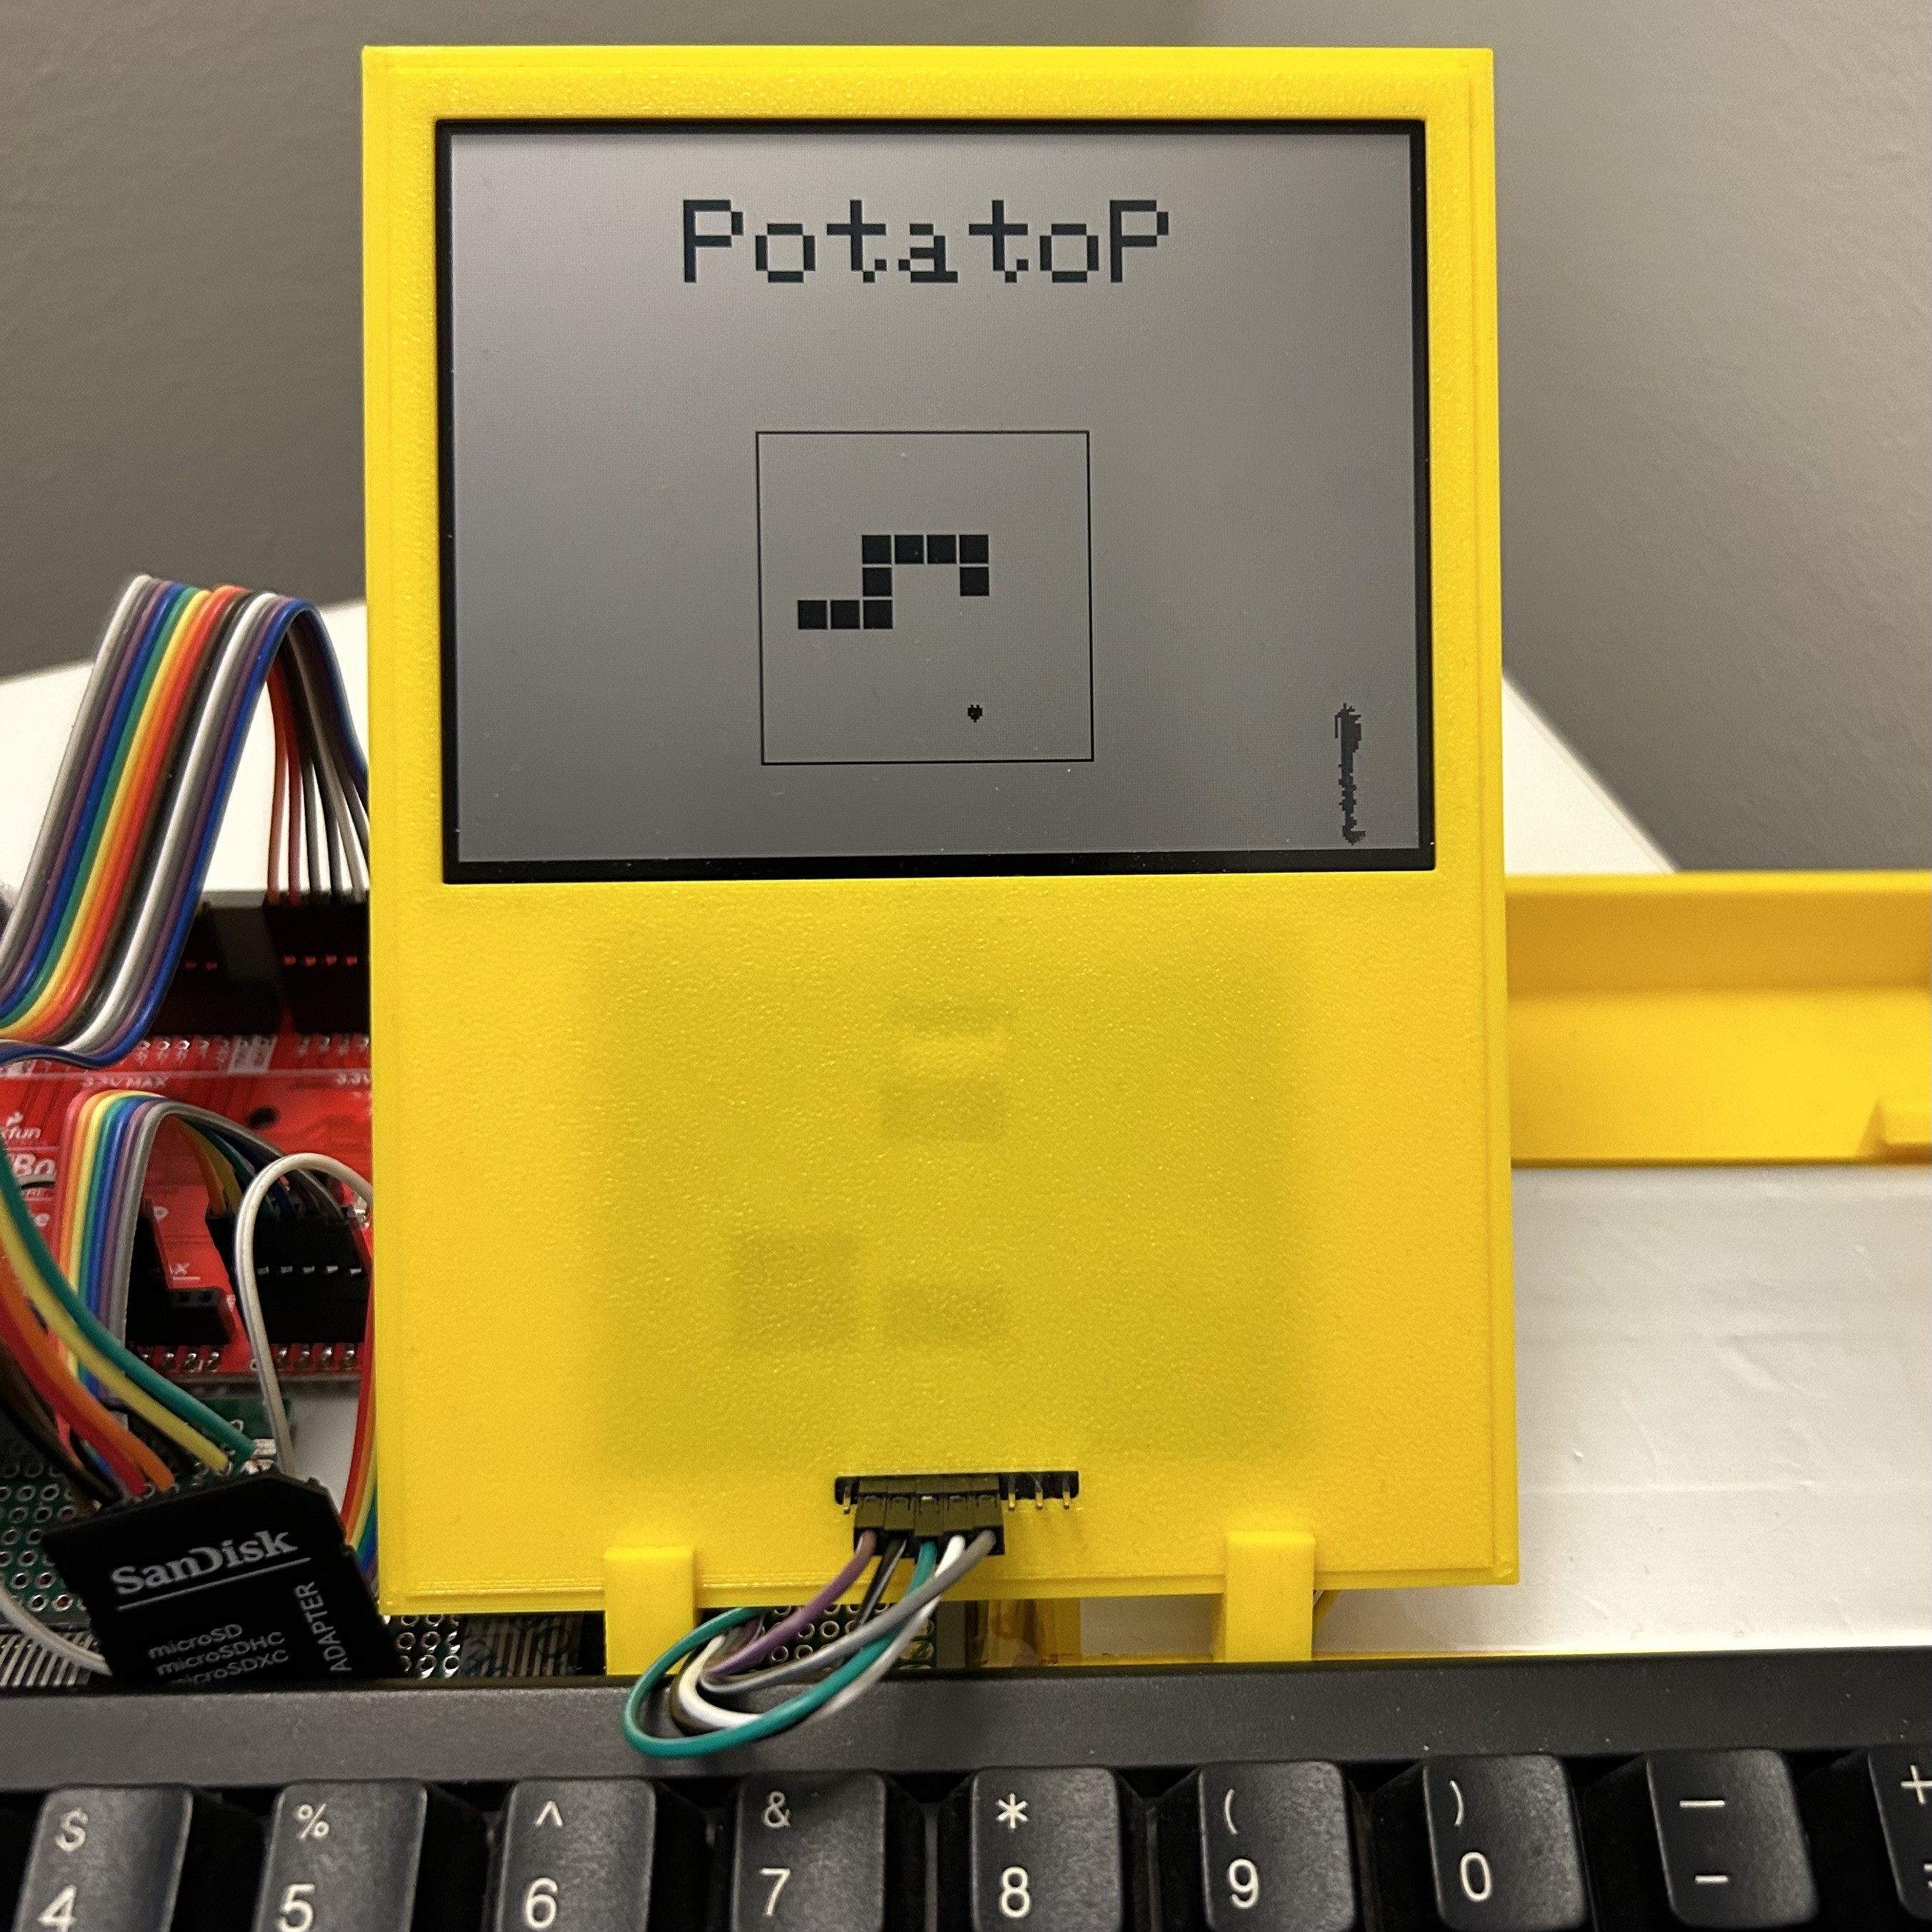
02/10/2023 at 23:20 • 0 commentsThankfully, I quickly found a workaround for the (second) SPI bug I complained about last time, so now I have a working setup with both a display and SD card!
That means I can now _really_ write code on the laptop it self - being able to save to the SD card is very useful - and I managed to hack up a passable version of Snake pretty quickly. No (other) computer involved, programmed exclusively on the PotatoP, using the built-in documentation in the latest version of uLisp for reference! I even hooked up a little speaker to some GPIO pins to make some clicks and bleeps for the game.
![]()
The size of the screen is surprisingly OK, the text is very clearly readable at the default 5x7 font size as long as there is decent light. And 53 characters is wide enough that it seems I can get used to it - I should refactor my code into smaller units anyway :-). The editor is still a bit slow when editing more than a screenful of text, but moving to a better data structure than "just a big string" is likely to help.
![]()
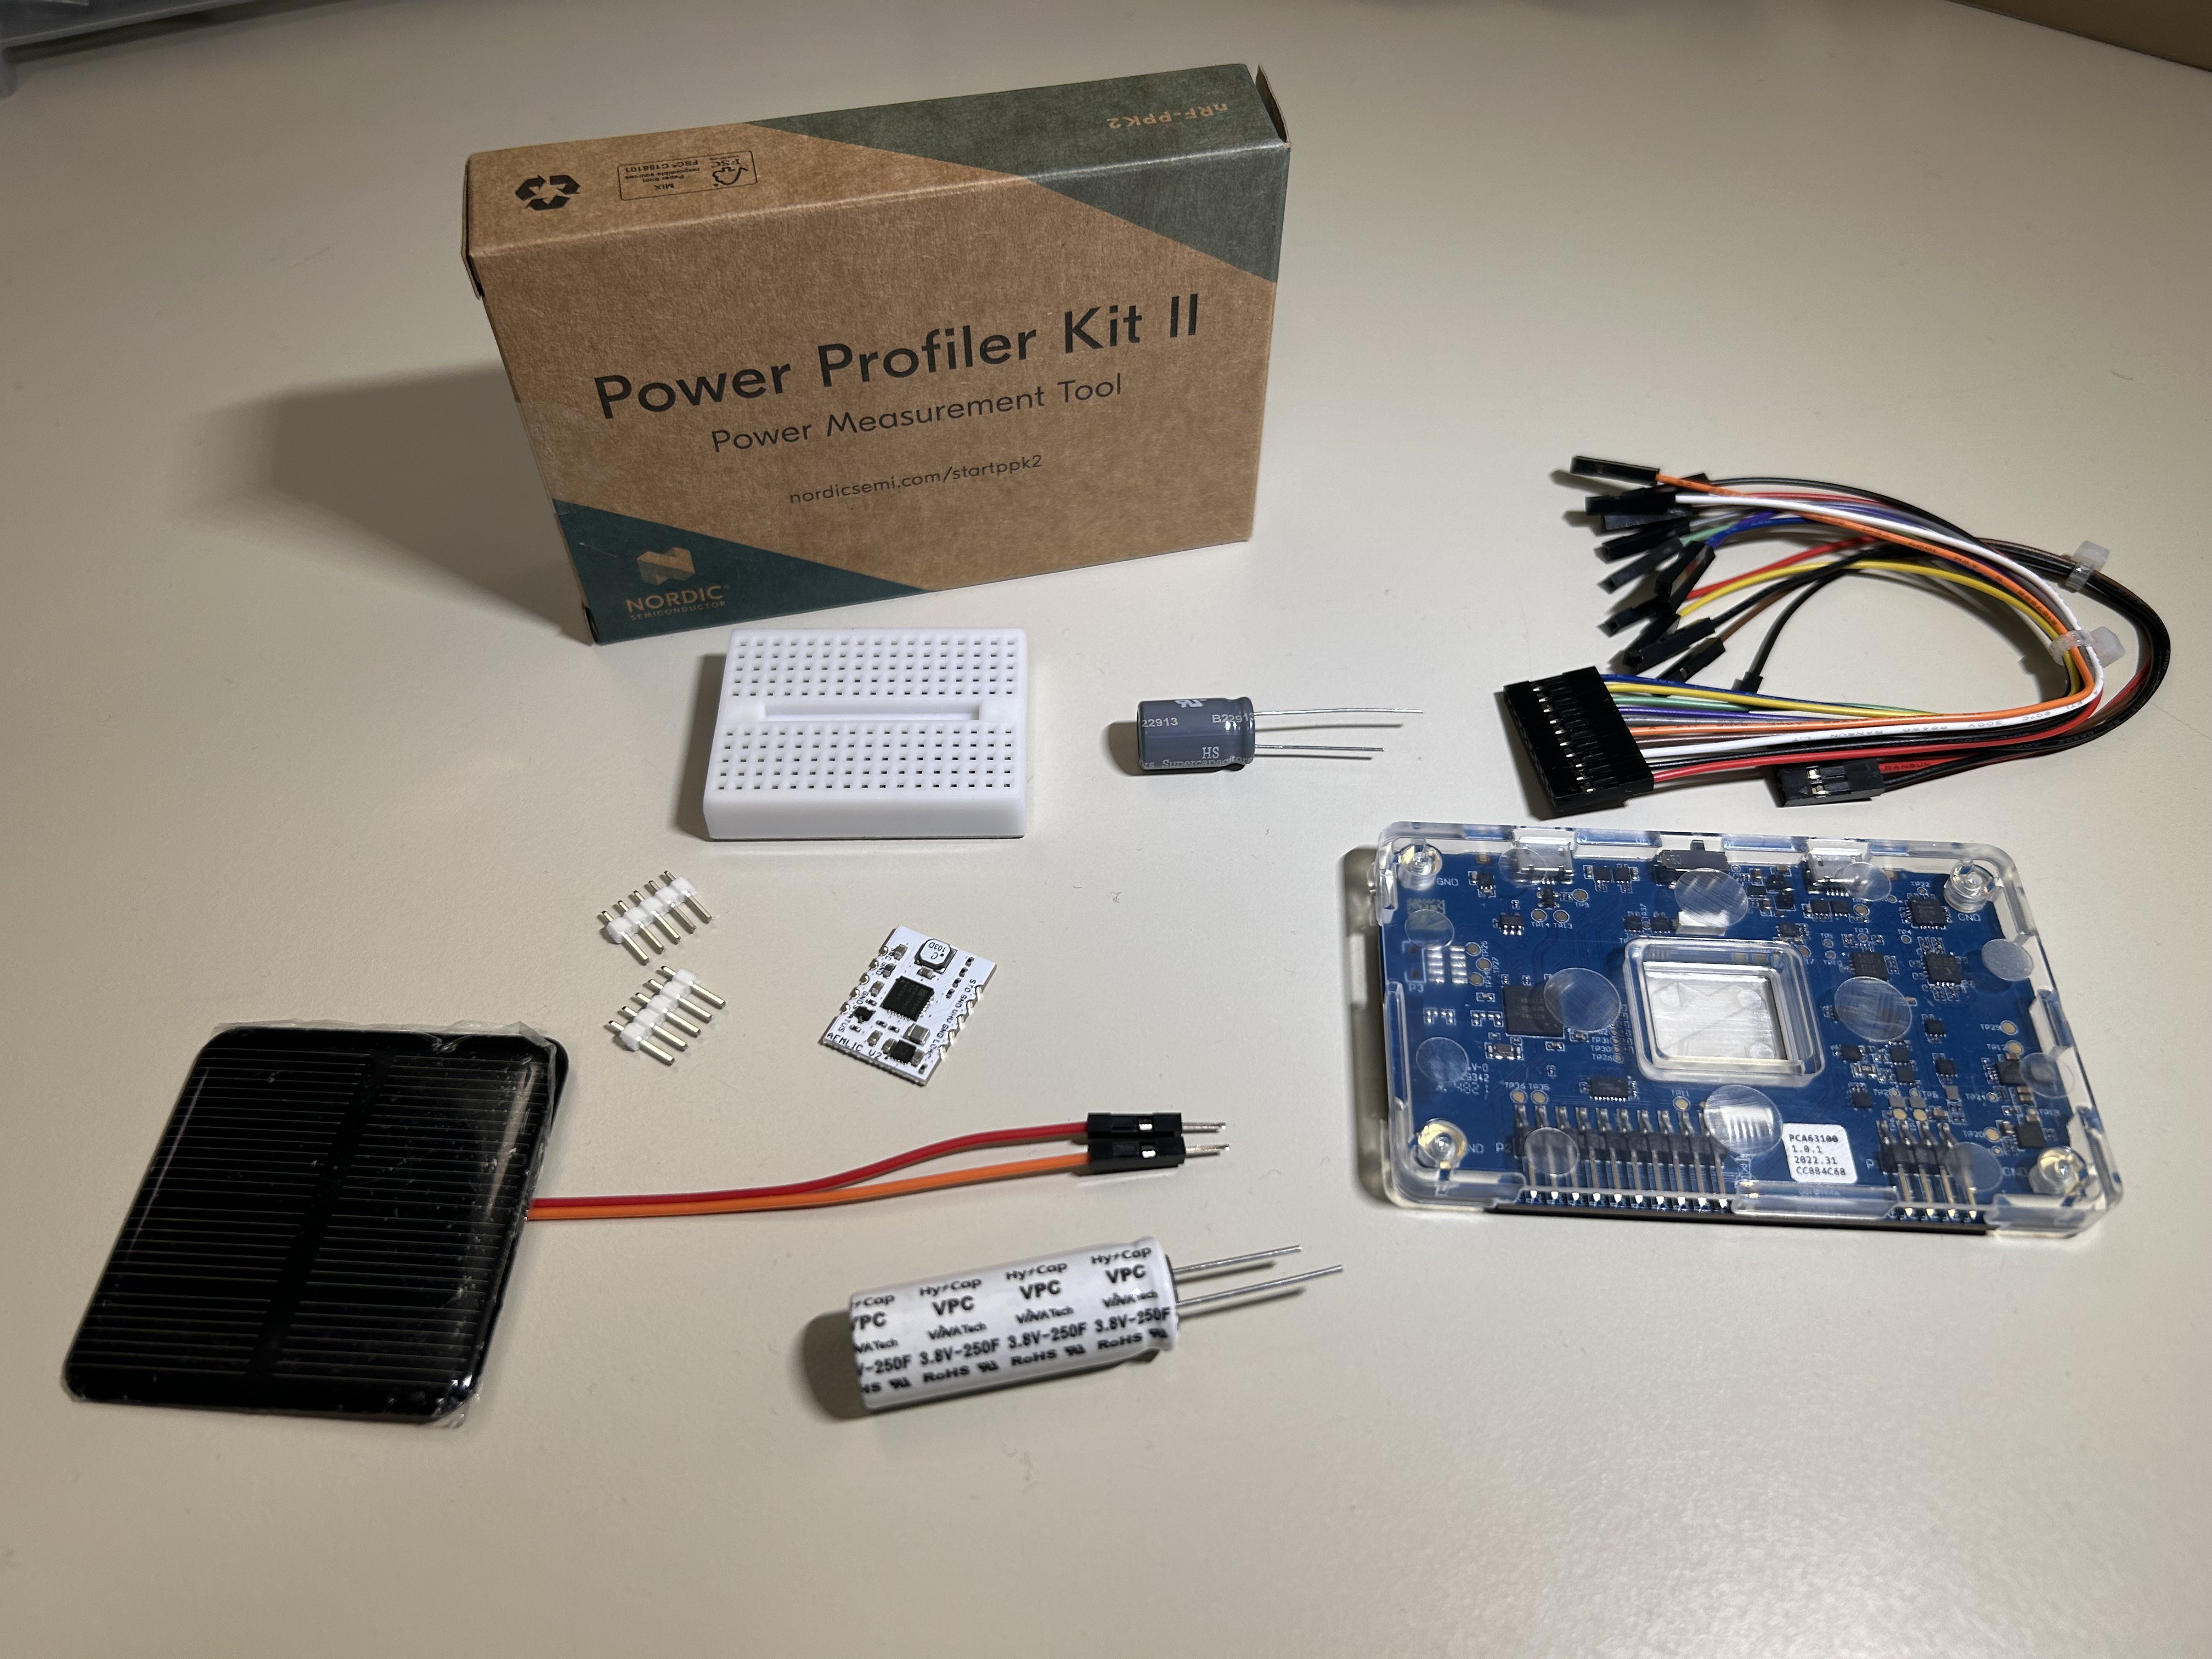
I also splurged on a few more items; most importantly a Nordic Semiconductor Power Profiler Kit II. I've also received another solar controller board by Jasper Sikken, this one using supercapacitors instead of a battery for energy storage. I really want to see if I can make this work well enough instead of a battery, as it has a lot of advantages - such as no toxic materials or worries about degrading battery chemistry.
![]()
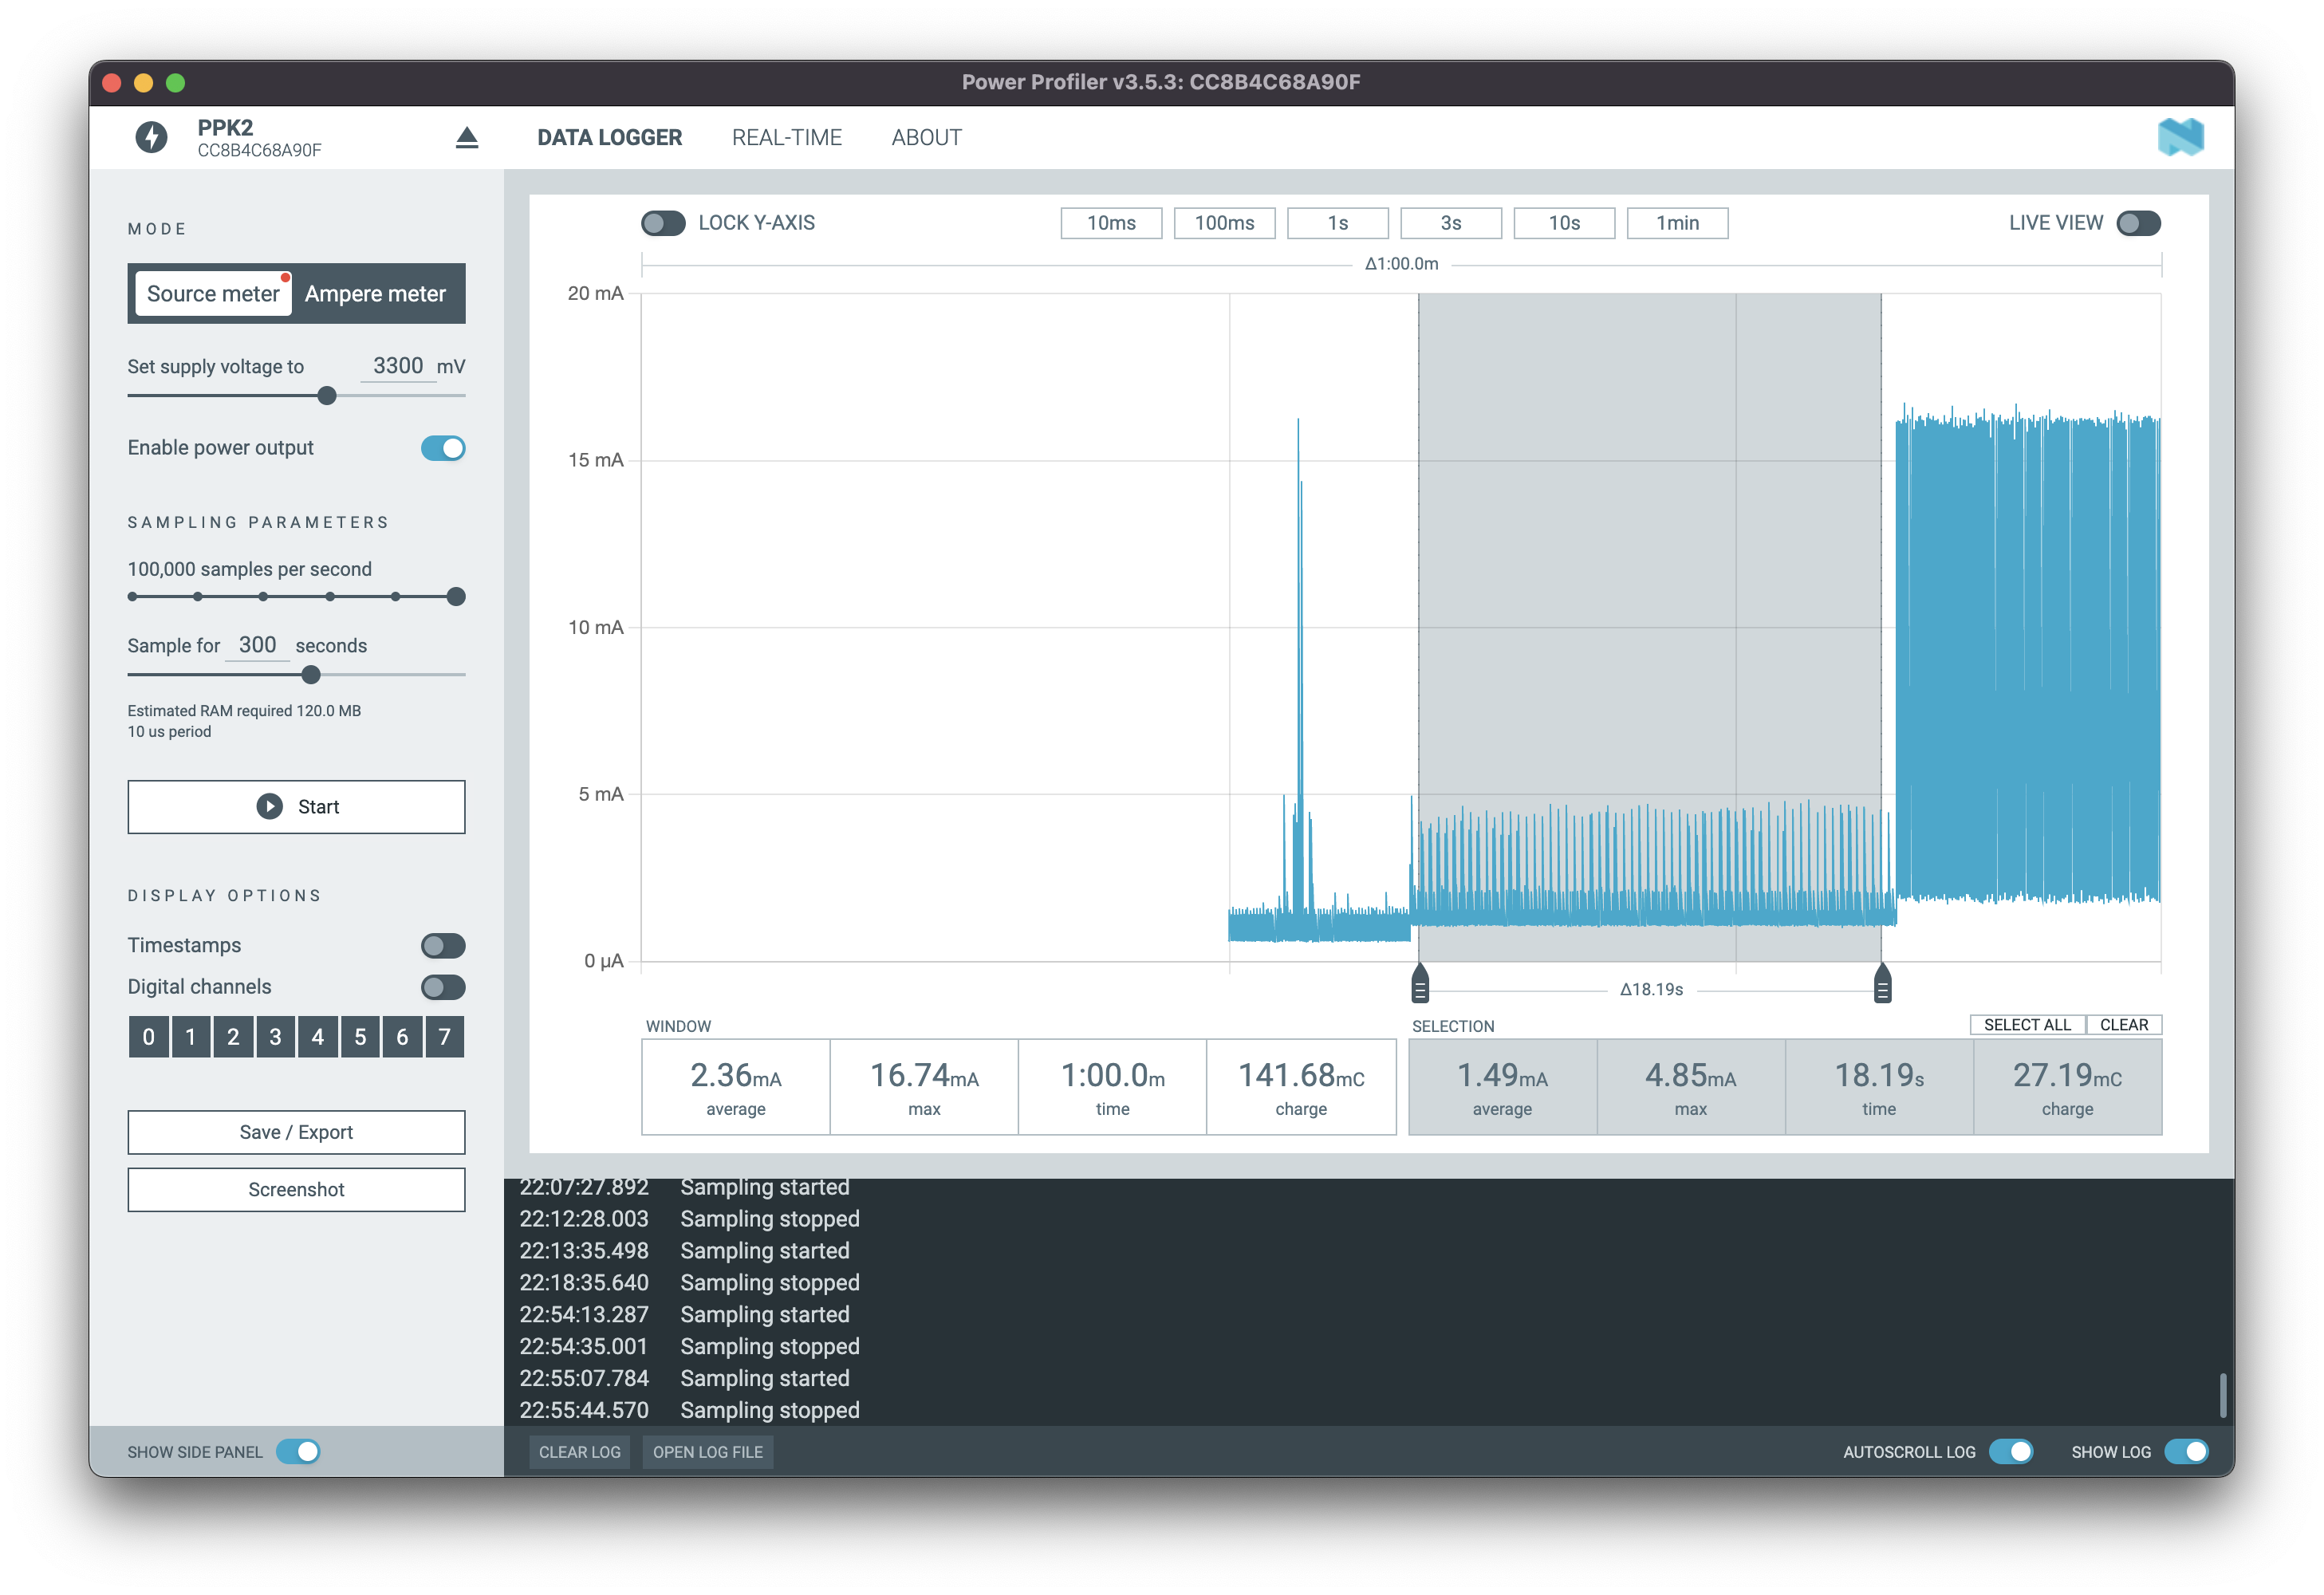
Of course I had to unpack and test the power profiler - and wow, this is certainly much better than trying to peep at a multimeter. As I suspected there are some current spikes, and it quickly becomes clear that there is still much room for improvement, but it's not as bad as I feared. power use at "idle" in the editor or uLisp REPL is currently at 2.64mW, and while running uLisp code to draw a fractal while updating the screen, it's 5mW.
![]()
Unfortunately, even when at idle, holding down all the arrow keys makes power jump up to 16.4 mW. So surprisingly, the greatest source of power consumption is the keyboard scanning - hopefully due to some simple-to-fix misconfiguration of the GPIO. My no-name second hand SD card also sucks down another 30mW once it's been initialized, but according to the datasheet the one I have ordered from Adafruit should do a lot better. So I still have hope to get the active power consumption below 6mW, and much closer to 0 at idle, once I get all that worked out.
![]()
Some concessions to usability must come first though - I need to redesign the editor to handle larger files, as well as add some very basic features like key repeat, faster scrolling, selecting text, copy/paste and so on. My library of lisp functions and little toys and experiments is growing quickly and is becoming unmanageable with the current version!
-
Working editor and data storage
02/05/2023 at 05:12 • 0 commentsI'm happy to report that moving the keyboard scanning code into uLisp went well! Initially I got some corruption on the display, but this was later fixed by disabling the keyboard interrupt while updating the screen. I also slightly rewired the keyboard to free up another SPI interface. More on that later ...
A simple text editor and REPL
It didn't take me too long to write a basic text editor in uLisp - working name "Typo". For now, it's very naive code and starts working poorly after about a screenful of text, so some optimizations along the lines of emacs's "redisplay" will eventually be required. But I can type and edit interactively on the PotatoP, with support for such niceties as the backspace key to undo my mistakes and arrow keys to move around :-)
So based on that I now have a basic working REPL, and it is suddenly possible to do further development work on the editor/REPL from the PotatoP itself. In celebration, I've tweaked the prototype display protector and reprinted it in glorious yellow:

Planned future work on this prototype includes replacing the damaged display, adding a second display for side-by-side coding and graphics, and removing cat hair from the keyboard Error handling
At first though, usage was severely hampered by the lack of error checking. If there was any problem at all in the code I input, the REPL crashed and had to be restarted from the serial console. Fortunately I came across an uLisp forum post where Goheeca and mgr had extended an earlier version of uLisp with some basic error handling. This couldn't be directly applied to the current version, but with a few tweaks ... it works! I am immensely grateful. I also extended the "testescape" function to respond to keyboard input, so I can interrupt execution if the runtime of my code exceeds my patience.
Some types of malformed programs can still cause the interpreter to hang, the most likely of which is forgetting to close a double-quoted string or parenthesized expression, which causes the uLisp reader to go into an infinite loop. It will also hang if the code recurses too deeply and there is a stack overflow.
For the former issue, I've started writing a basic parser (in uLisp!) that will check the validity of my expressions before submitting them to the reader. I hope that this can also be used to give more helpful error messages, making it trivial to find my mistakes. For the latter, I've no plan yet ...
Storage options
In the mean time, the presence of these bugs makes it all the more obvious that there's no easy way yet to save my work. If I define a function in the editor, I have to connect the USB-C cable, exit the REPL by sending the escape char from the serial console, "(pprint <function name>)" to display it there, then copy-paste it and save it in a file on my PC. I could streamline this process, but my goal is a stand-alone computer - so I've begun looking into how to store lisp code and text files on the device itself.
I've still only used about 1/4 of the 1Mb of flash program memory on the Apollo3, and it would be possible to use the remaining space for storage. But although that would fit quite a bit of code/text, it could be vulnerable to being overwritten by later firmware updates, and I'd have to implement it myself and ensure proper wear leveling - and making a mistake in that could kill the flash chip quickly.
So instead I soldered some wires to a microSD adapter, uncommented a #define and tried out the SD card support already present in the interpreter - and it works out of the box. It's somewhat slow and doesn't support listing files, but that should be easy enough to add. It even supports "(save-image)" and "(load-image)" to save/restore the entire workspace, although personally I want to be able to work with files more explicitly.
As usual there's an issue to overcome - updates to the display stop working after I've used the SD card. Probably related to both using SPI in some incompatible way, which I'm looking into.
Another issue for this project is the power usage for generic microsd cards - the spec seems to require up to 300mA for the card, which is at least 50X more than the rest of the system, and ~4x what the power supply in the solar harvesting AEMLION board can provide. The random one I'm testing with seems to use a lot less, but as I don't really trust it I've ordered an Adafruit SPI Flash SD card for which the spec sheet indicates a max of 30mA (and 0.2mA with the clock stopped). This should be indistinguishable from a "real" SD card from the software. 512MB should be enough for nearly indefinite coding or writing, and as long as it's only being used for intermittently for saving/loading (say, reading or writing 5% of the time) it shouldn't affect the battery life of the system much...
My updated power estimate is then a measured ~2.5 mA (for the display and CPU when running lisp code and updating the display at 10 fps), 30mA * 5% duty cycle for the SD card gives 1.5mA for a total of 4mA, which in theory is 2500 hours or ~125 days of continuous active use with the 12000 mAh PiJuice battery. That's with no contribution from the solar panel(s) I'm planning to put on the lid, and idle power consumption is < 1mA, so it still seems quite excessive - it should hold through (several!) dark Norwegian winters just fine.
Now I just need to fix that SPI bug ...
-
Mini update: power usage halved!
01/21/2023 at 06:24 • 1 commentNow got max power usage more than halved, down to ~2 mA - again that's with scanning the keyboard, updating and refreshing the screen, and now also while running some floating point calculations in a loop, so I'm hoping this is near representative of actual usage.
The big power gain was mostly from shutting down the GPIO lines used for serial, which were backpowering the serial chip on the dev board ... the blue LED (which happens to be on the port I'm using for SPI clock) is still blinking away, and may at this point be a serious contender for reducing power usage with a swipe of the soldering iron.
Currently working on completing the keyboard routine and integrating it into uLisp so I can have a working REPL!
-
Starting back up, baby steps
01/11/2023 at 21:36 • 0 commentsFinally, I'm back to getting a little bit done on this project. After getting everything set up again, my first bit of progress is actually figuring out what went wrong with the graphics library and how to fix it. It seems the combination of the adafruit gfx / sharp memory display libraries and the sparkfun artemis arduino core end up doing hw SPI transfers most significant bit first, while the display expects least significant bit first. Not 100% sure where the issue lies, probably in the arduino core, but I was able to hack around it by reversing the bits in each byte before transmitting. Anyway, with that working there's a very nice boost to the screen refresh rate! It was quite distractingly slow.
Got a good tip on how to reduce power usage too, so looking forward to testing that out next!
-
Falling down rabbit holes
03/20/2022 at 22:07 • 0 commentsTo quickly sum up the progress I've made since last time - I can now type on the keyboard, and the words show up on the screen! Those letters in the picture are pretty chunky - but that is for your easy viewing pleasure. I can comfortably read with the default 5x7 font which lets me display 53x30 characters. Moving it closer and adding another one or two next to it should give me sufficient screen real estate.
![]()
I've measured current consumption from the battery at 6mA, or about 22 mW, while scanning the keyboard and constantly updating the screen. That should give me about 83 days of battery life (given constant use) with the laptop-size battery I've ordered.
It's certainly better than my standard laptop, but not quite as good as could be hoped for - it's 4x the quoted 5 mW power for the Artemis module. Disconnecting the screen or putting the CPU to sleep didn't seem to make much of a difference either, and that means I won't be able to recharge using only the solar panels, certainly not with indoor light at least.
I suspect most of the power draw is from other components on the board, like the voltage regulator, power LED and possibly more. I've cut the traces to the PDM microphone earlier, but I don't want to start desoldering the other components just yet.
The keyboard scanning rabbit hole
I was able to get the timer driven interrupt working, and posted a simple example in the Sparkfun forums in hope that it might help others. The rest was supposed to be simple! But when I coded up the keyboard scanning routine, using the standard Arduino pinMode and digitalWrite / digitalRead calls, it was slow ... unacceptably slow.
It took about two milliseconds to scan the whole keyboard matrix, which I had naively been hoping to do tens of thousands of times per seconds - but I could barely scan it 500 times per second, and even then the CPU would have been 100% busy scanning the keyboard and have no time left to do anything else.
I realized I would have to leave the easy and comfortable world of Arduino tutorials, and started digging into the guts below. Happily I discovered that all the source code for the underlying software is included in my ~/.arduino folder!
Turns out that Sparkfun's Arduino core for the Artemis boards is based on Mbed OS, and every call to pinMode or digitalWrite will spend some time looking up the right mbed::DigitalInOut object. Keeping references to and calling these directly saved about half of the time, getting it down to 1 ms per scan. Reducing the scan rate to 256 times per second seemed acceptable enough for now - that's 25% of the CPU, but I can fix it later.
Or so you'd think, but I just couldn't accept that. So I dug down through another layer ... the implementation of Mbed OS for the Apollo3 ends up calling functions from the Ambiq SDK. These have somewhat more arcane names, like am_hal_gpio_input_read, but have even less overhead - calling these directly got me down to about 240 microseconds per scan, or about 6.6% of the total CPU time.
There is yet another layer I could chip away at - there is a "fast GPIO" function, or I could even directly read and write from the I/O registers - but I spent a whole evening trying without much success, and 240 microseconds at 48Mhz is 11520 clock cycles, about ~103 clock cycles per key scanned, and I think I'll be able to live with that ... for now.
The hardware SPI rabbit hole
Once I had come to terms with the keyboard scanning, my next step was to display the results on the screen, and I promptly fell into another hole. Screen updates are just a little too slow with software-driven SPI for typing to be responsive. Using he same shortcuts as for the keyboard helps, but it's not great, and getting hardware SPI to work with the Adafruit library on the Sparkfun board is still giving me trouble.
After consulting the display data sheet and programming app note I was able to write data to the display using hardware SPI without using the Adafruit library, so now I know it can work on this chip! And if I really can't figure it out, I'll have the option of writing my own display routines.
It could be a lot faster as I could do partial refresh of only the lines that need to change. And I could even offload the data transfer to be done using the DMA functionality of the Apollo3 IO Modules ... yeah, this one goes pretty deep too, and I'm still in it. Hoping I can crawl my way out over the coming week.
Next steps
Once I get that part out of the way, I'll finally get to write some LISP code - a basic text editor with a keyboard shortcut to (eval '(my code)) so I can start programming on the device itself! Oh, and I'll need to design and 3d print a case to make it all tidy, compact and nice(r) looking.
-
Prototyping progress
03/12/2022 at 21:33 • 0 commentsThe photo I originally uploaded shows an Adafruit NRF52840 Express board - this worked great for testing the display, but I wanted more GPIOs for scanning the whole keyboard matrix directly (14 column lines + 8 row lines).
I had previously ordered the Sparkfun Artemis ATP board (48 GPIOS!) in the hope to get close to the extremely low power usage numbers they are quoting (5mW). Probably not if I'm using that many GPIO lines, but if I could get even close it would be amazing. Currently it idles at around 4mA@3.3V, so 13.2mW ...
![]()
That board sure took it's sweet time in the mail, but now that I have it I have been able to verify that I can get uLisp running on it, scan the keyboard matrix and read all the keys (from LISP). Success!
What hasn't gone great is getting the display to work with hardware SPI. I must have tried a hundred different combination of parameters but no luck yet. Are there some assumptions in the Adafruit libraries that don't apply to the Sparkfun board? No idea. For now I'll ignore that display updates are kind of slow, and plod on with the next step ...
... which is scanning the keyboard at regular intervals, doing debouncing and turning it in to a nice and neat sequence of keyup/down events. I am lucky to have some code to go by from the uLisp author's own very cool lisp badge project: http://www.technoblogy.com/show?2AEE
In parallel I'm 3D printing a very simple case for the display and breakout board. I learned the hard way that those FPC connectors are fragile, and ruined one 4.4" display - good thing I ordered extra. And hopefully I've learned my lesson now and the case will keep the next one safe.
PotatoP
A LISP-programmable laptop with battery life measured in years