-
Software update, new feature
01/11/2025 at 14:50 • 0 commentsHi,
I've made 4 of these vintagephones!
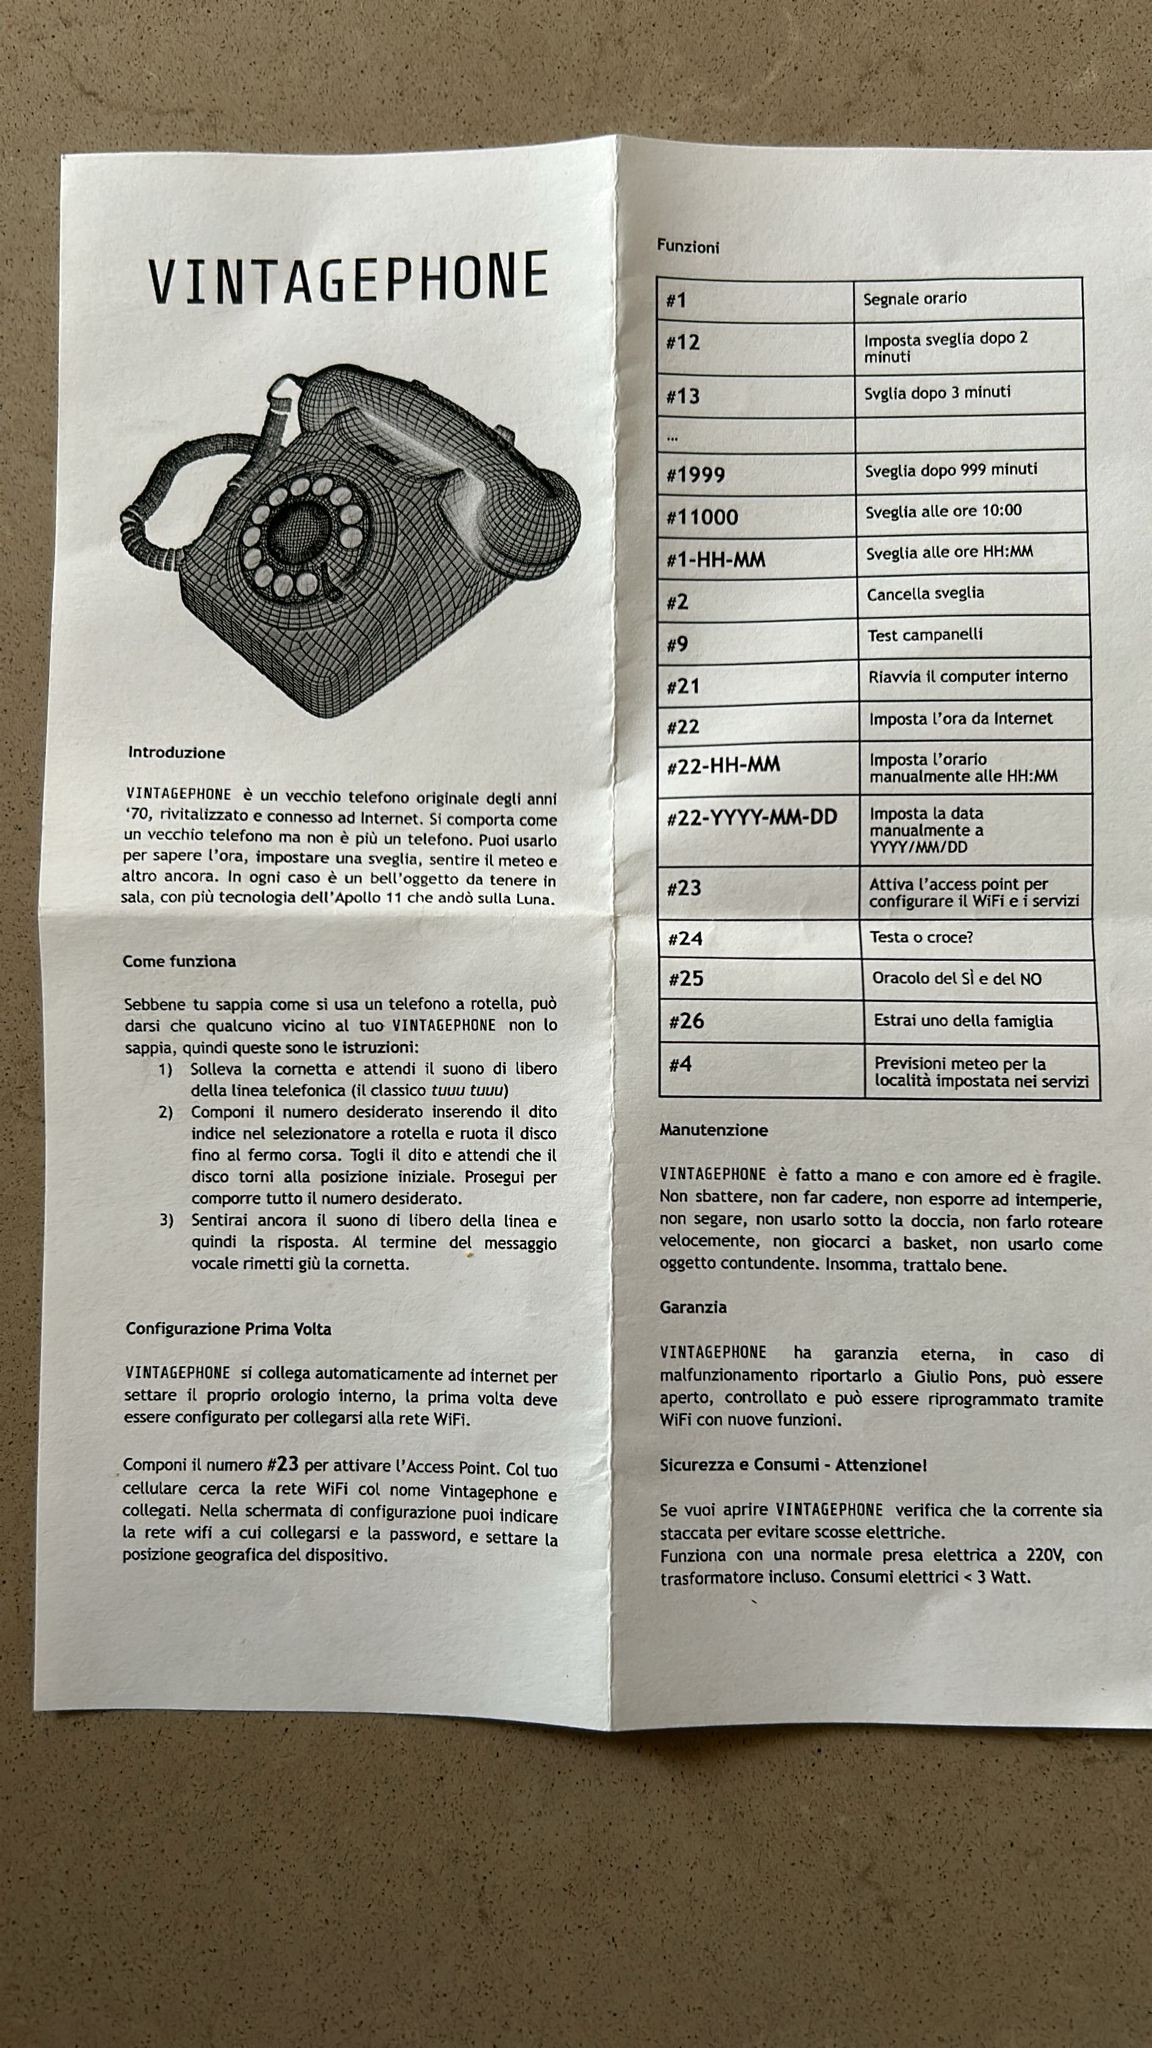
I use to give them as present to people I love! I've also made a funny instruction sheet:
![]()
Software changes:
I've added a new function number, now by dialing #26 the Vintagephone will randomly tell you the name of one of your family members.
To activate this function you have also to make a folder "04" on the micro-sd card and place there the mp3 files with the names.
Since I've not found a way to count the mp3 files in a folder (is it possible!?!) you have also to update the number of files in the line 1535 of the vintagephone.ino software. I should really fix this tedious bug.
I've updated the source file in the Github repository.
https://github.com/giuliopons/vintagephone
I've also updated the code to allow the usage of the hanging-up switch in reverse (some phones have the switch reversed).
I've fixed a bug that sometimes lets you hear sounds even when you hang up the receiver.
Bye!
-
PCB tested
05/08/2023 at 06:47 • 0 commentsThe PCB was tested and used to make a second Vintagephone. :-)
-
PCB for vintagephone
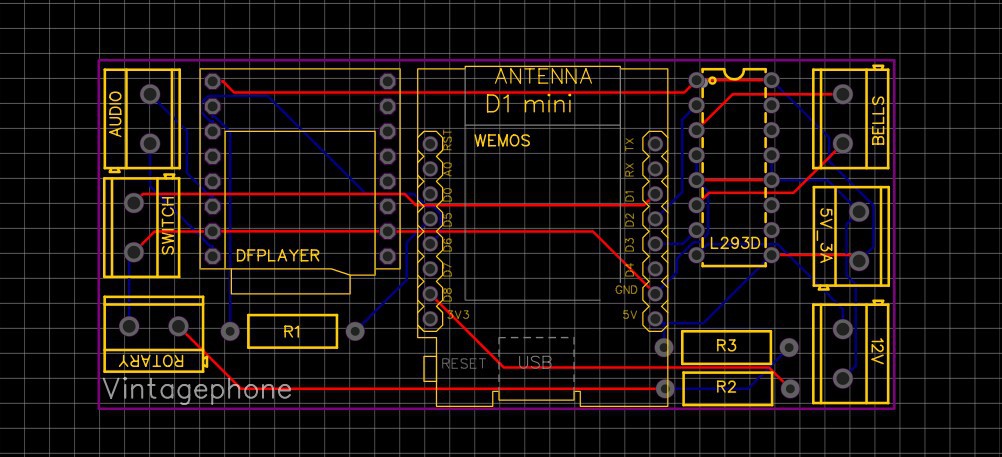
04/14/2023 at 16:35 • 0 commentsWith the help of a friend I've done the PCB of the project.
![]()
Waiting for the PCB to assembly and test it
R1 = 1k
R2= 330
R3 = 10k
-
Vintagephone software
06/23/2022 at 21:56 • 0 commentsSoftware components
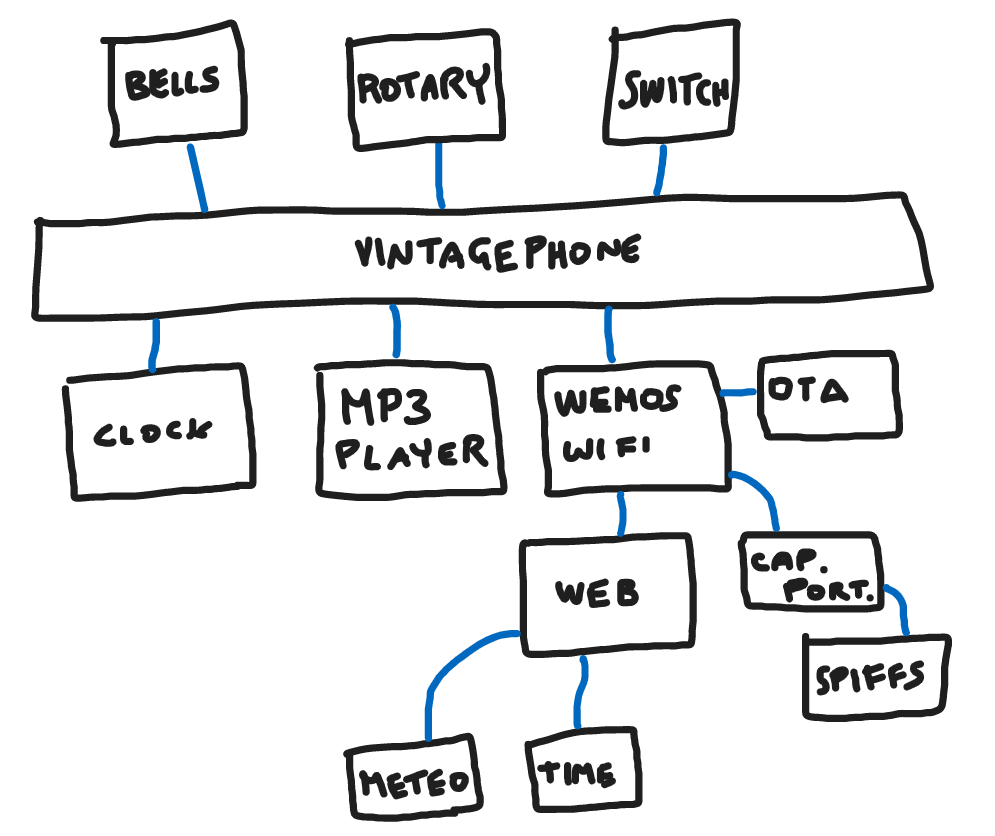
Vintagephone software is composed by different parts.
We have some functions to control the bells, the rotary encoder and the switch.
We have functions that handle the clock methods, for setting the time and check the timer for alarms.
We have functions that handle the mp3 player, play and stop an mp3 track.
We have many functions to handle the Wemos functionalities, such as the OTA (Over The Air) update process, to upload new sketches without plugging the usb cable, or the functionalities to handle the captive portal when the Vintagephone is in AP mode (Access Point). The first time you will use it you'll need the AP Captive Portal to configure the acccess to your wifi. You can use your smartphone to confgiure it.
The AP captive portal uses the SPIFFS, the simplified file system that is used to store the HTML, css and JS for the portal.
Then with Wemos we have access to the WWW where we can get correct time information and other services such as the meteo service.
All the libraries used are available in the Arduino software library.
Phone status
Every time Vintagephone is used the phone keeps track of its status.
There are 5 status:
- DIALING (0)
- CALLING (1)
- CALL_ENDED (2)
- ANSWERING (3)
- HANDSET_DOWN (4)
- RINGING (5)
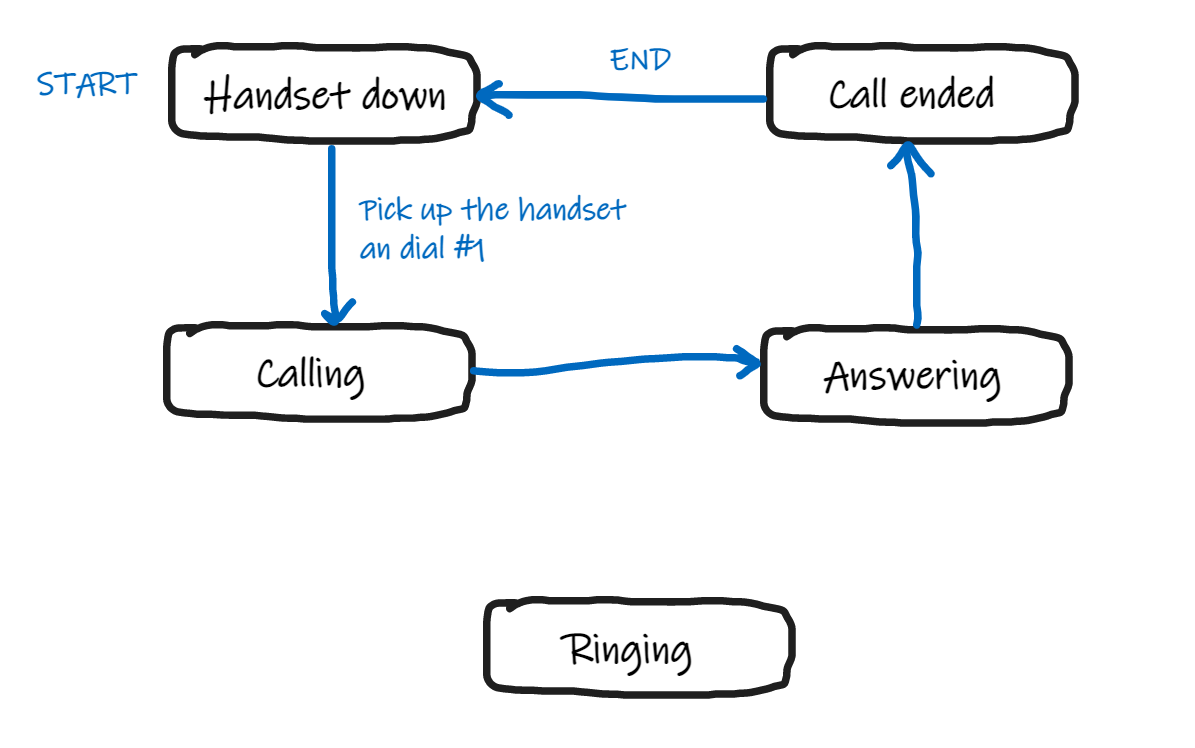
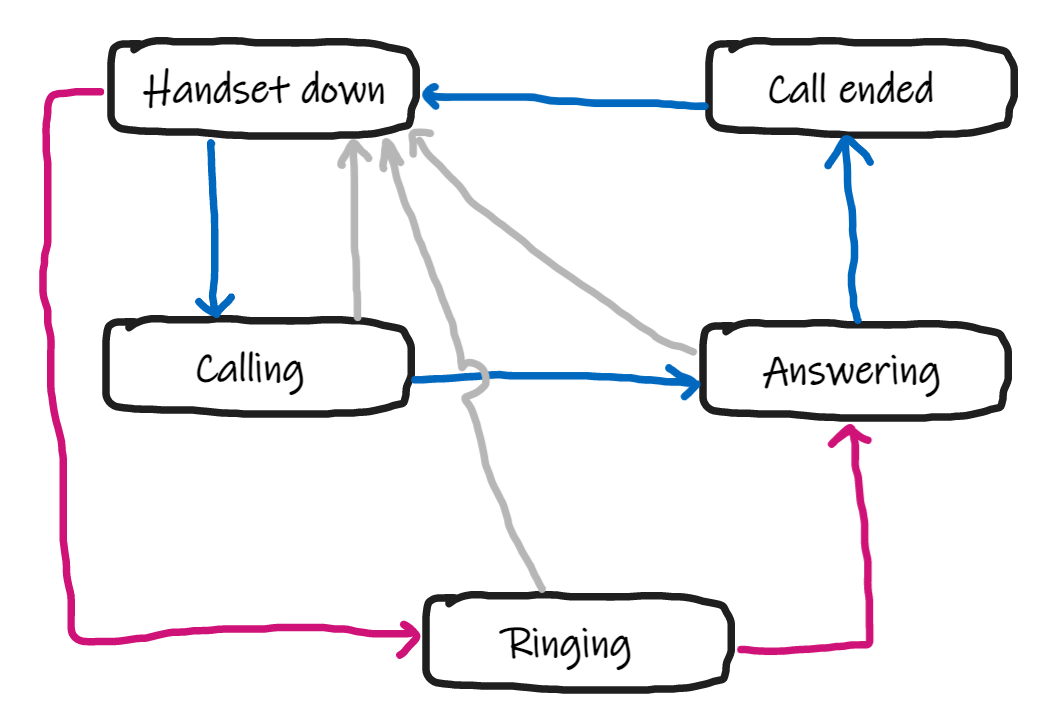
For example when a user call 1 to ask the correct time, the Vintagephone passes from one status to the other like this:
This sequence is the same for all the calls dialed. Ringing status is not touched.
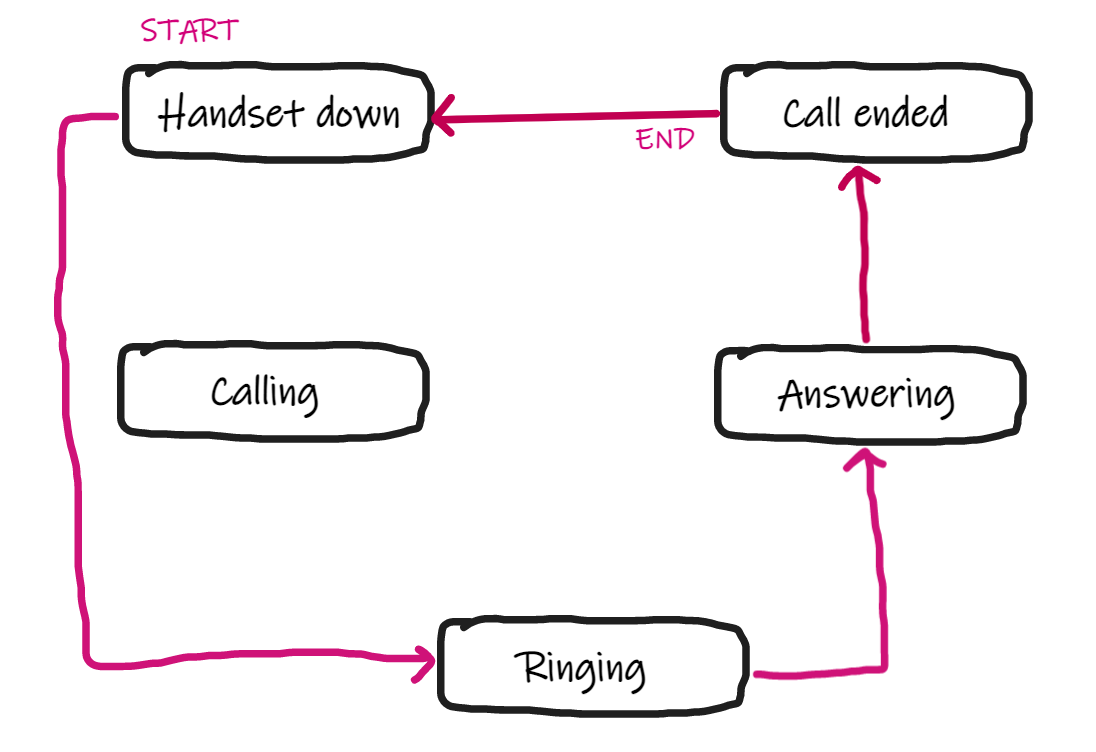
When you set an alarm a time is setted and when the triggering time is reached the sequence is a bit different:
If the user put down the handset during an answer or doesn't answer when the phone is ringing, the software detects the closing of the switch and stop the player and go back to the initial status. So the complete diagram for the phone status is this:
You can customize services and answers in the main loop, by adding blocks of code:
// #3456789 YOUR CUSTOM NUMBER THAT NOT MATCH PREVIOUS NUMBERS
// ---------------------------------------------------------------
if(phoneNumber=="3456789") {
   found = true;
   setPhoneStatus(ANSWERING);

   //
   // Add your code here
   // then play your tracks
   //
   // use playTrackNum(x, WAIT_END) to play mp3 number x in mp3 folder.
   // use playTrackFolderNum(x,y, WAIT_END); to play mp3 number y in x folder.
   // use WAIT_END if you want the process to wait the end of the mp3
   //

   setPhoneStatus(CALL_ENDED);
   playTrackNum(1);
}
Everytime you want to add a new service, if you need different phrases, you'll probably need to open the case to reach the micro sd card and add the new mp3 files.
Github
All the code is available on github and it's well commented!
-
Wemos + bells + switch
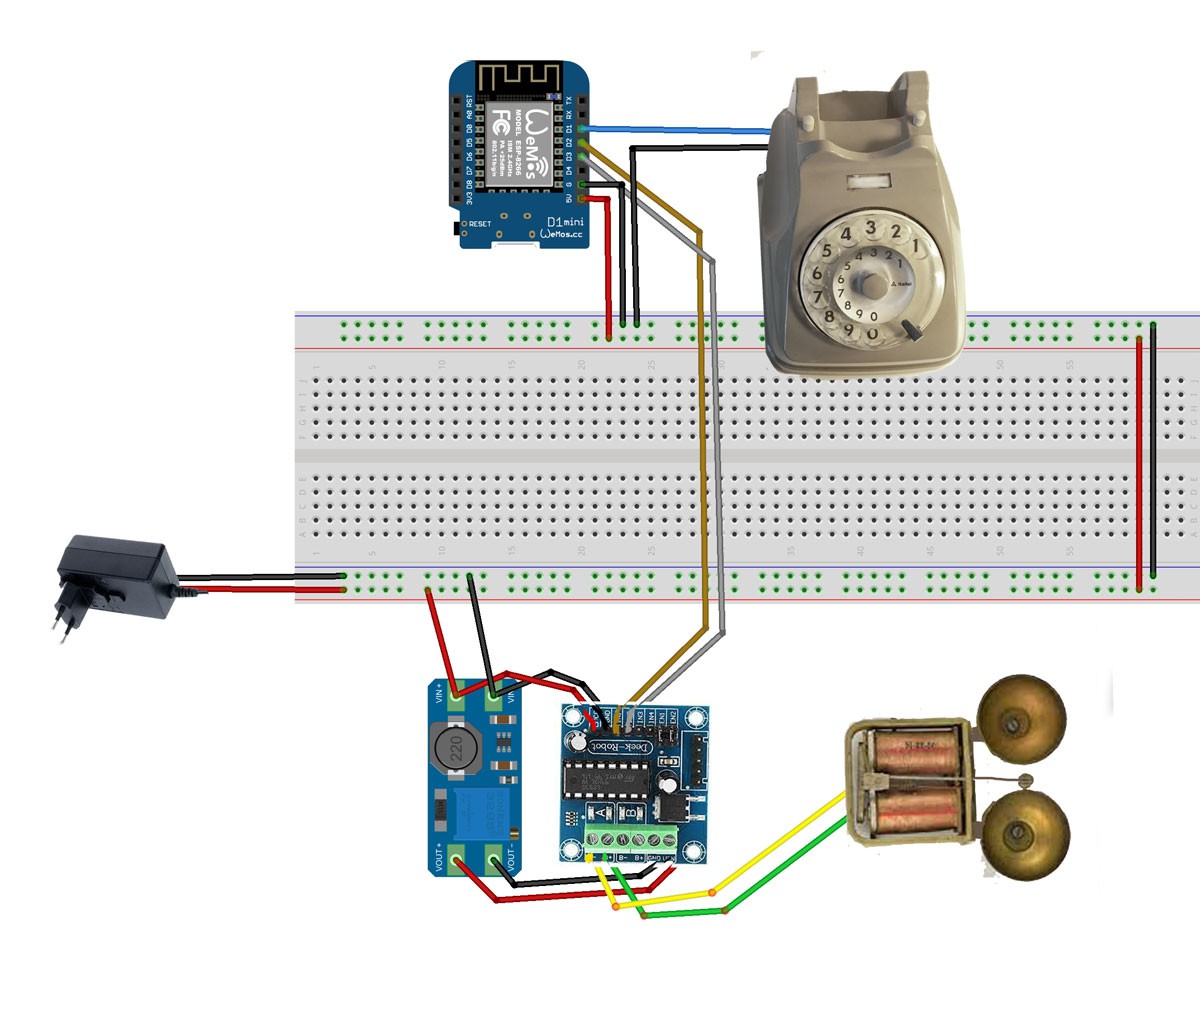
05/15/2022 at 16:19 • 0 commentsOk, let's try to make those bells ring! How do they ring? Between the two bells there is a small hammer which rapidly and alternatively move against the bells. It's moved with a magnetic field created by a coil.
You can try to manually swap the + and - poles of a 9 volts battery to two pins of the coil, and sometimes you can hear a small "ding" when you change the poles!
So we need a way to feed in alternate current to two pins of the coil. The alternate current inside coils creates the magnetic field.
Since our project runs with direct current we need a way to transform it. I've first added a boost up to raise the voltage from 5 V to 12 V. The raised voltage then goes to the controlled input of the LD293 shield. This shield is commonly used to drive motors with an external power source, but with two pins from Wemos we can turn on and off alternatively the power to the output to pins A+ A-.For example, we put 0 to A- and 1 to A+, then we can invert the values: A- to 1 and A+ to 0. So, if we use those A+ and A- to feed to the coil we have a signal that goes alternatively from -12 V to +12 V.
Try some different delays to match the proper frequency that sounds nice!
![]()
We can also connect a pin of Wemos to the switch to detect the close and open of the circuit.
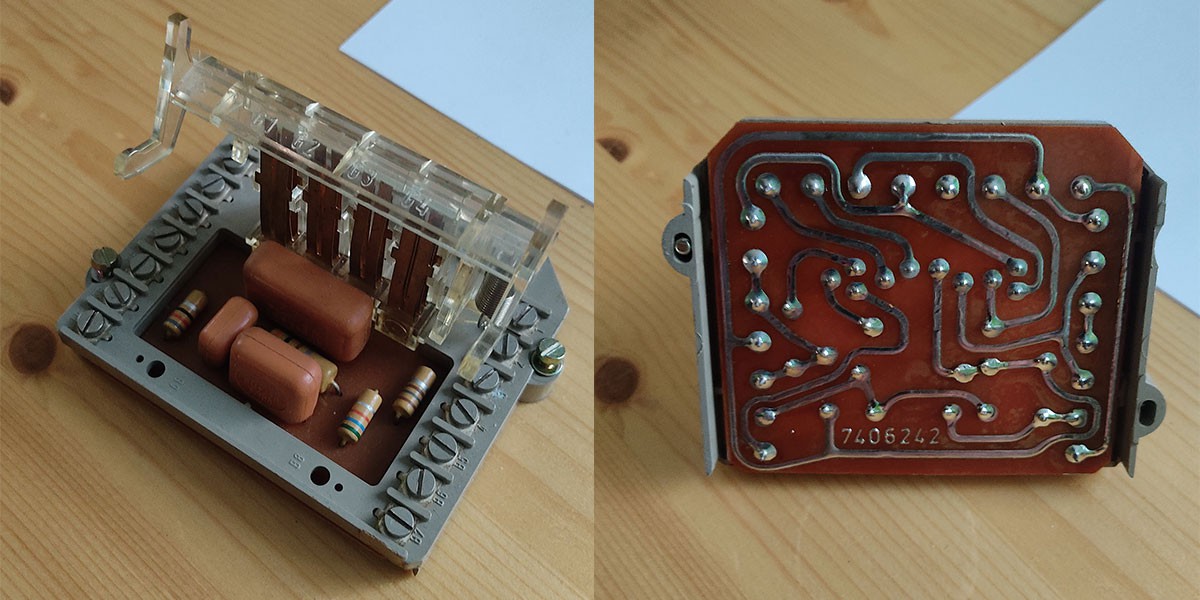
When you disconnect all the cables you can turn upside-down that old circuit board and see the stain tracks, you can also try with the tester to find the two pins that change the state when you move the lever that drive the switch on and off.
![]() Here is a small script that ring the bells a few times and then makes a pause. It will repeat until someone picks up the handset.
Here is a small script that ring the bells a few times and then makes a pause. It will repeat until someone picks up the handset.#define PIN_HANGUP_SWITCH D1 // switch hang up #define PIN_BELL_1 D2 #define PIN_BELL_2 D3 void setup() { Serial.begin(115200); pinMode(PIN_HANGUP_SWITCH, INPUT_PULLUP); pinMode(PIN_BELL_1,OUTPUT); pinMode(PIN_BELL_2,OUTPUT); } // // Ring the bells! // Make a alternate square wave on bells coil with 2 pin and L293D driver void bells() { int maxRings = 5; byte cornettaStatus; // 0 = OPEN, PICK UP - 1 = CLOSE, HUNG UP while(maxRings>=1) { int i = 0; cornettaStatus = digitalRead(PIN_HANGUP_SWITCH); if(cornettaStatus==1) Serial.println("Ringing..."); while(cornettaStatus==1 && i<30) { digitalWrite(PIN_BELL_2,LOW); digitalWrite(PIN_BELL_1,HIGH); delay(20); digitalWrite(PIN_BELL_2,HIGH); digitalWrite(PIN_BELL_1,LOW); delay(20); i++; cornettaStatus = digitalRead(PIN_HANGUP_SWITCH); } if(cornettaStatus==0) Serial.println("Picked up!"); digitalWrite(PIN_BELL_2,LOW); unsigned long ti = millis() + 2000; while(cornettaStatus == 1 && millis()<ti){ delay(1); cornettaStatus = digitalRead(PIN_HANGUP_SWITCH); } if(cornettaStatus==0) Serial.println("Picked up!"); maxRings--; } } void loop() { bells(); }Here is also a video!
-
Meteo forecast service added
05/08/2022 at 17:26 • 0 commentsJust added meteo forecast service with open-meteo.com Api.
Dial number #4 to listen to meteo.
Now I need to make some AP portal setting page to configure latitude and longitude.
-
Wemos + rotary dial encoder
05/06/2022 at 15:10 • 0 commentsAfter the handset the rotary encoder disc is the most fascinating part of the old phones.
The disc allows the user to compose a sequence of numbers, each time you rotate the disc - which is a normally closed circuit - and release it, it will rotate back to its starting position and it will mechanically open a switch that make electric pulses. We can detect and count these pulses to determine each digit dialed.
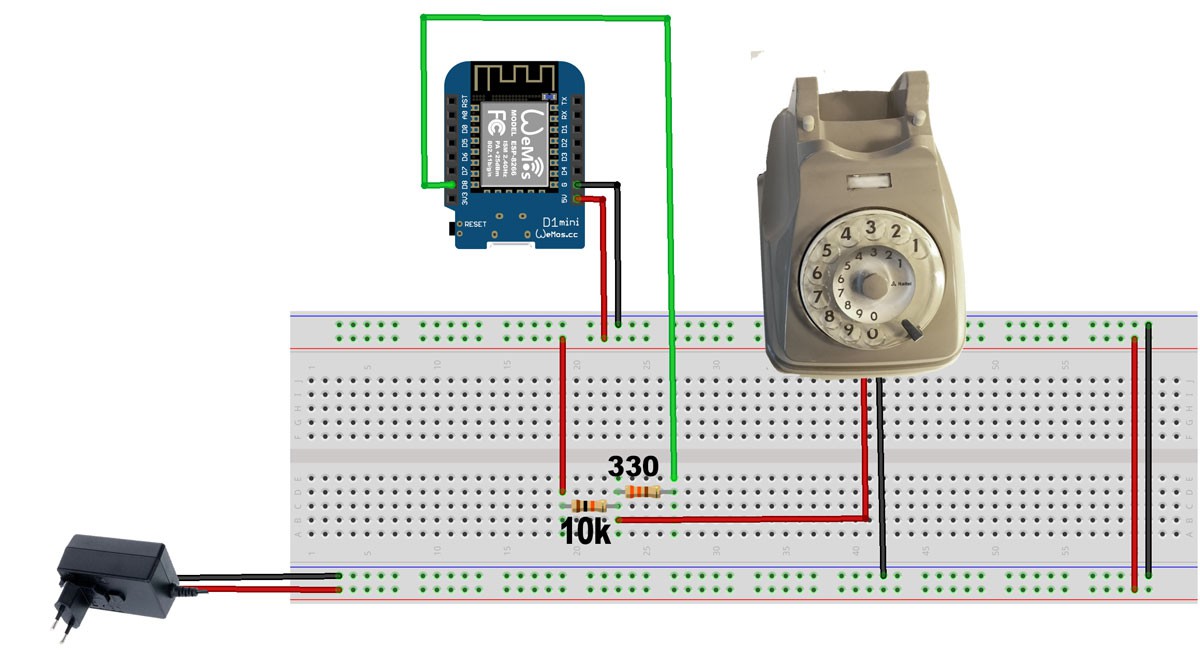
To count those pulses we have to connect two outcoming wires from the rotary encoder. In my Italian SIP model there are four wires, but we need just two: one wire should be connected to GND and the other one to a pin of our board to read incoming pulses. Here is the schema. The rotary dial is a normally closed circuit so the D8 pin of Wemos read 0 because it's connected to ground throught a 330 Ohm resistor.
When a number is dialed, for example 3, the rotary open and close the switch 3 times, and the D8 pin reads three pulses of 1 because of the 5 Volts throught the series of the two resistors.
![]()
On the Arduino forum I've found a discussion about the rotary encoder that points to this link with a function readNumber that correctly counts those pulses.
In this video you can see pulses in the Arduino IDE plotter.
You can try to plot the pulses with this code:int in = D8; void readNumber() { int needToPrint = 0; int count=0; int lastState = LOW; int trueState = LOW; long lastStateChangeTime = 0; int cleared = 0; // constants int dialHasFinishedRotatingAfterMs = 100; int debounceDelay = 10; int digits = 0; unsigned long nodialingtime = 4000 ; unsigned long lasttimernothing = millis() + nodialingtime; while( digits < 10 && millis() < lasttimernothing) { int reading = digitalRead(in); Serial.println(reading); if ((millis() - lastStateChangeTime) > dialHasFinishedRotatingAfterMs) { // the dial isn't being dialed, or has just finished being dialed. if (needToPrint) { // if it's only just finished being dialed, we need to send the number down the serial // line and reset the count. We mod the count by 10 because '0' will send 10 pulses. //Serial.println(count % 10, DEC); digits++; needToPrint = 0; count = 0; cleared = 0; lasttimernothing = millis() + nodialingtime; } } if (reading != lastState) { lastStateChangeTime = millis(); } if ((millis() - lastStateChangeTime) > debounceDelay) { // debounce - this happens once it's stablized if (reading != trueState) { // this means that the switch has either just gone from closed->open or vice versa. trueState = reading; if (trueState == HIGH) { // increment the count of pulses if it's gone high. count++; needToPrint = 1; // we'll need to print this number (once the dial has finished rotating) } } } lastState = reading; } } void setup() { Serial.begin(9600); pinMode(in, INPUT); } void loop() { readNumber() ; }The script is included in the repository on Github.
-
Mp3 + Wemos + handset
05/04/2022 at 21:20 • 0 commentsIn these logs I will show how to retrofit your vintage rotary phone. I'll try to describe the main steps to modify the phone.
The first step is to put together the DF mini player, the Wemos board and the old handset.
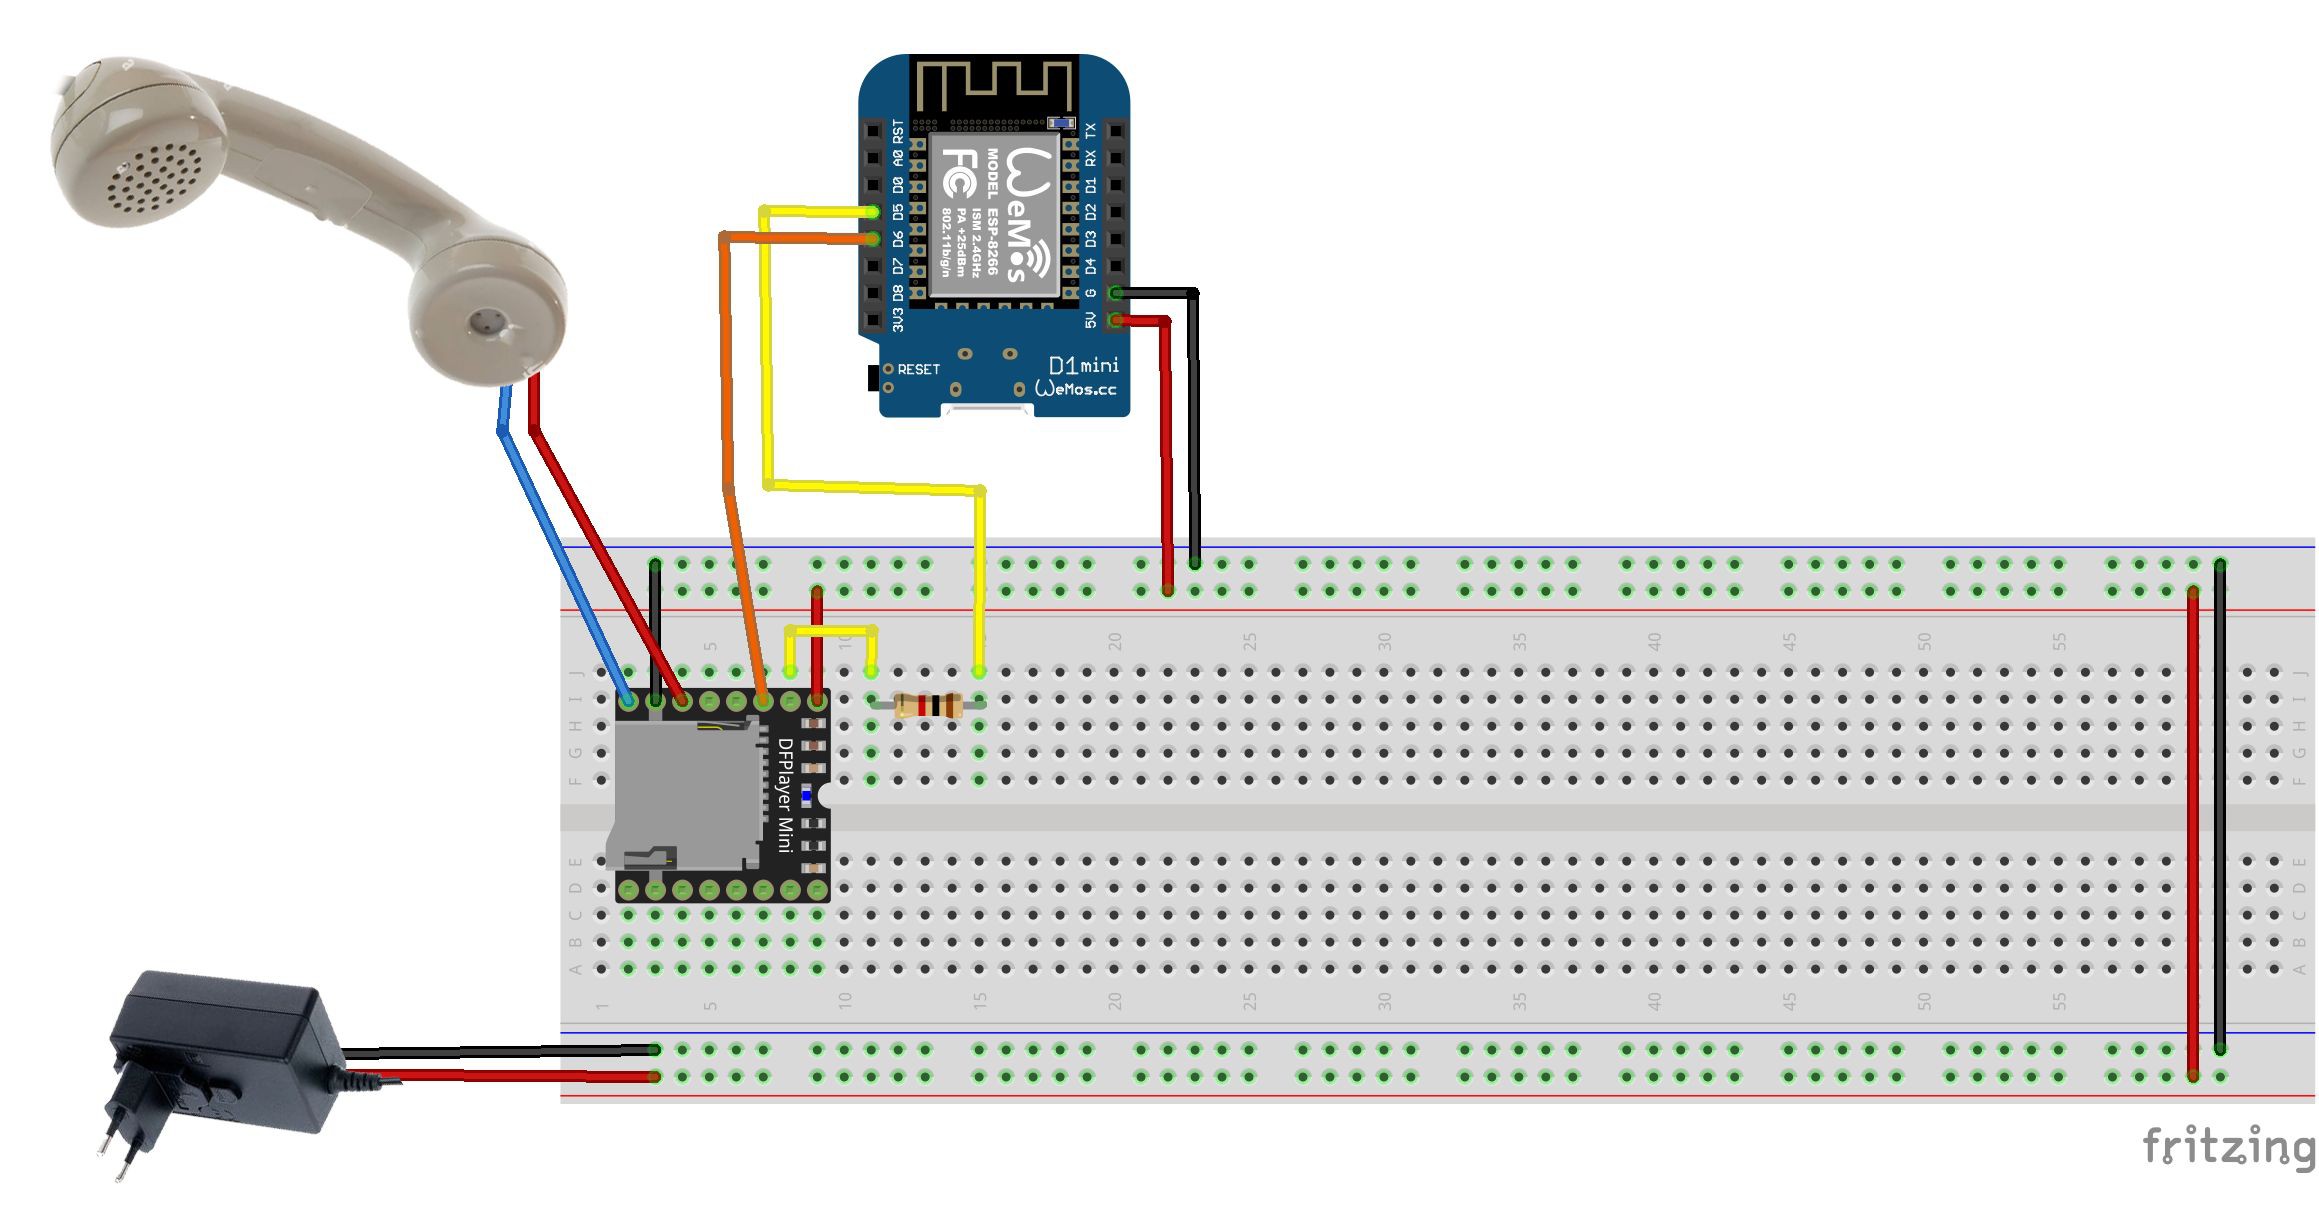
The DFplayer mini is an MP3 player that can talk with your preferred microcontroller through serial communication with two wires.In this log we connect the player with the Wemos board. There is just a thing to pay attention to before connecting. The DFplayer has a 3V logic, and Wemos has a 5V logic. This means that a High signal is transmitted with 5V from Wemos and thus will damage your DF player.
So we need to put a resistor between the receiving pin of DF player and the transmitting pin of Wemos, in this kind of two pins wired communication the RX pin of a board is connected to the TX of the other device, and viceversa.
In this case the second pin it's not necessary since the DF player is transmitting and Wemos is receiving and the 3V high signal is correctly received as an High signal also from Wemos, because it's more then half of 5V.
Everything above 2.5V is considered high, and everything under 2.5V is considered low. So it works.
The DF player has two pins who bring left and right audio signals to the speaker and we connect them with cables coming out of the handset.
To connect the handset you have to find the two proper cables out of the three cables available.
TIP: When you open the old phone, disconnect all the connectors from the parts you want to use, you need to access the cables of the handset and no other wiring should be linked to the rest of the old phone or this will change the behaviour of the system.
Since I don't want to open the receiver, I've just tried two of the three cables. In my handset the cables to use are red and blue.
Here is the schema:![]()
You can upload a few mp3 on your micro SD card, insert the cart in the player and test the process with the DF mini example scripts of the Arduino IDE library DFminiMp3.
I've used version 1.07.
![]()
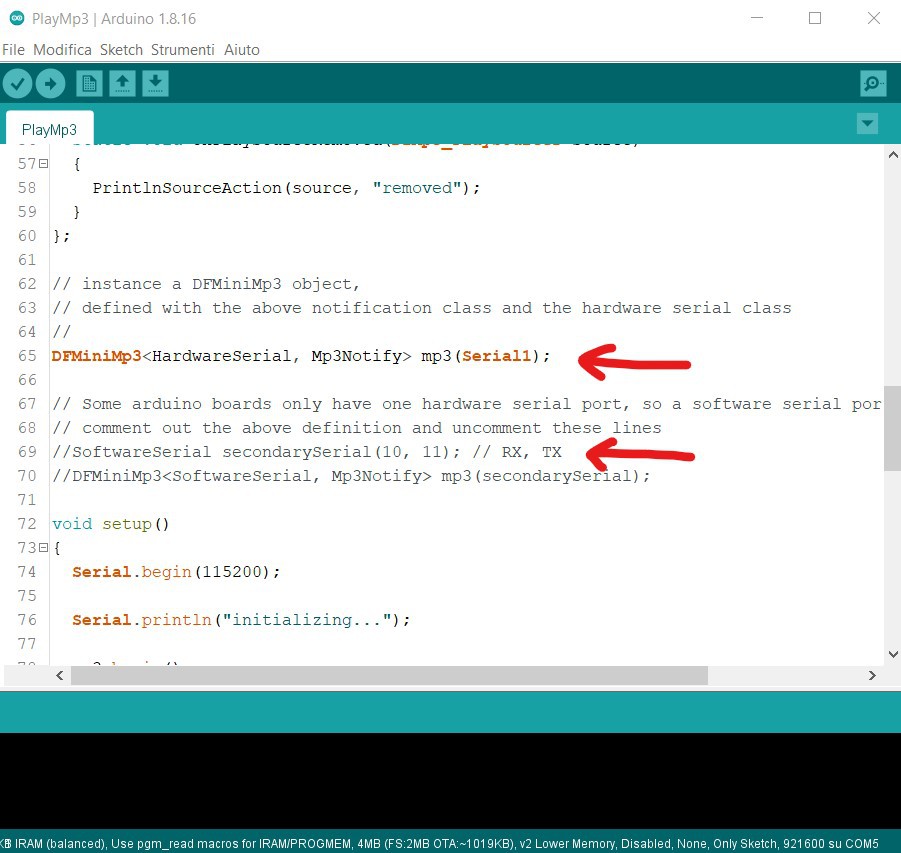
When you try the PlayMp3.ino example sketch you have to modify some lines, since in the Wemos board we use a Serial Software and not an Hardware software:
![]()
So comment line 65 and uncomment 69 and 70.
At line 69 change 10 with D6 and 11 with D5.
If you hear your mp3 in the handset you did it!
If not check these things:
- check pin connections RX-TX and resistor on pin D5 as described in the above schema.
- check folders name in your SD card, you should have only a folder named mp3 and inside a few mp3 files with names that are numbers zeropadded: 0000.mp3, 0001.mp3... and so on. Four digits numbered files.
- if none of above, think about adding an external power source
-
Meteo service
04/29/2022 at 22:12 • 0 commentsI'm looking for a meteo service which I'd like to call directly from Wemos to retrieve informations.
I've found open-meteo.com which seems to be able to deliver, free and easy, an API endpoint to parse with Wemos.
For example here are meteo informations for Milano (Italy).
Latitude and longitude should be inserted with the AP portal.
-
Code updated on github
04/29/2022 at 19:28 • 0 commentsCode project on Git
Vintagephone - old rotary phone retrofitting
An open project to bring new functionalities to vintage phones with the nice old rotary, keeping their fascinating vintage style alive.
 Giulio Pons
 Here is a small script that ring the bells a few times and then makes a pause. It will repeat until someone picks up the handset.