AIRPOCKET
-
Additional Functions
06/06/2022 at 23:53 • 0 commentsWhen the main board was created, LEDs for indicators and DIP switches for setting shooting conditions were included in the design. Now that we have confirmed the operation of the shooting function, we will add some of those functions as well.
We plan to modify them in the future, but first here is what we have done.
DIP SWITCH ON OFF #1 Manual mode Auto mode #2 - - #3 Auto WB Fixed WB #4 Color Gray Scale #5 ISO40* ISO100* #6 - - *Since opencv's sensitivity adjustment function does not work, the exposure time was used to adjust the exposure time so that the atmosphere is about equivalent.
-
Movie Length
05/26/2022 at 00:14 • 0 commentsThe captured images are stored in memory and output as a movie file as soon as the shooting is finished. 5-second movie takes about 20 to 30 seconds to output.
The resulting movie is shown here.
The occasional blackout is probably a malfunction of the photo reflector. The photo reflector detects reflected light from the infrared LED, but it is located near the lens. When the shutter opens, it probably detects the IR light from the outside world, causing the shooting timing to be off.
There may be room for improvement if an IR filter is attached to the lens.
-
Test Shooting and Program Improvements
05/25/2022 at 09:05 • 0 commentsNow that the main board was ready, the program for photography was completed.
When the shutter movement is detected by the photo reflector on the main board, one image is saved by opencv. If the shutter movement is not detected for more than 0.1 second, the program judges that the shooting is finished and the saved image data is concatenated and output as an MP4 file.
There were several points that we noticed during the development of the program, and we created the program with the following points in mind.
Buffer data processing
When acquiring images with opencv, the image data that can be acquired with the imread command is the data stored in the buffer. By default, four images are buffered, so the data from four frames ago is acquired. Because of this buffer function, it is not possible to clearly specify the timing of shooting, and it was very, very, very difficult to synchronize the shooting timing.
This time, I was able to synchronize the shutter timing by changing the buffer to one image and specifying the shooting mode as explained in the next section.Shooting Mode, FPS and FoV
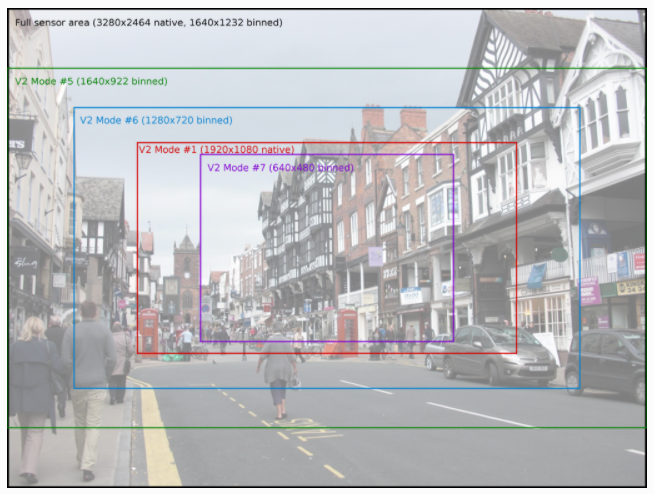
The IMX219 can shoot at a maximum of 90FPS, but this can cause the FoV of the image to become small. This time I was aiming to shoot at a minimum of 16 FPS and a maximum of 64 FPS, but in still photography using opencv, it was difficult to match the shutter timing without using a mode with a smaller FoV.
In this case, I shot in Mode 6 at 1280x720, but the image is cropped for the sensor size, so the image is closer to telephoto.
For more information on IMX219 shooting modes, FPS, and FoV, please refer to this page.![]()
-
Making the main board
05/19/2022 at 06:30 • 0 commentsNow that we are able to detect the shutter movement, which had been a pending project, we have started fabrication of the main board.
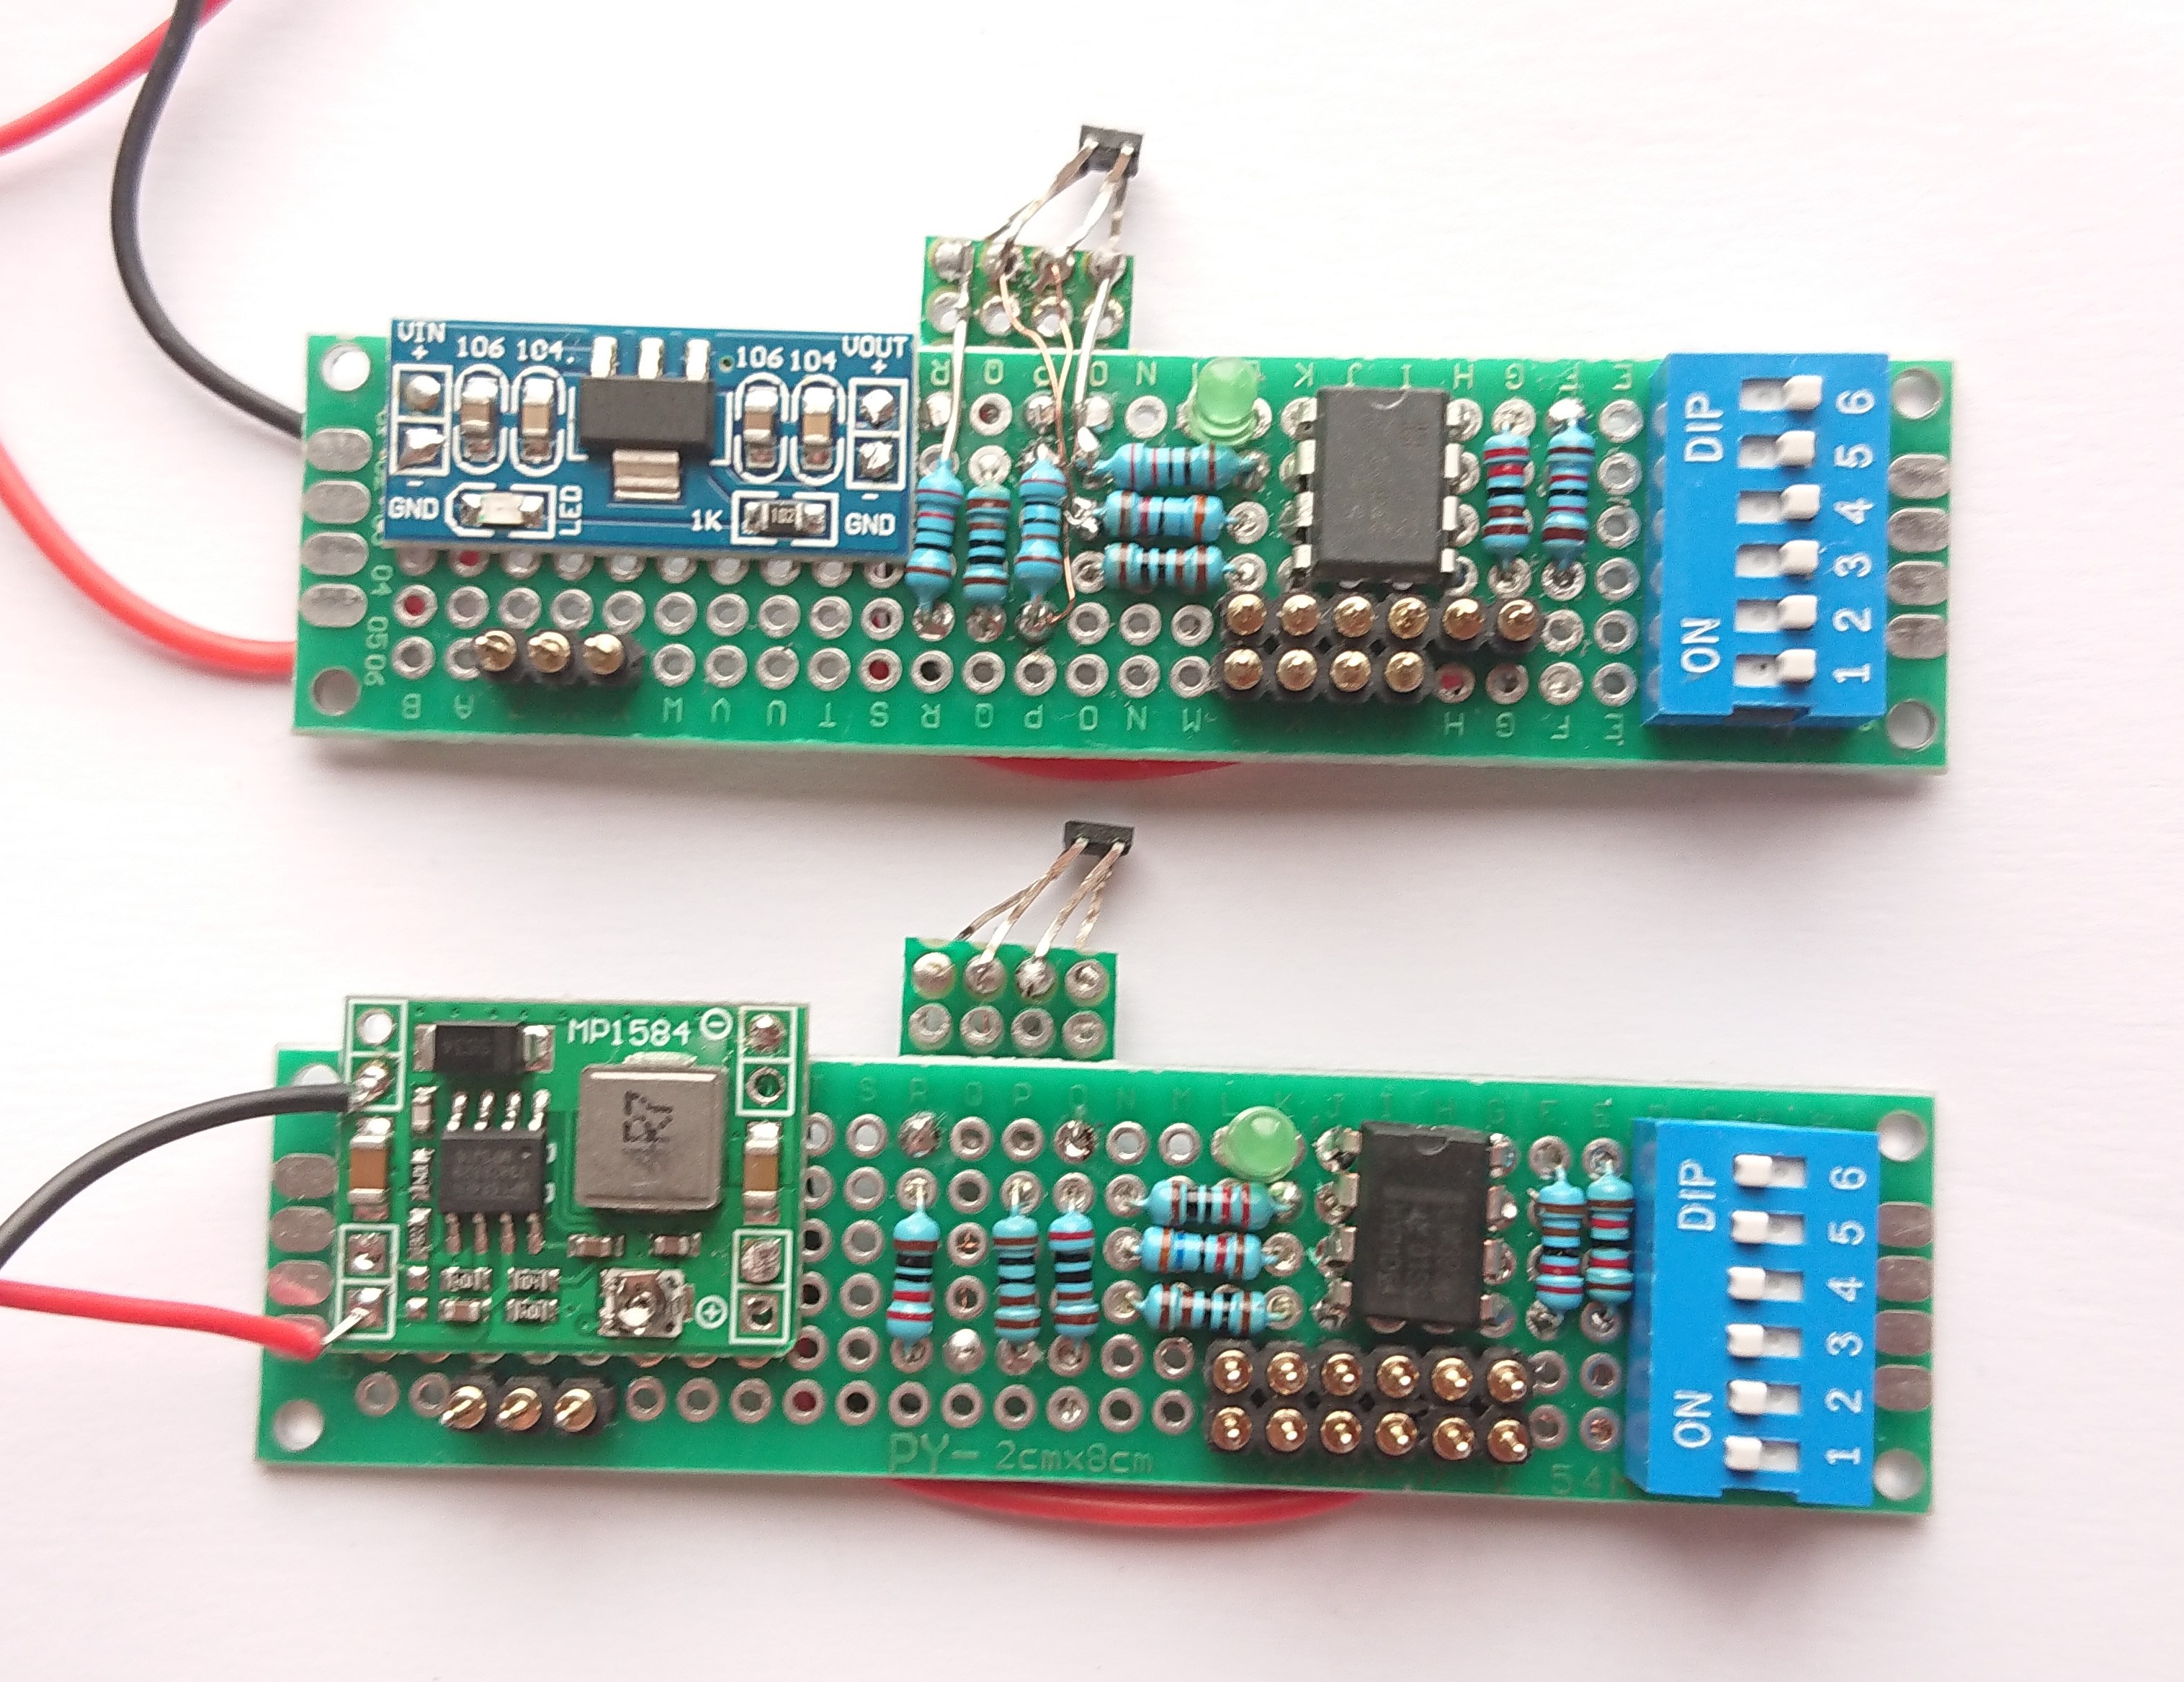
It has a DC-DC converter, a photo sensor for shutter detection, DIP switches for inputting shooting conditions, and pins for connecting to the Raspberry Pi.
When we checked the operation, we found that the Raspberry Pi was reset due to lack of power when continuous shooting was performed. As a countermeasure, we changed the DC-DC converter from the LM1117 3V3 version board (top photo) to the MP1584 version board (bottom photo).![]()
-
Detection of shutter movement
05/07/2022 at 14:32 • 0 commentsNow that the circuit for detecting shutter movement using a photo reflector has been established, we will test whether it is possible to detect the actual shutter opening and closing movement.
After examining the areas inside the camera where shutter operation could be detected, it appears that the movement of the film feed claw can be detected. However, the claw itself moves right next to the lens, so it would collide with the image sensor.
Although we wanted to avoid touching the camera body as much as possible, we decided that we had to touch this part, so we cut off the claws.
The following video shows the claws on the film feed component cut off and the reflector attached where the claws used to be.As a reflective material, aluminum tape was used, which reflects the IR light of the photo reflector well. In this video, the camera is running at the FPS 16 setting.
When the photo reflector was temporarily mounted in front of the reflective material to check its operation, the LED for the indicator flickered quickly. Although it is currently impossible to determine if there is any capture, it appears that shutter movement can be detected in this way.
-
IDLE TALK
04/28/2022 at 09:06 • 0 commentsThis is the first time I have touched an 8mm film camera, but when I touched it, I was pleasantly surprised by its presence and texture, such as its weight and fast-moving shutter, more than I expected. It is an anachronistic spring-driven mechanism, but because of that, it is also robust enough to work even now, more than 70 years after its manufacture.
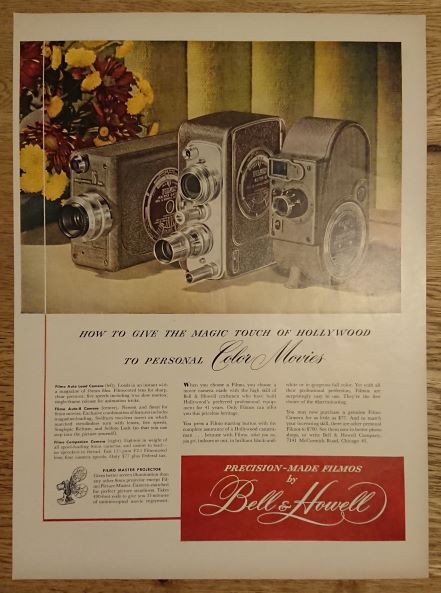
When I was doing some research, I found an advertisement of the watch on sale, so I ended up buying it.
![]()
"When you choose a Filmo, you choose a movie camera made with the high skill of Bell & Howell craftsmen who have built Hollywood"s preferred professional equipment for 41 years. Only Filmos can offer you this priceless heitage."
-
Change image sensor to IMX219
04/27/2022 at 08:32 • 0 commentsUntil now we have been using the OV5647 image sensor, the biggest advantage of which was that it could handle up to 90FPS, but we were not satisfied with the image quality.
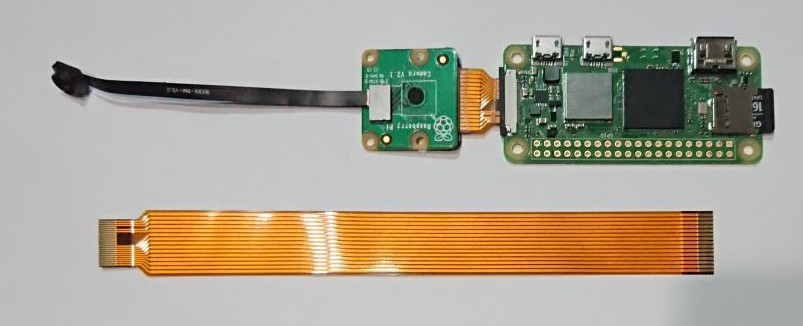
As an alternative, we obtained a small sensor unit with an IMX219 sensor. It is possible to divert the Raspberry Pi camera V2 board and replace only the sensor unit.
There is one problem, the MIPI connector on the Raspberry Pi camera V2 is 1mm pitch x 15PIN, but the Raspberry Pi zero is 0.5mm pitch x 22PIN, so a conversion cable is required.
The conversion cable we obtained was too long to fit into the case, so we modified it to cut the cable at the same time.
The Raspberry Pi camera V2 board is also in the way, but if the placement of the main board is improved, it will fit in.![]()
-
Consideration of a sensor for shutter movement detection
04/25/2022 at 03:22 • 0 commentsThis 8mm film camera has a variable FPS. In order for the image sensor to capture moving images, the shutter timing of the camera must be synchronized with the sensor operation.
It is very difficult to detect the shutter timing operation, and if a mechanical mechanism is added, it may become a burden and change the shutter timing itself.
In this case, we will attempt to detect the movement by attaching a reflector to the shutter rotation mechanism and using a photo reflector.
First, I used a breadboard to check the sensor sensitivity and circuitry.
When the part with aluminum tape in front of the sensor comes to the front of the sensor, the LED shines.Although the sensitivity needs to be adjusted, we will test the actual device using this method.
-
Case Design
04/22/2022 at 06:17 • 0 commentsThe case is designed to house the image sensor and other components.
The following items are stored in the case.
- Image sensor
- Raspberry Pi 2
- Main board
- Sensor for acquiring shutter movement
- Battery
- Power switch
- 2 LEDs
- Dip switch
The specifications of the device itself, which will be placed inside, have not yet been clearly decided, but I will make a mock-up and check it as we finalize the design.
After three prototypes, I will proceed with development based on the shape shown in the photo.
-
Started software development
04/14/2022 at 23:49 • 0 commentsIn 8mm film cameras, the shutter timing is linked to the frame feed of the film. When controlling the image sensor, the shutter timing must be detected in some way to capture an image. The captured image data is later connected and converted to video.
First, we created a time-lapse tool that uses test opencv to take a picture at a specified timing, convert it to a movie, and then output it.Looks good.
A Spring-Drive Digital Movie Camera
Digitize a vintage spring-drive 8mm camera. Not for the sake of convenience, but for the enjoyment of video recording.