 Mrinnovative
How-to-make-a-stroboscope-using-arduino

Hello friends in this post we will see how to make Stroboscope using arduino. Stroboscope an instrument for studying periodic motion or determining speeds of rotation by shining a bright light at intervals so that a moving or rotating object appears stationary.
A stroboscope, also known as a strobe, is an instrument used to make a cyclically moving object appear to be slow-moving, or stationary. It consists of either a rotating disk with slots or holes or a lamp such as a flashtube which produces brief repetitive flashes of light. Usually,
the rate of the stroboscope is adjustable to different frequencies. When a rotating or vibrating object is observed with the stroboscope at its vibration frequency (or a submultiple of it), it appears stationary. Thus stroboscopes are also used to measure frequency.

COMPONENT REQUIRED

Arduino Nano :- https://amzn.to/2NyDX4u
0.96" OLED Display :- https://amzn.to/2NDva11
10W LED :- https://amzn.to/2NCZdFW
10K POT :- https://amzn.to/2x81M8W
Toggle S/W :- https://amzn.to/2NafZ05
2222A Transistor :- https://amzn.to/2QojE8b
Custom PCB
CIRCUIT DRAWING

Stroboscopes produce carefully timed pulses of light in order to make a rotating object appear still. While this may seem like something of an exotic concept, YouTuber Mr. Innovative decided to build his own using an Arduino Nano.
His project uses a PN2222A transistor to drive a 10W LED, which acts as the device’s light source. The spinning RPM is set via a potentiometer, and a small OLED provides user feedback.
Let’s do some mathematical calculation
We had designed this circuit for LXML-PWC1-0100 LUXEON LED.
Voltage required to illuminate LED i.e. Vin
V_{in} = V_t + (V_f \times nLED) Here we are using three LED in series, hence number of LED nLED = 3
V_t = 2 V_f = 3.99V (voltage required to powering the single LED)
Now, wee can calculate the Vin voltage
V_{in} = 2 + (3.99 \times 3) = 13.97 \approx 14V So, we required approximately 14V per column.
After calculating required voltage for powering the LED, let’s calculate supply voltage by LM317
CUSTOM PCB
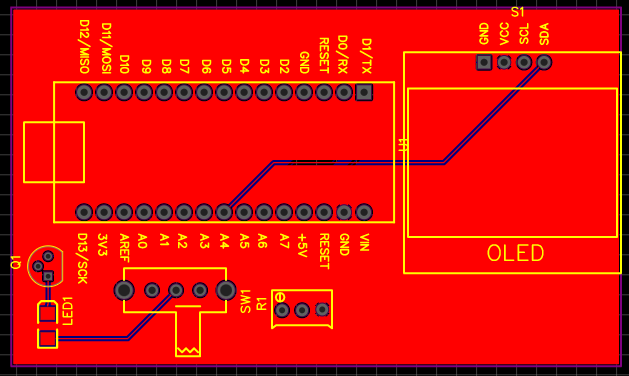

I have design circuit and PCB in easyEDA and ordered PCB from JLCPCB
This is the link of PCB editabl file
Yes PCB are the heart of the electronics based project usually we hesitate to try custom PCB and opt to homemade solutions
like breadboard or Zero PCB earlier I also was in the same boat, I hesitate to try custom PCB my belief was they are much expensive.
but then I came to know about JLCPCB.COM and I was totally surprised how low price PCB's are they offering
there PCB quality is best in market, now I always go with PCB for my project and JLCPCB.COM is my trusted
If you planing to order any PCB for your projects so you can consider JLCPCB.com because
I always prefer JLCPCB.com for my PCB needs, JLCPCB.com have best deals for their customers $2 for 1-4 Layer PCBs, free SMT assembly monthly.
If you seriously need quality PCB quickly in your hand then you must have to try JLCPCB PCB manufacturing service. They have Special offer of $2 for 1-4 Layer PCBs, free SMT assembly monthly. If new user signup today from this link JLCPCB.com you will get welcome coupons from JLCPCB.

SMT Assembly service of JLCPCB.com is cherry on top now get your PCB fully assembled and save your time and money Select components for your PCB from there Parts Library of 200k+ in-stock components they are offering $30 valued New User coupons & $24 SMT coupons every month $8.00 setup fee, and $0.0017 per joint
Now no need to order components separately for you PCB and get free from stress of soldering them on PCB just try PCB SMT assembly service and get you PCB with components pre assembled and ready for the project
👉 Try PCBA service of JLCPCB.com and save your time and money, get PCB ready...
Read more »
 Jithin Sanal
 RoboCircuits
 Sagar 001
 Hari Wiguna