-
1Step 1
The DVI to HDMI Pinout Schematic http://goo.gl/sN0o27 shows the front view of a female connector which of course at the same time depicts the PCB-side pinout of a male plug viewed from rear.
When a suitable platform has been found and pried open...
![]()
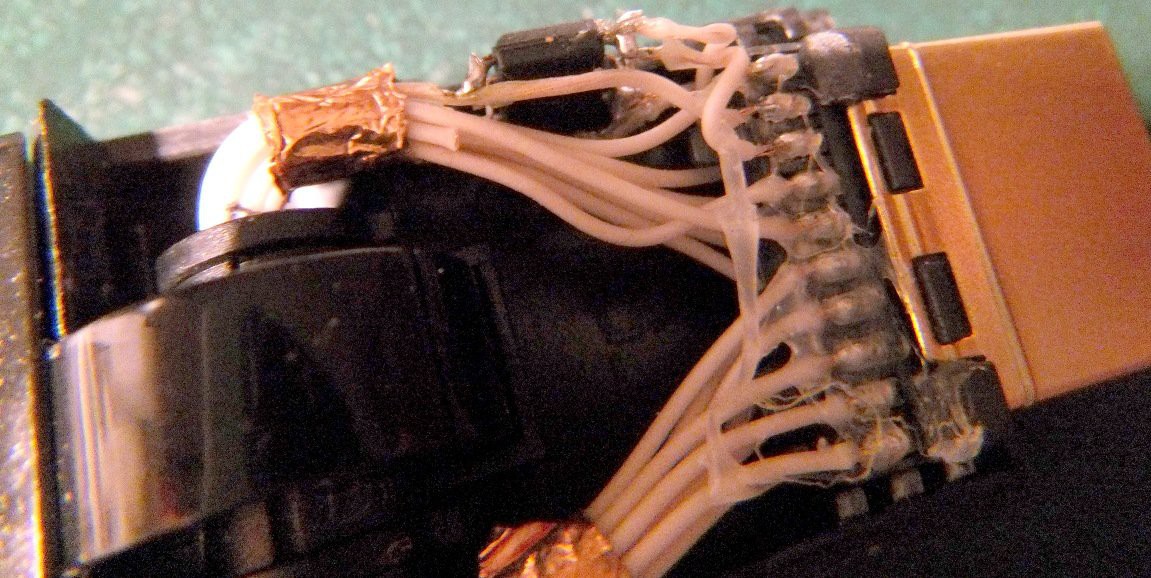
...we'll have to cut the I²C (SCL and SDA) lines a centimeter or so from the rear of the male HDMI connector's pins 15 and 16.
The respective stub of wire remaining at the connector is then soldered to the 24LC22A's pins 5 for SDA and 6 for SCL
(counting counter-clockwise as usual from the notch on the IC's marked top, i.e. near the bottom right pin in the picture below).![]()
The electrical insulation from the DDC Ground and +5V wires (which will not be cut) is cautiously removed (mechanically or by heating) just as far as necessary and the bare wire below exposed and solder-tinned...
![]()
...so that the opposing corners of the IC can be soldered to make contact: DDC Ground wire 17 to pin 4 of the IC, +5V wire 18 bridging both pins 7 and 8 (so the VCLK pulled high will keep the EEPROM write-enabled).
![]()
Once finished and with all necessary insulation restored, the circuitry is shrink-wrapped or the connector snapped shut again.
-
2Step 2
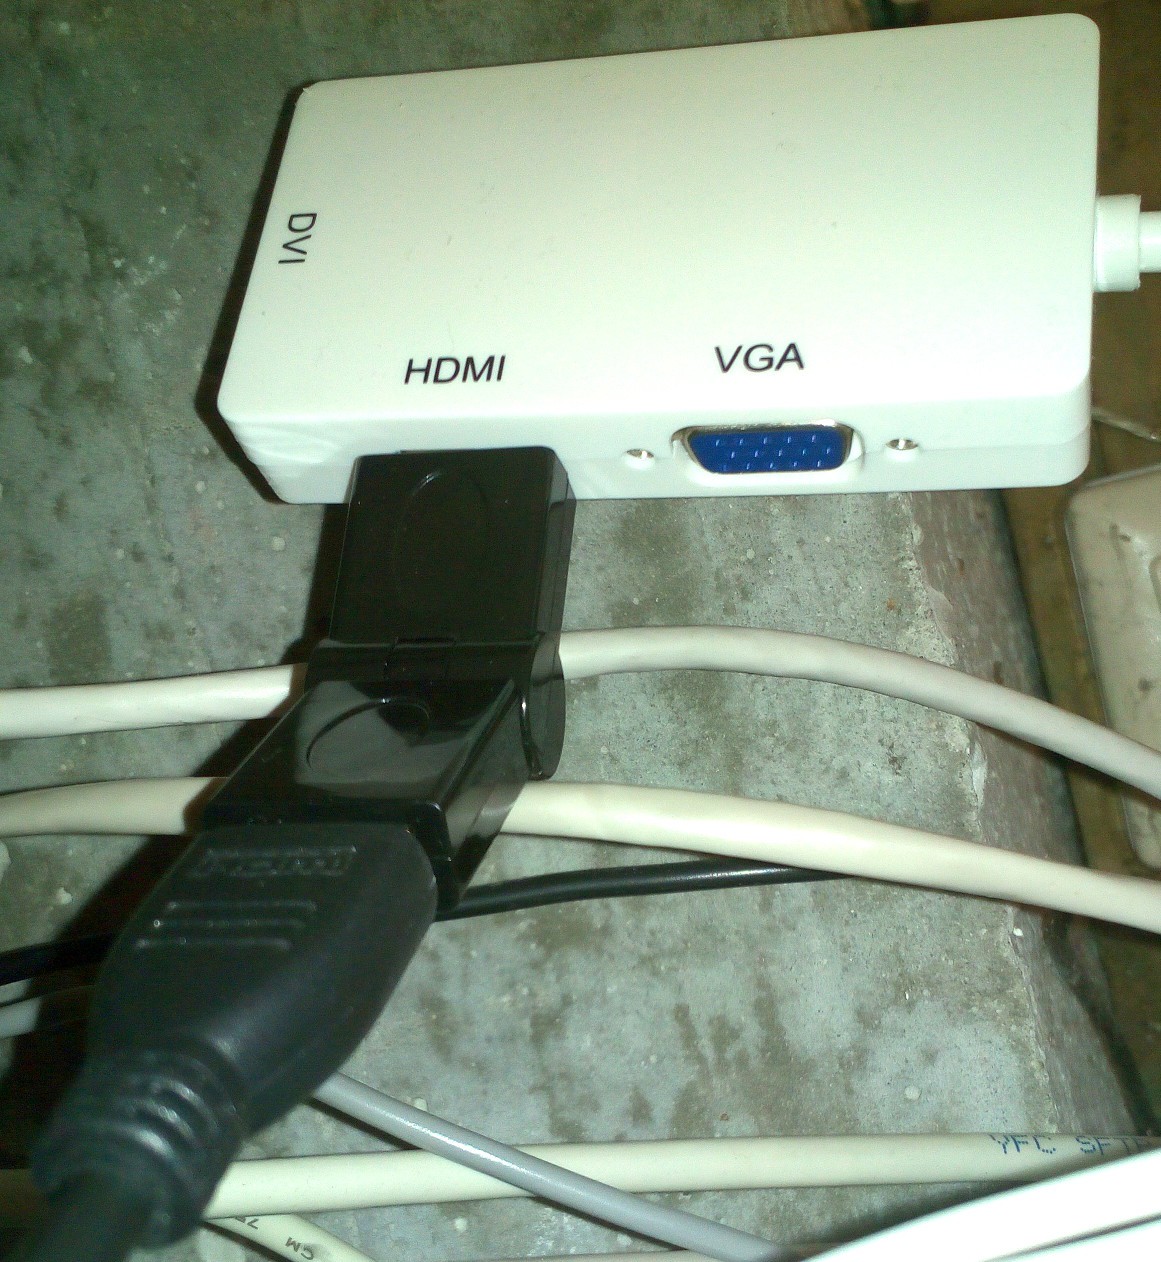
Before plugging in the freshly minted EDID Inserter (my last picture shows one dangling from a "3 in 1 Display Port DP Male to HDMI/DVI/VGA Female Adapter" off eBay, the case of which could also house our EEPROM of course),
![]() check that the
sink with the most appropriate EDID is connected and detected.
check that the
sink with the most appropriate EDID is connected and detected.If it is connected through an amplifier that adds audio decoding to the E-EDID information,
make sure this switched on and doing its magic on the HDMI as well.On Windows, you'd need a programming software, e.g. the special version of PowerStrip as in http://forums.entechtaiwan.com/index.php?topic=1970.msg21481#msg21481 for the following.
Linux will let you take the risks (that you alone choose to bear) for free.
In the Debian/Ubuntu example below, the numbers may vary from system to system.
The eeprom module most conveniently dumps the E-EDID, but has to be removed again before running the i2ctools it's incompatible with:
xrandr --verbose -q
sudo apt install i2c-tools
sudo modprobe eeprom
cp /sys/bus/i2c/devices/3-0050/eeprom ~/E-EDID_EEPROM.bin
sudo rmmod eeprom
modprobe i2c-dev
hexdump -C ~/E-EDID_EEPROM.bin
sudo i2cdetect 3
sudo i2cdump 3 0x50
In the outputs from the above, you should see 3 (bytewise identical) dumps of the actual 256kB E-EDID you want. Tellingly the monitor/projector manufacturer's ID and model are going to show up in the right-hand (ASCII) side of the hexdump.
-
3Step 3
Plug in the freshly minted EDID Inserter and a repeated invocation of the following should yield only 256 FFs typical of an EEPROM fresh from the factory:
sudo i2cdump 3 0x50Dire admonitions are issued even when merely trying to read:
No size specified (using byte-data access) WARNING! This program can confuse your I2C bus, cause data loss and worse! I will probe file /dev/i2c-3, address 0x50, mode byte Continue? [Y/n] 0 1 2 3 4 5 6 7 8 9 a b c d e f 0123456789abcdef 00: ff ff ff ff ff ff ff ff ff ff ff ff ff ff ff ff ................ 10: ff ff ff ff ff ff ff ff ff ff ff ff ff ff ff ff ................ 20: ff ff ff ff ff ff ff ff ff ff ff ff ff ff ff ff ................ 30: ff ff ff ff ff ff ff ff ff ff ff ff ff ff ff ff ................ 40: ff ff ff ff ff ff ff ff ff ff ff ff ff ff ff ff ................ 50: ff ff ff ff ff ff ff ff ff ff ff ff ff ff ff ff ................ 60: ff ff ff ff ff ff ff ff ff ff ff ff ff ff ff ff ................ 70: ff ff ff ff ff ff ff ff ff ff ff ff ff ff ff ff ................ 80: ff ff ff ff ff ff ff ff ff ff ff ff ff ff ff ff ................ 90: ff ff ff ff ff ff ff ff ff ff ff ff ff ff ff ff ................ a0: ff ff ff ff ff ff ff ff ff ff ff ff ff ff ff ff ................ b0: ff ff ff ff ff ff ff ff ff ff ff ff ff ff ff ff ................ c0: ff ff ff ff ff ff ff ff ff ff ff ff ff ff ff ff ................ d0: ff ff ff ff ff ff ff ff ff ff ff ff ff ff ff ff ................ e0: ff ff ff ff ff ff ff ff ff ff ff ff ff ff ff ff ................ f0: ff ff ff ff ff ff ff ff ff ff ff ff ff ff ff ff ................ -
4Step 4
Besides a special build of PowerStrip (for Windows) available upon request only,
some rare EDID-writing code is still archived online but never made it into mainline due to the serious risk of picking the wrong EEPROM:
If you wipe the one on a DVIADD card, your video will go dark with little chance of easy repair;
if you kill the JEDEC one on a memory module, you might have to say good night to your system for quite a while...- http://web.archive.org/web/20100223201748/http://koders.com/c/fidD45707B5A8219B9BB191AEB7E7185063DA5B1F94.aspx
- http://web.archive.org/web/20081122160849/http://lists.lm-sensors.org/pipermail/i2c/2007-August/001701.html
So all they had the courage to ship in i2c-tools is a one-byte writer named i2cset.
Hence for the daring who want flash-program their EDID Inserter even without additional hardware such as the http://dangerousprototypes.com/docs/Bus_Pirate or simply a Raspberry Pi,
we'll have to work around this limitation (and the timing issue that an EEPROM needs time to settle after each single-byte write)
by constructing a sequence of write operations from the E-EDID we saved above.Manually compiling the list of instructions as in https://sites.google.com/site/chrisbecke/home/edid-reprograming would become a rather tedious and error-prone exercise.
I have come up with the code below (3 and 0x50 most likely machine-specfic again), to be used at your very own risk only,
which might ruin you for life, make your dog bite you, and anything else
(as the standard disclaimer goes, whether a good or bad one the professor would not say...),
or simply represent a clever combination of xxd and a regular expression to automate the process:# 100ms delay prevents Error: Write failed # to be authenticated, use some other sudo just before calling the resulting script, e.g. # rmmod eeprom # which is conflicting # modprobe i2c-dev # sudo i2cdump 3 0x50 xxd -g 1 -c 1 ~/E-EDID_EEPROM.bin | sed 's/......\(..\):\ \(..\).*/sudo\ i2cset\ -y\ 3\ 0x50\ 0x\1 0x\2\nsleep\ 0.1/g' >~/Flash_E-EDID_EEPROM.shMade executable (chmod a+x or similar), the resulting ~/Flash_E-EDID_EEPROM.sh will start like this:
sudo i2cset -y 3 0x50 0x00 0x00
sleep 0.1
sudo i2cset -y 3 0x50 0x01 0xff
sleep 0.1
sudo i2cset -y 3 0x50 0x02 0xff
sleep 0.1
sudo i2cset -y 3 0x50 0x03 0xff
sleep 0.1
sudo i2cset -y 3 0x50 0x04 0xff
sleep 0.1
sudo i2cset -y 3 0x50 0x05 0xff
sleep 0.1
sudo i2cset -y 3 0x50 0x06 0xff
sleep 0.1
sudo i2cset -y 3 0x50 0x07 0x00
sleep 0.1
sudo i2cset -y 3 0x50 0x08 0x04
sleep 0.1
...and so on.
Its purpose is to write the (hopefully intended) entire EEPROM (as dumped above), one byte at a time (worked even to HDMI through a DisplayPort adaptor as above for me), waiting a tenth of a second after each.It should only be used (if at all) right after shortly preceding invocations of sudo and i2cdump (and prayers optional but appropriate) to be sure it can run without prompting for privileges.
Afterwards i2cdump as above should show contents similar to the one read from the original sink (monitor or projector), possibly with some in-line audio decoding).
You might also insmod eeprom again; then check that the emulated E-EDID matches the original one:
cmp /sys/bus/i2c/devices/3-0050/eeprom ~/E-EDID_EEPROM.binWhen everything works as you have made and programmed a sufficient number of EDID Inserters,you can finally select sources at your KVM or matrix switch without fear of sinks staying (and sources going) dark or being fed the wrong resolution (and audio configuration if any).
If you have a TV, monitor or projector that reports (and makes the source select) "broken" resolutions (but do not want to risk reflashing its built-in EEPROM), the EDID Inserter is an easy, non-invasive fix to these issues.
Also remote-controlling "headless" servers becomes easy this way by using the EDID Inserter as a dummy without having to find and ask anyone locally to try and connect a monitor (as well as possibly reboot) for service.
EDID Inserter
Boot to best resolution for all sources behind KVM or matrix switch,emulate E-EDID to fix display&audio issues even where there's no monitor


 check that the
sink with the most appropriate EDID is connected and detected.
check that the
sink with the most appropriate EDID is connected and detected.
Discussions
Become a Hackaday.io Member
Create an account to leave a comment. Already have an account? Log In.