 Guillermo Perez Guillen
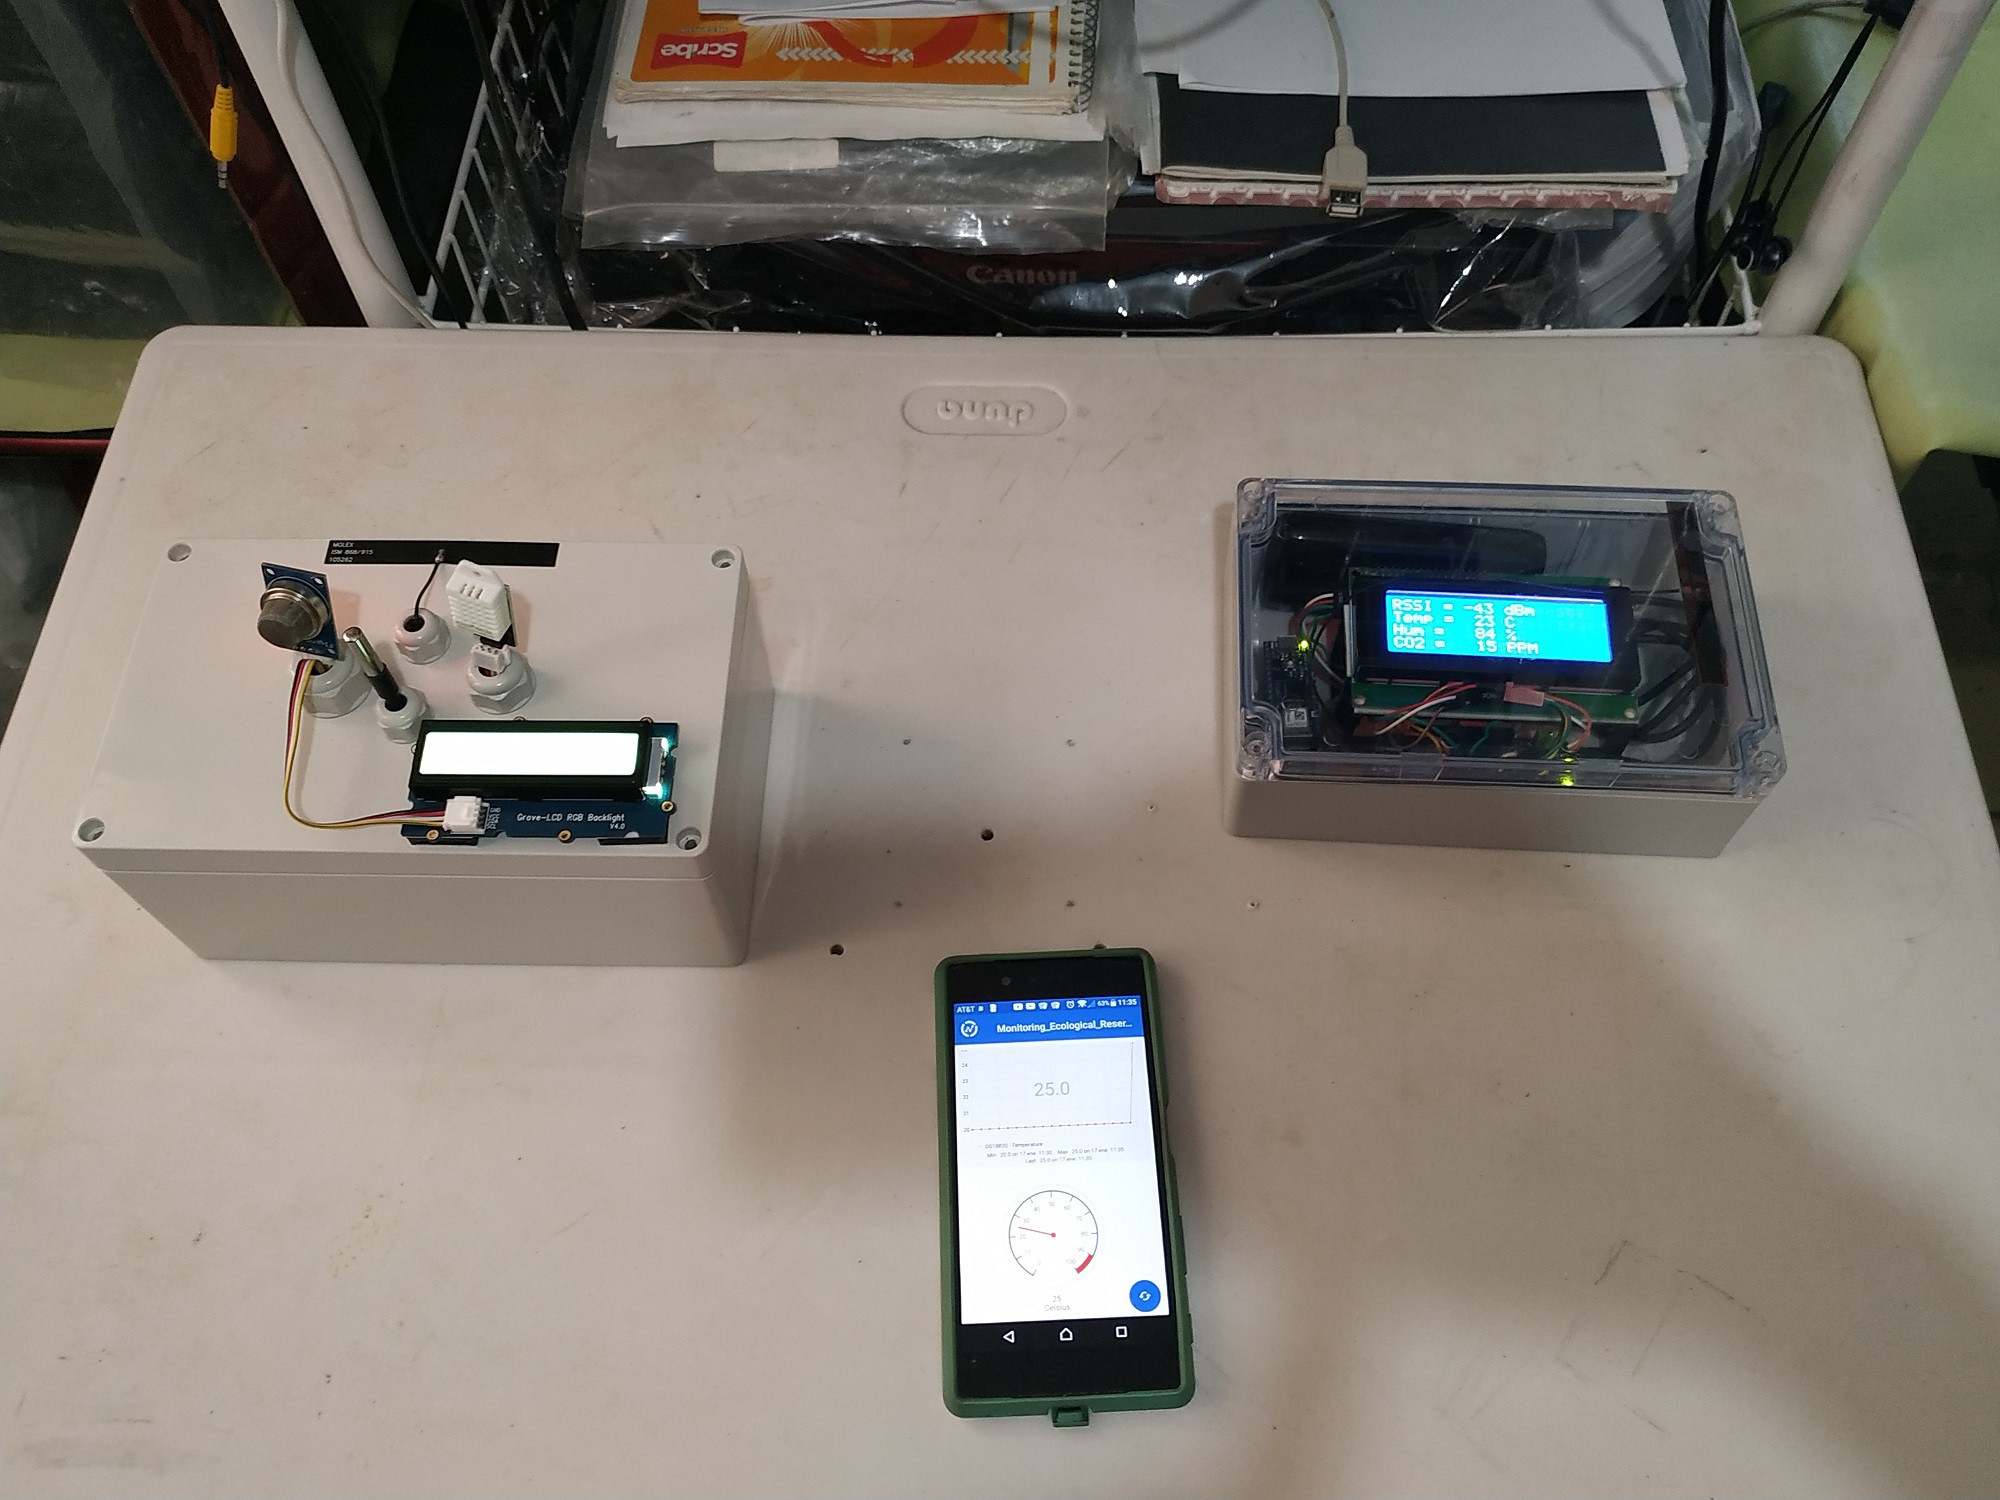
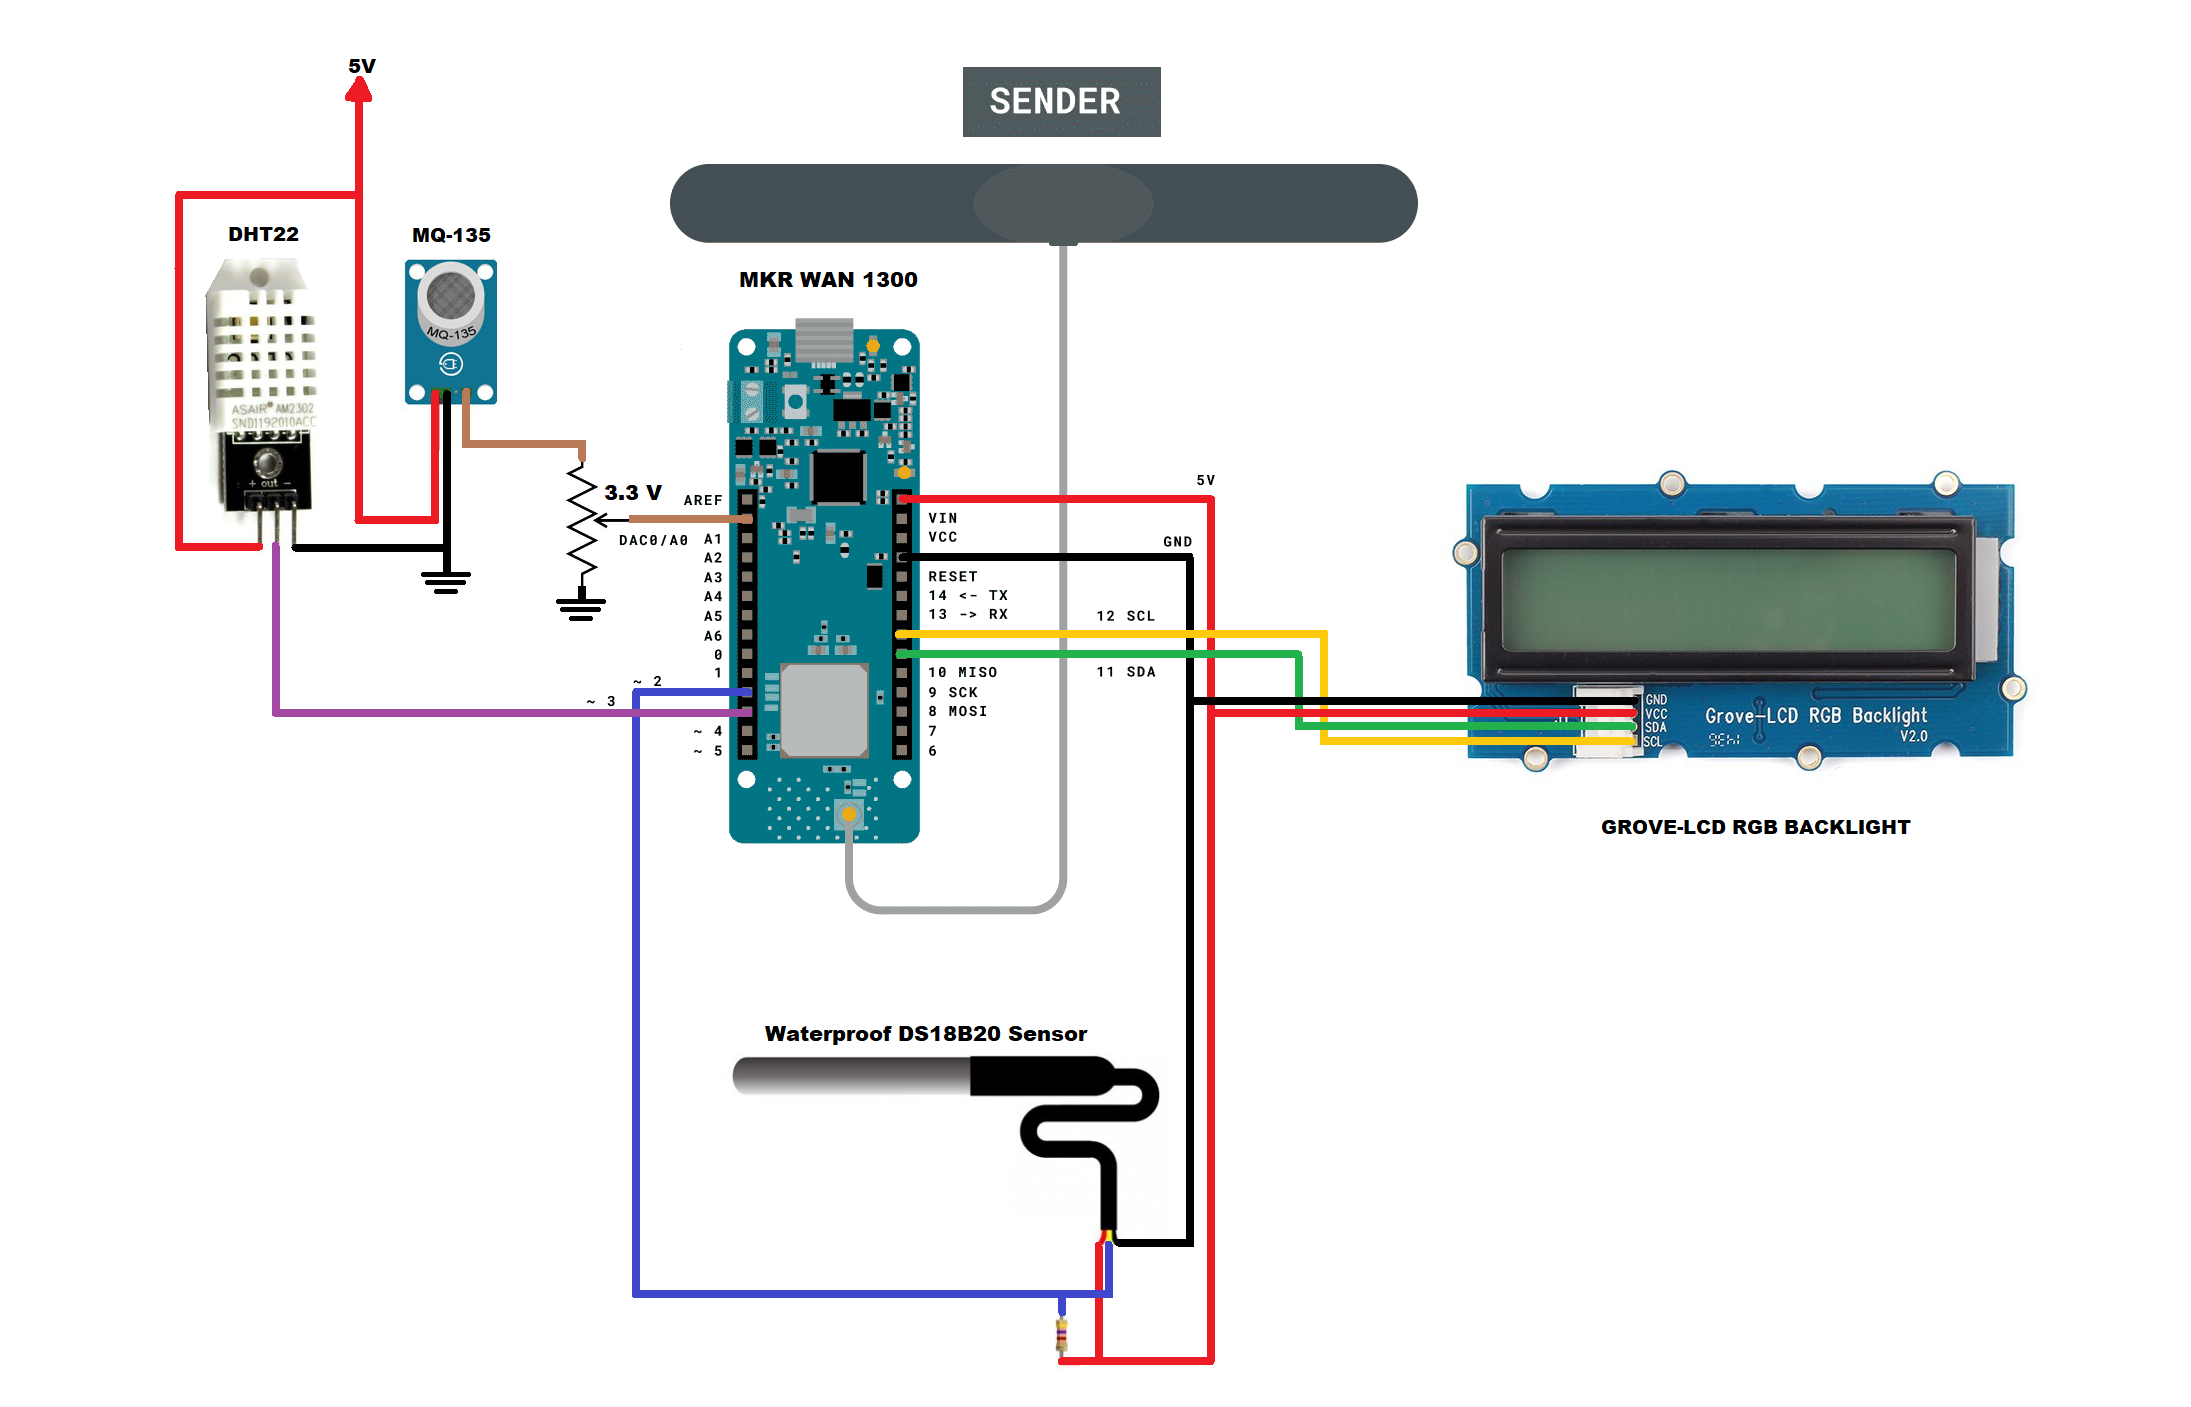
LORAWAN TRANSMITTER
Below I show you the schematic diagram of the transmitter with multiple sensors.
Below I show you the code used to upload it to the Arduino MKR WAN 1300 transmitter board.
LoRaSender_v5.ino
// AUTHOR: GUILLERMO PEREZ GUILLEN

#include <SPI.h> // LoRa->
#include <LoRa.h>
#include <OneWire.h> // DS18B20->
#include <DallasTemperature.h>
#include <Wire.h> // LCD->
#include "rgb_lcd.h"
rgb_lcd lcd;
const int colorR = 173;
const int colorG = 255;
const int colorB = 47;

#include "DHT.h" // DHT22 ->
#define DHTPIN 3    // Pin where the sensor is connected
#define DHTTYPE DHT22   // DHT22 sensor
DHT dht(DHTPIN, DHTTYPE);

// DS18B20-> Data wire is plugged into port 2 on the Arduino
#define ONE_WIRE_BUS 2
OneWire oneWire(ONE_WIRE_BUS);
DallasTemperature sensors(&oneWire);

#define anInput     A0 // MQ135-> analog feed from MQ135
int counter = 0;

void setup() {
  // set up the LCD's number of columns and rows:
  lcd.begin(16, 2);
  lcd.setRGB(colorR, colorG, colorB);
  lcd.print("ECOLOGY!");
  pinMode(anInput,INPUT); // MQ135
  lcd.setCursor(0, 1); // LCD
  lcd.print("LoRa Sender");
  if (!LoRa.begin(915E6)) {
  lcd.setCursor(0, 1); // LCD
  lcd.print("Starting LoRa failed!");
    while (1);
  }
  sensors.begin();   //temperature sensor starts
  dht.begin();
}

void loop() {
  int co2now[10]; //int array for co2 readings
  int co2raw = 0; //int for raw value of co2
  int co2ppm = 0; //int for calculated ppm
  int zzz = 0; //int for averaging
  for (int x = 0;x<10;x++) // MQ135-> samplpe co2 10x over 2 seconds
  {
    co2now[x]=analogRead(A0);
    delay(200);
  }
  for (int x = 0;x<10;x++) // add samples together
  {
    zzz=zzz + co2now[x];
  }
  co2raw = zzz/10; // divide samples by 10
  co2ppm = co2raw;
  int h = dht.readHumidity(); //We read the Humidity
  sensors.requestTemperatures();   //The command to read the temperature is sent
  int temp = sensors.getTempCByIndex(0); //The temperature is obtained in ยบC
  // send packet
  LoRa.beginPacket();
  LoRa.print(temp);
  LoRa.print(",");
  LoRa.print(h);
  LoRa.print(",");
  LoRa.print(co2ppm);
  LoRa.endPacket();
  lcd.clear();
  lcd.setCursor(0, 0); // LCD
  lcd.print("P=");
  lcd.setCursor(3, 0); // LCD
  lcd.print(counter);
  lcd.setCursor(8, 0); // LCD
  lcd.print("T=");
  lcd.setCursor(11, 0); // LCD
  lcd.print(temp);
  lcd.setCursor(14, 0); // LCD
  lcd.print("C");
  lcd.setCursor(0, 1); // LCD
  lcd.print("H=");
  lcd.setCursor(3, 1); // LCD
  lcd.print(h);
  lcd.setCursor(6, 1); // LCD
  lcd.print("%");
  lcd.setCursor(8, 1); // LCD
  lcd.print("CO2=");
  lcd.setCursor(13, 1); // LCD
  lcd.print(co2ppm);
  counter++;
  delay(13000);
}
LORAWAN RECEIVER
Below I show you the schematic diagram of the receiver. device

Below I show you the code used to upload it to the Arduino MKR WAN 1300 receiver board.
LoRaReceiver_v5.ino
// AUTHOR: GUILLERMO PEREZ GUILLEN

#include <SPI.h>
#include <LoRa.h>
#include <Arduino.h>   // SERCOM1
#include "wiring_private.h" // SERCOM1

// SERCOM1: Rx->D9 & Tx->D8
Uart Serial3 (&sercom1, 9, 8, SERCOM_RX_PAD_1, UART_TX_PAD_0);
void SERCOM1_Handler()
{
  Serial3.IrqHandler();
}

#include <Wire.h> // Library for I2C communication
#include <LiquidCrystal_I2C.h> // Library for LCD
LiquidCrystal_I2C lcd = LiquidCrystal_I2C(0x27, 20, 4); // Change to (0x27,16,2) for 16x2 LCD.

char cadena[30]; //We create an array that will store the characters that we will write in the PC console. We assign a limit of characters, in this case 30
byte posicion=0;  //Variable to change the position of the characters in the array
int valor;  //Integer Variable

void setup() {
  lcd.init();  // Initiate the LCD:
  lcd.backlight();
  pinMode(LED_BUILTIN, OUTPUT);
  Serial.begin(9600);
  Serial3.begin(9600); // SERCOM1
  // Assign pins 8 & 9 SERCOM1 functionality
  pinPeripheral(8, PIO_SERCOM);
  pinPeripheral(9, PIO_SERCOM);
  Serial.println("LoRa Receiver")
  if (!LoRa.begin(915E6)) {
    Serial.println("Starting LoRa failed!");
    while (1);
  }
}

void loop() {
  int packetSize = LoRa.parsePacket();
  if (packetSize) {
    memset(cadena, 0,sizeof(cadena));//memset deletes the contents of the array "cadena" from position 0 to the end sizeof
    // received a packet
    Serial.print("Received packet... ");
    // read packet
    while (LoRa.available()) {
      char dedos= (char)LoRa.read();
      Serial.print(dedos);
      Serial3.print(dedos);
      cadena[posicion]=dedos;//Read a character from the string "cadena" from "posicion", then read the next character with "posicion++"
      posicion++;
    }
    posicion=0;
    int signal_rx = LoRa.packetRssi();
    // print RSSI of packet
    Serial.print(" with RSSI ");
    Serial.println(signal_rx);
    int parte1 = getValue(cadena,',',0).toInt();
    int parte2 = getValue(cadena,',',1).toInt();
    int parte3 = getValue(cadena,',',2).toInt();
    Serial.println(parte1);
    delay(100);
    Serial.println(parte2);
    delay(100);
    Serial.println(parte3);
    delay(100);
    lcd.clear();
    lcd.setCursor(0, 0);
    lcd.print("RSSI =");
    lcd.setCursor(7, 0);
    lcd.print(signal_rx);
    lcd.setCursor(11, 0);
    lcd.print("dBm");
    lcd.setCursor(0, 1);
    lcd.print("Temp =");
    lcd.setCursor(8, 1);
    lcd.print(parte1);
    lcd.setCursor(11, 1);
    lcd.print("C");
    lcd.setCursor(0, 2);
    lcd.print("Hum =");
    lcd.setCursor(8, 2);
    lcd.print(parte2);
    lcd.setCursor(11, 2);
    lcd.print("%");
    lcd.setCursor(0, 3);
    lcd.print("CO2 =");
    lcd.setCursor(8, 3);
    lcd.print(parte3);
    lcd.setCursor(11, 3);
    lcd.print("PPM");
    digitalWrite(LED_BUILTIN, HIGH);
    delay(2000);
    digitalWrite(LED_BUILTIN, LOW);
    delay(12000);
  }
}

String getValue(String data, char separator, int index)
{
  int found = 0;
  int strIndex[] = {0, -1};
  int maxIndex = data.length()-1;
  for(int i=0; i<=maxIndex && found<=index; i++){
    if(data.charAt(i)==separator || i==maxIndex){
        found++;
        strIndex[0] = strIndex[1]+1;
        strIndex[1] = (i == maxIndex) ? i+1 : i;
    }
  }
  return found>index ? data.substring(strIndex[0], strIndex[1]) : "";
}
IOT CONNECTION TO THE THINGSPEAK PLATFORM
Finally, below I show you the code to program the Arduino NANO 33 IoT board. this code processes the three sensors information and sends it to the ThingSpeak IoT platform.
Nano33Iot_Multiple_Sensors.ino
// AUTHOR: GUILLERMO PEREZ GUILLEN

#include <WiFiNINA.h> // THINGSPEAK->
#include "secrets.h"
#include "ThingSpeak.h"

char ssid[] = SECRET_SSID;    //  your network SSID (name)
char pass[] = SECRET_PASS;   // your network password
int keyIndex = 0;            // your network key Index number (needed only for WEP)
WiFiClient  client;
unsigned long myChannelNumber = SECRET_CH_ID;
const char * myWriteAPIKey = SECRET_WRITE_APIKEY;

char cadena[30]; //We create an array that will store the characters that we will write in the PC console. We assign a limit of characters, in this case 30
byte posicion=0;  //Variable to change the position of the characters in the array
int valor;  //Integer Variable

void setup()
{
  Serial.begin(9600);
  Serial1.begin(9600);
  // THINGSPEAK-> check for the WiFi module:
  if (WiFi.status() == WL_NO_MODULE) {
    Serial.println("Communication with WiFi module failed!");
    // don't continue
    while (true);
  }
  String fv = WiFi.firmwareVersion();
  if (fv != "1.0.0") {
    Serial.println("Please upgrade the firmware");
  }
  ThingSpeak.begin(client);  //Initialize ThingSpeak
}

void loop()
{
  // THINGSPEAK-> Connect or reconnect to WiFi
  if(WiFi.status() != WL_CONNECTED){
    Serial.print("Attempting to connect to SSID: ");
    Serial.println(SECRET_SSID);
    while(WiFi.status() != WL_CONNECTED){
      WiFi.begin(ssid, pass); // Connect to WPA/WPA2 network. Change this line if using open or WEP network
      Serial.print(".");
      delay(5000);
    }
    Serial.println("\nConnected.");
  }
  if(Serial1.available()) //Is there data inside the buffer?
  {
    memset(cadena, 0,sizeof(cadena));//memset deletes the contents of the array "cadena" from position 0 to the end sizeof

    while(Serial1.available()>0) //As long as there is data in the buffer execute the function
    {
      delay(5);
      cadena[posicion]=Serial1.read();//Read a character from the string "cadena" from "posicion", then read the next character with "posicion++"
      posicion++;
    }
    posicion=0;
    // Write to ThingSpeak. There are up to 8 fields in a channel, allowing you to store up to 8 different
    // pieces of information in a channel.  Here, we write to field 1.
    int parte1 = getValue(cadena,',',0).toInt();
    int parte2 = getValue(cadena,',',1).toInt();
    int parte3 = getValue(cadena,',',2).toInt();
    Serial.println(parte1);
    delay(100);
    Serial.println(parte2);
    delay(100);
    Serial.println(parte3);
    delay(100);
    // set the fields with the values
    ThingSpeak.setField(1, parte1);
    ThingSpeak.setField(2, parte2);
    ThingSpeak.setField(3, parte3);
  // write to the ThingSpeak channel
  int x = ThingSpeak.writeFields(myChannelNumber, myWriteAPIKey);
  if(x == 200){
    Serial.println("Channel update successful.");
  }
  else{
    Serial.println("Problem updating channel. HTTP error code " + String(x));
  }
    delay(15000);
  }
}

String getValue(String data, char separator, int index)
{
  int found = 0;
  int strIndex[] = {0, -1};
  int maxIndex = data.length()-1;
  for(int i=0; i<=maxIndex && found<=index; i++){
    if(data.charAt(i)==separator || i==maxIndex){
        found++;
        strIndex[0] = strIndex[1]+1;
        strIndex[1] = (i == maxIndex) ? i+1 : i;
    }
  }
  return found>index ? data.substring(strIndex[0], strIndex[1]) : "";
}
Don't forget to type the corresponding credentials to connect to the IoT provider. In the download section you can get the "secrets.h" file.
// and connection details

#define SECRET_SSID "*********"        // replace MySSID with your WiFi network name
#define SECRET_PASS "************"    // replace MyPassword with your WiFi password

#define SECRET_CH_ID *******            // replace ******* with your channel number
#define SECRET_WRITE_APIKEY "****************"   // replace **************** with your channel write API Key
Discussions
Become a Hackaday.io Member
Create an account to leave a comment. Already have an account? Log In.