 Timo Birnschein
-
1Flash the image to the SD card
Download the latest image and flash it to the SD card using Raspberry Pi Imager.
Either choose EU version or US version for your location. I chose US but I don't know what other than the wifi frequencies are actually different. The SDR Radios I purchased have tuned antennas. Maybe the EU ADSB runs different frequencies? I doubt it.
-
2Enable persistent logging to SD card (and with that unlocking write access to the SD card)
One thing I find really strange is the way the SD card is being setup. For a device like this, it's good to have the SD card mounted as ReadOnly. However, this should be pointed out in huge letters on on the front page because not everyone is a Linux expert and knows why something like apt install fails.
By default, the SD card only offers about 200MB of storage for installing software. That maxed out during my very first attempt to get GPS running. Searching lots of github issues and reddit, I finally had the steps together to get this to work:
Go to the main page
(sorry for the washed out screenshot [it's an issue with HDR in Windows or Chrome and taking screenshots]) and click on the build number in the center at the top a bunch of times in rapid fire until something pops up indicating "Developer Mode" was enabled.
Then, go to the Settings tab and be amazed about all the new settings that showed up.
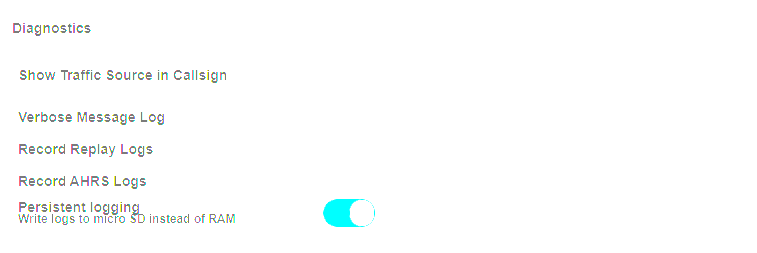
At the bottom right, there is Diagnostics. At the very bottom, check Persistent Logging:
Now reboot. The file system will now be mounted as Read/Write. This is way less safe in terms if SD card data corruption but it will allow you to install mandatory software to get the system to work. I suppose it's a good idea to turn this back off after you're done. I have yet to confirm that this will, in fact, reset the SD card to read-only.
-
3GPS via 3.3V UART on the Raspberry Pi 3 40-pin header
Follow the instructions for GPS on the Pi 3 from here for any UBLOX GPS receiver. The two I have are NEO-M6 based and both work on 3.3V. Do not connect the power pin on the GPS module to 5V as it makes its GPIOs also 5V which in turn will damage the raspberry pi.
-
4Fix Wifi and set the country code to US (if in the US)
This one was annoying but easy to fix.
At some point, my Stratux installation just disabled Wifi entirely. Out of seemingly no reason, the access point was gone. In fact, typing
ifconfig
into the terminal only showed the loopback device "lo" as well as Ethernet on "eth0".
"wlan0" was not existent.
Turns out the country code was lost somehow. Probably my fiddling with the settings to get the security features to work. The result was that RFKILL blocked wifi automatically on the Raspberry Pi 3. In order to solve this, I needed to reset the country code using either
raspi-config
under Localization Options and then WLAN Country
or use
sudo raspi-config nonint do_wifi_country USdirectly.
That's not enough, though. We can check whether wifi is blocked using:
rfkill listWe also need to unblock wifi using
rfkill unblock wifiThat should permanently unblock wifi until you flash the SD card again.
-
5I2C Sensors and debugging
I wanted to use a BMP280 I had in my parts bin for altitude measurements. I have used it in the past for a simple weather station and it works great! Turns out, it is even the go to sensor for Stratux, so I went ahead and plugged it in, activated it in the settings menu and.... nothing. Great.
Long story short: The datasheet reveals, the ChipID. I had both, the BMP280 and the BME280 in by parts bin. I accidentally plugged in the wrong breakout board and wondered why the thing doesn't work. The ChipID of the BME and the BMP are different. The BME has the ID 0x60 while the BMP has 0x58. Stratux no like 0x60 even though only the hygro-meter is missing and the rest of the chip is the same. Turns out, the reason is, the developer didn't want to fork that driver, too, so he is not gonna fix this.
To check the I2C is working you can scan the entire bus for connected ICs using.
pi@stratux:~ $ i2cdetect -y 1
     0  1  2  3  4  5  6  7  8  9  a  b  c  d  e  f
00:                         -- -- -- -- -- -- -- --
10: -- -- -- -- -- -- -- -- -- -- -- -- -- -- -- --
20: -- -- -- -- -- -- -- -- -- -- -- -- -- -- -- --
30: -- -- -- -- -- -- -- -- -- -- -- -- -- -- -- --
40: -- -- -- -- -- -- -- -- -- -- -- -- -- -- -- --
50: -- -- -- -- -- -- -- -- -- -- -- -- -- -- -- --
60: -- -- -- -- -- -- -- -- -- -- -- -- -- -- -- --
70: -- -- -- -- -- -- 76 --
Address 76 is present and indicates a BMP280 could be using that address. However, one can only be (reasonably) sure if the chipID is actually 0x58. The Chip ID is located, according to the datasheet, at 0xd0. If we dump the entire register range of address 0x76, we also get the register 0xd0:
Then you can run i2cdump to get data from a device address:
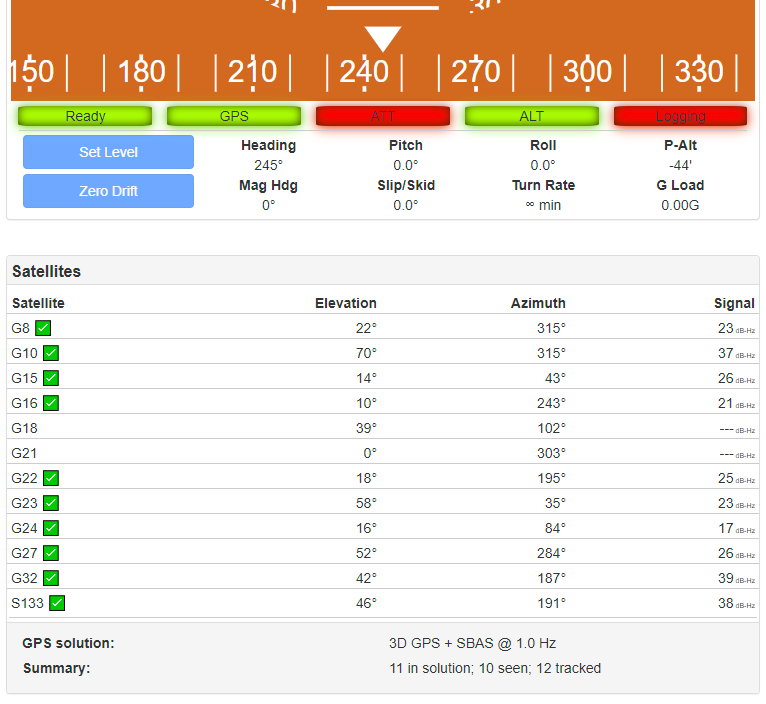
pi@stratux:~ $ i2cdump -y 1 0x76
No size specified (using byte-data access)
     0  1  2  3  4  5  6  7  8  9  a  b  c  d  e  f    0123456789abcdef
00: 00 00 00 00 00 00 00 00 00 00 00 00 00 00 00 00    ................
10: 00 00 00 00 00 00 00 00 00 00 00 00 00 00 00 00    ................
20: 00 00 00 00 00 00 00 00 00 00 00 00 00 00 00 00    ................
30: 00 00 00 00 00 00 00 00 00 00 00 00 00 00 00 00    ................
40: 00 00 00 00 00 00 00 00 00 00 00 00 00 00 00 00    ................
50: 00 00 00 00 00 00 00 00 00 00 00 00 00 00 00 00    ................
60: 00 00 00 00 00 00 00 00 00 00 00 00 00 00 00 00    ................
70: 00 00 00 00 00 00 00 00 00 00 00 00 00 00 00 00    ................
80: 59 74 90 62 1e 42 c3 00 64 6b ae 64 32 00 0b 95    Yt?b?B?.dk?d2.??
90: fb d6 d0 0b ac 18 90 ff f9 ff 8c 3c f8 c6 70 17    ???????.?.?<??p?
a0: 00 00 ce 00 00 00 00 00 00 00 00 00 33 00 00 c0    ..?.........3..?
b0: 00 55 00 00 00 00 60 02 00 01 ff ce 13 71 03 00    .U....`?.?.??q?.
c0: 08 00 b7 ff 00 00 00 00 00 00 00 00 00 00 00 00    ?.?.............
d0: 58 01 00 00 00 00 00 00 00 00 00 00 00 00 00 00    X?..............
e0: 00 00 00 00 00 00 00 00 00 00 00 00 00 00 00 00    ................
f0: 00 00 00 04 b7 30 00 4f 48 10 7d 53 60 00 00 00    ...??0.OH?}S`...
As can be seen, 0x58 is present. In my case, this revealed 0x60 and I was all confused. I'm glad I checked. Only this worked, pressure altitude was shown in the Stratux web-interface and ALT was shown as green.
At this point, it should look like this:
-
6Installing an ARHS sensor using the MPU9250 that ships with the different ChipIDs regularly
When one buys a new MPU9250 module that also comes with a BMP280 pressure sensor from Amazon nowadays the WHO_AM_I chip ID located at i2c register address 0x75 is also 0x75. In older versions this was either 0x71. This is an issue since Stratux only uses sensors it specifically knows.
So we need to build from source to be able to get that change in.
These instructions were modified from the original wiki here. The modifications were needed because I'm using a from by b3nn0 instead of the original author. Some additional mods come from here.
sudo su -
*** IF THERE IS A PROBLEM WITH THE CAFILE, RUN date -s "Tue May 7 19:40:00 UTC 2019"
AND SET WITH CURRENT UTC TIME***
raspi-config --expand-rootfs
reboot

sudo su -
cd /root/
wget https://dl.google.com/go/go1.14.2.linux-armv6l.tar.gz
tar -zxvf go1.14.2.linux-armv6l.tar.gz
set GO111MODULE=on
git clone --recursive https://github.com/b3nn0/stratux
cd stratux
export PATH=/root/go/bin:${PATH}
export GOROOT=/root/go
export GOPATH=/root/go_path
service stratux stop
make
make install
service stratux start
Unfortunately, this results in an error after some compiling:
/bin/sh: 1: go: not found
make[1]: *** [Makefile:31: gen_gdl90] Error 127
make[1]: Leaving directory '/root/stratux'
make: *** [Makefile:28: all] Error 2
So even though, we defined where go is it can't find it. I checked, it is in fact there, but even manually I cannot execute it. It just tells me "No such file or directory".
Stratux ADSB Receiver and AHRS
Project to document my personal steps to get Stratux to work with my components.

Discussions
Become a Hackaday.io Member
Create an account to leave a comment. Already have an account? Log In.