David Tucker
-
No progress
08/01/2023 at 05:41 • 0 commentsJust a small update. I have not forgotten about this project, but it is temporarily on hold. We went on vacation and when we came back it was suddenly hotter than the sun outside. With temperatures over 118 F it is just too hot to get out into the garage. However the rains are coming, and my hope is that the temperatures will drop soon. To that end I have cleaned up the garage and have it ready to go in case we have a cool day.
-
Chopped
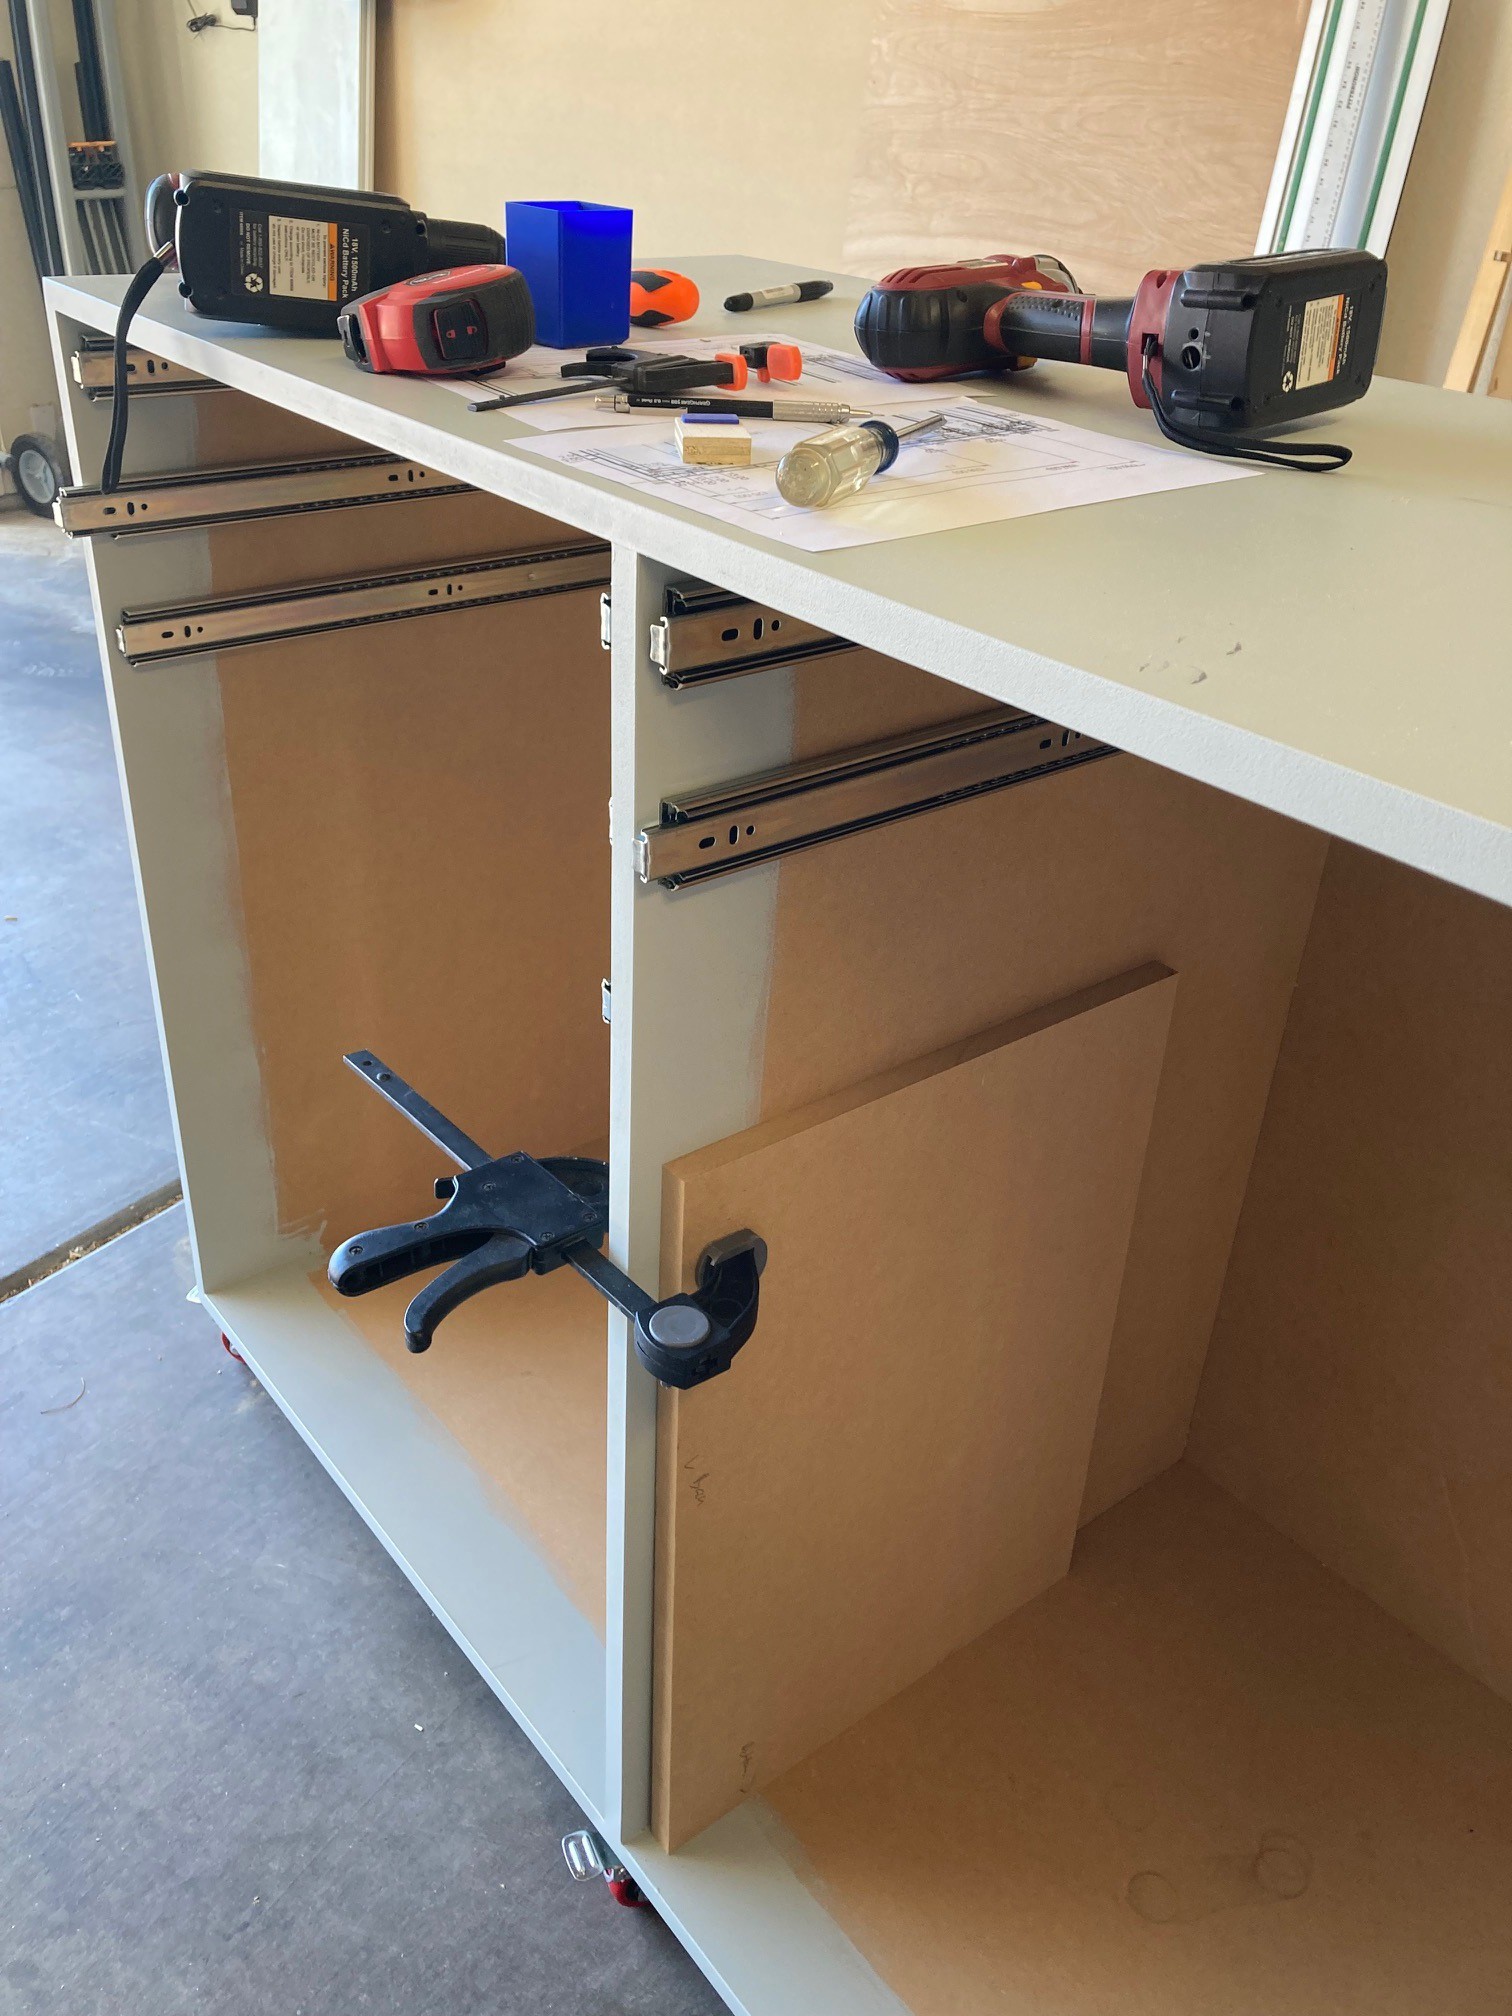
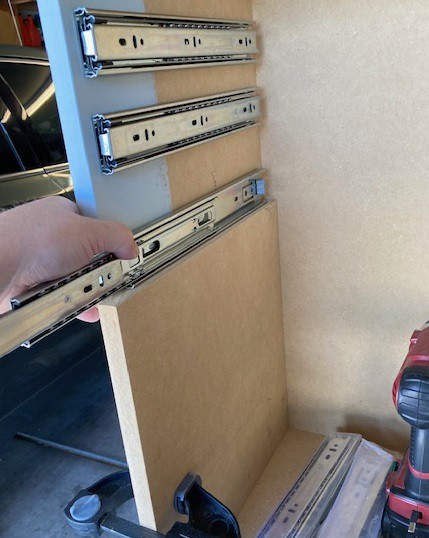
05/29/2023 at 18:42 • 0 commentsI had a busy weekend and managed to get the drawer slides installed into my tool cart. I found this trick from someone where you cut down a piece of scrap wood as a reference for installing the rails. This way each side is perfectly in alignment and level to the floor of the cart.
![]()
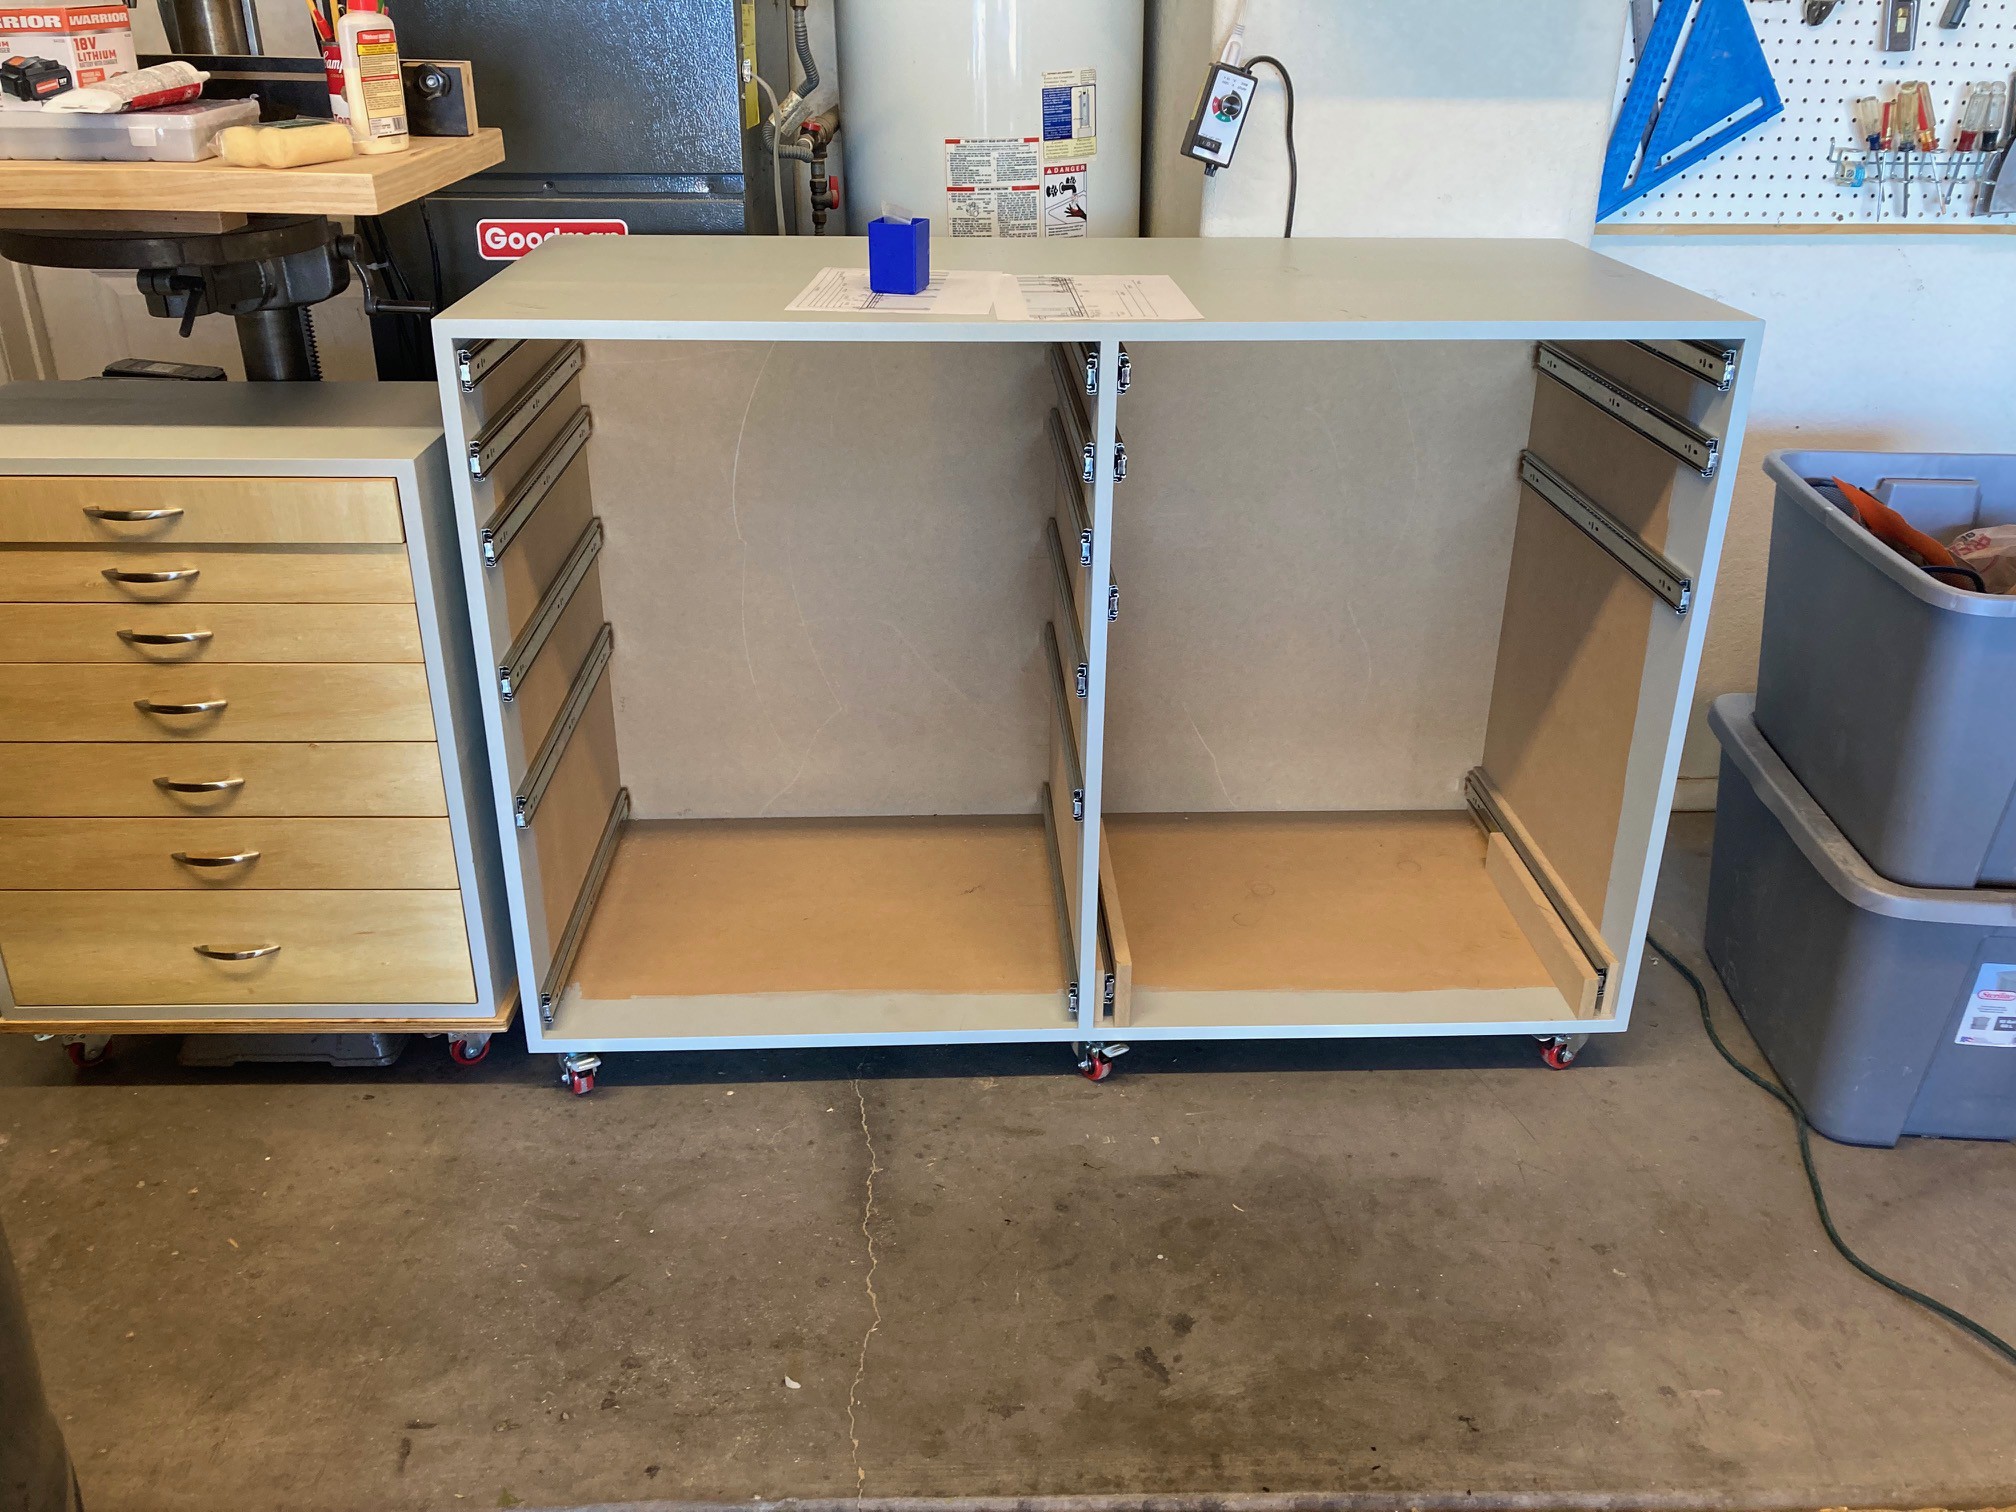
It seems to work well, I was able to get everything installed fairly quickly. Notice the extra spacers on the bottom right drawer. This is where the air compressor will go. For now I'm not going to make this a sealed box, but if I need to quiet things down further then I wanted to have room to run a seal all the way around the frame of the drawer. Along the same lines I did not put a top on the box, but I could fit it in easily enough if I needed too.
![]()
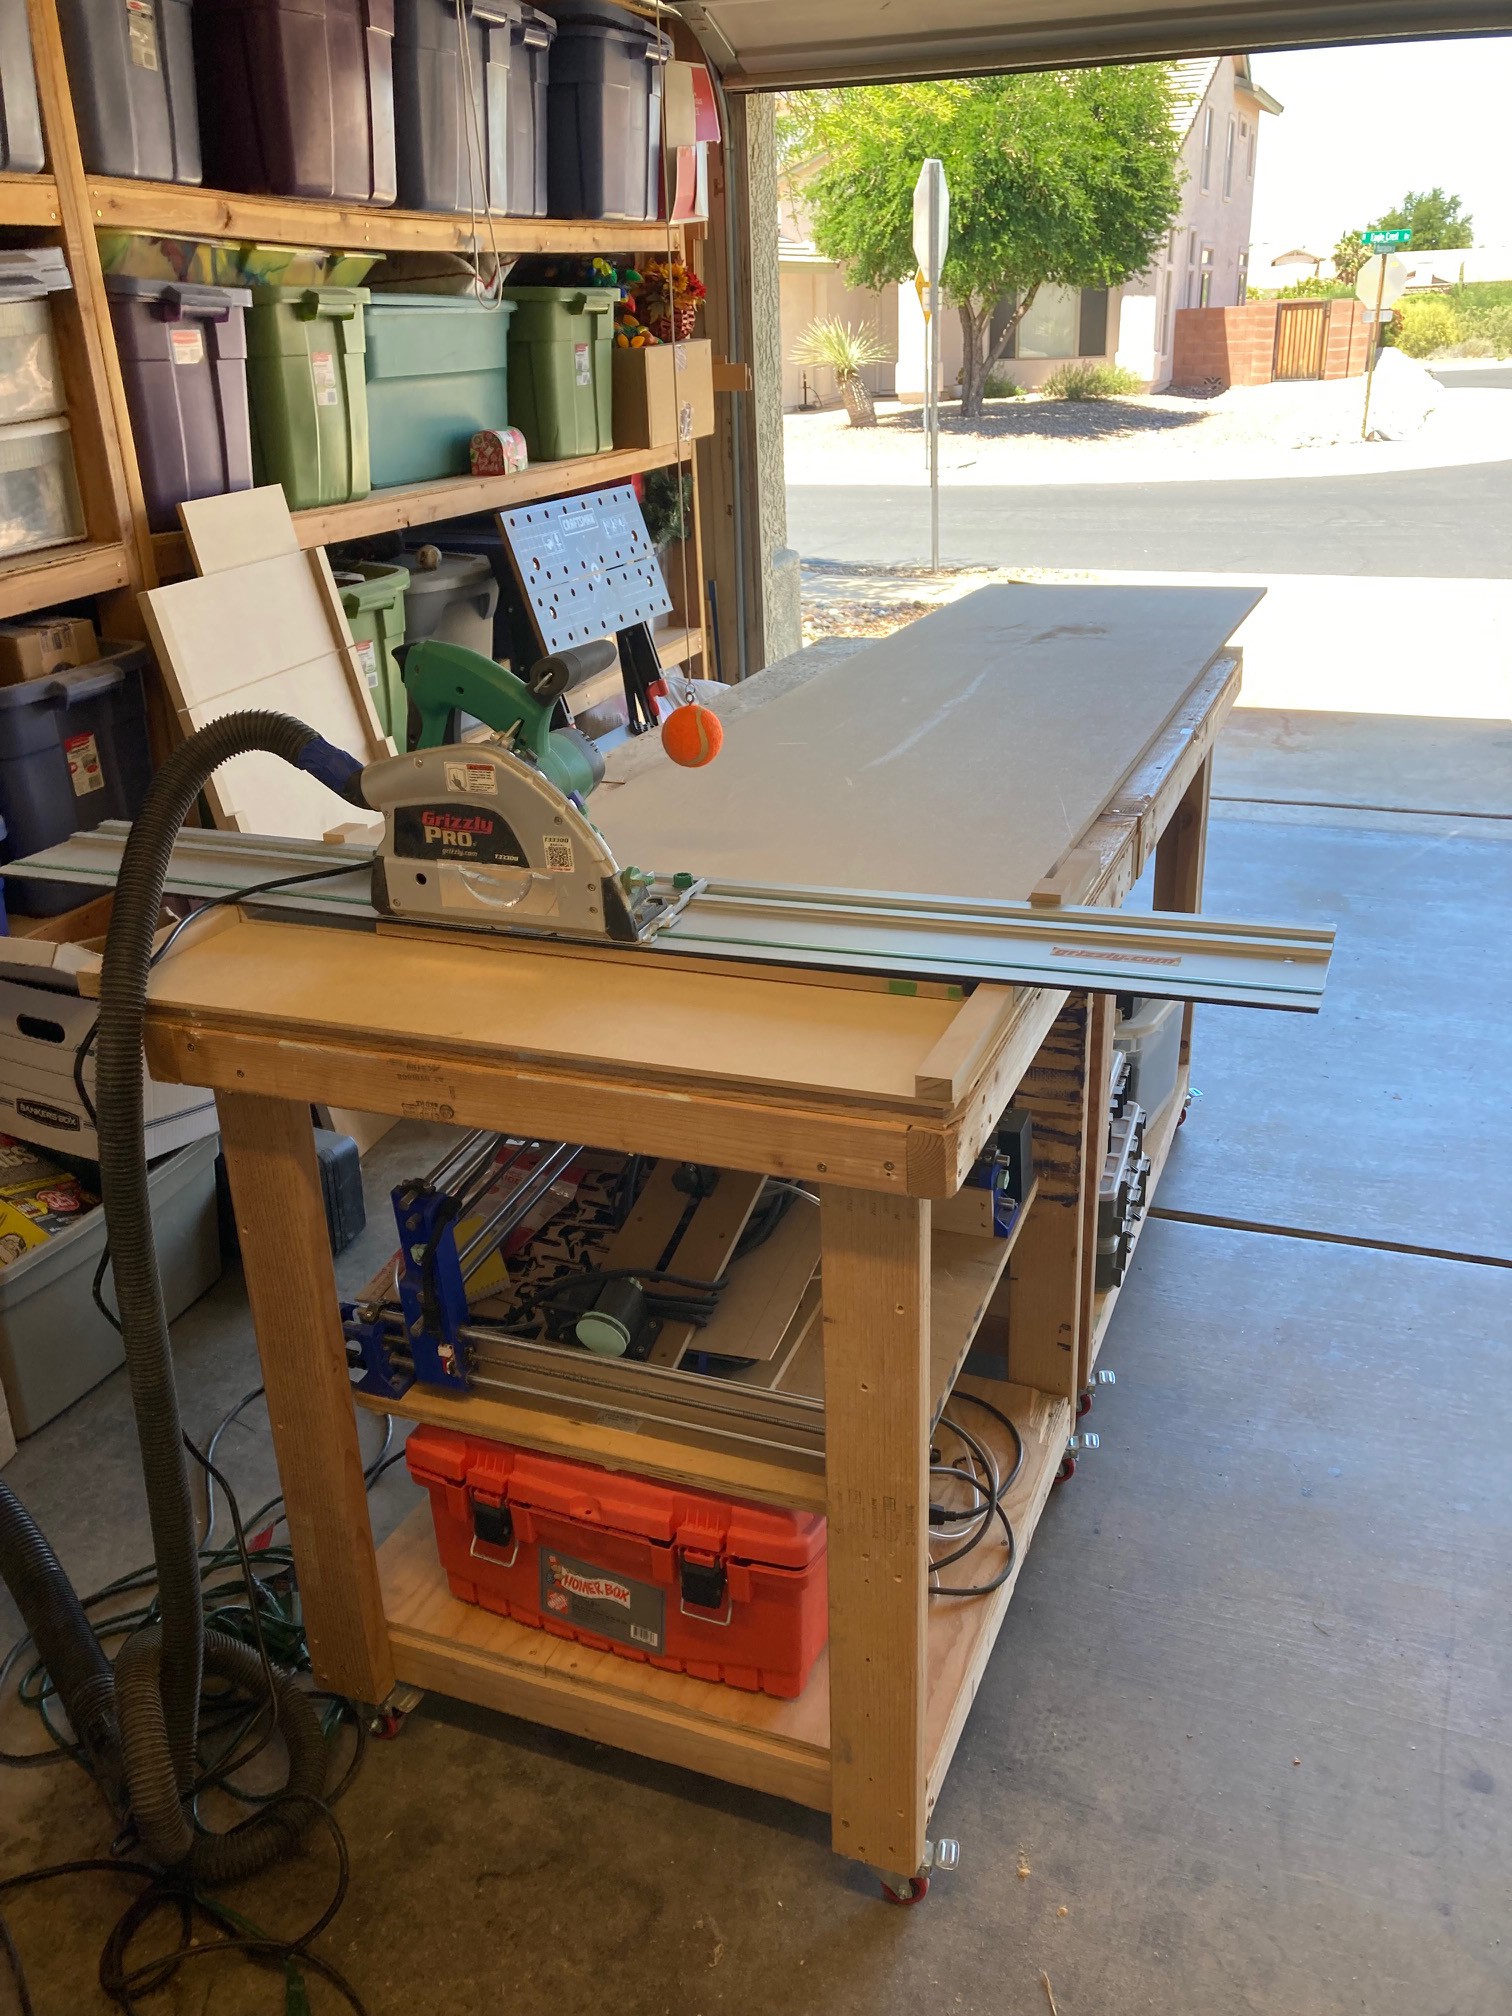
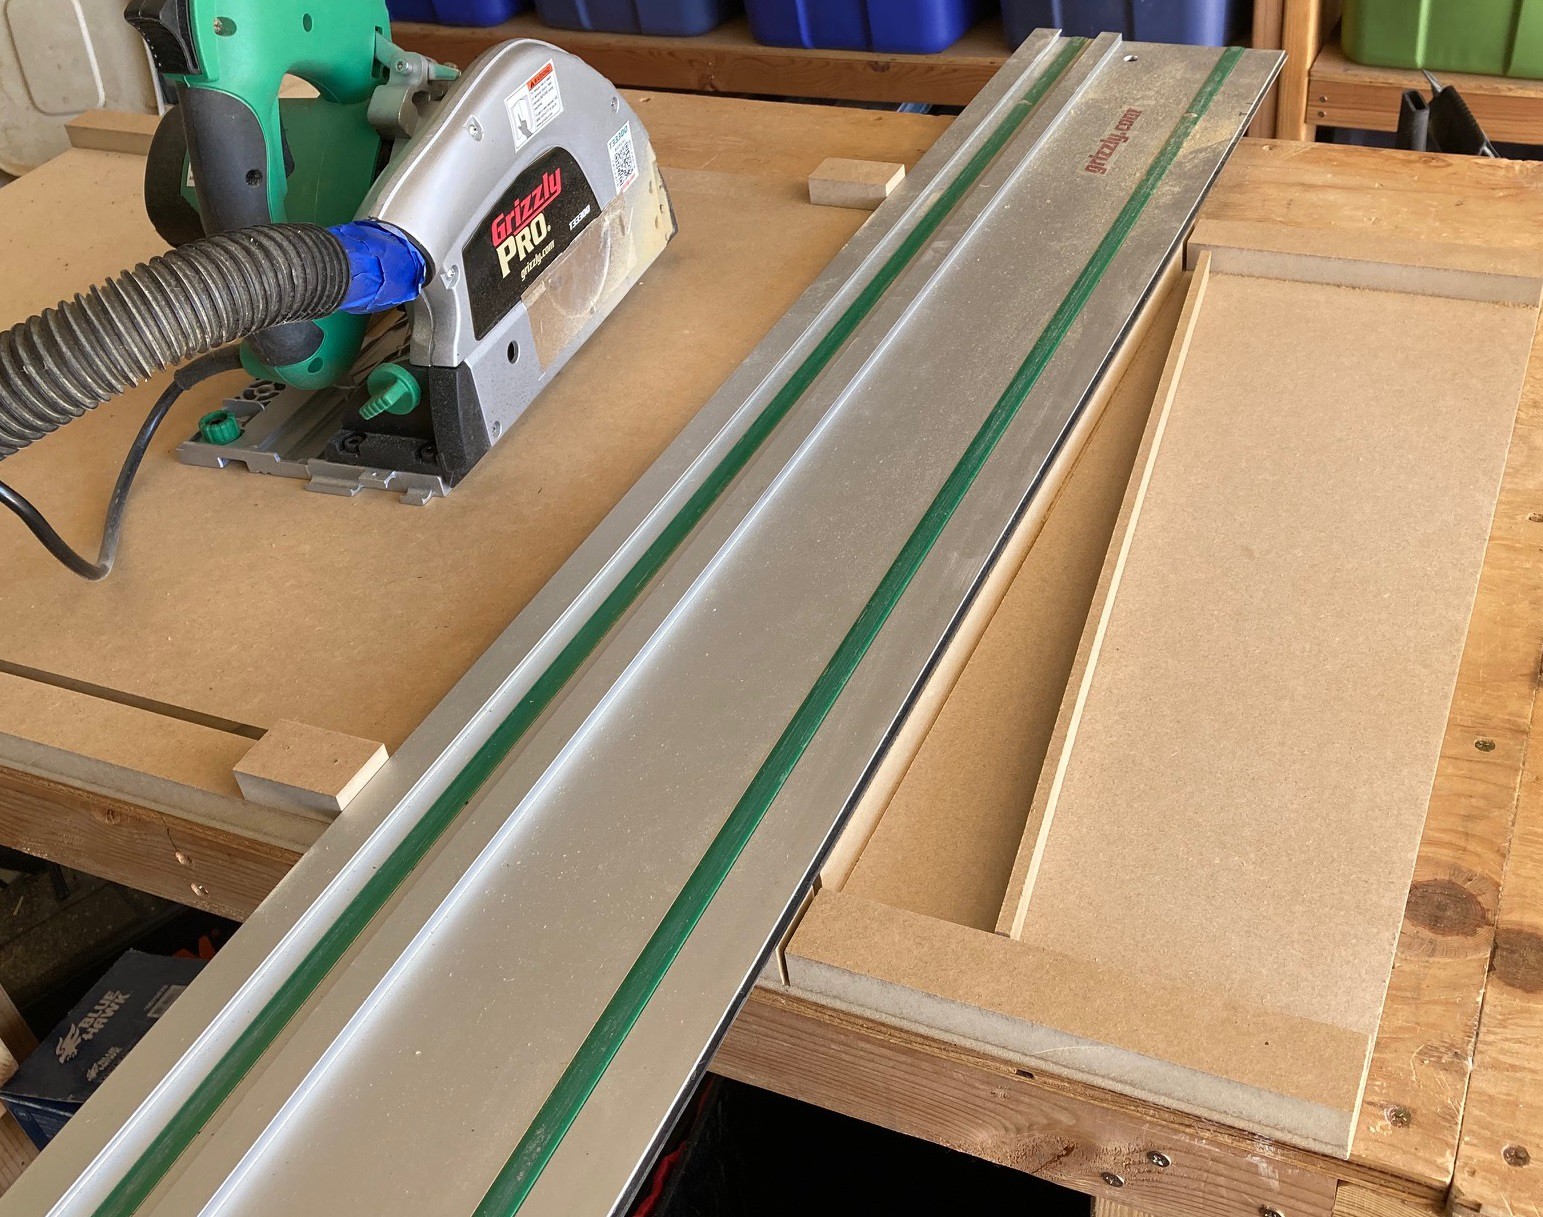
To cut the drawer sides I needed to make a new cross cut jig. The one I made before was too narrow.
![]()
Using this I was able to run a full sheet of wood through the jig. I made it through one full 4'x8' sheet so far, I still have another sheet and a smidge to cut out. But these are the drawer bottoms, they should go quicker. I probably won't have time to finish cutting the parts this week, or next, but hopefully the week after I can get things cut and start building drawers.
![]()
-
Cubed
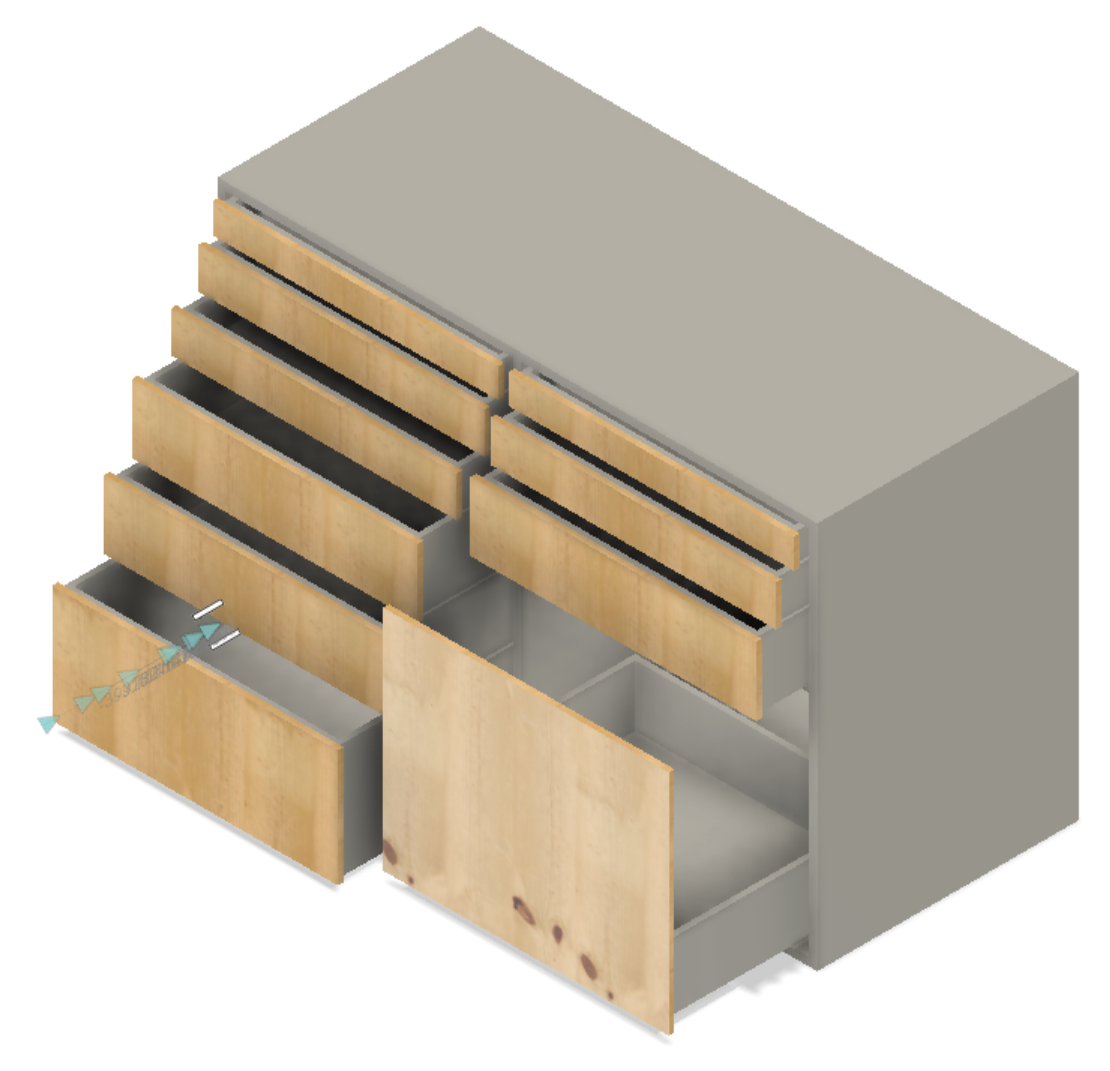
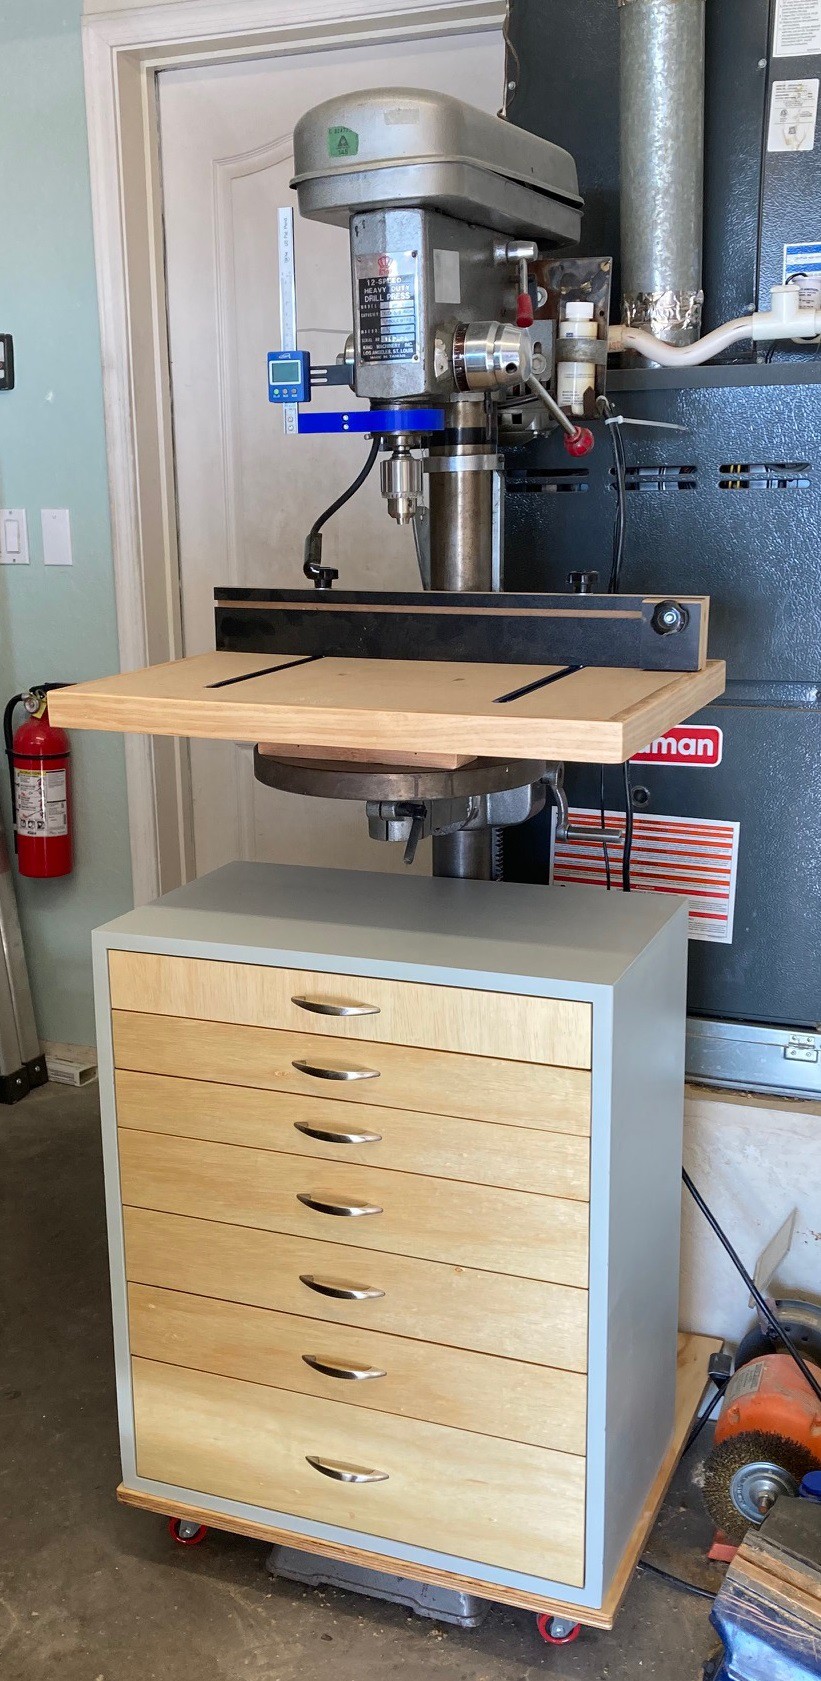
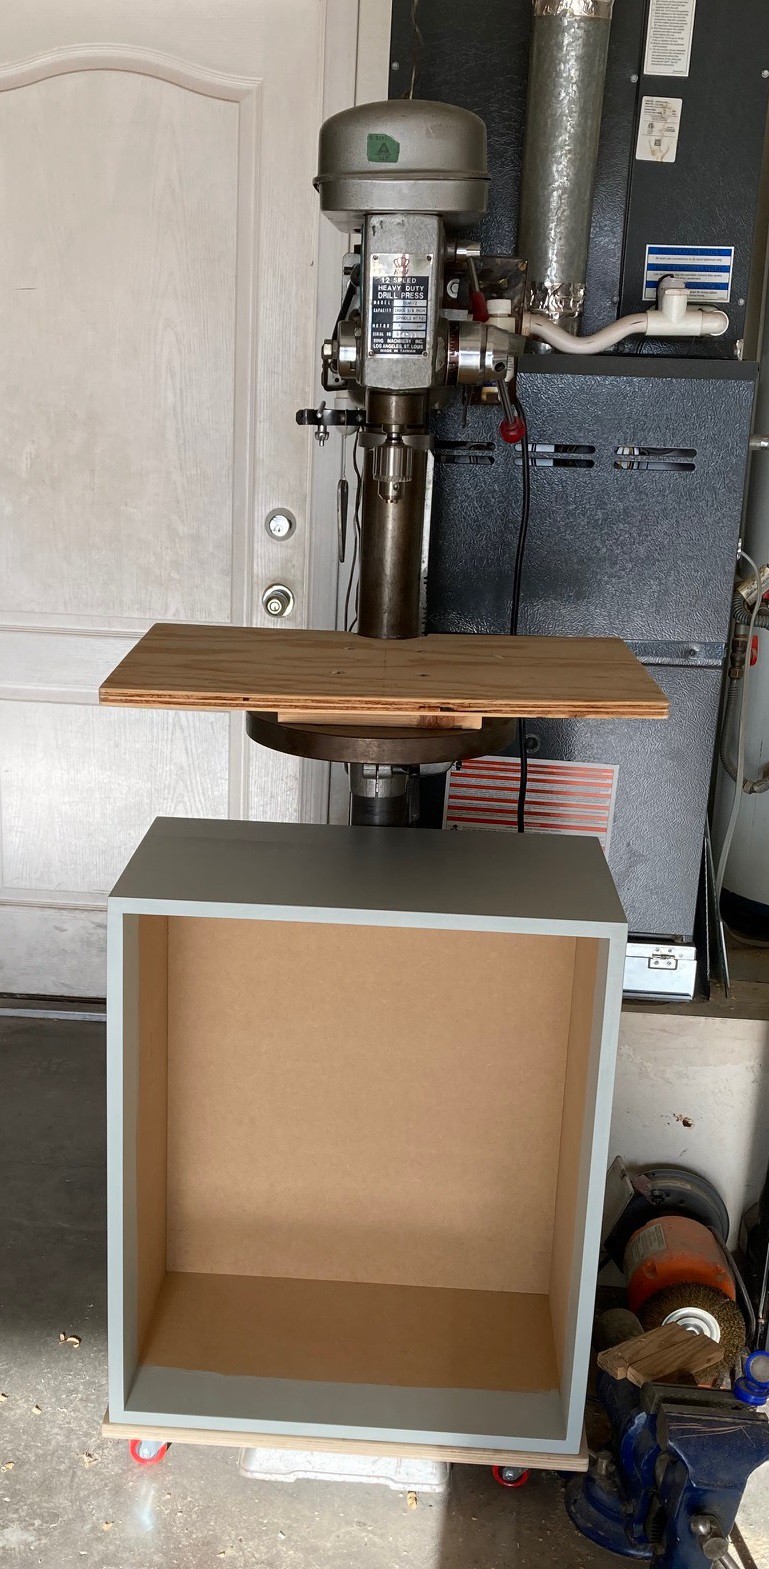
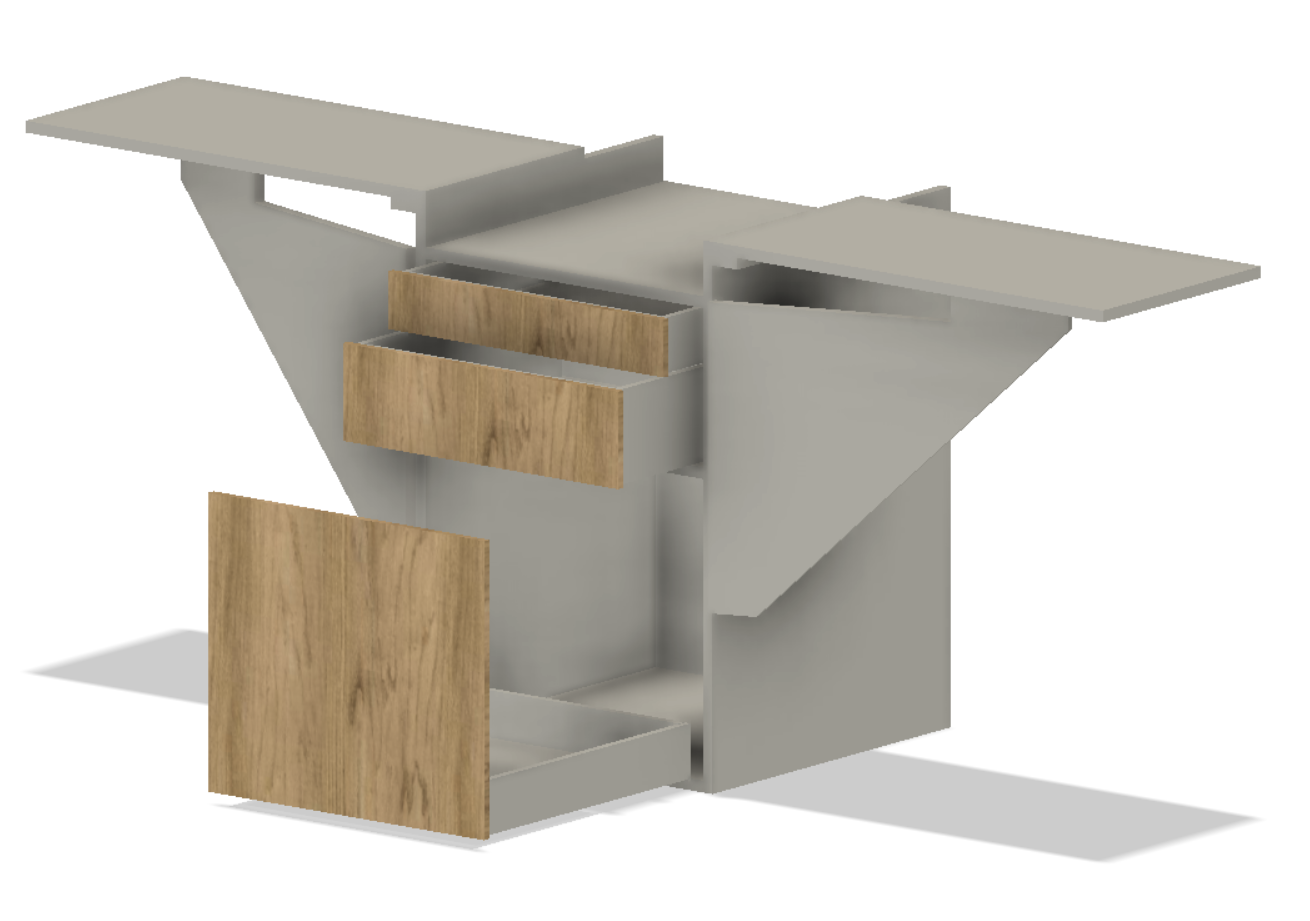
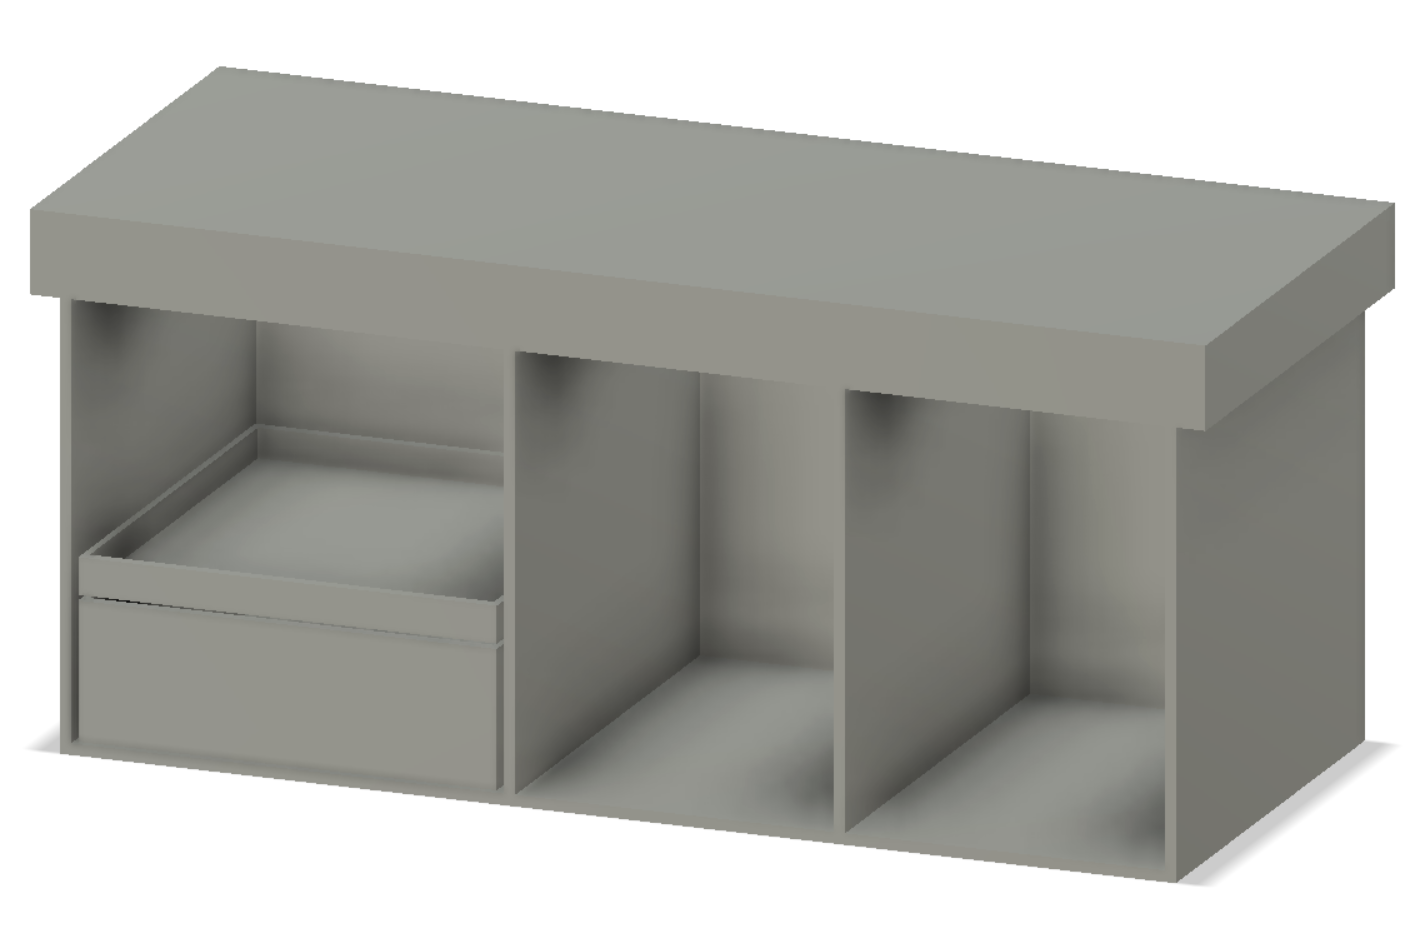
05/21/2023 at 23:32 • 0 commentsI had a productive couple of weeks. Not only did my daughter graduate from highschool, but I found a few hours in between the merriment to build my tool cart shell. Just a reminder, this is the end goal.
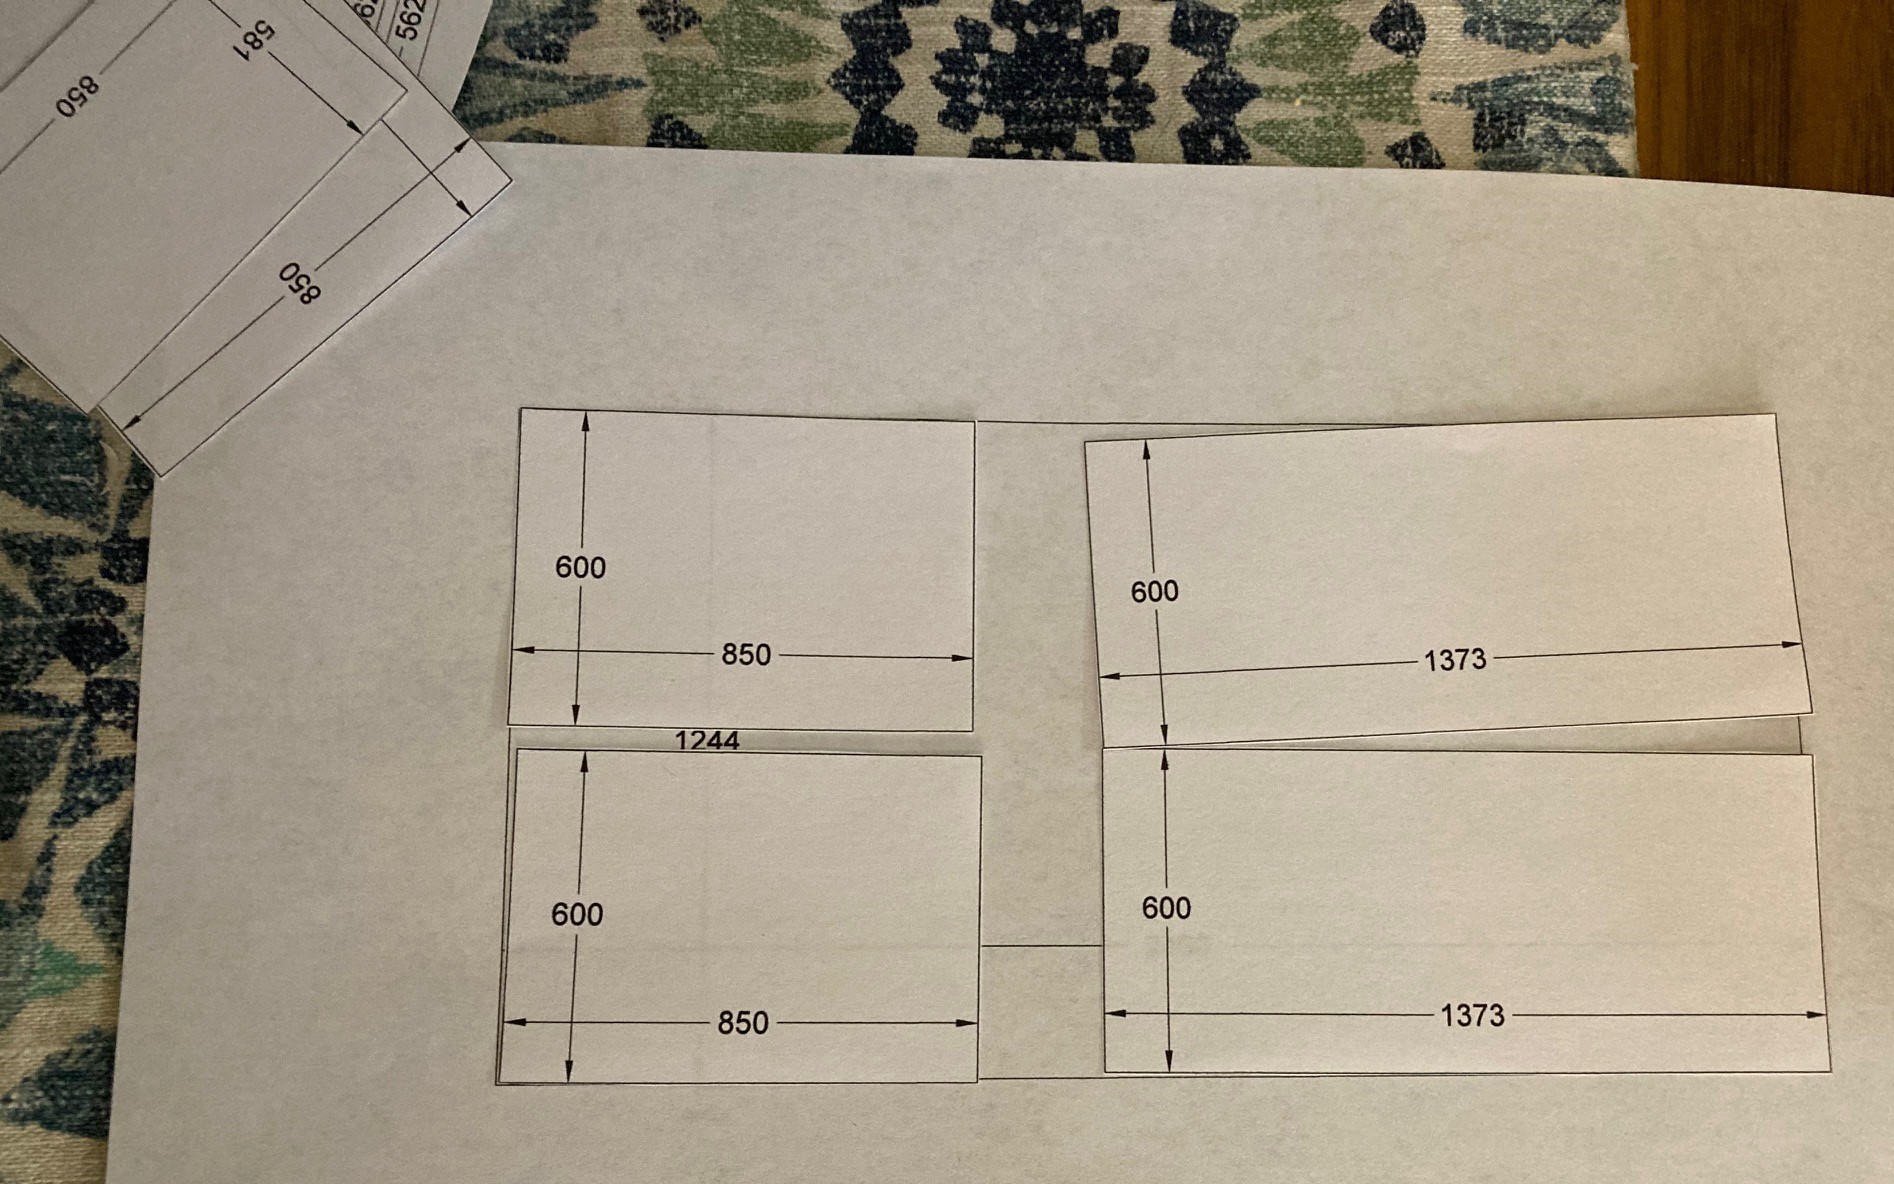
I have been strugging with a good way to make a cut list. I have a tool that works ok, but not great. I have tried manually moving parts around in Fusion, but find that extremely tedious (maybe I'm missing a trick), finally I tried going old-school and just printing out scale parts and laying them out on scale representations of my sheets. This worked so much smoother than anything else. It makes me feel like I'm missing something on the computer side, it should be much faster and simpler to lay out parts.
![]()
I tried to put a lot more care into my cuts and biscuit jointer joints and it seems to have paid off. The big fix seems to be focusing on eliminating any rocking of both the track saw and the joiner on the workpiece. I was able to get everything together with less than 1mm of error.
![]()
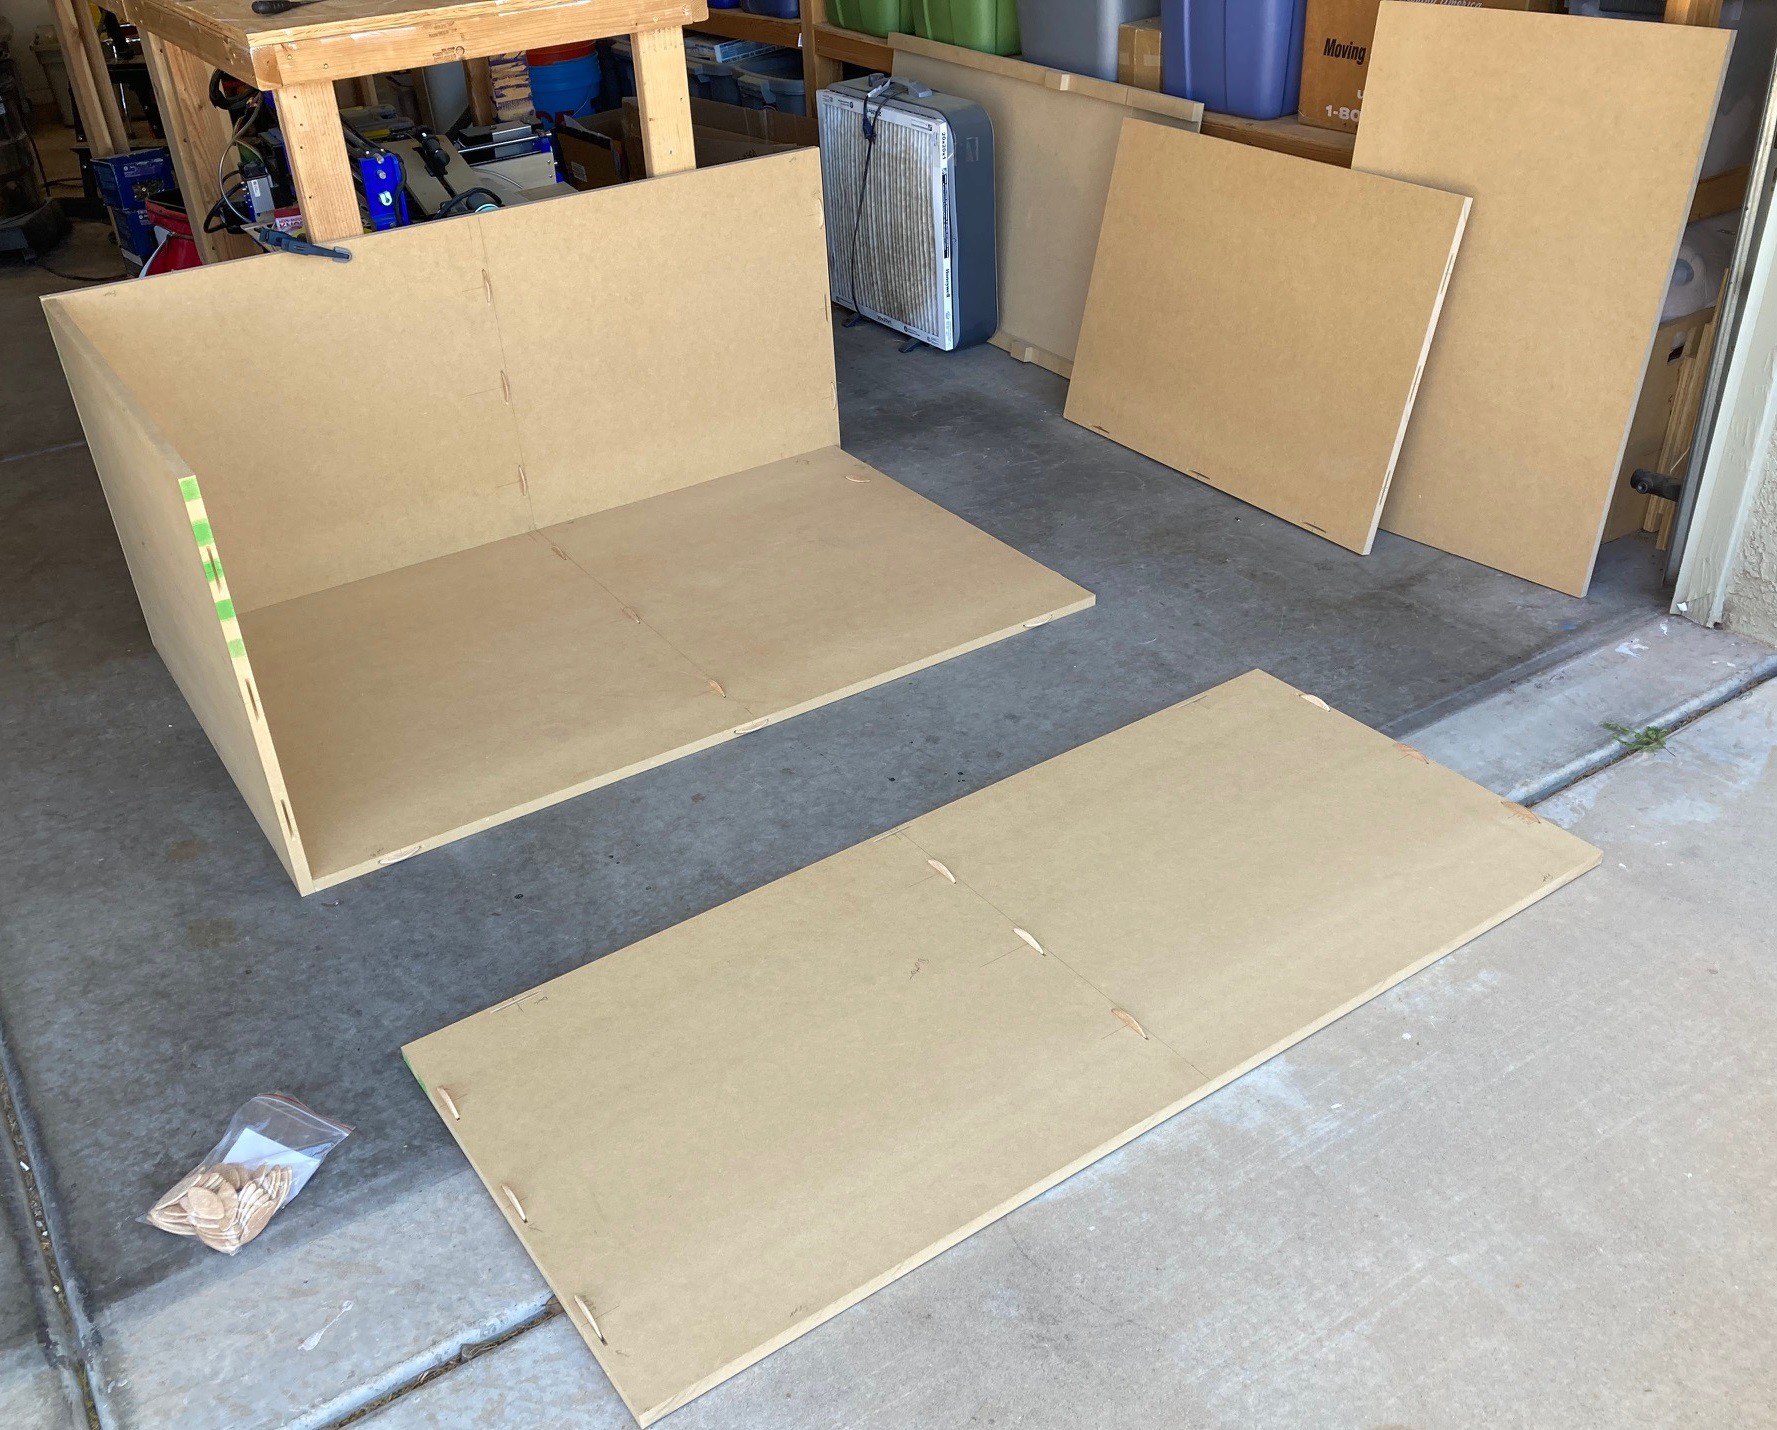
This was far too big to assemble on my workbench, so I put it together on the floor. I did a rough fit, then using a hammer and some care I made sure it was all squared up properly.
![]()
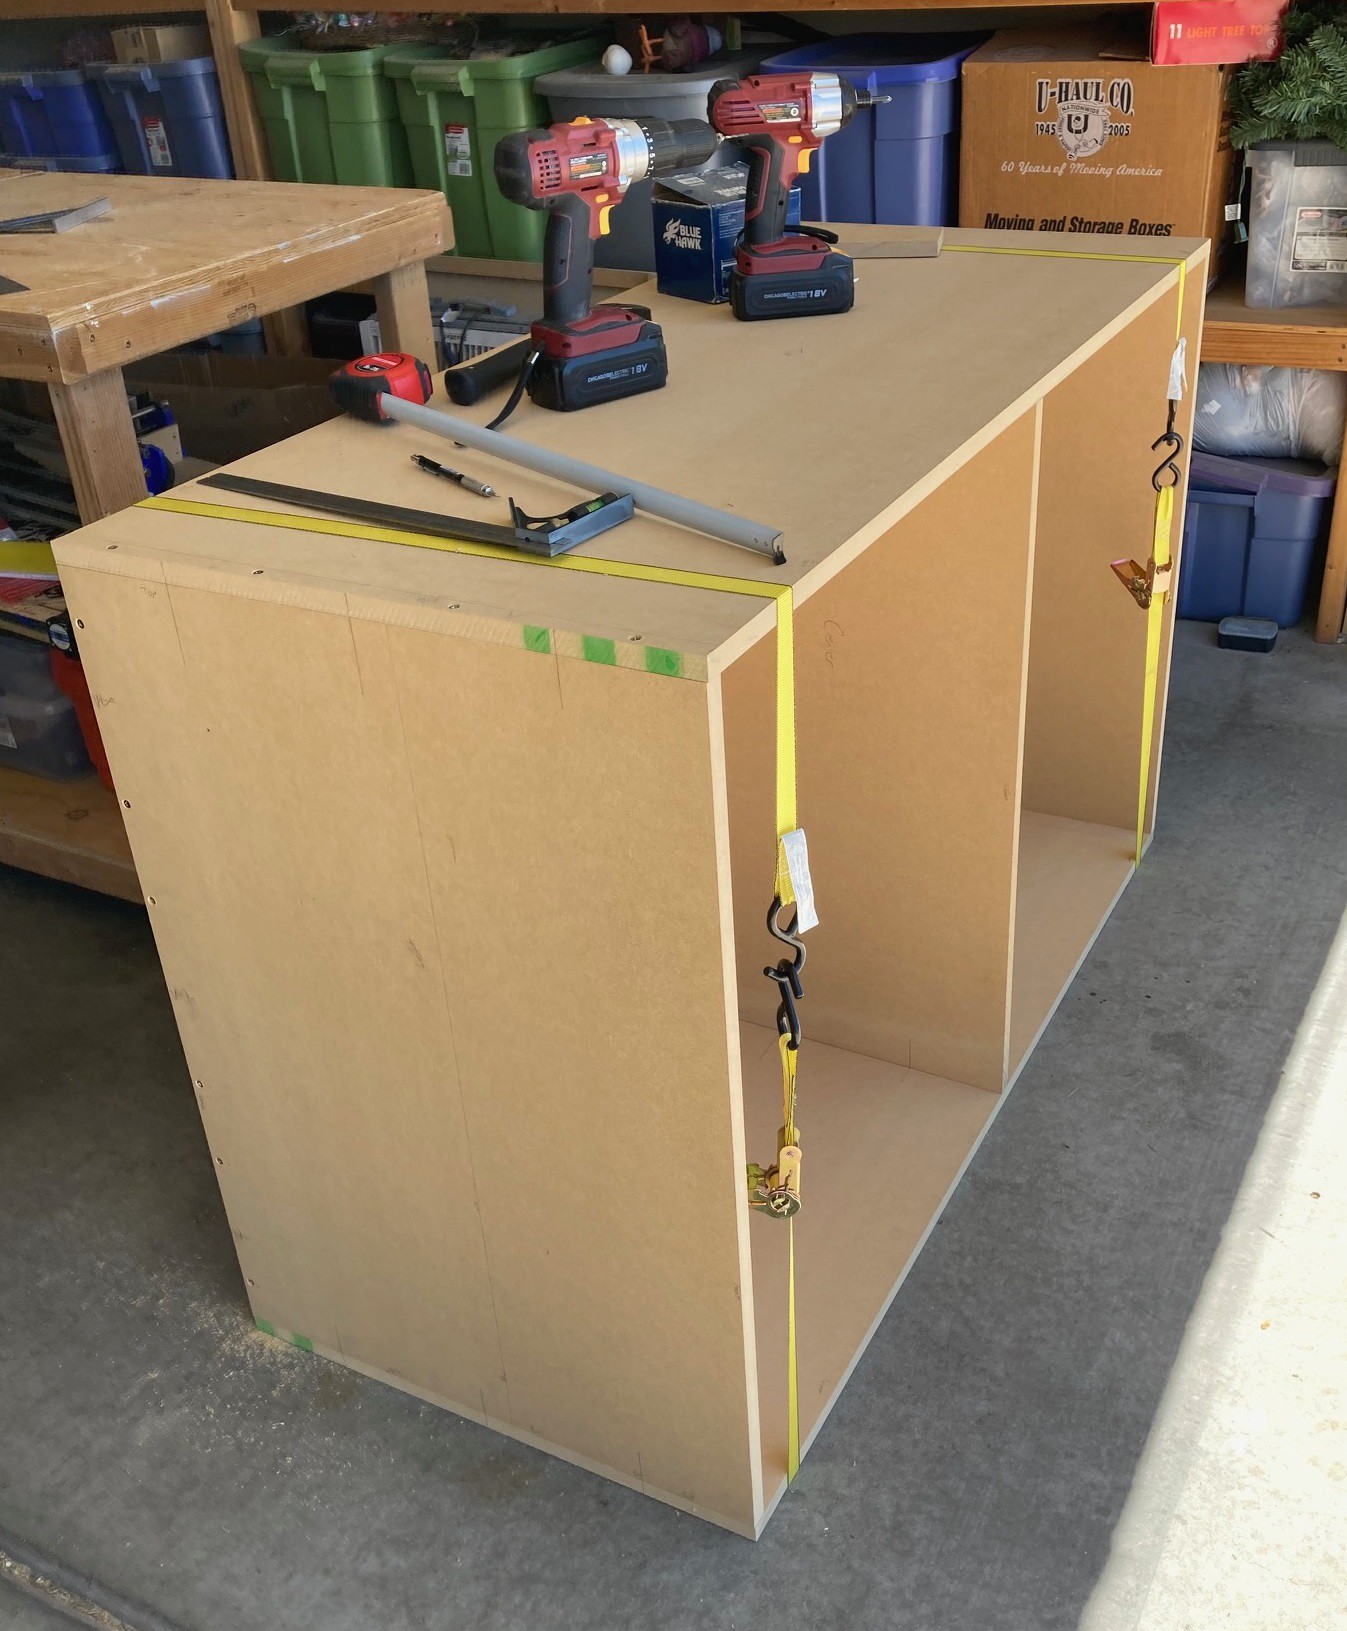
From there I put in the pilot holes and screwed it all together. I had to use straps to hold it together while I flipped it around to get access to all the holes. This is right on the edge of what I can even maneuver on my own without assistance. Trying to dead lift one side without any sort of hand hold was quite a challenge. It is almost 2 full sheets of 3/4" MDF, that works out to almost 200 pounds, although I would guess this is closer to 140 pounds.
![]()
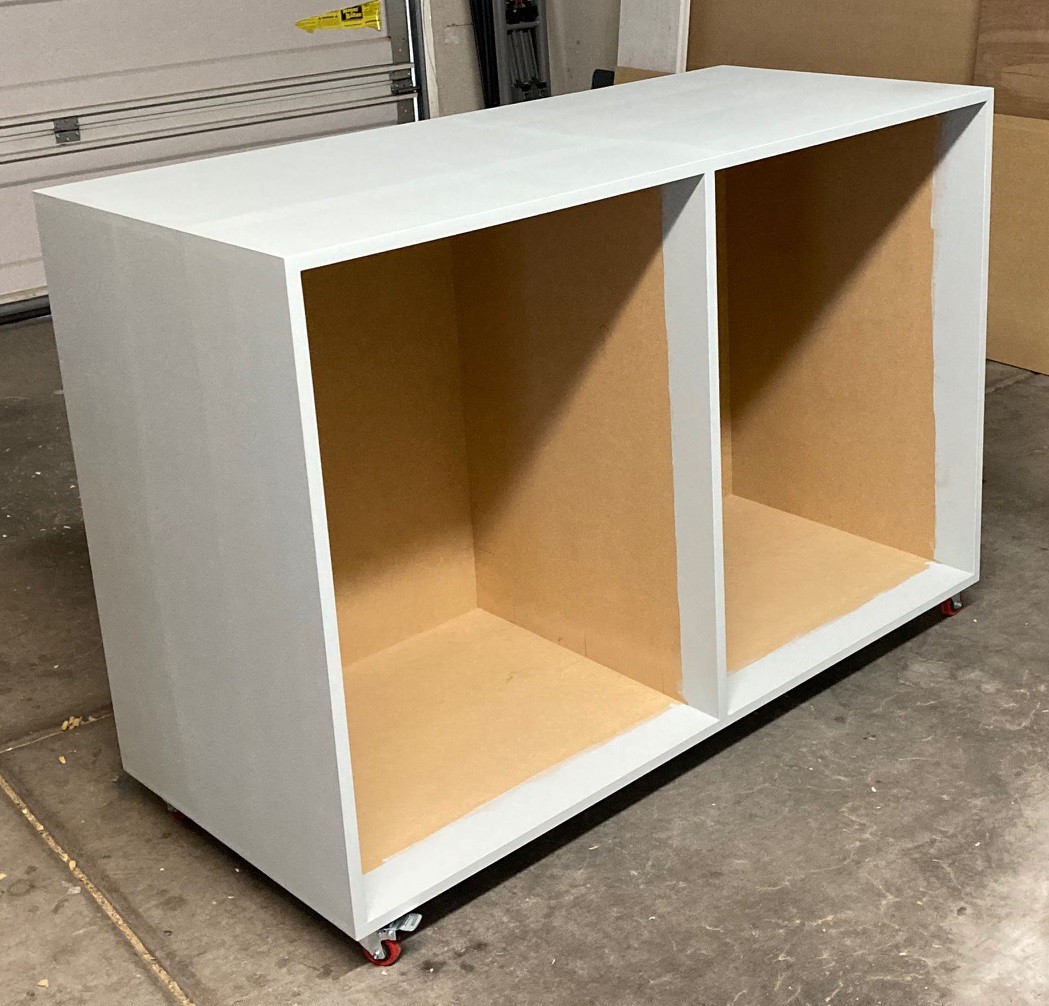
Finally I sanded everything down, patched up the screw holes, installed casters and managed to get it all painted up. I think it turned out well.
Up next is installing the drawer slides and then the more difficult challenge of making the drawers. I went out today and got the rest of the wood I need to make the drawers. Hopefully next weekend I will have some time to start in on that job.
---
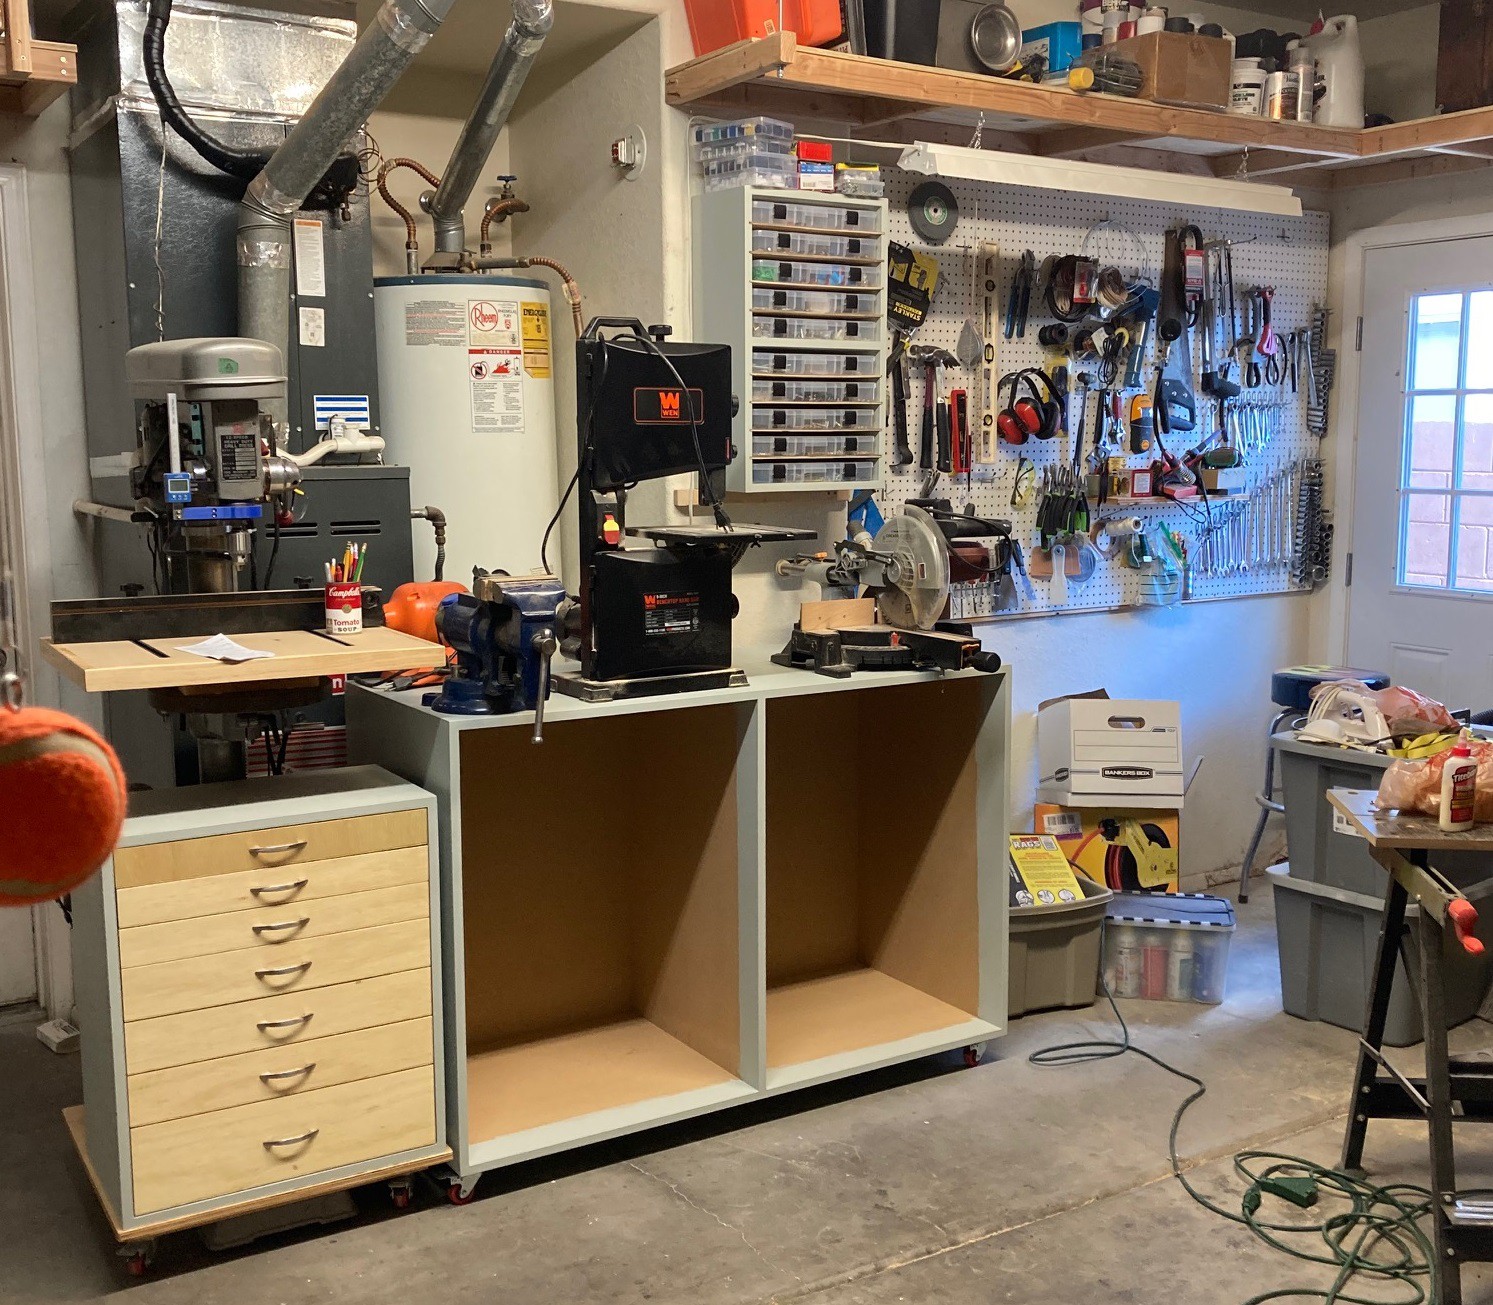
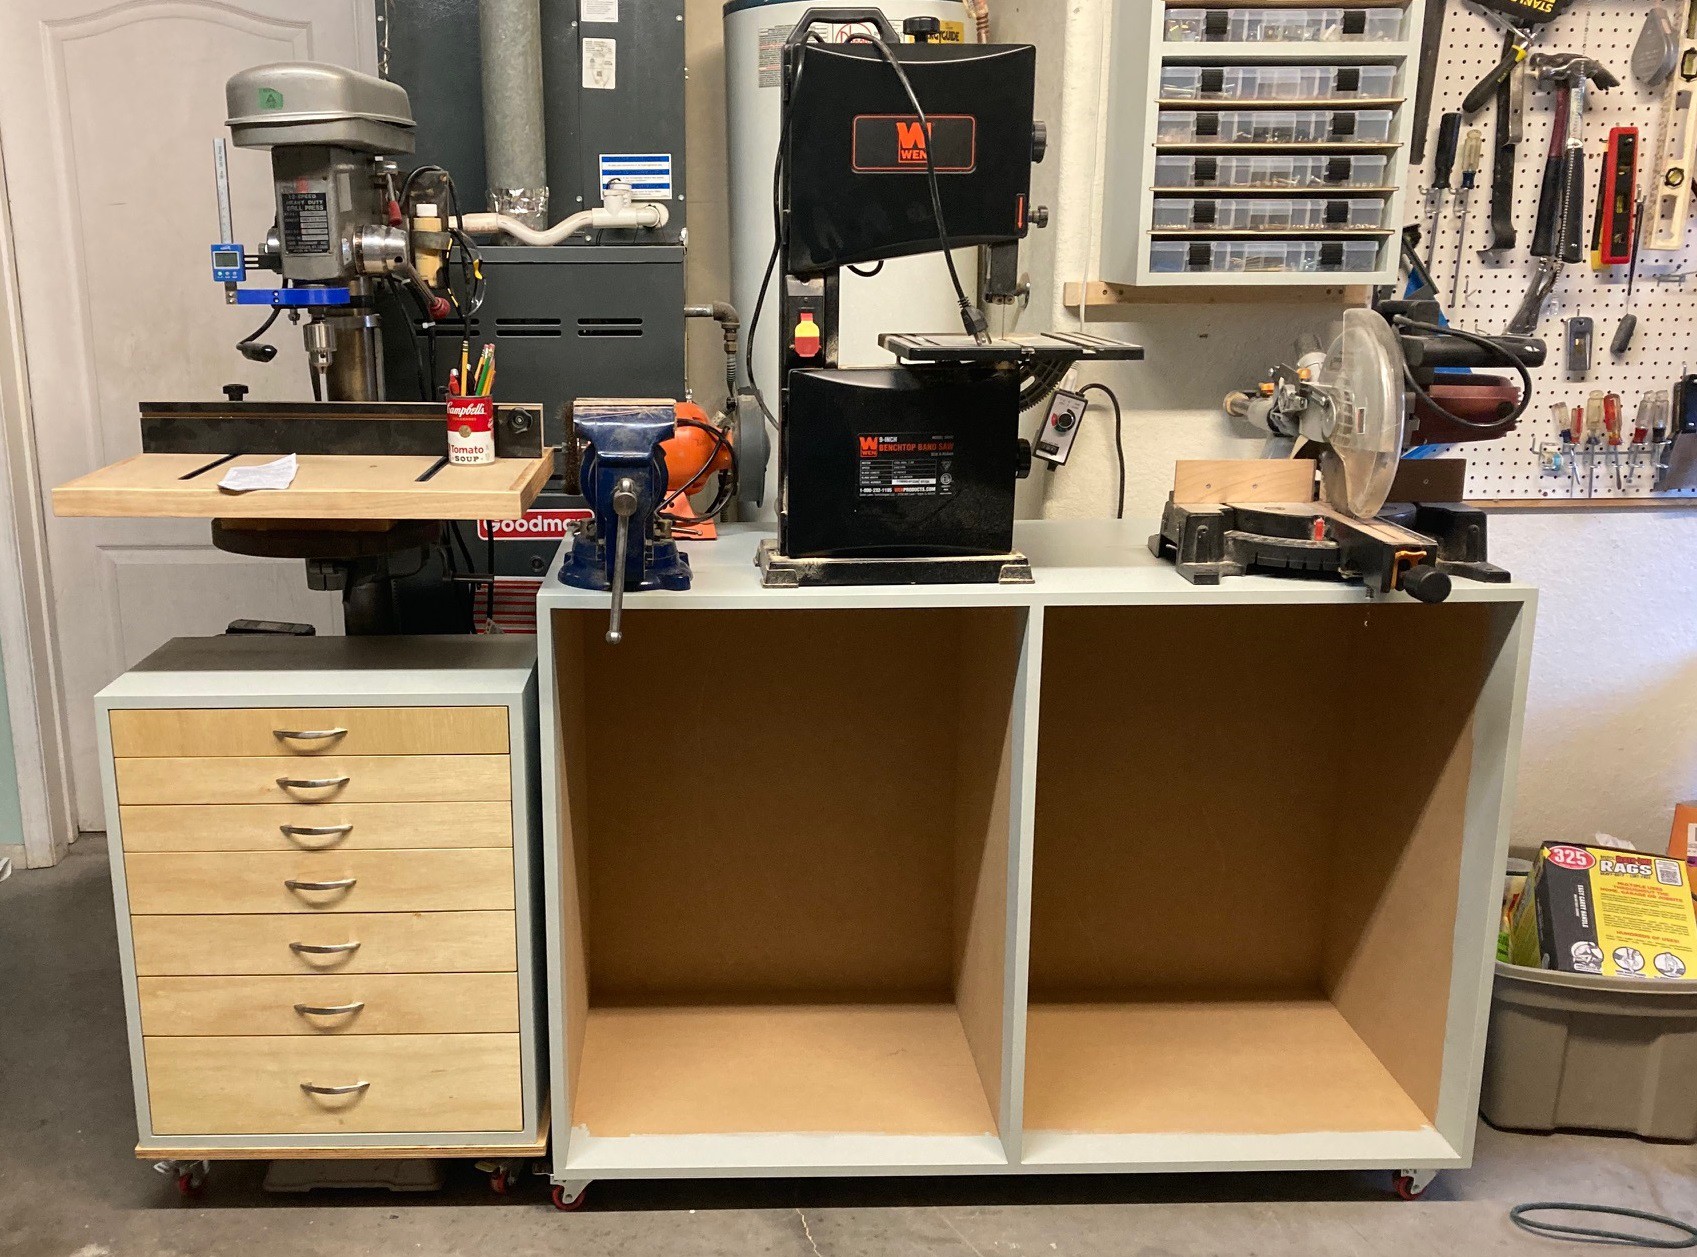
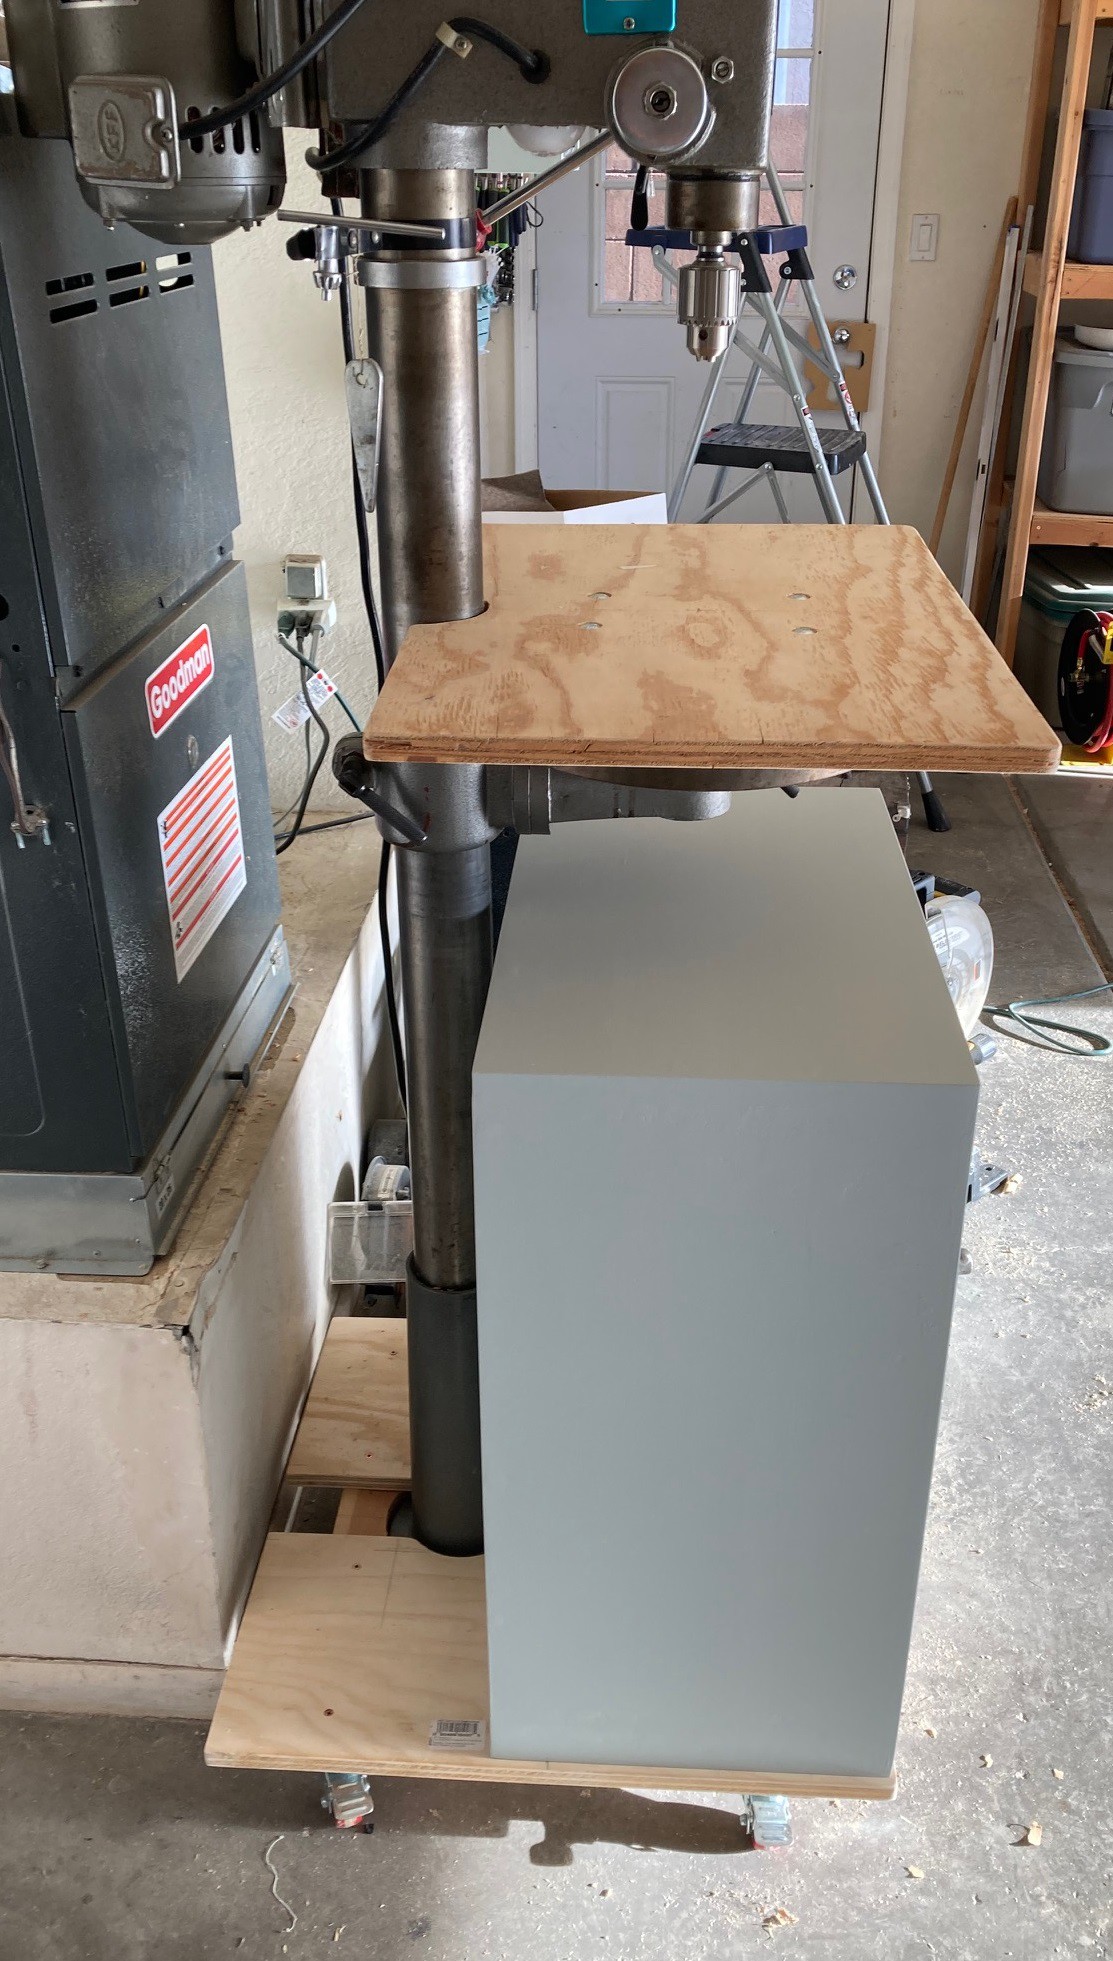
Edit, I roughly placed everything where it goes, it will take a bit of reorganization but it all seems to fit fairly well. The cabinet is a bit tall for the band-saw, but not so tall it is dangerous or unusable. I like tall workbenches anyway, and I decided to maximize storage capacity over usability since I don't use these tools every day.
![]()
![]()
I still have some room on the top of the cart to fit a belt sander or some other tool. And I may switch the miter saw and vice around. I always wanted my vice on the right hand side, but have only ever had it on the left because of space constraints.
---
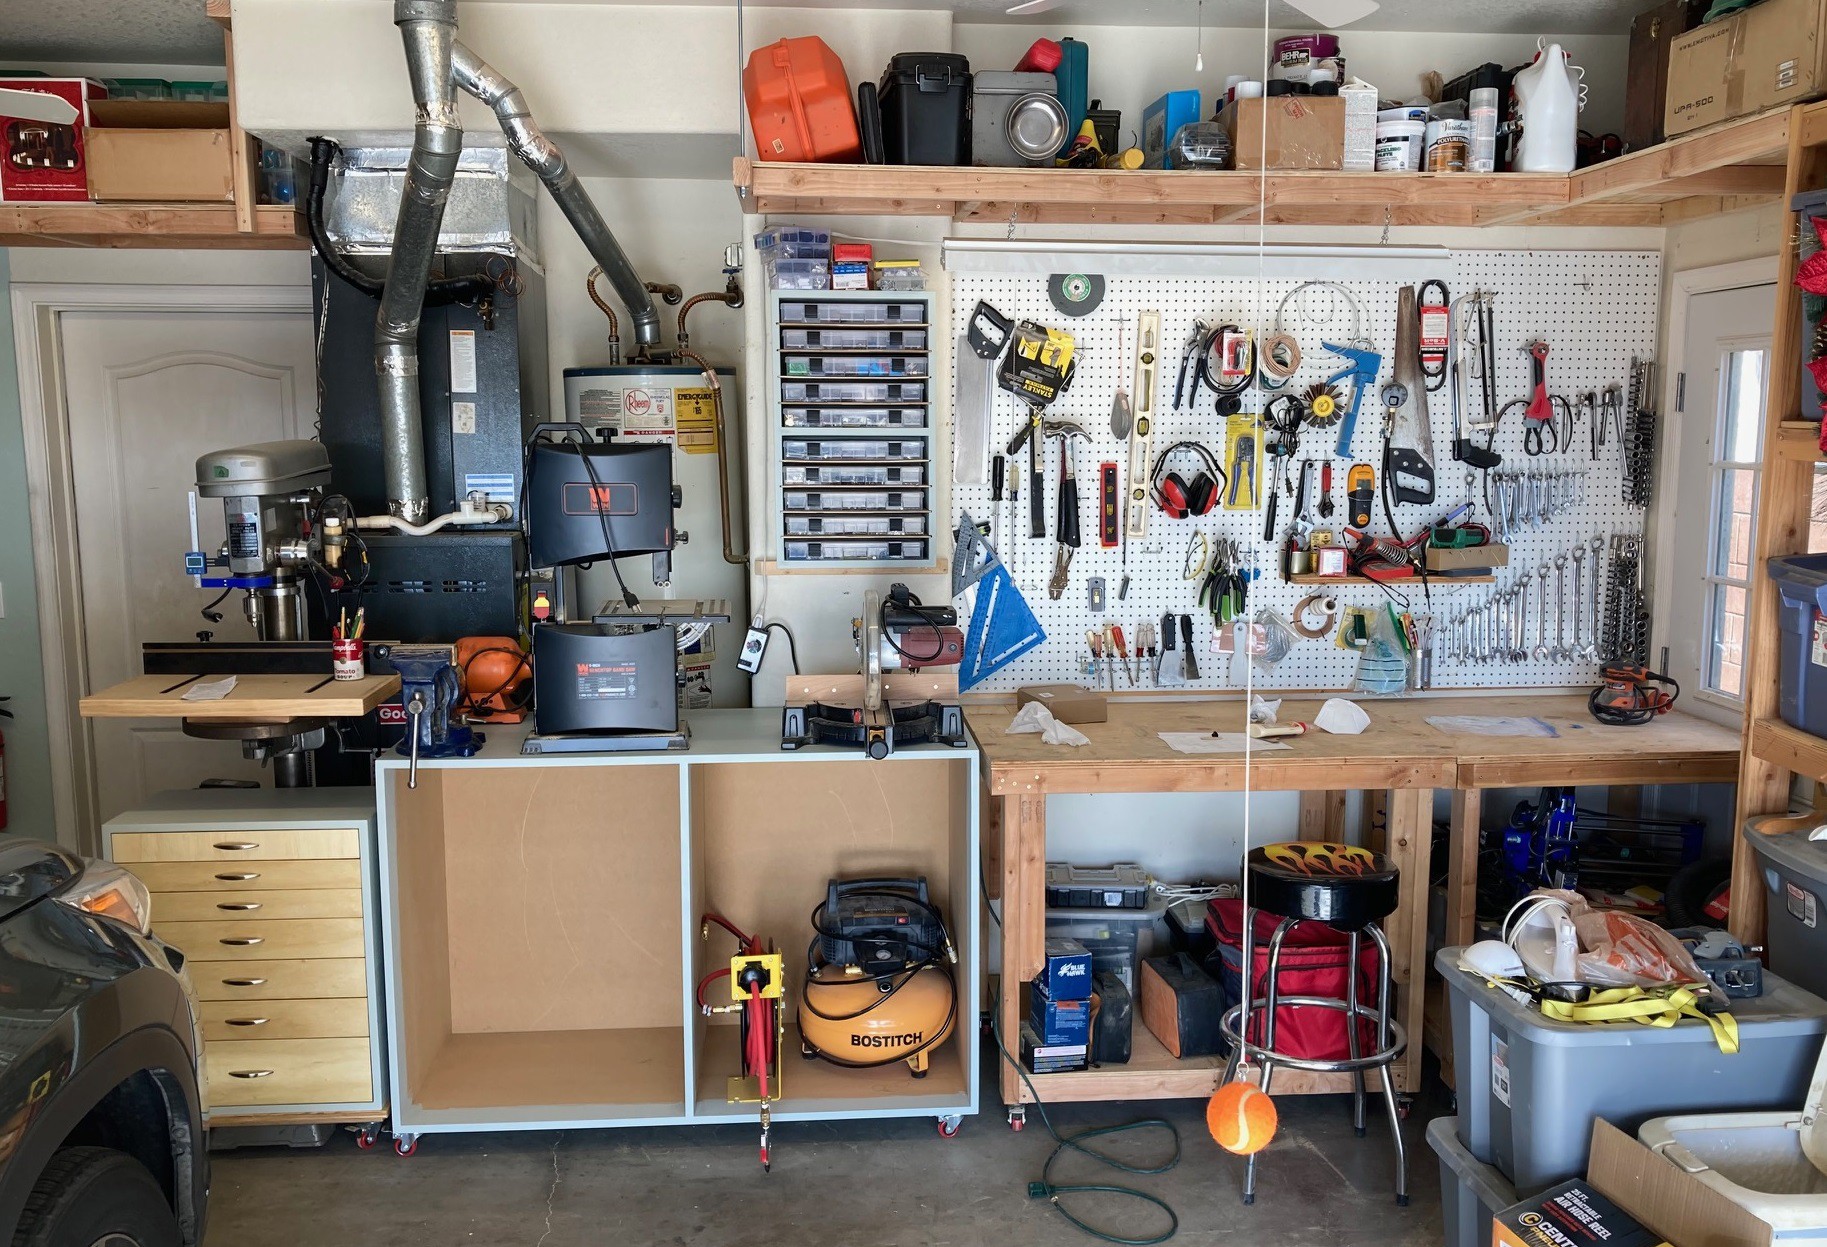
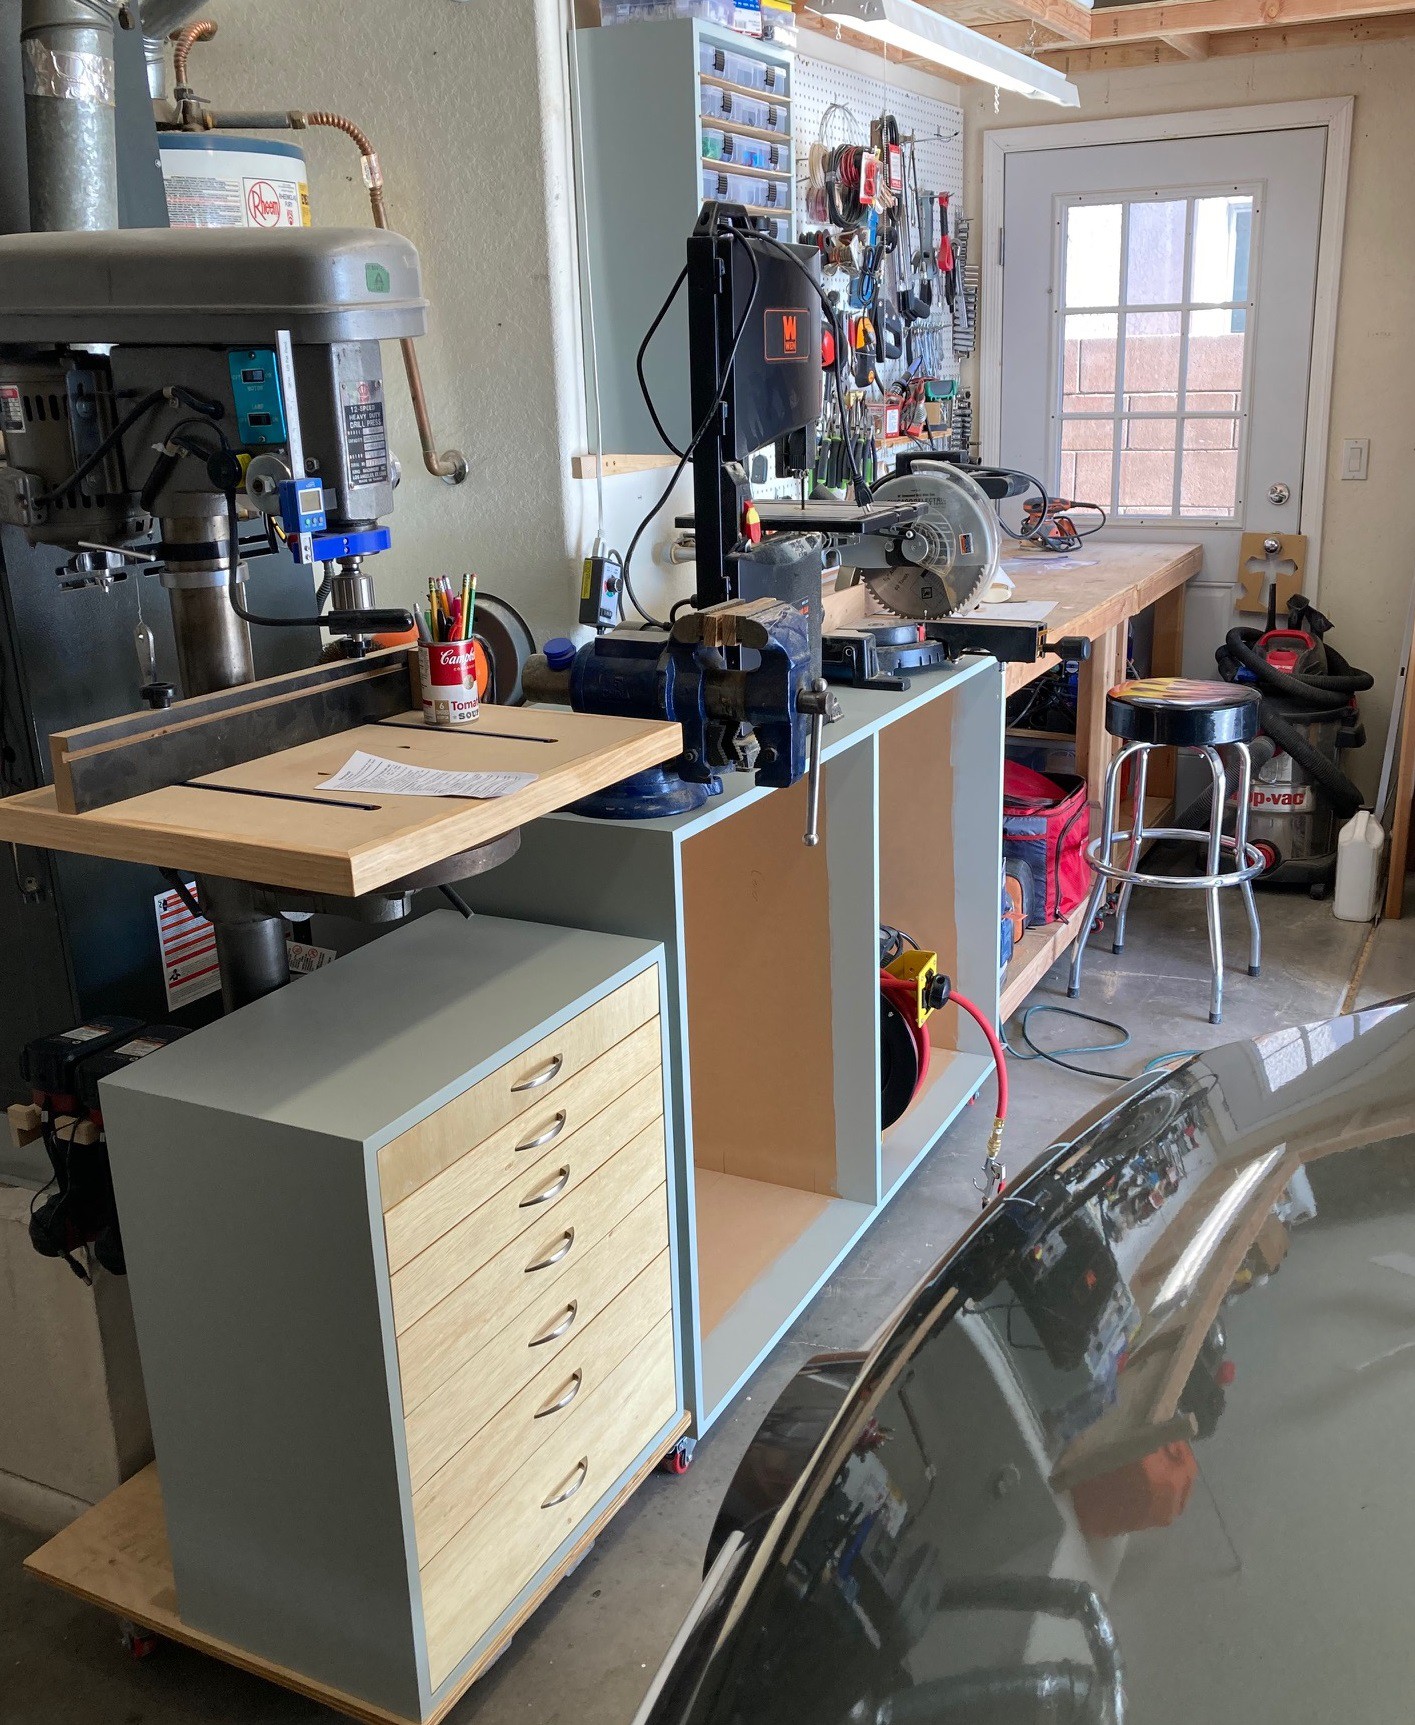
Edit2, I took the time to put it all together so I could verify it all fits in the space. I'm really pleased so far. It is a bit tall, I'm not positive I should not have knocked 2 inches off the height, but overall it uses the space very well. I can't wait to get the drawers in place and all my junk put away properly. I need to find a right angle addaptor for the hose reel, and verify it can actually fit in the space with the compressor (including inside the drawer sides). But otherwise I think I'm ready to start cutting next week.
I'm also really unhappy with my pegboard. Outside of a couple of tools I really don't find it useful. Hopefully I will have enough space to at least put some of these tools into drawers so they can stay dust free. It is something to think about, how I could use the space better and still manage to open the side door at least most of the way.
![]()
![]()
-
The Price is Right
05/14/2023 at 05:36 • 0 commentsI have started cutting up the pieces for my tool cart cabinet. And in the process I have been spending some time working with my budget Grizzly track saw. It made me contemplate weather a $220 track saw is worth it, compared to a $450 Makita or $650 Festool.
On the plus side the Grizzly is better than a skill saw. It is many times easier to cut in a nearly perfect straight line. It also comes with two 52" rails, I really would not want anything shorter than this (the latest model uses 32" rails). And with a bit of care it gets the job done (for a fraction of the price).
On the down side:
There is nothing level or square about the rail. The ends were not squarely cut, it was damaged in shipping, and every part of the rail tips and rocks. A better rail system probably eliminates this problem. Going with a thicker splinter guard helped, but there is still way too much play of the tool on the rail. I find I need to put a thumb on the base of the tool to push it into the rail to get consistent cuts.
The depth adjustment is neither accurate, or easy to use. Dust collection is sub par. It lacks a case (why?). The rails don't connect well together, there is too much play in them. The rails are proprietary to the grizzly, you cant use the wide array of rails from other brands or any of the accessories.
The negatives list is fairly large, however this cuts way better and faster than I was managing with my skill saw. And with enough care you can get accurate cuts. I do wish I had a 90" continuous rail, I would not use it often but it would be useful from time to time. And I wish I did not need to baby it as much, but this is not so frustrating that I want to spend $500 or so to solve the problem. However if I was making any money at all on wood working, or trying to build things quickly, I would spend the money in a heart beat to get a better saw. I can see the attraction of the Festools, for users who are making money. One bad cut can cost you $50 or more these days and doing that a few times would totally justify the expense.
-
Summing it up
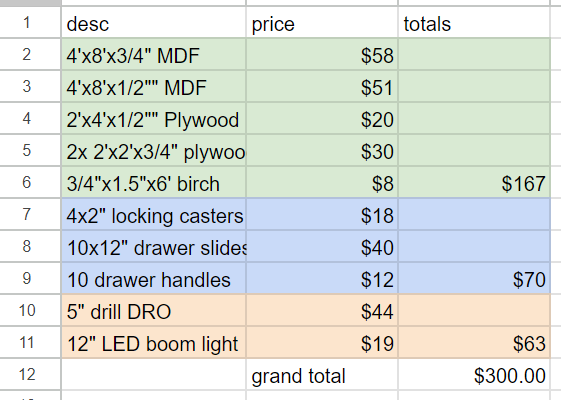
05/11/2023 at 19:58 • 0 commentsNow that my drill cart is done, it is time to take stock of the costs. Not including tool purchases I spent around $300 in total upgrading the drill. About half of that was wood, a quarter was hardware, and another quarter was drill upgrades. Wood is crazy expensive right now, I'm not using particularly nice stuff here. This could easily have cost twice as much.
The question then is was this worth it?
- This is a hobby, and it took me a good two month to build this, so that works out to around $150 a month, I suppose that is on par with most hobbies.
- You can also compare this to what you could buy commercially. I did buy a drill press table top from harbor freight for $30 or so years ago. A drill press dolly cost around $50 to $100. And a small toolbox is another $100. That puts this in the $200-$300 range for something that is not as space efficient.
- Or you can just see it as a good investment in the shop. This is something that should still be useable in 30 years or more.
Overall I'm very happy with the build. I do wish wood prices were half what they are now and that we had easier access to quality plywood, but still you have to live with what your given.
--
![]()
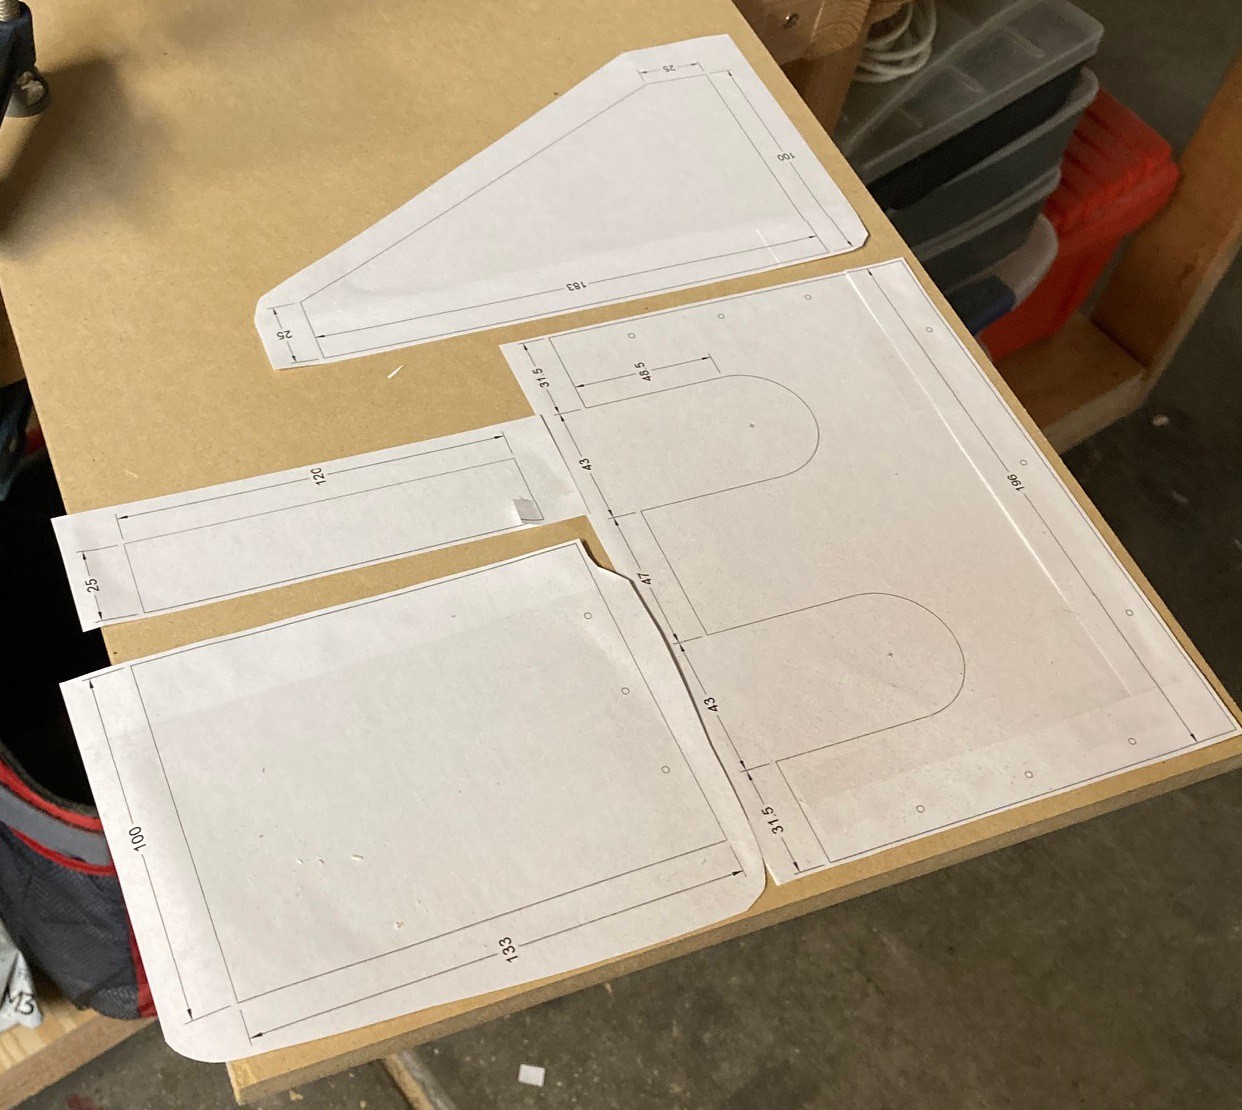
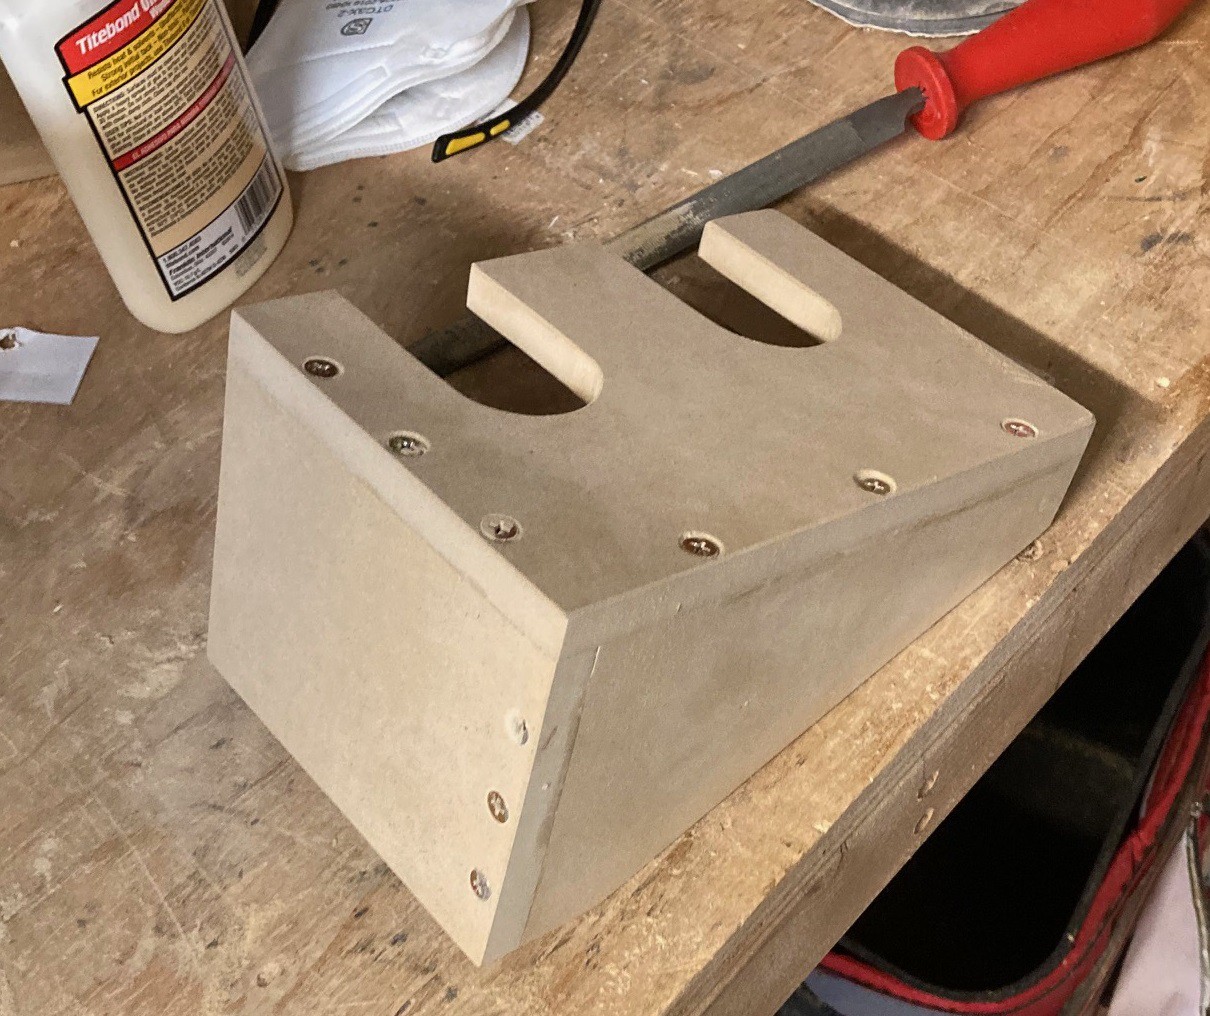
I decided to make a small bracket for the back of my drill cart to hold my power drills. As an experiment I tried printing out the plans 1:1 and gluing them to the wood and cutting everything out on the bandsaw. It worked out quite well. The cuts are not perfect, but close enough that a touch of sanding cleans things up. And it is probably more accurate then trying to transfer the dimensions over by hand.
![]()
I put it together with screws and wood glue.
![]()
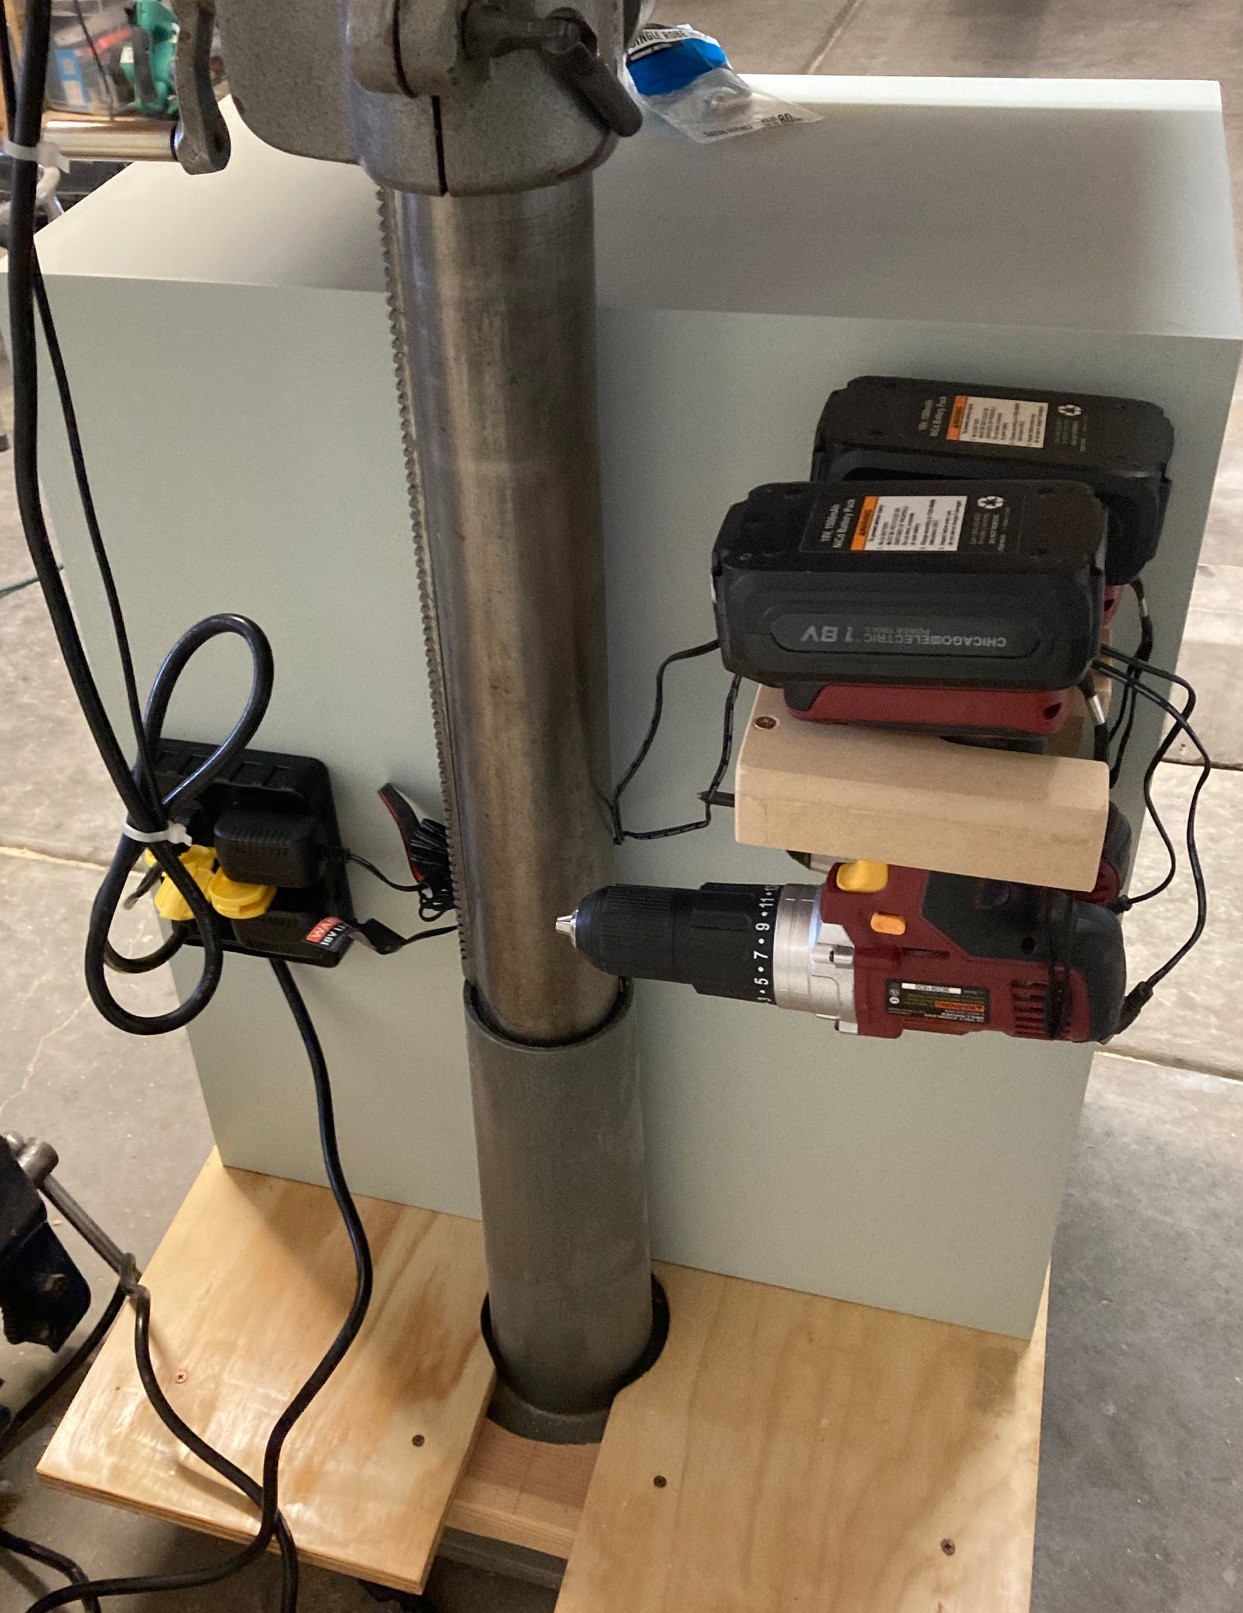
A little sanding and it was ready to go. I picked up a power strip to attach to the cart. This lets me use my LED light as well as holding the drill chargers and it provides more flexibility in moving the drill around the shop. It is not the best use of this space, I may try to rework this later, but for now I'm happy.
-
Drilling Down
05/08/2023 at 00:49 • 0 commentsThe handles came and I'm finally done! For now it is just resting on the baes of the drill, I will probably attach it more permanently just to make things more safe, but otherwise I have nothing left to do.
![]()
Someone suggested removing all but one of the handles on the feed wheel. This sounded like a good idea to me, so I gave it a try. I was always annoyed with these handles, they tended to run into whatever I was drilling, and they rattle loose all the time. Having one on the far side seems to solve at least one of the problems, and since it is out of the way I can add in a touch of Loctite if I need too as well.
![]()
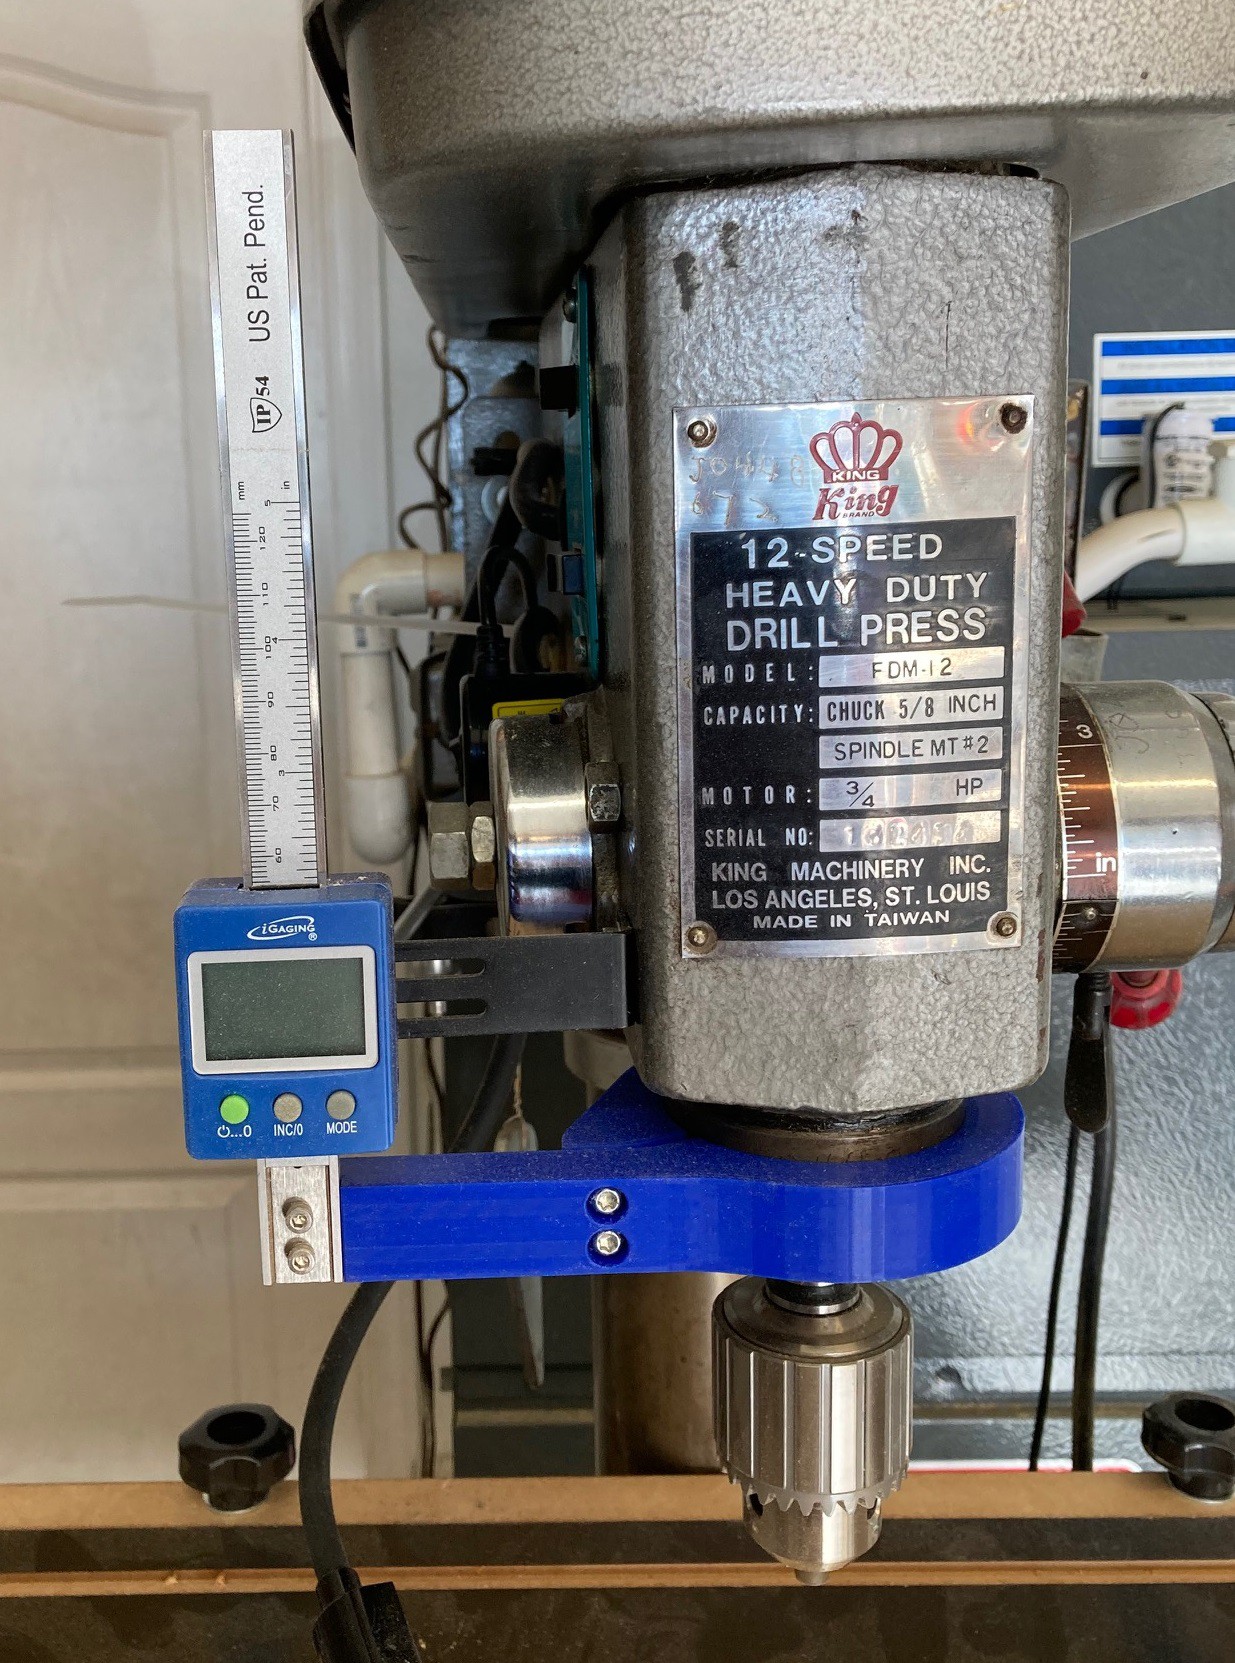
Here is a better quality picture of the DRO and its mounts. I'm using a 15mm thick 3D printed flange to hold it onto the spindle. It seems really strong, however if I did it over again I would put the clamp on the far side of the part. Right now as you change the clamp pressure the arm moves forward and back, making fine adjustment a challenge.
![]()
And here is a better shot of the LED light. This uses a fixed magnet covered in a thin bit of rubber to hold itself onto the drill. This holds much stronger than I would have thought.
![]()
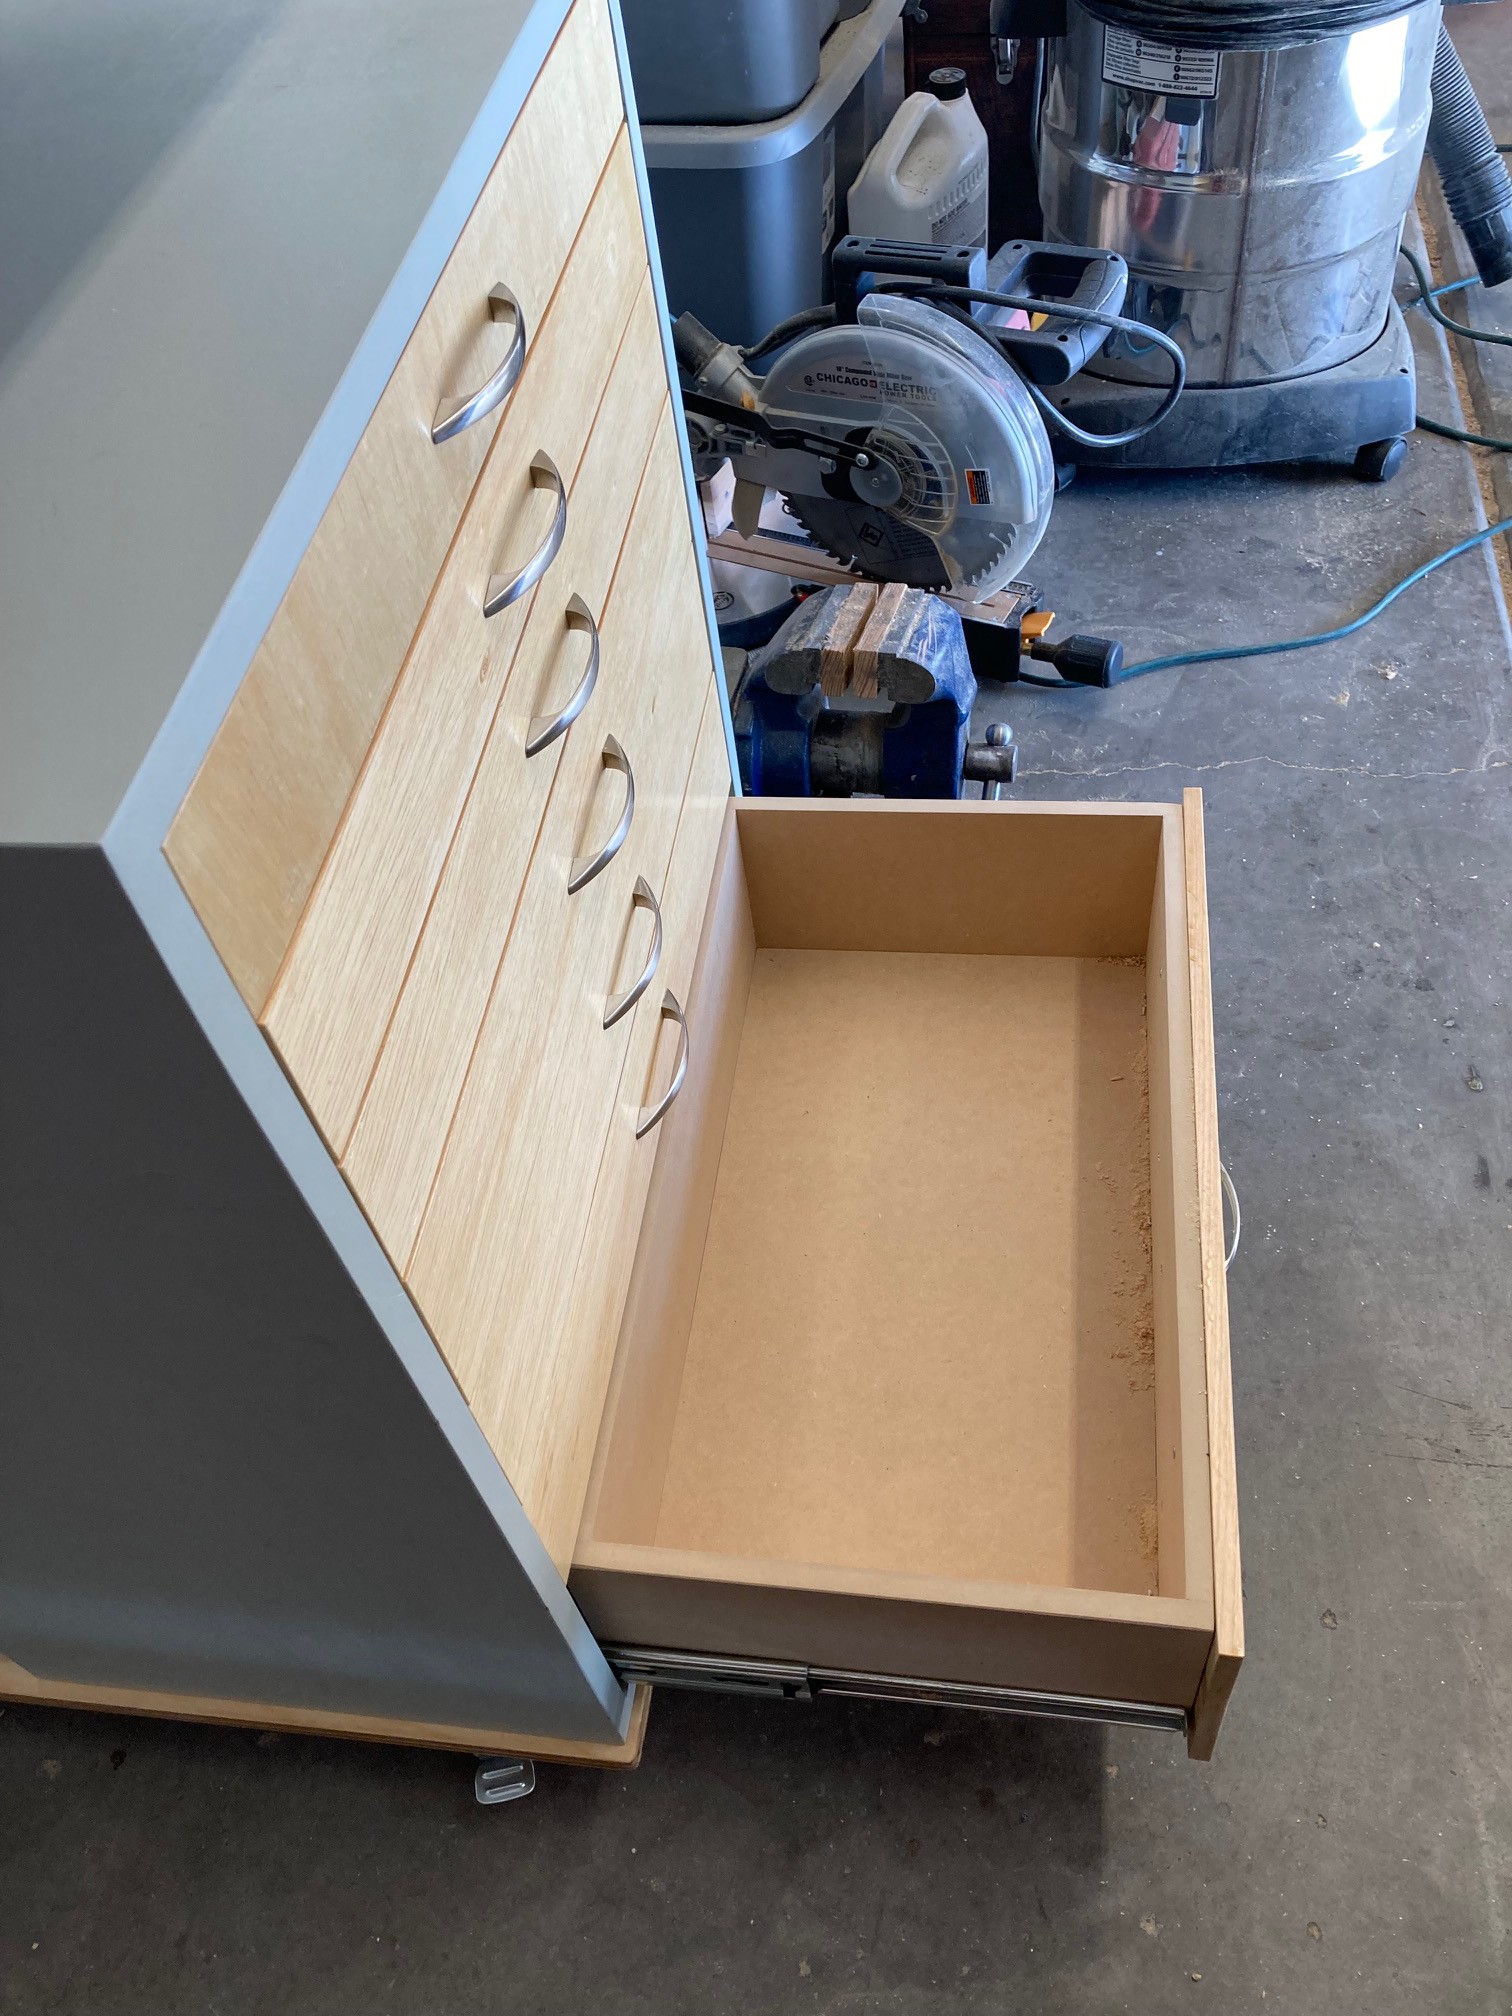
I obviously need to vacuum out the chips still, but these drawers have a nice depth to them and I picked the sizes to be as versatile as possible. I have plans on 3D printing some specialized inserts here to help hold various drill bits and other sharp instruments.
![]()
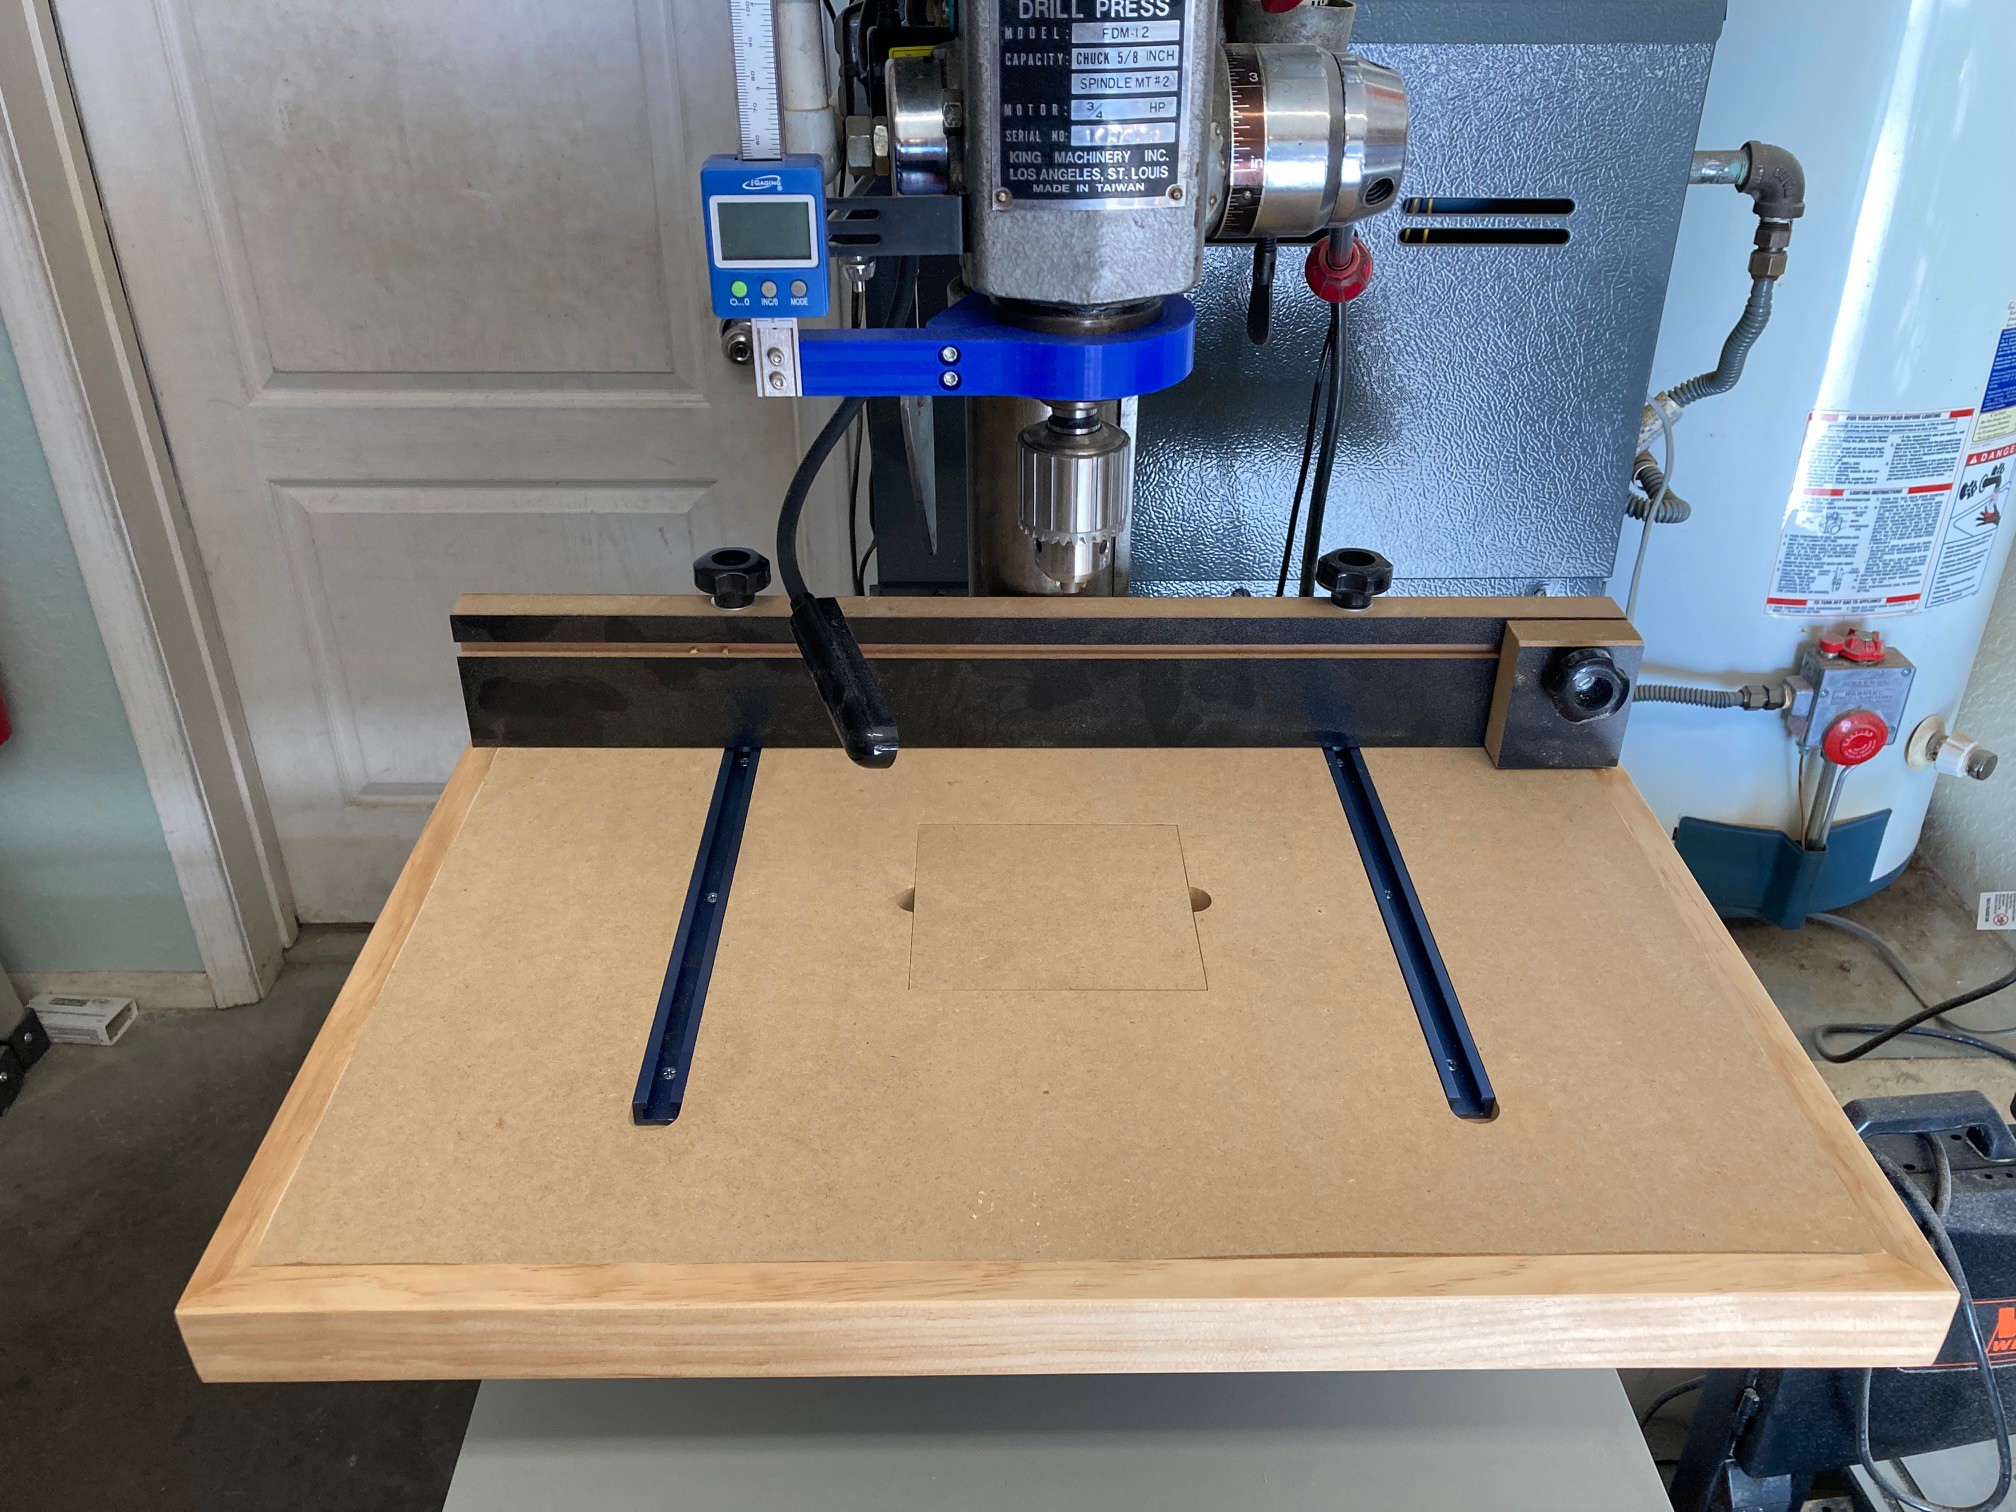
I'm super happy with this table, I'm looking forward to doing a lot of drilling on it. The whole thing is secured with just 4 wingnuts to the steel table underneath and could be removed quickly if needed. I still need to make sure everything is still square.
![]()
I still need to work out what to do with this space in the back. I had plans on putting my grinder back here, but I don't think it would fit very cleanly. I also thought about putting my clamps back here, but that is not terribly convenient. Maybe I will make a holster for my power drill and impact driver. One thing I do plan on doing is mounting some power to the base of the cart that I can plug my drill and light into along with having a socket or two for other uses (maybe drill chargers).
Overall I'm really happy with this build. There are plenty of little flaws here and there, but no real regrets. It came together well and I was able to cut and fit the parts with enough accuracy to fit the design. I also learned a lot and feel ready to tackle the next cart (once I get some rest).
-
Table Top
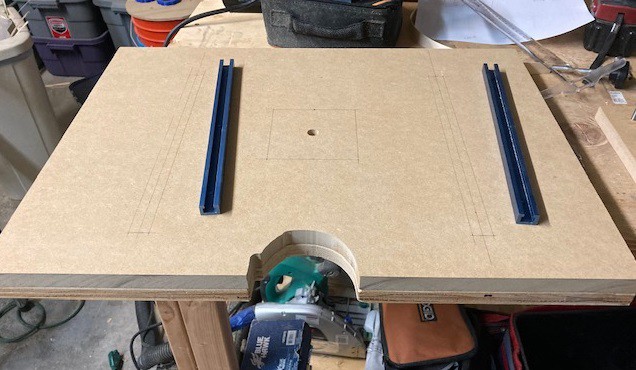
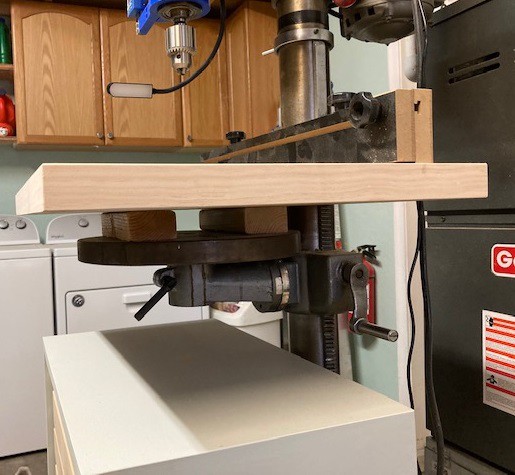
05/06/2023 at 22:53 • 0 commentsI had temporarily put a piece of scrap plywood in place as a table top for my drill press. I basically never drill metal so having a nice large flat top is more important than having lots of nifty hold down clamps. I had a top from harbor freight that got the job done, but it was too small.
![]()
I decided to use a piece of 3/4" mdf as a proper top surface and keep the old scrap 3/4" plywood piece as a base for strength. This way I have a very smooth top that is also very solid. I screwed the two pieces together and trimmed them flush with my track saw, then used a palm router to make sure they were perfectly in alignment.
![]()
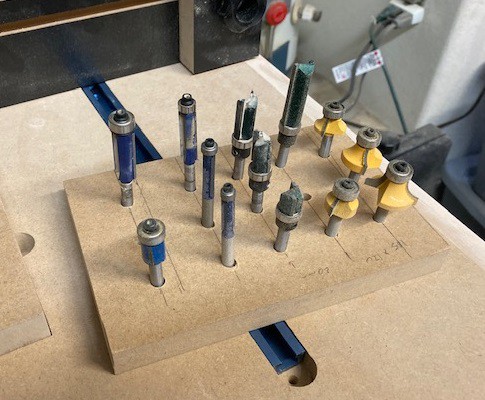
I picked up a couple of packs of cheap bits for my palm router from amazon, they seem to get the job done ok. The ones with the bearing at the tip of the cutter are much better, it is nearly impossible to mess things up with this configuration, since any tipping of the router will leave extra material rather than taking away too much. However for cutting slots you need the other style with the bearing at the base, just be very careful with them, they are much easier to mess up.
![]()
I wanted to bring the fence over from my last top, that meant cutting some slots for the aluminum profile that the fence slots into. Some scraps taped to the top worked fine for guides.
![]()
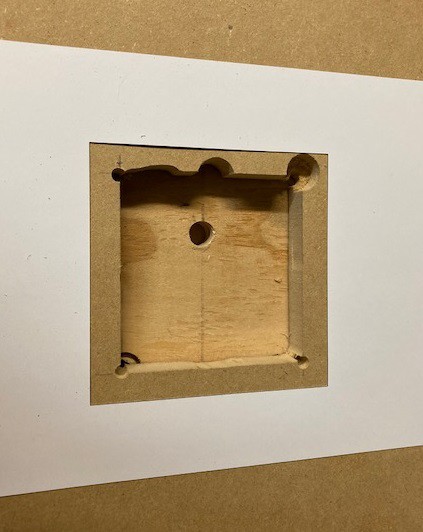
This worked great for the slots, but not as great for a pocket to put a waste board into the top. I tried to get smart and drill the corners and a tab out before hand, and it turned into a hot mess. One of the boards slipped causing issues, and the holes I drilled were not precise enough. And of course I marked one hole wrong and drilled it in the wrong spot.
No problem, I just made a new pocket that was wider than the last and started over. To make sure it was perfectly square this time, I drew a 130 mm square in Inkscape and printed it on cardstock. Then cutting the square out using a razor blade I could position it where I wanted and transfer the lines over. Finally I used my brad nailer to staple my guide boards down so nothing would shift. This time I had a perfect pocket.
![]()
Using my cross cut jig I was able to make two blanks for the hole that fit perfect. And I was able to put finger holes in the pocket by drilling a hole into a scrap piece of wood and then using my pattern bit to transfer it to the base. A bit of sanding and these inserts can be swapped out quickly and effortlessly and I can easily make more since they are exactly 130 mm square.
![]()
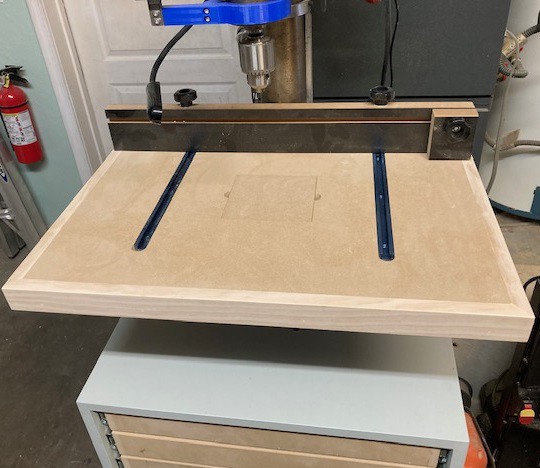
I edged the whole thing with some hard wood I glued and pinned onto the base. This should help further protect the MDF while still maintaining a very flat edge.
![]()
The underside of the table is very flat and open as well, so I can easily get clamps in there. The standoffs help me get some clearance around the crank that lifts the table up so I'm not bashing my knuckles. It also allowed me to extend the table top backwards around the post so drilling odd shaped pieces gives more support.
![]()
This is just a test fit of everything, but at the back I will have some extra room that I need to find a use for. The fence is removable because there are small holes drilled in front of the t-track that let it come out of the slots. That further increases my depth of drilling. And I did not quite have enough material to fully edge band the back of the table, but you don't notice it and it should not cause too much trouble. I have everything lacquered up and drying right now. Hopefully tomorrow I can get it all together.
![]()
I picked up a drill DRO and a light on a magnetic base to finish the whole thing off. I 3D printed a clamp for the DRO, since the one it came with was a bit wobbly. This seems to be working great, and it is more convenient to us than a stop. I still have my stop, if I need it, but most of the time just looking at the dro is enough to get the hole depths correct. The DRO is a bit fussy, needing to be very well aligned to run smoothly, but in the end we got it running well.
-
Sliding Allong
05/06/2023 at 22:27 • 0 commentsSo life has been busy recently, but I have had some time to poke around in the shop. I managed to build all my drawers, sand them up, and install them into my cabinet.
![]()
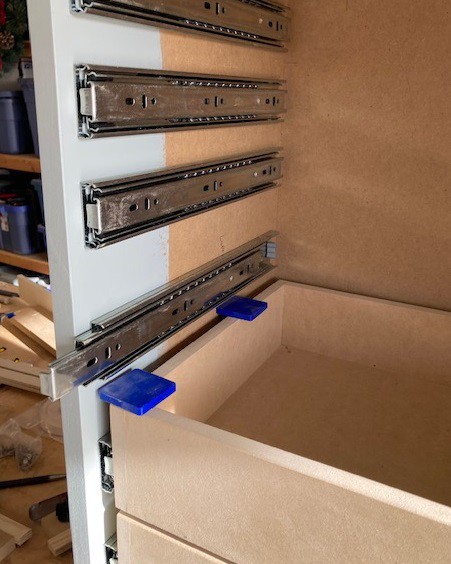
I'm using ball bearing side mounted drawer runners. I measured out where the bottom edge of all the drawer runners should end up and then cut a piece of scrap wood to act as a guide for instillation. I also cut a piece of the face material to act as a spacer so the front edge of the slides all line up properly with the front edge of the cabinet.
![]()
Once the slides were in place I 3D printed some spacers so that each drawer was spaced properly from the one below it. I was a bit worried there would be some compounding errors here since the drawers were not referencing a common ground point, but it seems to have come out square in the end.
![]()
These slides have very little adjustment, so I had to really take my time trying to make everything line up properly. I think I got there in the end. I have a tiny bit of forward/back adjustment available, I may use that to dial it in perfectly, once the fronts are on.
These slides have a small rubber bumper at the back that acts as a soft close as well as making it more difficult for these to come open. It is a bit stiff, but I like that since these are on wheels and I don't want the drawers coming open while I'm rolling things around. Still for use in your kitchen I would find these a bit annoying. You can remove the bumper, but the bumper acts as a stop, so it allows the drawer to slide back further once removed.
![]()
I have never quite decided what to put on the fronts of my drawers. I ended up picking up a medium quality quarter sheet of 1/2" plywood to use as temporary fronts. As an experiment I tried edge banding the plywood as well. Overall I'm not impressed with edge banding, it is frustrating to work with and prone to tearout and splintering. Maybe I just need more experience, but so far it is not much fun. This plywood is not high enough quality to justify edge banding, but it was an interesting learning experience, and it does not look horrible at least.
I'm waiting for the varnish to dry and I have some drawer pulls on order to finish it all off. I'm really looking forward to starting sorting my tools into drawers. Hopefully tomorrow the parts will show up and I can finish this off.
-
Precision
04/23/2023 at 01:13 • 0 commentsI have not had much to post recently, but I have had time to get some work done.
![]()
I was able to cut out the shell of the drill press storage and get it painted.
![]()
I'm pleased with how it turned out in the end, but I had some troubles both with my track saw and my biscuit jointer. I have been accumulating more and more measuring devices in an effort to improve the accuracy and repeatability of my cuts. However even trying to be very careful some of my cuts were off by more than a mm and that made the box go together a little crooked. The biscuit jointer also had issues, somehow it is also off by a mm or so. I have not yet gotten to the bottom of that one. Is it just sloppy handling, a loose rail, or something else.
![]()
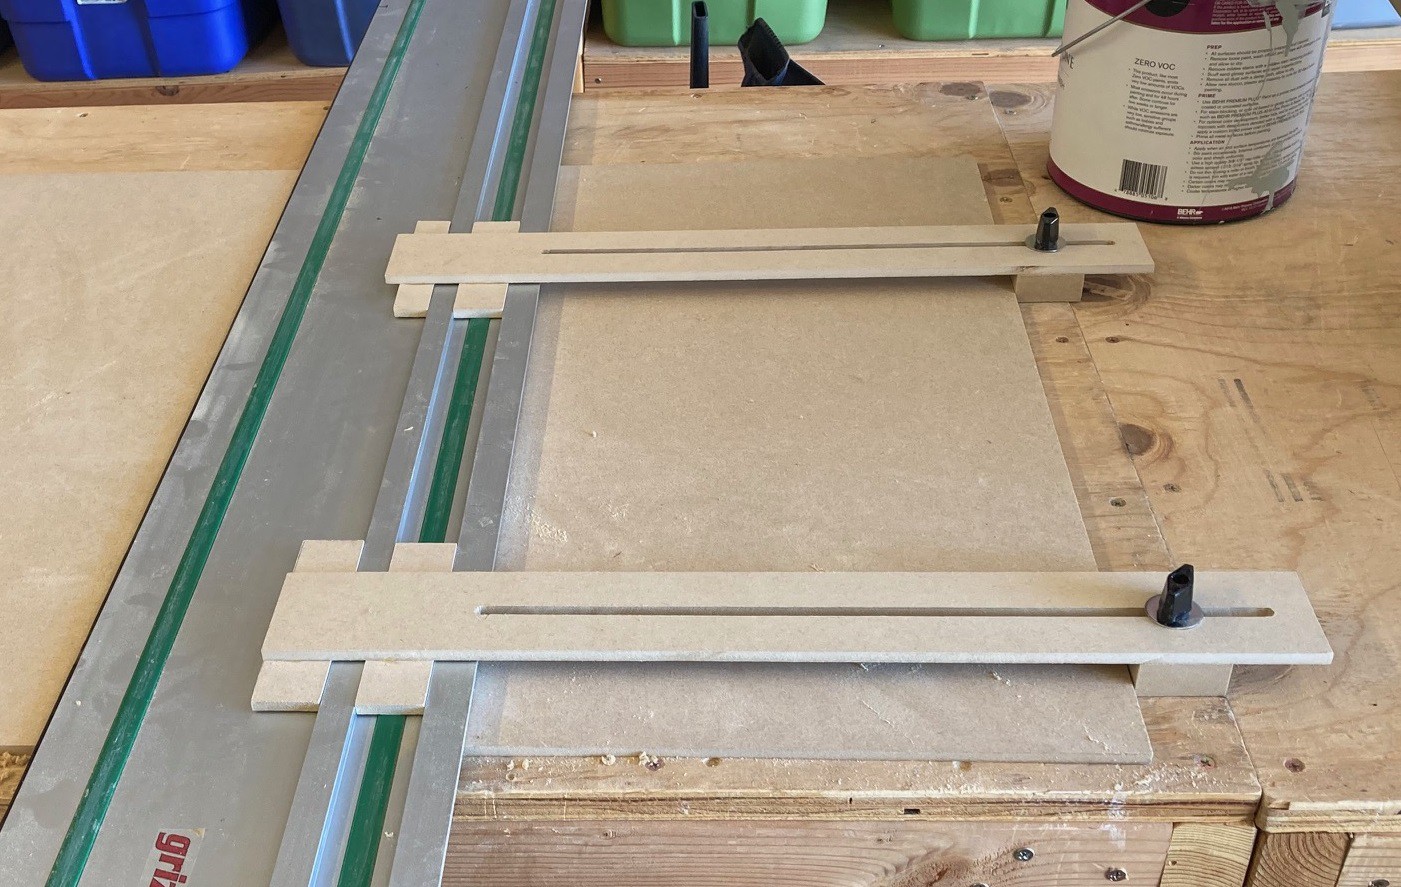
For the drawers I was not thinking of using biscuits, but I do need to make an awful lot of repeatable cuts. I have been casting around for ideas on how to make that happen. One great idea I came across was from Peter Millard's 10 minute workshop. He has an introductory track saw series and recommends making these parallel guides. They clip onto the top of the track and help you realign it for repeat cuts. My track lacks a groove on the top like Festool tracks have so I can't use the commercial parallel guides, but these were basically free and seem to work just as well.
![]()
I also made this cross cut sled that he recommended. I was able to make both out of a $8 1/4 sheet (2'x4') of 1/4" mdf and some scraps of 3/4" mdf. I was able to cut a 250 mm wide sheet of 3/4" mdf with less than 0.1mm of error across the cut. Hopefully together these will allow me to make repeatable cuts as I churn through the 40 or so parts (120+ cuts) needed to make the drawers.
I'm also planning on making some templates to help make the drawers. Hopefully that and my brad nailer will be more accurate than my biscuit jointer. And I'm working on a 'waist side spacer' to help make cutting thin strips more accurate as well. I'm all setup and ready to start cutting, I just need to work up the nerve and do it already.
-
Baby Steps
04/01/2023 at 23:29 • 0 commentsSo my weekends have been far too busily to really get out to the shop. However I have been spending more time polishing up my designs. I reworked the miter saw cart so the wings actually work properly. I had to spin the supports around to make them work properly without adding more thickness.
I'm contemplating adding in some t-tracks to act as stops on the wings. However that would entail thickening up the wings by a bit. I think for now I will content myself with clamping a board to the wings for now. I can always add in t-tracks later.
For the main benches I was thinking about combining them back together into one single bench. It would almost cover a full sheet of plywood and it would make for a much better (and larger) working surface. The big concern is can I pull it out of where it is stored easily enough when it is one monolithic piece. I think I will clamp my workbenches together and see how easy they are to roll around together.
Finally I made a run to the store today and picked up my wood for the first two boxes. I have to push through on my taxes this weekend, so I probably won't have time to make any cuts. But my hope is that next weekend I can get the frames put together and start doing serious work on this project.