Close
0%
0%

The Phone Friend

Bring any old phone to life, no disassembly required!

Similar projects worth following
So you want to do stuff with a landline telephone like make it ring, or play sounds through the handset? Maybe you'd like to use the keypad for something?

Meet your new best friend! The Phone Friend is a complete solution for authentic bell ringing, tone generation, audio throughput, dial detecting, and more. Works with any telephone of any era, with no disassembly or modifications to the original telephone needed.

Just plug in your phone and go!

Best of all: The Phone Friend is easy and cheap to build!

The component list is so short that it fits right here in the description: one Raspberry Pi Pico W, one AG1171, one phone jack, one diode, two capacitors. And some of those parts are optional. Total parts cost: under $20!

The Phone Friend is designed for standalone operation, but also includes WIFI, USB, I2C, SPI and more for easy connectivity with other devices.

The goal of this project is to enable simple but complete interaction with any telephone, of any era, with no disassembly or modifications to the original telephone.

Most Recent Updates:

Features

The Phone Friend can:

Build It

  1. Safety Considerations
  2. The AG1171 Phone Line Interface
  3. The Pi Pico W Controller
  4. Wiring the AG1171 to the Pico
  5. Writing the Software

dialToneTest.wav

Waveform Audio File Format (WAV) - 2.06 MB - 04/13/2023 at 03:42

Download

AG1171_typicalConnectionDiagram.pdf

Adobe Portable Document Format - 72.71 kB - 04/11/2023 at 06:25

Preview

  • 1 × Raspberry Pi Pico W MCU
  • 1 × Silvertel AG1171 SLIC

  • All Aboard

    Steph08/18/2023 at 00:08 0 comments

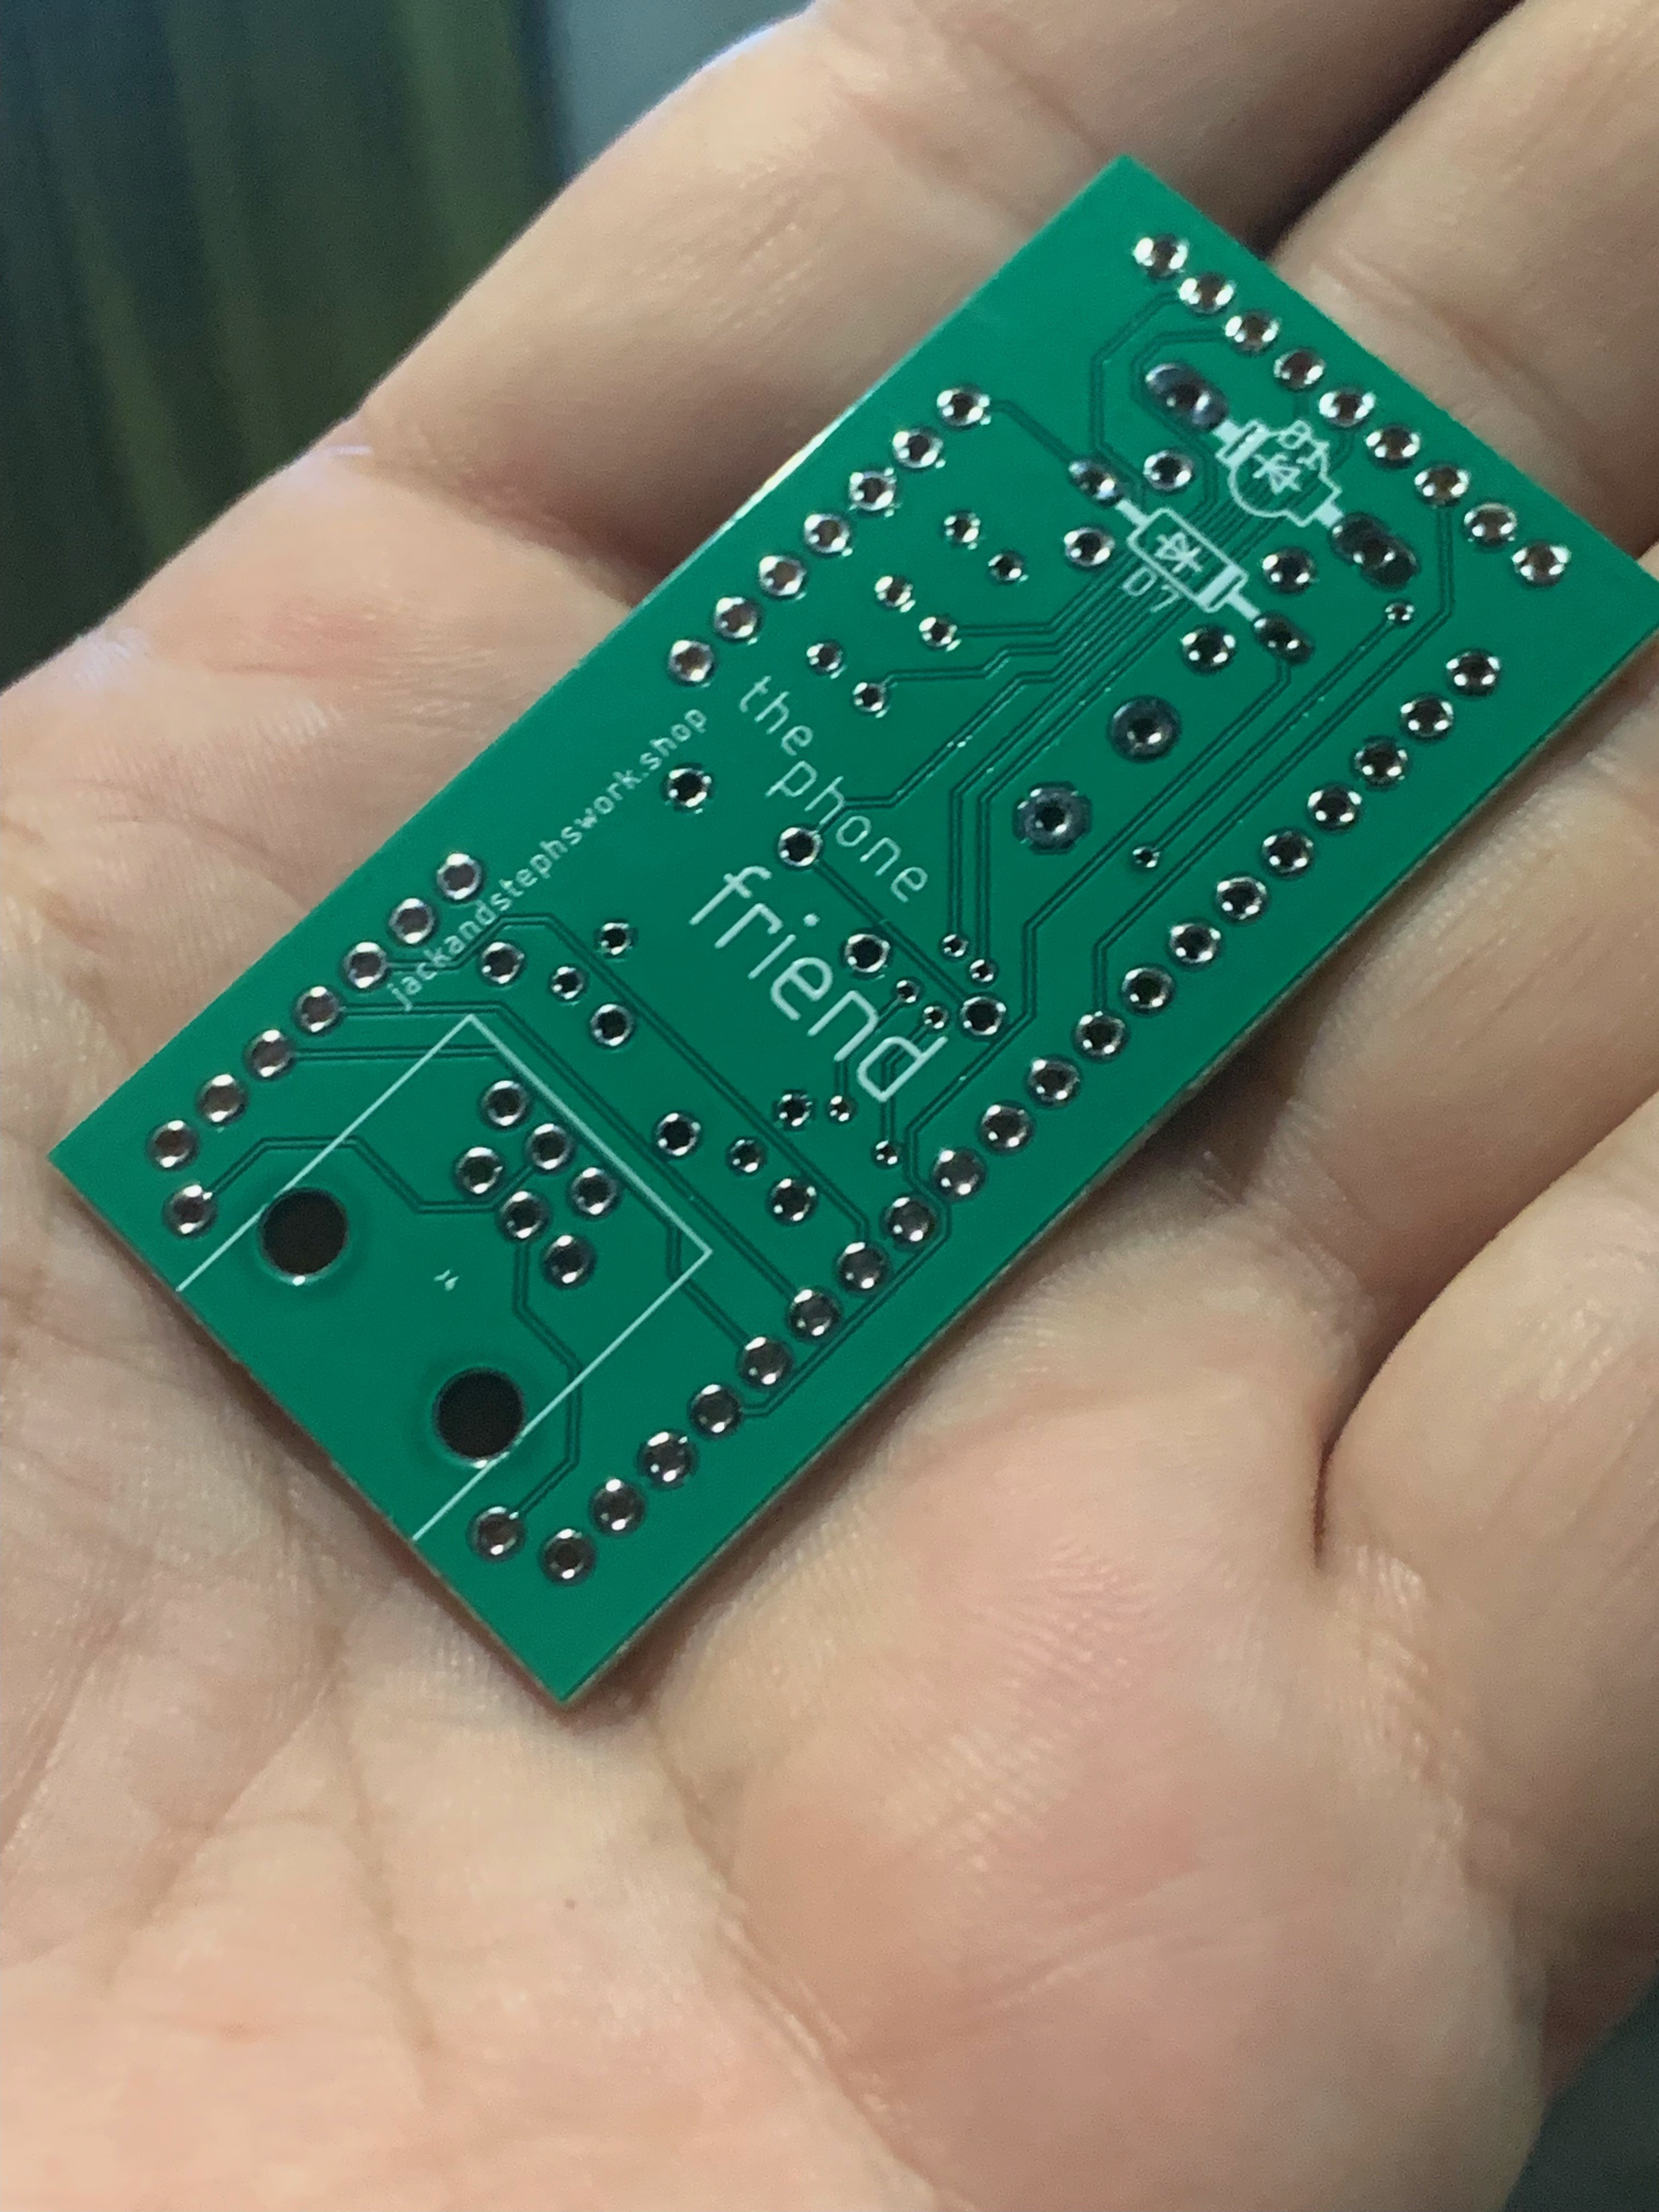
    Look I Made a PCB!

    It's my first one! 

    It went relatively well! I soldered the AG1171 and a Pi Pico W to the board, and the attached phone rang on the first try:

    I felt proud when it worked because my expectations for this first board were very low. I didn't even expect all the parts to physically fit together. But they did! The handset audio also worked, but it sounded noisy and distant. It was a pretty cool effect actually, sounding rather similar to a long distance phone call over a bad connection. 

    But I knew something was wrong. 

    A closer look revealed that I had routed the audio to the wrong pins. Somehow, enough signal leaks out of a neighboring pin (which isn't supposed to be connected) to make a lo-fi version of the audio output. I re-soldered the decoupling capacitors to the correct pins, and the audio came through to the handset crystal clear. Well, crystal clear for a phone, anyway.  I'll have to fix the routing issue in the next version of the board, but I'll also keep in mind the accidentally discovered lo-fi option. Depending on the outcome of some tests, I might build in a switch to select between the two. 

    Zero to hero

    Since I didn't know any of this stuff two weeks ago, here's some basic info about designing a PCB.

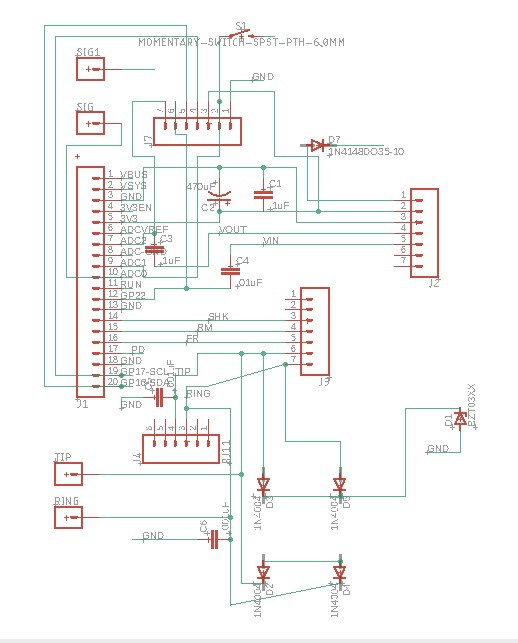
    The design consists of two parts, the schematic and the board. The schematic is basically a map of every component that will be on the board, and the connections between each component. The Phone Friend's schematic looks like this:

    • be aware that this initial version is sloppy and contains errors, so don't try to follow it.

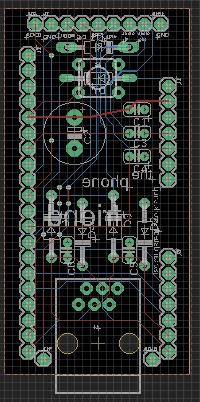
    Once the components are placed and connected in the schematic, they can be positioned on the board. The board design describes the physical placement of the components and the copper traces that will connect them. This is the description of the PCB that will ultimately get manufactured. It's not unlike a photoshop file with multiple layers. One layer designates the outline of the board, another layer marks the holes to be drilled, and other layers represent the copper traces on both the top and bottom side of the board, the pads, the silkscreen layer for the printed labels, etc. 

    The board I designed carries the AG1171 and the Pi Pico W, along with a handful of mostly optional additional components. It simply routes power to the AG1171, as well as control and audio pins to and from the Pico.

    The board also carries a standard telephone jack, which is technically called a RJ11 connector. It's the large rectangular shape at the bottom of the board in the graphic above. The six green circles inside the top of the rectangle are holes for the pins of the jack, and the two larger holes beneath simply accept plastic mounting posts that help hold the jack in place. Since we only care about connecting to the phones tip and ring lines, we will only utilize the two middle pins of the connector. That means our jack is fully described as a RJ11 6p2c, where the "6p" portion describes the number of possible connectors and the "2c" describes how many connections are actually in the connector.

    Which brings us to...

    The Wonderful World of Part Selection

    So far our PCB exists only virtually, but later it will have to match up rather exactly with the physical properties of the parts we'll eventually solder onto the board. Many (all?) of the parts you can put on a PCB come in a variety different shapes and sizes called their "package." Once the package is chosen, a matching part is added to the schematic, hopefully with the correct footprint for the package.

    There are two ways to add parts to your schematic:

    1. Find the part in a library
    2. Build the part yourself

    #2 sounds hard so I stuck to finding parts in a library that somebody else already built. I found all the parts I needed in a library provided by Sparkfun.

    In the case of the RJ11 phone jack, I used the RJ11 part found in the Sparkfun library....

    Read more »

  • Reach Out and Touch Someone

    Steph04/15/2023 at 20:01 2 comments

    Let's Get Toned

    Rotary dialing is great and all, but it has its limits. In the late 1960's, the telephone companies created DTMF  to replace it. DTMF, also known as Touch-Tone dialing, replaces the rotating dial with this familiar beeping keypad:

    DTMF stands for Dual Tone Multi Frequency, which means that each number you press sends two tones at the same time, one high tone and one low tone. These audible tones get sent along the wire mixed right in with voice signals. Here's a chart showing the exact tone combinations:

    So when you press a button on a touchtone phone, you and your phone essentially become a two-note synth band playing for an audience of one: whatever machine is listening on the other end of the line, decoding the tones. 

    Secret Decoder Ring

    I considered using a dedicated DTMF decoding chip for The Phone Friend. They are inexpensive and pretty easy to implement, but I ran into a problem. Every one I could find runs on 5v, and the rest of The Phone Friend uses 3.3v*. 

    The Pi Pico that controls The Phone Friend has a powerful processor, and so far in this project, we haven't used it for much more than counting up to 10. I started to wonder if the Pico could do the DTMF decoding by itself. Spoiler: it can. 

    But First Meet My Friend Goertzel!

    A Very Special Algorithm

    I started to research how dual tone signals are decoded. Here's what wikipedia has to say about decoding DTMF signals:

    DTMF decoding algorithms typically use the Goertzel algorithm.

    So I figured that would be a good place to start. 

    The Goertzel algorithm turns out to be an equation that (warning: I barely understand this part) we can use to identify the most dominant tones in an audio signal. It's similar to its better known friend the fast Fourier transform, but is faster than FFT when you're just searching for a few sets of tones. Seems perfect for detecting DTMF. Unfortunately, its the sort of thing that looks like this when you google it:

    ...and I just... I can't.

    And thats ok!

     If you really want to know how it works, you can. But I don't. And didn't. 

    Part 2: Getting Someone Else To Do It

    I fed the Goertzel algorithm to a much, much larger algorithm (GPT-4), and got back a working python function. I adapted that code for CircuitPython, then did some tweaking to make it run fast and reliably. It is not fast enough to keep up with all autodialing machines, some of which dial very fast, but it is more than fast  enough to achieve 100% accuracy** with human dialed digits and no false positives.

    In the video demo below, notice how The Phone Friend accurately handles repeated short presses of the same digit, as well as extra long presses:

    Code is pasted here, with pretty comments that explain how everything works. 

    I know how the Goertzel code works, but I do not know much about the math behind how it works, so that section is... light on comments. 

    *technically the Raspberry Pi Pico and AG1171 are both able to tolerate 5v, but the Pico datasheet says 3.3v. 

    **100% accuracy is not a guarantee, but it is a genuine observation about the results I'm seeing here. Don't rely on The Phone Friend to decode anything critical.

  • Finger on the Pulse

    Steph04/14/2023 at 00:55 0 comments

    Detecting pulse dials is easy...

    ...but not fun.

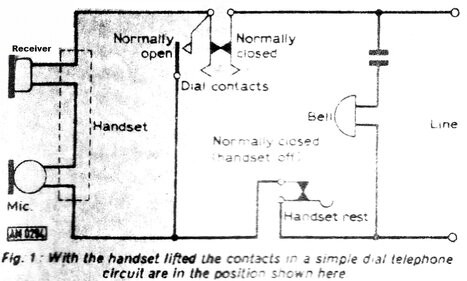
    Let's start with the part that *is* fun: detailed technical explanations. When your phone is on the hook, the Ring and Tip lines are (essentially) not connected. When you lift the handset, you close a switch that connects Ring to Tip, allowing current to flow through the phone so that you can talk and dial etc. 

    Here's a phone circuit from 1905 that demonstrates the function of the hook switch:

    The diagram shows how when the handset is lifted, the mic and speaker are connected through the battery. When it's hung up, the bells are ready to be rung with AC from the hand-cranked generator. It's essentially the same circuit used in every phone for the next 100 years.

    With one exception...

    ...automated dialing. 

    In the above circuit, a human operator was needed to connect each call to the appropriate line. 

    The rotary dial allowed for calls to be connected without human intervention, and it did so by adding one switch connected to the dial. This new switch briefly breaks the Ring-Tip connection once for each number on the dial. 

     In this diagram, you'll also notice that the battery and generator have been moved out of the phone and into the Central Office. 

    Detecting those Pulses

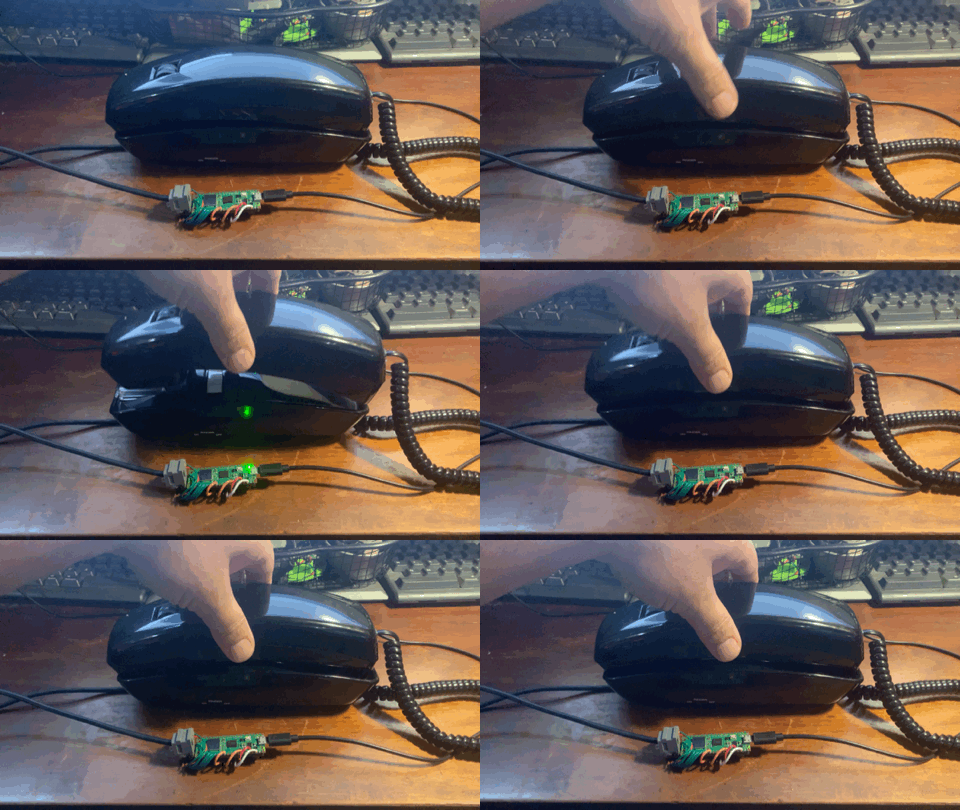
    To get the number from a rotary dial, we not only have to count the pulses, we also have to know the difference between a short pulse and a regular ol' hang up, aka a really long pulse. Here, we demonstrate The Phone Friend's ability to detect the hook switch status as well as read the rotary dial pulses. In addition to the results printed to the screen, notice the LED on The Phone Friend light up to indicate the phone has been lifted off the hook, and blink off to indicate each pulse from the dial:

    The code that runs that demo is here, and it's heavily commented for your reading pleasure. I'd paste it here, but the page formatting ruins my pretty comments. Basically, here's how it works:

    • We monitor the switch hook indicator on the AG1171 in a loop:
      • When it indicates that the line is disconnected:
        • If the line gets reconnected fast, its a dial pulse
        • If the line stays off, it's a hang up.

    That's it!

  • You Can Ring My Bell

    Steph04/13/2023 at 18:16 0 comments

    Ding-a-Ling-a-Ling 

    Here's the code to make the bells ring. First we'll be setting up the F/R and RM pins for the AG1171. Then we'll set up a timer so our bells will ring and pause in the correct cadence

    The only new library in this code is pwmio, which we'll use to generate the 20hz pulse we need. 

    This code will ring the phone whenever it's on hook, and stop the ring signal when the phone phone is picked up.

    import digitalio
    import board
    import time
    
    # We'll use the pwmio library to send an alternating signal 
    # to the F/R pin
    import pwmio
                        
    led = digitalio.DigitalInOut(board.LED)
    led.direction = digitalio.Direction.OUTPUT
    
    SHK = digitalio.DigitalInOut(board.GP21)
    SHK.direction = digitalio.Direction.INPUT
    
    # Setup pin for ring mode
    ringingMode = digitalio.DigitalInOut(board.GP20)
    ringingMode.direction = digitalio.Direction.OUTPUT
    ringingMode.value = False
    
    # Setup our PWM pin and set 20hz rate (north american ring)
    forwardReverse = pwmio.PWMOut(board.GP19, frequency=20, duty_cycle=0x0000)
    
    slicEnable = digitalio.DigitalInOut(board.GP18)
    slicEnable.direction = digitalio.Direction.OUTPUT 
    slicEnable.value = True
    # Per datasheet, AG1171 needs 50ms to wake up
    time.sleep(.05) 
    
    def ringBell():
        print('Ringing...')
        ringingMode.value = True
        elapsedTime = 0
        startTime = time.monotonic()
    
        while not SHK.value: # ring as long as the phone is on the hook
            # ring bells for 2 seconds
            if elapsedTime < 2:        
                forwardReverse.duty_cycle = 0x7FFF #this means 50% duty cycle
                led.value = True
            # bells off for 4 seconds
            elif elapsedTime > 2:
                forwardReverse.duty_cycle = 0x0000 #off
                led.value = False
            # reset elapsed time after 2 + 4 seconds
            if elapsedTime >= 6:
                startTime = time.monotonic()
            
            elapsedTime = time.monotonic() - startTime #update the elapsed time once per loop
            time.sleep(.1)
    
        # The handset has now been lifted, so stop ringing
        print('...pickup.')
        forwardReverse.duty_cycle = 0x000
        ringingMode.value = False
        
        # Blink led 25 times to indicate pickup/hangup
        for x in range(25):
            led.value = not led.value
            time.sleep(.05)
        led.value = False
    
    # Main loop
    while True:
        if not SHK.value:
            ringBell()

  • Don't Use That Tone with Me

    Steph04/12/2023 at 05:32 0 comments

    Next Stop: Dial Tone

    Dial tone is comprised of two tones playing at the same time: 440hz and 350hz (in North America anyway, the exact tones vary by location).  

    A common way to reproduce a dial tone is to loop the playback of a short wav or mp3 recording, but this method has drawbacks:

    • Recordings take up a lot of space.
    • Frequently the source recording is poor.
    • Imperfect loops cause audible clicks in the tone.

    With careful loop creation these issues can be managed, but there is another way.

    Let's Roll Our Own

    Instead of playing back a recording of some dial tone, we can generate our own. Here are the benefits:

    • Easily adapt to regional differences
    • Fine control over sample rate, tone and mixing
    • Continuous waveform means no audible seam in the loop

    Here's how it works. In this code, we'll build on our last code by importing some math and audio libraries then generating and playing the dial tone. It's a little longer than our last script, but it's still easy to understand:

    import digitalio
    import board
    import time
    
    # We'll need these to generate our sine waves
    import math
    import array
    
    # These libraries handle our audio needs
    from audiopwmio import PWMAudioOut
    from audiocore import RawSample
    import audiomixer
    
    # Setup Pins
    audio = PWMAudioOut(board.GP22)
                            
    led = digitalio.DigitalInOut(board.LED)
    led.direction = digitalio.Direction.OUTPUT
    
    SHK = digitalio.DigitalInOut(board.GP21)
    SHK.direction = digitalio.Direction.INPUT
    
    slicEnable = digitalio.DigitalInOut(board.GP18)
    slicEnable.direction = digitalio.Direction.OUTPUT 
    
    # Per datasheet, AG1171 needs 50ms to wake up
    slicEnable.value = True
    time.sleep(.05) 
    
    # This function accepts a frequency in Hz
    # and returns a playable RawSample
    def generateTone(frequency): 
        samples = sampleRate // frequency
        buffer = array.array("h", [0] * samples)
        # The ugly bit below fills the buffer with our wave
        for i in range(samples):
            # Calculate the angle for this sample in radians
            angle = 2 * math.pi * i / samples
            # Calculate the sine value, scale to the range of
            # int16 then stick it back in the buffer
            buffer[i] = int(math.sin(angle) * 32767)    
        tone = RawSample(buffer, sample_rate=sampleRate)
        return tone
    
    # This function sets volume for both voices,
    # then starts playing both tones in a loop
    def dialTone():
        if not audio.playing:
            audio.play(mixer)            
            mixer.voice[0].level = .2    
            mixer.voice[1].level = .2
            mixer.voice[0].play(tone440, loop=True)    
            mixer.voice[1].play(tone350, loop=True)
            
    # Setup the sample rate (other rates sound worse for me)
    sampleRate = 31000
    
    # The mixer combines our tones and controls volume
    mixer = audiomixer.Mixer(buffer_size=1024, voice_count=2, 
                       sample_rate=sampleRate, channel_count=1,
                       bits_per_sample=16, samples_signed=True)
                            
    # Use our tone function to generate and save the dial tones
    tone440 = generateTone(440)
    tone350 = generateTone(350)
    
    # Main loop
    while True:
        # Turn on LED when off-hook
        led.value = SHK.value
        
        # Turn on dial tone when handset is lifted
        if SHK.value:
            dialTone()
        else:
            audio.stop()
        
        time.sleep(.1)
    • Note that using PWM to output audio is prone to producing audible artifacts, especially when outputting pure tones. The values shown in this script have been selected through experimentation to sound best to my ear on my phones, and may need to be adjusted to suit your needs. 

    Results!

    Listen to the Phone Friend dial tone here!

    (I tried to embed it here but it didn't work, sorry)

    PWM output is normally filtered to roll off high-frequency noise. I've skipped this step in the Phone Friend because the low-quality nature of telephony serves as it's own treble filter. Because of this, you'll hear some harshness in this recording that ordinarily isn't audible on the telephone handset.

    This clip was captured by tapping into the Pico's audio output on Pin 22 directly, and passing to the input of a Marantz recorder set at 48khz, 16bit uncompressed wave. You'll hear a loud click as the handset is lifted, followed...

    Read more »

  • All the Bits Fit to Print

    Steph04/11/2023 at 16:04 0 comments
  • Hello, World... but for phones

    Steph04/11/2023 at 15:31 0 comments

    A simple Demo

    The Phone Friend is programmed with CircuitPython, an easy scripting language for microcontrollers. After connecting the Pico and the Ag1171, you're ready to plug in a phone and run some code. 

    Here's a short demo script. If everything is wired up properly, this script will turn on the Pico's on-board LED whenever the handset is lifted off the hook, and off when it's hung up. 

    #Switch Hook Indicator Light for The Phone Friend
    import digitalio
    import board
    import time
    
    #setup the on-board LED
    led = digitalio.DigitalInOut(board.LED)
    led.direction = digitalio.Direction.OUTPUT
    
    #setup the switch hook indicator as input
    SHK = digitalio.DigitalInOut(board.GP21)
    SHK.direction = digitalio.Direction.INPUT
    
    #Setup the PD (power down) pin as output
    slicEnable = digitalio.DigitalInOut(board.GP18)
    slicEnable.direction = digitalio.Direction.OUTPUT 
    slicEnable.value = True
    time.sleep(.05) #give AG1171 50ms to wake up
    
    while True:
        led.value = SHK.value #set LED using switch hook
        time.sleep(.1)

     Result:

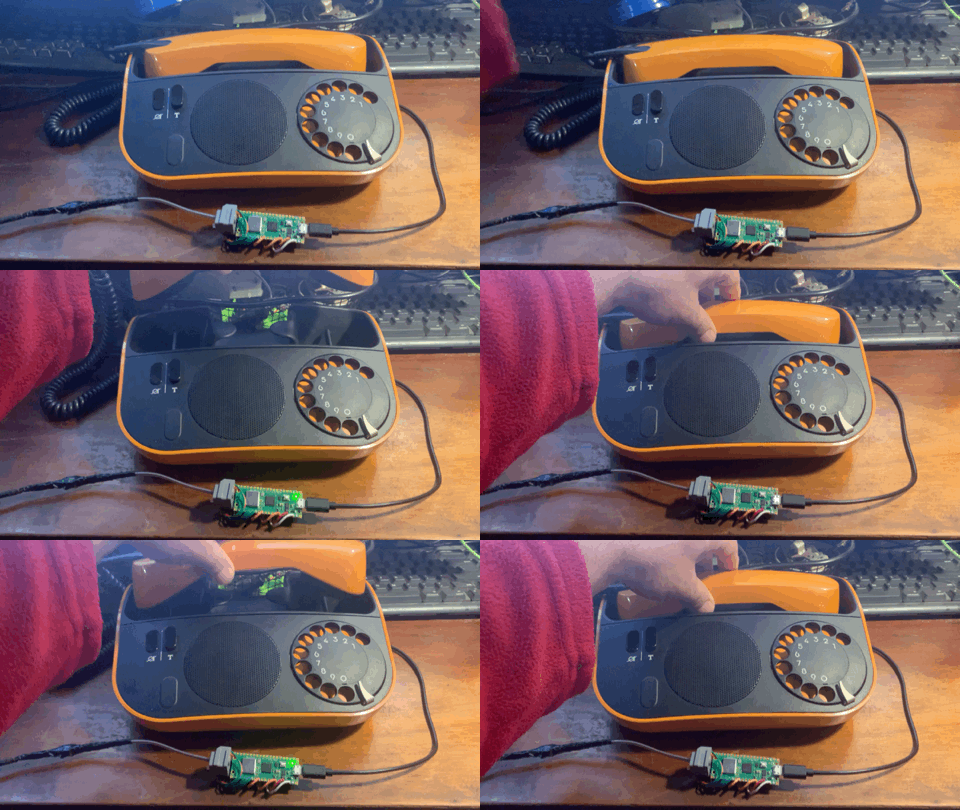
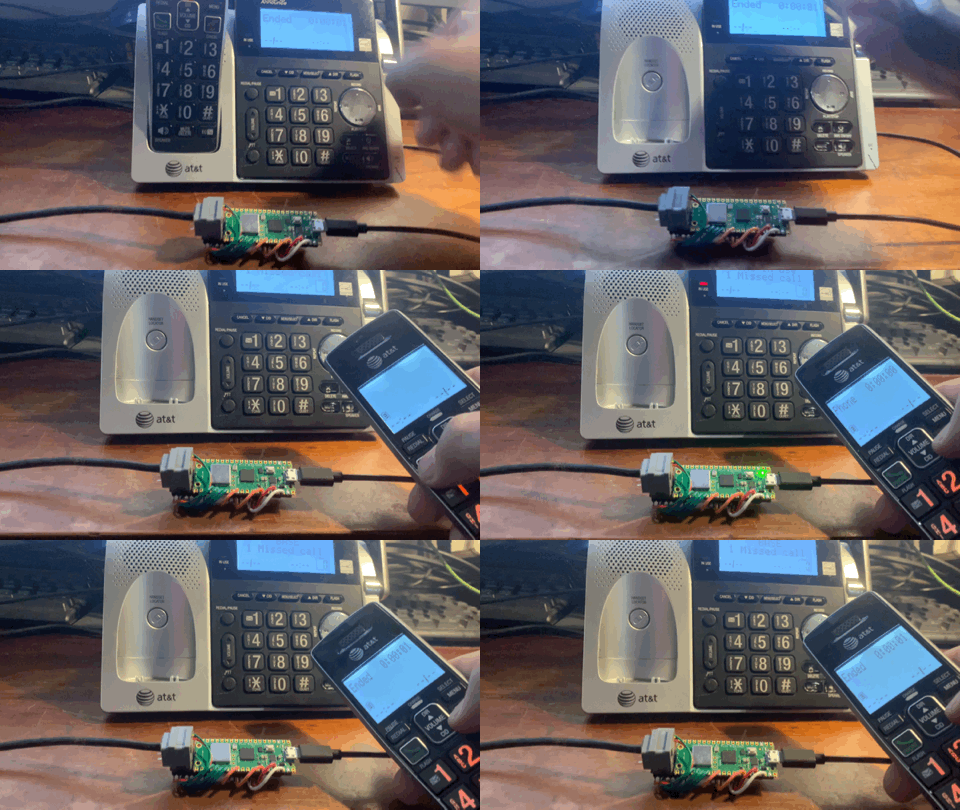
    The Phone Friend works with any landline telephone, so the demo code above already works with any type of phone, including rotary and cordless:

  • Wiring the AG1171 to the Pi Pico W

    Steph04/11/2023 at 04:57 0 comments

    With Our Powers Combined

    Hooking up the AG1171 to a microcontroller is pretty easy. The AG1171 only has 14 pins, and 4 of them aren't connected to anything. Of the remaining 10, a couple are optional. You'll need just a few extra components, and they're all super common:

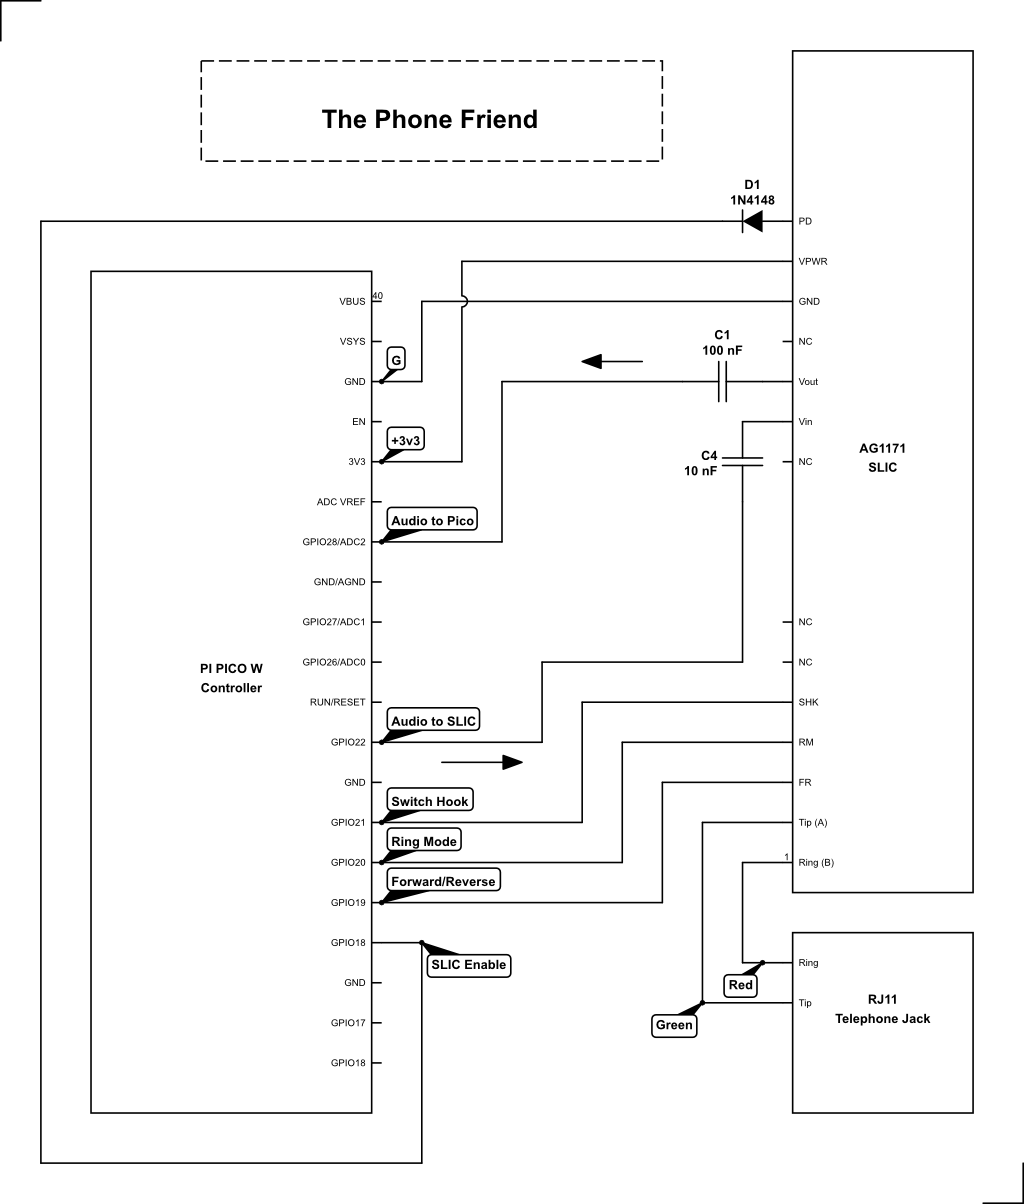
    1. Two ceramic capacitors (10nF and 100nF) for the audio lines on Pins 9 and 10. You can't skip these because they are necessary for removing the DC bias from the audio signal.
    2. A diode for Pin 14, the Power Down pin. If you plan on using this pin for power-saving purposes, the datasheet specifically warns that this pin should only be pulled low. Applying logic high or V+ will apparently fry something, so the diode here prevents that from ever happening. 

    That's it.* If you don't happen to have those components sitting nearby, they are easy to salvage from discarded electronics. 

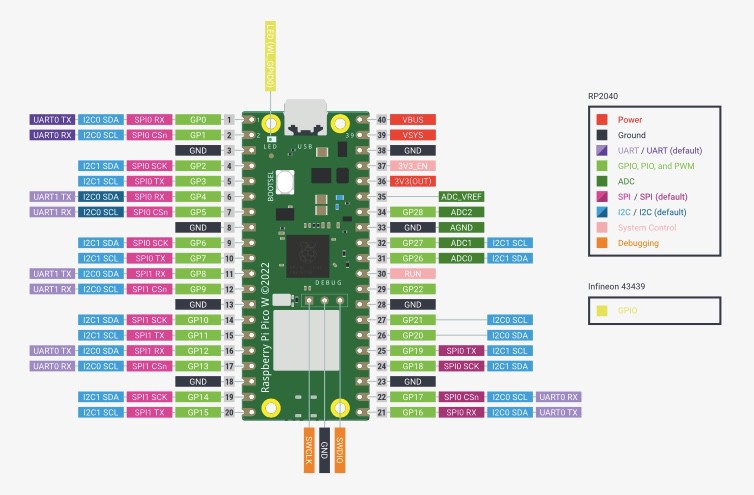
    If you want to use the code posted in this project, here's how I've connected the AG1171 to the Pi Pico W:

    While many designers might roll a custom PCB or even just a breadboard to make the interface between the AG1171 and the controller, I employed a technique more inspired by...

    ...Rock and Roll

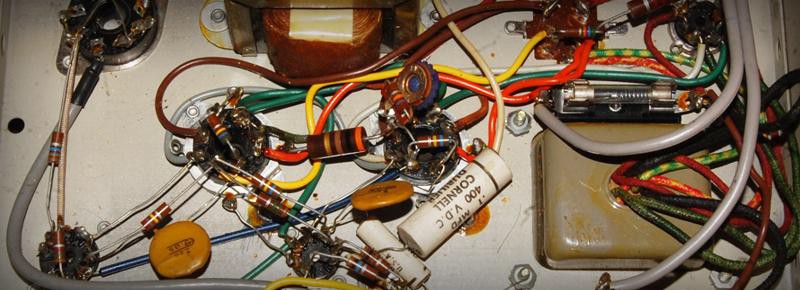
    Some of the coolest early guitar amps employ a technique called point-to-point wiring. Instead of being laid out on a board, the circuit is made by connecting the individual components directly to each other. Purists say this technique sounds better. I don't know about that, but I do know it looks cooler:

    photo credit

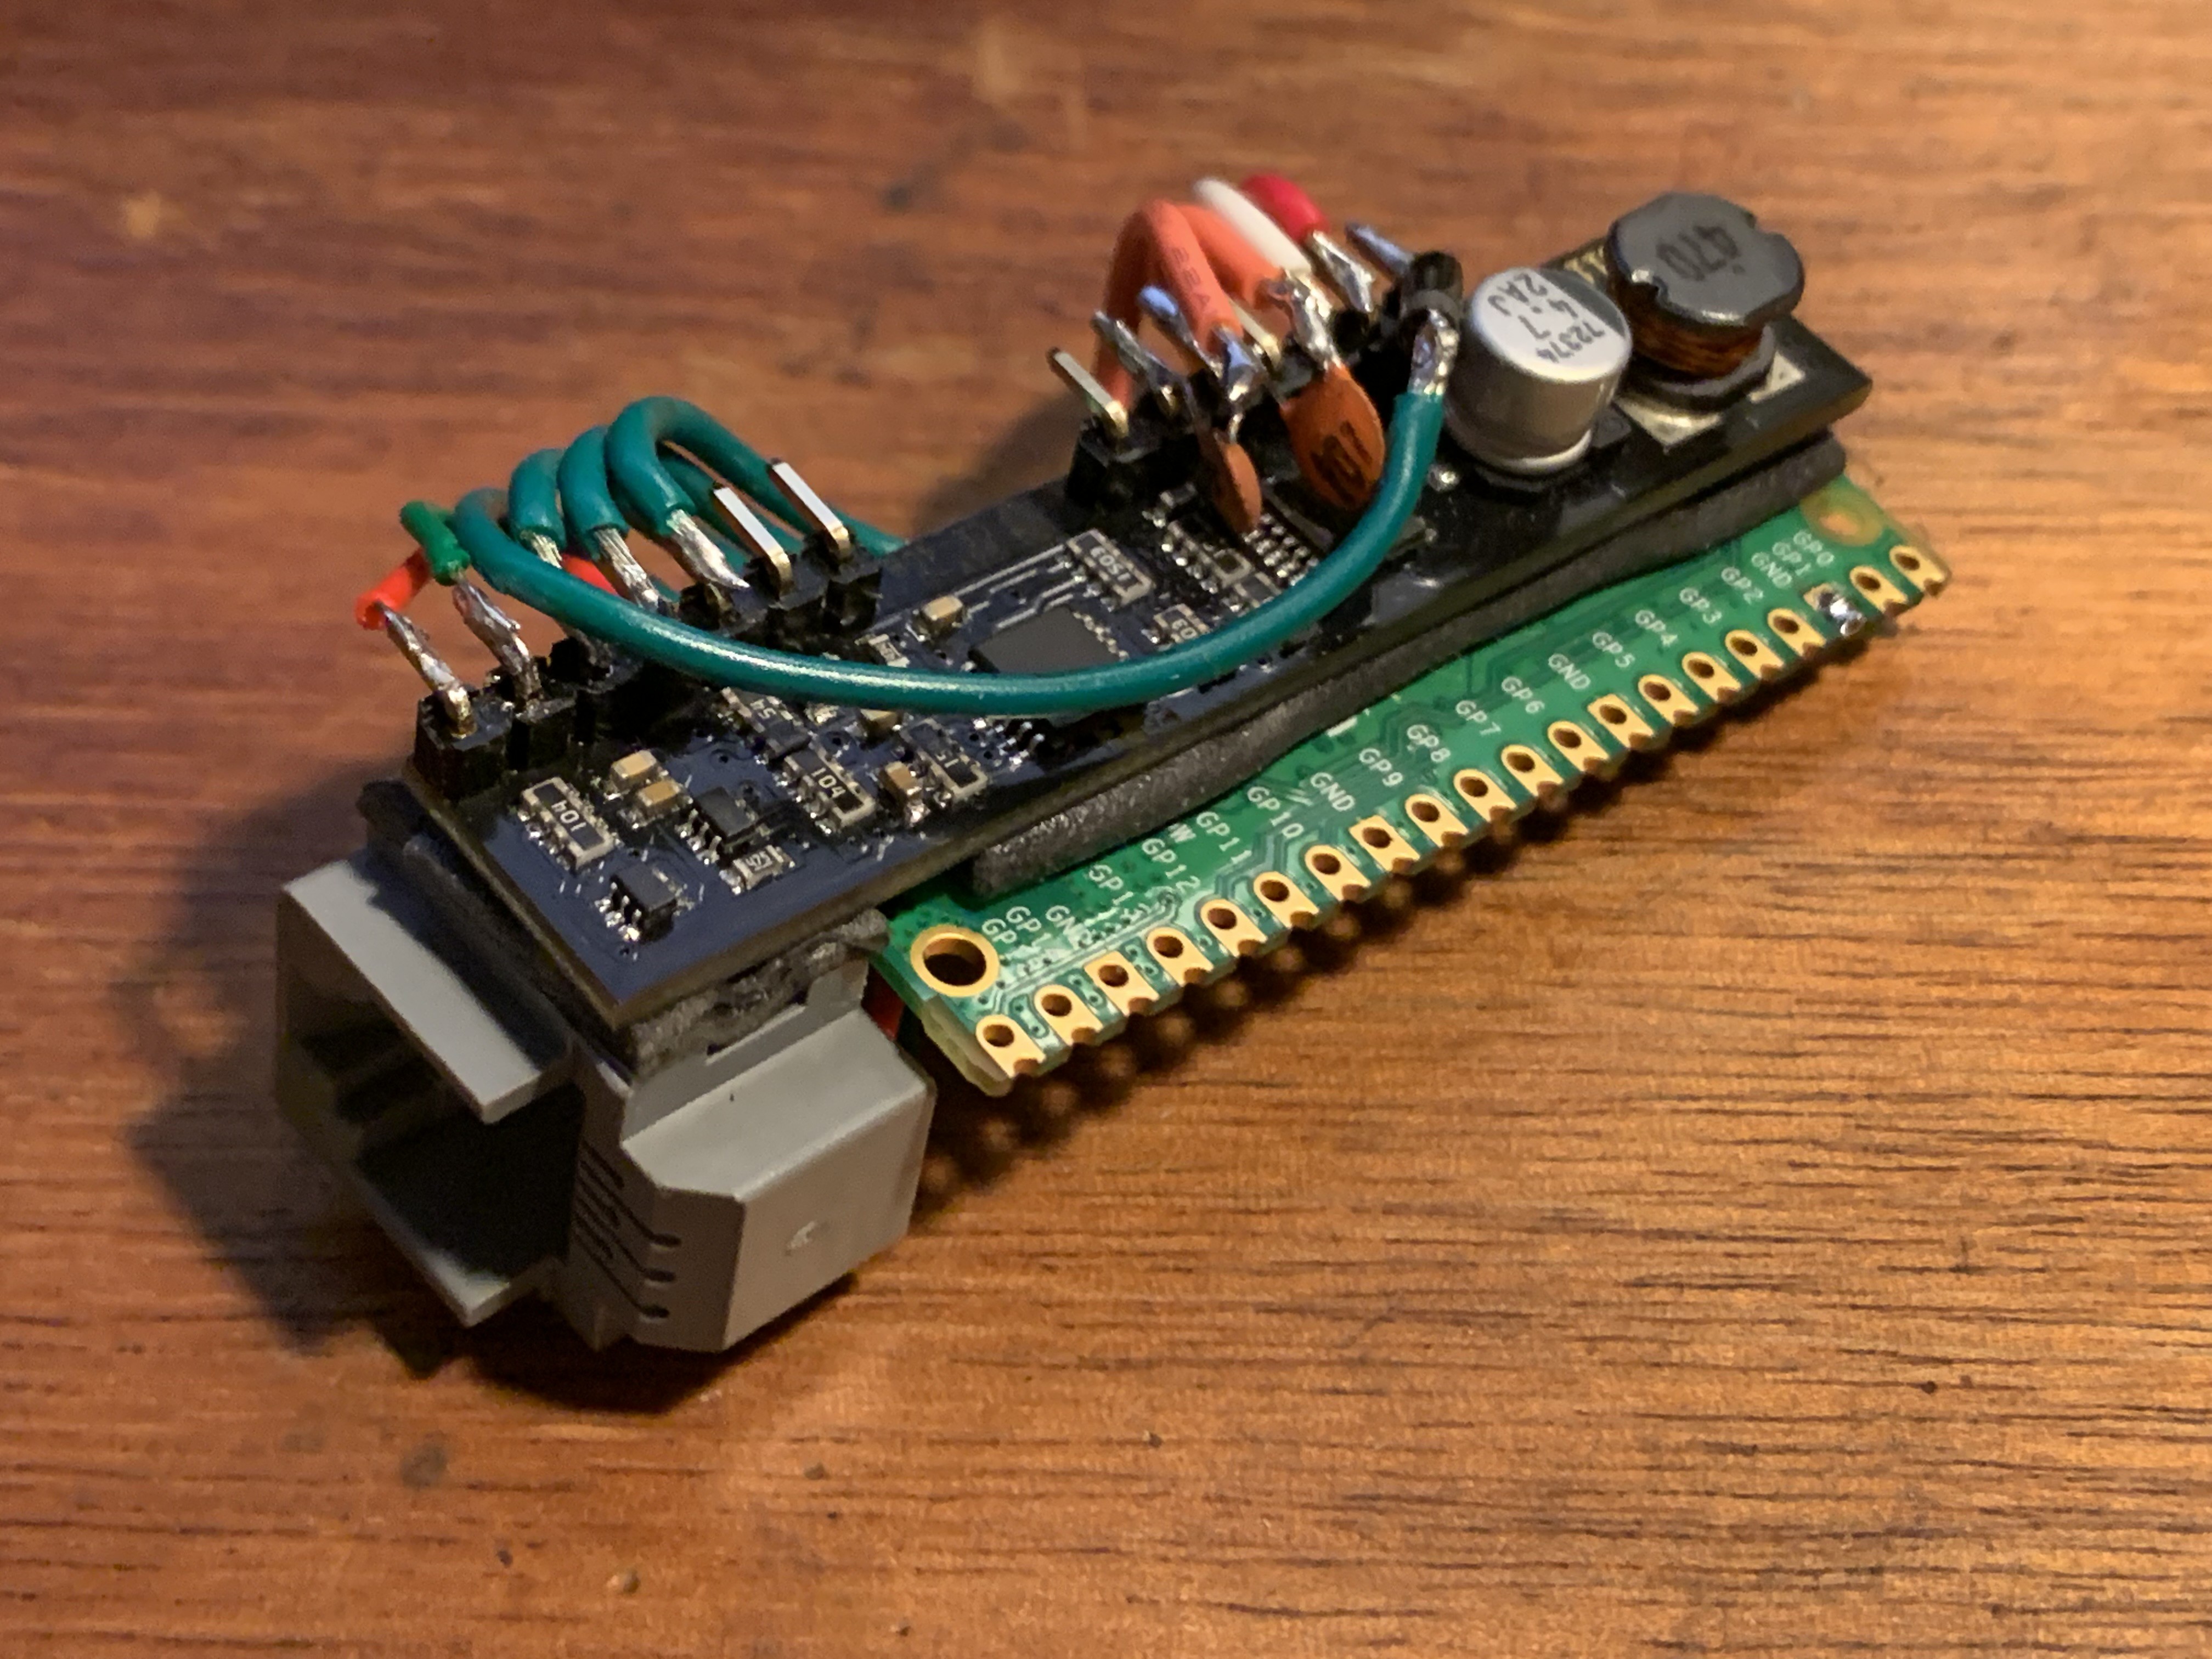
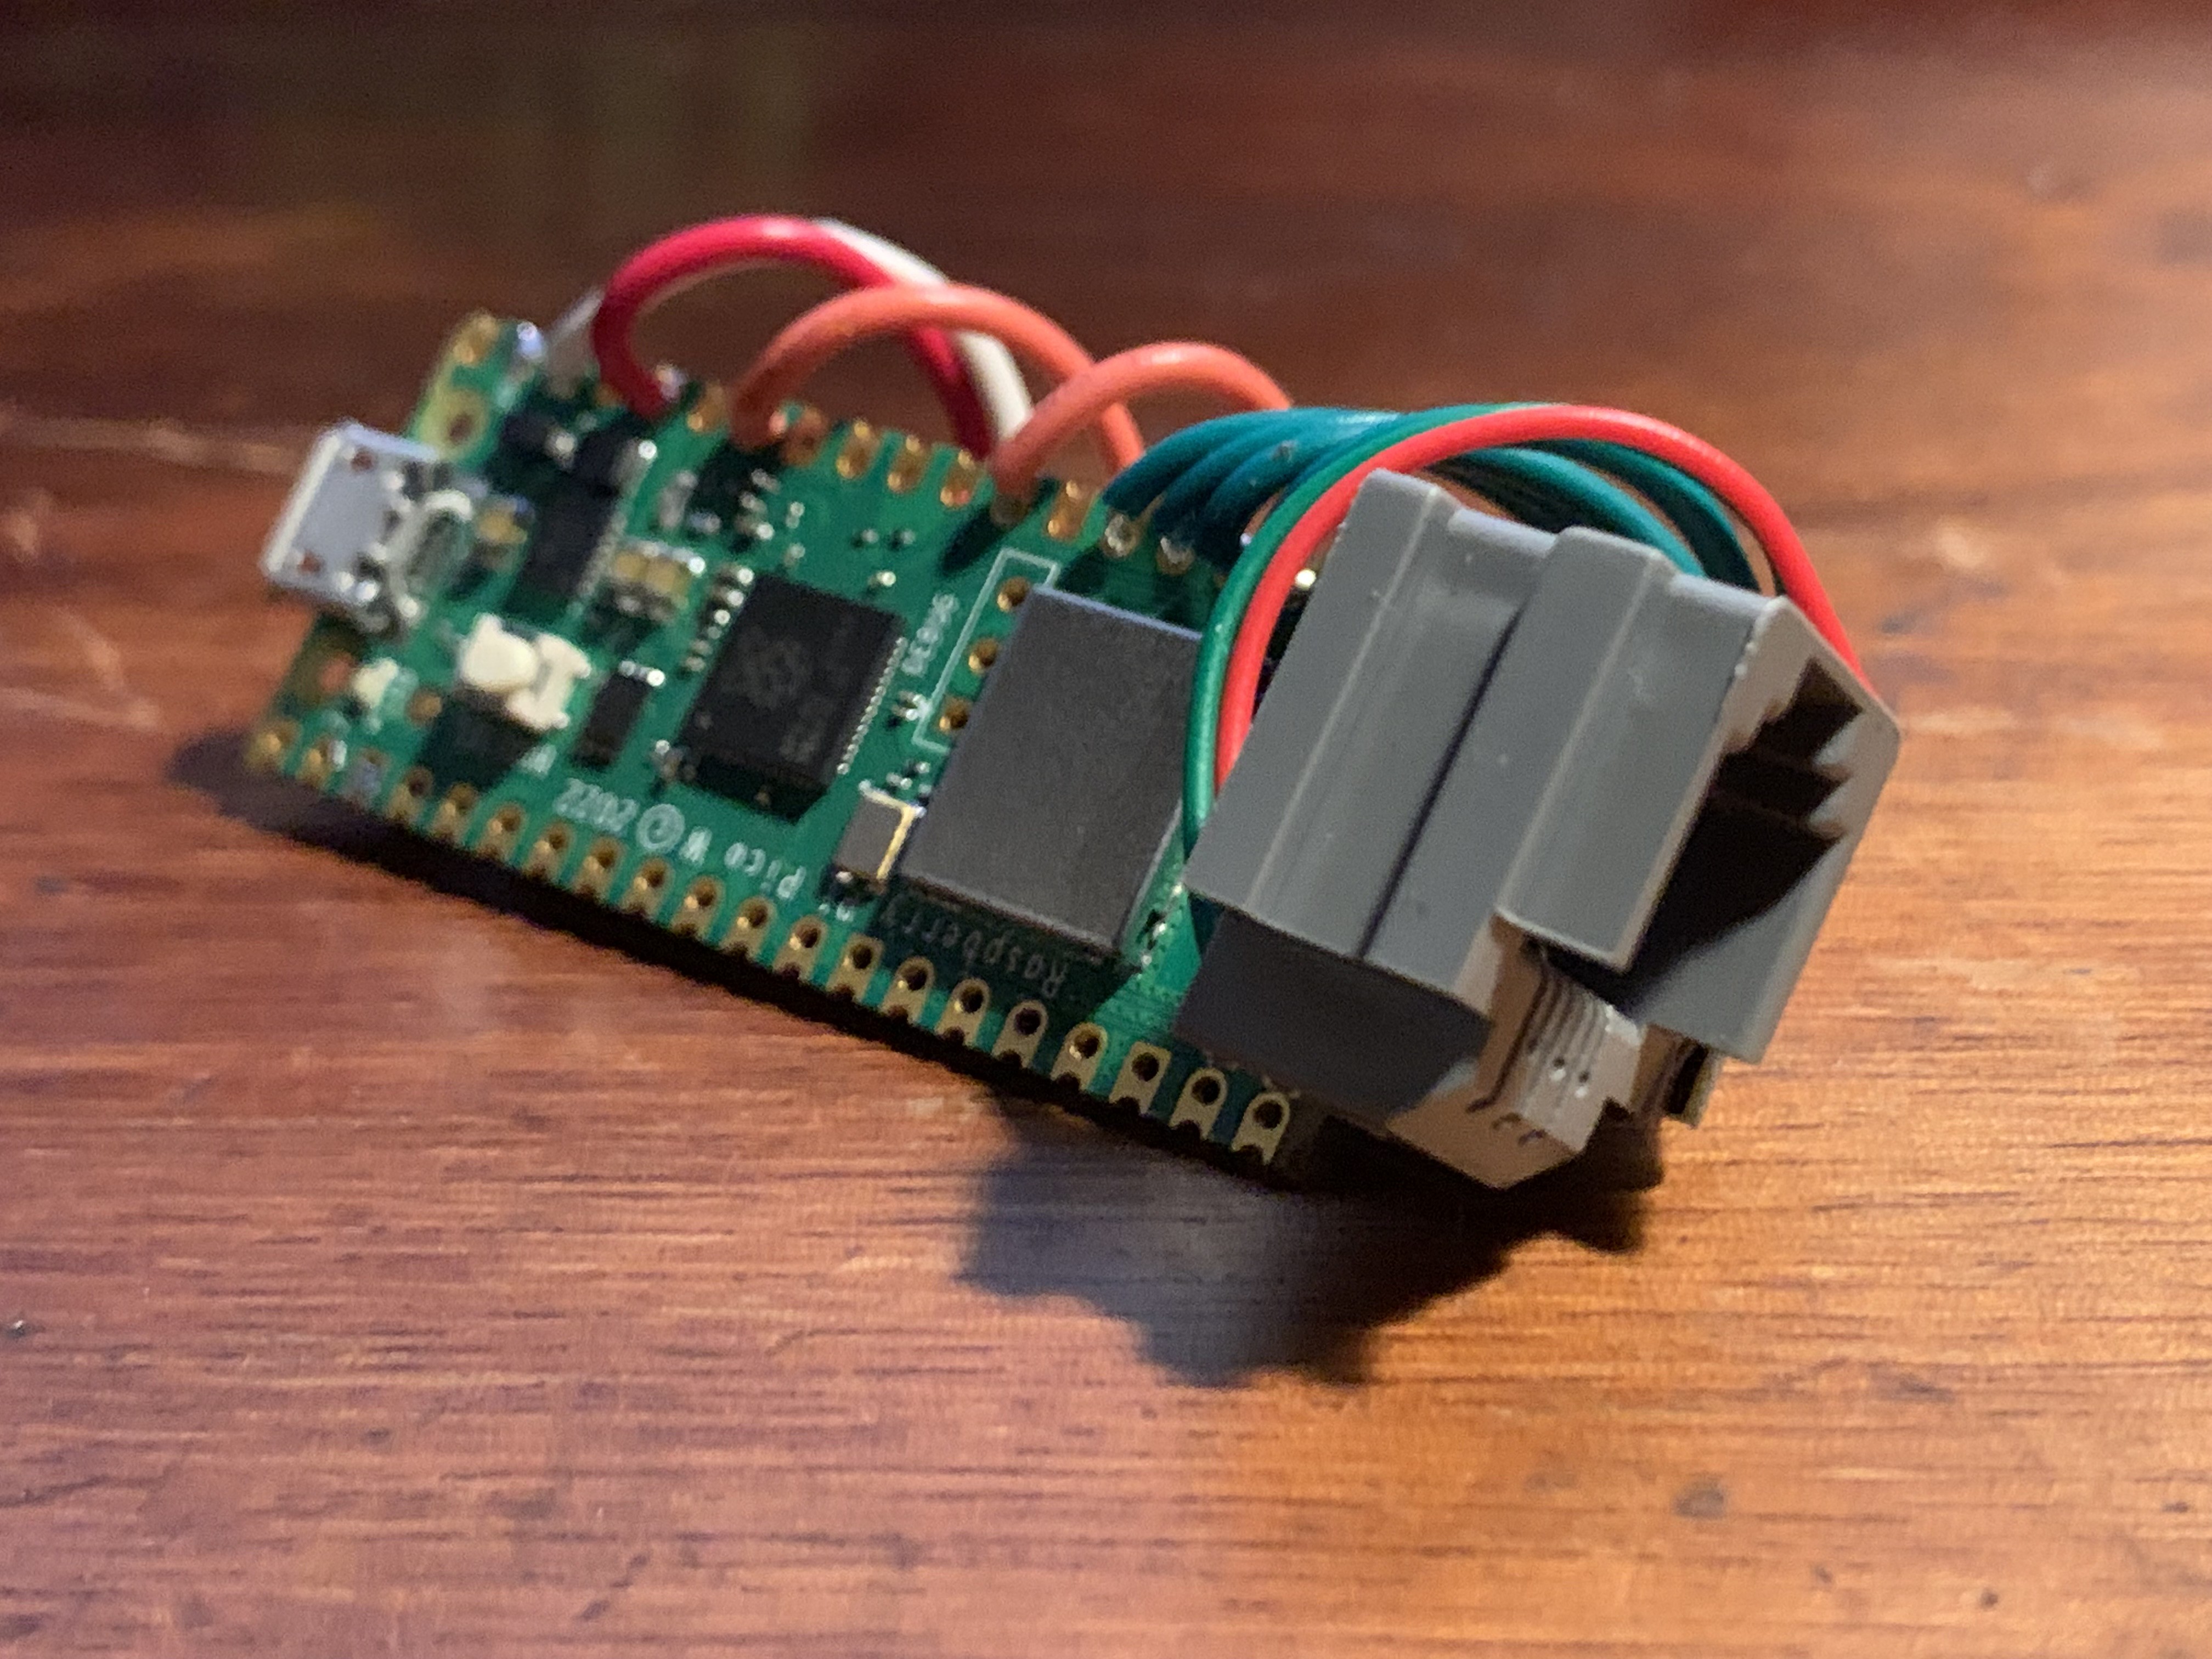
    The assembled Phone Friend takes inspiration from these vintage amps. First, the pins of the Pico and AG1171 are connected directly by short lengths of wire, with the external components soldered inline. Then, the boards are folded over and attached to each other with double-stick foam. The RJ11 jack is attached in the same fashion. The completed unit looks like this:

    *Well actually...

    • PLEASE NOTE that for this project, I've left off a handful of external components that the datasheet calls for. I omitted the typical power filtering capacitors across V+ and GND, figuring that the supply from the Pico would be clean enough. I also omitted some diodes that the datasheet calls to be placed across Pins 1 and 2 (Tip and Ring) and GND. Those are the lines that connect to the phone. I presume they exist to protect against voltages going places they shouldn't. I can't be any more specific than that because to be honest, I don't really know. I can say this: these omissions haven't caused any trouble for the circuit as described in this project. But do me a favor and DON'T TAKE MY WORD FOR IT. If you're building a different circuit, or even if you're building the exact circuit I describe, look it over and decide for yourself. Here's the full implementation suggested by the manufacturer.

  • We Need Brains

    Steph04/11/2023 at 00:50 0 comments

    Controlling the SLIC

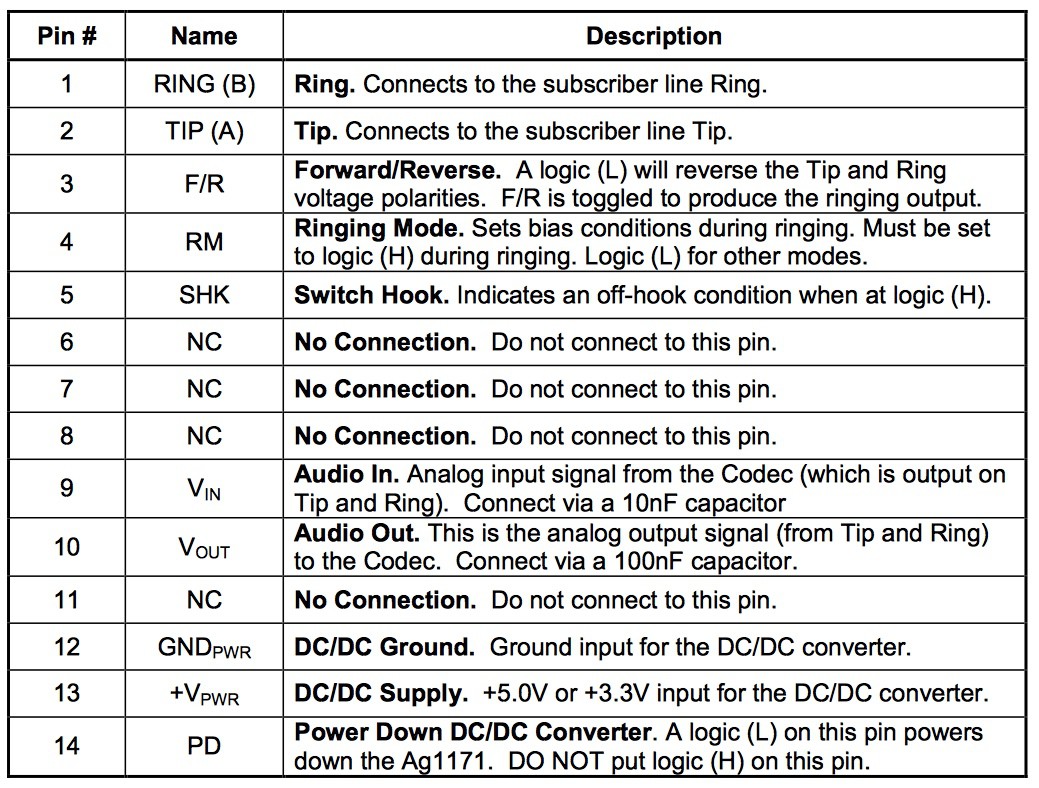
    A powered up AG1171 SLIC can energize a phone, but without some additional components, it can't do much else. The rest of the functions happen by interacting with pins 3, 4, 5, 9, 10 and 14:

    • To play un-amplified audio into the phone line from any computer or media player (from a line-out jack for example) connect that signal to Pin 9 of the AG1171 (through a 10nF capacitor as specified in the datasheet) and the AG1171 will handle the amplification and send the audio to the handset. If your only goal is to playback audio, you can stop here.
    • To cause the connected phone to ring, you'll need some extra stuff. The AG1171 generates the high voltages needed to ring internally,  but you'll need to tell it how frequently the voltage should oscillate by pulsing Pin 3. In the North America, the ringing signal alternates at a rate of 20hz. Other geographies have differing rates, ranging from ~16-60. Therefore you'll need an oscillator, and ideally a variable one. 
    • You'll also want a way to control the *cadence* of the ring, meaning the duration of the bell ringing and the time between each ring. Additionally, you must enable ring mode by energizing Pin 4.
    • If you want to know when the phone is on or off the hook, so you'll need to monitor the hook switch indicator on Pin 5.
    • It might be important to know what digits the connected phone is dialing. Rotary phone dialing can be detected on Pin 5, but DTMF tones are different. To catch those, you'll have to monitor the audio coming out of the phone line on Pin 10.
    • Finally, grounding Pin 14 allows us to power down the AG1171. 

    A Microcontroller Match

    The Raspberry Pi Pico W is a powerful microconroller with more than enough pins to operate all the features of the AG1171. Even while running less-optimized code such as Circuitpython, the Pico's RP2040 processor is fast enough to do mp3 and wav audio playback, as well as audio capture for monitoring DTMF tones. The "W" version with wifi retails for $6, while the non-wifi version sells for $5. 

    Why Pi

    Almost any microcontroller would work to control the basic functions of the AG1171. Heck, even a 555 timer and a few switches can do it. Here's why I chose the Pico line for this project:

    1. Local availability. The Pico was already on my desk.
    2. Supply. The Pico is widely available. (Here in 2023 there is still an ongoing chip shortage, making other systems like the Raspberry Pi 4 expensive or impossible to find)
    3. Affordability. The Pico eliminates the need for all of the following standalone modules:
      1. Power supply ($1-5): pico provides a well-regulated 3.3v 
      2. DTMF decoder ($5-10): CPU can handle this instead
      3. Audio player ($2-20): audio output is available via PWM
    4. Programmability. The Pico's 2040 processor is popular and widely supported in CircuitPython and other environments, making it easy to code for.

  • So You Think You're SLIC

    Steph04/08/2023 at 02:51 1 comment

    Now let's meet the star of our show!

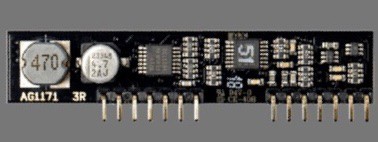
    Presenting the Silvertel AG1171 Subscriber Line Interface Circuit!

    Cool but what does it do?

    Phone lines use the magic of analog to combine a variety of signals over a single pair of wires. Those two wires carry all the following:

    • Audio into the phone
    • Audio out of the phone
    • -48v DC "battery" voltage
    • 90v AC ring voltage
    • (eventually) Data like Caller ID and DSL

    Now for a fun diversion into telephony terminology:

    • The phone company calls every phone number a Subscriber Line
    • The phone company calls itself the Central Office

    The Central Office houses the batteries which provide voltage to all the connected phones, and the human switchboard operators or mechanical switching equipment used to connect one line to another for calls. To make our phone work, we'll have to replicate everything the CO provides. 

    If you were thinking that sounds like a lot of work, or 90 volts AC sounds like a lot, you are correct! Ring voltage was originally supplied by hand-cranked magnetos and had to be strong enough to ring big heavy bells located far away. Today, it's an unusual voltage that's not trivial to generate. Plus, you don't want those volts getting into the rest of your circuit, which is probably a puny 3-5 volts. 

    Good News Everyone

    Luckily, this problem has long been solved by SLICs like the AG1171 and many similar products. 

    These circuits can be found in stuff like VoIP adapters, where they enable the use of ordinary phones over internet based calling. The SLIC sits between the telephone and the rest the system, where it safely generates the necessary voltages for the phone to operate, as well as handling the audio in/outs.  

    The chip comes in a few different package sizes. We'll be using the 14 pin SIL (single in line) version. According to the datasheet, here's what the rest of the pins hook up to:

    It's easy to get started:

    • Pin 13 to V+ (3.3v-5v)
    • Pin 12 to Gnd
    • Pin 2 to phone line tip (green wire)
    • Pin 1 to phone line ring (red wire) [note that tip and ring can be reversed without consequence]

    At this point, when you apply power to the AG1171, the phone line will be live. If you try speaking into the telephone handset, you should hear sidetone in your earpiece. 

    Congratulations, your phone line is hot.

View all 12 project logs

Enjoy this project?

Share

Discussions

Gregory Sanders wrote 04/16/2023 at 12:02 point

Thanks for all the great data you're posting.  You've answered several questions I've had for a long time. 

Do you plan to bring all this to the point of being able to use one of these old phones using SIP or something like that?  (maybe a dumb question).  That's been hanging in the back of my mind for some time, but I still have not dedicated enough time to find out if it's even possible.  I know there used to be gear you could buy on Amazon that supposedly would let you use an analog phone with a Voip service, but they leave me a bit unconvinced.

At any rate, what you're doing here is fascinating and informative.  Thanks!

  Are you sure? yes | no

Gregory Sanders wrote 03/26/2023 at 13:37 point

Thanks for listing the resources.  Will you be posting more details?  This seems like it matches one of the things on my 'Million Thing List' (the list of projects I want to do some day when I get time).

  Are you sure? yes | no

Steph wrote 04/01/2023 at 02:14 point

Absolutely! More details are incoming.

  Are you sure? yes | no

Similar Projects

Does this project spark your interest?

Become a member to follow this project and never miss any updates